
Reaching prospects and maintaining connections with existing customers are two of the most important functions of your website. One of the ways this is done is through the use of corporate event calendars. Calendars allow your users to see what public events your company is holding, find out about webinars, better understand the lifecycle of your technology, or simply better connect with your service or sales representatives.
Video can also be a great connector of the Web, whether to disseminate technical information and provide how-to's, or to tap into your current customer base as an advertising technique to sell your company's wares. More and more frequently, if people have the option to find information through reading marketing copy or watching a five-minute video, they are turning to the video.
In this chapter, you'll learn how to implement these fundamental tools, allowing you to utilize them to increase your conversion rate. You'll be looking at things from the perspective of a testimonial page, but with slightly more generic examples that allow you to use these features throughout your site, wherever they make sense.
This section gives you a continuation of the use cases that started in Chapter 7. It connects the exercises you will perform in this chapter with the plan laid out in the implementation guide, and puts a story to the features we will cover in this chapter, specifically the ListSummary Server Control, calendars, and the DMS.
CONNECTING TO CLIENTS
Having developed the homepage in the last chapter, the OnTrek marketing team is now looking to disseminate information to potential prospects. Their objectives are to create a section of the site where they can list Customer Testimonials. This section is a go-to location for the sales team for reaching potential clients, by helping them understand how the OnTrek system can help their businesses. Additionally, they need to implement calendars to keep clients up-to-date on trainings, open houses, Webinars, and other corporate events. The combination of these two efforts allow them to more clearly connect to potential and existing clients by maintaining that connection in a more solid way, so clients are never in a position of not having enough information about OnTrek's product line and service offerings.
Wireframe
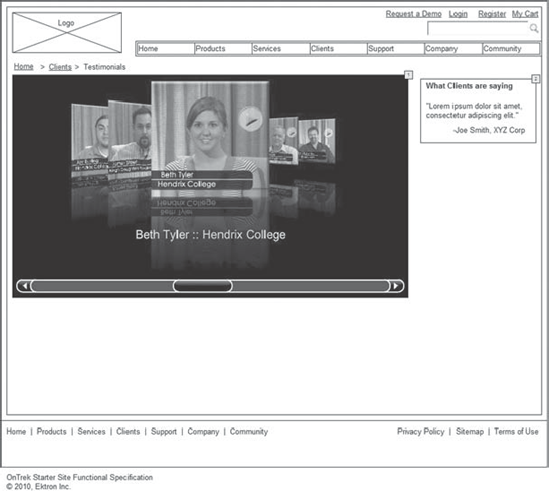
The example Wireframe for this chapter, shown in Figure 8-1, is the Video Testimonials page. The goal of this page is to showcase existing customers, helping drive interest in the OnTrek suite of products.
Actor
Jack is the Director of IT at Acme Inc. and is researching security related software packages for his company's network. He is looking to understand how OnTrek's solution set has helped other companies in need of security related services and products. Additionally, he wants to know how in-depth OnTrek's support for its existing customer base is, which means knowing the schedules for trainings and technical Webinars.
Scenario
In this scenario, Jack:
Analyzes OnTrek and is interested in the product line, but needs to know how the relationship will grow over time between Acme and OnTrek.
Needs to find out about existing partnerships with current clients of OnTrek.
Looks at the menu of the site, and finds a section for Customer Testimonials.
Follows the link and arrives at the page with the primary objective being to find information about satisfied customers.
Uses the videos on the page to learn that information.
Outcome
A successful outcome in this use case is one where Jack can easily find useful information about current OnTrek customers. Using the videos, he should be able to determine the satisfaction level of the existing customer base, as well as learn about potential uses of the technology. Additionally, he should feel satisfied that there is enough existing customer outreach through the use of the calendar to feel comfortable in closing a deal to purchase. The success rate of this group of technologies can be measured through the use of analytics, and through customer reports sent directly to the sales people.
It's become a standard practice for companies to request references and testimonials when shopping for expensive packages. When a company has a very good relationship with its existing customer base, it's a point of pride, and marketing is always interested in showing them off in the hopes of higher conversion rates in their sales cycles. To answer these needs, it has become more and more common to include videos of customer testimonials on company websites.
There are other reasons why videos are becoming a more popular way to disseminate information. As mentioned earlier, people are increasingly interested in collecting information through a well-crafted video than they are through trudging through pages of marketing copy. Additionally, some forms of information are more easily delivered through video than through the written word. As Webinars and other video tools become more popular, there is an increasing desire to house that information in a viewable location. The Ektron Framework has solidly integrated such tools into its feature set over time.
This chapter covers the use of calendars and ListSummaries. ListSummaries tend to be one of the cornerstones of Web designs, by producing simple navigational elements that are always automatically up-to-date. Through their rich customizability, they can produce simple lists of links or can be the fundamental driver behind interfaces such as photo galleries. By allowing for customization through XSLT, data binding, and EKML, ListSummaries and calendars have become one of the chief problem-solving tools when building towards high-gloss projects.
Calendars, much like video, have become a de facto must-have on both client facing websites and internal websites. As part of the rebuild of the feature in version 8.0 of the Ektron Framework, calendars received the ability to behave more like content, by storing event definitions in an XML back end. Being based on content allows them to utilize other features inherent in the content model including permissions, workflow, categorization, and so on. This update also introduced a much richer front-end interface modeled on Outlook, and a complete overhaul of the recurring event capabilities.
The new calendar feature has a feature set commensurate with any other calendar on the market — whether it's exporting entire iCal feeds of calendars, sorting by category, or mashing up multiple event feeds, the calendar feature can take your requirements and make them reality.
Taking this collection of three features, this chapter will run through the fundamentals of each and discuss how they work under the covers. You will then practice implementing these features into various scenarios.
ListSummaries are used to display a list of the content in a folder, and optionally, recursively down the child folders. This is a typical feature on a website, and one of the oldest features in the Ektron Framework. The usefulness of this server control fundamentally depends on how closely the Information Architecture of your site matches the front end organization of your site, but in most cases the two nearly mirror each other.
Due to this mirroring, you can use ListSummaries to show content related to what's currently being viewed, or a list of recently updated content, among other types of output. You can also use ListSummaries with custom XSLTs. They can include the full HTML of the content they refer to, allowing developers to provide features such as aggregated updates.
This section discusses the various ways you use a ListSummary on your site, and how to approach the different uses from a development perspective. The specific examples you will work through are based on the most common needs, which usually involve displaying a basic list of links, while still matching the format and style of the page that the ListSummary occurs on. This section shows how to:
Implement a basic ListSummary.
Change the markup using XSLT.
Change the markup using EKML.
The ListSummary is a versatile control in the Ektron Framework tool belt. It serves a very basic function, but through the use of a wide variety of properties, it can be stretched to provide a list of links in almost every way imaginable. Table 8-1 contains these properties.
Table 8.1. ListSummary Server Control Properties
PROPERTY | DESCRIPTION |
|---|---|
| Defines, in seconds, how long to cache the results. A value of zero specifies not to cache the results. |
| Specifies the query string parameter for content IDs. If the query string contains a match for this, the ListSummary is replaced with a content block displaying the specified content item. If left unspecified, the display will always be the ListSummary. |
| If this is specified, the ListSummary filters to display only matching items of that type. The value is an enumeration. |
| Specifies the path to the XSLT to render the results against. |
| The ListSummary retrieves the contents of the folder specified by this property. |
| Returns Content View Count, Content Rating, and Content Rating Average in the XML document. This information can then be used in a custom XSLT. |
| Specifies whether to retrieve the HTML of the content items, or just the details necessary to display a link and summary. This is typically set to |
| Sets whether to display icons next to the displayed links. This property has an effect only when one of the default XSLT values is used. |
| Sets the target on anchor tags in the default output. Can be set to _blank, _self, _parent, or _top. Leave blank for normal link behavior. |
| Specifies the path to an EKML file. If this is set, it will override any value in |
| The number of results to retrieve. |
| The key to sort items. Can be set to |
| Ascending or descending order. |
| Specifies whether to retrieve items in subfolders. |
| Specifies the default category to add content to if added through the access point displayed to logged-in authors just above the ListSummary. |
As is clear from Table 8-1, the methods for modifying the ListSummary Server Control are quite varied. Let's explore how some of those properties react when you use the ListSummary on a page:
Start by creating a new Web form on your site called ListSummary.aspx. On the declarative ASPX file, drag the ListSummary Server Control from the toolbox on the left into the page between the form tags. This is shown in the following snippet.
<CMS:ListSummary
  ID="uxListSummary"
  runat="server" />
The snippet, as is, defaults to show only content items from the root folder in the Workarea. The first thing you might try is specifying a different folder to display, and turning recursive display on.
<CMS:ListSummary
  ID="uxListSummary"
  FolderID="72"
  Recursive="true"
  runat="server" />
With the updated code in place, you now see all the content below the Pages folder in the Workarea. It's displaying a pretty long list of content now, as displayed in Figure 8-2, so you should probably set a maximum on the number of items displayed.
The following snippet configures the ListSummary Server Control to display a maximum of five results per page, with paging set to on. It's also set to display the results in alphabetical order by title.
<CMS:ListSummary
  ID="uxListSummary"
  FolderID="72"
  Recursive="true"
  MaxResults="5"
  EnablePaging="true"
  OrderBy="Title"
  OrderByDirection="Ascending"
  runat="server" />
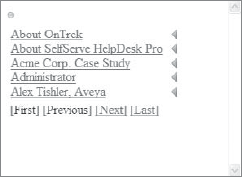
This combination of settings provides a much more useful layout, as seen in Figure 8-3. The paging is done via AJAX, which allows for fast and seamless user interaction.

There are also a few ways to change the way the ListSummary Server Control looks. By default, if you don't set the DisplayXslt property, the server control will use the ecmNavigation template. There are, however, three other predefined options for display. You can set the DisplayXslt property to None–Databind, which does not display anything, but populates the EkItems property so the results can be worked with programmatically.
You can also set the DisplayXslt property to ecmTeaser or to ecmUnorderedList. These are prebuilt documents that cannot be modified, but can help you avoid having to author new XSLT's by covering common use cases. Figure 8-4 shows what the display looks like when set to ecmTeaser.

If you want to change the display layer to something that the standard options won't allow for, you can use a custom XSLT in those situations. To do so, follow these steps:
Retrieve the XML you will be transforming. You can do this by reading from the
XmlDocproperty on the ListSummary Server Control at runtime, which involves adding a textbox to the declarative ListSummary.aspx file.In the codebehind, set the Text property of the textbox to the
XmlDocproperty, as in the following snippet.Textbox1.Text = uxListSummary.XmlDoc.OuterXml;
When you view the page in the browser, the textbox appears with the generated XML inside it. A sample of the XML produced by the ListSummary is reproduced in Listing 8-1.
Example 8.1. ListSummary Server Control XML output
<Collection>
  <Content>
    <ID>58</ID>
    <Type>Content</Type>
    <Title>All Hardware Products</Title>
    <QuickLink>
    http://thunder2/OnTrek/Products/Hardware/All-Hardware-Products/</QuickLink>
<Teaser></Teaser> <Html></Html> <StartDate>1/1/0001 12:00:00 AM</StartDate> <DateModified>7/15/2010 5:50:29 AM</DateModified> <DateCreated>7/15/2010 5:47:18 AM</DateCreated> <EndDate>12/31/9999 11:59:59 PM</EndDate> <LastEditorFname>Application</LastEditorFname> <LastEditorLname>Administrator</LastEditorLname> <Hyperlink> <a href="http://thunder2/OnTrek/Products/Hardware/All-Hardware-Products/"> All Hardware Products</a> </Hyperlink> <DisplayStartDate></DisplayStartDate> <FolderID>84</FolderID> <ContentStatus>A</ContentStatus> <Language>1033</Language> <AssetInfo> <Id></Id> <Icon></Icon> <FileName></FileName> <FileExtension></FileExtension> <ImageUrl></ImageUrl> <Language>0</Language> <MimeName></MimeName> <MimeType></MimeType> <PluginType></PluginType> <PublishPdfActive>False</PublishPdfActive> <Status></Status> <Type>0</Type> <Version></Version> </AssetInfo> <DisplayDateModified>7/15/2010 5:50:29 AM</DisplayDateModified> <DisplayDateCreated>7/15/2010 5:47:18 AM</DisplayDateCreated> <DisplayEndDate></DisplayEndDate> <EndDateAction>Archive_Expire</EndDateAction> <Comment></Comment> <Image>/OnTrek/WorkArea/images/application/spacer.gif</Image> <ImageThumbnail> /OnTrek/WorkArea/images/application/thumb_spacer.png</ImageThumbnail> <FilePath> http://thunder2/OnTrek/Products/Hardware/All-Hardware-Products/</FilePath> </Content> <Content> <ID>57</ID> <Type>Content</Type> <Title>All Software Products</Title> <QuickLink> http://thunder2/OnTrek/Products/Software/All-Software-Products/</QuickLink> <Teaser></Teaser> <Html></Html> <StartDate>1/1/0001 12:00:00 AM</StartDate> <DateModified>7/15/2010 5:51:07 AM</DateModified> <DateCreated>7/15/2010 5:44:58 AM</DateCreated> <EndDate>12/31/9999 11:59:59 PM</EndDate><LastEditorFname>Application</LastEditorFname> <LastEditorLname>Administrator</LastEditorLname> <Hyperlink> <a href="http://thunder2/OnTrek/Products/Software/All-Software-Products/"> All Software Products</a> </Hyperlink> <DisplayStartDate></DisplayStartDate> <FolderID>84</FolderID> <ContentStatus>A</ContentStatus> <Language>1033</Language> <AssetInfo> <Id></Id> <Icon></Icon> <FileName></FileName> <FileExtension></FileExtension> <ImageUrl></ImageUrl> <Language>0</Language> <MimeName></MimeName> <MimeType></MimeType> <PluginType></PluginType> <PublishPdfActive>False</PublishPdfActive> <Status></Status> <Type>0</Type> <Version></Version> </AssetInfo> <DisplayDateModified>7/15/2010 5:51:07 AM</DisplayDateModified> <DisplayDateCreated>7/15/2010 5:44:58 AM</DisplayDateCreated> <DisplayEndDate></DisplayEndDate> <EndDateAction>Archive_Expire</EndDateAction> <Comment></Comment> <Image>/OnTrek/WorkArea/images/application/spacer.gif</Image> <ImageThumbnail> /OnTrek/WorkArea/images/application/thumb_spacer.png</ImageThumbnail> <FilePath> http://thunder2/OnTrek/Products/Software/All-Software-Products/</FilePath> </Content> </Collection>This XML document contains all the information you need to generate anything you want to display. You may notice that the
Htmltag is empty for each content item; the propertyGetHtmlon the ListSummary determines whether or not to retrieve the HTML. There is a slight performance hit to retrieve the HTML, which is why it defaults to off, but if required, the HTML can be retrieved as well.For the output, you're going to generate some very simple HTML that will output an unordered list of links. The output is very similar to the
ecmUnorderedListoutput, but it should serve as a reasonable basis for future development you may need to do. The output looks like the following code snippet.<ul> <li> <a href="target.aspx?id=1">title of content</a> </li> <li> <a href="target.aspx?id=2">title of content 2</a> </li> <li> <a href="target.aspx?id=3">title of content 3</a> </li> </ul>To achieve this output, the XSLT shown in Listing 8-2 will match the Collection/Content section and then retrieve the inner tag for the hyperlink, and simply render it into a list.
Example 8.2. UnorderedListSummary.xslt
<?xml version="1.0" encoding="utf-8"?>
<xsl:stylesheet version="1.0" xmlns:xsl="http://www.w3.org/1999/XSL/Transform"
    xmlns:msxsl="urn:schemas-microsoft-com:xslt" exclude-result-prefixes="msxsl">
    <xsl:output method="xml" indent="yes"/>
  <xsl:template match="Collection">
    <ul>
      <xsl:for-each select="Content">
        <li>
          <xsl:copy-of select="Hyperlink/a"/>
        </li>
      </xsl:for-each>
    </ul>
  </xsl:template>
</xsl:stylesheet>
This listing should be saved as a new file called ~XmlFilesUnorderedListSummary.xslt. To set your ListSummary Server Control to use it, set the
DisplayXsltproperty to the new location, as shown in the following snippet.<CMS:ListSummary ID="ListSummary1" FolderID="72" Recursive="true" MaxResults="5" EnablePaging="true" OrderBy="Title" OrderByDirection="Ascending" DisplayXslt="~XmlFilesUnorderedListSummary.xslt" runat="server" />
This updates the display on the Web page to what is shown in Figure 8-5.
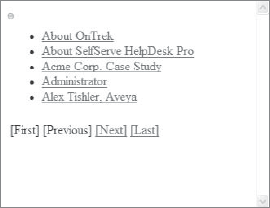
As you can see in Figure 8-5, paging is still functional, and the ListSummary respects the sorting options you have specified. This makes it simple to update the display because you don't have to reinvent the wheel by adding custom paging or internal sorting. It also means that under-the-hood performance will be as fast as possible, since the transform is taking place on as small a portion of the data as possible. The XML supplied for the transform only contains the information that is currently being displayed to the end user, rather than the full result set.
While XSL transforms are a powerful way of translating the display layer, Ektron is aware that not all developers are completely comfortable with writing XSL transforms. To solve this issue, Ektron has introduced EKML, short for Ektron Markup Language, which can handle basic transformations through simple looping and string replacement of tokens. This language was introduced by Ektron to allow developers to avoid complex XSLT's in simple use cases.
The way EKML hooks into the ListSummary Server Control is very similar to the procedure for XSLT documents. You create an EKML document, and set the MarkupLanguage property to the location of the file. The ListSummary then caches the file and transforms the output according to the structure defined in the markup document. The structure of the file is mostly HTML, with some tags that define where special processing needs to be done, such as loops. Table 8-2 contains the list of special tags used in EKML.
Table 8.2. EKML Tags
TAG | DESCRIPTION |
|---|---|
ekmarkup | The root element for EKML documents. |
ekoutput | The output from the server control goes between these tags. |
ekrepeat | Anything between these tags will be repeated for each item in the list. |
ekbubbleinfo | Defines the contents of a popup bubble. The bubble is invoked when a link, which is inserted with the token |
The EKML tags define the basic structure of the EKML document. In addition to the tags there are a whole series of tokens that are replaced with the appropriate values for the objects being displayed. These tokens are outlined in Table 8-3.
Table 8.3. EKML Tokens Usable in ListSummaries
TOKEN | DESCRIPTION |
|---|---|
| The item's comment information. |
| The ID of the content item. |
| The date the content item was created. |
| The date the content item was last modified. |
| First name of the most recent editor. |
| Last name of the most recent editor. |
| Description of the folder. |
| ID of the folder. |
| Name of the folder. |
| The actual HTML of the content item. |
| Hyperlink to the item. |
| Replaced with the path to the image defined in the item's metadata. |
| Replaced with an image tag corresponding to the content type of the current item. |
| Replaced with the path to the thumbnail generated for the image defined in the item's metadata. |
| The number of items returned. |
| The language currently being displayed. |
| The QuickLink of the content from the Library. |
| The domain for the current page. |
| Creates a link to display a bubble containing the template defined in the |
| Displays the status of the content item. |
| Displays the teaser for the item. |
| Displays the title for the item. |
| Runs a URL encoding function against the passed in string. The passed in string can be the output of another token. |
| Outputs the value from the specified query string parameter. For example, on the url |
Now that you know the allowed tokens, you can create an EKML document that outputs the same HTML as the XSLT you created earlier. Take the code from Listing 8-3 and save it in ~XmlFiles as UnorderedListSummary.ekml.
Example 8.3. UnorderedListSummary.ekml
<ekmarkup>
  <ekoutput>
    <ul>
      <ekrepeat>
        <li>
          [$HyperLink]
        </li>
      </ekrepeat>
    </ul>
  </ekoutput>
</ekmarkup>
Now you simply need to point the ListSummary Server Control at the new file by setting the MarkupLanguage to point to the new file. This is outlined in the following snippet.
<CMS:ListSummary
  ID="uxListSummary"
  FolderID="72"
  Recursive="true"
  MaxResults="5"
  EnablePaging="true"
  OrderBy="Title"
  OrderByDirection="Ascending"
  MarkupLanguage="XmlFilesUnorderedListSummary.ekml"
  runat="server" />
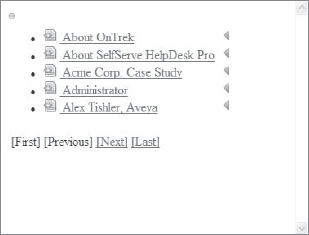
The output of this update is shown in Figure 8-6. As is visible in the output, the HyperLink token is actually replaced by a DMS menu style link. There is a bit more intelligence in the token then there is following the same process with an XSLT. Using EKML can be a great way to simplify your development efforts while creating rich and complex displays.
Calendars have been a long-time feature of the Ektron Framework, but with version 8.0 they received a major overhaul. Where the old version had calendars stored outside of content, the new version makes calendars more like folders of events. Events themselves are stored as a subtype of content, which allows events to take advantage of the feature set built around content. This includes the capability of being categorized via taxonomy and the storage of associated metadata.
The interface also received a big facelift, and rather than using a simple table for output, they now use a rich, complex interface. The interface comes by way of Telerik's Scheduler component, and is similar in look and feel to Outlook. Because the items themselves are now content, they can also be displayed in the Content Block Server Control, the ListSummary Server Control, and almost any other control designed to work with content.
In this section, you learn how to administer calendars in the Ektron Framework, and then you move on to the many modes of displaying the events to users on your site. Finally, you learn how the events are stored in the system.
Most calendar administration takes place in the Workarea. There are three types of calendars in the Ektron Framework: system calendars, user calendars, and group calendars. The process of creating each type is slightly different. The first thing you do in this section is create one of each and learn the differences.
Next, you work through some of the different methods of displaying these calendars on your site. There are two modes of displaying calendar information: either as content or as a calendar. When displaying an Ektron calendar using the calendar interface, you use the WebCalendar Server Control. When displaying it as content, you can use a ListSummary, or any other content control. This chapter covers using the WebCalendar, ListSummary, and Content Block Server Controls to display events. Finally, it discusses how to use the API to retrieve a list of upcoming events from the system, and how to modify the way some of the server controls render the information. In this section, you:
Create a system calendar, a group calendar, and a user calendar.
Display events using a WebCalendar Server Control with customizations.
Display events using a ListSummary Server Control.
Display events using a Content Block Server Control.
Display a list of upcoming events.
Output iCal feeds.
Creating a system calendar follows the same process as creating a standard folder in the Workarea. The difference is what is displayed in the Content pane after creating it. To create a system calendar:
Open the Workarea after logging in as Admin, and go to the Content pane.
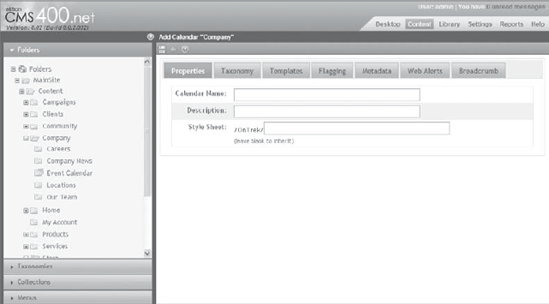
Right-click a folder in the folder tree and select Add Calendar. This brings up the Add Calendar form, as seen in Figure 8-7.
This form is almost exactly the same as the Add Folder form, covered in Chapter 5.
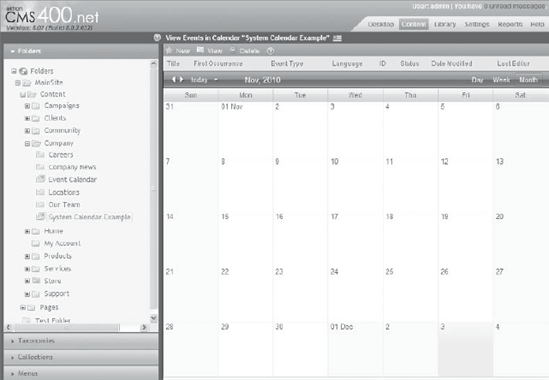
Enter in a Calendar Name, select a taxonomy node, and then click Save. When the page returns, it shows you an interface that is similar to the Folder View page, but with the exception that a calendar view is also visible. This is shown in Figure 8-8.
Interacting with the calendar in this view is the same as from the front end WebCalendar Server Control, which is covered in more depth later in this section. The key point to note about this view is that it supports dealing with events in two ways:
Via the calendar itself: You use this to create new events, update event details, and reschedule events.
Via the interface you are used to using for content: The classic content interface is useful in updating metadata, templates, and other related content details.
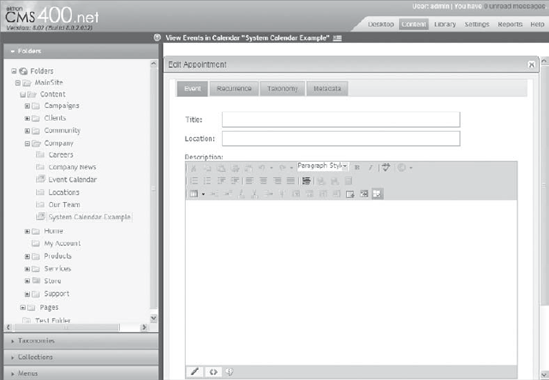
Try out the content interface now by first creating an event. Double-click the calendar on a day of your choice. This brings up the Edit Appointment form, shown in Figure 8-9.
The Title, Location, and Description fields are self-explanatory. The start date for the event is shown underneath those three primary fields. By deselecting the All Day checkbox, three additional fields will be shown. These fields allow you to specify the start time, as well as the end date and time. Using these options allows you to specify the exact period that your event will run. It is possible to create events that run for multiple days, but generally the preferred practice is to use recurrence to define the additional days, as each recurrence can then be managed separately with its own details.
On the Recurrence tab, a single checkbox is shown, unchecked by default. By checking the Recurrence checkbox, a group of additional fields is shown. These fields allow you to specify the type of recurrence, as well as how long the event should run — definable as forever, after a certain number of occurrences, or up until a specific date and time. The supported recurrence modes are:
Daily
Weekly
Monthly by Date
Monthly by Day
Yearly
The difference between by Date and by Day is that the by Date option allows you to specify a specific day number, where the by Day option is used for settings such as the first day of the month, or the last Sunday of the month.
There are two additional tabs on this form; these allow for setting taxonomy associations and metadata settings. Because this calendar was associated with a taxonomy when you created it, clicking that tab allows you to categorize this event into one or more taxonomy nodes. Taxonomy categorization can be an integral part of how events are displayed, as each created interface allows them to be filtered by taxonomy.
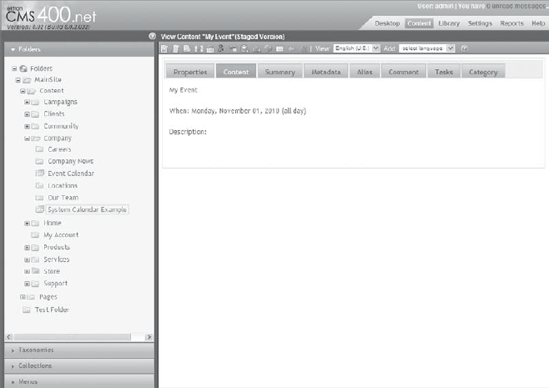
Enter My Event as the title for your event now, and and click Save, which returns you to the calendar view, with the event listed above the calendar as well as shown on the calendar itself, as shown in Figure 8-10.
As you can see, the new event has been added to the event list, along with the details of when the event occurs and what type the event is. This event has the type Original, which means that it is the base definition of the event. The other types are "Variance - Extra Occurrence" and "Variance - Cancelled Occurrence." Extra Occurrence means that it is a member of a recurring series whose details have been changed for that day. A cancellation means that the event that should have occurred on that day, due to a recurrence rule, has been cancelled.
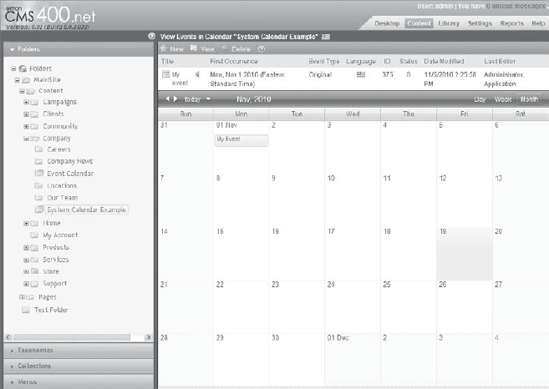
The event is also shown with a DMS Menu instance, which allows content authors to perform immediate actions on the content such as deleting it or moving it through an approval chain. Click the title of the event on the list now to be taken to the detail view of the event. The detail view is also shown in Figure 8-11.
The event detail view does not allow you to edit the event itself, but does allow you to manage the summary, metadata, alias, content scheduling, templates, and taxonomy associations.
User and group calendars are similar to system calendars in that they store events in the same way. The difference is the location that these events are stored internally. When a user or community group is created in the Ektron Framework, the system automatically adds a hidden folder for that user or group. One of the properties available during the creation process is whether to create a calendar for the new object — if checked, then a calendar folder is added underneath the private folder.
The upside to group and user calendars is that they maintain proper permissions automatically for groups and users. The downside is that there is no content interface for the events or calendars in the Workarea the way there is for System Calendars.
Let's create a user calendar now.
Start by going to Settings

Clicking the edit button brings up the edit user properties interface, with a tab labeled Custom, shown in Figure 8-12.
On the Custom tab, there are two settings that are related to the calendar:
Create User Calendar: Checking this box and saving creates the user calendar and makes it available for use as a data source. It is not possible to roll back the creation of a user calendar or a group calendar, as this can lead to loss of data. It is an option on the user profile for performance reasons — if your users do not create calendars, this can make the system more responsive by reducing the number of folders in the system.
Time Zone property: This list is generated from the Windows time zone list. When a user selects a time zone, all calendar events from that time forward are calculated from the version stored (based on GMT) to the user's time zone. This allows users across the globe to all see the event in their appropriate time zones. It is a required field, but if it has not been entered, for example for a user who was created programmatically, the system displays the events in the server time zone.
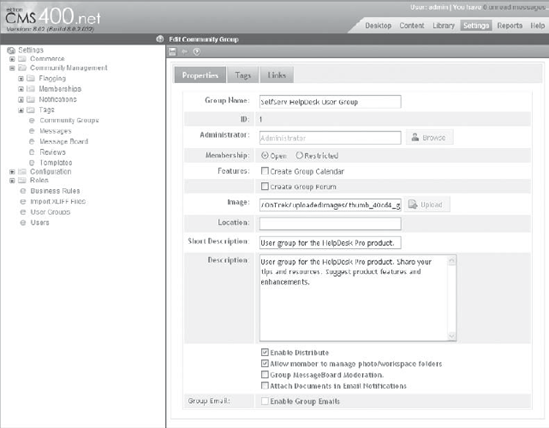
Community groups have a similar method of creating user calendars, but the interface is slightly different. Go to Settings

The WebCalendar Server Control is the primary interface for Ektron calendars. The control uses the Telerik Scheduler component internally for rendering, but supports a variety of overrides. Using the server control with its default settings is straightforward. You'll create these examples on a new Web form. Create the Web form in the root of your site and call it Calendars.aspx, shown in Listing 8-4, and drag the WebCalendar Server Control from the toolbox into the form of the new page.
Example 8.4. Calendars.aspx
<%@ Page Language="C#" AutoEventWireup="true"
  CodeFile="calendars.aspx.cs" Inherits="calendars" %>
<%@ Register Assembly="Ektron.Cms.Controls"
  Namespace="Ektron.Cms.Controls" TagPrefix="CMS" %>

<!DOCTYPE html PUBLIC "-//W3C//DTD XHTML 1.0 Transitional//EN"
  "http://www.w3.org/TR/xhtml1/DTD/xhtml1-transitional.dtd">

<html xmlns="http://www.w3.org/1999/xhtml">
<head runat="server">
    <title>Calendars</title>
</head>
<body>
    <form id="form1" runat="server">
      <CMS:WebCalendar ID="uxWebCalendar" runat="server">
      </CMS:WebCalendar>
    </form>
</body>
</html>
The WebCalendar Server Control has a few key properties that are used as attributes on the control, but data sources are encoded as inner XML. Table 8-4 shows the properties.
Table 8.4. WebCalendar Server Control Properties
PROPERTY | DESCRIPTION |
|---|---|
| Setting this to |
| The display mode the calendar is set to by default. Can be set to Month, Week, or Day. Defaults to Month. |
| The path to the user control that will render the event on the calendar. Defines bubble behavior as well as what text displays. Defaults to ~WorkareaWebCalendarDefaultTemplateDisplay.ascx. |
| If set to |
| The WebCalendar attempts to detect if there is already a ScriptManager instance on the page. If there isn't, it adds one internally. Occasionally, depending on where the external ScriptManager is in the control tree, it falsely detects no ScriptManager. Set this to |
| The WebCalendar uses an UpdatePanel internally to allow for Async Postbacks. If you don't want this behavior, set UseUpdatePanel to |
| Defaults to ~/Workarea/WebCalendar/View/WebCalendar.css. This can be pointed elsewhere to modify the base styles. |
In addition to the properties listed in Table 8-4, there are internally encoded properties to define the data sources for the calendar. The following code snippet shows a few examples of how this can be achieved.
<CMS:WebCalendar ID="uxWebCalendar" runat="server">
  <DataSource>
    <CMS:CalendarDataSource
      backColor="AutoSelect"
      defaultId="111"
      queryParam="calendarId"
      sourceType="SystemCalendar" />
    <CMS:CalendarDataSource
      backColor="Blue"
      defaultId="222"
      queryParam="groupCalendarId"
      sourceType="GroupCalendar" />
    <CMS:CalendarDataSource
      backColor="DarkRed"
      defaultId="333"
      queryParam="userCalendarId"
      sourceType="UserCalendar" />
  </DataSource>
</CMS:WebCalendar>
The WebCalendar in the previous snippet has three sources defined. Each source then has several properties. Table 8-5 outlines the properties for CalendarDataSource.
Table 8.5. CalendarDataSource Properties
PROPERTY | DESCRIPTION |
|---|---|
| The default ID to use. If the source is a system calendar, this is the folder ID. If the source is a user or group calendar, this should be set to the user or group ID. |
| The query string parameter to use. If this is specified and the query string contains a parameter by the same name, the value overrides the |
| The type of the calendar. Can be |
| The color to display the event in. This is an enumeration. |
In addition to these baseline data source properties, the CalendarDataSource tag also supports an inner encoded list of taxonomy IDs to use as a filter against the particular source. For instance, a developer can specify that the calendar should only show events from category ID 23 or 24 that are in system calendar 432 using the following code snippet.
<CMS:WebCalendar ID="uxWebCalendar" runat="server">
  <DataSource>
    <CMS:CalendarDataSource
        backColor="AutoSelect"
        defaultId="432"
        sourceType="SystemCalendar">
      <CMS:CategoryID categoryId="23" />
      <CMS:CategoryID categoryId="24" />
    </CMS:CalendarDataSource>
  </DataSource>
</CMS:WebCalendar>
Note
When specifying multiple category IDs for a single data source, all events from each category are included — it is an OR operation rather than an AND operation.
All of these settings can be configured through codebehind, allowing for items like a taxonomy tree filter to be applied to the WebCalendar. The properties are stored as generic lists, making it straightforward to manage the sources. The following example achieves the same effect as the previous snippet.
Ektron.Cms.Controls.CalendarDataSource Source;
Source = new Ektron.Cms.Controls.CalendarDataSource();
Source.backColor = Ektron.Cms.Controls.EventColor.AutoSelect;
Source.defaultId = 432;
Source.sourceType = Ektron.Cms.Controls.SourceType.SystemCalendar;

Source.CategoryIDs.Add(new Ektron.Cms.Controls.CategoryID(23));
Source.CategoryIDs.Add(new Ektron.Cms.Controls.CategoryID(24));

uxWebCalendar.DataSource.Add(new Ektron.Cms.Controls.CalendarDataSource());
uxWebCalendar.Fill();
These steps allow you to display calendars on your site with a minimum of fuss, while achieving a rich interface for your users and administrators. Deeper customizations can also be performed on the WebCalendar — three main areas that people frequently want to customize on the WebCalendar are the event rendering, the event editing form, and the styling on the calendar.
When referring to the event rendering of the WebCalendar, we are talking about the information displayed for each event in the day, week, or month view. An example of the bubble is shown in Figure 8-14. This bubble is created through the instantiation of a user control that is normally in the Workarea at ~/Workarea/WebCalendar/DefaultTemplate/Display.ascx. To override this display, copy the user control from the Workarea to another location on your site, and update the property DisplayTemplatePath on the WebCalendar to reflect the new location. The user control can then be modified to display anything you want.
As mentioned earlier, another common need is to modify the event editing form. This is also a user control in the Workarea that is instantiated on demand. In this case, the user control is stored at ~/Workarea/WebCalendar/DefaultTemplate/AdvancedForm.ascx. There is no property that allows this to be overridden to another location, but as the control is exposed, modifications can be made directly to the control to support alternate functionality.
Note
A caveat to modifying Workarea files is to remember that when you upgrade your installation of the Ektron Framework, your modifications will be overwritten by the new versions of these files from Ektron.
A final common set of modifications made to the WebCalendar is to customize the CSS included by the control. The property CssFile allows you to point the WebCalendar somewhere other than the default location for the CSS. The unmodified file is stored in ~/Workarea/WebCalendar/View/WebCalendar.css. To modify it, copy it somewhere else in the site, and update the CssFile property to point at the new location. Inside the file, the style rules are broken into three main sections. The file starts with the styles defined for the advanced form, followed by the base layout styles for the WebCalendar view. That is then followed by a theme section, which defines the look and feel including colors and images.
Events stored in Ektron calendars are stored as a subtype of content. What this means is that all the features that standard HTML content supports are also supported by WebCalendar events, including taxonomy, metadata, search, permissions, and workflow.
Additionally, since the events are stored in what is effectively a folder, they can be displayed by most controls as standard content. For example, it is possible to use a ListSummary Server Control to display a list of events from a calendar. As an example, the following code snippet will output the result shown in Figure 8-15.
<form id="form1" runat="server">
  <CMS:ListSummary runat="server" ID="uxListSummary" FolderID="124" />
</form>
The tradeoff with this approach comes from how the events are stored under-the-hood. As mentioned earlier, the events are stored similarly to the iCalendar standard. What this means is that the rules for recurrence are stored as part of a master event, and that additional occurrences or cancellations of recurrences are stored as variances in secondary content. The outcome of this type of storage is that if you have an event that recurs every week, it only shows up once as a single piece of content. If you then cancel a single occurrence of the event, the cancellation shows up as a second piece of content. If you were then to modify a different occurrence and save it, you end up with four total pieces of content. One of the additional items is the cancellation for that day, and the other is the additional variance for that day.
For some uses this is fine, as you can write a custom XSLT against the XML to display what you need from the event details, but in other cases you will be actually looking for a list of upcoming events, which is covered later in this section.
In the same way the ListSummary Server Control can display a list of events from a calendar, you can use the Content Block Server Control to display a detail view of an individual event. The Ektron Framework internally uses an XSLT to transform the stored data for the event into a standardized display layer. You can then combine this display layer with other standard Ektron controls, such as the MessageBoard Server Control, to create a rich interface for people to interact with these events. This section covers how to display the event on a Content Block Server Control, as well as how to modify the display of the event by changing the XSLT.
In the Smart Form section of Chapter 6, you read how Smart Form designs are stored in packages. A package contains five major elements, from the schema to the input form. The key part of the package that is used to display the data in a content block, however, is the default XSLT.
Events in the Ektron Framework are based at their core on a Smart Form, which means the behavior is almost exactly the same as any other Smart Form.
This includes the way the data is rendered through the Content Block Server Control. The hidden Smart Form package contains a default XSLT that has the smarts to render the event definition in an appropriate manner, depending on the language and time zone of the user. When an event ID is specified for a Content Block Server Control, it automatically renders the event using that predefined XSLT. In this section, you render the event you created earlier using a content block. Once you've investigated how the system behaves by default, you'll learn how to create a custom XSLT for rendering the data, while maintaining the intelligence supplied in the original.
To render an event into a Content Block Server Control, you need to know the event's ID:
In the Workarea, navigate to the calendar built into the OnTrek site, at /MainSite/Content/Company/Event Calendar.
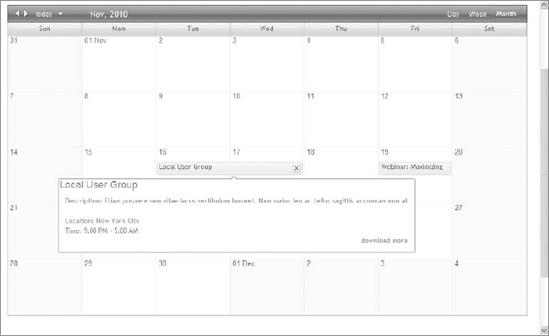
Once there, look at the list of events that's rendered just above the calendar in the Content pane — the starter site ships with three events. We'll display the Local User Group event, which is ID 252, as shown in Figure 8-16.
You will use that value as the
DefaultContentIDvalue in the Content Block Server Control.Return to the Calendar.aspx file in Visual Studio, and replace the ListSummary Server Control with a Content Block Server Control, as shown in the following snippet.
<form id="form1" runat="server">
  <CMS:ContentBlock
    runat="server"
    ID="uxContentBlock"
    DefaultContentID="252" />
</form>
When you reload the page in your browser, you should see something that resembles the output shown in Figure 8-17. In this example, the event has a complex recurrence rule, which is correctly interpreted by the XSLT and rendered into a verbal description of that rule, displayed with the event.

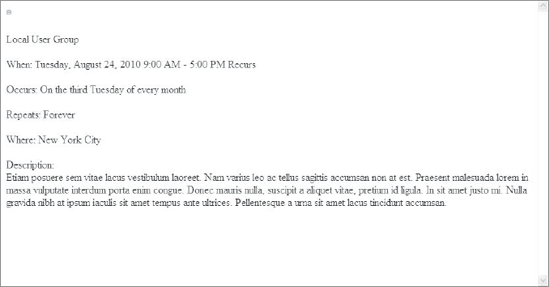
While, the output is a bit bland, the markup is clean enough, so the display layer can be formatted using CSS to match the site it is being displayed on. But if you want to use different words for some of the output, or change the order, or even skip some elements, a copy of the XSLT used in the package is also provided in ~/Workarea/WebCalendar/XSL/default.xslt. This file can be copied elsewhere into your site, modified at will, and then used to override the default package XSLT for Web events.
To point your content block at the custom XSLT, use the DisplayXSLT property on the Content Block Server Control. For example, on your site you copied the default XSLT to the XMLfiles directory, so you could update your content block code to look like the following snippet. Once you have rewired it to use your custom XSLT, you can modify the webevent.xslt file until you are satisfied with the format or language.
<form id="form1" runat="server">
  <CMS:ContentBlock
    runat="server"
    DisplayXslt="~/XmlFiles/webevent.xslt"
    ID="uxContentBlock"
    DefaultContentID="252" />
</form>
The XSLT file itself is fairly complex, and this section doesn't go into it in depth, but there are a few decisions that were made in the development of the WebCalendar system that may not be apparent immediately. The main item to note is the custom extension functions that are used in the XSLT — specifically ekext:convertUTCtoLocal and ekext:formatDateTime. By using the Saxon processor packaged with the Ektron Framework to perform an XSLT2 conversion rather than an XSLT1 conversion, Ektron could have avoided the need for these custom extensions, as date logic is included with the XSLT2 specification. However, the decision to use custom extensions was made for two reasons: The localization included with the Saxon processor does not include data for all regions, meaning that in some cases the localization of dates would fail. Additionally, by moving the functions into the core Ektron stack, the XSLT became substantially simpler.
The WebCalendar infrastructure also has a rich API for retrieving and modifying events. The majority of this API can be accessed through the Ektron.Cms.Framework.Calendar.WebEvent class, but there are a few additional functions available only through the Ektron.Cms.Content.Calendar .WebEventManager class. Many of these functions are self-explanatory. For example there are functions to Add, Delete, Update, and CancelOccurence. But the key function covered right now is the GetEventOccurenceList function.
Whereas the ListSummary Server Control was useful in showing a list of events from the perspective of content — one item per event definition, regardless of recurrences — the GetEventOccurenceList is used to expand the recurrence rules into a full set of event occurrences, and then correlate them with cancellations and additional occurrences. What this means is that when you call GetEventOccurenceList you get output that matches exactly what you see on the WebCalendar display for a given time period.
The output of this function is not added into a mode of display on the WebCalendar Server Control because it is very straightforward to use one of the standard ASP.NET controls to display the output. A common method of displaying the event list is to use the ASP.NET Repeater Server Control.
Let's walk through an example now of setting up the retrieval and display.
Return to the Calendar.aspx file in Visual Studio and open the codebehind for the file.
Retrieve the list of events. In this example, you'll start with the current time and get the list of events covered over the next month. You can optionally provide a Category ID to filter by, but let's skip that in this example.
Add the following code snippet to your file.
protected void Page_Load(object sender, EventArgs e)
    {
      List<Ektron.Cms.Common.Calendar.WebEventData> eventList;

      Ektron.Cms.Content.Calendar.WebEventManager webEventApi;
      webEventApi = new Ektron.Cms.Content.Calendar.WebEventManager();
      eventList = webEventApi.GetEventOccurrenceList(
        88, DateTime.Now, DateTime.Now.AddMonths(1));
    }
This code retrieves the list of
WebEventDatainstances, each of which contains a single occurrence of an event.At this point, you can create an ASP.NET Repeater Server Control on the declarative side and create that output formatting. Flip over to the Calendar.aspx file, and put the following snippet in between the
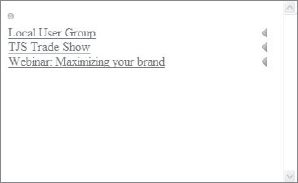
Formtags.<asp:Repeater ID="uxRepeater" runat="server"> <ItemTemplate> Event Name: <%# Container.DataItem as Ektron.Cms.Common.Calendar.WebEventData).DisplayTitle%><br /> Event Start: <%# Container.DataItem as Ektron.Cms.Common.Calendar.WebEventData).EventStart .toString()%> <br /> Event Location: <%# Container.DataItem as Ektron.Cms.Common.Calendar.WebEventData).Location%> <br /><br /> </ItemTemplate> </asp:Repeater>Now all that remains is to databind the Repeater Server Control to the list of occurrences you retrieved through the API. The following amendment to the codebehind does this.
uxRepeater.DataSource = eventList;
uxRepeater.DataBind();
Now when you visit Calendar.aspx in your browser, you should get output like that shown in Figure 8-18.

For posterity's sake, Listing 8-5 lists the complete code (both declarative and codebehind) for the Calendar.aspx and Calendar.aspx.cs files.
Example 8.5. Calendar.aspx and Calendar.aspx.cs
<%@ Page Language="C#" AutoEventWireup="true"
  CodeFile="calendars.aspx.cs" Inherits="calendars" %>
<%@ Register Assembly="Ektron.Cms.Controls"
  Namespace="Ektron.Cms.Controls" TagPrefix="CMS" %>

<!DOCTYPE html PUBLIC "-//W3C//DTD XHTML 1.0 Transitional//EN"
  "http://www.w3.org/TR/xhtml1/DTD/xhtml1-transitional.dtd">

<html xmlns="http://www.w3.org/1999/xhtml">
<head runat="server">
    <title>Calendars</title>
</head>
<body>
<form id="form1" runat="server">
  <asp:Repeater ID="uxRepeater" runat="server">
    <ItemTemplate>
      Event Name: <%# (Container.DataItem as
        Ektron.Cms.Common.Calendar.WebEventData).DisplayTitle%>
      <br />
      Event Start: <%# (Container.DataItem as
        Ektron.Cms.Common.Calendar.WebEventData).EventStart.toString()%>
      <br />
      Event Location: <%# Container.DataItem as
        Ektron.Cms.Common.Calendar.WebEventData).Location")%>
      <br /><br />
    </ItemTemplate>
  </asp:Repeater>
</form>
</body>
</html>using System;
using System.Collections.Generic;
using System.Linq;
using System.Web;
using System.Web.UI;
using System.Web.UI.WebControls;
public partial class calendars : System.Web.UI.Page
{
protected void Page_Load(object sender, EventArgs e)
{
List<Ektron.Cms.Common.Calendar.WebEventData> eventList;
Ektron.Cms.Content.Calendar.WebEventManager webEventApi;webEventApi = new Ektron.Cms.Content.Calendar.WebEventManager();
eventList = webEventApi.GetEventOccurrenceList(
88, DateTime.Now, DateTime.Now.AddMonths(1));
uxRepeater.DataSource = eventList;
uxRepeater.DataBind();
}
}One final frequently asked question about the feature set that WebCalendars provides is how to export events from the Ektron Framework and import them into another application such as Outlook, and vice versa. The Ektron Framework does not support importing iCal or vCal files from other sources, but it generates them in order to move events from the framework to another software platform.
In fact, the default interface for the WebCalendar Server Control includes a link to download the .ICS file for each event. By hovering over the event link, the event bubble appears on the calendar, including a download link, as seen in Figure 8-19.

The download link in the bubble points to the file ~/Workarea/WebCalendar/View/IcalGenerator .ashx and includes the query string parameter eventid. This file generates feeds for entire calendars as well, by specifying the calid query string parameter instead. This ability allows for programs to have live feeds of calendars if they support it.
The feed generated supports version 2 of the iCal standard, which allows it to also specify the originating time zone information for the event. This means that whenever users worldwide add the event to their calendars, the event appears in their local time zones, and respects the translation effects of moving across potentially two daylight savings boundaries in the case of a recurring event.
This section covers how to work with video files and Flash in the CMS. The Ektron Framework is designed to make this as straightforward as possible, while allowing developers to treat the videos as content so that attributes can be set on the files and concepts such as metadata can still be applied to them.
There are also options other than managing your videos within the Ektron Framework. For example, the Ektron Framework ships with a BrightCove PageBuilder Widget, which allows you to use the BrightCove video management service and distributed content network to embed corporate videos into your site and easily track statistics. We'll cover these in more depth after we discuss how to serve your files from the Ektron Framework.
This section corresponds to the Testimonials section of OnTrek. The testimonials page is comprised of a single Flash object that retrieves the testimonial information from a Smart Form configuration, and then displays it inside the container. In this scenario, you will simplify the example by working with a single Flash object. This section covers how to add the object to the system, manage options on it, and display it. It also discusses some of the alternatives to managing the video within the Ektron Framework. The specific items in this section will be:
Adding an object to the DMS
Modifying settings on the managed object
Displaying the managed object
Alternatives to using the Ektron Framework to manage your assets
Adding assets to the framework is an action performed in the Workarea.
Open the Workarea and log in as Admin.
Once in the Workarea, navigate to the Content tab, and drill down in the tree to Mainsite/Content/Clients/Client Testimonials.
Once in the folder, there is an icon on the toolbar that shows a window with a green arrow

File Upload: Shown in Figure 8-20 this tab uses a standard file upload button normal in most browsers. Simply navigate to the file and click upload to add the media to your site as a managed item.
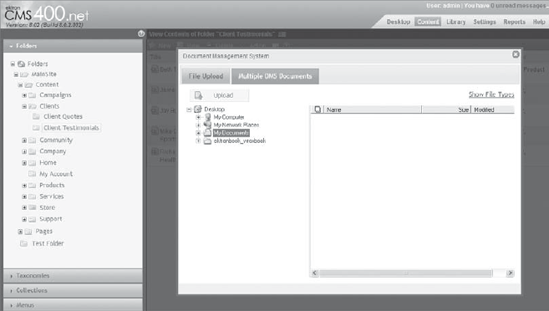
Multiple DMS Documents: Shown in Figure 8-21 this tab provides an interface that displays a file selector inline on the page, and can be used to upload multiple files at the same time. It uses DAV as the backend service, which can be very user friendly, but the downside is that it can be temperamental about its configuration. This is why both options are presented, so that even if DAV has a hiccough, you can still add files to the DMS.
Go to the Multiple DMS Documents tab.
Navigate using the presented folder tree in the Web page to C:InetpubwwwrootOnTrekuploadedfilesMainSiteClient_Testimonials, and check the box next to Beth tyler.flv. Then click Upload. When the file finishes uploading, the Content pane in the Workarea will refresh to the list view of the content in the folder. The list now includes the Testimonial .swf file.
The alternative to uploading through the upload interface is to select New

Click the file now to bring up the properties. In this interface, you can see that working with your assets is exactly the same as working with normal HTML content, with all the same capabilities.
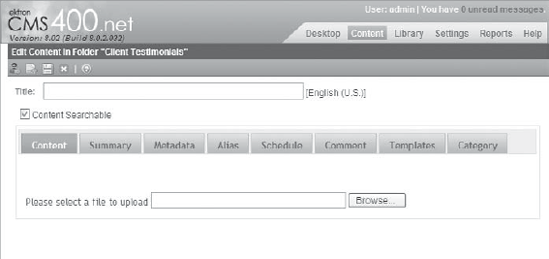
Editing the settings on the uploaded Flash video also works the same way as normal content. Simply click the edit icon on the toolbar, and you will be shown all the options available for the current type of content. The edit screen is shown in Figure 8-23.

The main difference from normal content is that the Content tab shows a series of options that affect how the Flash object is shown on the site. The options differ based on whether the object is a SWF or other type of media. These options are outlined in Table 8-6.
Table 8.6. Flash Settings in the Workarea
SETTING | DESCRIPTION |
|---|---|
Width | Width of the object in pixels. The DMS attempts to automatically retrieve this value when the file is uploaded. |
Height | Height of the object in pixels. The DMS attempts to automatically retrieve this value when the file is uploaded. |
AutoStart | A Boolean to determine whether the video should start playing immediately, or whether it should be clicked on to initiate playing on the page. |
Loop | Sets whether to infinitely loop the video. Use PlayCount if you want to loop a specific number of times. |
Menu | Determines whether to show the menu. |
ContextMenu | Enables the right click context menu on videos. |
BGColor | Sets the default background color of the object tag when rendered in a content block. |
Align | Determines where to align the object in its containing element. Can be set to Left, Right, Top, or Bottom. |
SAlign | More specific align options for browsers that support it. Can be set to Left Edge, Top Edge, Right Edge, Bottom Edge, Top Left, Top Right, Bottom Left, and Bottom Right. |
Quality | The default quality level to use for the Flash player. |
Scale | Determines how to scale the object. Can be set to Default (Show all), No border, or Exact Fit. |
WMode | Sets Flash to the corresponding window mode: can be set to Window, Transparent, or Opaque. This is frequently the issue in shine-through problems, where the Flash object covers up elements like menu navigation when it shouldn't. If you are having an issue with shine-through, try setting this to Transparent. |
uiMode | Determines whether to show a full ui, or a minimized ui for video playback. |
WindowlessVideo | Microsoft alternative to WMode. |
In addition to the options on this screen, there is a preview of the object, as well as an upload interface. Remember that to update the object with a new version, it must have the same name; otherwise it is uploaded as a different object in the DMS.
These settings are applied whenever the item is displayed through a Content Block Server Control, and are implemented through setting the correct parameters on the object tag that is written to the page. Flash objects can override certain of these settings, but in general they can help you to achieve the exact look and feel you desire for your site.
Working with objects in the DMS is very straightforward. All the logic to print the correct HTML to the page is contained in the Content Block Server Control, which means all you need to display them is that same control. Let's test it out by creating a new page in the root of the site called Video.aspx. Drag a Content Block Server Control onto the page so it looks like the code in Listing 8-6.
Example 8.6. Video.aspx
<%@ Page Language="C#" AutoEventWireup="true"
  CodeFile="Video.aspx.cs" Inherits="Video" %>

<%@ Register Assembly="Ektron.Cms.Controls"
  Namespace="Ektron.Cms.Controls" TagPrefix="CMS" %>

<!DOCTYPE html PUBLIC "-//W3C//DTD XHTML 1.0 Transitional//EN"
  "http://www.w3.org/TR/xhtml1/DTD/xhtml1-transitional.dtd">

<html xmlns="http://www.w3.org/1999/xhtml">
<head runat="server">
    <title></title>
</head>
<body>
    <form id="form1" runat="server">
    <div>
      <CMS:ContentBlock
        ID="ContentBlock1"
        runat="server"
        DefaultContentID="86" />
    </div>
    </form>
</body>
</html>
Return to the Workarea and make sure your file has been published and then view the properties to find out the content ID of the video. Replace the number 86 with the appropriate value for your object. When you save the file and view it in the browser, you will see your video playing with your options.
The Ektron Framework works very well for certain situations, such as rich applications, or raw SWF files containing video. However, it isn't the end-all be-all when it comes to video. For instance, FLV videos, which require a Flash video player to be displayed, will not work with just a Content Block Server Control to display them. There is, however a Flash Widget that can be used with PageBuilder to display FLVs.
Ability to display is not the only consideration when making a choice about how to deliver your content. Also keep in mind that video is one of the most bandwidth-intensive functions you can perform with a site. Additionally, because of the way ASP.NET is structured, it is not very good at keeping connections open for long periods of time, which is something that downloading large files, like video, requires. There is also the question of the ability to stream files — ASP.NET can be configured to do stream files, but it does require some hacking around in the system to get streaming working.
Ektron is aware of these considerations. One solution supplied by Ektron is the BrightCove Widget, which integrates with the third-party vendor to allow you to create a collection of videos that can be displayed on your site with solid analytics and a clean player.
Another common solution is to use a free service like YouTube to manage your videos, and then embed the player onto your page. All of these options allow you to easily share videos with potential clients and site visitors.
In this chapter, you learned the following:
ListSummary Server Control: You added one more fundamental feature to your tool belt in the ListSummary Server Control, which allows you to easily generate lists of content based on the folder they are contained in. It also allows for straightforward modification of the output layer through a rich selection of properties as well as the ability to modify the output entirely through the use of XSLT and EKML.
EKML: This is the first time the book has covered EKML. While it can be simplistic, it can also be a powerful way of easing development time through the elimination of one of the more complicated aspects of developing for the Ektron Framework: the XSLT.
XSL Transforms: These are an extremely powerful tool for translating from a raw data feed to user interface ready HTML. In them, you have a Turing complete language that can do nearly anything asked of it.
Creating and Managing Calendars: These were completely rewritten for version 8.0 of the Ektron Framework. Specifically, the chapter covered the concept of the three different calendar types: user calendars, group calendars, and system calendars. These three types are not very different in their underpinnings. But when displaying them, the system can simplify things greatly for you by not requiring you to find out a particular user's hidden calendar ID, as an example.
Displaying Calendars and Events: This chapter also covered myriad ways of displaying the data from them, as well as how to customize those display layers in depth. The ability to significantly change how an event is rendered in a Content Block Server Control and how to modify the way event bubbles appear on the WebCalendar Server Control are both capabilities that you will likely need to tap into at some point in your development exercises, and now you have the tools to do so.
Videos: You explored how videos are stored in the Ektron Framework. This increasingly useful feature has been explored on many of the sites Ektron has been used for, and is one of the primary identified needs of many companies' Web projects. The chapter discussed some of the tradeoffs of using an external video management service, and also discussed the strong capabilities and integration provided through object management in the DMS.
Through the judicious use of these features, you can deliver strong marketing campaigns to your company, as well as help customers find out about your organization and why they should become a customer.