
How do you establish a social network including users, friends, and profiles?
How do you connect members with community groups?
Can you use dashboards as personalized portals of information?
How do you stay up-to-date on members' activity streams?
What is the purpose of micro-messaging?
It is no exaggeration to say that social media has fundamentally changed the way businesses operate and engage with customers. Changes are happening to the way corporations are doing business as a result. Information is being shared regularly through many different online venues. Organizations that listen and participate in such conversations gain an advantage over their customers by increasing sales, extending marketing opportunities, and increasing customer loyalty through improved support and public relations.
Prior to the age of social media, businesses were used to communicating directly both with customers and employees in one outward direction. This is no longer the case. Customers talk about the brands with which they interact in open forums on the Internet; employees blog about their company on personal websites and ask questions around the virtual water cooler. Businesses can no longer ignore the comments that people have. Communication is at the core of social media and if you are not engaging in the conversation on your own website, the conversation will happen elsewhere.
Social media is not just for external communities; it is also relevant for employees, which corporations are trying to leverage to improve their corporate culture and productivity. As new employees join the workforce, they expect or even demand that these social tools are a part of their everyday activities.
The OnTrek website uses social functionality to foster the community's involvement in many aspects of the website's functions. In Chapter 10, you learned how to use Web 2.0 type communication tools to provide support to existing clients through the use of blogs, wikis, and discussion boards. This chapter continues the conversation by showing how to use the social networking functionality for site visitors to discover relevant information, to discuss topics with like-minded individuals, and to discover community members in need of (or able to provide) help.
To ensure that your site's social functionality can provide these services and meet the expectations of community members, this chapter looks at the components that form the core of social networking sites and shows how they are implemented in the OnTrek website using the Ektron Community Framework. Keep in mind that this framework encompasses both Web 2.0 and the social networking type functionality. Often times these two concepts are used interchangeably; however, Ektron does not do so. Ektron uses the phrase Web 2.0 to refer to the broad set of technologies that facilitates a two-way conversation between site visitors and site owners (through blogs, wikis, discussion boards, and so on; see Chapter 10). Ektron uses social software to refer specifically to the technology that allows users to form connections among one another and share information through those connections. This section and chapter focuses exclusively on the social networking aspects of the Ektron Community Framework.
The most important aspects of social networks are as follows:
The individual members: Each member typically has his or her own profile that serves as their virtual presence on the website. Profiles often show contact information, various documents such as photos, videos, and blog posts, and list the member's friends, which signifies users who have been granted some elevated level of trust.
The community group: This group allows members to unite around a common purpose and share information on a specific subject. A group also has a group profile, which serves as its homepage on the site and is usually the epicenter of the group activity. Group administrators can set permissions on groups so they are public and open to anyone or private, which means members must get approval to join. Group members can share information, discover others with similar interests, and work collaboratively to create documents.
Activity streams: On both user profiles and group profiles it is common to find activity streams that list activities related to the group or member. The member profile includes the activities related to that individual, such as friending (for example, "John is now friends with Susan") and content creation (for example, "John uploaded a new video entitled Summer Vacation"). Similarly, on the group profile, the activity stream includes activities that occur within the group itself, such as membership activities (for example, "John is now a member of the Sales Group") and collaboration activities (for example, "John published a new document entitled Engineering Product Specification"). In addition to reading the activity stream online, members can often request updates to be delivered via instant messaging, SMS, or through e-mail.
Micro-messaging or micro-blogging: This is a way of communicating that allows members to publish very short messages, share status updates (for example, "what are you doing now?"), and post relevant URLs and other interesting bits of information. Micro-messages can either be publicly visible to all members of the social network or only to friends. Twitter, which popularized micro-messaging, is often used in a number of ways — to crowd source for answers to questions in real-time, to keep aware of trending news topics, and to promote an event or other marketing event. Most micro-messages are text but some services allow for video and other multimedia formats.
When Ektron launched the first version of its Community Framework in 2006, there were no other Web content management vendors with this type of deeply integrated framework. Ektron recognized that a paradigm shift was underway that would fundamentally change what people would come to expect from websites, both public-facing websites and internal corporate intranets.
The Community Framework is composed of dozens of server controls and widgets, as well as a dozen more APIs, ranging from Web 2.0 type controls such as blogs and discussion boards, to the social networking components discussed here. This chapter focuses on the following aspects of the Ektron Community Framework:
Any time a membership user is created, the user is automatically given the plumbing needed for participation in a social network, such as the ability to establish connections with other users called colleagues, and storage for personal information. From a developer's point of view, no work is needed to configure or enable this underlying structural aspect of a social network; it is an inherent part of the system. Once a user has been created, the User Profile Server Control and APIs can be used to display the profile for that user on the website. It is from the user profile that users manage their colleagues, personal information, privacy settings, and so forth.
User profiles are also a place for community members to establish personal "dashboards" of information. Similar in concept to iGoogle (www.google.com/ig), a member's personal dashboard becomes a place where information can be aggregated from across the Internet or the organization. The information kept on the dashboard can serve two purposes:
Community members use it to organize information into one centralized location.
Members use it to share information with others visiting the profile.
Ektron's Community Groups are created by community members as a place to discuss particular topics and share information with its list of members. Community members either join community groups out of interest or because they're invited to join by the group's administrator. Community profiles are displayed using the Community Group Profile Server Control and APIs and contain information similar to that found in the user's profile.
Keeping community members up-to-date on all of the activities occurring within their social network of colleagues and the community groups is of critical importance. As such, the Ektron Community Framework includes a general-purpose notification engine to alert members when certain activities of interest take place. These notifications can be delivered in a number of ways, including through e-mail and through the website's activity stream timeline, using the ActivityStream Server Control and APIs.
Later in this chapter, you'll see how to incorporate micro-messaging into the user profile, allowing members to publish micro-messages to the system and keep their colleagues and community groups apprised of their activity. Micro-messages are a type of activity, which means that members can choose to be notified of micro-message posts through a number of different channels, including SMS or the activity stream. Also, later in this chapter, you'll see how to work with micro-messaging through the Community Framework's MicroMessage Server Control, and you'll walk through its integration onto the user profile, as implemented on the OnTrek website.
Community members, friends, and user profiles form three of the most basic elements of a social network.
As far as the Ektron database is concerned, the members of a website's community are one or the other of the following:
Membership users: Created either by a CMS admin through the Workarea, or by the site visitor through the website during the membership registration process (see the section "Allowing a User to Register on the Site" in Chapter 7).
Any time either type of user is created, they are automatically given the plumbing needed for participation in a social network, such as the ability to establish connections with other users (called colleagues) and storage for personal information. From a developer's point-of-view, no work is needed to configure or enable this underlying structural aspect of a social network; it is an inherent part of the system.
Once a user is in the system, she can begin establishing connections with other members. This process is typically called friending and two users who have friended each other are called colleagues. It is worthwhile noting that the system uses a symmetric friending paradigm like Facebook, which means that both users need to establish the friendship connection before they're considered colleagues. It does not use the asymmetric follow approach used on sites such as Twitter, where one user can follow another without the approval of the person being followed.
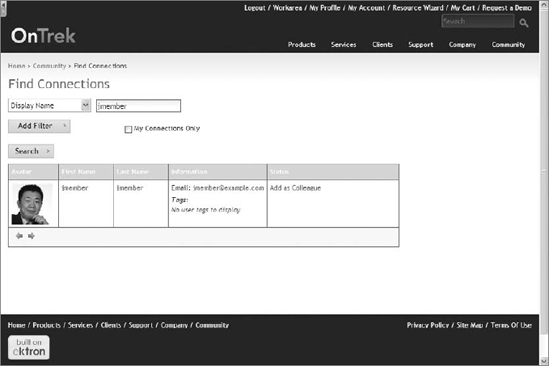
The CommunitySearch Server Control is one of the primary methods for community members to discover other potential connections by searching by name, interests, tags, or even location. The search results display members of the social network and include a link that members can use to issue a friend request. Figure 11-1 shows the search results, including the friend request link as displayed by the CommunitySearch Server Control. In addition to the CommunitySearch Server Control, there are APIs available that can be used to issue friend requests. You'll read about these APIs later in the User Profile "Under the Hood" section.
A user profile is a Web page that contains personal information for a community member. This information often includes a photograph, avatar, contact information, and other personal details that define the member's digital identity. On a corporate social network, such as an intranet, a profile contains work-related information, such as an individual's role and their supervisor's name. A profile can also store and share data. Users of sites such as MySpace and Facebook often upload videos and publish blog posts through their profiles.
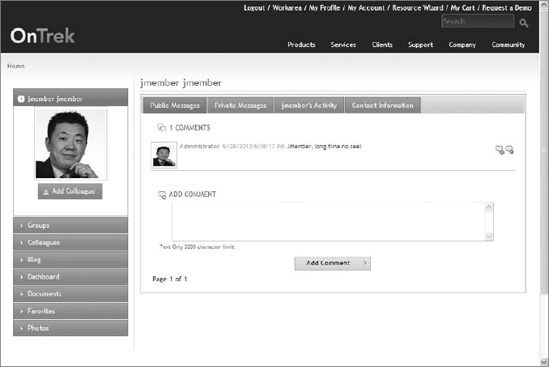
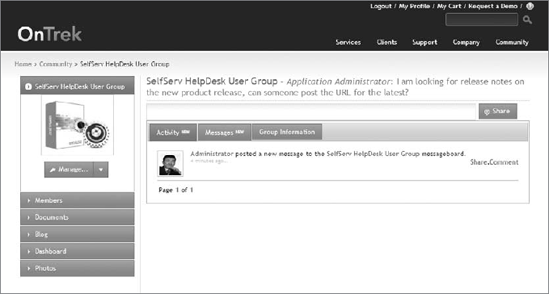
Profiles often provide community-generated content attribution, with the avatar and display name serving as the hyperlink pointing to the user's profile. In this way, profile links become a key aspect of social networking functionality, serving as a way to discover new users and learn more information about the person authoring the information. Figure 11-2 shows a posted message using the MessageBoard Server Control and shows how the post is attributed to a particular user through the use of an avatar and hyperlink to that user's profile.
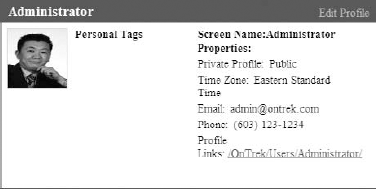
The UserProfile Server Control can be used to display a user profile for any CMS or membership user. The user profile displayed by the server control is very basic, and an example of its default display is shown in Figure 11-3. Users who are logged on have the ability to edit their profiles by clicking the Edit Profile link that appears in the top-right corner.
The default presentation can be customized by defining a custom XSLT and registering it using the server control's DisplayXSLT property. However, often the requirements for a website's user profile are more complex than the UserProfile Server Control can achieve, and so the stock server control may not be an option. Instead, the Ektron Community Framework APIs are frequently used to build a user profile. The OnTrek website is no exception — the user profile section of OnTrek is essentially an application unto itself.
Note
You can create friendly URLs for your members' profiles. For example, rather than referring to a specific member's profile as /user/profile.aspx?id=239, you can use /users/ john-smith, by enabling the Community Aliasing for Users feature. See the "Aliasing" section in Chapter 6 or more information.
In addition to this basic information, user profiles often also include links to other items:
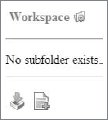
Community Documents: Every user in the system (both CMS and membership users) has a personal content repository associated with his account. This repository can be accessed and managed using the CommunityDocuments Server Control. This control allows users to create and share personal content on the website. Figure 11-4 shows the output of the CommunityDocuments Server Control prior to the user uploading any content.
Private Messaging: The Messaging Server Control allows community members to send and receive private messages. This is an important feature, as it offers a way for community members to communicate information that should not or cannot be shared publically on the website.
Colleagues: The Friends Server Control displays a list of users who are colleagues of a particular community member. This control is typically located on a user profile and is set to display the list of the member's current colleagues, pending colleagues, and invited colleagues.
Community Groups: The CommunityGroupList Server Control displays a list of community groups and can be used to present:
Community groups a user has joined
Community groups the user has been invited to join
Community groups the user has requested to join
Message Boards: The MessageBoard Server Control allows community members to author comments about a user, community group, or content item. The MessageBoard Server Control may be associated with a user, a community group, or with content. Moderation is also available, and requires that messages are approved prior to displaying on the website.
OnTrek's user profiles contain heavy client-side requirements, including the ability for users to:
Create folders by right-clicking elements and invoking a context menu.
Hide and show profile elements using sliding accordions.
Organize colleagues by dragging and dropping their avatars into folders.
With such highly interactive and specialized behavior requirements, using the UserProfile Server Control is not possible. Instead, the user profile section of the OnTrek website uses the Ektron Community Framework APIs extensively, and it serves as a good example of how to use those APIs to power a rich, interactive user experience.
OnTrek's user profile is logically divided into three tiers:
Presentation tier: Uses jQuery to create the interactive client-side experience.
Middle tier: Uses ASHX handlers to encapsulate business logic.
Ektron's APIs: For all data and CMS needs.
Overall, the OnTrek user profile presents a nice architectural model and clean pattern to follow when this type of rich functionality is required. It's a good example of what can be done with jQuery, .NET, and Ektron.
In this implementation section, you will focus your attention on the Ektron specific pieces of its implementation, namely the setup and configuration steps and the areas of the user profile application that use the Community Framework Server Controls and APIs. Later, in the User Profile "Under the Hood" section, you will continue to probe deeper into the implementation by looking into the source of the ASHX handlers and discovering a number of Community Framework API gems contained there.
Note
If you're interested in learning more about jQuery and its possible uses with Ektron, you can find additional information in the RIA section of Chapter 6, which uses jQuery and Ektron Smart Forms to provide an interactive image rotation component.
For any community implementation, you'll need to define the location to the user profiles, community groups, and other community pages. This is done by specifying the URL to these pages in the Community Templates screen in the Workarea. These paths are used by the system when links to these pages are generated. For example, the search results displayed by the CommunitySearch Server Control include a hyperlink to the profile of the community member (as shown earlier in Figure 11-1). The hyperlink displayed by the control uses the information specified in this screen.
To specify these paths, do the following.
Go to Workarea

In the User Templates section, enter the values in Table 11-1 as defined in the OnTrek implementation guide:
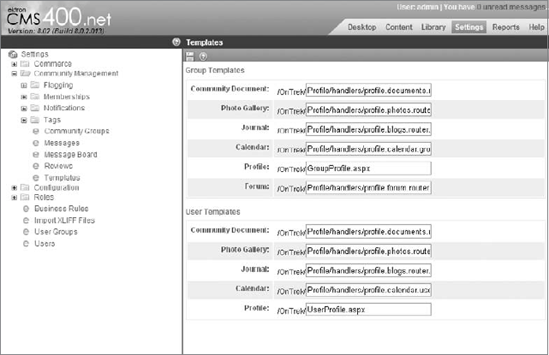
Table 11.1. User Templates values
DOCUMENT | VALUE TO ENTER | EXPLANATION |
|---|---|---|
Community Document | exchange/codedownload.aspx | URL for the page hosting the CommunityDocuments Server Control (or similar functionality using the APIs) |
Photo Gallery | /profile.aspx | URL for the page hosting the PhotoGallery Server Control |
Calendar | /workarea/communitycalendar.aspx | The Calendar for the individual user |
Profile | /user/profile.aspx | the URL for the user profile |
Journal | /user/blog.aspx | URL for the page hosting a blog control or similar |
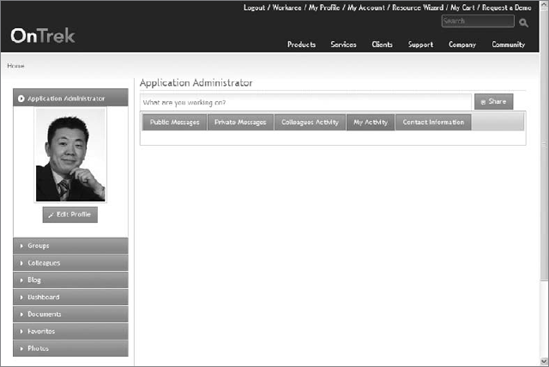
When logged in as Admin, opening OnTrek's Admin user profile in your Web browser will show something similar to the screen shown in Figure 11-6. You'll notice that there are two major regions defined for the user profile.
The first region occupies the left-side navigation and contains accordion items stacked vertically. At the top of the stack is the user's avatar, and then beneath it follows the Groups, Colleagues, Blog, Dashboard, Documents, Favorites, and Photos.
The second region occupies the majority of the real estate of the profile's center. This contains information that is contextual to the selected accordion item. For example, when the accordion item containing the user's avatar is selected, the main region displays the five tabs shown in Figure 11-6.
The implementation of the user profile is encapsulated into a single user control called ~/Profile/UserProfile.ascx; see Listing 11-1 (which is shorted for brevity). The two regions described previously (the accordion and the body) map to physical regions of this user control:
The accordion items are wrapped with
<div class="accordion">and define the content and behavior for each of the individual accordion items (shown in Listing 11-1).The main region, or body, is wrapped with
<div class="body">and uses an ASP.NET MultiView Server Control to load the appropriate view based on the selected accordion item.
Example 11.1. ~/Profile/UserProfile.ascx
<%@ Control Language="C#" AutoEventWireup="true" CodeFile="UserProfile.ascx.cs"
Inherits="Ektron.Profile.UserProfile" %>

<%@ Register TagPrefix="CMS" Assembly="Ektron.Cms.Controls"
Namespace="Ektron.Cms.Controls" %>
<%@ Register TagName="Blog" Src="./Accordion/Blog.ascx"
    TagPrefix="Ektron" %>
<%@ Register TagName="Calendar" Src="./Accordion/Calendar.ascx"
   TagPrefix="Ektron" %>
<%@ Register TagName="Colleagues" Src="./Accordion/Friends.ascx"
    TagPrefix="Ektron" %>
<%@ Register TagName="Dashboard" Src="./Accordion/Dashboard.User.ascx"
    TagPrefix="Ektron" %>
<%@ Register TagName="Documents" Src="./Accordion/Documents.ascx"
    TagPrefix="Ektron" %>
<%@ Register TagName="Favorites" Src="./Accordion/Favorites.ascx"
    TagPrefix="Ektron" %>
<%@ Register TagName="Groups" Src="./Accordion/Groups.ascx"
    TagPrefix="Ektron" %>
<%@ Register TagName="Photos" Src="./Accordion/Photos.ascx"
    TagPrefix="Ektron" %>
<%@ Register TagName="User" Src="./Accordion/User.ascx"
    TagPrefix="Ektron" %>
<%@ Register TagName="TreeView" Src="./Accordion/TreeView/treeview.ascx"
    TagPrefix="Ektron" %>
<%@ Register TagName="TreeviewContextMenu"
    Src="./Accordion/TreeView/treeview.contextmenu.ascx"
    TagPrefix="Ektron" %>

<asp:ScriptManager ID="uxScriptManager" runat="server" ScriptMode="Release" />
<Ektron:TreeviewContextMenu ID="treeviewContextMenu" runat="server" />
<div class="profileOverlay"></div>
<div class="userProfile profile">
    <input id="profile-focusHelper" type="hidden" name="profile" value="" />
    <div class="profile">

    <!-- REGION 1 - "accordion" -->
    <asp:UpdatePanel ID="upProfile"
                         runat="server"
                         ChildrenAsTriggers="false"
                         UpdateMode="Conditional">
      <ContentTemplate>
        <div class="width-6">
          <div class="rail">
            <CMS:UserProfile ID="cmsUserProfile"
                runat="server"
                Visible="true" />
            <div class="accordion">
            <h3>
            <asp:LinkButton ID="uxAccordionLinkUser"
                runat="server" CssClass="user" OnCommand="uxAccordion_Click"
                CommandArgument="user"></asp:LinkButton>
             <input id="uxAccordionDataUser" runat="server"
                type="hidden" name="accordionData"
                class="accordionData" />
             </h3>
           <div>
<div class="user">
<asp:Literal runat="server" ID="uxAvatar" />
<asp:MultiView ID="mvUserAccordion"
runat="server">
<asp:View
ID="uxUserAccordionEditProfile"
runat="server">
<a id="uxUserAccordionEditProfileLink"
runat="server"
class="ek_thickbox ui-button ui-widget
ui-state-default ui-corner-all
ui-button-text-icon">
<span class="ui-button-icon-primary
ui-icon ui-icon-pencil"></span>
<span class="ui-button-text">Edit Profile</span>
</a>
</asp:View>
<!--
-- remaining Views removed for brevity, see
-- source code for complete listing
-->
</asp:MultiView>
</div>
</div>
</div>
</div>
</div>
<!-- REGION 2 - "body" -->
<asp:UpdatePanel ID="upBody" runat="server" UpdateMode="Always">
<ContentTemplate>
<div class="body">
<input type="hidden" class="profileData"
id="uxProfileData" runat="server" name="profile" />
<input type="hidden" class="hostData"
id="uxHostData" runat="server" name="profile" />
<h3>
<asp:Literal ID="uxHeaderUser" runat="server" />
<span class="status">
<asp:Literal ID="uxHeaderStatus" runat="server" />
</span>
</h3>
<asp:MultiView ID="mvProfileBody" runat="server">
<asp:View ID="vwUser" runat="server">
<Ektron:User ID="ucUser" runat="server"
Mode="User" />
</asp:View>
<!--
-- remaining Views removed for brevity, see
-- source code for complete listing
-->
</asp:MultiView></div>
</ContentTemplate>
</asp:UpdatePanel>
</div>
</ContentTemplate>
</asp:UpdatePanel>
</div>
</div>In the associated codebehind file, ~/Profile/UserProfile.ascx.cs, the click event handler is responsible for handling the click events and loading the appropriate view:
protected void uxAccordion_Click(object sender, CommandEventArgs e)
        {
            this.activeTabId = (string)e.CommandArgument;
            this.activeTabIndex = this.GetControlIndex(this.activeTabId);
            OnSelectedUserControl();
            SetBody();
        }
The User Profile code so far has been more .NET code than Ektron Framework API; but it's important code to highlight for a few reasons. First, it demonstrates a practical real-world implementation of a user profile that incorporates most every standard element found in social networking profiles built using the Ektron Community Framework. Second, it will serve as a reference point for most every one of the remaining technical sections in this chapter.
At the very top of the UserProfile.ascx source code shown in Listing 11-1, you'll notice a number of Register statements that reference additional user controls. You'll now take a look at one of these specific user controls, the Friends.ascx control in order to better understand how this component of the User Profile is implemented and show how it uses the CommunityFramework API to display a list of the member's colleagues, as shown in code Listing 11-2.
Example 11.2. ~/Profile/Accordion/Friends.ascx
<%@ Control Language="C#" AutoEventWireup="true" CodeFile="Friends.ascx.cs"
Inherits="Ektron.Profile.Friends" %>
<%@ Register Assembly="Ektron.Cms.Controls" Namespace="Ektron.Cms.Controls"
TagPrefix="CMS" %>

<div class="colleagues members">
    <asp:PlaceHolder ID="uxFindColleague" runat="server">
        <div class="findColleagues clearfix">
            <label for="colleagues">Find a colleague...</label>
            <input type="text" id="colleagues" name="colleagues"
                   maxlength="50" class="findFriend" value="" />
            <a href="#FindColleague"
               class="ui-button ui-widget ui-state-default
               ui-corner-all ui-button-text-icon"
               title="Find a colleague"
onclick="Ektron.Profile.Colleagues.find(this);return false;">
<span class="ui-button-icon-primary ui-icon ui-icon-person"></span>
<span class="ui-button-text">Find</span>
</a>
</div>
</asp:PlaceHolder>
<asp:MultiView ID="uxColleagues" runat="server">
<asp:View ID="uxColleaguesUser" runat="server">
<div class="types">
<ul>
<li>
<a href="#colleagues-1">
<asp:Literal ID="uxFriendsLabel"
runat="server" /></a>
</li>
<li id="uxColleaguesAwaitingTab" runat="server">
<a href="#<%= uxColleaguesInvitedPanel.ClientID %>">
<asp:Literal ID="uxOutgoingRequests"
runat="server" /></a>
</li>
<li id="uxColleaguesNewInvitesTab" runat="server">
<a href="#<%= uxColleaguesPendingPanel.ClientID %>">
<asp:Literal ID="uxIncomingRequests"
runat="server" />
<asp:Label id="uxNewInvites" runat="server">
<img id="uxColleaguesNewInvites"
runat="server" visible="false"
enableviewstate="false" /></asp:Label></a>
</li>
</ul>
<div id="colleagues-1">
<asp:Literal ID="uxColleaguesCurrent" runat="server" />
</div>
<div id="uxColleaguesInvitedPanel" runat="server">
<asp:Literal ID="uxColleaguesInvited" runat="server" />
</div>
<div id="uxColleaguesPendingPanel" runat="server">
<asp:Literal ID="uxColleaguesPending" runat="server" />
</div>
</div>
</asp:View>
<asp:View ID="uxColleaguesNone" runat="server">
<p class="noColleagues">
<asp:Image ID="uxNoColleagues" runat="server" />
</p>
</asp:View>
</asp:MultiView>
<CMS:Friends ID="cmsFriends" runat="server"
Visible="false" MaxResults="200" />
<CMS:CommunityGroupMembers ID="cmsMembers"
runat="server" Visible="false" />
</div>The lines of particular interest are at the bottom, where you can see two references to two of the Ektron Framework's Server Controls, namely, the Friends Server Control (CMS:Friends) and the CommunityGroupMembers Server Control (CMS:CommunityGroupMembers). These two controls are placed side by side since this code file is shared across the implementation of the user and group profiles. On the user profile, the Friends Server Control is used to list a member's colleagues. On the group profile, the CommunityGroupMembers Server Control is used to display the group's members. Both of these controls have their visibility set to False, which means the display is being controlled through code. If you were to open its corresponding codebehind (Friends.ascx.cs), you would find the following code snippet:
private void GetUserProfile()
        {
            bool hasColleagues = false;
            string colleagues;
            XsltArgumentList xsltArgs;
            xsltArgs = new System.Xml.Xsl.XsltArgumentList();

            //Get Colleagues
            cmsFriends.DefaultUserID = this.ProfileId;
            cmsFriends.DisplayMode =
              Ektron.Cms.Controls.Friends.eDisplayMode.Directory;
            cmsFriends.DefaultFolderID = this.UserCookieData.CookieData.Colleagues.
Context[this.UserCookieData.CookieData.Colleagues.Context.Count - 1];
            cmsFriends.Hide = true;
            cmsFriends.Fill();
            xsltArgs.AddParam("mode", "", "colleagues");
            xsltArgs.AddParam("sitePath", "", this.contentApi.SitePath);
            xsltArgs.AddParam("permission", "", Enum.
GetName(typeof(UserPermission), this.UserProfileData.Permission).ToLower());
            xsltArgs.AddParam("profileMode", "", Enum.GetName(typeof(ProfileType),
this.Mode).ToLower());
            colleagues = EkXml.XSLTransform(cmsFriends.XmlDoc.InnerXml,
this.xsltPathCmsFriends, true, false, xsltArgs, false, null, Constants.
CacheProfileInterval);
            uxColleaguesCurrent.Text = colleagues;
In the underlying user control, the developer sets additional parameters to the Friends Server Control, namely, DefaultUserID, DisplayMode, and DefaultFolderID — the three most important parameters of the Friends Server Control.
The purpose of the DefaultUserID parameter is straightforward, with the specified value representing the default user ID that will be used by the control.
Since this server control has the ability to display four types of colleagues (current colleagues grouped by category, current colleagues listed in alphabetical order, pending colleagues, and invited colleagues), it is necessary to indicate which type you want returned. This is specified through the DisplayMode property, which is set to retrieve data in Directory mode (current colleagues grouped by category). The DefaultFolderID property correspondingly indicates which category colleagues should be selected from.
You may be wondering, though, why this code was manipulated in codebehind. Looking at this code further, it becomes apparent why the developer decided to set the control's visibility to False and to manipulate its display through codebehind: It presents a solution to a problem that many have run across previously. The problem is, when using the DisplayXSLT property of a server control, how can you pass along custom parameters to the transformation? The solution is one that can only be implemented in codebehind. You create an XsltArgumentList object, define your parameter values, and use the EkXml's transformation routine, which accepts an XSLTArgs object as a parameter. The result is the same had you used the DisplayXSLT property, with the exception and benefit that this transformation allows you to pass arguments.
Note
Take a look through the other user controls that are registered at the top of the page, namely:
./Accordion/Blog.ascx
./Accordion/Calendar.ascx
./Accordion/Dashboard.User.ascx
./Accordion/Documents.ascx
./Accordion/Favorites.ascx
./Accordion/Groups.ascx
./Accordion/Photos.ascx
./Accordion/User.ascx
Each is worth exploring further as they contain useful lines of code that can save you time when building your own user profile.
Given the heavy client-side requirements of the OnTrek profile, the application uses jQuery to achieve much of the rich client behavior. To facilitate client and server communication, the user profile application exposes Community Framework APIs over HTTP through the use of .NET ASHX handlers, and returns data formatted using JSON. ASHX handlers are a good choice when implementing this type of service because they avoid much of the overhead involved in rendering a full ASPX page. For example, ASHX handlers entirely skip the normal page lifecycle, reducing the computational overhead of a given request.
In the ~/Profile/Handlers/ folders, you'll find all of the following files:
profile.blogs.router.ashx
profile.calendar.group.router.ashx
profile.calendar.user.router.ashx
profile.colleagues.ashx
profile.documents.ashx
profile.documents.router.ashx
profile.favorites.ashx
profile.forum.router.ashx
profile.groups.ashx
profile.members.ashx
profile.photos.ashx
Each handler uses the Framework API in some way, exposing features that are not available through the Workarea or server controls. This section cherry picks through a few of the hidden pearls of these handlers, but there are many others not covered here, so it is highly advised that you spend some time browsing through these files at some point since they provide examples for things that haven't been exposed before.
Let's start by looking at how the ProcessRequest method defined in ~/Profile/Handlers/profile .colleagues.ashx handles various requests. It uses a switch statement to dispatch processing based on the type of action that is requested. The following snippet shows the relevant section of that ASHX handler:
public void ProcessRequest(HttpContext context)
        {
            //set header info
            context.Response.ContentType = "application/json";
            context.Response.Cache.SetNoStore();
            context.Response.Cache.SetRevalidation(
                HttpCacheRevalidation.AllCaches);

            GetTaxonomyTreeData();
            TaxonomyRequest taxonomyRequest;

            switch (this.Action)
            {
                case RequestAction.AddColleague:
                    this.friendsApi.AddPendingFriend(this.ColleagueId);
                    this.response = @"{""Status"":""OK""}";
                    break;
                case RequestAction.ApproveColleague:
                    this.friendsApi.AcceptPendingFriendForUser(this.ColleagueId,
                                                               this.UserId);
                    this.response = @"{""Status"":""OK""}";
break;Reviewing the implementation details of some of the RequestAction handlers might not be necessary in some cases, as the source code spans only a few lines. However, there are others operations which are more complex, like the implementation for the RequestAction.AddFolder shown in the following code snippet, that need explaining:
case RequestAction.AddFolder:
                 try
                 {
                  //add new node
                  taxonomyData = new TaxonomyData();
                  taxonomyData.TaxonomyDescription = String.Empty;
                  taxonomyData.TaxonomyName = Convert.ToString(this.CategoryName);
                  // community items have no language;
                  taxonomyData.TaxonomyLanguage = 0;
                  taxonomyData.TaxonomyType = (this.Mode == ProfileType.User) ?
                      EkEnumeration.TaxonomyType.User : EkEnumeration.TaxonomyType.
Group;
                  taxonomyData.TaxonomyParentId =
                      long.Parse(this.RequestTaxonomyData.Id);
                  long newCategoryId =
                      contentApi.EkContentRef.CreateTaxonomy(taxonomyData);

                  //get new node
                  taxonomyRequest = new TaxonomyRequest();
                  taxonomyRequest.TaxonomyId = newCategoryId;
                  taxonomyRequest.TaxonomyType = EkEnumeration.TaxonomyType.User;

                  // limit the taxonomy to just the level required
                  taxonomyRequest.IncludeItems = false;
                  taxonomyRequest.ReadCount = false;
                  taxonomyRequest.Depth = 1;

                  taxonomyData = this.contentApi.LoadTaxonomy(ref taxonomyRequest);

                  //translate to treeview
                  TranslateTaxonomyData(taxonomyData);

                  //set response
                  this.response = this.jsonSerializer.Serialize(this.TreeView);
                 }
To understand the previous code snippet, you should first understand the use case for the code. In this instance, the use case is: "As a developer, I can create new folders for organizing colleagues." Allowing for this type of organization means that the user can place colleagues into logical groups based on their relationship to the colleague. For example, as a community member, you might choose to place all of marketing colleagues into a newly created folder called Marketing.
Looking at the implementation, you might be surprised to find references to Taxonomy APIs and Taxonomy data classes in code for creating a new folder. This is because taxonomy is actually an extremely central part of the Community Framework and it serves a number of important purposes. By default, every user in the system has a user taxonomy associated to it. Although there is only one user taxonomy per user (a one-to-one mapping between a user and user taxonomy), there are predefined user taxonomy categories created to manage the relationships between the user and other community-related items, such as community groups, colleagues, and content. These predefined categories are child categories of the root folder.
The two significant differences between user taxonomies and content taxonomies are that user taxonomies are not language-aware, and also, there is no UI for managing them in the Workarea.
Given this new information, it now becomes clearer why the RequestAction.AddFolder handler references the Taxonomy API to create a new "folder" for organizing colleagues. You're actually creating new categories for this information behind the scenes and through the process of categorizing colleagues, documents, and community groups. You're establishing an organized relationship between a user and these objects.
Exploring the ~/Profile/Handlers/profile.colleauges.ashx further, you will see a number of references to the Ektron.Cms.Community.FriendsAPI namespace. This provides an interface for performing many of the actions you'd expect to have, including the ability to issue friend requests and approve friend requests. The following code snippet from that file shows how to do each of these respectively.
case RequestAction.AddColleague:
                    this.friendsApi.AddPendingFriend(this.ColleagueId);
                    this.response = @"{""Status"":""OK""}";
                    break;
                case RequestAction.ApproveColleague:
                    this.friendsApi.AcceptPendingFriendForUser(this.ColleagueId,
                                                               this.UserId);
                    this.response = @"{""Status"":""OK""}";
break;Another important point to know and highlight is how to retrieve a list of friends using the API. The following code snippet shows the procedures needed to get a list of colleagues for a given user. This code uses the same GetList/Criteria pattern that the Ektron's Framework APIs use (See Appendix B for more information about the Framework API, including cookbook style code snippets). The nice thing about the Framework API is its consistent use of GetList() for retrieving a list of items. Once you've used it, you know how to use it for other datatypes.
Ektron.Cms.API.Community.CommunityGroup groupApi =
          new Ektron.Cms.API.Community.CommunityGroup();

        Criteria<Ektron.Cms.CommunityGroupProperty> criteria =
          new Criteria<Ektron.Cms.CommunityGroupProperty>();
        criteria.AddFilter(Ektron.Cms.CommunityGroupProperty.GroupName,
                           CriteriaFilterOperator.StartsWith,
                           "H");
        List<Ektron.Cms.CommunityGroupData> groupList = groupApi.GetList(criteria);

        gvCommunitGroups.DataSource = groupList;
        gvCommunitGroups.DataBind();
The next code snippet shows how to retrieve a list of favorites using the same GetList/Criteria pattern. Notice the similarity between the two, despite the fact that they're querying for and returning entirely different datatypes.
Ektron.Cms.API.Community.CommunityGroup groupApi =
          new Ektron.Cms.API.Community.CommunityGroup();

        Criteria<Ektron.Cms.CommunityGroupProperty> criteria =
new Criteria<Ektron.Cms.CommunityGroupProperty>();
criteria.AddFilter(Ektron.Cms.CommunityGroupProperty.GroupName,
CriteriaFilterOperator.StartsWith,
"H");
List<Ektron.Cms.CommunityGroupData> groupList = groupApi.GetList(criteria);
gvCommunitGroups.DataSource = groupList;
gvCommunitGroups.DataBind();In both cases you'll also notice that the lists are data-bound to data-bindable server controls like the .NET ListView Server Control and the GridView Server Control. This pattern can be replicated for many of the community datatypes, making the process of data retrieval intuitive and straightforward.
Note
For a developer screencast covering the Framework API, including code samples and documentation, see http://dev.ektron.com/FrameworkAPI/.
One way to draw people to join a social network is to show that it is possible to connect with other members of the community who have similar interests. Community groups often serve this purpose and offer members the ability to discuss topics and discover new members in the process. Community groups often have profiles much like community users, which contain the same types of capabilities. They have their own message boards, or walls, threaded discussion boards, and displays of members belonging to the group.
Community groups also serve a purpose on internal intranets. In this context, community groups function as a collaborative workspace where members can work cooperatively to author content, manage project calendars, blog about project status, and use the activity stream timeline to see what has recently happened in the group.
Active community groups are often major hubs of activity on social networking sites, and it is important to make sure that community members are aware of them. These groups help members connect and give them a strong connection to the site, increasing the likelihood that they'll remain an active part of your community. The Ektron Community Framework supports the creation of community groups and also the technology to keep people informed of new community groups, activity community groups, and others.
The CommunityGroupProfile Server Control displays the basic information about a community group, including attributes such as group name, description, number of members, and the group administrator. The CommunityGroupProfile Server Control shares much of the purpose and function of the UserProfile Server Control covered in the previous section, and there are many parallels between the two server controls and the set of APIs used to manage and display them.
There are a number of ways for community members to discover new community groups, including the following:
Community group search: This facilitates the discovery of new members by exploring group names, descriptions, tags, and other custom defined attributes. The CommunitySearch Server Control and related APIs were covered in a previous section in this chapter (see "Users, Friends, and Profiles").
List of most popular and most active community groups: The CommunityGroupList Server Control displays a list of community groups and can be configured to display them by name, how recently they were created, or how popular they are. When associated with a user, this control can also be used to show community groups with which a user is associated, a list of community groups the user has been invited to join, or any restricted community groups the user has asked to join, where his acceptance is pending.
The community's activity streams: In real life, what compels someone to join a group, purchase a car, or eat particular foods, is often influenced by what other people are doing. If you see a number of people lined up to purchase the latest gadget, your instincts might compel you to check it out and maybe even purchase it. The activity stream provides a window into what people are doing, and when community members see others flocking to particular groups, they'll stop to explore and see if it is something that interests them. Activity streams are covered in the upcoming section in this chapter called "Activity Streams".
Community groups can be created through the Workarea and through the website. In many cases, the website is the primary place where community groups are created since membership users do not have access to the Workarea. If you're interested in exposing this functionality to your site visitors, consider using the CommunityGroupBrowser Server Control, which, in addition to allowing visitors to browse existing groups, also has the ability to create a new group. Offering visitors the ability to create community groups "on demand" is an extremely important piece in the social technology puzzle. Site administrators will never be able to predict which groups should be created and who should administer them. Putting this power in the hands of the community is the right way to approach this.
It is important to keep in mind that membership user groups and community groups are two completely different concepts and are used in entirely different use cases. There has been some confusion in the past about this, mostly because some use the terms "membership users" and "community members" interchangeably. To clarify this, CMS Administrators use membership user groups to grant content permissions to groups of membership users, whereas community groups are created by the community to facilitate information exchange around a topic or idea, as discussed here.
If you read through the previous section in this chapter titled "Users, Friends, and Profiles," recall that the OnTrek user profile had heavy client-side requirements and needed to use the Community Framework APIs for its implementation. If you haven't read that section yet, take a few minutes to do so. Much of what was described there, in terms of requirements and implementation approach, holds true for the group profile. In fact, OnTrek's group profile code is organized into the same three logical tiers discussed earlier (a presentation tier using jQuery, a middle tier encapsulating business logic using ASHX handlers, and a data tier using Ektron Framework APIs for CMS and data needs). In addition, it was implemented in such a way that a fair amount of the source code is shared across both the group and user profiles.
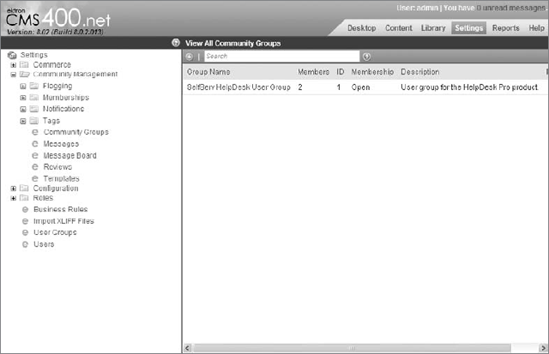
Community groups are used on the OnTrek website to facilitate conversations around the OnTrek product line. Since having this community group was a planned part of the initial site requirements and design, the group was created by a CMS admin. The following is a walkthrough of creating a new community group in the Workarea.
Open Workarea
Click the Add New Community Group icon

On the Add New Community Group screen, you have a number of form fields available to describe the community group. These fields are grouped into three categories, organized and separated by tabs.
Properties tab: Here you are required to provide a group name, assign an administrator, and specify whether the group is open or restricted. The following list describes select fields for data entry.
Administrator: Administrator here refers to the group administrator, which is an individual who has the privilege to delete a group or edit its properties. By default, the person who created the group is the group administrator. You can delegate administrative responsibilities to a user by clicking the Browse button and selecting a different user.
Membership: Membership can either be extended to everyone (public) or restricted to those users who have been granted access to join (private).
Enable Distribute: If you want to offer the administrator the ability to move content from the Community Group to the content folder tree, check this box.
Tags tab: Use this to associate short, one word descriptions to the community group. For example, tags for an "New England Patriots Fans" community group might be "football," "sports," or "fans."
Categories tab: Note that this tab might not be displayed on your installation. It will not show up if you have not defined at least one taxonomy for community groups. To enable the tab, simply create a new taxonomy (see Chapter 6) and make sure to select the group checkbox to indicate you want to categorize community groups using the taxonomy.
Click Save.
Just as you previously defined the location to various community member pages, you'll follow the same process for community group templates. To review, you must specify the URL paths used by the system when links to group pages are used. For example, the community group search results displayed by the CommunityGroupList Server Control include a hyperlink to the profile of the community group. This hyperlink uses the URL specified in this screen.
To specify these paths, do the following.
Go to Workarea
In the Group Templates section, enter the values shown in Table 11-2, as defined in the OnTrek implementation guide.
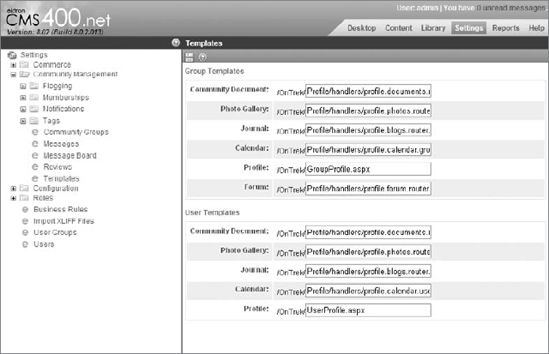
Table 11.2. Community Group Templates in OnTrek
TEMPLATE NAME | TEMPLATE PATH | DESCRIPTION |
|---|---|---|
Community Document | /Profile/Documents.aspx | The URL for the page hosting the CommunityDocuments Server Control |
Photo Gallery | /Profile/GroupPhotos.aspx | The URL for the page hosting the PhotoGallery Server Control |
Profile | / GroupProfile.aspx | The URL for the group profile |
Journal | / GroupProfile.aspx | The URL for the page hosting the group blog |
Forum | /Workarea/CommunityForum.aspx | The URL for the page hosting a threaded discussion control |
The primary use of a community group is to facilitate communication and interaction between community members, and OnTrek's Group Profile User Control includes many features to achieve this. The screen in Figure 11-9 shows its primary view, which contains a list of the activities that have recently taken place in the group, notes that have been posted to the group message board, and group information.
If you've read the previous section of this chapter (called "Users, Friends, and Profiles"), this interface should look very familiar. The implementation of the Group Profile User Control for the OnTrek website breaks the functionality into two groups (just as was done in the User Profile User Control) and those two groups are: the functionality contained within the accordion and the functionality contained within the main body. The items in the main body are contextual to the selected accordion item, and change accordingly when a new accordion item is selected.
The source code for the Group Profile User Control can be found in ~/Profile/GroupProfile.ascx. As this was covered in the previous technical section, this section focuses on a few of the real workhorses of the profile, which are the user controls that are registered at the top of the document. These are:
./Accordion/Blog.ascx
./Accordion/Calendar.ascx
./Accordion/Dashboard.Group.ascx
./Accordion/Documents.ascx
./Accordion/Forum.ascx
./Accordion/Friends.ascx
./Accordion/Group.ascx
./Accordion/Photos.ascx
Each is used to define the behavior of the main body of the profile. Which control is loaded is determined through the use of a .NET MultiView Server Control in the following way:
<asp:MultiView ID="mvProfileBody" runat="server">
                    <asp:View ID="vwGroup" runat="server">
                      <Ektron:Group ID="ucGroup" runat="server" Mode="Group" />
                    </asp:View>
                    <asp:View ID="vwMembers" runat="server">
                      <Ektron:Members ID="ucMembers" runat="server" Mode="Group" />
                    </asp:View>
                    <asp:View ID="vwDocuments" runat="server">
                      <Ektron:Documents ID="ucDocuments" runat="server"
                        Mode="Group" />
                    </asp:View>
                    <asp:View ID="vwBlog" runat="server">
                      <Ektron:Blog ID="ucBlog" runat="server" Mode="Group" />
                    </asp:View>
                    <asp:View ID="vwCalendar" runat="server">
                      <Ektron:Calendar ID="ucCalendar" runat="server"
                        Mode="Group" />
                    </asp:View>
                    <asp:View ID="vwForum" runat="server">
                      <Ektron:Forum ID="ucForum" runat="server" Mode="Group" />
                    </asp:View>
                    <asp:View ID="vwDashboard" runat="server">
                      <Ektron:Dashboard ID="ucDashboard" runat="server"
                        Mode="Group" />
                    </asp:View>
                    <asp:View ID="vwPhotos" runat="server">
                      <Ektron:Photos ID="ucPhotos" runat="server" Mode="Group" />
                    </asp:View>
</asp:MultiView>When a user clicks the accordion item labeled "Members," the Members User Control is loaded. Looking up at the register statements on the top of the page, you can see that the Member control is defined in Friends.ascx. You might recall that you looked into this file in Listing 11-2 in the previous section, since the user and group profiles share this code file. In this section, you'll examine this file again, except this time you'll see how it is used to display a list of the group members. At the bottom of Listing 11-2, you'll find the following snippet:
<CMS:CommunityGroupMembers ID="cmsMembers" runat="server" Visible="false" />
The visibility for this control is set to false, which previously has meant that it is being used in codebehind. Opening ~/Profile/Accordion/Friends.ascx.cs, you see the following snippet defined for retrieving member information in the GetGroupProfile method. You can see it follows a very similar pattern to the User Profile implementation seen earlier. Specifically, it references the CommunityGroupMembers Server Control by its ID cmsMembers to populate the DefaultCommunityGroupID and DisplayMode properties.
private void GetGroupProfile()
        {
            this.communityGroupApi = new CommunityGroupAPI();
this.communityGroupData =
communityGroupApi.GetCommunityGroupByID(this.ProfileId);
this.xsltPathCmsFriends = this.contentApi.SitePath +
"profile/xslt/cmsGroupMembers.xsl";
bool hasColleagues = false;
string colleagues;
XsltArgumentList xsltArgs;
xsltArgs = new System.Xml.Xsl.XsltArgumentList();
//Get Members
cmsMembers.DefaultCommunityGroupID = this.ProfileId;
cmsMembers.DisplayMode = CommunityGroupMembers.eDisplayMode.Members;
cmsMembers.Hide = true;
cmsMembers.Fill();
xsltArgs.AddParam("mode", "", "members");
xsltArgs.AddParam("sitePath", "", this.contentApi.SitePath);
xsltArgs.AddParam("permission", "",
Enum.GetName(
typeof(GroupPermission),
this.GroupProfileData.Permission).ToLower());
xsltArgs.AddParam("isGroupAdmin", "",
this.GroupProfileData.IsGroupAdmin.ToString().ToLower());
xsltArgs.AddParam("myId", "", this.UserId);
xsltArgs.AddParam("groupAdminId", "",
this.communityGroupData.GroupAdmin.Id.ToString());
colleagues = EkXml.XSLTransform(cmsMembers.XmlDoc.InnerXml,
this.xsltPathCmsFriends, true, false, xsltArgs, false,
null, Constants.CacheProfileInterval);
uxColleaguesCurrent.Text = colleagues;Table 11-3 shows a list of the commonly used properties of the CommunityGroupMembers Server Control, and a description of what the impact of each property is.
Table 11.3. Select Properties of the CommunityGroupMembers Server Control
PROPERTY | DESCRIPTION |
|---|---|
| Sets the amount of time, in seconds, that the server control's data is cached. The default value is 0. |
| The community group ID that is used by default. |
| Defines which type of members are displayed, Members or PendingMembers. |
| Defines the XSLT that is used to customize the markup presented by the control. |
| Gets or sets the QueryString parameter to read a community group ID dynamically. To use the default community group ID, leave this blank. |
| Allows you to override the UserProfile template URL defined in the Workarea. You can embed the following two tokens:
to create a URL such as this:
|
| The maximum number of items to return. |
Another noteworthy section of the previous snippet is found at the top of the GetGroupProfile method, where you can see the CommunityGroupAPI being used to programmatically retrieve group information by the group's ID. This information gathers data that is passed as an XSLT argument into the XSLT transformation. At the bottom of the GetGroupProfile method, you can see that the result of this transformation is rendered to the page using an ASP.NET Literal Server Control.
Note
The register statements at the top of the GroupProfile.ascx include the following user controls:
./Accordion/Blog.ascx
./Accordion/Calendar.ascx
./Accordion/Dashboard.User.ascx
./Accordion/Documents.ascx
./Accordion/Favorites.ascx
./Accordion/Groups.ascx
./Accordion/Photos.ascx
./Accordion/User.ascx
Each of these files contains code that can be repurposed for use in your own user profile. Make sure to explore these files further.
To further your understanding of the Community Framework APIs relevant for Community Groups and the group profile, this section continues to look through the list of ASHX handlers listed earlier in the chapter. In the ProcessRequest method in ~/Profile/Handlers/profile.members.ashx, you'll find the following snippet
public void ProcessRequest(HttpContext context)
        {
//set header info
context.Response.ContentType = "application/json";
context.Response.Cache.SetNoStore();
context.Response.Cache.SetRevalidation(
HttpCacheRevalidation.AllCaches);
GetRequestParams();
switch (this.Action)
{
case RequestAction.AcceptInvitation:
long userAccepting = 0;
if (this.MemberId > 0) {
userAccepting = this.MemberId;
} else {
userAccepting = this.contentApi.UserId;
}
this.groupApi.AcceptGroupInvite(userAccepting, this.GroupId);
this.response = @"{""Status"":""OK""}";
break;
case RequestAction.AddMember:
this.groupApi.AddUserToCommunityGroup(this.GroupId,
this.MemberId);
this.response = @"{""Status"":""OK""}";
break;
case RequestAction.ApproveMember:
this.groupApi.ApprovePendingGroupUser(this.MemberId,
this.GroupId);
this.response = @"{""Status"":""OK""}";
break;
case RequestAction.DeclineInvitation:
long userDeclining = 0;
if (this.MemberId > 0) {
userDeclining = this.MemberId;
} else {
userDeclining = this.contentApi.UserId;
}
this.groupApi.DeclineGroupInvite(userDeclining, this.GroupId);
this.response = @"{""Status"":""OK""}";
break;
case RequestAction.DeleteMember:
if (this.IsPending) {
this.groupApi.DeletePendingGroupUser(this.MemberId,
this.GroupId);
} else {
this.groupApi.RemoveUserFromCommunityGroup(this.GroupId,
this.MemberId);
}
this.response = @"{""Status"":""OK""}";
break;
case RequestAction.JoinGroup:
this.groupApi.AddUserToCommunityGroup(this.GroupId,
this.MemberId);
if (this.contentApi.IsAdmin()) {this.groupApi.ApprovePendingGroupUser(this.UserId,
this.GroupId);
}
break;
case RequestAction.LeaveGroup:
long idToLeave = 0;
if (this.MemberId > 0) {
idToLeave = this.MemberId;
} else {
idToLeave = this.UserId;
}
this.groupApi.RemoveUserFromCommunityGroup(this.GroupId,
idToLeave);
this.response = @"{""Status"":""OK""}";
break;
case RequestAction.CancelJoinRequest:
this.groupApi.CancelJoinRequestForCommunityGroup(this.GroupId,
this.UserId);
break;
}
}This method defines the business rules executed when various actions occur. The current action is evaluated in a switch statement and processed accordingly. The group-related actions handled in this method are AcceptInvitation, AddMember, ApproveMember, DeclineInvitation, DeleteMember, JoinGroup, and LeaveGroup.
Looking through these action handlers, it is clear that the bulk of the work is performed through the Community Group API that was instantiated earlier in the file through the following code:
groupApi = new Ektron.Cms.Community.CommunityGroupAPI();
This API provides the following methods that are used to implement these action handlers.
groupApi.AcceptGroupInvite(userAccepting, GroupId);
groupApi.AddUserToCommunityGroup(GroupId, MemberId);
groupApi.ApprovePendingGroupUser(MemberId, GroupId);
groupApi.CancelJoinRequestForCommunityGroup(GroupId, UserId);
groupApi.DeclineGroupInvite(userDeclining, GroupId);
groupApi.RemoveUserFromCommunityGroup(GroupId);
The Framework API has the ability to retrieve a list of groups using the GetList/Criteria pattern described earlier
Note
The Framework API is covered as well in Appendix B. See this appendix for more information about the Framework API, including cookbook style code snippets.
Ektron.Cms.API.Community.CommunityGroup groupApi = new
Ektron.Cms.API.Community.CommunityGroup();

        Criteria<Ektron.Cms.CommunityGroupProperty> criteria = new
Criteria<Ektron.Cms.CommunityGroupProperty>();
criteria.AddFilter(Ektron.Cms.CommunityGroupProperty.GroupName,
CriteriaFilterOperator.StartsWith, "H");
List<Ektron.Cms.CommunityGroupData> groupList = groupApi.GetList(criteria);
gvCommunitGroups.DataSource = groupList;
gvCommunitGroups.DataBind();The results set returned from the Framework API's GetList method is data-bound to a data-bindable control (in this case the ASP.NET GridView Server Control), which gives developers and designers fine-grained control over the markup that is produced.
Ektron's Dashboards allow site visitors to create personalized portals of information, aggregating data from various sources, simplifying the decision-making process by gathering information into one single location. These portals can be personalized for an individual based on their interests, or for an entire group of people based on the collective purpose of that group. For example, as an individual member of the marketing department, you might have a dashboard filled with various types of Web analytics information as well as a list of tasks waiting for your attention.
Sites like iGoogle have made it possible to create such dashboards centered around the Search textbox. As an iGoogle user, any time you launch your browser to perform a Google search, you're presented your iGoogle gadgets keeping you informed of any changes to the information in which you're interested, such as stocks, or the weather.
As a developer using Ektron, you have access to its dashboard feature which means you can easily implement dashboards on your website, allowing your visitors to create personalized portals of widgets to aggregate information and to keep people on the site from switching to other applications.
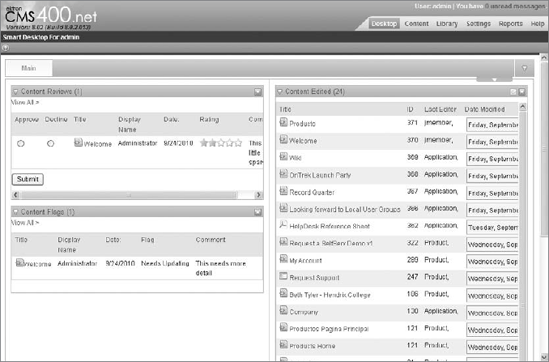
Site visitors using this feature can drag widgets into their personalized dashboard to display e-mail, events, syndication feeds, and Web analytics, as well as perform tasks related to their roles (see Figure 11-10). As a content author, you can make edits to content right from the dashboard. As a human resources manager, you can add new posts to the list of available jobs, without having to navigate to the Workarea or to the jobs section of a website.
A dashboard consists of multiple pages, each containing a number of tabs, with each tab containing a number of columns, and each column a number of widgets. A group dashboard is used by group members to set up a portal page that addresses that group's unique needs. Any group member can view and create or edit the page's content.
Tabs can be made public or private. A private tab is available for viewing and editing only by its creator. This means that on a private group dashboard, only group members can view and create or edit it. If a tab is public, anyone can view the tab and its widgets, but authentication is often required because viewing some types of content requires content permissions and valid credentials. So, If the tab is public, anyone can view it but only the group members can create and edit the content.
Because widgets are just user controls, you can create your widgets and expose them through the Widget Tray, or extend the ones already shipped with the product, or extend the ones that are already there. Personalization lets a membership user or community group member customize a single page on the site for their own use. A PageBuilder page, on the other hand, lets an Ektron user create pages on the actual website.
The OnTrek user and group profile pages each include a dashboard component. The dashboard component is a personalization control that requires a few configuration steps. Before opening Visual Studio, you must first go to the Workarea to create a new widget space. A widget space is simply a collection of widgets that you can use to present to members to populate their dashboards. You can create multiple widget spaces. For example, one group of users could only be allowed to create dashboards with Sales and Marketing Widgets, whereas another group might only be able to select from Engineering and Support Widgets. The process of creating a widget space also assigns it a widget space ID.
To create a widget space:
Go to the Workarea
Click the Add button.
Enter a title for the widget space. This title is a descriptive name that is used only in the Workarea.
Select the Group Space checkbox if you'll use this widget space for a Community Group Dashboard. Leave it deselected if you intend to use it for a User Group Dashboard. See Figure 11-11.
Select the widgets to include in the widget space. The widgets included here are available to site visitors and appear in the dashboard's Widget Tray.
Click the Save button and take note of the ID of the widget space.
The dashboard implementation for OnTrek can be found in ~/Profile/Accordion/Dashboard.ascx and in Listing 11-3. The source code is extremely simple, as it registers the personalization user control that is shipped by Ektron in the Workarea, which handles the bulk of the work.
Example 11.3. Dasboard.ascx: The User Profile Dashboard
<%@ Control Language="C#" AutoEventWireup="true"
  CodeFile="Dashboard.User.ascx.cs"
  Inherits="UserControls_Profile_Dashboard_User" %>
<%@ Register TagName="Personalization"
  Src="~/Workarea/Personalization/personalization.ascx"
  TagPrefix="ucEktron" %>
<div class="dashboard">
    <asp:PlaceHolder ID="ph1" runat="server" />
</div>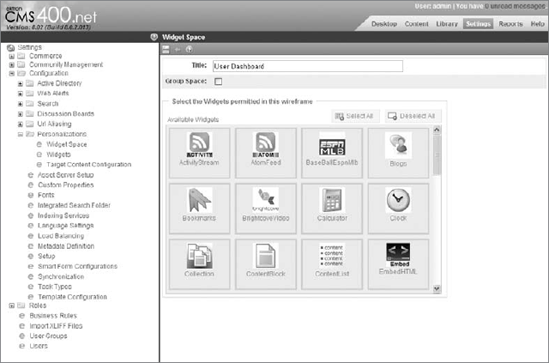
To implement the dashboard user control on your own page, follow these steps.
Open Visual Studio and create a new Web form.
From the toolbox, drag-and-drop a Script Manager from the AJAX extensions on the Toolbox. You might need to download the Microsoft AJAX Library if this item is not available on the Toolbox.
In Visual Studio's folder browser, navigate to the following folder: workarea/personalization/.
Drag-and-drop a personalization user control (personalization.ascx).
In the User Control's property box, specify the widget space ID that you created earlier.
An activity stream is a list of tasks or actions that a person performs and that friends and colleagues read to keep informed about that person. The feature was first popularized on social networking sites like Facebook so users could share pictures with friends, comment on a friend's activities, register for events, or exchange contact information with another friend. Ektron sees the power of such lists in other contexts as well. On the eIntranet, Ektron's intranet product, Ektron uses activity streams to keep employees informed of business activities. On public-facing sites, activity streams are more than for informing friends of new photos, as demonstrated in the OnTrek website; they can notify members when knowledge-based articles are published or when product blog posts are written.
Activity streams are also useful in helping people find information in two new ways:
Through timeline navigation: Often times, you publish documents only to discover you need to make edits soon after. Timeline navigation allows you to find a document through your personal activity stream, providing an alternative to searching for it or navigating to it through a folder or menu structure.
Through social navigation: Activity streams mean users can "share" activities, which is in effect a way of providing a "vote" for the activity. This causes popular activities to bubble to the top of the activity stream, and when items are repeatedly shared, they remain at the top longer, thus giving greater visibility to popular items.
Like most technologies, the many benefits of activity streams may blind you to the importance of building a strategy to take full advantage of streams. When social networks are active, activity streams grow quickly, which increases the possibility that a useful activity message will be lost in the noise. In this section, you'll learn the key concepts needed to get working with activity streams and learn ways to implement them to improve their "signal to noise" ratio. In the Activity Streams "Under the Hood" section you'll dive into the underlying Notification Framework used by the activity streams, and learn how to extend that framework to support custom notification agents and activity types.
Why would you want to use activity streams on your community site? Here are six reasons:
Discovery: Activity streams give community members the ability to find and navigate to relevant and timely information as it is created in real time.
Awareness: Activity streams give members insight into the public events and workplace activities that may impact their goals.
Collaboration: With greater awareness comes more involvement with and contribution of ideas to projects that would otherwise remain unnoticed.
Notification: You can send your members notification of time sensitive events delivered through text and e-mail messages.
Stickiness: As notifications drive people back to the site, and streams give greater awareness of info available on it, now site visitors have more reasons to visit the site and engage with its members.
SEO: Think of the activity stream as a dynamic "sitemap" pointing to the latest active content, giving search crawlers a window into the most up-to-date content, and increasing the possibility of finding information through search results.
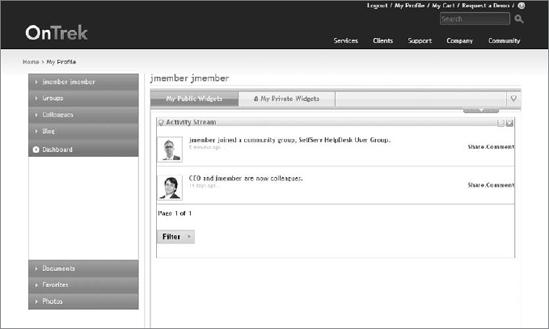
To understand how to use an activity stream, look at the ActivityStream Widget illustrated in Figure 11-12. By default, this widget is configured to show all the activities from the current user's social network. When users log in and view this widget, they see all their colleagues' activities plus those activities that occur within the community groups to which the users belong. This activity stream also considers content and community group permissions; so for example, if a colleague posts a document to a private group that you do not belong to, you do not see it in your activity stream. Likewise, if you update private content that only you can see, none of your colleagues are notified of this event.
Users of the ActivityStream Widget can filter the activities by clicking the Filter button. Doing so opens a textbox that accepts the names of users and community groups and updates the widget's display to include the activities from only those names. The filtering defined on the widget persists in the widget storage (see Chapter 9). Therefore, you can use multiple ActivityStream Widgets on a PageBuilder Page or dashboard, with each instance of the widget having its own filter criteria. Users can also populate their dashboards with these widgets filtered in such a way as to improve the "signal to noise" ratio. For example, on an intranet, a marketing manager might filter the widget to display only activities from his direct reports. On a public website like OnTrek, site visitors might include only activities from OnTrek employees or other product experts.
A site visitor can also globally control what displays in the activity stream by managing activity preferences either through the site's membership profile settings or the Workarea (if they have Workarea permissions). Figure 11-13 shows the Activities settings screen, which has three sections:
Colleagues: Allows users to control what type of user displays by default in controls like the ActivityStream Widget. Any filtering done at the widget level filters off of this information.
Community Groups: Allows users to control what type of community group activities displays by default in controls. Any filtering done at the widget level filters off of this information.
My Activities: Here, users can control which of their activities are published into the activity stream.

In Figure 11-13 you'll also notice that, in addition to the Activity Stream column, there are two additional columns, SMS and Email, which you use to configure notification of activities on your mobile device or through your e-mail account. As you might have guessed from this screen, the activity stream system sits on top of a larger Notification Framework. This topic's "Under the Hood" section covers the Notification Framework and demonstrates its extensibility by showing how to create custom Notification Agents and custom Activity Types.
In addition to the ActivityStream Widget, there is a server control and APIs for working with and displaying activities. Much like its widget counterpart, the ActivityStream Server Control displays activities from the current user's social network of colleagues and community groups per their activity notification settings. The server control, however, does not provide the same type of user-driven filtering through the GUI as does the widget. Instead, you can programmatically control the ActivityStream Server Control through its API in codebehind; you must do any filtering using code like this:
// You can exclude the current user from the stream
activityStreamCtrl.ExcludeUserIds.Add(CurrentUserID);

// You can also choose to exclude certain groups
activityStreamCtrl.ExcludeGroupIds.Add(GroupId1);
activityStreamCtrl.ExcludeGroupIds.Add(GroupId2);
The control has a number of properties that modify its behavior, including displaying a particular community group or user's activities, or a set of users' activities. If you want to display the activity stream associated with a particular group instead of the logged-in user's activity stream, set the control's ObjectType property to User or Group to specify that the control is associated with a community group. Then set its DefaultObjectID property to the community group ID for the particular community group. The important point to note here is that once this configuration is made, the user who views this page will see the activities of this particular group, regardless if they're a member of the group or not.
This brings up a very important attribute of the activity and notification system. Although, by default, only those activities to which a user has permission to see will appear for them, developers can override this and force the server control to display activities from the global activities, which might not fall within the activities the logged-in user has specified in their settings. The ActivityStream API also has the same ability, that is to either retrieve activities and filter them according to community group, content permissions and configuration settings, or to allow a developer to define the logic that governs which activities display. A partial list of properties is listed in Table 11-4.
Table 11.4. Selected Properties from the Activity Stream Server Control
PROPERTY | DESCRIPTION |
|---|---|
| Sets the amount of time, in seconds, that the server control's data is cached. The default value is 0. |
| The ID of the object whose activity stream is to display. If you want to display a user's activities, set the ObjectType property to User and set DefaultObjectID to the user's ID. |
| Defines the XSLT that customizes the markup presented by the control. |
| The maximum number of activities to display in the activity stream. |
| Activity streams can be displayed for a user or a group. This property lets you define which to display. Then use the DefaultObjectID to specify the ID of the user or group. |
Looking through Table 11-4, you can see that you control the activity stream markup using XSLT by setting the DisplayXSLT property, just as you would for most Ektron server controls. Providing your own XSLT overrides the default presentation and allows you to customize how the activity stream displays. Keep in mind that any of the default functionality provided by the server control will be overridden as well, so you'll have to implement your own paging.
Another approach to customizing the activity stream markup is to query the activity stream using the Activity Stream API and then data-bind the results to a templatable server control like the ASP .NET ListView or Repeater Server Controls. This approach uses standard ASP.NET data binding and templating functionality and therefore means that your markup is controlled in an ASPX template or ASCX User Control. Listing 11-4 shows an ASPX template hosting an ASP.NET ListView Server Control to render a list of activities with custom markup.
Example 11.4. CustomStreamDisplay.aspx
<body>
  <form id="form1">
  <div>
    <h1>Activity Stream</h1>

    <asp:ListView ID="listViewActivityStream" runat="server">
       <LayoutTemplate>
          <div id="ActivityList">
            <asp:PlaceHolder ID="itemPlaceHolder" runat="server">
          </div>
       </LayoutTemplate>

       <ItemTemplate>
          <div id="ActivityMessage">
             <img class="ActivityAvatar" alt="Avatar"
                  src="<% #Eval("ActionUser.Avatar") %>"/>
             <span class="ActivityDisplayName">
               <%#Eval("ActionUser.DisplayName") %>
             </span>
             <div class="date"><%#Eval("Date") %></div>
             <div><%#Eval("Message") %></div>
          </div>
</ItemTemplate>
<EmptyDataTemplate>
<h3>No activities have been posted yet.</h3>
</EmptyDataTemplate>
</asp:ListView>
</div>
</form>
</body>In Listing 11-5, you find the code that retrieves the activity list using the ActivityStream API. In this example, the GetUserActivityStream (long) method retrieves the activities from a particular user's social network. You can also use this API to retrieve a specific user's activities, or the activities for one or more community groups. Once you retrieve the activity list, the ASP.NET ListView's DataBind() method data-binds the activity list to the ListView Server Control.
Example 11.5. CustomStreamDisplay.aspx.cs
Using Ektron.Cms;
using Ektron.Cms.Framework;
using Ektron.Cms.Activity;
using ActivityStreamApi = Ektron.CMS.Framework.Activity;

public partial class Developer_ActivityStream_CustomStreamDisplay :
    System.Web.UI.Page
{
   protected void Page_Load(object sender, EventArgs e)
   {
      DisplayActivityStream();
   }

   private void DisplayActivityStream()
   {
      PagingInfo pageInfo = new PagingInfo();
      pageInfo.TotalRecords = 10;

      ActivityStreamApi activityStreamApi = new ActivityStreamApi();
      long userId = activityStreamApi.RequestInformation.UserId;

      List<ActivityData> listActivities =
        activityStreamApi.GetUserActivityStream(userId);

      listViewActivityStream.DataSource = listActivities;
      listViewActivityStream.DataBind();
}The OnTrek site uses activity streams primarily to give site visitors a way to find the information being contributed (discovery), to give a greater understanding of what is happening within the community (awareness), and to allow site visitors to be notified of time-sensitive information, such as product security patches (notification). This is done through the activity stream integration on the community homepage, through the use of the ActivityStream Server Control. The implementation for this is very straightforward since it uses the standard ActivityStream Server Control with no customizations.
In Visual Studio, open ~OnTrekPagesCommunity.aspx.
Drag-and-drop the ActivityStream Server Control onto the page template.
Note
The OnTrek website has implemented this feature on the ~OnTrekPagesCommunity.aspx template.
There are a few items which can be customized to allow for a greater degree of flexibility when working with activity streams. In this section you'll be exposed to customizing the messages published when activities occur, as well as adding new activity types to your implementation.
Although the activity stream framework is installed and enabled by default on all new installations of Ektron, upgrades from installations prior to version 8.0 have this feature disabled. The reason for this is that in order to enable the feature on upgrades, you must run a script that updates each user's default activity preference settings, which in some databases represents a very large number of records and could increase the time it takes to upgrade the site. For this reason, administrators wanting to use this feature must enable the feature manually once the upgrade process is complete. This is done in the Workarea by navigating to Settings
The messages that display in activity streams, although specific to the activity that has occurred (for example, "Derek is now friends with Gerson"), follow a general format that you define by following these steps:
Go to the Workarea in Settings
Modify a template by clicking the title of a particular notification message template then clicking Edit. Figure 11-14 shows the screen where you edit notification message templates.
In Figure 11-14, there are two key areas to keep in mind:
Tokens: Lists all of the Notification Message Template Tokens that are applicable to this particular message. You can place these anywhere in the Text or Plain Text fields.
Text and Plain Text: These fields define the actual text of the message, once the tokens have been processed by the notification engine. For example, once the site user named Derek updates a content titled "My Weekly Status," the tokens in the string "@SubjectUser.DisplayName@ updated content '@content.Title@'" would be replaced, yielding a final output of "Derek updated content 'My Weekly Status'."
On this screen you can copy the tokens you want to display from the Tokens field and paste them into the Text and Plain Text fields so they are rendered into the final output.
Once you have filled in the fields, click Save, and from that point forward the defined message will be used in notifications when the specified activity occurs.
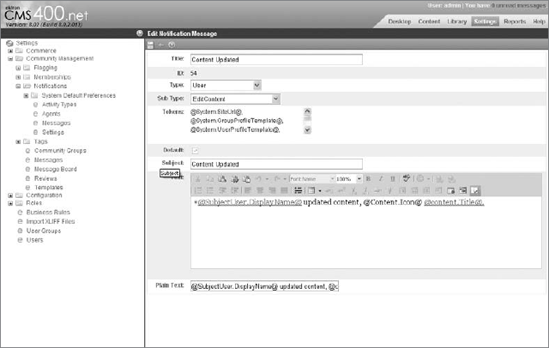
The notification framework makes it possible to define custom activity types, which means that you can tailor the activities in an activity stream to the types of activities that are happening on that site. For example, on a website for stock traders, the activity stream could include messages such as "Bill rated the stock NAOC positively" or "Bill put the stock NNEJ on his favorites list." On an intranet, the activity stream could include a message such as "John logged in." Creating and raising a custom activity is a two-step process. The rest of this section walks through how to create a custom activity type that will be raised when a user logs into the site.
First, you must add a new Custom Activity definition in the Workarea.
Go to Settings
Click the Add icon (

Type User Logged In for the name of the custom activity type name.
Specify the action scope. The action scope is the context in which the activity is raised. There are two types of activities:
Community Group: Those raised by a user from within a community group.
User: All other activities.
The User Log In activity is raised outside of a community group, so you should select User.
Now that the activity type has been registered, take note of its Activity Type ID, as displayed in the list shown in Figure 11-16. The activity ID in this development environment is ID 1001.
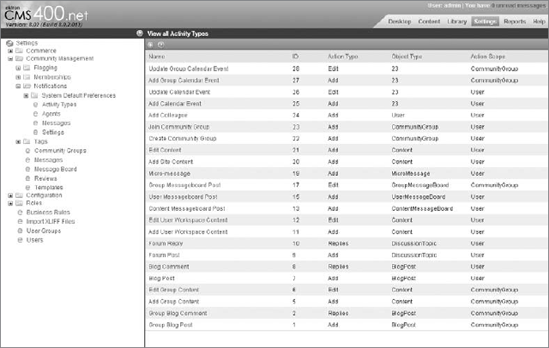
Now, users must modify their preferences to define how they want to be notified when the User Logged In activity occurs. As shown earlier, this is controlled on the Users Activities preferences screen shown in Figure 11-17. Make sure to select the User Logged In checkbox on the Colleagues and My Activities sections.
Writing the code to raise a custom activity is a straightforward three-step process:
Using the ActivityAPI, create an instance of the ActivityData object and specify the ActivityTypeId of your newly created custom activity as defined in the Workarea (mine was 1001).
Raise the activity using the ActivityAPI's
Publish()method.Encapsulate this code into a method and call this method in the code from which you want the activity to be raised.


You can see an example of this in the following code snippet, which defines the RaisedLoggedInActivity() and encapsulates the code that defines the ActivityData object and then raises it. Because you want the custom activity to be raised anytime a site visitor logs in, you must insert a reference to the custom RaisedLoggedInActivity() method wherever your login processing logic is defined.
private void RaiseLoggedInActivity()
    {
         // The user is now logged in, get their ID
         Ektron.Cms.Framework.Activity.Activity activityApi =
           new Ektron.Cms.Framework.Activity.ActivityApi();
         ActivityUserInfo activityUser = new ActivityUserInfo();
         activityUser.Id = activityApi.UserId;

        // Define the "User Logged In" activity
        ActivityData activityData = new ActivityData();

       // Reference to the user that raised the activity
       activityData.ActionUser = activityUser;

       // Our activity type ID as defined in the Workarea
       activityData.ActivityTypeId = 1001;

       // The activity message that is put in the Activity Stream
       activityData.Message = "<p>I logged in</p>";

       // The language ID of this particular message
       activityData.LanguageId = 1033;

       // Raise the "User Logged In" activity
       activityApi.Publish(activityData);
     }
Note
It is also worth noting that the activity message for custom activities does not use the activity message template to define the message format. Instead, the message is defined by setting the Message attribute of the ActivityData object as is done in the previous code snippet. One benefit of this approach is that these messages could be defined as XML, which implies that you can add any custom metadata to the message and keep the message data separate from its presentation.
For more information on activity streams, take a look at the Ektron Developer screencast titled "Getting Activity Streams on Your Website," which includes a video walkthrough of some of these concepts and pointers to a Notification Architecture diagram as well as a document describing how to troubleshoot the notification system. See http://dev.ektron.com/getting-activity-streams-on-your-website/.
It took the general Web population some time to make heads or tails out of Twitter-style micro-messaging after its arrival in 2006. Over the years, micro-messaging has become an extremely important communication tool and one that you need to consider when planning your website's community strategy.
What niche does micro-messaging fill that made it so popular? Prior to micro-messaging, there was no way to deliver quick and frequent bursts of information to a large audience — something that combined the brevity of instant messaging with the public nature of blogging. What originally started off as a means for primarily updating personal status has evolved into a marketing platform — a way to solicit feedback from customers, a means for promoting events, and an opportunity to build relationships. This mode of communication has its place on both third-party sites like Twitter and on your own website. While there are significant business benefits to participating in micro-messaging in both places, this section focuses on why you might want to use micro-messaging on your site and how to best integrate it there.
Use cases for micro-messaging on a public-facing site differ somewhat from those on an internal one. The OnTrek site uses micro-messaging within the context of the OnTrek community to engage members in a conversation with OnTrek employees and other members of the community. This allows the marketing group to have an authentic and public conversation with the community, share information that they've found, and publically send stuff to their friends.
On an intranet such as Ektron's eIntranet, micro-messaging becomes a way to give employees a greater awareness of what's happening around them. In either scenario, micro-messaging facilitates building a tighter knit community by allowing members to share what they're thinking, what they're doing, and what is capturing their attention.
Ektron provides two ways to display and post micro-messages on a website: the MicroMessage Server Control and the Community APIs. By default, the MicroMessaging Server Control shows posts (also sometimes called status updates) from members of the visitor's social network of colleagues. A single micro-message post consists of the name of the user posting the message, the micro-message post itself, and the age of the post. The control's DisplayMode property can control the displayed micro-messages. The four DisplayModes are shown in Table 11-5.
Table 11.5. MicroMessage Server Control DisplayMode Options
DISPLAYMODE | DESCRIPTION | USE CASE |
|---|---|---|
User | Micro-messages from a specific user | Use this mode when you want to provide a list of messages for a particular user. For example, the user profile might contain a list of a particular individual's micro-messages. |
Colleagues | Micro-messages from a specific user's social network of colleagues | Use this mode when you want to display micro-messages from the colleagues of a particular user. For example, a community homepage might use this mode so users can see what micro-messages their colleagues have posted. |
TimeLine | Micro-messages for all users that have marked their profiles as "public" | Use this mode when you want to display all messages marked as public, including messages from those users that are outside of a user's social network of colleagues. |
Message | A single micro-message | Use this mode when you want to have a page that displays a single micro-message. This is useful as it gives site visitors a permanent link to a single message. |
Note
Micro-messages are a type of activity in the notification framework (see the section entitled "Activity Streams" earlier in this chapter) which indicate that visitors can choose to be notified of micro-messages via SMS, e-mail, and other custom notification agents that may have been optionally created. It also means that micro-messages will appear in the activity stream through the ActivityStream Widget, Server Control, and APIs.
The MicroMessage Server Control also displays a Search tab when the micro-message search feature is enabled, which allows users to search through micro-messages published by the logged-in user, their colleagues, and all members whose profiles are public. The results are filtered to include only those messages that contain each of the search terms entered by the users. Exact matching is achieved by surrounding phrases with quotes. It's important to note that this feature does not use the larger search architecture (see Chapter 7) used by the system for searching managed items like content, documents, and so on. If this feature is not enabled, and you want to offer your site visitors the ability to search micro-messages, you need to do the following:
Install the Full Text Search component of the Microsoft SQL Server. To do this, insert the SQL Server Installation disc and select Full Text Search from the installation options. This allows you to enable and add the Full Text Search component to an existing SQL Server installation.
Run the FullTextIndex.sql script on your database. You can find this script in: Program FilesEktronCMS400v80UtilitiesSiteSetupDatabaseFullTextIndex.sql.
Verify that the Full Text Index is configured properly by viewing an ASPX template containing the MicroMessaging Server Control. The Search tab appears on the control once the system is configured properly.
The properties of the MicroMessaging Server Control are similar to many Ektron Server Controls and allow you to customize its behavior in a number of significant ways. Table 11-6 lists the significant server control properties.
Table 11.6. Properties on the MicroMessaging Server Control
PROPERTY | DESCRIPTION |
|---|---|
| Sets the amount of time, in seconds, that the server control's data is cached. The default value is 0. |
| In cases where you're displaying a user's micro-messaging stream, this value represents the user ID. |
| Defines the XSLT that customizes the markup presented by the control. |
| Defines the name of the parameter that is evaluated to read an object ID dynamically. By default, its value is id. If you want to override this to a value such as UserId, specify that here. |
| The maximum number of messages to return. 0 signifies that an unlimited number of results should be returned. |
Micro-messaging is included in the OnTrek website through the user's profile. Following Ektron's general best practices, its implementation is encapsulated into a custom user control and is found in ~/Profile/Accordion/User.ascx.
Given the Wireframe for the user profile on the OnTrek site, it is required that the textbox that accepts the user input for micro-messages is visually separated from the list of existing micro- messages, as shown in Figure 11-18. This indicates that the MicroMessaging Server Control's default presentation cannot be used because it displays the textbox vertically stacked above the list of micro-messages. For this reason, an external textbox captures the visitor's text input and a server control renders the micro-messages separately. When the Submit button is clicked, the micro-message is programmatically submitted using the MicroMessaging API, and the list of micro-messages is updated.
To examine the code that brings these pieces together, and see an example of how to use an external textbox to post micro-messages, follow the steps below.
Open the user control found at ~/Profile/Accordion/User.ascx. This user profile page has five tabs, including one for My Activity, which is the label used for micro-messages and activity notifications. Look through the source code and notice how it uses an ASP.NET MultiView Server Control for controlling which view to present based on the selected tab.
Towards the top of the server control, you will notice the following snippet of code for rendering the textbox for posting micro-messages and the "Share" button:
<div id="uxStatusWrapper" runat="server" class="clearfix setStatus">
    <asp:TextBox ID="uxStatus" runat="server" CssClass="status"
                 Columns="30" Text="What are you working on?"></asp:TextBox>
    <p class="setStatus">
        <asp:LinkButton ID="uxSetStatus" runat="server" OnClick="uxSetStatus_
Click" />
        <span class="ui-button ui-widget ui-state-default
                     ui-corner-all ui-button-text-icon setStatusButton" >
           <span class="ui-button-icon-primary ui-icon ui-icon-comment"></
span>
           <span class="ui-button-text">Share</span>
        </span>
    </p>
</div>
On the LinkButton, notice the
OnClickattribute. This references theuxSetStatus_Clickevent handler which has the following implementation:protected void uxSetStatus_Click(object sender, EventArgs e) { //set statusEktron.Cms.Framework.SocialNetworking.MicroMessage statusApi = new MicroMessage(); Ektron.Cms.MicroMessageData statusData = new MicroMessageData(); statusData.UserId = this.contentApi.UserId; statusData.MessageText = uxStatus.Text; statusApi.Add(statusData); //render ui this.ProfileData.SetStatus("- " + uxStatus.Text); uxStatus.Text = "What are you working on?"; uxSetStatus.Visible = true; //reload activity stream (colleagues) cmsActivityStream.ExcludeUserIds.Add(this.ProfileId); cmsActivityStream.Fill(); //reload activity stream (me) LoadMyActivityStream(); }This event handler uses the MicroMessage API and
MicroMessageDataclass for defining and adding the message to the user's list of micro-messages. The ActivityStream Server Control, which displays a list of all the user's activities including all posted micro-messages, is used to render the list.Note
You may wonder why the ActivityStream Server Control was used in place of the MicroMessaging Server Control. This is simply because OnTrek's requirements specified that all activities for a user must be displayed and not just micro-messages. If the requirements specified that only micro-messages should be displayed, you could replace this implementation with the MicroMessaging Server Control.
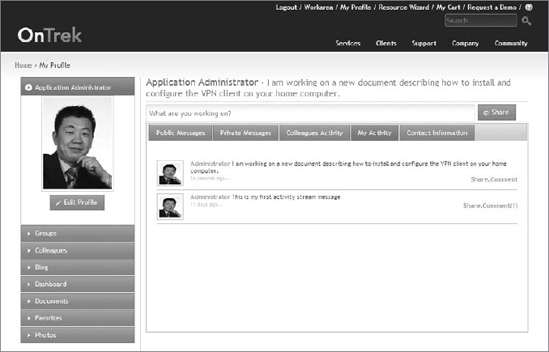
Micro-messages have the potential to reach a very wide audience; this makes micro-messaging an attractive target for spam and related abuse by ill-intentioned community members. Developers and administrators can use the spam-filtering capabilities of the micro-message system to filter out spam prior to it being added to the system. The system-defined spam filters are available when you use the MicroMessage Server control. Enabling the filters is perfomed through the use of the SpamControlType and SpamTimeSpan properties. These properties allow you to implement the following rules:
Block a message when the same message has been posted within a single calendar day.
Block a message when the same message has been posted within a specified time period, relative to the time of the first post.
Block a message when the same message has been posted within a specified time period. The rule is specified using the SpamControlType property of the server control, and each of the three rules corresponds to a particular value:
SameUserMessageDay
SameUserTimeDelay
SameMessageTimeDelay
Note
Spam control is turned off by default.
In cases where you need to define your own spam-filtering rules, you can implement your own filter by setting SpamControlType to Custom and overriding the server control's CustomSpamMethod in codebehind. Listing 11-6 shows an example of blocking messages that contain the word "spam."
Example 11.6. ~/CMS400Developer/Developer/MicroMessaging/CustomSpam.aspx.vb
Imports System
Imports Ektron.Cms
Imports Ektron.Cms.Framework
Partial Class Developer_MicroMessaging_CustomSpam
    Inherits System.Web.UI.Page

    Protected Sub Page_Load(ByVal sender As Object, ByVal e As System.EventArgs)
        Handles Me.Load
        Me.MicroMessaging1.CustomSpamMethod(AddressOf SpamHandler)
    End Sub
    Private Function SpamHandler(ByVal data As MicroMessageData) As Boolean
       If data.MessageText.IndexOf("spam",
StringComparison.CurrentCultureIgnoreCase) > −1 Then
            Return True
        End If
    End Function
End ClassThis chapter discussed core components of a social networking site built using the Ektron Community Framework. It explains how the Community Framework contains APIs and Server Controls that can be used to implement the Web 2.0 type features discussed in Chapter 10 to facilitate community generated content through blogs, wikis, and discussion boards. It also covers how social networking features allow users to create and benefit from social connections between community members.
The key features of social networking are as follows:
Ektron's friending infrastructure: Of all the social networking functionality discussed in this chapter, none is more important than the ability for community members to establish links between one another. Through Ektron's friending infrastructure, community members can establish such connections and use the resulting "social graph" (the network of connections that form between users) to further discover information, stay on top of the news, and share content. You learned about user profiles and saw how they can be used to display much of the information created and shared by users using the UserProfile Server Control. The OnTrek implementation was also covered, and it showed how APIs were used to present a highly customized presentation.
Community groups: In this chapter, you learned how community members form community groups. Discovery of community groups primarily happens either through the community group search functionality, which allows members to search for groups by name or tag, or by navigating through the list of most active, most popular, or most recently added groups. Community groups allow members to come together to discuss and collaborate on particular topics.
Activity streams: Once users are connected to a social graph and belong to community groups, it's important to have some way to know what has happened in these circles since the last visit. This is where activity streams are useful. Activity streams provide the list of activities for a user, a social network, a community group, or some combination of them. Most community-related events flow through the notification system, which allows users to be notified through the activity stream, but Ektron can also use SMS, e-mail, and potentially other custom notification agents.
Micro-messages: Another way to keep members of a social network informed of the events that have the potential to impact them in some way is through the use of micro-messaging. Community members post short micro-messages that typically include some type of status information (for example, "I'm currently working on the Q2 sales projections"), buzz-worthy content such as a link worth sharing, information about an upcoming event, and so on. Micro-messages are also an activity type, which means they also raise events in the notification system and are then made available through SMS, e-mail, and other gateways.