
The eCommerce feature of Ektron is one of the largest new features in the product. It supports the entire lifecycle of commerce transactions, with a rich suite of features to enable complex processes. In this chapter and the next, you will be working through the process of implementing the eCommerce feature on the OnTrek website. In this chapter, you approach things from the Workarea side, so it's more about configuring your site to enable eCommerce, and then creating the catalog of products. You will also work with reports, and move products through the fulfillment process. The next chapter approaches the subject from a more technical viewpoint, covering how to implement the server controls necessary to create a seamless shopping experience for site visitors.
In this chapter, you spend your time configuring the basic options of eCommerce, including tax structures and shipping options. You'll work with currencies and payment options and learn about notifications. You will go through the process of creating product types and learn about the various capabilities of each class of product type. You'll create a catalog in parallel with the existing catalogs on the OnTrek site, and a sample product as well, learning about the options available at each step. You'll also explore how coupons can support the user experience by offering a wide array of discount structures.
Finally, you'll examine the capabilities of the reporting subsystem and order workflow system. You'll learn how to extend the workflow process, and how to move items through it. You will also walk through the various steps in completing purchases, and see how the historical data is managed.
Now that the infrastructure of the community, support, and marketing portions of the OnTrek website have been constructed, you are left with the eCommerce functionality of the website. The eCommerce piece is a fairly large portion to chew off, so the OnTrek implementation team has decided to break it into two pieces, the first of which is the fundamental act of creating the infrastructure of shipping, tax, coupons, and product inventory so that customers can order goods directly from OnTrek through the website.
ADDING ECOMMERCE FUNCTIONALITY
This use case introduces the primary actor Dan, a site administrator and developer, who has been charged with populating the OnTrek website with the catalog of goods that OnTrek offers to its clientele. It describes the expected scenario and defines the desired outcome.
Wireframe
The example Wireframe for this chapter, shown in Figure 12-1, is the eCommerce landing page, which lists out some selected products from the OnTrek catalog, and invites the user to add them to their cart or browse for further products.
Description
This use case defines the process Dan must follow to build up the underlying infrastructure in order to create a fully functioning eCommerce solution on the OnTrek website. It will walk through basic configuration, and creation of the catalog of products, so that the developer, Ted, has the necessary content to develop the front-facing portion of the codebase to support the actual purchasing process.
Actor
Dan is a member of the marketing team at OnTrek. Through feedback on the site, his manager has determined that users browsing the OnTrek site would be much more likely to convert to customers if they could do so online rather than having to deal with the sales team during what is mostly a manual process at this point. Armed with his convictions, the manager has tasked Dan with managing the process of creating an online shopping experience using the Ektron Framework. Dan will then hand off the completed foundation to the IT team for development of the front end of the shopping cart experience.
Scenario
In this scenario, Dan:
Configures the underlying options for supported regions and currencies
Configures higher level options, such as taxes and shipping support
Connects the site with an online payment gateway to accept funds from customers
Creates the notification messages that customers will receive
Creates a set of product types that will support the various categories of goods that OnTrek wants to sell
Creates the catalog structure to store the inventory
Creates the set of products that OnTrek sells
Outcome
The OnTrek marketing team is now prepared to hand off the site to a dedicated developer to build out the eCommerce functionality supporting the online purchasing of goods by OnTrek customers.

In this chapter, you will cover the underlying requirements in the build out of an eCommerce feature for an existing website. This chapter doesn't cover the code development side, which is instead reserved for the next chapter, but will spend a lot of time covering all the various options that can impact how the eCommerce feature of your site works.
For the configuration of the site options, you'll delve into the shipment providers and payment gateway providers. The ability to modify these providers in the Ektron Framework allows you a large amount of flexibility in matching the capabilities your site provides to your business model. You'll also learn how to build custom providers in the next chapter. You'll explore how taxes are configured, as well as currencies, regions, and types of payments. These features make it easy to participate in the global marketplace, without needing customizations. You'll also take an in-depth look at how e-mail notification messages are constructed.
Once that has been completed, you'll examine product types and classes and how to build them. The eCommerce feature allows for the specification of Smart Form-like product configurations, allowing you to easily capture the relevant data for each class of product, ensuring consistency for users browsing your site. This chapter will discuss some best practices and things to keep in mind when building these types, and will discuss how to manage them going forward.
The chapter will then cover coupons, including how to create them, how they are applied, and the variety of ways they can affect your customers' orders. Coupons also can be limited in their application; this creates a safety net by limiting your exposure to discounts.
Armed with the product types, you'll explore how to create actual catalogs of goods, and then dive into creating products and groups of products. Working with the catalogs and products is similar to working with content, allowing you to leverage the knowledge you've already gained about the Ektron Framework. The chapter will also discuss the reporting options available, including order workflows and how to extend them. The chapter will end with a discussion on the states of orders, and how to manage orders as they move through the workflow. There will be further discussion of customizing the default workflow behavior in Chapter 13, however the default workflow the eCommerce feature ships with will cover the needs of most developers.
In a production environment, eCommerce has a couple of key requirements to be enabled for use. First and foremost, it requires a license. Like a few other features in the Ektron Framework, the eCommerce feature is not included in the standard license, but can be added to a standard or professional license through the use of a module license. The eCommerce feature is included with an enterprise license, however. When working in a keyless environment, as is the norm for developers building code on a Localhost site, the feature will also be enabled. In this situation, the server is only accessible through the loopback interface, so users will not be able to visit the site via a host name.
In the OnTrek environment, if the license is not enabled, any pages that interact with the eCommerce feature will return an error stating the feature is not enabled. In addition, any menu items that point to a page that has an eCommerce item on it will be hidden. If you can't see any eCommerce links in your installation, or when you follow an eCommerce link you receive an error, please speak with your Ektron sales representative.
Once the eCommerce feature is enabled on your site, you must enter the Workarea to set up the appropriate configuration options in order for your server controls to render properly. In this section, you learn how to configure the basic aspects of the eCommerce feature. In the next section, you work with some products in the workflow and some supporting features. For the configuration aspect, this section specifically covers the following areas:
Managing major configuration options
Configuring the settings for shipping and taxes
Configuring payment methods and currencies
Creating product types
The majority of the configuration for eCommerce takes place in the Settings tab in the Workarea. To get to the eCommerce configuration section follow these steps:
Log into the Workarea now as admin and switch to the Settings tab.
Directly under the Settings entry in the Settings tree, there should be a node for Commerce. If there isn't, please speak to an Ektron sales representative about getting a trial license with the eCommerce feature.
To enter the new license key, go to Workarea

Under the eCommerce node, there are six major groups of items. The first area covered in this section is the Configuration node. Open this now, and you'll see six items underneath it, as shown in Figure 12-2.
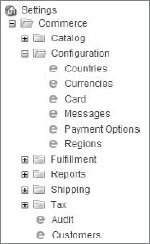
These items manage settings that act system wide, and control availability of catalogs in the site among other things. The following list enumerates each item and describes what it is used for. After covering the items from a high level, the subsequent sections will dive a little deeper into each item.
Countries: Allows you to manage the list of countries usable throughout the system. This populates the list of options in areas throughout the eCommerce feature, for example, tax management and warehouse management.
Currencies: The eCommerce system allows use of all currencies throughout the world. In this item, you can choose which currencies should be supported on your site, as well as manage exchange rates.
Card: This node supports creating new payment options and managing existing payment options. For instance, you may want to allow for gift cards that act like credit cards in the payment options on your site. You can use this area to create the definition so that the option appears in the payment type dropdown presented to customers when they check out.
Messages: Customers of your site will be accustomed to receiving e-mail notifications at several events during the order fulfillment lifecycle. This section is used to manage the form letters sent when those events take place.
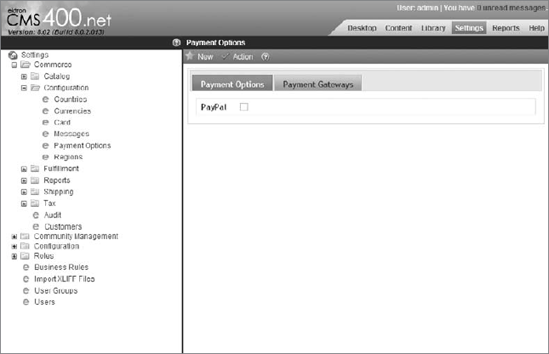
Payment Options: This area allows you to configure gateways used to collect payment on orders. There are several gateways with re-built connectors that can be used out-of-the-box. In addition, the eCommerce feature is built in an extensible way so that you can build additional providers for further gateways painlessly.
Regions: While the eCommerce Framework comes with a list of predefined countries and regions, these may change over time or be inadequate for your needs. The Regions area allows you to update the regions of each country as needed. For instance, in the United States, each state is a region.
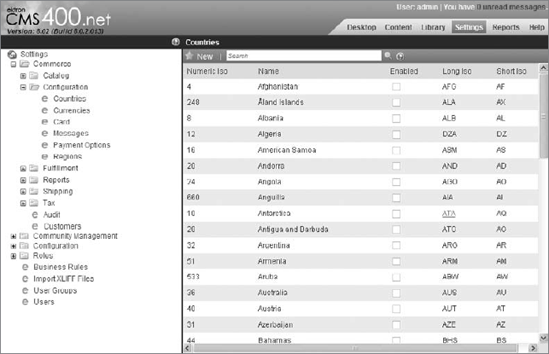
The Countries pane, shown in Figure 12-3, contains the list of countries throughout the world. It stores numeric ISO code, as well as the long and short ISO abbreviations. This list is used in two main ways:
To define country level taxes: These can optionally be overridden with regional settings. For instance, in the U.S., there is no sales tax if the sale crosses state borders. This means that the country tax for a company based in Massachusetts would be 0, whereas orders shipping to Massachusetts would have the sales tax applied; in this case it is 6.25 percent.
To determine shipping costs. The country list allows you to enable or disable appropriate countries as shipping destinations. The shipping provider then uses the country code to correctly determine the cost of shipping to that location.
To enable or disable a country for customer locations, follow these steps:
Go to Workarea
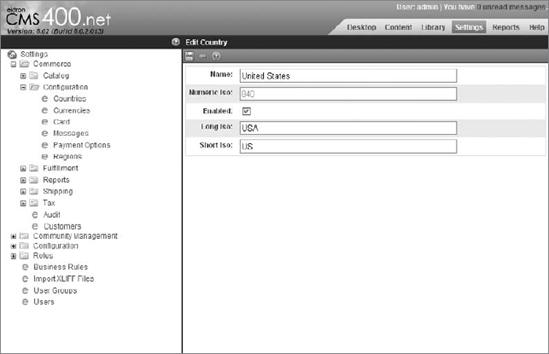
This brings you into the details pane for the country you selected. At this point, you see the same details as in the list, including the full name of the country, the numeric ISO code along with the short and long ISO abbreviation for the country, and an indicator of whether the country is enabled.
Click Edit the toolbar to edit these settings now, and you will see the Edit Country screen as shown in Figure 12-4.
On the Edit Country screen you can enable or disable the country at will. Enabled countries will appear on dropdowns of customer locations and shipping destinations.
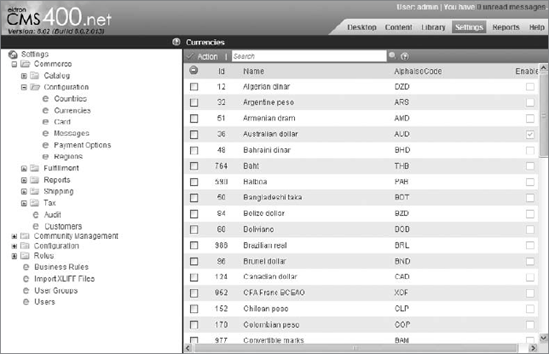
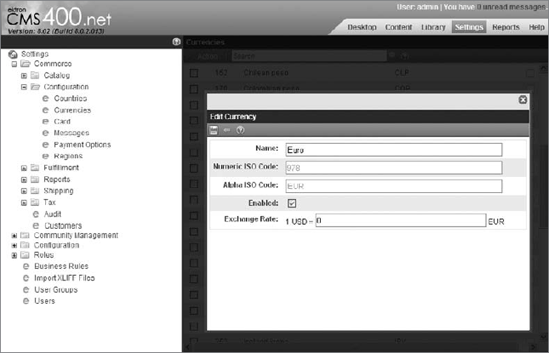
The Currencies pane allows you to manage the list of supported currencies. There are no internal limitations in the eCommerce engine restricting the use of currencies. The system comes preloaded with all currencies defined in the ISO 4217 name list. Each currency is stored with a name, the numeric ISO code, the ISO abbreviated name, and the exchange rate.
Currencies are switched on the site by using the Currency Select Server Control, which operates very similarly to the Language Select Server Control, allowing the end users to select the currency for the item being priced. A default currency can be selected for the site by setting the value of the ek_ecom_DefaultCurrencyId tag in the web.config file at the root of your site.
Note
Remember not to change the ek_ecom_DefaultCurrencyId tag after creating products, as it can corrupt the pricing of those products on the site.
While pricing on a per-currency basis can be performed for each item individually, you also have the option of having the Ektron Framework automatically calculate the appropriate price for each product by using the exchange rate defined for that currency. The exchange rate calculation is performed against the default currency. For example, out-of-the-box, the default currency is U.S. dollars. Each additional enabled currency then can have its own exchange rate that would be calculated against the dollar in this case. So let's say you kept the USD as the default currency, and enabled GBP as an alternate currency with an exchange rate of 1 USD = .65 GBP. If you were to then create a product with a price of 100 USD, site visitors could use the Currency Select Server Control to switch currencies to GBP, in which case they would see the price automatically calculated as 65 GBP. These calculations are performed as needed, so if you were to then modify the exchange rate for GBP, the price would reflect the change on the site immediately.
To manage the currencies for your site, follow these steps:
Go to Workarea
You can filter the list of currencies using the Search box on the toolbar. A currency can be edited by selecting the currency from the list. This brings up a modal window that allows you to edit the details of that currency, as shown in Figure 12-6. This modal allows you to modify the name, whether or not the currency is enabled, and the exchange rate versus the default currency.
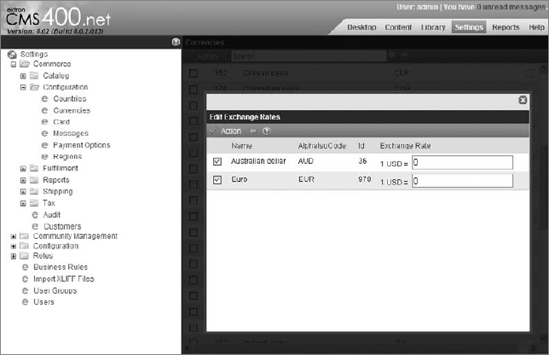
You can also update the exchange rates for all the enabled currencies from a single screen. From the Currencies pane, select Action
When you are finished editing, select Action
The currency exchange rates can also be programmatically manipulated through the Ektron.Cms .Commerce.ExchangeRateApi. This API can be used to keep your stored exchange rates up-to-date with market conditions if desired. This operation is more advanced, however, and is beyond the scope of this book.
The Ektron eCommerce feature comes with five predefined credit card types: American Express, Diners Club, Discover, MasterCard, and Visa. These card types are used to populate the credit card type dropdown in the checkout process. Each card specification can be updated with custom naming, icons, and regular expressions for early validation of that card type.
There are two main actions available in this area. New cards can be added, and current cards can be updated. To perform either of these actions, go to Workarea

To add a new card type: Select New
To edit the existing cards: Simply select the card from the list, which brings up the same interface used for new cards but is pre-populated with the current options. The Edit Card Type pane is shown in Figure 12-9.
There are several occasions during the order and fulfillment process when notifications are typically sent to the ordering party. The messages center allows you to define the format used in the e-mails that are sent when these events occur. The events and the associated message type are described in Table 12-1.

Table 12.1. eCommerce Message Types
EVENT | MESSAGE TYPE | DESCRIPTION |
|---|---|---|
Order Submission | OrderReceived | Occurs when an order is placed on the website. |
Order Cancellation | OrderCancelled | Occurs when an order is cancelled. |
Order Shipped | OrderShipped | Occurs when an order is shipped from the warehouse. |
Order Completed | OrderCompleted | Occurs when an order is closed out and completed. |
The messages used in eCommerce follow the same token string replacement method employed in other messages throughout the system. The acceptable tokens are listed in Table 12-2.
Table 12.2. eCommerce Message Tokens
TOKEN STRING | DESCRIPTION |
|---|---|
@CustomerFirstName@ | First name of the customer. |
@CustomerLastName@ | Last name of the customer. |
@OrderId@ | ID of the order. |
@OrderSubTotal@ | Total cost of the order excluding taxes, shipping, and coupons. |
@OrderTotal@ | Total cost of the order to be charged to the customer. |
@OrderShippingTotal@ | Cost of shipping the order. |
@OrderCouponTotal@ | Value of coupons applied to the order. |
@OrderTaxTotal@ | Total tax applied to the order. |
@OrderItemTitle@ | The title of an individual item on the order. This token must be used within the @OrderItemStart@ and @OrderItemEnd@ loop markers. |
@OrderItemSalePrice@ | Sale price of an individual item on the order. This token must be used within the @OrderItemStart@ and @OrderItemEnd@ loop markers. |
@OrderItemQuantity@ | Quantity for a given line item on the order. This token must be used within the @OrderItemStart@ and @OrderItemEnd@ loop markers. |
@OrderItemTotal@ | The total cost of a given line item. Excludes taxes and shipping; is calculated by multiplying the item quantity by the item sale price. This token must be used within the @OrderItemStart@ and @OrderItemEnd@ loop markers. |
@OrderItemStart@ and @OrderItemEnd@ | These markers are used to specify the start and end location of the text to repeat for each line item in the order. |
@TrackingUrl@ | Replaced with the URL for the order shipment tracking page. |
The eCommerce messaging system uses the same underlying technology as the content notification system. This means that for these e-mails to be sent, the CDOSYS SMTP and relay information must be configured properly in the web.config, as well as in IIS.
Note
For more information on this process, see "Configuring E-Mail for Tasks and Content" in Chapter 1 of the CMS400 manual, installed with the Ektron Framework on your system.
To create or modify the messages for your eCommerce system, follow these steps:
Go to Workarea
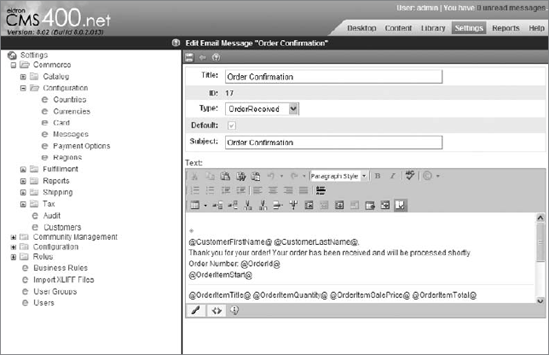
From there you can either select an existing message to edit, or you can create a new message by selecting the Add icon from the toolbar. Additionally, you can create messages for each language enabled on your site by selecting the appropriate language in the dropdown on the Messages pane toolbar. When the system generates the e-mail for a specific event, it uses the message template in that user's language.
Select the Order Confirmation message now, and select Edit on the resulting pane. The view updates with the edit screen, as shown in Figure 12-11. As is shown in the screenshot, the editing interface is a rich HTML editor, meaning you can easily create detailed attractive message formats. This message also shows a relatively complex e-mail format.

There are two types of payment options available in the eCommerce subsystem. The first type is PayPal, which is commonly accepted on many sites. The second type is to use a payment gateway, which allows you to hook up a merchant account directly to your website for immediate payment processing.
Using PayPal is frequently a less complicated way of enabling payment on your site but requires that the user be handed off to the PayPal website to complete the payment process. As this happens via a customized page you can still maintain some level of custom branding on the destination page. This is in contrast to a payment gateway, however, where the users never leave your site to complete their purchases.
There are two ways for the customer to use PayPal during the checkout process.
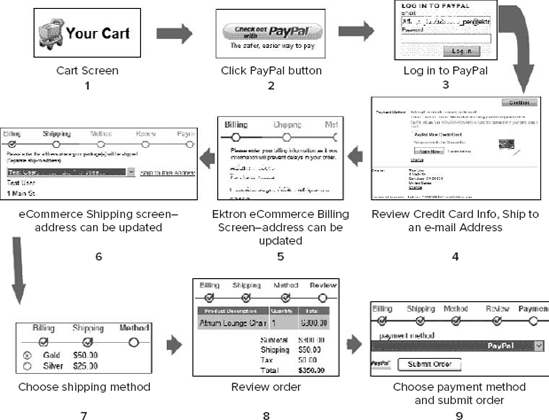
If the customer selects PayPal from the Shopping Cart screen, the process proceeds as follows, and is illustrated in Figure 12-12.
The customer starts on the cart screen.
The customer selects PayPal as the payment method.
The PayPal website comes up, requiring the customer to log into their PayPal account.
The customer selects the payment and address information from their PayPal stored data.
The information is passed back to the eCommerce system, pre-populating the addresses for shipment and billing.
Shipping and billing information is presented to the user for modifications.
Additional costs, such as shipping and taxes, are determined based on the addresses.
The customer confirms the order.
The customer returns to PayPal to finish checking out.
If the customers do not click the PayPal button on the Shopping Cart screen, they follow a slightly different process. They manually enter the addresses rather than having them be pre-populated from the PayPal account. The rest of the process, however, is exactly the same.
To enable PayPal support, follow these steps:
Create an account on PayPal as a seller.
Update the PayPalUser, PayPalPwd, and PayPalSignature keys in your web.config with the API username, password, and signature exposed by PayPal for that account.
Enable PayPal as a valid option in the Workarea.
You can customize the PayPal payment page to match your site more closely. These steps are covered in depth in "Enabling PayPal Support" in Chapter 17 of the CMS400 manual, installed with the Ektron Framework on your machine.
To enable PayPal in the Workarea, follow these steps:
The other option for accepting payments on your website is to use a payment gateway. A payment gateway is a service that accepts credit card payments on behalf of your website, through a back channel. From the customer's point of view, the experience appears to take place exclusively on your site.
The Ektron Framework ships with three payment gateway modules, supporting Authorize.Net, PayFlow, as well as a manual gateway that allows you to use an offline payment service. You can use this service, for instance, if you don't have a Web-enabled merchant account, but instead manually run credit cards at a physical location. In addition, the gateway system follows a provider model, allowing you to extend the system by creating custom gateway software to hook into other merchant account companies.
Gateways allow you to process payments other than credit cards as well; for instance, it is possible to accept payment by check through a gateway. Depending on the type of payment, the processing method may vary. The process for credit cards is outlined here:
The gateway provider on your site must first send the transaction information, such as the credit card number and amount, to a merchant account processor.
The merchant account processing system then passes the information to the Credit Card Interchange, which then passes the information to the credit card issuer.
The credit card issuer approves or declines the transaction and passes the appropriate funds back through the Credit Card Interchange.
The Credit Card Interchange passes the results back to the merchant account processor, which sends the received funds to your account, and the result of the transaction to the gateway provider on your site.
Finally, the gateway provider saves the results of the transaction to the database.
Notice that the gateway provider does not save the credit card information in that process. For security purposes, customer account information is never stored, only transaction results are.
In order to accept gateway transactions, you must first create a relationship with a payment gateway provider. As mentioned earlier, the eCommerce system supports Authorize.Net and PayFlow out-of-the-box, so if you do not yet have a merchant account, it is recommended that you choose one of these providers to minimize implementation time.
The eCommerce system supports entries for multiple gateways, but will only ever use one gateway at a time. In the Workarea, one gateway is marked as the primary gateway, and that gateway is used for all transactions. That gateway cannot be deleted unless another gateway is marked as default.
Managing gateways takes place in the Workarea, at Workarea

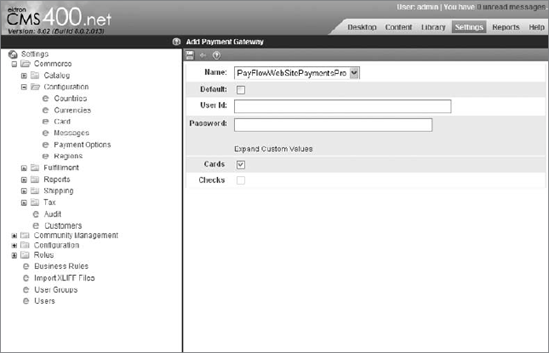
To modify an existing gateway definition, click the name in the list of gateways. Click the Edit button to modify the values shown to you. Table 12-3 lists and explains each field.
Table 12.3. Payment Gateway Form Fields
FIELD | DESCRIPTION |
|---|---|
Name | The name of the payment gateway provider. This list is generated from the installed provider modules on your site. |
Default | This field specifies whether this gateway is the default provider. Only the default provider is used to process payments. |
User ID | This is your user ID with the gateway provider. It identifies your account to ensure the payment goes to the correct account. |
Password | The password for your gateway provider account. |
Custom Values | Some providers require additional details; for instance, PayFlow requires a vendor and partner string to be specified. These additional values are put into the Custom Values fields. |
Credit Cards | Specifies whether the gateway supports credit cards. |
Checks | Specifies whether the gateway supports checks. |
Adding a gateway definition to the system takes place through the same form. From the Payment Options pane, select New
Checks are a special case in the eCommerce system. If supported by your gateway, checks are listed in the Payment Method dropdown on the payment screen during the checkout process. The customer is then asked to specify their bank name, account number, and routing number, as shown in Figure 12-16.

The process by which check payments are processed also differs slightly from the normal process. The process for processing these payments is as follows.
The eCommerce CMS user goes to the View Payment screen on the order, and selects Action
After a few days, the funds are transferred to the merchant account, at which point the eCommerce CMS user updates the order by selecting Action
From this point, the order processing continues as normal.
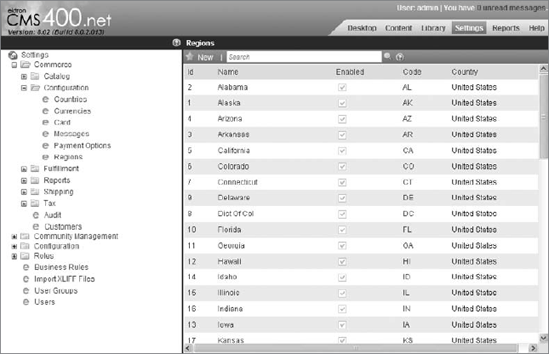
Regions are used in much the same way as countries. They define a list of geographic areas within a country for the purposes of taxes. The list of regions is displayed as part of the checkout process when collecting address information for billing and shipping. These regions' definitions vary from country to country — for instance, in the United States, each region is a state, as that is the variance for tax structures.
By default, the regions defined in the eCommerce system are the 50 U.S. states, the District of Columbia, and 9 Canadian Provinces. To add further regions for other countries, follow these steps:
Go to Workarea
From this screen, select New
Table 12.4. Add Region Form Fields
FIELD
DESCRIPTION
Name
The name of the region.
Code
An abbreviation for the region.
Country
The country this region belongs to. This list is generated from the list of enabled countries; if the country you want is not shown, go to Workarea
Enabled
This controls whether the region is displayed in the region dropdown in the Checkout Server Control.
Add another region to this country?
If checked, the form reloads after adding the region, allowing you to quickly add another region.
To enable the region for use, check the Enabled checkbox. Click the save icon to save the item.
Now that you have set up the major configuration options, you're ready to move into the shipping and taxes sections. The shipping section allows the configuration of shipping options available to the customers on the site, and enables you to hook into external systems so that you can provide accurate shipping cost estimates. The taxes section gives you the ability to define tax rates based on geographic locations so that customers do not overpay or underpay taxes on their goods.
Much like the payment model, the shipping system follows a provider model, so that you can create plug-ins that allow for shipping through methods not supported out-of-the-box. The eCommerce system ships with providers for FedEx and UPS out-of-the-box, along with a Flat rate provider that charges a fixed cost.
The providers available for the system are defined in the shipment.config file at the root of your site. This file contains the type data needed to instantiate your provider. You'll notice that it has an entry for each of the three shipment providers the system ships with. The FedEx and UPS entries are incomplete in a new installation. In order to use these in a production environment, you need to contact the appropriate company to obtain the following information:
Sservice URL
Key
Password
Account number
Meter number
Transaction ID.
This information must then be entered into the shipment.config file.
Note
Because the shipment provider is read in from the shipment.config file, and this file exists at the root of the site, in a multisite environment you must ensure that each multisite contains an exact copy of this file.
While any number of shipping providers can be defined in the shipment.config file, only one provider can be active in the system at a time. The default shipment provider is selected through the attribute defaultProvider on the shipmentProvider tag in the shipment.config file. If the new shipping method does not match the desired provider's offerings, you should ensure that the default is set correctly.
Your inventory can also be managed through the eCommerce Framework, relying on the concept of warehouses. The system supports multiple warehouses, but only calculates cost for shipping from the default warehouse.
The final piece of the shipment puzzle is to define packages. Packages allow you to specify standard box sizes along with weight restrictions. The shipping calculator built into the eCommerce Framework uses the box definitions along with the list of products to be shipped to the destination to approximate the best fit into the smallest-sized and fewest number of packages. This minimized number of boxes is then passed into the shipment provider for cost estimation. If the ordered item exceeds the size of the largest defined package, the dimensions of that item are passed directly to the shipment provider instead.
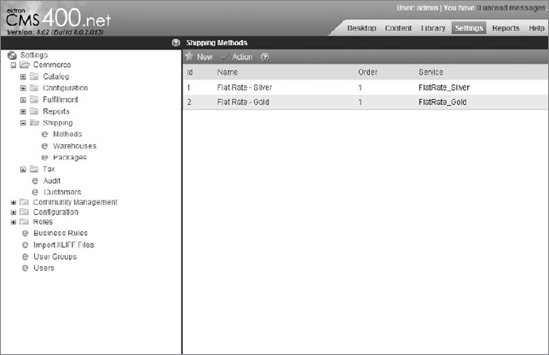
To add a shipping method, managing your warehouse and defining packages, follow these steps:
Go to Workarea
Select New
Table 12.5. Add Shipping Method Form Fields
FIELD
DESCRIPTION
Name
The name for the level of service that displays to the users as part of the checkout process in the Checkout Server Control.
Active
Specifies whether the specified service level is available as a choice on the checkout form.
Provider Service
The internal name for the level of service. Clicking View Options shows a dropdown displaying valid options gathered from the shipment provider. Selecting one of the dropdown options fills in this field with the appropriate value.
The management of warehouses takes place in the Workarea at Workarea
Note
One of the requirements for the eCommerce platform to work correctly is that at least one warehouse be defined in the system. This is required even if you are not managing inventory online, or are dealing exclusively in online products.
To create a warehouse, go to the Warehouses pane at Workarea
The fields on this form are mainly designed to capture the location of the warehouse, which is then passed to the shipment provider to calculate the shipping cost for each order so that the customers can be charged appropriately. The fields are described in Table 12-6.
Table 12.6. Create Warehouse Form Fields
FIELD
DESCRIPTION
Name
Name of the warehouse.
Street1, Street2
The street address of the warehouse.
City
The city of the warehouse.
Postal Code
The postal code of the warehouse.
Country
The country of the warehouse.
State/Province
The state or province of the warehouse.
Default Warehouse
Specifies whether this warehouse should be used in cost calculations. If default, this is the only warehouse used in calculations.
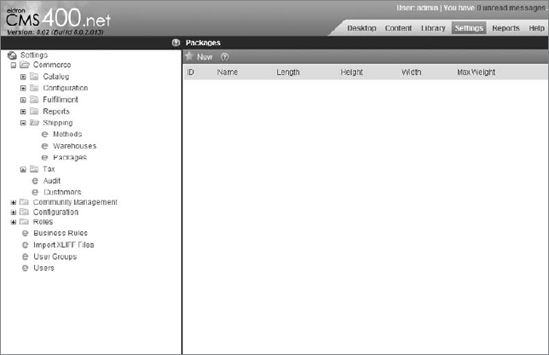
Package management takes place through the Packages pane at Workarea
To add a new package, select New
Table 12.7. New Package Form Fields
FIELD
DESCRIPTION
Name
The name you choose to use for this package size.
Length
Length of the packages. The unit you use should match the unit that appears to the right of the field, either inches or centimeters.
Height
Height of the package in the correct unit.
Width
Width of the package in the correct unit.
Max Weight
The maximum weight this package can support, with the units matching the units on the field — pounds or kilograms.

The Ektron eCommerce package supports a fairly complex tax structure, allowing you to create classes of goods that are taxed at different rates, as well as variances of those rates based on destination locations. Management of these rates takes place through the Workarea in the Workarea
The eCommerce feature comes preloaded with four tax classes: alcohol, goods, services, and tobacco. You can add, update, or delete these classes at any time. This list populates the Tax Class field when editing catalog entries, so that each product is categorized correctly. To manage these tax classes, follow these steps:
Go to Workarea
To edit one of the existing categories, click its name.
To add a new category, select New

Taxes are applied to the order through a waterfall method. For each item in the order, the tax class of that item is found, and then the eCommerce engine tries to find a matching tuple that defines the tax code for the shipping destinations postal code and tax class. If it finds a match, it applies that rate and stops. If there is no matching tuple, the engine then looks at the regional tax rate for the destination and tax class. Again, if it finds a match, it applies the match and quits; otherwise the engine then checks the country rate.
If for a given destination you must apply multiple levels of taxes, you should build the combined rates into the smallest applicable geographic area. For instance, if in your postal code you must pay a 5 percent sales tax, and in your state you must pay a 4 percent sales tax, you should enter a 9 percent sales tax for your postal code, and 4 percent at the state level.
The three remaining screens in the Tax section on the Settings tree are for managing the rates at each geographic level. The Postal tax table allows you to enter rates for the postal code level, Regional at the regional level, among other levels.
As an example of managing the rates, this section explores how to set up the rates for a given state. Assume you have a company based out of Massachusetts. The state sales tax in Massachusetts is 6.25 percent. This means that for orders going to Massachusetts, you need to charge the appropriate tax. For orders going outside the state, there is no tax. To set up the rates for a given state, follow these steps:
Open the Regional tax table, by going to Workarea
Click a region name. The display updates to show you the tax rates for that region. Find Massachusetts in the list, and click it. The stored tax rates are 0 percent across the board, as shown in Figure 12-22.
Click the link "Click here to edit the tax rates," and the display updates to show the detail view of that region.
Click Edit on the toolbar, and then select the Tax Rates.
Update the Goods category to reflect the 6.25 percent tax, and click the save icon on the toolbar.
Now that the fundamentals of your eCommerce site have been set up, you are ready to create the products. Before you can jump into the products themselves though, you need to configure your product types. Once you have defined the types, you need to create a catalog to house the products. Finally, you can then create the products themselves. In this section, you look at those items in that order.

Product types are used to define the different categories of products you sell on your site. A type definition allows you to specify the type of information you capture about each product belonging to that type. For instance, you might have a product type for books, in which you can specify the title, author, synopsis, ISBN, and page count. You may also want to carry movies on your site, which have a series of other properties to capture, such as the title, year, lead actors, synopsis, and several reviews. Having a product type for each line of goods allows you to require the relevant details so your customers can easily understand the product, and your catalog managers can ensure that relevant details are captured.
In addition to the field definition, called the content page, the other main detail to note in a product type is the class of the type. There are four classes of product types. The class of a type affects both the management of the products based on that type as well as the process of purchasing products of that type. The classes are outlined in Table 12-8.
Table 12.8. Product Classes
CLASS | DESCRIPTION |
|---|---|
Kit | A type of product that contains a list of free text options. The options can affect the overall price of the product. For instance, a laptop's price will go up or down based on the amount of memory in it, as well as the hard drive size. |
Bundle | A single item that consists of other items from the catalog. It has its own price and images separate from the underlying product entries. For instance, when buying a desktop computer, you may want a bundle consisting of a monitor, a keyboard, and a mouse, with a discounted overall price. |
Product | Products can be a simple product, which is a single entry, or a complex product. A complex product is similar to a bundle in that it takes several simple products and groups them together, but unlike a bundle it maintains each simple product's price and details, and the customer interacts with them as separate products. The benefit is that on the Product List or Product Search, only the complex product is displayed. It's only when the users get to the product details that they choose a specific variant of the product with its own price. For instance, you may have Kingston Value RAM, available in different speeds, at different prices. By grouping them into a complex product, you create less overhead when people are trying to decide on the type of memory they should get, only presenting them with a choice of speed after they've made the choice of brand. |
Subscription | A subscription is fundamentally different from other types of products in that it allows for recurring billing. In addition, it adds purchasers into a specified membership group, allowing you to manage the group's access to private content. |
Product types are used when creating a catalog, in much the same way that Smart Forms are used when creating content folders. They dictate the types of products that you can add to each catalog. Let's investigate creating a new product type now. You'll create a type for training videos on OnTrek:
Go to Workarea
To create a new product type, select New
Table 12.9. Add Product Type Form Fields
TAB
FIELD
DESCRIPTION
Properties
Title
The title of the type. It displays under the new menu in catalogs it is assigned to.
Description
A description of the product type.
Class
The class of the product type, selected from Product, Kit, Bundle, or Subscription.
Attributes
Attributes
Used to manage secondary information about the product. The types of data are limited to free text, dates, numeric, and Boolean values. You can compare attributes to metadata on a Smart Form versus the content stored inside the Smart Form itself.
Media Defaults
Thumbnails
Allows you to specify a set of thumbnail sizes to generate. These are generated from the main image associated with products based on this type, and are usable in the display page for products, as well as on product lists.
For the training video product type, enter Training Video for the title and description, and select Product as the class.
On the Media Defaults tab, add two entries, one called large at 150 × 125 pixels, and one called small at 70 × 58 pixels.
Click Save, and move to the second stage of type creation, which is to create the content page (similar to a Smart Form) for the product type.
Add three text fields with titles to this form: title, description, and running time. Set the description field to be multi-line.
Note
This example is simple, but when you are designing product types for your catalog, spend time to make sure you're getting the information you'll need going forward. Also remember that much like Smart Forms, products based on a type are not automatically updated or flagged when the underlying type is modified. This means that doing updates to the product type's content page after products have been entered based on the type may break those products. Spend time up front designing these pages so you don't find yourself struggling with a poor design later.
The final content page is shown in Figure 12-24. Click Save and return to the overview of the new product type.

Now that you have a product type to work with, you can create a catalog to contain your training videos.

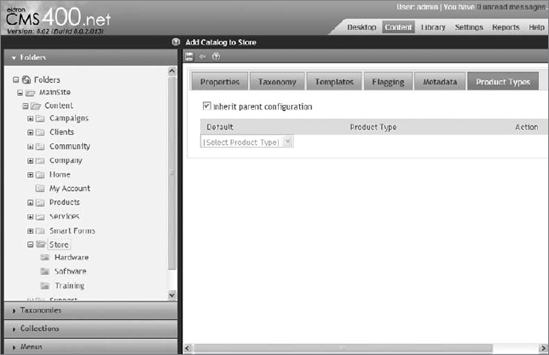
Catalogs are the method by which products are organized, and they serve as the storage location in the Content Tree for those products. They function just like content folders, and are required in order to create products. Creating a catalog is very similar to creating a content folder. Instead of picking Smart Forms, however, you pick product types. Create a catalog now by following these steps:
Go to Workarea
Select New
Name the new catalog Videos, and then switch to the Product Types tab. The tab is shown in Figure 12-25. This tab is very similar to the Smart Form tab in a normal folder.
Deselect the Inherit parent configuration checkbox, and add Training Video from the dropdown to the list.
Click Save — you are returned to the Store catalog.
Select the new Videos catalog from the folder tree, and the view is updated with the list of products currently in the folder.
As is visible from the catalog view shown in Figure 12-26, the interface is almost the same as a folder. For instance, catalogs are language specific, meaning that you can create translations for each product in the catalog. One of the only differences is that under the View menu, the options for filtering the view are catalog-centric — having to do with the class of product. You can filter the view by All Types, Products, Kits, Bundles, or Subscriptions.
Now that you have the catalog created, you need to create a training video product.

As we discussed, the goal of the new catalog is to house a series of training videos available for purchase. We have the catalog in place, so now we will add our first training video for sale.
To view the SmartForm content tabs, select New
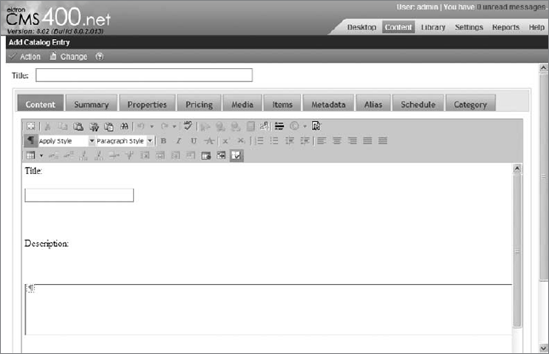
Content: This is the same tab (see Figure 12-27) you see when working with Smart Forms. You'll recognize the Smart Form design from when you put together the product type design.
Summary: The Summary is displayed in search results, and in the ProductList Server Control as shown in Figure 12-28.
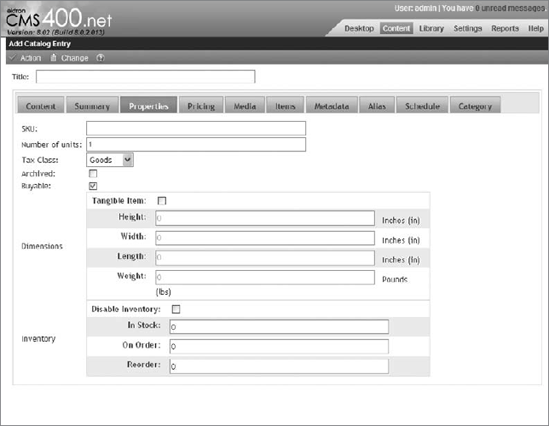
Properties: Shown in Figure 12-29, you use this to manage system-level product properties that are required. By default this includes the SKU, how many items are in a single purchase (such as 2 DIMMS of memory in a single order of dual channel RAM), tax class, whether the item is purchasable, the dimensions, and inventory data for the item.
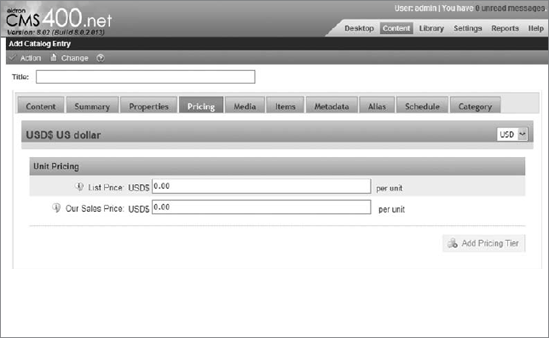
Pricing: Shown in Figure 12-30, this allows you to enter pricing details about the product. The list price usually displays the original price, or the manufacturer's suggested retail price for the product. The sales price below that is what you are actually selling the product for. Additionally, beneath the standard pricing you can add tier pricing; for instance you may want to sell a $20 item for $15 as long as the customer orders more than 10 of them. Finally, you may notice that in the top-right side of the interface you can select other currencies. You can manually set the price in a foreign currency here. If you don't set the price manually, the price in the foreign currency is calculated based on the exchange rates defined in the Currency screen in the Settings tab.
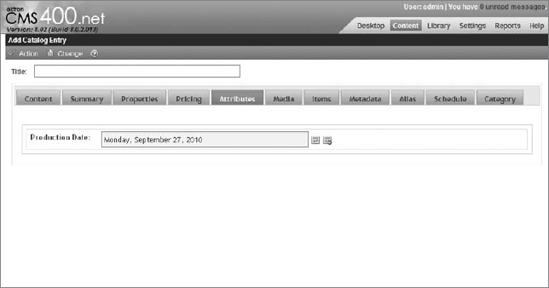
Attributes: Shown in Figure 12-31, this manages any custom properties that were created as part of the product type definition. If no custom properties were defined, this tab won't show up.
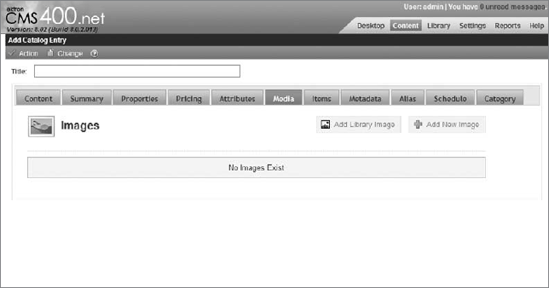
Media: Shown in Figure 12-32, this allows you to specify the images to display for a product on the site. You can add an image from the library or upload one. Adding an image automatically creates the thumbnails of the original based on the thumbnail definitions in the product type specification. Once an image is added, you can specify details about it, such as the title, alt text, and whether to show it in the product gallery. You can also choose one of the uploaded images to use as the product icon. All the images are available in XSLTs on the Product Server Controls, allowing you to specify what size to use in which scenarios (except for the Product Search Server Control, which always uses the full-size version of the default product icon).
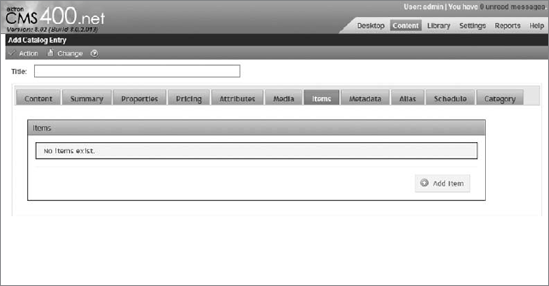
Items: As shown in Figure 12-33, you use this for all product classes, but in different ways. For simple products, when you use it to select additional products, it turns the simple product into a complex product, allowing grouping of common products. When working with:
A bundle class product type: You can select the other products that combine to make this bundle.
Kit class product types: You can work with the groups of options that make up the kit, and specify how they modify the price.
A subscription class type: You can select the membership group where purchasers should be added.
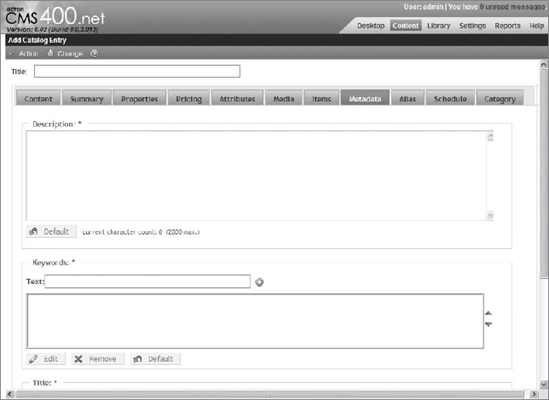
Metadata: The Metadata tab (shown in Figure 12-34) is the same as for normal content.
Alias: Aliases (shown in Figure 12-35) also work the same way as normal content, and can be a useful way of managing SEO for your product catalogs.
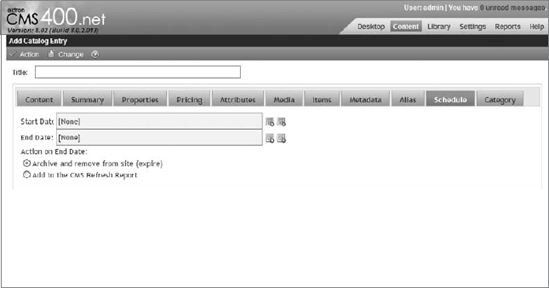
Schedule: Just like normal content, you can schedule a go-live date and set expiration dates for products in your catalog.
Category: You also have the ability to use taxonomy to categorize your catalog items (see Figure 12-37).
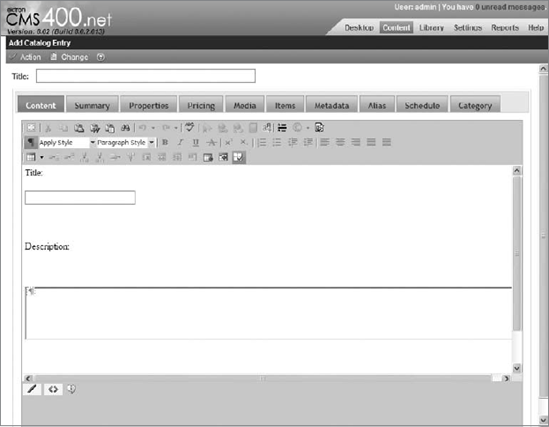


Now that you know what all the tabs are all about, follow these steps to create a new product in the Videos catalog:
Select New
Enter Administrator Training Video for the title.
Switch to the Content tab, and in the title field on the custom form, enter "Administrator Training Video," and "See step by step directions on the included DVD for administering your OnTrek Software" for the description. Enter "6 hours" for the running time.
Switch to the Pricing tab and enter in a list price of $800, and a sales price of $750.
Fill out any required fields on the Metadata and Category tabs.
Select Action from the toolbar, and click Submit.
In addition to the familiar interface of editing items through the Workarea, you can also manage most of the properties on catalog items through the front end of your site, through the editor's menu. You can look at the options that are new when viewing an existing product in the Workarea. Browse to Workarea
You'll notice, as shown in Figure 12-39, that the toolbar has some additional items on it that are not on regular content. Specifically, the View menu has two new items, Cross Sell and Up Sell. You can use these items to drive additional sales by presenting customers with additional options as they shop on your site.

Cross Sell: Offers items that are related to the product in question. For instance, a monitor and a laptop bag would both be good cross sell items for a customer buying a laptop.
Up Sell: Is a higher end, more expensive laptop than the one the customer is currently looking at.
The interfaces for adding cross sell and up sell items are the same, simply displaying a list of items, and allowing you to add more by browsing the catalog in a modal window to find the target product.
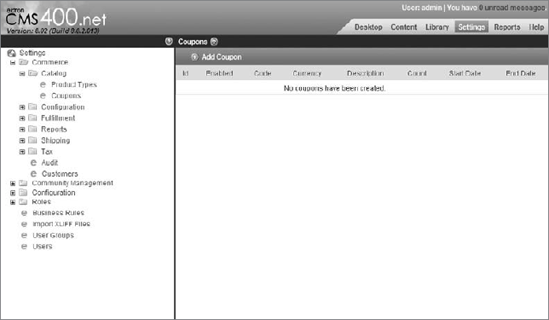
Coupons are one of the features that can easily be overlooked in the eCommerce product. They are rich in their capabilities, and are useful tools in aiding marketing efforts. The capabilities of coupons include discounting by a dollar amount or by a percentage. If you discount by a percentage, you specify a maximum dollar value of the discount. You have a wide range of options to restrict usage including:
Applying coupons to specific products
Applying to the most or least expensive item in a shopping cart
Specifying that a customer can only use a coupon once
Limiting a coupon so it's only applied when other coupons are not applied
Specifying a date range the coupon is valid for
Specifying a maximum number of redemptions for a given coupon
Specifying a minimum order value before a coupon can be used
This rich set of capabilities means that you can create a coupon to fit any situation you run into. Let's explore the process of creating coupons now. Creating a coupon is a four-step process, with the first step being to specify the type of coupon. Next is setting up the discount, followed by setting up the scope of the coupon. Finally, you can specify the catalog items the coupon can be applied to.
To create a coupon, follow these steps:
Go to Workarea
Click Add Coupon now, and you will see the Add Coupon pane. It consists of a Wizard.
Fill in the first window of the Wizard:
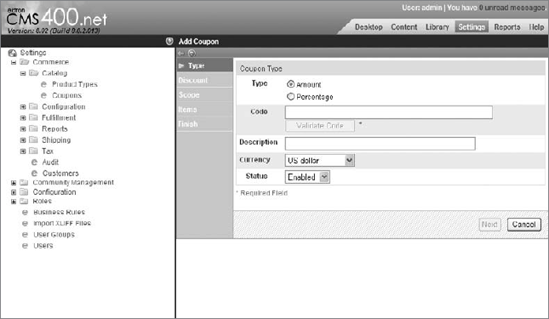
Specify the type, as shown in Figure 12-41.
The coupon type step allows you to specify the fundamental elements of the coupon. Table 12-10 lists the fields in this form along with a description of each field.
Table 12.10. Add Coupon Type Step Fields
FIELD
DESCRIPTION
Type
Can be set to Amount or Percentage and dictates the type of the discount.
Code
The code the users must enter to activate the coupon in their carts. Because it does not make sense to have two coupons with the same code, the Validate Code button next to the field allows you to check if the code you want for the coupon is available.
Description
Allows you to specify a description for the coupon.
Currency
Allows you to specify currency this coupon can be used with. A coupon can be used with a single currency only if it is a numeric discount, and is rejected if the user is browsing the site with a different currency. If the coupon is a percentage discount, it can be used with any currency.
Status
Set to Enable to allow users to use this coupon provided the other conditions for the coupon are met.
Specify the discount amount. If, on the first step (specifying the type), you selected Amount for the type, you can specify exactly what that discount should be. If instead, you specified that this should be a percentage discount, in this step you specify what that percentage should be, along with a maximum amount for the discount. If the maximum is left at 0, there is no maximum. If you specify a maximum amount and the percentage would result in a discount larger than that amount, the discount still applies, but is whatever you specified as the maximum rather than the percentage calculation.
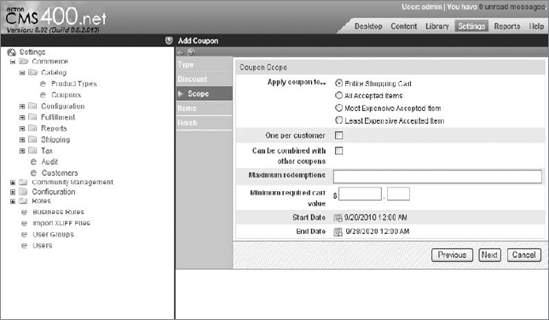
The Scope screen allows you to limit the coupon's usability. It is shown in Figure 12-42, and Table 12-11 lists the fields and descriptions found on the Scope pane.
Table 12.11. Add Coupon Scope Step Fields
FIELD
DESCRIPTION
Apply Coupon To
Sets how coupons can be applied. Can be set to Entire shopping cart, items that have been approved for use with the coupon, just the most expensive accepted item in the cart, or just the least expensive item in the cart.
One per Customer
Whether a customer can reuse the same coupon.
Can be combined with other coupons
A flag to set whether the coupon should only be applied singly or whether it can be applied in conjunction with other coupons.
Maximum redemptions
The number of times the coupon can be redeemed before it expires and is invalid.
Minimum required cart value
The value the cart must contain before the coupon can be applied.
Start Date
The beginning of the period that the coupon can be redeemed.
End Date
The end of the period the coupon is valid.
You can modify Items only if the Apply Coupon To field has been set to something other than the entire shopping cart. If set to All Accepted Items instead, you have the opportunity on this screen to specify the list of included items, and the list of excluded items. If an item satisfies conditions on both lists, it is excluded. This means that, depending on whether you have a large list of items you want the coupon to be accepted for, or a small list to accept it for, you can approach the list from either direction.
Click Finish to return to the list of coupons.
At this point you have all the administrative areas of your eCommerce solution set up. What remains is the processing of reports, and actually running orders through the system. This section first covers the various reports that can be run to get snapshots of how many orders and which orders are in various states of fulfillment, and then covers the process by which orders are pushed through from the initial receipt of an order to the fulfillment of that order.
The eCommerce reports are accessible through two locations in the Workarea. These locations are:
Workarea
Workarea
The same set of reports are in both locations, but depending on the roles the eCommerce user is assigned to, they may not be able to access the reports through the Settings tab. Additionally, these reports are all available as widgets so that you can add them to the Desktop in the Workarea.
There are five reports the eCommerce system provides.
Customer Reports: Summarizes the top customers in several categories. It displays the name of the customer, the number of orders the customer has submitted, the total dollar amount the customer has purchased, and the date the person first became a customer.
The report can be run against several types of data: by selecting the most recent link, a dropdown displays, allowing you to report against the most recent customers, the most valuable customers, and the most active customers.
Key Performance Indicators: Lets you compare sales and orders from two time periods. You can set the time periods to compare by clicking the This Month link in the period column. It displays a dropdown containing many options for time periods, ranging from today and yesterday to comparing whole years. Set the current period and previous period, and then click the refresh button to update the report.
Payment Reports: This lists the received payments within a given time period. You can use it to reconcile financial statements with the ordering system. It displays the date the payment was captured, the last four digits of the credit card, the type of payment, the transaction ID, the amount of the transaction, and how much of the transaction, if any, was voided.
A report can be run by using the calendar icons to specify a start and end date for the report, and then clicking the Set New Dates link to update the report.
Sales Trends: Generates a line graph of order volume versus date. The X-axis of the graph can be set to daily or monthly by selecting the period link at the top of the report.
Top Products: Displays the most successful products on your site. It is ordered by the quantity sold, and can be run by selecting the period and the number of records to display, and then clicking the Update button.
In addition to these high-level reports, you can run reports against fulfillment criteria, which is useful in pushing orders through the order workflow. Before you look at those reports, take a moment and look at how orders move through the eCommerce system.
Note
The eCommerce system supports creating custom workflows through the Windows Workflow Foundation. For more information on this, see Chapter 13 of this book. For most cases, the default workflow will be capable of supporting your needs.
The built-in order processing workflow is as follows:
Submission of an order on the site. At this point the payment is processed for authorization, but has not yet been captured.
The order goes into a queue. Once in the queue, it awaits interaction by an eCommerce CMS user, and it can be marked as fraudulent, or it can be captured, in which case the transaction actually takes place.
The order is updated and has the following status:
Complete: With the default workflow, this happens as soon as the order is shipped but with custom workflows it could represent some post-sale activity as having been completed.
Cancelled: The order was cancelled either by the customer or by a site eCommerce administrator.
InProcess: The state an order is in after it has been submitted, but when payment has not yet been captured for it.
The process is simplified for intangible goods, and is almost completely automated in that scenario. The workflow map is shown in Figure 12-43.

The manual state transitions in that workflow take place through the View Order screen, which you can open by accessing individual orders through the Orders report:
Access the Orders report by navigating to Workarea
Select orders by the date range, the customer, or the catalog item.
When you have found an order that requires processing, click the order to enter the View Order screen.
The View Order screen, shown in Figure 12-44, has a list of tabs that contain information about the order. When an order is placed, the information about the items, coupons, and so on is all copied out of the original locations into a permanent location in the database so that the order details are never lost, even if the details of the original items change. The tabs display that copied data, so the View Order screen always shows the correct data for that order.
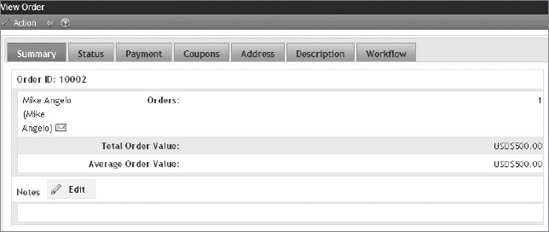
In order from left to right, the tabs display the following information.
Summary: Shows the order ID, the person who placed the order, and the order value. It also allows you to capture notes about the order.
Status: The Status tab shows the current status of the order, as well as the status history.
Payment: Displays the list of payments applied to this order. By clicking a payment you can retrieve the details of that payment, including the transaction ID, the gateway, the type of payment, the last four digits of the card number, the amount received, and the date of authorization and capture.
Coupons: Displays any coupons that were applied to the order, and the effect of those coupons.
Address: Displays the billing and shipping addresses associated with the order, and allows you to edit them. In addition, it displays the tracking method and number if one has been entered.
Description: Displays the items that are in the order, allowing you to fulfill the order and ship the items.
Workflow: Displays a log of the actions the order workflow engine has applied to the order up to this point.
Most of the interaction that takes place with orders is done through this screen, by selecting appropriate entries on the Action menu. When an order is received, you want to capture the order, then track it:
Selecting Action
Once the order ships, next update the tracking number for the order. Select Action
You can also mark the order as fraud and cancel the order. If your organization deems an order to be fraudulent, select Action
This chapter covered a large subset of the activities required to get the eCommerce feature functioning on your site, including the following:
The basic configuration of geographic locations, such as countries and regions.
The currencies in use at each location and how to manage exchange rates for those currencies.
How to manage the card types defined in the system as well as the payment options.
How to manage the messages defined in the system.
Some of the settings that rely on the lower order settings, such as tax structures. This included how those tax structures are used to calculate the correct taxes on each order, as well as how to set them based on geographic shipping destination.
How to manage the shipping options, including the way goods are packaged, the providers you can specify as handlers for your shipping needs, and the warehouses your goods are stored in.
How it all comes together to calculate the correct cost for shipping the order.
Creating product types, which you learned are basically an extension of Smart Forms.
Creating a catalog, which was a lot like working with folders
Creating a simple item.
The other item classes, and how they can be used to fulfill complex needs in your inventory.
Coupons, and how you can use them to support marketing needs.
About the different types of coupons, how you can manage the reusability of those coupons, and how you can extract the most value out of making coupons available to customers.
The overall process of handling and processing orders. You learned how to run reports to find out the success rate of your store, and how to fulfill orders from start to finish.
The actions available to you on a per-order basis.
How to create a successful strategy for approaching the fulfillment of orders.