
Chapter 2
Creating Arduino Sketches
IN THIS CHAPTER
![]() Learning the essentials of the Arduino language
Learning the essentials of the Arduino language
![]() Working with variables
Working with variables
![]() Adding if statements to your programs
Adding if statements to your programs
![]() Using while and for loops
Using while and for loops
![]() Creating your own functions
Creating your own functions
Welcome to programming! This chapter is a very brief introduction to the programming language you use to develop Arduino sketches. If you’ve never done any kind of computer programming before, you’re in for an interesting and fun journey. The nuances of computer programming can be difficult to grasp at first, but once you get your mind around some of the basic concepts, you’ll discover all sorts of things you can coerce your Arduino to do.
 The Arduino language is actually a standard programming language known as C++. C++ happens to be an advanced version of a somewhat simpler language called C. Because most beginning Arduino programs don’t actually use any of the advanced features, you can think of the Arduino language as simply C for now. In fact, I refer to the Arduino language simply as C rather than as C++ throughout this chapter. At some point, you may want to venture into the world of C++ programming for your Arduino, but programming in C++ is beyond the scope of this humble book.
Introducing C
As you learn in Chapter 1 of this minibook, you use the Arduino IDE to create sketches and upload them to your Arduino. The term sketch is simply Arduino’s word for a C program.
 If you’re unclear on how to create and upload a sketch to your Arduino, please reread the preceding chapter. You can’t progress very far in Arduino programming without writing some actual programs, downloading them to an Arduino, and observing how they work.
Before we get going, I recap the program that was presented in the previous chapter. For your convenience, the program is repeated in Listing 2-1.
LISTING 2-1 The Blink Program
void setup() { →1
pinMode(13, OUTPUT); →2
} →3
void loop() { →4
digitalWrite(13, HIGH); →5
delay(1000); →6
digitalWrite(13, LOW); →7
delay(1000); →8
} →9
Here are some important details about this program — going through it line by line — that you need to understand in order to create other, more complicated sketches:
- →1 The first line of the program declares a function named setup. As you may recall from Chapter 1 of this minibook, a function is a set of programming instructions that are collected together and given a name. In this case, there is just a single instruction (the pinMode instruction in line 2). The setup function is called by the Arduino once, as soon as the Arduino starts up or is reset. This function is usually used to execute instructions that need to be executed only once, such as the pinMode instruction that establishes whether a particular pin will operate as an input or output pin.
There are a few other details about this line to note:
- The line begins with the word void. In C, all functions can return a value. That is, when a function finishes executing, it can return a value that can be used elsewhere in the program. Not all functions actually do return values, however. When a function does not return a value, the declaration must begin with the word void. This simply indicates that the setup function does not return a value.
- The function name setup is followed by a pair of parentheses, with nothing in between the parentheses. In C, data can be passed to a function using what are called arguments. These arguments must be listed in parentheses following the function name. In the case of the setup function, no arguments are required. However, the parentheses are always required; hence, a set of empty parentheses must always follow setup.
- The left curly brace character follows the parentheses. This marks the beginning of the programming instructions that are contained within the setup function. Everything between this left curly brace and a matching right curly brace (which is found in line 3) belongs to the function. In this case, that is just one instruction, the one found in line 2.
- →2 This line sets the input/output mode of pin 13. It does so by calling a built-in function named pinMode. The pinMode function is a function just like the setup function, except that it is predefined by Arduino as part of the standard function library — a collection of many standard functions that you can use in your Arduino programs. The pinMode function simply designates whether a particular I/O pin will be used as an input pin or an output pin.
Like most standard library functions, and unlike the setup function, the pinMode function does require arguments. In fact, it requires two arguments. These arguments must be enclosed in parentheses:
- The first argument specifies the pin for which you want to set the mode. In this case, we are setting the mode of pin 13.
- The second argument specifies what the mode should be. In this case, we’re setting the pin to operate as an output pin.
You may be wondering why the word OUTPUT is written in all capital letters. That’s because the word OUTPUT is what is known in C as a constant. A constant is a word that is defined within the C program as a symbol that stands for some predefined value. In this case, the constant OUTPUT is defined by the same standard library that defines the pinMode function. Another constant defined by this library is INPUT, which you could use instead of OUTPUT to designate the pin as an input pin.
One final and very important point to note about this line: It ends with a semicolon. In C, all statements must end with a semicolon. In general, a statement is an instruction that directs the program to do something. In this case, the statement tells the program to execute the pinMode function to define the mode of pin 13. The first line of the program doesn’t require a semicolon because it doesn’t tell the program to do anything; it simply marks the start of the setup function.
- →3 This closing (right) curly brace is matched with the opening (left) curly brace at the end of line 1 to mark the end of the setup function. Thus, this brace and the one in line 1 enclose the instructions of the setup function.
- →4 This line marks the beginning of the loop function. As you can see, it closely resembles line 1, which marks the beginning of the setup function. Like the setup function, the loop function doesn’t return a value, so it begins with the word void. And like the setup function, the loop function doesn’t use any arguments, so it includes an empty set of parentheses. And this line ends with an opening curly brace to mark the beginning of the statements that will be executed when the Arduino calls the loop function.
- →5 This line calls the digitalWrite function, another standard Arduino library function. This function sends output data to a pin. The two arguments specify the pin to which the data should be sent and the data value to send to the pin. In this case, the value HIGH is sent to pin 13, which causes the voltage level at pin 13 to go to
 , thus lighting the LED. As you might guess, HIGH is another constant defined by the standard library. Notice also that this line ends with a semicolon to mark the end of the statement.
 - →6 This line calls yet another built-in function called delay. The delay function takes a single argument, which represents the number of milliseconds that the program should pause. In this case, 1,000 milliseconds is specified as the argument; this pauses the program for one full second. Notice that the comma is not used in the argument value 1000. Notice also that this statement ends with a semicolon.
- →7 After the LED on pin 13 has been allowed to stay lit for one second, this line calls digitalWrite again to turn off the LED. To accomplish that, it uses the constant LOW as the data to be sent to the pin. This sets the output at pin 13 to low, which turns off the LED.
- →8 Now the program calls delay again to pause the program for another 1,000 milliseconds, allowing the LED to stay dark for one second.
- →9 The final closing (right) brace marks the end of the loop function. Thus, the loop function includes four statements: two that write data to pin 13 and two that pause the program. Because the loop function is called repeatedly by the Arduino, the loop function causes the LED to flash on and off repeatedly as long as the program continues to run.
Building a Test Circuit
Project 44 provides a simple testing environment that will be useful to you as you learn the basics of Arduino programming. This project simply places eight LEDs and eight current-limiting resistors on a breadboard and connects them to digital pins 0 through 7 on the Arduino. After you’ve built this circuit, you’ll create several Arduino sketches that use various programming techniques to flash these LEDs in interesting patterns.
Figure 2-1 shows the finished circuit, ready to be used for testing the programs you’ll write as you work your way through this chapter.
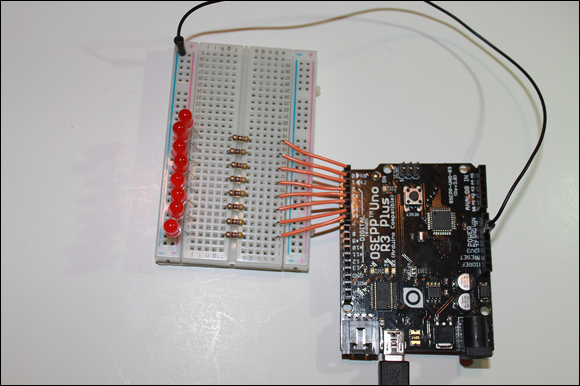
FIGURE 2-1: An Arduino UNO with eight LEDs connected via a breadboard (Project 44).
Project 44: An Arduino LED Test Board
In this project, you connect a breadboard with eight LEDs to digital ports 0 through 7 on an Arduino UNO board. You can use this board to test the programs shown in this chapter.


Parts
- One computer with Arduino IDE installed
- One Arduino UNO board
- One mini-B USB cable
- One small solderless breadboard (RadioShack 2760003)
- Eight 5mm red LEDs (RadioShack 2760209)
- Eight
 resistors (yellow-violet-brown)
 - Eight jumper wires
Steps
-
Insert the resistors.
 : E3 to F3
 : E5 to F5
 : E7 to F7
 : E9 to F9
 : E11 to F11
 : E13 to F13
 : E15 to F15
 : E17 to F17
 - Insert the LEDs.
LED
Anode
Cathode
LED1
J3
Ground
LED2
J5
Ground
LED3
J7
Ground
LED4
J9
Ground
LED5
J11
Ground
LED6
J13
Ground
LED7
J15
Ground
LED8
J17
Ground
- Connect jumpers from the breadboard to the digital pins on the UNO board.
Breadboard
Digital Pin
A3
0
A5
1
A7
2
A9
3
A11
4
A13
5
A15
6
A17
7
-
Connect the ground bus to the UNO board ground.
Use a jumper to connect any hole in the ground bus on the breadboard to either of the GND pins on the UNO board.
-
Connect the UNO to the computer.
Use the mini-B USB connector.
-
Upload the LED Flasher program (see Listing 2-2, in the next section) to the UNO.
The LEDs on the breadboard will flash on and off at one-second intervals.
Flashing the LEDs
Earlier in this chapter, you see a program that flashes a single LED on pin 13 on and off. In the rest of this chapter, I show several variants of that program, which flash the eight LEDs in the test project (Project 44) in various sequences. Along the way, you can add more C statements to your repertoire to provide more and more complex ways to control the flashing.
 Keep in mind throughout this chapter that if you can turn an LED on or off with an Arduino sketch, you can control anything that can be connected to an Arduino’s digital I/O port. The Arduino itself doesn’t know or care what kind of circuit you connect to a digital I/O pin. All it knows is that when you tell it to, the Arduino makes the I/O port HIGH or LOW. It’s the external circuitry connected to the pin that determines what happens when the pin goes HIGH.
The only limitation is that the Arduino itself can swing only about 20 mA through its I/O pins. If the circuit connected to the pin requires more current than 20 mA, you must isolate the higher-current portion of the circuit from the Arduino. The easiest way to do that is to use a transistor driver or a relay.
Listing 2-2 shows a simple program that flashes all eight of the LEDs on and off at half-second intervals. This program uses nothing more than the setMode, digitalWrite, and delay functions that you already know about. The program turns all eight LEDs on, pauses 500 ms (half a second), turns the LEDs off, waits another half second, and then jumps back to the Main label to start the whole process over.
LISTING 2-2 The LED Flasher Program
void setup() { →1
pinMode(0, OUTPUT); →2
pinMode(1, OUTPUT);
pinMode(2, OUTPUT);
pinMode(3, OUTPUT);
pinMode(4, OUTPUT);
pinMode(5, OUTPUT);
pinMode(6, OUTPUT);
pinMode(7, OUTPUT);
}
void loop() { →3
digitalWrite(0, HIGH); →4
digitalWrite(1, HIGH);
digitalWrite(2, HIGH);
digitalWrite(3, HIGH);
digitalWrite(4, HIGH);
digitalWrite(5, HIGH);
digitalWrite(6, HIGH);
digitalWrite(7, HIGH);
delay(500); →5
digitalWrite(0, LOW); →6
digitalWrite(1, LOW);
digitalWrite(2, LOW);
digitalWrite(3, LOW);
digitalWrite(4, LOW);
digitalWrite(5, LOW);
digitalWrite(6, LOW);
digitalWrite(7, LOW);
delay(500); →7
}
The following paragraphs summarize the operation of this program:
- →1 The start of the setup function, run once when the UNO starts up or is reset.
- →2 The next eight lines call the setMode function eight times to set the I/O mode for pins 0 through 7 to OUTPUT.
- →3 The start of the loop function, called repeatedly while the UNO runs.
- →4 The next eight lines call the digitalWrite function eight times to set the status of pins 0 through 7 to HIGH, thus turning on all eight LEDs.
- →5 This line calls the delay function to pause the program for 500 milliseconds.
- →6 The next eight lines call the digitalWrite function to set the status of pins 0 through 7 to LOW, thus turning off all eight LEDs.
- →7 This line calls the delay function to pause the program for 500 milliseconds.
Using Comments
A comment is a bit of text that provides an explanation of your code. The Arduino completely ignores comments, so you can put any text you want in a comment. Using plenty of comments in your programs to explain what your program does and how it works is a good idea.
To create a comment, place two forward slashes at the beginning of the line. When C sees the two slashes, it ignores the rest of the line. Thus, if you place the slashes at the beginning of a line, the entire line is considered to be a comment. If you place a comment in the middle of a line (for example, after a statement), everything after the slashes is ignored.
It’s a common programming practice to begin a program with a group of comments that indicates what the program does, who wrote it, and when. This block of comments may also indicate what I/O devices are expected to be connected to the Arduino. Listing 2-3 shows a version of the LED Flasher program that includes both types of comments.
LISTING 2-3 LED Flasher with Comments
// The LED Flasher Program
// Doug Lowe
// September 8, 2016
//
// This program flashes LEDs connected to digital pins 0
// through 7 at half-second intervals.
void setup() {
// Set pins 0 through 7 to OUTPUT
pinMode(0, OUTPUT);
pinMode(1, OUTPUT);
pinMode(2, OUTPUT);
pinMode(3, OUTPUT);
pinMode(4, OUTPUT);
pinMode(5, OUTPUT);
pinMode(6, OUTPUT);
pinMode(7, OUTPUT);
}
void loop() {
// Turn all LEDs on
digitalWrite(0, HIGH);
digitalWrite(1, HIGH);
digitalWrite(2, HIGH);
digitalWrite(3, HIGH);
digitalWrite(4, HIGH);
digitalWrite(5, HIGH);
digitalWrite(6, HIGH);
digitalWrite(7, HIGH);
// Wait a bit
delay(500);
// Turn all LEDs off
digitalWrite(0, LOW);
digitalWrite(1, LOW);
digitalWrite(2, LOW);
digitalWrite(3, LOW);
digitalWrite(4, LOW);
digitalWrite(5, LOW);
digitalWrite(6, LOW);
digitalWrite(7, LOW);
// Wait a bit
delay(500);
}
Creating Identifiers
An identifier is a word that you make up to refer to a programming element by name. Although you can assign identifiers to many types of elements, they’re most commonly used for the following:
- Function names, such as setup and setMode
- Variables and fields, which hold data used by your program
- Arguments, which pass data values to functions
You must follow a few simple rules when you create identifiers:
- Identifiers are case-sensitive. As a result, SalesTax and salesTax are distinct identifiers.
- Identifiers can be made up of upper- or lowercase letters, numerals, underscore characters (_), and dollar signs ($). Thus, identifiers have names such as Port1, SalesTax$, and Total_Sales.
- All identifiers must begin with a letter. Thus, a15 is a valid identifier, but 13Unlucky isn’t (because it begins with a numeral).
Using Variables
A variable is a name that is assigned to a particular bit of data in your program. Variables are essential to almost all serious Arduino programs, because they provide a way to keep track of data, perform calculations on data, and make decisions based on data.
In C, a variable can store four distinct types of data:
- int: The int type stores integer values — that is, whole numbers.
- float: The float type stores floating point numbers — that is, numbers with decimal points.
- double: The double type stores what are called double precision floating-point numbers — that is, numbers with decimal points that store twice the number of digits as a regular float variable.
- char: The char type stores a single byte of data.
You must define a variable before you can use it in an Arduino program. The most basic form for declaring a variable is this:
type name;
Here are some examples:
int time;
float reading;
char status;
Notice that a variable declaration is considered to be a statement in C, so it must be followed by a semicolon.
Once you’ve created a variable, you can use it in an assignment statement to assign it a value. An assignment statement consists of a variable name followed by an equals sign, followed by the value to be assigned. For example, this assignment statement assigns the value 500 to a variable named time:
time = 500
You can combine the declaration of a variable and the assignment of a value into a single statement, like this:
int time = 500;
Here, the variable time is both declared and assigned the value 500 in a single statement.
The value on the right side of the equals sign can be an arithmetic calculation. For example:
time = 500 + 10
In this example, the value 510 is assigned to the variable named time.
There’s not a lot of point in doing arithmetic using only numerals. After all, you could just do the calculation yourself. Thus, the previous example could be written like this:
time = 510
The real power of variable assignments happens when you use variables on the right side of the equals sign. For example, the following statement increases the value of the time variable by 10:
time = time + 10
In this example, the previous value of time is increased by 10. For example, if the time variable’s value was 150 before this statement executed, it will be 160 after.
An important thing to know about variables is that you can declare them either inside of a function or outside of a function. If you declare a variable inside of a function, the variable can be used only within that function. However, if you declare a variable outside of a function, the variable can be used in any of the functions in the program. Such a variable is sometimes called a global variable because it can be used globally throughout the program.
Although not required, it is customary to declare all variables within a function at the very beginning of the function, before any other statements in the function. For global variables, it is customary to define them near the beginning of the program, before any functions.
Doing Math
As you’ve already seen, C lets you perform addition, subtraction, multiplication, and division using the symbols (called operators) +, -, *, and /. For example:
int x = 10;
int y;
y = x * 3;
In this example, the value 30 will be assigned to the variable y.
Here are a few things you need to know about how C does math:
- C uses the normal order of operations found in math. So, multiplication and division are done before addition and subtraction. For example:
int x = 10;
int y;
y = x + 5 * 3This statement assigns the value 25 to y, because 5 is first multiplied by 3 and then the result is added to 10.
- You can use parentheses to force calculation of a certain part of the formula first. For example:
int x = 10;
int y;
y = (x + 5) + 3Here, C first does the calculation inside the parentheses, giving a result of 15. It then adds the 3 to the 15 to give the final result, 18.
- When you do division with integers, the fractional part of the answer is discarded and the result is an integer. For example:
int x = 8 / 3This statement assigns the value 2 to x. That’s because 8 divided by 3 is 2 with a remainder of 2. The remainder is discarded.
A Program That Uses Variables and Math
Listing 2-4 shows a program that uses a global variable to change the speed at which the LEDs flash each time the loop function is called. As you can see, a variable named Time is used to provide the number of milliseconds that the delay function is paused each time it is called. Each time through the loop, the value of the Delay variable is increased by 10. Thus, the LEDs flash very fast when the program first starts, but the flashing gets progressively slower as the program loops.
LISTING 2-4 The LED Flasher Program with a Variable
// The LED Flasher Program
// Doug Lowe
// September 8, 2016
//
// This program flashes LEDs connected to digital pins 0
// through 7 at half-second intervals.
// The Time variable
int Time;
void setup() {
// Set pins 0 through 7 to OUTPUT
pinMode(0, OUTPUT);
pinMode(1, OUTPUT);
pinMode(2, OUTPUT);
pinMode(3, OUTPUT);
pinMode(4, OUTPUT);
pinMode(5, OUTPUT);
pinMode(6, OUTPUT);
pinMode(7, OUTPUT);
// Initialize the Time variable
Time = 10;
}
void loop() {
// Turn all LEDs on
digitalWrite(0, HIGH);
digitalWrite(1, HIGH);
digitalWrite(2, HIGH);
digitalWrite(3, HIGH);
digitalWrite(4, HIGH);
digitalWrite(5, HIGH);
digitalWrite(6, HIGH);
digitalWrite(7, HIGH);
// Wait a bit
delay(Time);
// Turn all LEDs off
digitalWrite(0, LOW);
digitalWrite(1, LOW);
digitalWrite(2, LOW);
digitalWrite(3, LOW);
digitalWrite(4, LOW);
digitalWrite(5, LOW);
digitalWrite(6, LOW);
digitalWrite(7, LOW);
// Wait a bit
delay(Time);
// Increase the wait time
Time = Time + 10;
}
Using If Statements
An if statement lets you add conditional testing to your programs. In other words, it lets you execute certain statements only if a particular condition is met. This type of conditional processing is an important part of any but the most trivial of programs.
Every if statement must include a conditional expression that lays out a logical test to determine whether the condition is true or false. For example:
x > 5
This condition is true if the value of the variable x is greater than 5. If x has a value that is equal to or less than 5, the condition is false.
One of the oddities about the C programming language is that it requires you to use two equal sign to test for equality. For example:
x == 5
This condition is true if the value of the variable x is exactly 5. If the value is anything other than 5, the condition is false.
The basic form of an if statement looks like this:
if (condition)
statement
Note that the condition must be enclosed in parentheses.
Here’s a simple example:
if (Time == 500)
Time = 1000;
This if statement looks at the value of the Time variable and changes the value to 1000 if the current value is 500.
The statement part of the if statement can be either a single C statement or a group of statements. If you use a group of statements, you must enclose them in curly braces. For example:
if (Time == 500)
{
Time = 1000;
Counter = 0;
}
In this example, two statements are executed if the value of the Time variable is 500.
The if statement can also include an else component that provides one or more statements that are executed if the condition is not true. For example:
if (Time == 500)
Time = 1000;
else
Time = 500;
In this example, one of two things happens: If the Time variable has a value of 500, the Time variable’s value is set to 1000; but if the Time variable has a value other than 500, the Time variable’s value is set to 500.
As in the if component, the else component can have more than one statement. In that case, the statements must be bounded by braces, like this:
if (Timer == 500)
{
Timer = 1000;
Counter = 0;
}
Else
{
Timer = 500;
Counter = Counter + 1;
}
One final thing to know about if statements is that one if statement can be contained within another. This arrangement is called nesting, and it’s very useful for implementing complex decisions.
Listing 2-5 shows a program that cleverly uses a nested if statement to flash the LEDs in an alternating pattern of three quick flashes followed by three longer flashes. The program uses a variable named Time to control the delay interval (250 for the quick flashes, 500 for the longer flashes) and a second variable named Counter to count how many times the LEDs have been flashed. The nested if statement looks like this:
if (Counter == 3)
{
if (Time = 250)
{
Time = 500;
}
else
{
Time = 250;
}
Counter = 0;
}
Here, the first if statement is used to change the Time variable and reset the Counter variable to zero whenever the Counter variable reaches 3. Within this if statement, a second if statement checks the value of the Time variable and sets it to 500 if the variable’s current value is 250; otherwise, the Time variable is set to 500. In essence, this inner if statement toggles the Time variable between 250 and 500 each time the Counter variable reaches 3.
LISTING 2-5 The LED Flasher Program with an IF statement
// The LED Flasher Program
// Doug Lowe
// September 8, 2016
//
// This program flashes LEDs connected to digital pins 0
// through 7. The LEDs are alternately flashed quickly 3
// times, then more slowly 3 times.
// The Time variable
int Time;
int Counter;
void setup() {
// Set pins 0 through 7 to OUTPUT
pinMode(0, OUTPUT);
pinMode(1, OUTPUT);
pinMode(2, OUTPUT);
pinMode(3, OUTPUT);
pinMode(4, OUTPUT);
pinMode(5, OUTPUT);
pinMode(6, OUTPUT);
pinMode(7, OUTPUT);
// Initialize the Time and Counter variables
Time = 10;
Counter = 0;
}
void loop() {
// Turn all LEDs on
digitalWrite(0, HIGH);
digitalWrite(1, HIGH);
digitalWrite(2, HIGH);
digitalWrite(3, HIGH);
digitalWrite(4, HIGH);
digitalWrite(5, HIGH);
digitalWrite(6, HIGH);
digitalWrite(7, HIGH);
// Wait a bit
delay(Time);
// Turn all LEDs off
digitalWrite(0, LOW);
digitalWrite(1, LOW);
digitalWrite(2, LOW);
digitalWrite(3, LOW);
digitalWrite(4, LOW);
digitalWrite(5, LOW);
digitalWrite(6, LOW);
digitalWrite(7, LOW);
// Wait a bit
delay(Time);
// Determine the correct wait time
if (Counter == 3)
{
if (Time == 250)
{
Time = 500;
}
else
{
Time = 250;
}
Counter = 0;
}
// Increment the counter
Counter = Counter + 1;
}
Using While Loops
As you already know, the main part of any Arduino program is a function called loop, which the Arduino calls repeatedly as long as the program runs. So, you’re already familiar with the basic concept of looping, which is an essential element of nearly all computer programs, regardless of the programming language used or the type of device on which the program is running.
In addition to the basic looping mechanism provided by the loop method, you can provide additional forms of looping within the setup or loop methods. The C language provides several ways to create program loops. The most basic is called a while loop, which is simply a loop that repeats continuously as long as some condition is met.
The basic form of a while loop is this:
while (condition)
statement
Note that the statement part of the while loop can be a single statement or a series of statements enclosed in braces.
Here’s an example of a while loop that initializes pins 0 through 7 as OUTPUT pins:
int pin = 0;
while (pin < 8)
{
setMode(pin, OUTPUT);
pin = pin + 1;
}
On each execution of this loop, the setMode method is called to set the mode of the pin indicated by the pin variable to OUTPUT. Then the value of the pin variable is increased by 1. So, the first time through the loop, the mode of pin 0 is set. The second time, pin 1 is set. And so on, until pin 7 is set. On that execution of the loop, the pin variable is increased to 8. Then, on the next execution of the loop, the condition is false and the loop ends.
This business of adding one to a variable in a loop is so common that the C programming language has a helpful shortcut called the increment operator. The increment operator is simply two plus signs in a row that you write after a variable name instead of before it. For example:
pin++;
Here’s what the complete loop looks like using the increment operator:
int pin = 0;
while (pin < 8)
{
setMode(pin, OUTPUT);
pin++;
}
Listing 2-6 shows a version of the LED flasher that flashes the LEDs one at a time for half a second each, starting with the LED on pin 0 and proceeding through the LED on pin 7. Notice that because of the while statement inside of the loop function, the program actually flashes all eight of the LEDs on each execution of the loop function.
LISTING 2-6 LED Flasher with a while Loop
// The LED Flasher Program
// Doug Lowe
// September 8, 2016
//
// This program flashes LEDs connected to digital pins 0
// through 7. The LEDs on each pin are flashed one at a
// time in sequence from pin 0 to pin 7 for half a
// second each.
// The Time and Pin variables
int Time;
int Pin;
void setup() {
// Set pins 0 through 7 to OUTPUT
Pin = 0;
while (Pin < 8)
{
pinMode(Pin, OUTPUT);
Pin++;
}
// Initialize the Time variable
Time = 500;
}
void loop() {
Pin = 0;
while (Pin < 8)
{
digitalWrite(Pin, HIGH);
delay(Time);
digitalWrite(Pin, LOW);
Pin++;
}
}
Using For Loops
A for loop is a special type of looping statement that automatically keeps a counter variable. For loops are ideal when you want to execute a loop a certain number of times or when you want to perform an action on multiple I/O pins.
The basic structure of a for loop looks like this:
for (initialize; test; increment)
statement
The following paragraphs describe what the three parts in the parentheses do:
- The initialize part initializes the loop and establishes the counter variable that will be used. The variable can already exist or it can be declared in the initialize part. Typically, the variable is given a starting value here.
- The test part is a condition test that is used to determine when the loop ends. Typically, the condition will test for a certain value of the counter variable. The loop keeps executing as long as the condition is true. When the condition tests false, the loop ends.
- The increment part is used to increment the counter variable.
Here’s a simple example that sets the mode of pins 0 through 7 to OUTPUT:
for (int Pin = 0; Pin < 8; Pin++)
{
setMode(Pin, OUTPUT);
}
In this example, Pin is declared within the for loop as the counter variable and is given an initial value of zero. The loop continues to execute as long as the Pin variable is less than 8, and after each execution of the loop, the Pin variable is incremented by 1. In this way, the loop sets the mode for pins 0 through 7.
One interesting feature of a for loop is that you can count backward. The easiest way to do this is to use the decrement operator, which is similar to the increment operator you learn about earlier in this chapter, but which uses two minus signs instead of two plus signs. As you might guess, the decrement operator subtracts one rather than adds one.
To count backward, you should set the initial value of the counter variable to the value you want to start with and test for the lower limit value in the condition. For example:
for (int Pin = 7; Pin >= 0; Pin--)
{
digitalWrite(Pin, HIGH);
delay(500);
digitalWrite(Pin, LOW);
}
This example flashes the LEDs in reverse order, from pin 7 to pin 0. (Notice the >= condition test, which tests True if the value of the Pin variable is either greater than or equal to zero.)
You can also skip-count with a for loop. For example, the following loop flashes every other LED (that is, the LEDs on pins 0, 2, 4, and 6):
for (int Pin = 0; Pin < 8; Pin = Pin + 2)
{
digitalWrite(Pin, HIGH);
delay(500);
digitalWrite(Pin, LOW);
}
Listing 2-7 shows a version of the LED Flasher program that uses a pair of for loops to flash the LEDs first in one direction, and then in the opposite direction. This creates an effect similar to the spooky electronic eyes on the evil Cylons in the old TV series Battlestar Galactica. The setup function uses a for loop to initialize the output pins. Then, in the loop function, two for loops are used. The first for loop flashes the LEDs in sequence from pins 0 to 7. The second for loop flashes the LEDs in reverse order, from pins 6 through 1. Notice that the second for loop doesn’t flash all eight pins. If it did, pins 0 and 7 would actually flash twice with each call of the loop function, which would mar the timing of the effect.
LISTING 2-7 The LED Flasher Program with for Loops
// The LED Flasher Program
// Doug Lowe
// September 8, 2016
//
// This program flashes LEDs connected to digital pins 0
// through 7. The LEDs on each pin are flashed one at a
// time in forward sequence from pin 0 to pin 7 and then
// backwards, each for half a second.
// The Time variable
int Time;
void setup() {
// Set pins 0 through 7 to OUTPUT
For (int Pin = 0; Pin < 8; Pin++)
{
pinMode(Pin, OUTPUT);
}
// Initialize the Time variable
Time = 500;
}
void loop() {
// Flash pins 0 through 7 forward
for (int Pin = 0; Pin < 8; Pin++)
{
digitalWrite(Pin, HIGH);
delay(Time);
digitalWrite(Pin, LOW);
}
// Flash pins 6 through 1 backward
for (int Pin = 6; Pin > 0; Pin--)
{
digitalWrite(Pin, HIGH);
delay(Time);
digitalWrite(Pin, LOW);
}
}
Crafting Your Own Functions
In the previous sections, I explain how to create the setup and loop functions that are required by every Arduino program, and how to use standard library functions such as pinMode, digitalWrite, and delay. In the last section of this chapter, I tell you how to create your own functions that you can call from the setup or loop functions to simplify your code.
Why would you want to do this? Here’s a simple example: In Listing 2-7, you may have noticed that the same three lines of code were repeated in the two for loops used in the loop function. Rather than repeat those three lines of code, you could create your own function that contains those lines. You might call this function flashLED. Then all you’d have to do in the for loop is call the flashLED function.
To create a function, you must declare the function much the same as you declare the setup and loop functions. The main difference is that when you create your own functions, you’ll likely need to pass data to the functions via arguments. For example, you’ll need to pass the pin number to the flashLED function. You may also want to pass the delay time as an argument.
Here’s an example of a function that turns an LED on, waits for a certain period of time, and then turns the LED off:
void flashLED(int Pin, int Time)
{
digitalWrite(Pin, HIGH);
delay(Time);
digitalWrite(Pin, LOW);
}
As you can see, the first line of the function declares the arguments in a manner that’s similar to how variables are declared. The first argument is of type int and is named Pin, while the second argument is also of type int but is named Time.
Listing 2-8 shows a version of the Cylon-eyes program that uses a function to flash each LED. Notice that this version of the program eliminates the global Time variable, because the duration of the flash is passed to the flashLED function as a parameter.
LISTING 2-8 The LED Flasher Program with a Function
// The LED Flasher Program
// Doug Lowe
// September 8, 2016
//
// This program flashes LEDs connected to digital pins 0
// through 7. The LEDs on each pin are flashed one at a
// time in forward sequence from pin 0 to pin 7 and then
// backward, each for half a second.
// The Time variable
void setup() {
// Set pins 0 through 7 to OUTPUT
For (int Pin = 0; Pin < 8; Pin++)
{
pinMode(Pin, OUTPUT);
}
}
void loop() {
// Flash pins 0 through 7 forward
for (int Pin = 0; Pin < 8; Pin++)
{
flashLED(500);
}
// Flash pins 6 through 1 backward
for (int Pin = 6; Pin > 0; Pin--)
{
flashLED(500);
}
}
void flashLED(int Pin, int Time)
{
digitalWrite(Pin, HIGH);
delay(Time);
digitalWrite(Pin, LOW);
}
Besides accepting arguments, a function can also return a value. There’s not much use for functions that return values in programs that simply flash LEDs, so let’s consider a different example. Suppose your Arduino project has a need to calculate the area of a rectangle, where the height and the width of the rectangle are represented by int values. You could calculate the area as follows:
int x = 5;
int y = 10;
int a;
a = width * height;
Another way to do this would be to create a function that accepts the width and the height as arguments and returns the area of the rectangle. Here’s how you could write the function:
int area(int width, int height)
{
int area;
area = width * height;
return area;
}
In this example, the function area is given a return type of int, meaning that the function will return an integer value when called. Then, in the body of the function, a return statement is used to end the function and provide the return value.
Here’s how you could use this function to calculate the area:
int x = 5;
int y = 10;
int a;
a = area(x, y);
It’s important to note here that the names of the variables you specify as arguments when you call the function do not have to match the names of the arguments specified within the function. Instead, the arguments are positional: The first argument you pass to the function will be used as the width, and the second will be used as the height.