
Chapter 9: Converting Your Visitors to Customers
Running a successful business involves not only being able to attract new visitors but also the ability to convert these visitors into meaningful business opportunities and, eventually, customers. The concept of inbound marketing was built on this premise. This enables you to connect with potential customers and prospects, and then eventually convert them to paying customers by giving them relevant and valuable content to inform their decision.
HubSpot is designed to help you reach your potential customers, build meaningful relationships with them as they become relevant opportunities, and then turn them into a customer and—eventually—your biggest promoters. It has several tools—for example, smart content, emails, and workflows—to help you achieve this.
In this chapter, we'll show you how to use HubSpot to create lasting relationships with prospects and customers through email nurture plans and workflows. We will also explore the use of conversion tools such as calls to action (CTAs), forms, and lead flows to capture the information of prospects visiting your site.
We'll cover the following topics in detail:
- Creating forms and using their features
- Creating a landing page in HubSpot
- Building lead-nurturing workflows
By the end of this chapter, you will have learned how to use HubSpot's conversion tools to personalize your communication with prospects and increase the number of qualified contacts handed over to sales.
Technical requirements
To get the most out of this chapter, you will need the following:
- A HubSpot Marketing Professional account
- Super admin access to your HubSpot portal
Creating forms and using their features
Forms are a critical part of any marketer's strategy as they are the most popular way to capture a lead's details. Every website page, campaign, and social media ad eventually leads the prospect to give you their details using a form. Therefore, the more control you have over adjusting fields or optimizing the user experience (UX) when filling out a form, the higher the likelihood of capturing more contacts. Remember—the goal is to make filling out forms as painless as possible and to ask the right questions at the right time. It is often said that filling out a form is like going on a first date. There are some questions you ask on a first date and others you leave for second or future dates.
Unlike regular website forms, using HubSpot forms for your website and campaigns allows you to capture vital information without making the user feel overwhelmed at having to fill out too many fields. Here are five features of HubSpot forms that can help you convert more leads:
- Choose from a variety of forms: From website forms to standalone forms, exit pop-up forms, or slide-in forms, HubSpot allows you to create any type of form, without coding, to increase the chances of capturing a visitor's information.
- Add custom fields: You can choose to add any fields or questions to forms.
- Optimize your form experience with dependent fields or progressive fields: This feature allows you to decrease the length of your form by keeping certain questions hidden until a user has answered previous questions.
- Ensure data privacy with built-in General Data Protection Regulation (GDPR) text: Stay compliant with this feature by explicitly showing visitors how their information will be stored and used when filling out a form.
- Continue the conversation by sending a follow-up email: As most form submissions require some way to follow up, you can build a follow-up email within the Forms tool if needed.
In the following sections, we will explain in depth how to use each of these features, but first, let's understand how to access the Forms tool in HubSpot.
To access forms in HubSpot, go to Marketing | Lead Capture | Forms, as shown in the following screenshot:

Figure 9.1 – Accessing the Forms tool in HubSpot
Now, we can look at the five features of the HubSpot Forms tool.
Choosing your form type
By clicking Create Form on the top right, you will soon arrive at a dialog box showing six different types of forms you can create within HubSpot, as illustrated in the following screenshot:

Figure 9.2 – Types of forms in HubSpot
The types of forms you can choose are explained as follows:
- Embedded form: These are forms you would typically use on your website or a landing page.
- Standalone page: These are forms you would like to use just as a form without any additional text or design around it. Think of it as Google Forms when you just want people to fill out the information.
- Pop-up box: These are for exit forms that can be placed on the site when someone is leaving your website.
- Dropdown banner: These are forms that are placed on the top of your website or landing page to make a specific announcement or lead to another place.
- Slide in left box: These are forms that can be placed on a specific page and slide in from the left so that they can prompt the visitor to click and be redirected to another place on your site. This technique is often used on blog pages so that users can then download a higher-converting asset such as an e-book or a case study.
- Slide in right box: This is very similar to the Slide in left box form type just described, with the only difference being that it slides in from the right.
In Chapter 2, Generating Quick Wins with Hubspot in the First 30 Days, we explained how to use Pop-up box as a quick win to convert more leads. Slide in left box and Slide in right box are relatively new features released by HubSpot. They are like a pop-up form and can be used as a quick-win technique as well to improve conversions. So, in this chapter, we will focus on how to optimize the use of the Embedded form and Standalone page forms. They both operate the same way; technically, only their use cases are different.
Once you click on Embedded form and Next, you will then be taken to another page that prompts you to select a template, as shown in the following screenshot:

Figure 9.3 – Selecting a template for your forms
HubSpot offers some pre-made templates to help you decide on the most important fields for the various types of forms you might be considering. Choosing any of them can also be a great start in creating your form. In this example, however, we will begin by clicking on Blank template and then Start.
Adding fields to a form
You will notice once you arrive at the next page that Email is already a mandatory field in the form. This is because it is the minimum information you will need to collect about a contact. Also, as HubSpot is an inbound platform mostly focused on online communication, it only uses email to identify a unique contact and not something else, such as a phone number.
Now, let's say we are creating a webinar form for an upcoming webinar event. The first step is to consider the minimum information you would need to collect from a contact registering for it. Besides email, you may want to consider First Name and Last Name fields, and if you aren't insisting on a company email address, then you may want to add a Company Name field.
So, let's first see how to add these fields. Have a look at the following screenshot:

Figure 9.4 – Understanding form fields
As you can see in Figure 9.4, all fields in the system are on the left-hand side, while fields that will appear on the form are located on the right side. To add a field to the right side, you need to follow these steps:
- Search for the name of the field using the search bar on the top left.
- Click on the field you want to choose. It will then appear on the right side.
- Rearrange the fields in the order you want them to appear on the form. You can see an illustration of this in the following screenshot:

Figure 9.5 – Building fields in a form
Should you wish to add more fields to your form that do not exist in the list of options, click on Create new on the top left-hand side of the screen, as illustrated in the following screenshot:
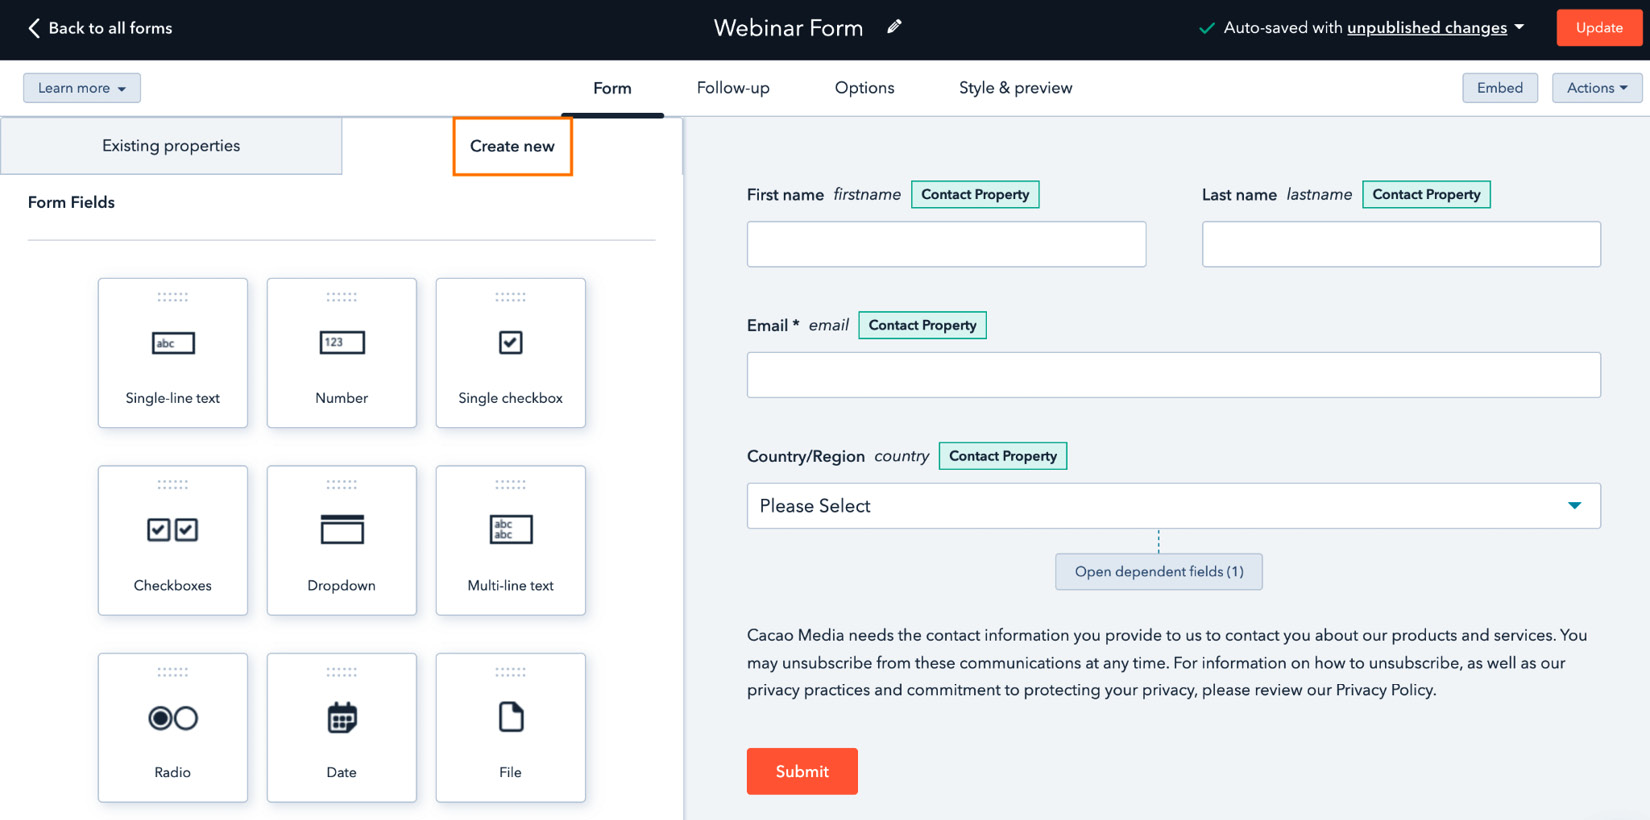
Figure 9.6 – Creating additional fields
Should you wish to add text—for example—to your form, you will need to select the Header Text option. The text will then appear on the top of the form, and you can add any text you wish by clicking on this sample text that appears. You can see an illustration of this in the following screenshot:

Figure 9.7 – Adding header text
Once you've edited the text, click Done, and the text will appear at the top of the form, as seen in the following screenshot:

Figure 9.8 – Editing the header text
Completing these steps will allow you to have a completed form, as seen in the following screenshot:

Figure 9.9 – Completed form
The next step is to find ways to optimize the form and make it easier for people to fill it out.
Optimizing the form by adding dependent or progressive fields
Although most online users are accustomed to filling out forms, this does not mean they enjoy doing it. Most drop-offs from websites and campaigns occur when a contact reaches a form and, for some reason, decides not to complete it. The most popular reasons for not completing a form are that the form is too long or asks for information the visitor is not yet ready to share. However, marketers are often measured by how many of these contacts they can get to fill out a form while ensuring these contacts are qualified.
Next are three important features HubSpot forms offer to ensure conversions are not hampered:
- Collecting business emails instead of generic emails: To get users to enter their business email address in a form, you would need to block the ability for them to add a free email address. To enable this feature, click on the Email field in the right-hand section, and another box on the left will pop up, as shown in the following screenshot. Scrolling down on this section, you will eventually arrive at a box that says Email domains to block. Here, you have the option to add domains, such as your competitors if you don't want them to access this event. Or, you can simply check the Block free email providers box:

Figure 9.10 – Blocking free email providers
Note
Once you've chosen to block all free email domains, it is best to remove Company Name from the form. Asking this question is redundant, as HubSpot can then automatically fill this in using the contact's domain provided in the email address.
- Using dependent fields to ask more questions without making the form lengthy: Another consideration when creating a form is to think about questions that can be answered depending on the previous answer in a field. For example, let's say I added Country to the list of form fields, and then, if a contact chooses United States, only then would they see another field asking to choose a State value. To build this logic, you would need to use a feature called Dependent Fields. Follow these steps to execute it:
- Add the field you want to be first filled out to the form. In this case, it's Country/Region.
- Click on the field, and then the box on the left changes, as shown in the following screenshot. After this, click on the Logic tab:

Figure 9.11 – Building logic into fields
- Scroll until you see Dependent fields, as shown in the following screenshot. Once there, complete the logic, which in this case is If country contains any of United States, then show State/Region field. The purpose of this function is that the State/Region field will remain hidden in the form from visitors who never choose United States as their country. Only visitors who choose United States as their country will see the State/Region field after:
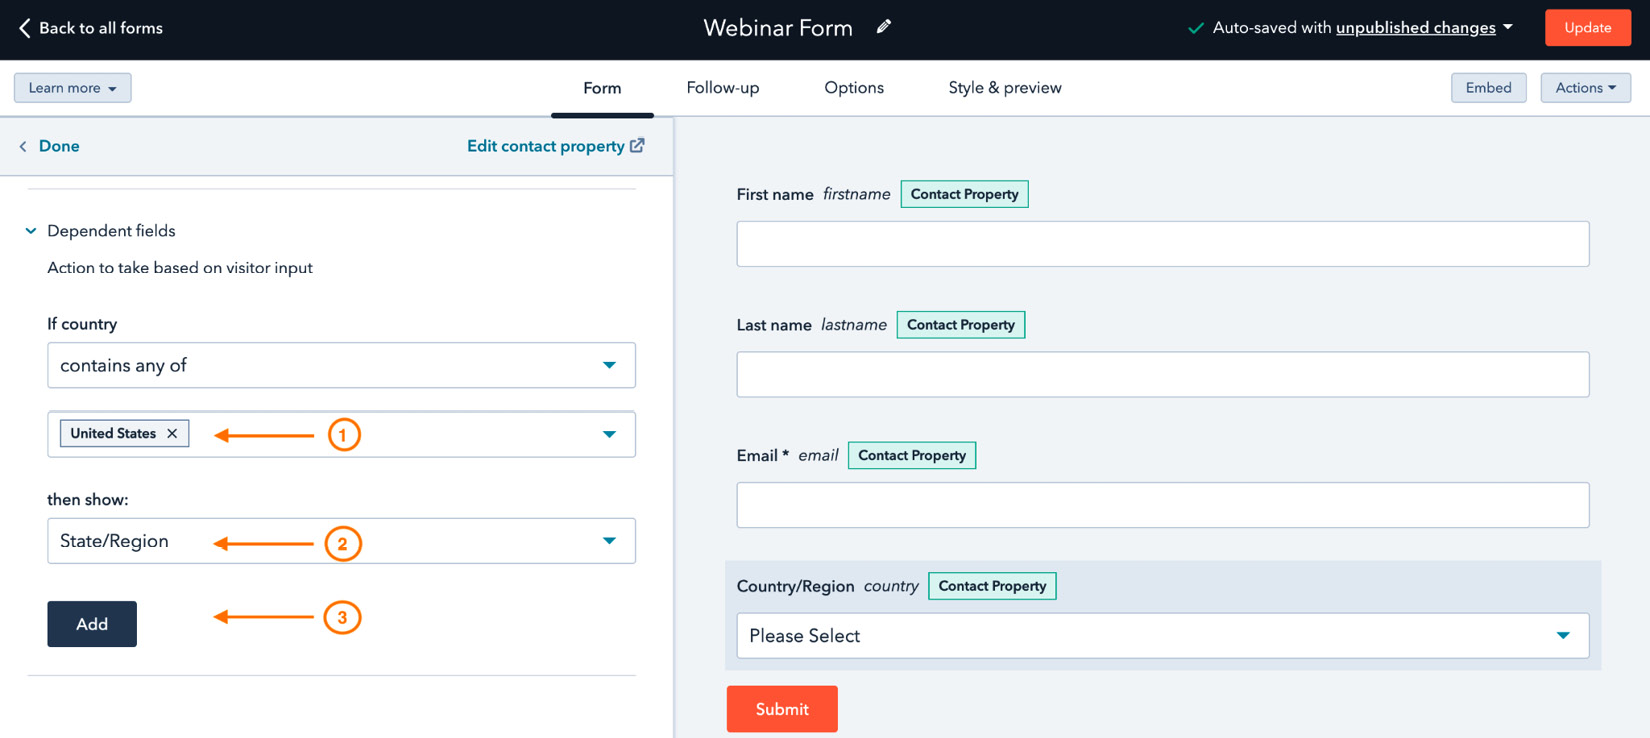
Figure 9.12 – Building dependent fields in a form
- Once this is completed, the dependent field appears in the form, as seen in the following screenshot, and will operate accordingly:

Figure 9.13 – Dependent field in a form
- Being able to use the progressive forms feature: Progressive forms allow you to change the fields displayed on a form for returning visitors so that you can capture more interesting information from the contact. As mentioned earlier, you can think of it very much like dating. You don't want to ask your date every time you meet them what their first name, last name, and email address are. Instead, you want to get to know them better every time you meet them. So, you may consider asking questions such as "What is your job title?", "What is your phone number?", or "Are you currently using a CRM?".
Let's see how to build progressive fields. Proceed as follows:
- Ensure you are back to the view where you see Existing Properties on the top left-hand side of the screen.
- Look for the questions you would like to ask of returning visitors and drag and drop them to the bottom section on the right, in a section called Queued Progressive Fields. Your form should then look like the one shown here:
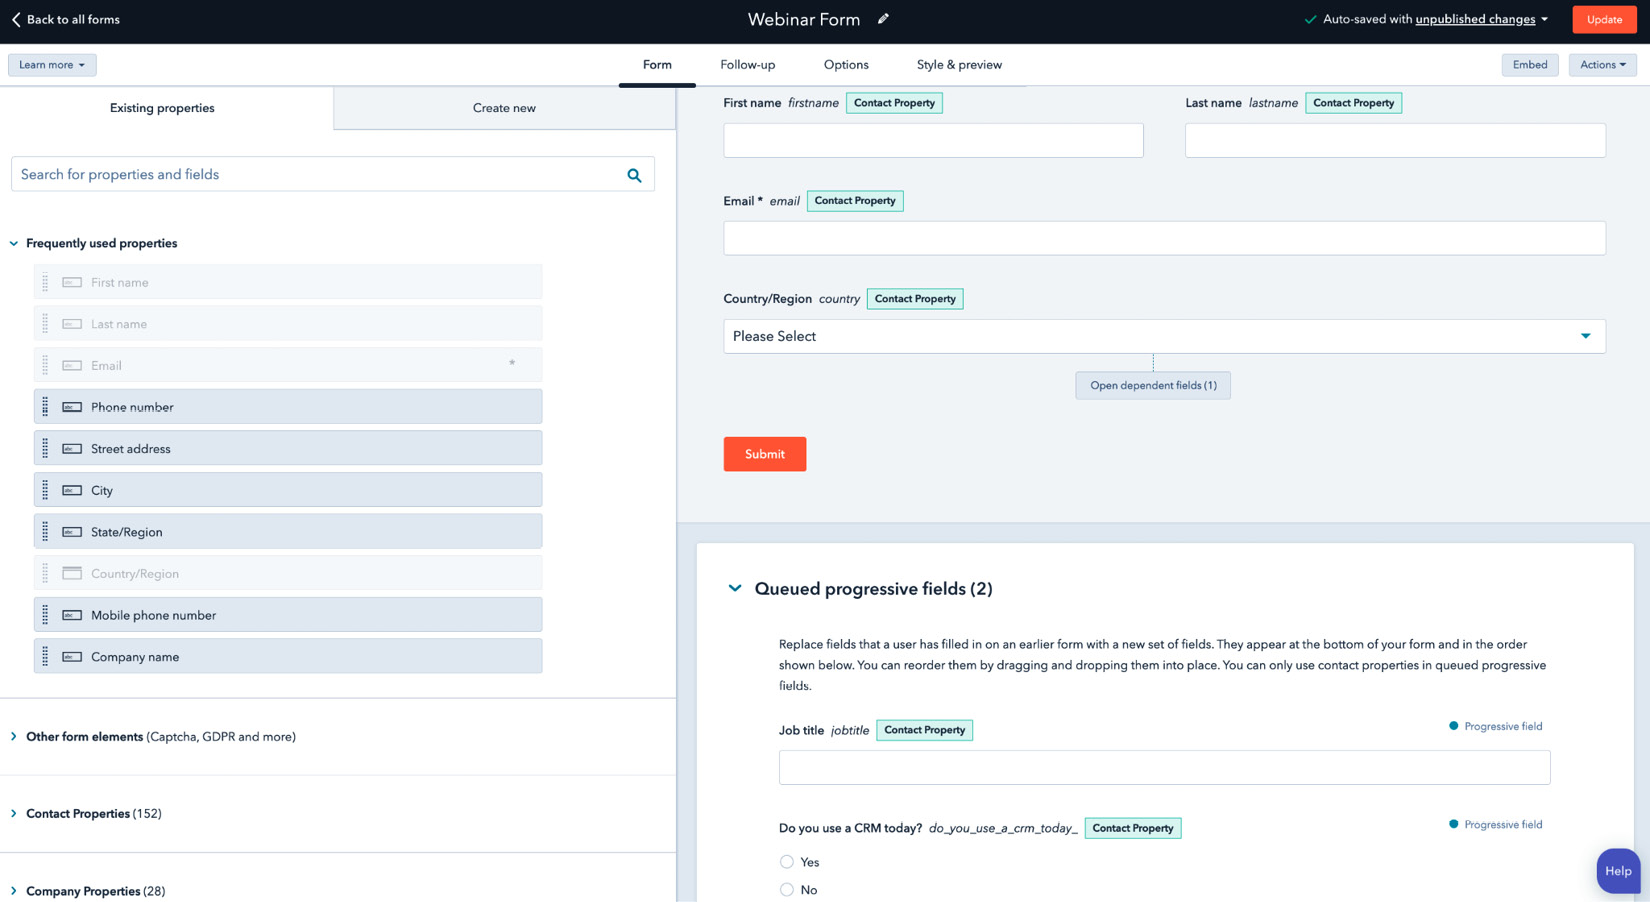
Figure 9.14 – Successfully adding progressive fields to a form
Remember that these progressive fields will only be shown to returning visitors whose information you already have in your customer relationship management (CRM) database. New visitors who have not yet converted or given you their information will see regular fields, such as First Name, Last Name, Email, and Country.
Preventing spam submissions and ensuring data privacy
Now that your forms are optimized, the next consideration is to add elements that would prevent bots and spam from submitting information to your forms and to ensure your forms are GDPR- and California Consumer Privacy Act (CCPA)-compliant. Adhering to these regulations allows you to store the information of your contacts and reach out to them in the future without being exposed to fines and penalties.
To set up these features, follow these steps:
- Set up reCAPTCHA: reCAPTCHA encourages users to go through one more step of verification before submitting forms. It could be to rewrite a combination of letters and numbers or to identify all the traffic lights in a picture. This helps the system verify you are a real user and not a bot. To turn this feature on in HubSpot, scroll down to the left-hand side of the page until you reach the Other form elements section, and then turn on the toggle next to it, as shown in the following screenshot:

Figure 9.15 – Adding reCAPTCHA
- Adding GDPR notices to your forms: Data privacy has become a central issue among online users, and therefore it is highly recommended to always have some type of GDPR notice on any forms that exist on your website or campaigns. This ensures users are fully informed of your interest to store their data and contact them in the future. This is particularly important if your target audience is primarily located in Europe and the United States (US) (the US equivalent of GDPR is CCPA).
To activate this feature, you simply need to choose one of the three pre-built options of GDPR notices in HubSpot. To access them, you will find a box called GDPR options, just below CAPTCHA (spam prevention). Clicking on it gives you three options from which you can choose. Once chosen, it will appear right after the last field on the form so that visitors can comply before clicking Submit. See the following screenshot to view this in more detail:
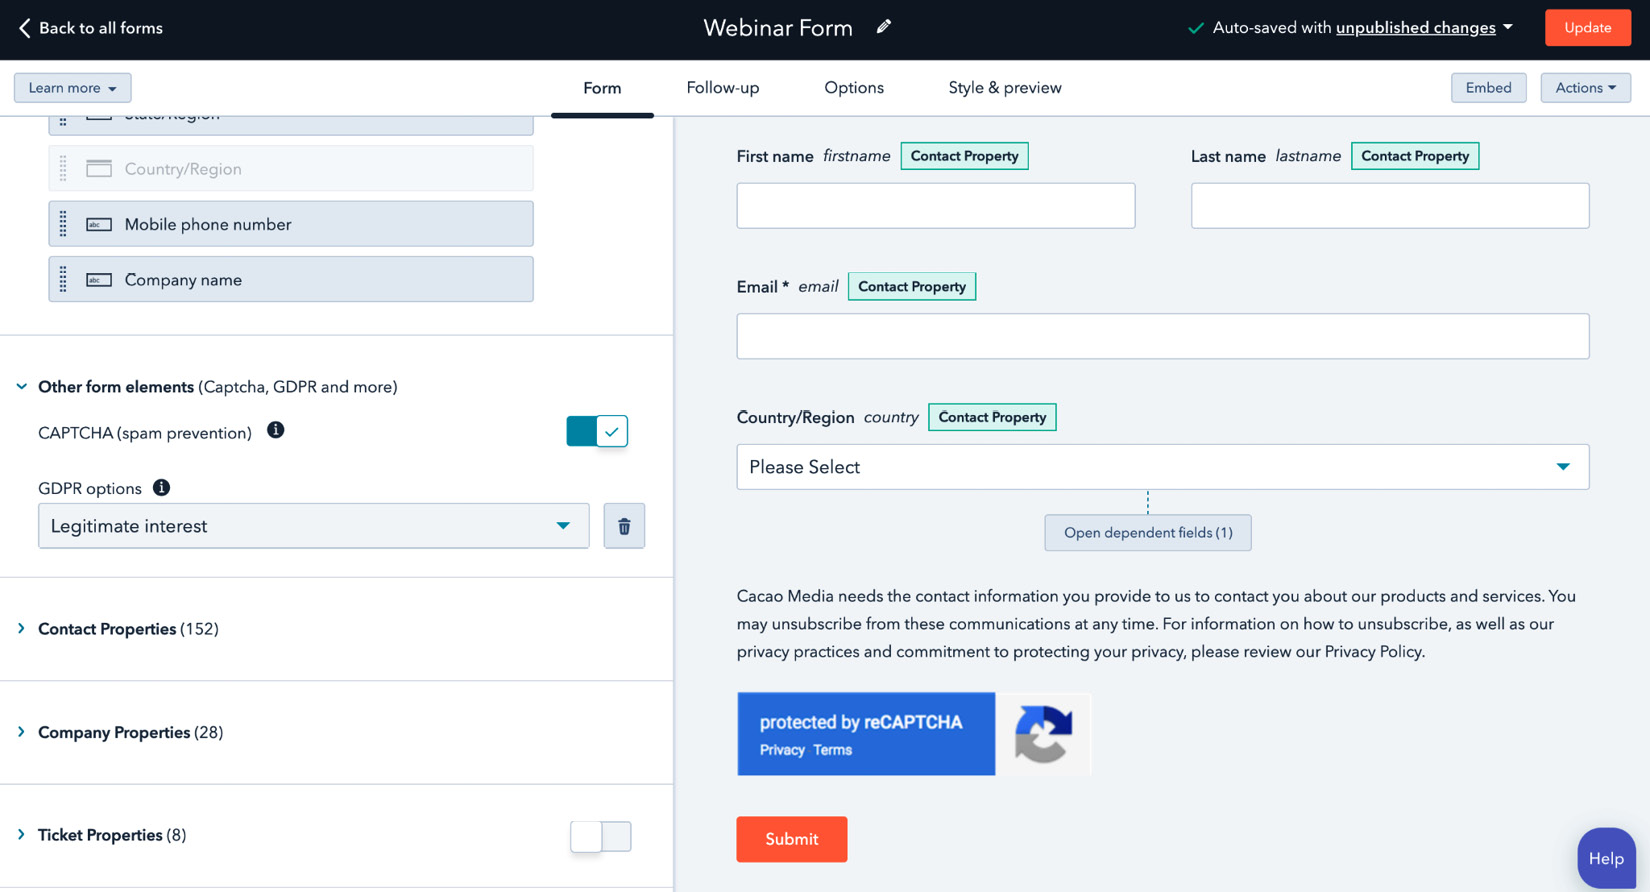
Figure 9.16 – Adding GDPR notices
Adding these two features to your form often helps to improve the quality of the leads you attract, since—as we will discuss later in the chapter—you would like to nurture these contacts a bit further before they get on a call with you.
Adding a follow-up email
Now that we have all elements of the form in place, the next step is to ensure there is some confirmation for contacts when they have submitted a message. HubSpot forms make this easy by providing an option to create a follow-up email within a form. To access it, click on Follow-up on the top navigation bar in the form module, as shown in the following screenshot:
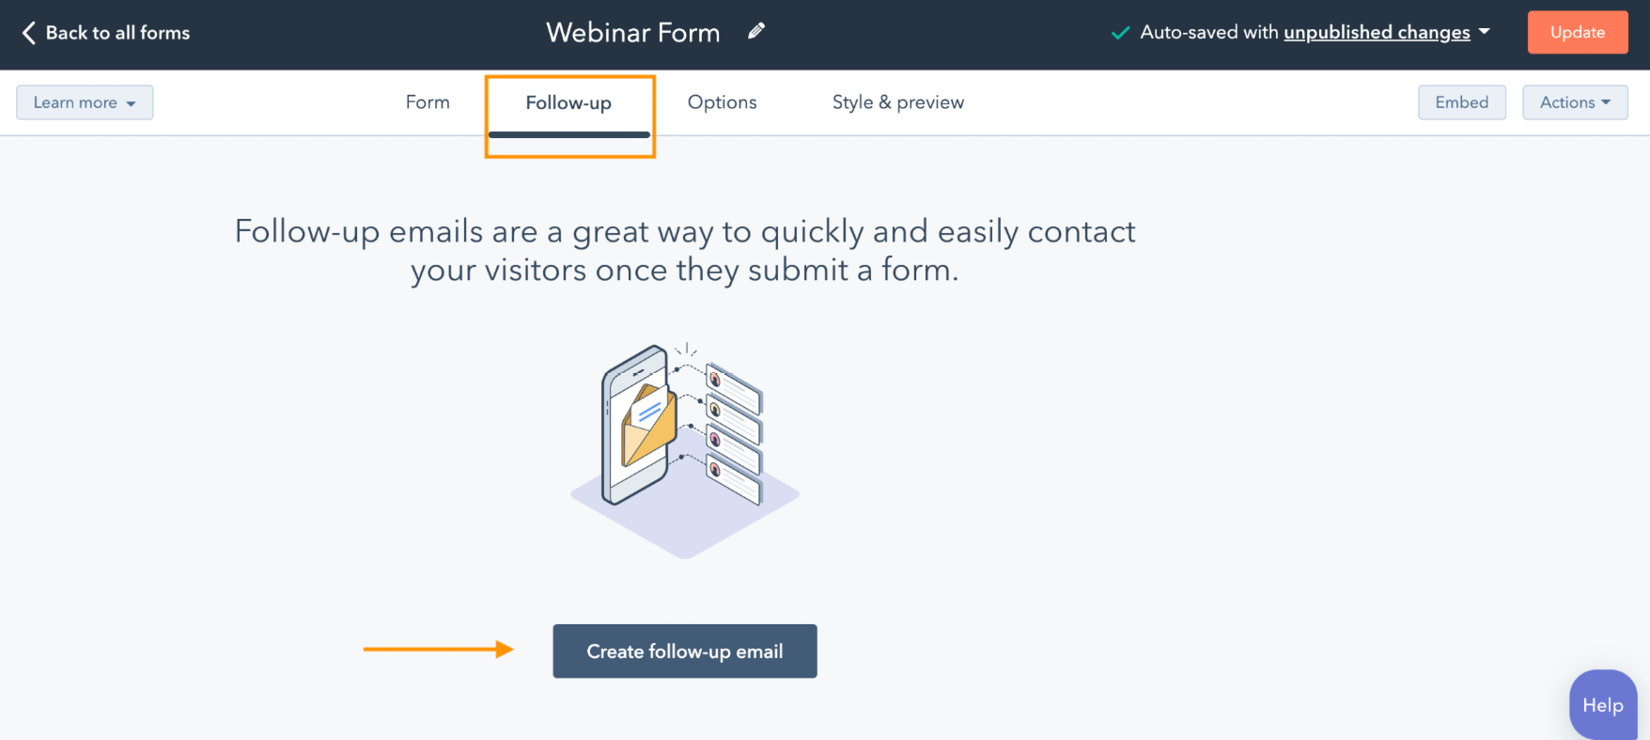
Figure 9.17 – Accessing follow-up emails
Once there, click on Create follow-up email and begin creating an email. Note that for this particular webinar form, you won't necessarily need to create a follow-up email. The email will automatically come from the platform hosting your webinar—Zoom or GoTo Webinar. But for illustration purposes, we have created an email as it can be used for other scenarios such as a Contact us form or a Downloading the content form. The process is illustrated in the following screenshot:

Figure 9.18 – Building a follow-up email
A follow-up email is created, as seen in the following screenshot, but note a few restrictions when creating this email. For example, personalization tokens are not accessible in this simple form email template, as well as the ability to edit the footer address to a single line or two not being possible. If these are features important to your follow-up email, I suggest building a regular automated email and then adding it to the workflow. Later in this chapter, we will demonstrate how to do this. In the meantime, the following screenshot demonstrates an example of what a follow-up email would look like when created in a form:

Figure 9.19 – Example of a follow-up email
Once a follow-up email is created, the next option is to define what should happen next when a user submits the form and who should be notified, as well as whether these contacts should be set as marketing contacts and be created as new contacts in your CRM.
Defining the next steps once a form is submitted
I'm sure you've filled out a form online before and recall one of the following two things happening:
- You saw a thank-you message appear after you clicked Submit.
- You were redirected to another page where a thank-you message appeared, along with some other assets.
To execute either of these actions in HubSpot, you must first click on Options on the top navigation bar of the form, and then the first section allows you to determine which of these actions you would like to occur. To display a thank-you message, simply click on this option and create a message you would like to appear. Notice in this textbox that you can add hyperlinks, so if you created this form to download an asset (for example), you can give access to the asset from this message. You can see an illustration of this in the following screenshot:

Figure 9.20 – Setting up a thank-you message after a contact submits a form
On the other hand, if you wish to redirect users to another page to display more information, you can do so by checking the Redirect to another page option, as seen in the following screenshot:

Figure 9.21 – Setting up a redirect link after a contact submits a form
The next setting you may like to configure for form submissions is who should get a notification once a form is submitted. By default, whoever creates the form is notified, but this isn't often the case. For example, if you have set up a demo form, you would usually like the owner of the lead to be notified; or, you may choose to notify additional users within the system so that other team members will know a contact has requested a demo.
To set up notifications for the owner of a contact to be notified, ensure you are still on the Options tab of the Form page. Then, scroll down a bit and check the Send submission email notifications to the contact's owner box, as seen in the following screenshot; and to add additional contacts to notifications, add their email address to the Send submission notifications to section:
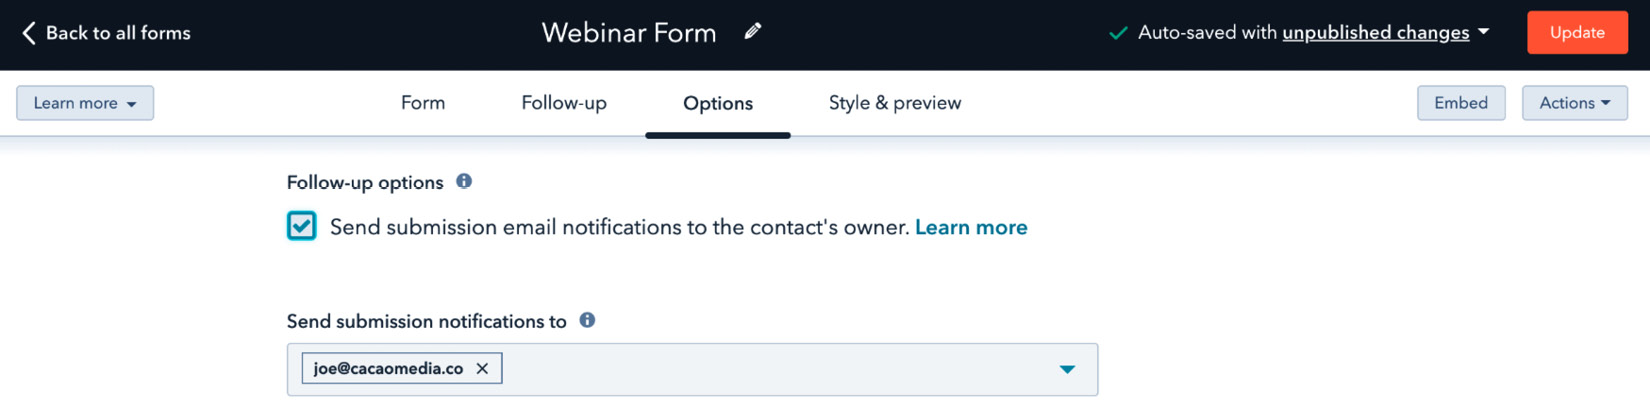
Figure 9.22 – Setting up notifications for form submissions
So, now what's left? Designing the form, of course.
Designing the form
HubSpot has made it possible for everyone to have the option to style and design forms as they wish. You can do so by accessing the Style & preview section within the form module, as shown in the following screenshot:

Figure 9.23 – Styling forms
In the Input options section of the form builder, you can decide whether your form fields should be boxes with squared edges or round edges or lines, as seen in the following screenshot:

Figure 9.24 – Changing the font and size of form fields
You can also choose the font of form fields, the label color, the help color, and GDPR description notice colors, as shown in the following screenshot:

Figure 9.25 – Changing the thank-you message and button design
In addition, if you wish to change the size and color of the thank-you message, the option exists to do so, as seen in Figure 9.25.
After completing these previous steps, you are now in a position to publish your form.
Setting your form live
To publish your form, simply click on Update in the top right-hand corner of your page and click Publish, as shown in the following screenshot:

Figure 9.26 – Publishing a form
Once a form is published, you can use it on any HubSpot landing page or website page. However, if you wish to use it on a non-HubSpot asset such as your website, you will need to copy the embed code that appears on the final page after you click Publish, as shown in the following screenshot:

Figure 9.27 – Using the embed code to set a HubSpot form live on a non-HubSpot asset
Following these eight steps will help you successfully create, optimize, and use a HubSpot form on your website or your landing page.
Next, let's examine how to create a landing page in HubSpot. We'll also see how you can connect a form and the thank-you page.
Creating a landing page in HubSpot
Landing pages are dedicated web pages usually focused on getting users to take one specific action, which is usually to fill out the form on the landing page. Each landing page should have the following:
- A headline text
- An explanatory subtext
- A form
- An image or a video
In most cases, there is no navigation bar on a landing page.
HubSpot's cloning and drag and drop features make it easy to create and reuse landing pages. To create a landing page, follow these steps:
- Access the Landing pages tool by going to the top navigation bar and clicking on Marketing | Landing Pages, as illustrated in the following screenshot:

Figure 9.28 – Accessing Landing Pages
- Then, click on Create in the top right-hand corner of the page and choose Landing page, as shown in the following screenshot:

Figure 9.29 – Choosing Landing page
- A pop-up box will then appear, prompting you to select a subdomain and enter a Page name value, as shown in the following screenshot:
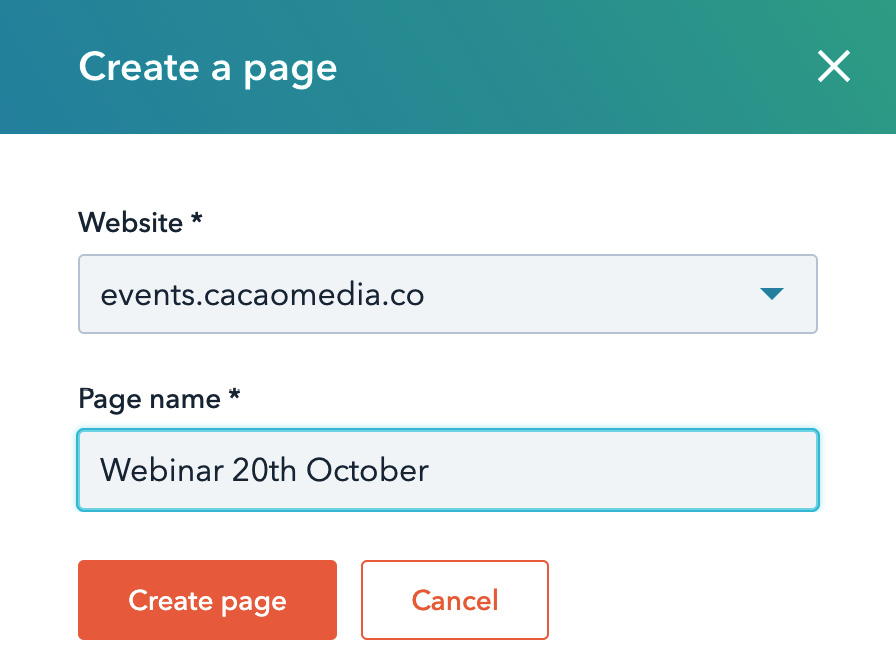
Figure 9.30 – Choosing a subdomain and a page name
- Click Create page, and then choose one of the templates that will appear, as illustrated in the following screenshot. Note you can always design your own template and apply it in HubSpot:

Figure 9.31 – Select a landing page template
- Once you have chosen a template, you can update the text via the modules that will appear on the left-hand side, as shown in the following screenshot:

Figure 9.32 – Editing the text on the landing page
- The next step is to add the form you previously built to the landing page by selecting the form from the options on the left side. Click Choose a form. At this point, you will also be asked whether you want to redirect the users to a thank-you page or to display an inline thank-you message. Whichever option is chosen here will override the options set previously when building the form. The process is illustrated in the following screenshot:

Figure 9.33 – Adding the form on the landing page
- Once you are satisfied with the content that visitors will see on the landing page, the next step is to configure the settings. Clicking on Settings, found on the top navigation bar, will take you to the backend of the landing page. Here, you can first choose an internal name for the page and a page title, as shown in the following screenshot. Note that the Internal page name value is for your records only so that you can find the page in the future in HubSpot, so it's good to keep some type of naming convention here. The Page title value is what visitors will see as the name of the page in search engines, and so on:
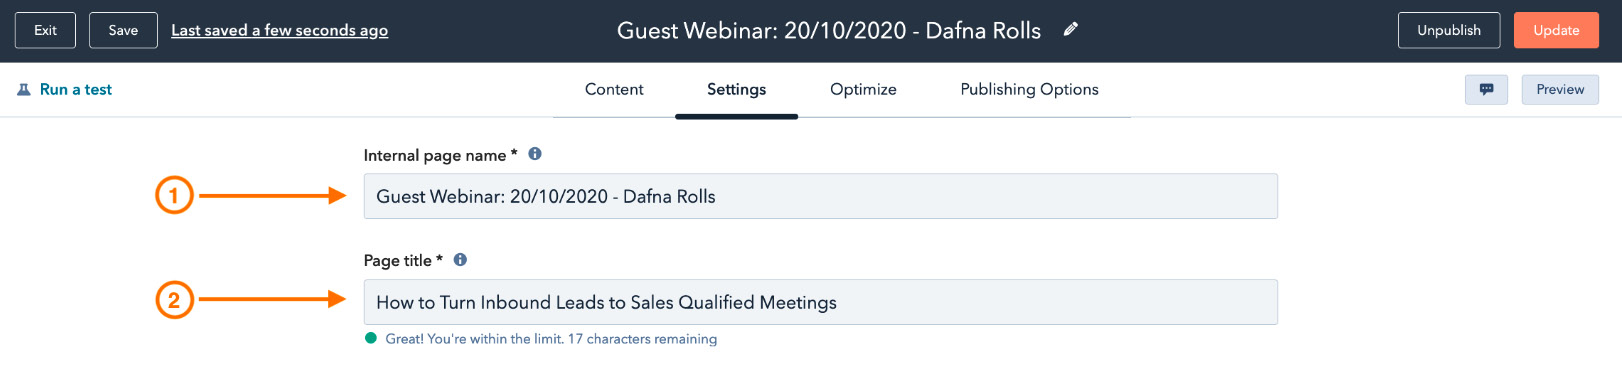
Figure 9.34 – Choosing a page name and title
- Next, update the Page language setting to your preferred language. Then, choose the correct subdomain and add a Content slug value, which is usually the name of your page. Next, add a Meta description value. See the following screenshot for an illustrative example of each of these points:

Figure 9.35 – Choosing a page name and title (continued)
- The next set of options invites you to attach a campaign to the landing page so that you can track the results of this campaign. You should also insert an image so that if the page is shared on social media, there would be a dedicated image that would show up and it would make your page optimized for sharing. Remember to add the name of the webinar as the alternative text of the image as this helps with search engine optimization (SEO), as we will discuss in the next step. The process is illustrated in the following screenshot:

Figure 9.36 – Adding campaigns and featured images
- Once the page settings are complete, the next action would be to check the SEO optimization of the page. You want to ensure, at the very least, the following main items are optimized: a page title exists, the title is fewer than 70 characters, search engines can display the page in search results, and the page has a meta description. The bottom line is the more green checkboxes you have on the left, the more optimized your page will be for SEO. The process is illustrated in the following screenshot:

Figure 9.37 – Optimizing the page for SEO
- Once these steps are completed, all that is left to do is to publish your page by clicking Publish or Update in the top right-hand corner.
So, now that we have built forms and landing pages, the next step is to ensure that leads are getting timely emails to follow up once an action is taken and a form submitted. In this example, the next expected action when the form is submitted would be to get a confirmation email with details of how to join the webinar. In other cases, it could be a link to download an asset or confirmation that someone will be in touch with you. These latter cases can be dealt with by using the form options, as described previously, but for an event such as a webinar, we would need to use the workflow function to get this step done.
Building lead-nurturing workflows
Workflows are the holy grail of the HubSpot portal. A workflow is the most commonly used tool in Marketing Hub as it allows marketers to build drip campaigns and maintain the internal organization of the CRM. In this section, we will specifically look at how to build a nurturing workflow for a webinar.
However, before getting into the workflow itself, we must first map out what is required from a webinar workflow. Which actions would you like this workflow to perform? Here are some scenarios to consider:
- The workflow should send a confirmation email with details of how to join the webinar to contacts who submitted the form.
- The workflow should send a reminder to contacts who registered for the webinar, maybe a day before and an hour before.
- The workflow should send a summary of the webinar to contacts who attended the webinar. Those who missed the webinar should get its recording.
These three are basic actions you would expect for a webinar event. Of course, there might be more internal actions you may want to add, such as converting attendees into marketing-qualified leads (MQLs) and sending them off to the sales team. We will consider these scenarios in the next section.
At this point, let's break this down into steps to understand what we need to convert these actions into a workflow. This is what we'd need to do:
- Send a confirmation email to contacts who submitted the form. In order to send this email, we would need the following:
- The form that users will be submitting to join the webinar
- Integration to the webinar platform chosen to host the webinar so that a confirmation email could be sent to those contacts
- Send a reminder email to contacts who registered a day before and an hour before the webinar. In order to send this email, we would need the following:
- Date and time of the webinar
- A reminder email with details of how to join the webinar
- Send a summary email to attendees and non-attendees with a recording of the webinar. In order to send this email, we would need the following:
- A list of attendees and non-attendees
- A recording of the webinar
- A post-webinar email with a link to the recording
Note
Ensure this email does not go out before the recording is available.
A few more points you may want to consider are set out here:
- Are there any contacts that should never be enrolled in this workflow?
- Should contacts be allowed to re-enroll in this workflow?
- How to prevent contacts from enrolling in the workflow after the event has occurred.
This exercise should be performed for any type of workflow you are building, especially for nurturing workflows that will affect the information your contacts will receive.
Now that we understand what's needed, it's time to execute the actions.
Building a nurturing workflow for an upcoming webinar
To build a nurturing workflow for a webinar, there are a few steps to follow, as outlined here:
- Integrate HubSpot and your preferred webinar platform: HubSpot integrates seamlessly with Zoom or GoTo Webinar, two of the most popular webinar platforms for businesses. To integrate either of these platforms to HubSpot, go to Settings | Integrations | Connected Apps, then click on Visit App Marketplace, as illustrated in the following screenshot:

Figure 9.38 – Connecting Zoom or GoTo Webinar to HubSpot
You will then be redirected to another page where you can insert a webinar in the search bar and see all the webinar tools that exist and are integrated with HubSpot. Choose your preferred platform. The process is illustrated in the following screenshot:

Figure 9.39 – HubSpot's App Marketplace
- Set up a webinar: First, be sure to upgrade to the webinar package in Zoom or GoTo Webinar in order to complete your setup there. To see the steps of how to set up a webinar in Zoom or GoTo Webinar, go to Appendix A of this book.
Once the webinar setup is completed in Zoom or GoTo Webinar, the next step includes building all the assets we referred to earlier for creating a form and landing page.
In addition to forms and landing pages, you would want to create an invitation email to be sent out to your database and a last chance to register email that can be sent a day before the webinar date. Note that your reminder emails to registrants will typically be sent from Zoom or GoTo Webinar itself, as each registrant will receive a unique link to join the webinar so that you will know who attended and for how long.
Once these assets are created, you must then build a workflow to connect the form, the invitation emails, reminder emails, and post-webinar emails. To build this workflow, go to the top menu of your portal and choose Workflows. In some cases, if you have Sales Professional (Sales Pro), you will see Automation on the top menu of your portal; from there, choose Workflow.
Click Create Workflow in the top left right-hand corner of your portal.
The next page that appears gives you several options. First, you need to choose the type of workflow you wish to create—Contact-based, Company-based, Deal-based, or Ticket-based. Each of these options will depend on which properties you are trying to access within the HubSpot portal. For a webinar workflow, choose Contact-based.
Your next option is to choose how you want the workflow to start. Once again, you have several options, as outlined here:
- Blank workflow: This means your workflow is completely blank and can be used for any function you would like.
- Schedule: This type of workflow helps you set up recurring actions or send out recurring emails or messages to your prospects, customers, or team. For example, if you want to send out holiday greetings every year for Christmas, this workflow can be used.
- Specific date: This type of workflow helps you set up a chain of actions that will happen on a specific date. This is the "eBay workflow" for events such as webinars and conferences, so there will be no errors of prospects signing up for your event after the event date and receiving a confirmation email even though the workflow was left on after the date had passed.
- Contact date property: This type of workflow allows you to send emails or set up an action once that date property has arrived. This is generally useful for sending out a welcome email to a new customer or to send a notice to the onboarding team once a new customer is assigned.
The preceding options are shown in the following screenshot:

Figure 9.40 – Types of workflows
Now that we know we need to choose a specific date workflow, we click on this option and set the date of the webinar, and then click Next, as shown in the following screenshot:

Figure 9.41 – Building a specific date workflow
On the next page, you will see the outline of the workflow. The first stage is to choose an enrollment trigger. This is a list of contacts from your database you wish to invite to the webinar. You can see an illustration of this in the following screenshot:

Figure 9.42 – Adding a list of contacts to receive invitation emails
Once a list of contacts is chosen, the next step would be to choose the next action and the date on which you would like it to take place. It is typical to promote a webinar between 4 and 6 weeks before the webinar, so in this step, it is recommended to add the first invitation email that you would like your prospects to receive. Click Save once the date is entered, as seen in the following screenshot:

Figure 9.43 – Selecting a date and time you would like contacts to receive the first email
After choosing a date, you will then want to attach the first invitation email contacts should receive about the webinar. To do this, click the + sign again and choose Send email in order to select an invitation email that was created previously, as illustrated in the following screenshot:

Figure 9.44 – Choosing the Send email option for external communication to send out an email invitation
Choose emails from the list of emails that will appear once you click the Send email option. Then, once you choose the relevant email, click Save, as illustrated in the following screenshot. Note that you must create an automated marketing email and ensure it is published for you to see it as an option in workflows:
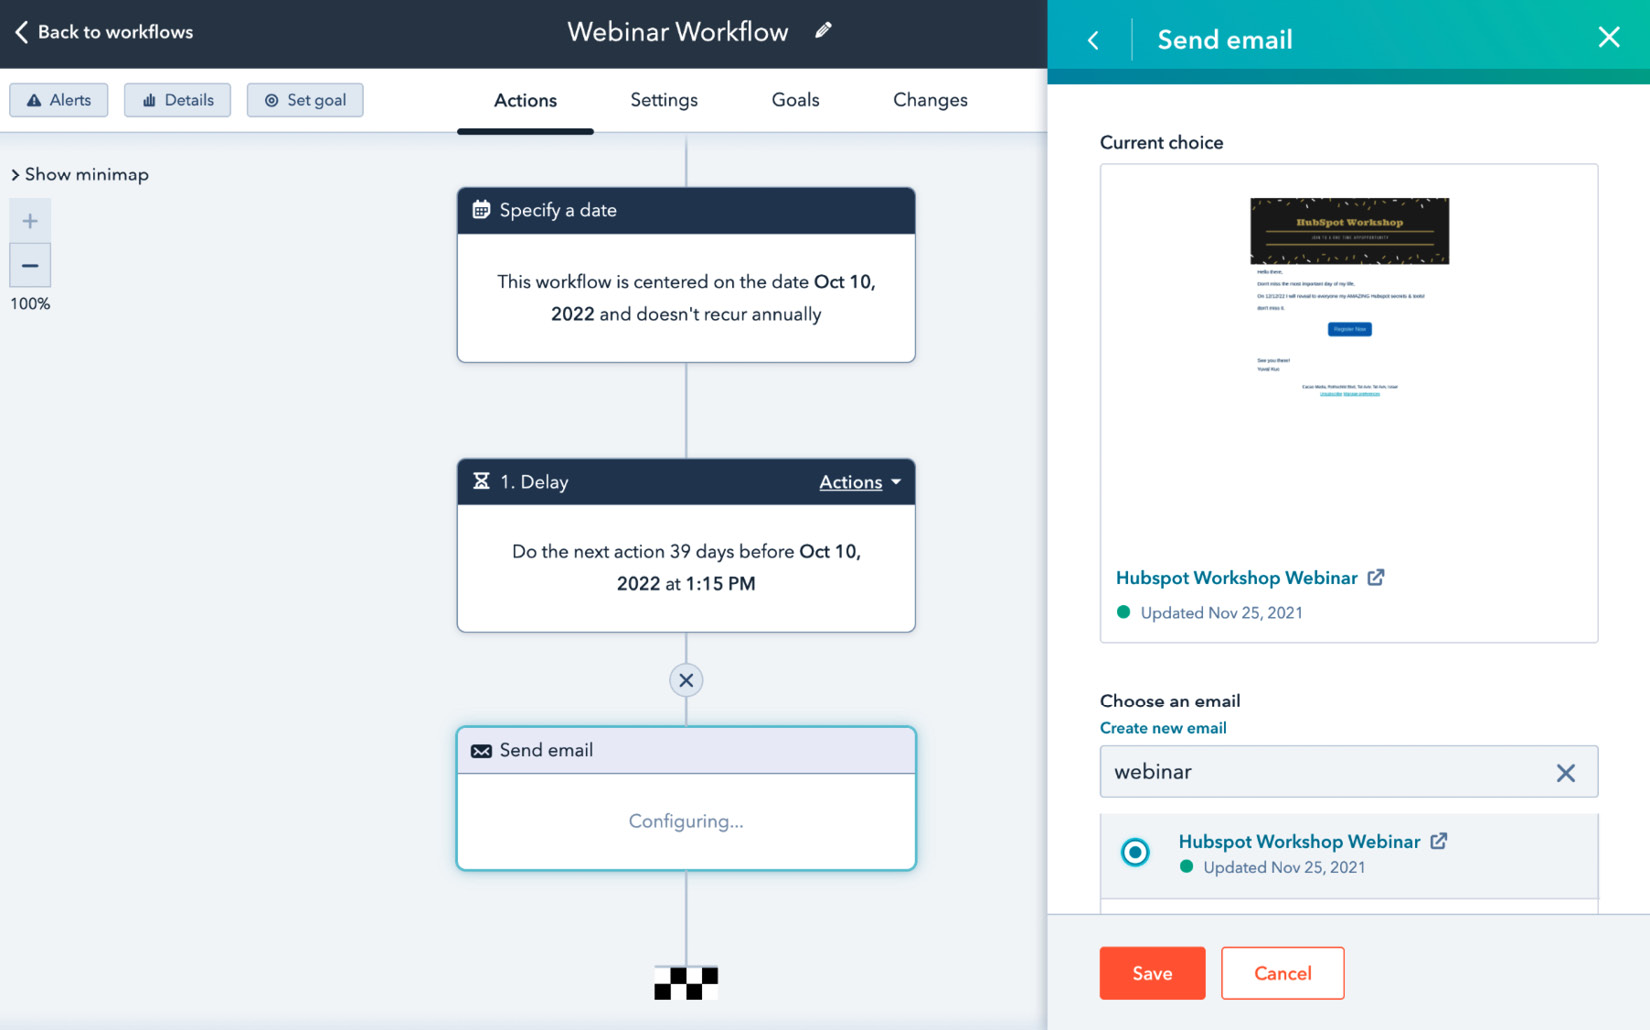
Figure 9.45 – Choosing an automated email from the list
Next, click the + sign and choose the Delay option to choose a time you would want the second email to go out. Next, you will want to split your actions so that only people who did not click on the webinar link in your email will get the second email, as it is assumed those people haven't signed up yet. To create an if/then case, click on If/then branch, as shown in the following screenshot:

Figure 9.46 – Selecting If/then branch
Next, choose the Marketing emails option, as illustrated in the following screenshot:

Figure 9.47 – Selecting the Marketing emails filter type
Select the previous email sent to the list of contacts—in this case, HubSpot Workshop Webinar—so that the system can check who clicked the links in those emails. Once you've selected the email, select Contact clicked a link in email, and select a link to register for the webinar. Note that if you choose the Any link option, you will be including those people who also clicked the links to your social media pages or the Unsubscribe link. The process is illustrated in the following screenshot:
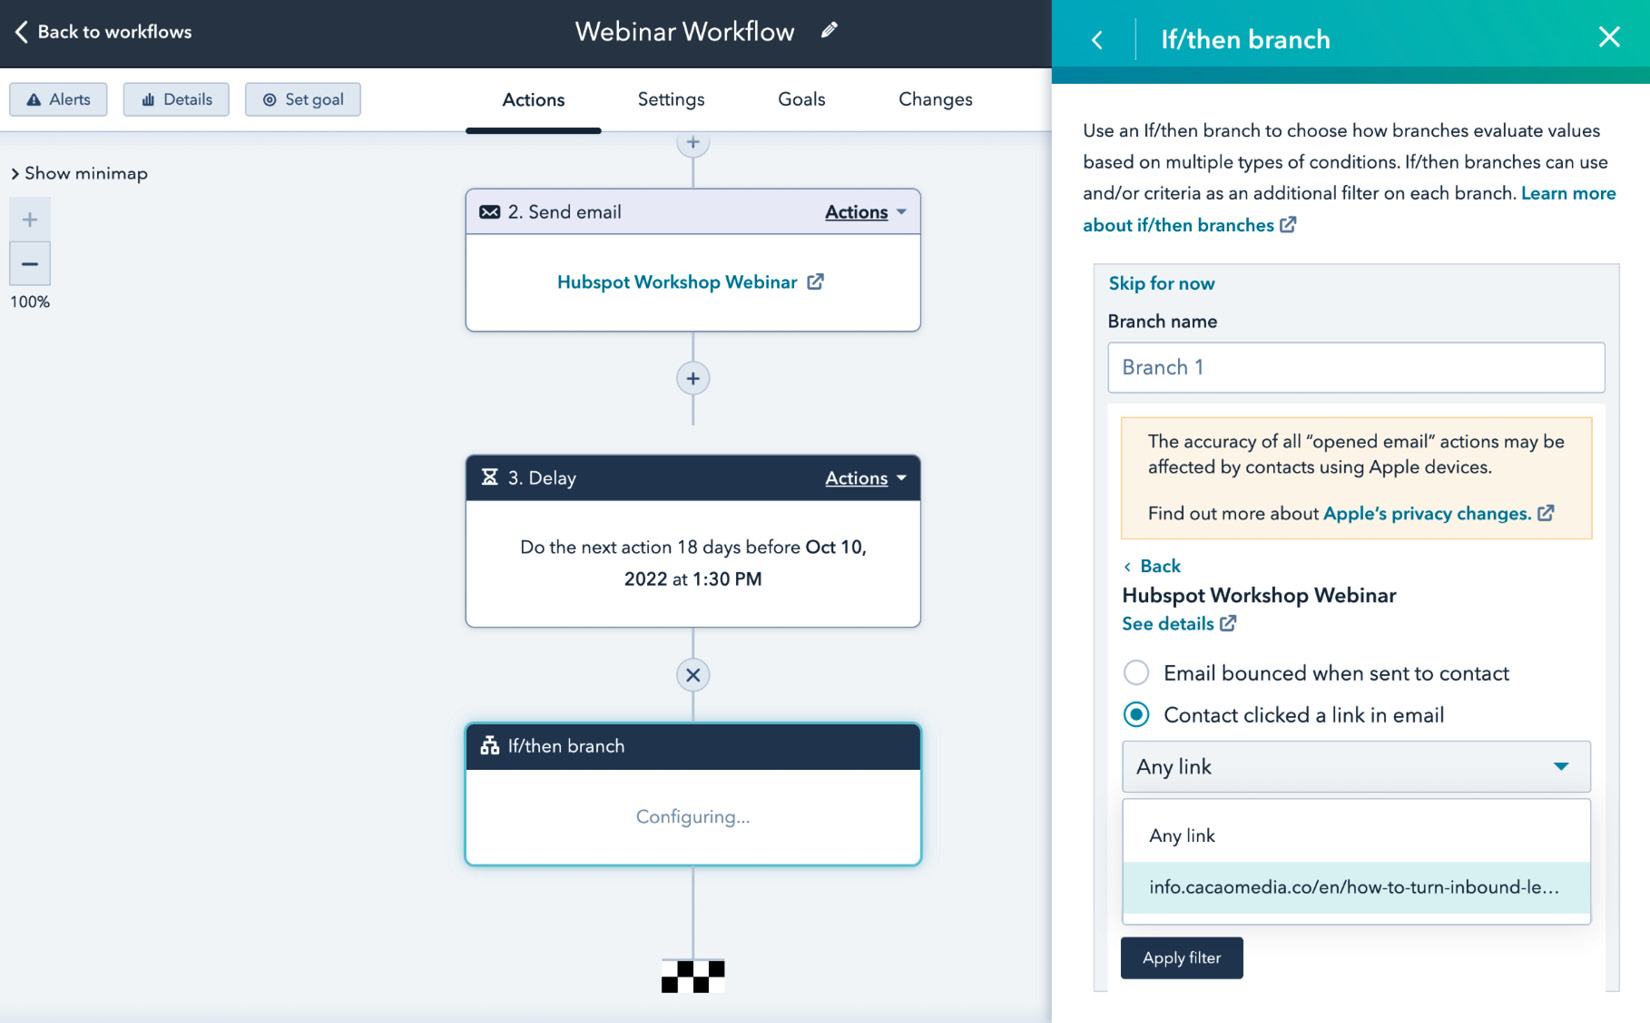
Figure 9.48 – Selecting a link that contacts should click to join the webinar
Once you've set up this if/then option, the next step is to insert a second email you would like to send to those who did not click on the link to receive. You can repeat these steps until all of your invitation emails have been included in the workflow. The process is illustrated in the following screenshot:
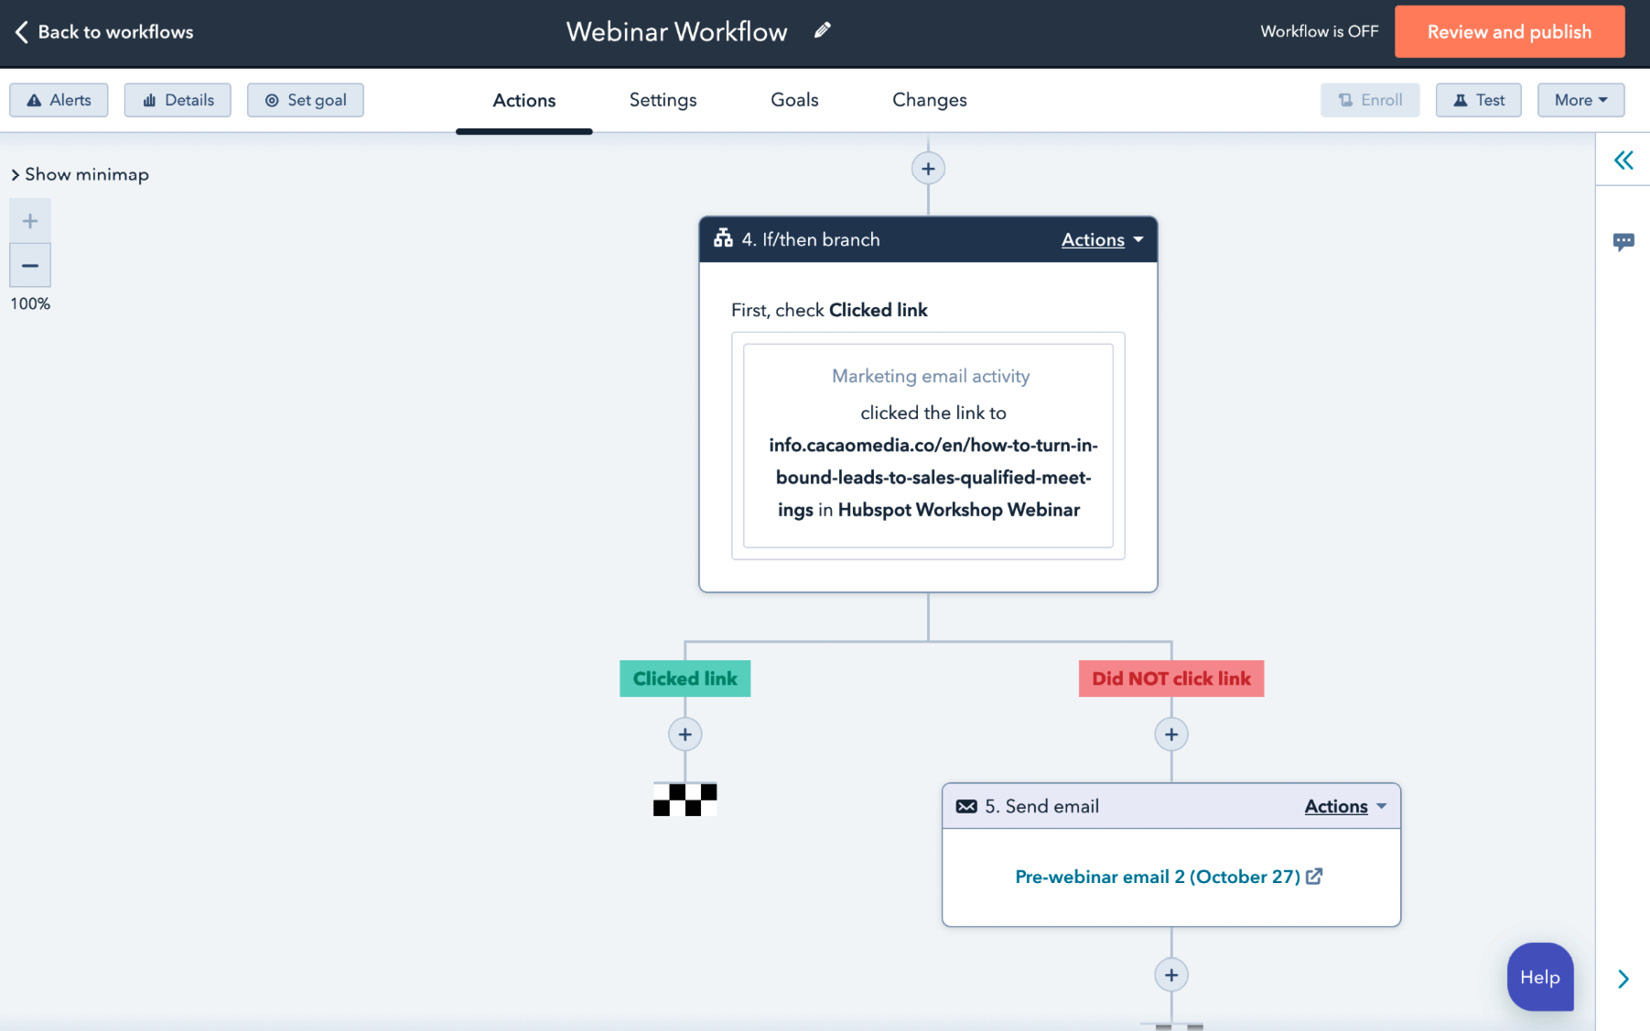
Figure 9.49 – Adding a second email to the relevant branch
Before turning on this workflow, though, there are some scenarios you must consider to check how the workflow will affect each contact in your database, not just the ones enrolled into the workflow as you intended. Some scenarios that you may want to consider are noted here:
- Whether contacts should be re-enrolled: If you would like contacts to be re-enrolled in the workflows, click on Enrollment triggers and select Re-enrollment, as illustrated in the following screenshot:
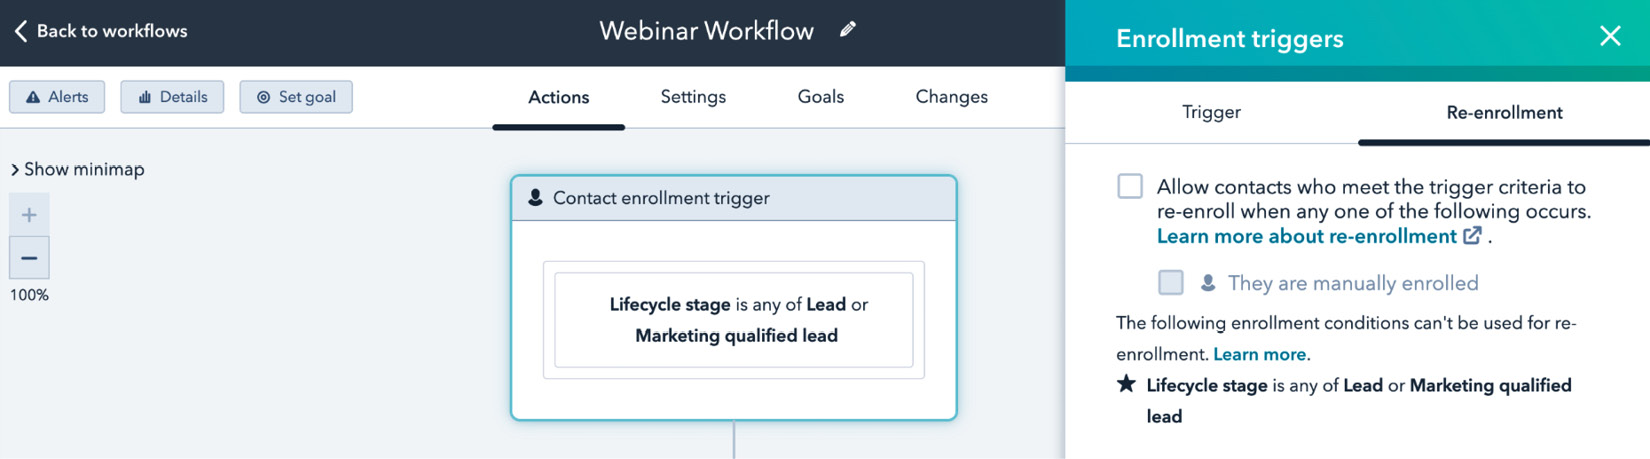
Figure 9.50 – Re-enrollment function of workflows
- Whether some contacts should never get into this workflow at all: If you would like certain contacts to never be enrolled in the workflow, even if they fulfill the action, click on Settings at the top of the workflow menu. Then, choose Unenrollment and Suppression and add the list of contacts to the suppression tab, as shown in the following screenshot:
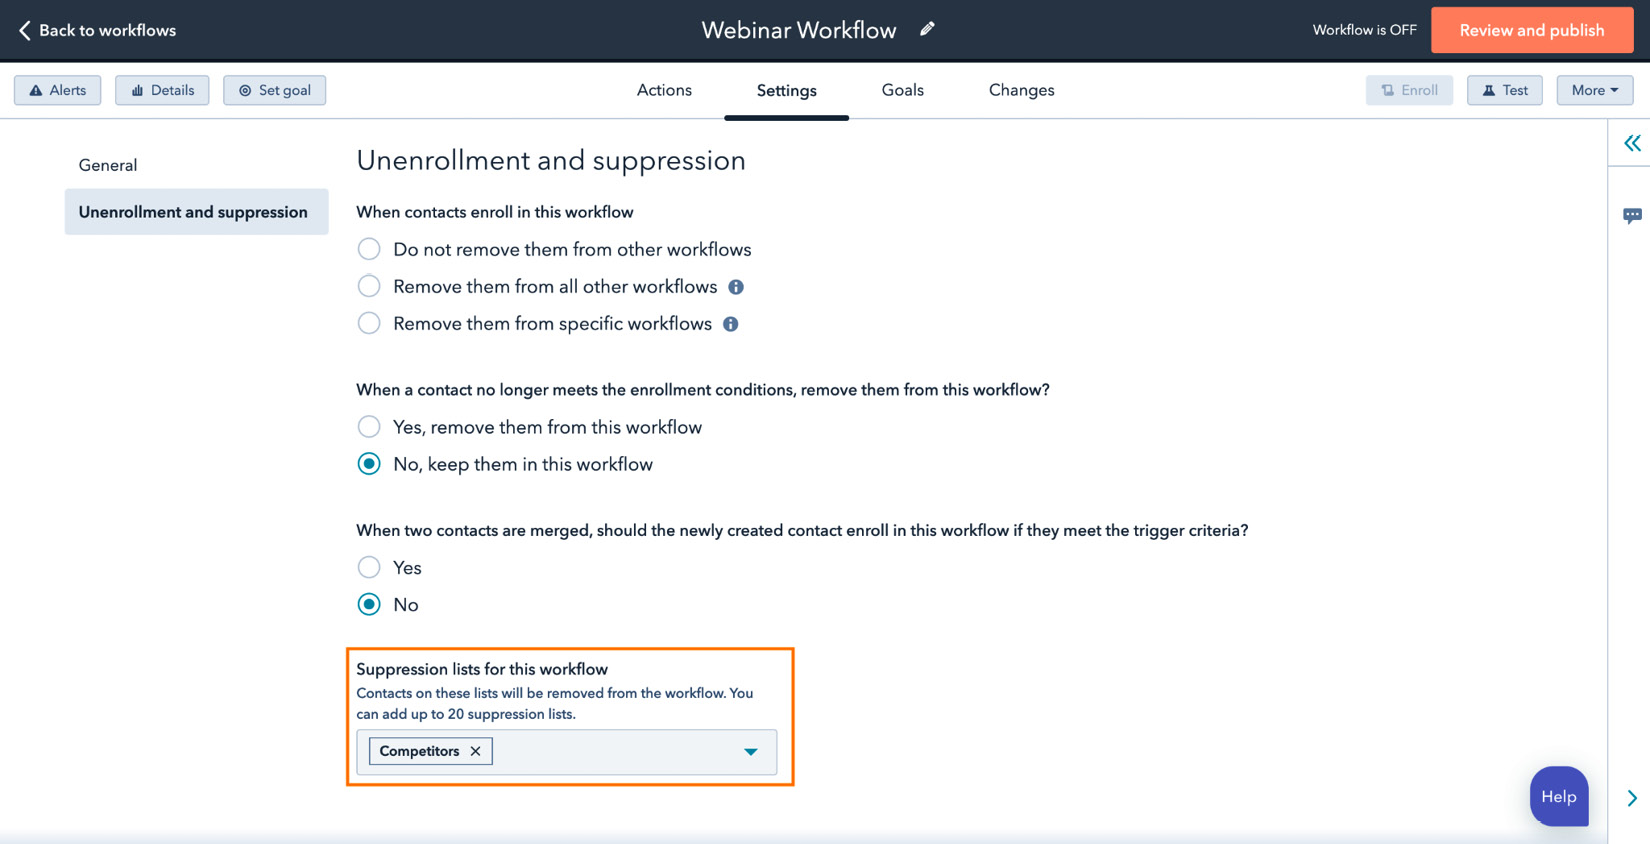
Figure 9.51 – Suppression function of workflows
- The point at which contacts should get out of this workflow: The point of the workflow is to get contacts signing up for the webinar. So, once they have taken this action, they should be taken out of the workflow to prevent them from receiving further emails. In order to do this, you must set a goal for the workflow that, once met, will unenroll contacts from the workflow. To set a goal, simply click on Set Goal in the top left-hand corner and choose a goal based on the properties available. In this case, the goal of this workflow is for the contact to submit a form. Note that you can always set more than one goal by clicking OR and choosing another property. You can see an illustration of this in the following screenshot:
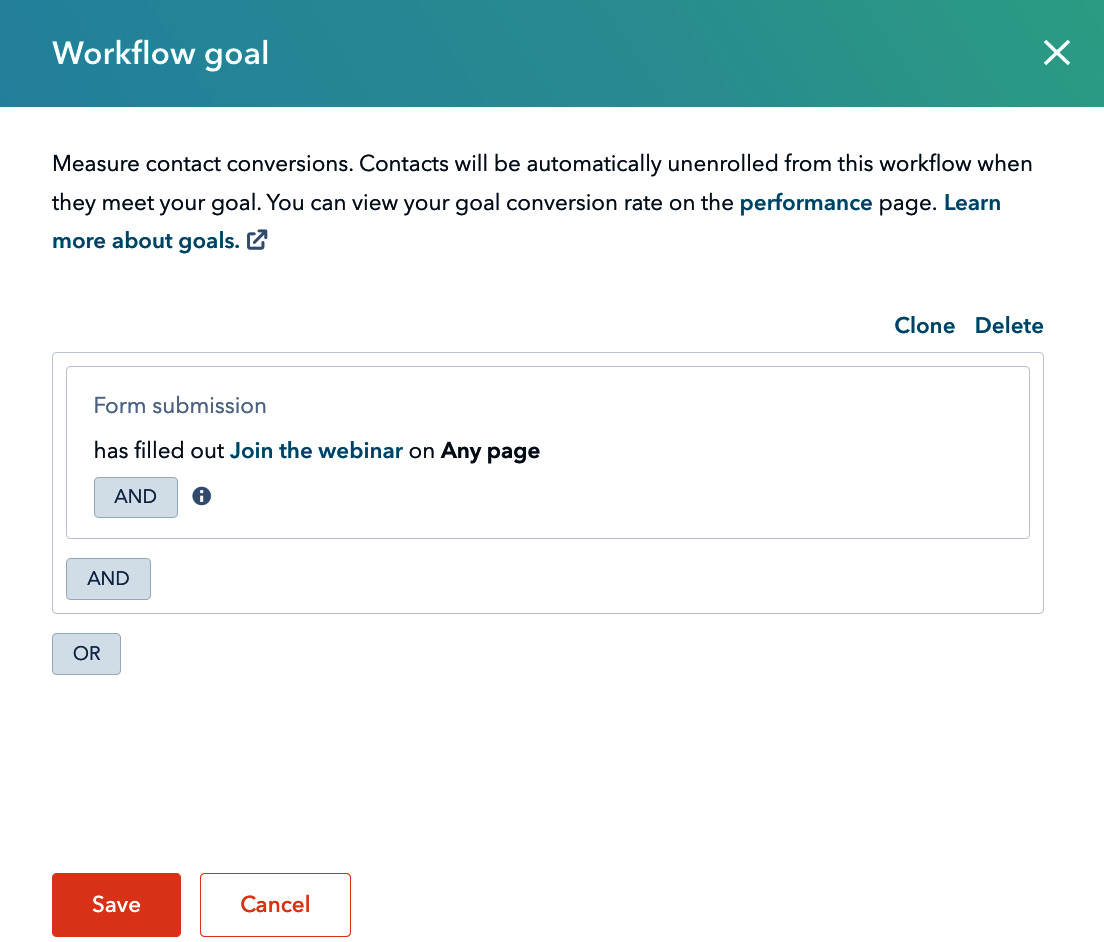
Figure 9.52 – Setting goals in workflows
There are a few other workflow features that might come in handy for this workflow or any other workflow you may build in the future—for example, sending emails out only during specific days and times or not sending them out on specific days, such as weekends or holidays. Other features, such as Remove them from specific workflows, also help you to remove contacts from workflows they may have previously been enrolled in so that they are not inundated with too many emails. The best practice when building workflows for lead nurturing is to spend some time brainstorming and mapping out exactly what these workflows should do and accomplish and then utilize the features to make it happen. After considering all scenarios, you can move on to the next step, which will ensure contacts get webinar confirmation emails from the chosen platforms.
Build a separate workflow to ensure registrants receive a confirmation email from Zoom or GoTo Webinar. It is recommended not to connect these steps to the previous workflow since contacts could reach the form for registering for the webinar in various ways. Therefore, the enrollment trigger for this type of workflow should be the form used on the landing page and not a list, as seen in Figure 9.51. Note the type of workflow used for building this process is Blank workflow. The process is illustrated in the following screenshot:

Figure 9.53 – Selecting a form as the enrollment trigger
Once you've selected an enrollment trigger, your next step is to connect the webinar created in Zoom or GoTo Webinar to the workflow. You can use one of the following options:
- To connect the webinar in Zoom to the HubSpot form, you must look for Zoom's webinar identifier (ID). Then, click the + sign and choose the Add Contact to Zoom Webinar option, then place the webinar ID below it, as indicated in the following screenshot:
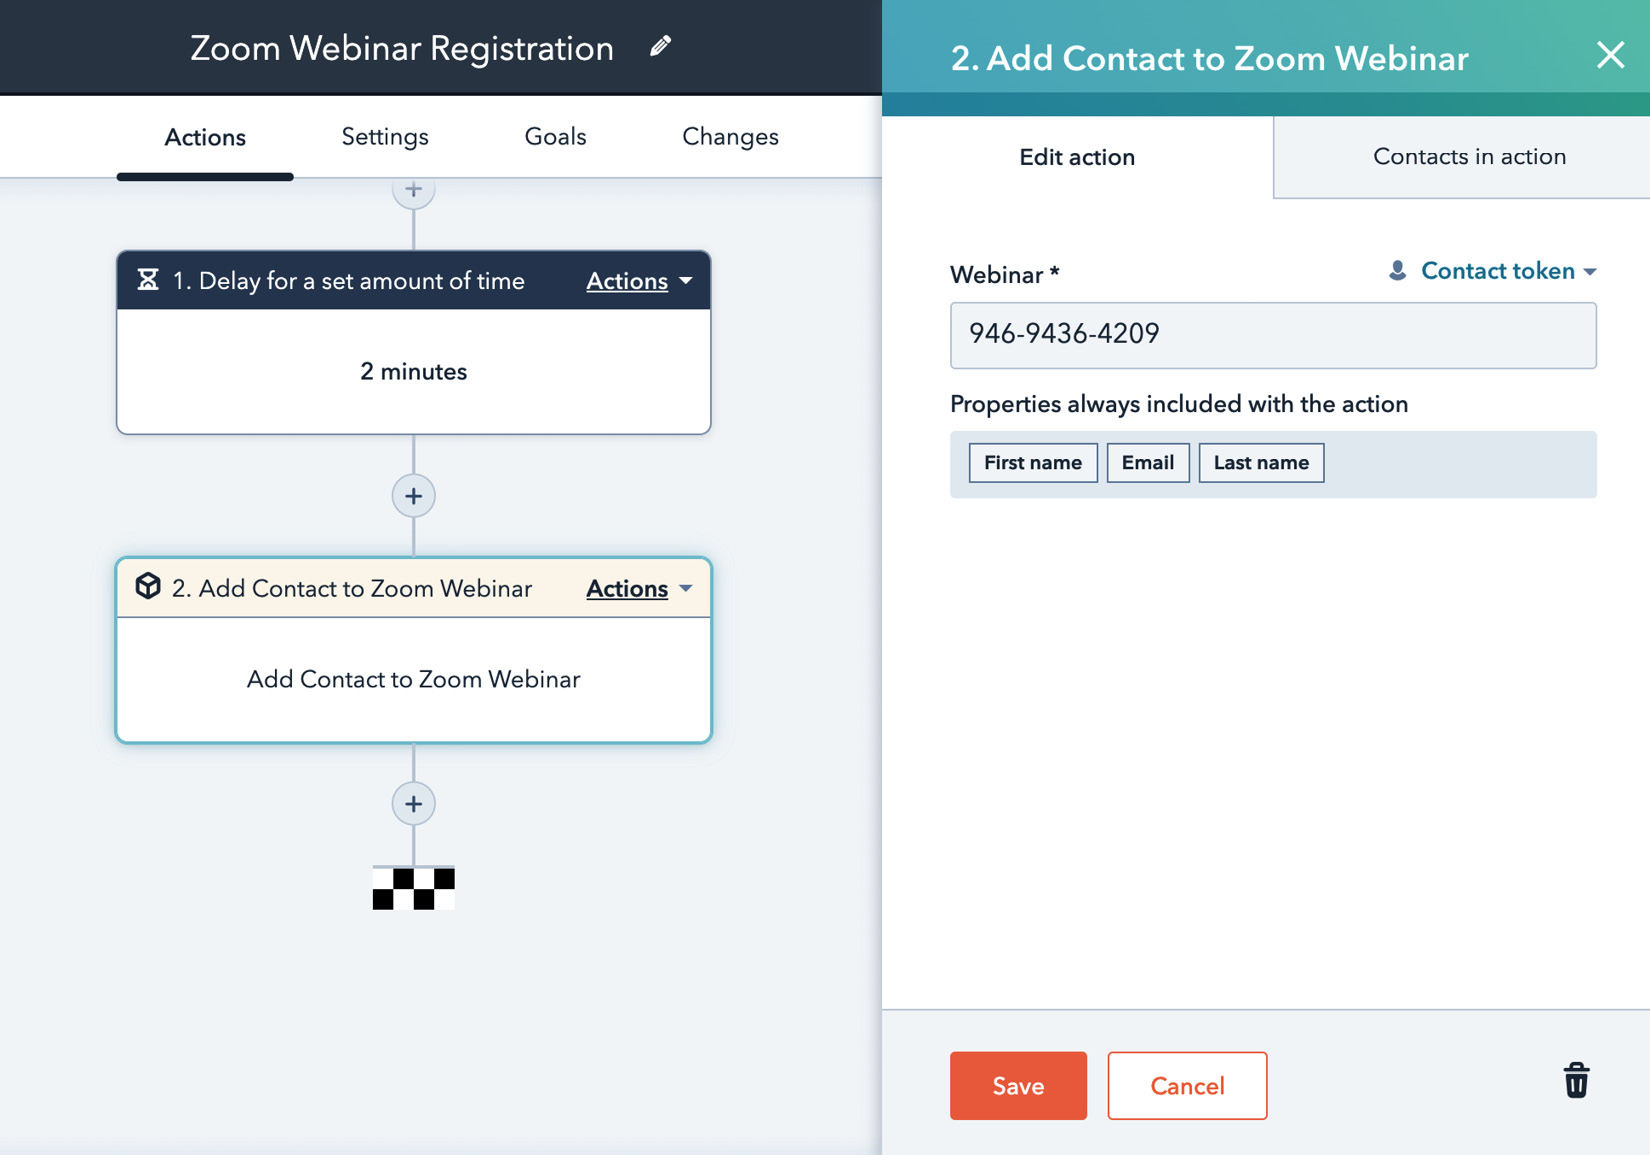
Figure 9.54 – Zoom webinar registration
- To connect the webinar to GoTo Webinar, we recommend you build the workflow with an enrollment trigger, using the form on the landing page. Then, click the + sign and choose the Add Contact to Webinar option. A box will appear from which you can choose a name for the webinar and fields you wish to integrate with the webinar, as shown in the following screenshot:
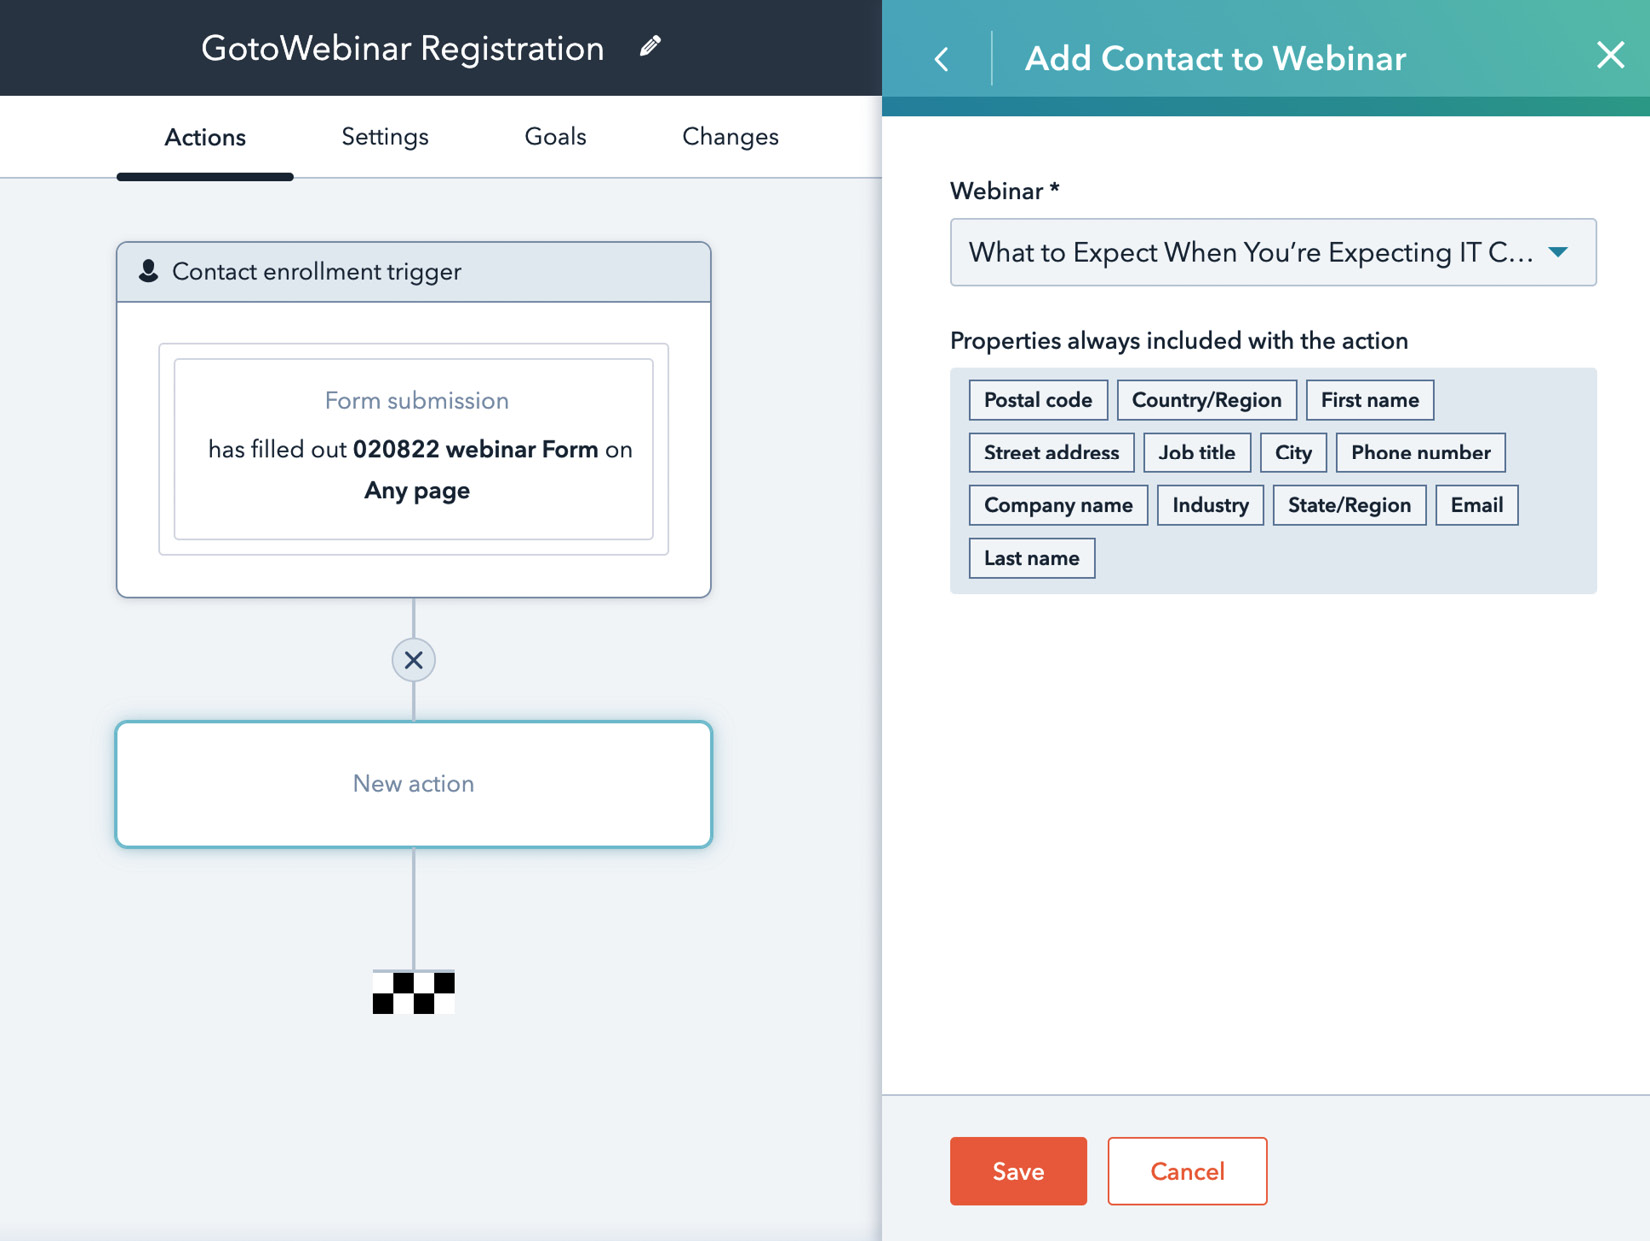
Figure 9.55 – GoTo Webinar registration
Following these steps will ensure that contacts who sign up for your webinar receive a unique confirmation email from either of these platforms to join the webinar. Note that if you use a regular meeting link from Zoom or GoTo Webinar to host a webinar, you will lose the ability to track who attended the event versus those who did not attend, as neither of these platforms retains this data when an event has ended if it was set up as a meeting since everyone used the same link to join the event. It is for this reason that it is highly recommended to use the Webinar add-on feature on Zoom or GoTo Webinar.
Summary
Understanding how to convert leads into qualified contacts that turn into meaningful opportunities is every marketer's challenge. Therefore, having a suite of easy-to-use tools that allow you to achieve this is what each marketer seeks in a platform.
HubSpot offers a variety of such tools all in one platform. From forms to landing pages to workflows, these tools become a marketer's secret weapon as they allow a myriad of tasks to be done quickly and efficiently to achieve the main goal of improving conversions. Therefore, it is imperative that you take the necessary time to understand how each of these features works in order to ensure you get the best results from your campaigns.
In the next chapter, we will look more closely at how the email marketing tool in HubSpot can help you build meaningful relationships with your customers by sending them personalized and relevant information.
Questions
Have a go at answering the following questions:
- Which feature in HubSpot helps prevent spam submissions and ensures data privacy?
- What are the five features most landing pages should have?
- How do you prevent contacts from re-enrolling in your workflows?
Further reading
- Understanding Workflows in HubSpot: https://academy.hubspot.com/lessons/understanding-workflows-in-hubspot
- Using Workflows to Power Your Inbound Strategy: https://academy.hubspot.com/lessons/Using-Workflows-to-Power-Your-Inbound-Strategy
- How to Implement Workflows in Each Stage of the Flywheel: https://blog.hubspot.com/customers/implement-workflows-hubspot
- 56 Ways Customers Use Workflow Integrations: https://blog.hubspot.com/customers/56-ways-customers-use-workflow-integrations
- 5 Biggest Workflow Mistakes (and How to Avoid Them): https://blog.hubspot.com/customers/5-biggest-workflow-mistakes-how-to-avoid-them