Chapter 4: Empowering Your Sales Team through HubSpot
HubSpot is more commonly known for its marketing automation capabilities than its sales capabilities. However, in recent times, their sales tools have become more robust, often putting them ahead of the competition as it helps remove the friction that can exist between a prospect and salesperson. Today, more companies are using the platform to also power their sales activities as, first, it is mostly free to access, and second, it provides a few key advantages, as follows:
- It allows both marketing and sales teams to see the entire journey of the customer from the first interaction with your business to the moment they became a customer.
- It creates the perfect setup for sales and marketing teams to work closely together since they each have full visibility into each other's activities.
- It reduces the company's investment in technology as they now only need to invest resources in paying for and managing one platform instead of two different platforms.
This chapter will focus on helping your sales teams achieve three main goals using HubSpot sales tools:
- Identifying new leads in less time: We will review tools such as the prospects tool, email templates and sequences, and shared inbox profiles.
- Connecting with a prospect at exactly the right time: Tools such as email tracking, email scheduling, and notifications and calls will help you know when the best time is to reach out to a prospect.
- Landing more meetings and close more deals: Tools such as meetings, documents, and quotes will help you secure more meetings and turn those prospects into customers faster.
By the end of this chapter, you will be able to increase the efficiency of your sales teams by reducing the amount of administrative work required, as well as improving their deal-close rate. If you wish to understand how to create pipelines and use the deals specifically in HubSpot, please read the previous chapter.
Technical requirements
To ensure you get the most out of this chapter, be sure to have Admin access to your HubSpot account. Most of the elements discussed here are included in the free version of HubSpot, so even having a free version of the account can be very useful.
Identifying new leads in less time
In Chapter 2, Generating Quick Wins with Hubspot in the First 30 Days, we mentioned Google Analytics as a surefire way to understand which pages of your website attract the most visitors. However, one limitation of Google Analytics is that it cannot tell you who exactly came to your website. This is one of the major advantages of having a platform such as HubSpot. In the following sections, we will show you how the prospects tool or notifications can help you identify unique visitors.
Using the prospects tool
HubSpot has a proprietary tool called the prospects tool, which uses the HubSpot tracking code to detect the Internet Protocol (IP) addresses of visitors to your website. Note these visitors may not yet exist in your database, meaning they have not yet given you their contact details but will still appear in the prospects tool.
The tool is free to all users of HubSpot and works because, as most companies have unique IP addresses, once they visit your website using their company's internet network, the prospects tool populates your HubSpot portal with publicly available information about that company.
To access the prospects tool, navigate to Contacts | Target Accounts and activate this feature by clicking on Get started:

Figure 4.1 – Navigation bar to the prospects tool
Once the Target Accounts feature is activated, you will arrive at the following page, where you will find the Prospects tool in the bottom left menu:

Figure 4.2 – Navigation bar to the prospects tool
Clicking on the Prospects tab takes you to a page where you will see a lot of information about companies. Note, if you do not see any information appear you will need to double-check that your website is connected to HubSpot. Refer to Chapter 1, Overview of HubSpot – What You MUST Know, where we discussed the technical setup, for guidelines on how to do this.
Remember, this information is collected via IP addresses, so because of GDPR and personal privacy regulations, HubSpot cannot at this stage tell you who visited your site, as most times, these contacts have not yet opted in. So, it will only tell you which company was on your site, how many people from that company came to your site, how many pages they visited, and when they were last seen.
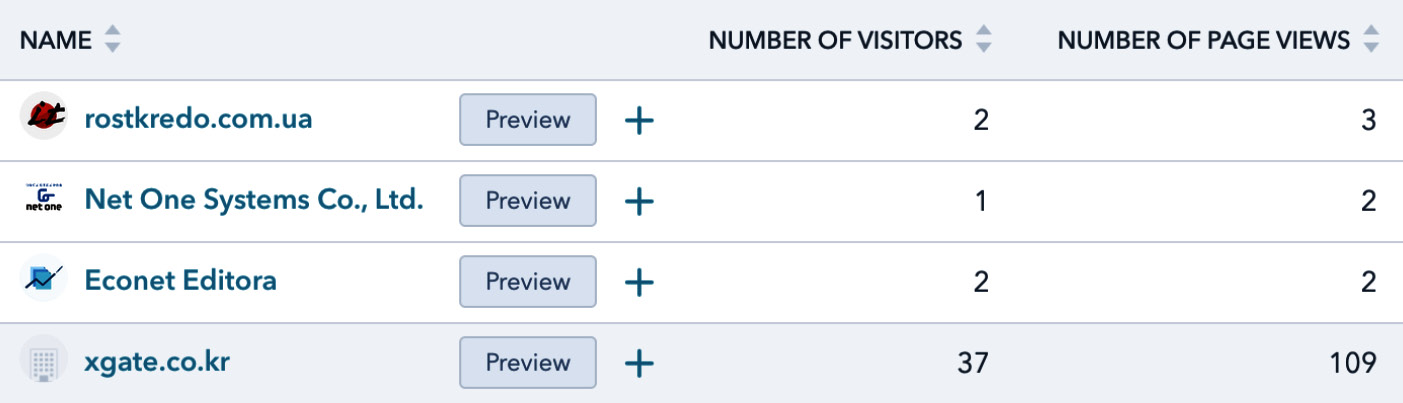
Figure 4.3 – Prospects tool
You can also add more columns to see which sources or channels bought these contacts, for instance, social media or direct traffic, as well as which countries they came from based on the IP location.
Note, for smaller companies or individuals visiting your site from the comfort of their home, the IP address will appear as their generic internet service provider, such as Verizon or Orange.
But, how exactly can your sales teams use this information?
One way is, first, by understanding whether certain target companies are visiting your site, the sales team can then research the relevant persona on LinkedIn and connect with them. For instance, if you are a cybersecurity company, then most likely the person from the company visiting your site is a CIO or systems security engineer, and you can then connect with such persons from the company on LinkedIn.
Another angle for which both your marketing and sales teams can use this tool is to build an account-based marketing (ABM) campaign targeting the companies that visit your website. You can start this campaign by setting up retargeting ads for these companies in HubSpot and then building an email sequence for this list of companies containing sales emails coming from the respective sales team members. And, once the prospects are converted, they will be added to the database for further follow-up by the sales teams. This brings us to our next tool – email sequences.
Prospecting better with email templates and sequences
Email templates are emails that can be set up to send repetitive content directly from your personal inbox. On the other hand, sequences are a combination of templates set up to be sent automatically at predefined intervals.
In Chapter 9, Converting Your Visitors to Customers, we will discuss marketing emails and workflows that exist in the Marketing Hub of HubSpot and are basically the equivalent of email templates and sequences. The main difference is that the former is sent directly from the inbox of the sales team members, while the latter is sent from HubSpot as a marketing email. Although both are automated emails being sent to the contacts at defined intervals, the advantage of using sequences is that it is a more personalized approach, as the emails will look exactly as if they are coming from your regular inbox. Unlike marketing emails, there is no design or unsubscribe link (if you choose not to add it).
Templates
Templates are also a free tool in HubSpot and found in the top menu by navigating to Conversations | Templates:
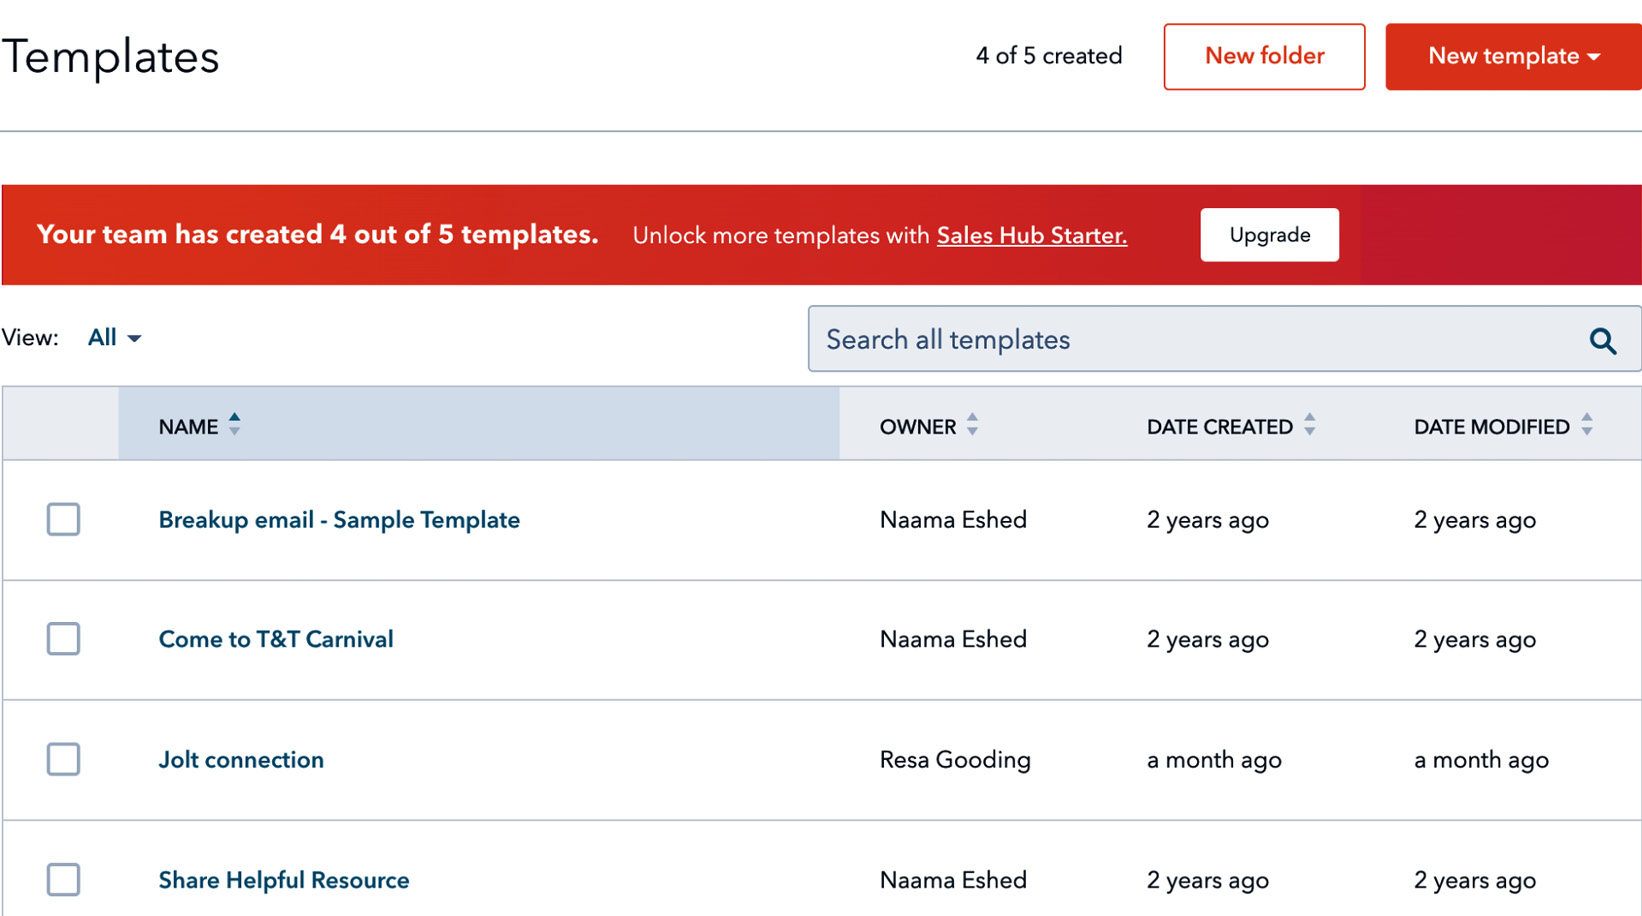
Figure 4.4 – Templates in HubSpot
From this page, you can click on the orange New Template button and choose either the From scratch or From template library option and begin creating your desired email content. As always, HubSpot shares with you a wealth of resources to help you get started; it's highly recommended to check out their library of email templates to get some ideas on how to position your email to a prospect.
Sticking to our cybersecurity example and setting up an email sequence that your sales teams can use as a follow up from leads identified from the prospects tool and enlisted to your ABM campaign, here's a sample of an email template with which you can begin:

Figure 4.5 – Template sample
Note a few things about the template:
- The content found in the Subject line will be populated in the email subject, so be sure to choose something that will encourage people to open the email.
- There are personalization tokens inserted in the email for the contact's first name and company name.
Once you've set up at least three of these types of templates, the next step is to set up the email sequence.
Automating your outreach with email sequences
Email sequences are a paid feature of HubSpot as part of the Sales Professional package. If you have access to this feature, you will find it under Automation | Sequences.
As mentioned previously, it is essentially a workflow that allows your sales teams to send automated emails to prospects directly from their inbox. It is a great tool to use when trying to follow up with a prospect to book a meeting or after sending a contract or any other sales-related activities that usually demand more than one email before getting the contact to respond. One of the most popular uses for setting up a sequence is when there is a need for your sales team to follow up with someone who booked a demonstration or trial of your product. Here's an example:
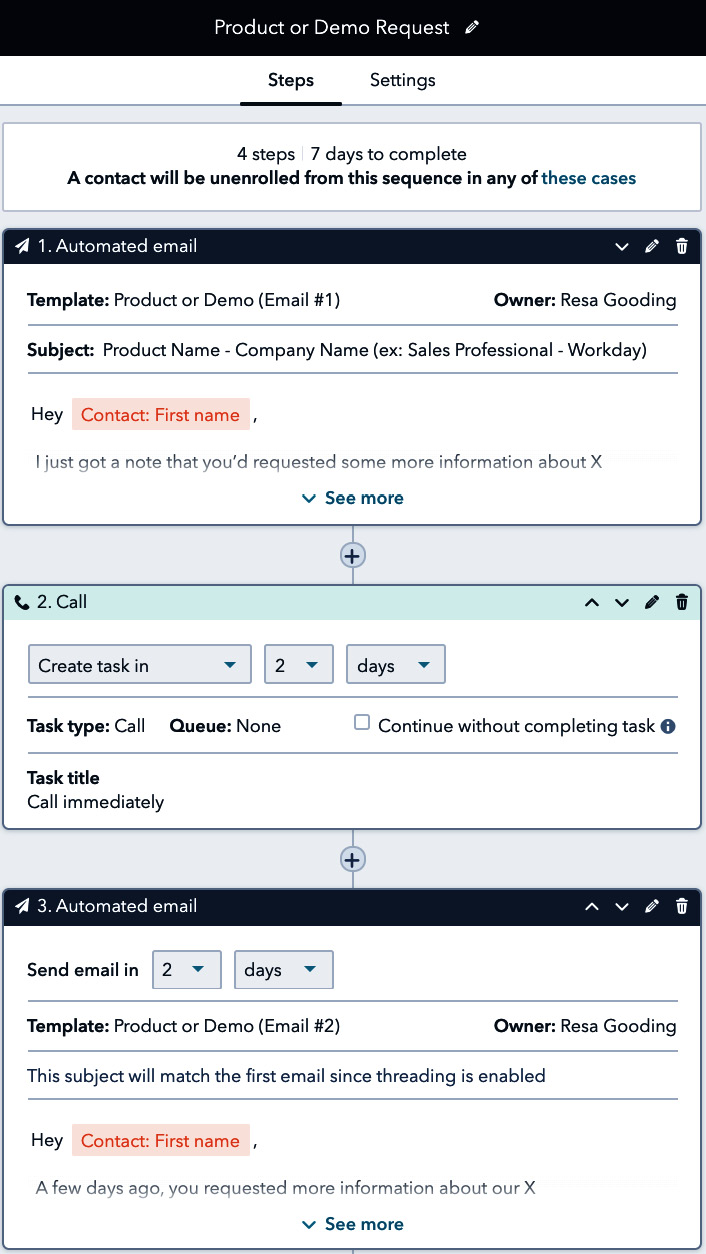
Figure 4.6 – Sequences tool
Here are a few points to note about HubSpot sequences:
- It can be a combination of emails, tasks, reminders, or any other action that a salesperson will generally take after reaching out to a prospect.
- You can enroll a single contact or multiple contacts at a time by putting them all in a list.
- You can decide on the intervals for when the next action should take place.
- Once a sequence is sent, you can see the statistics on its performance, specifically, open rate, click rate, and reply rate.
- You can view the performance of each of your emails, so you know which type of message resonated best.
- Last but not least, contacts will only be able to exit the sequence if they reply to your email or book a meeting.
Once you have enrolled contacts in your sequence, you can check its performance by clicking on the title of the sequence. It will bring you directly to the analytics page where you can view how many people were enrolled, the open rate of your emails, the click rate, reply rate, meeting rate, unsubscribe rate, and bounce rate:

Figure 4.7 – Analytics of a sequence
As shown, you can also view the performance of each individual email so you can determine which type of email gets the best reaction and replicate these patterns.
Centralizing all communication with prospects using a shared inbox
Another popular channel through which leads often come is your company's generic inboxes, such as [email protected] or [email protected].
These inboxes usually exist in the email domain that manages all your company's email inboxes, so understanding who has visibility to the emails coming in from these inboxes can be difficult. With HubSpot's shared inbox feature, you can now have any emails sent to these inboxes filtered into HubSpot, so that your sales teams can have visibility into the content that is being sent to each of them, and source any new leads that come in via this channel.
To connect a shared inbox to HubSpot, simply navigate to Settings | Tools | Inboxes. From there, choose Create a channel as seen in Figure 4.8 and follow the instructions, which prompt you to choose your email provider and allow connection to the inbox. You must have access to the inbox itself as you will be required to sign in.
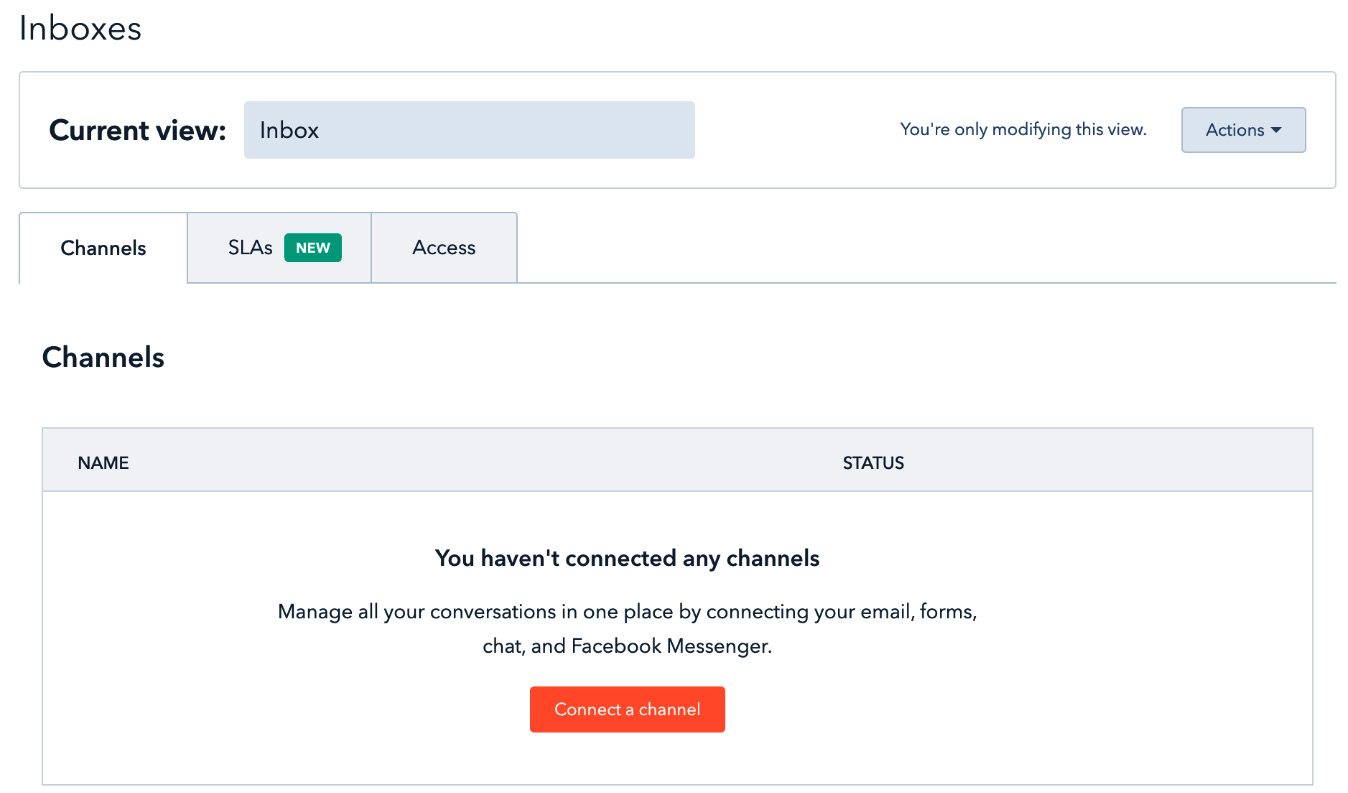
Figure 4.8 – Connecting a shared inbox
Once your shared inbox is connected successfully, you can view the information in this inbox by navigating to your top menu and choosing Conversations | Inbox. Here, you will find all messages that either come through your support inbox or your chat:
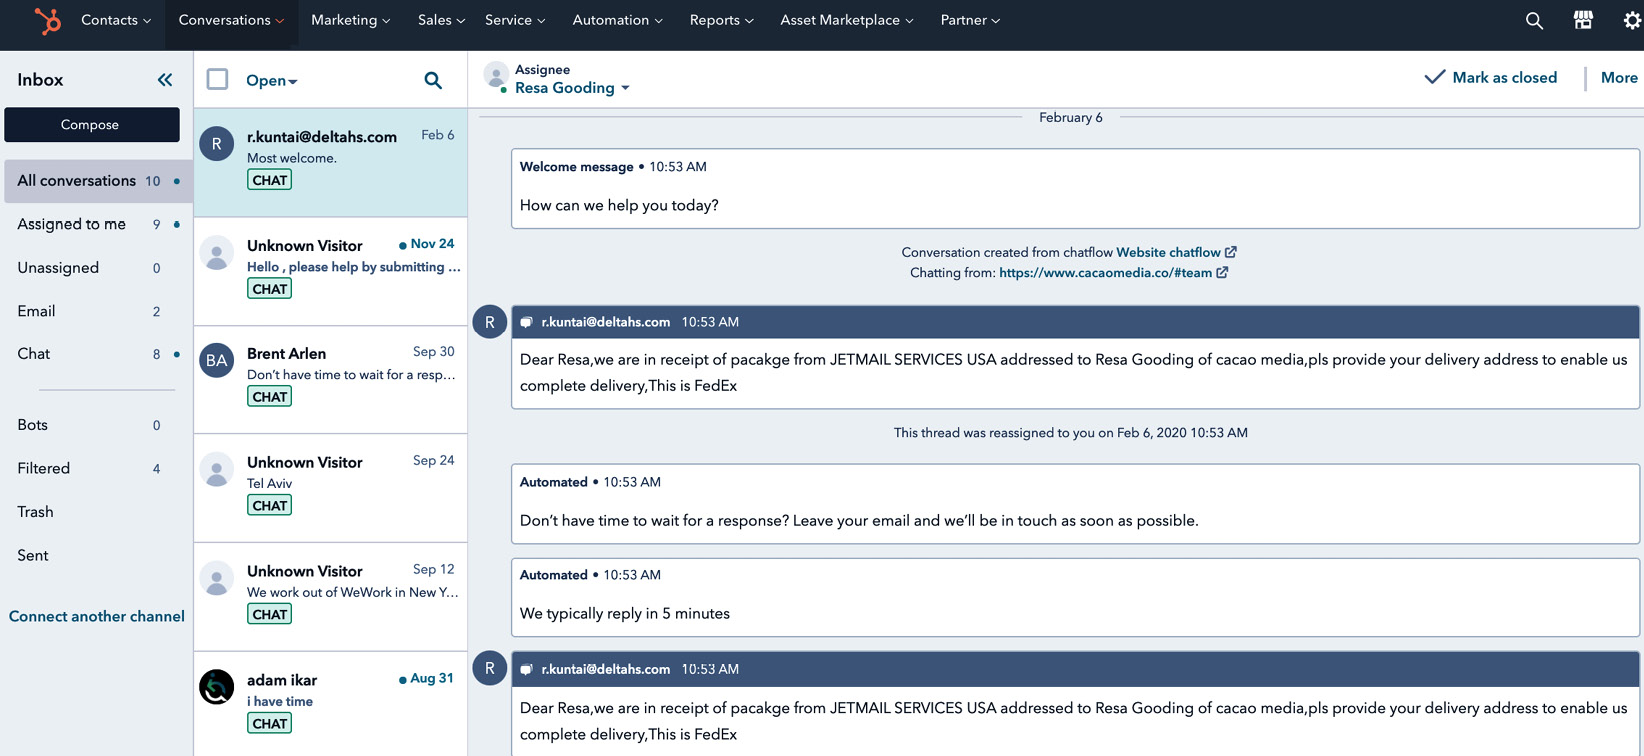
Figure 4.9 – Conversations inbox
Connecting your shared inbox allows your sales team to perform the following tasks:
- Identify which leads need urgent attention and respond to them immediately.
- Assign or include another member of the team in the conversation so they can also be in contact with the lead if deemed necessary.
- Filter relevant conversations only so you don't get overwhelmed with spam emails.
This gives your sales teams the ability to prioritize which leads need their urgent attention; the next step is to help them know when is the best time to reach out to that prospect.
Connecting with a prospect at exactly the right time
Timing is everything, right? But, as a salesperson, you often operate in the dark wondering when it is really the best time to call or connect with a prospect. How do you avoid, or at the very least minimize, that dreaded voicemail or out-of-office email response?
Fortunately, HubSpot has a host of useful tools (all free, by the way) that allow you to maximize your outreach and optimize the response rates you get. Some of these tools are email tracking, email scheduling, calling, and meeting calendars, all of which will be covered in the following sections.
Email tracking
One of the most useful tools in a salesperson's arsenal is knowing not just if someone receives your email but also knowing if they opened the email and when. Connecting your personal inbox to HubSpot allows this feature to be activated, so that each time someone opens your email, a notification will pop up in the email sent.
But first, let's make sure you have your personal inbox connected correctly to HubSpot. To connect your inbox to HubSpot, navigate to Settings | General | Email. Pay attention to selecting the Connect an inbox option under Personal Inbox and not Shared Inbox. Once you've selected this option, simply follow the prompts that direct you to complete the integration.
The following screenshot shows you a successfully connected inbox to HubSpot:
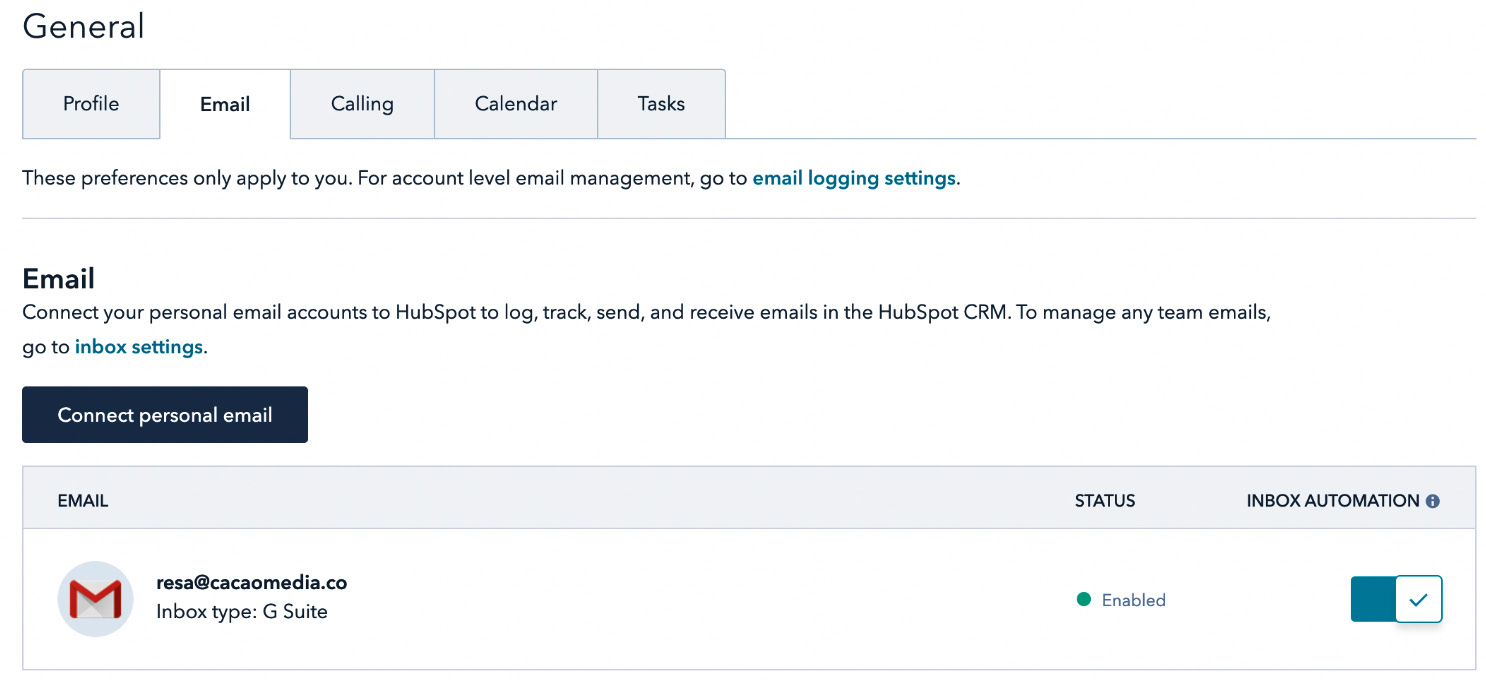
Figure 4.10 – Difference between shared inbox and personal inbox
Note, when connecting a shared inbox, everyone with access to HubSpot will have visibility to the emails sent to that inbox from within HubSpot. Therefore, this is another incentive to ensure you connect your personal inbox correctly so you can control what information you wish to be logged into the system from your personal inbox.
Email scheduling
Research shows that the best time to send an email is between 8 a.m. and 9:30 a.m. That being said, you aren't always available to write an email at this time or press the send button, even if it is ready in your drafts. So, the best alternative is to write that email whenever you can and schedule it to be sent at the time you wish the recipient to get it.
Hubspot's email scheduling tool, which is part of the integration of connecting your inbox to HubSpot, allows you to schedule the email to be sent when you choose.
Simply compose the email in your inbox, and at the very bottom where the Send button appears, click on the arrow, and you will see Schedule Send. Clicking on this option will reveal a list of dates and times to select to send the email:

Figure 4.11 – Email scheduling feature
Remember that to activate this feature, you must also download the HubSpot extension to your inbox when integrating your emails.
Getting instant notifications when prospects land on your website
Another helpful and free feature that allows you to coordinate your interactions with prospects at exactly the right time is the notifications feature, which exists in the prospects tool described earlier. As you may recall, the prospects tool tracks visitors to your website. So, if you wish to connect with a prospect who's been hard to connect with, receiving a real-time notification when they are on your site can be a great time to pick up the phone and connect with them, as it indicates you are on their mind at this very moment.
To activate this notification, you once again navigate to Contacts | Target Accounts, then scroll to the bottom of the page and click on Prospects. Once arriving on the page, in the top right-hand corner, click on Actions | Manage Notifications.
A box, as shown next, will then appear inviting you to activate either personal notifications or team notifications so your entire team can receive these alerts. This allows you (or select members of your team) to get real-time notifications when companies visit your site for the first time or return after some time:
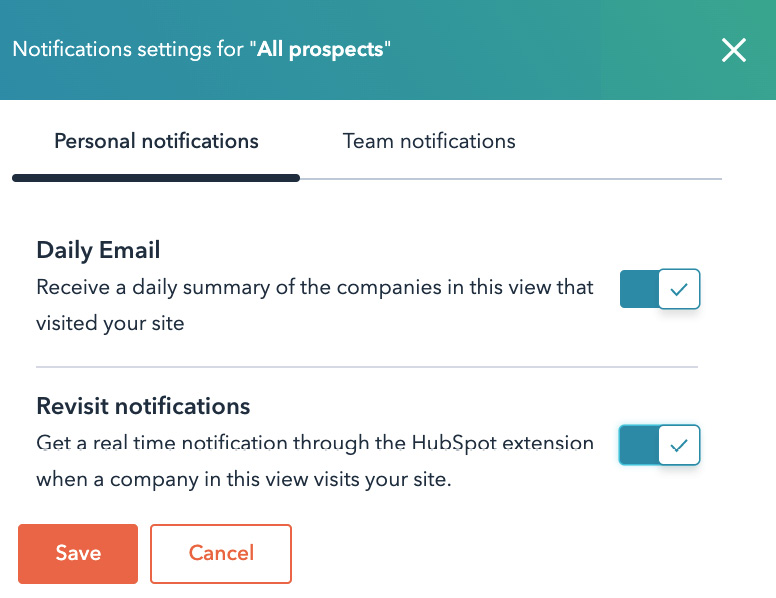
Figure 4.12 – Notifications tool
Having this feature activated makes it very convenient for your sales teams to connect with prospects at a more convenient time.
Connecting over the phone and keeping a record with the calling feature
This brings us to another great feature, calling, which helps sales teams to record a call with a contact and set up follow-up tasks immediately after the call.
To activate this feature, navigate to Settings | Sales | Calling and connect your phone number as prompted:

Figure 4.13 – Calling tool
Here are a few useful tips to help you use this feature once the integration is set up:
- You can make a call to the contact directly from your phone or from HubSpot.
- The contact must have a phone number associated with their record for the call to be recorded. You can add this information manually to the contact if needed.
- If a contact opts out of all marketing communication, then you won't be able to call the contact from HubSpot or record the call under their record.
The calling tool is effective to reach potential customers and log this activity with them. But, one phone call is never enough to convert someone into an actual customer. According to statistics, it can take up to 14 interactions with a lead before they convert to the next stage. HubSpot tools such as the meeting calendar, documents, and quotes can be quite handy for helping move a prospect along your sales process. Let's take a closer look at how they work.
Landing more meetings and closing more deals
HubSpot Sales Hub is commonly used to track the progress of deals and the pipeline in which your sales team is actively engaged. To make this process more efficient, HubSpot has added a suite of tools such as the meetings tool to help sales teams book more meetings, the documents tool to help sales teams keep track of how prospects are engaged with the documents sent to them, and the quotes tool to get the prospect to confirm their interest in purchasing and the sales teams to close more deals.
Save time booking meetings
The first of such tools is the meetings tool. This tool is a free feature of HubSpot that connects your calendar with HubSpot, so you can provide a calendar view of your availability and time for the prospects to easily book a meeting with you. The advantage of using HubSpot's meeting tool instead of another platform is that it will automatically take contacts out of any email that they may currently be enrolled in when they book a meeting.
To set up the meetings tool, first, connect your calendar to HubSpot by navigating to Settings | Sales | Meetings. Once you get to this page, you will arrive at the view shown in the following screenshot. Choose to connect your calendar depending on the email platform you use and follow the instructions as seen:
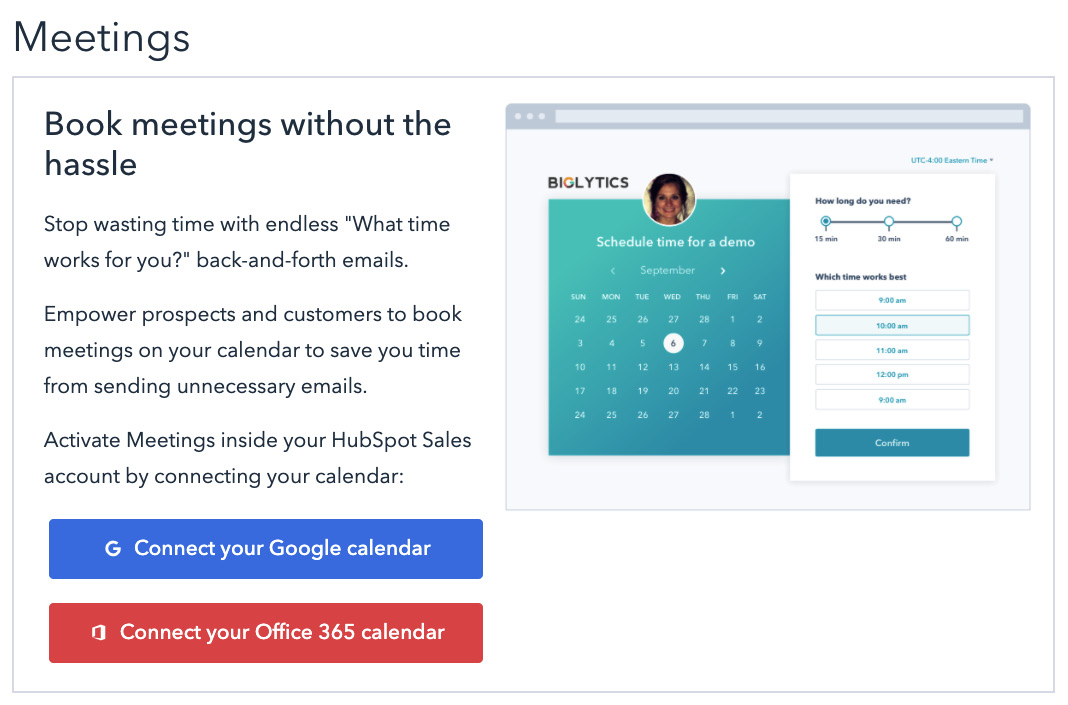
Figure 4.14 – Connecting your calendar to HubSpot
Once your calendar is connected, it's time to set up your meeting link so users have a view of your availability. To set up your meeting calendar, follow these steps after connecting your calendar to HubSpot. If you missed the popup to set up your meeting link, go to your top menu and navigate to Sales | Meetings and you will be able to set it up accordingly:
- Click on Details in the left bar and in Meeting headline, enter the headline you would like users to see on your meeting calendar, for instance, Meet with Resa Gooding:
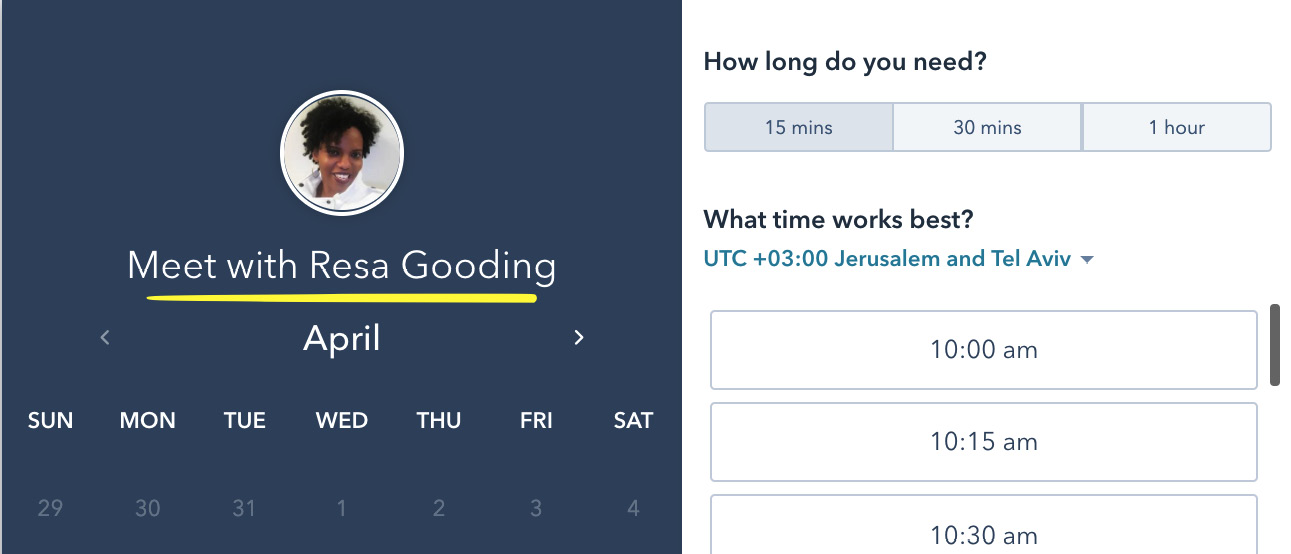
Figure 4.15 – The headline feature in the meetings tool
- Then, enter the name of the meeting in Meeting name, for instance, Demo with [Your Company Name]. This is what the link will be called when inserting it into an email.
- Choose the ending of your URL, for instance, a demonstration or free consultation. This URL cannot be changed once you create it, so choose wisely.
- Enter the duration of time that people can book a meeting with you, for instance, 30 mins, 1 hour, and so on:

Figure 4.16 – Adding your details to the meetings tool
Once these steps are completed, click on Configuration on the left side menu.
In the Configuration menu, you will set the details the user will see in the calendar invite once they book the meeting with you:
- Enter the Location details. Note, if you typically have meetings online and you use a video conferencing tool such as Zoom, you can connect it to HubSpot, so it will automatically send a Zoom link to anyone who books a meeting with you.
- Fill in the Invite subject textbox, which can have a personal token or company token in it, so it can read Meeting with [Your Name] + [Company Name / Contact Name].
- Enter the Invite description details, which will provide a short description of what people can expect from the meeting.
- Set the Booking page language option to your prospect's language, or if you work internationally, it is recommended to leave the settings as Default to visitor's browser settings so it can adjust automatically.
- Set Date and time to your preference, or if you work internationally, it is recommended to leave the settings as Default to visitor's browser settings so it can adjust automatically.
- For Email notifications, ensure the toggle button is on so users will automatically get a confirmation email once they book a meeting with you. In addition, it is recommended to set the email reminders for 1 day before and 1 hour before, so no one 'forgets' they booked a meeting with you 3 weeks ago.
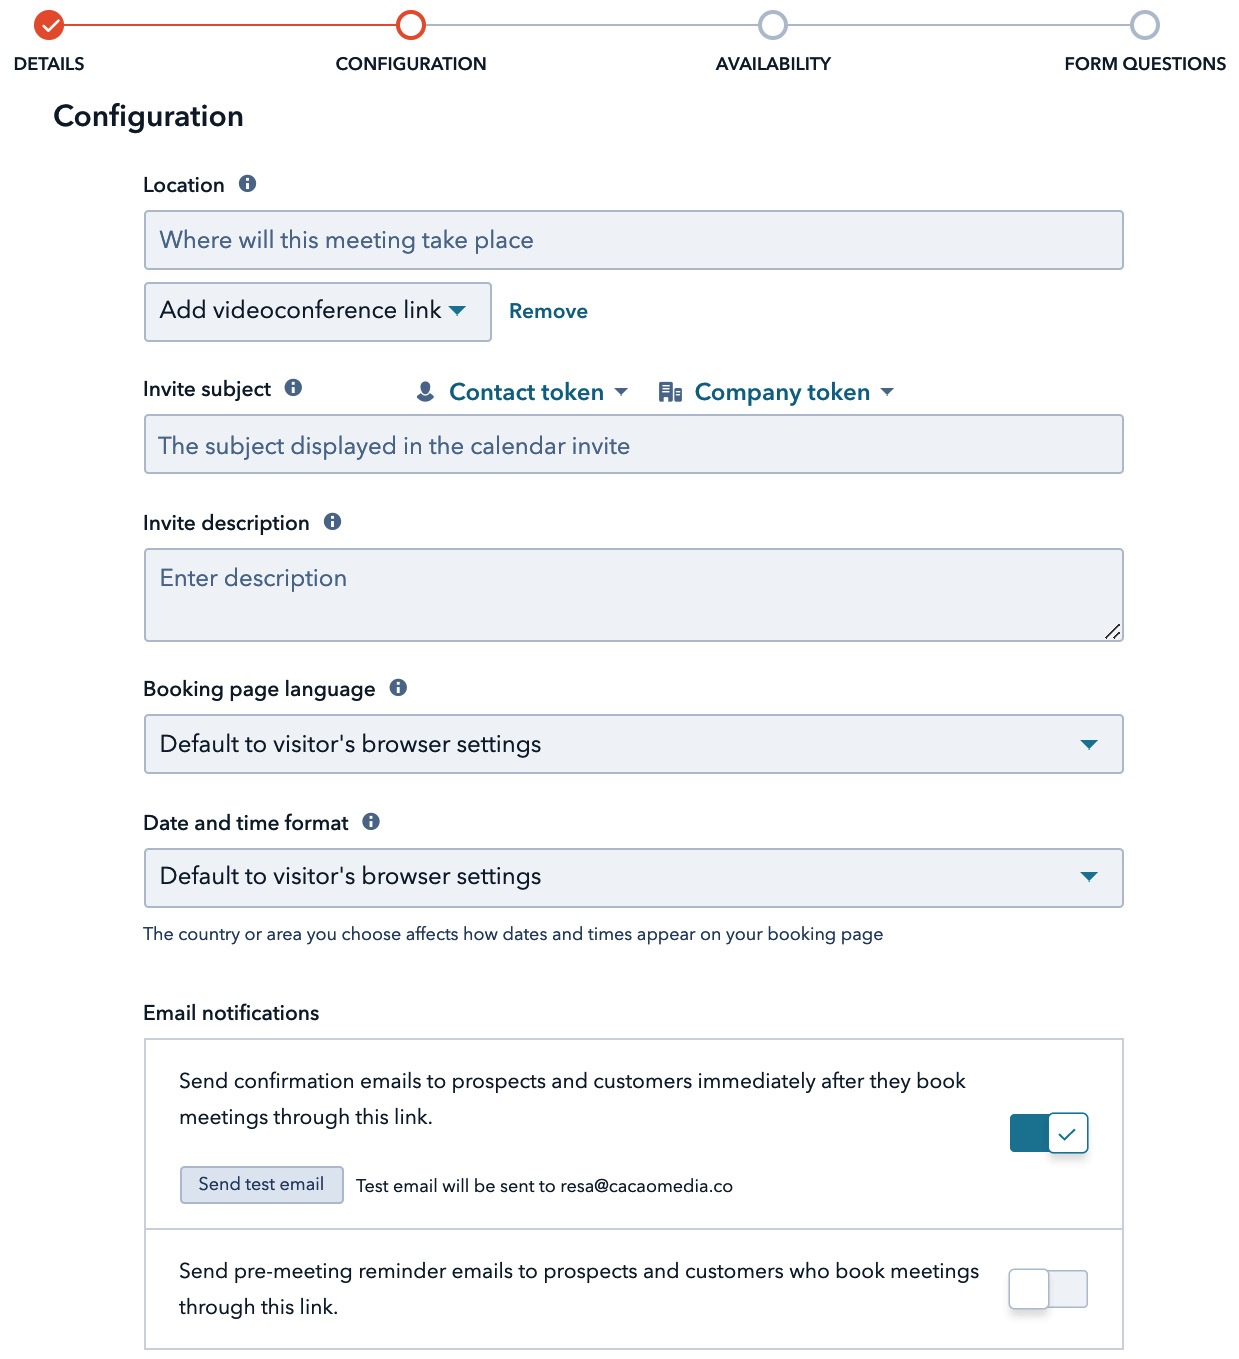
Figure 4.17 – Configuring the meetings tool
- Once your details and configurations are set, the next step is to decide when you actually want to take meetings. Navigating to Availability on the left sidebar allows you to choose the days and range of times you wish to be available for meetings:
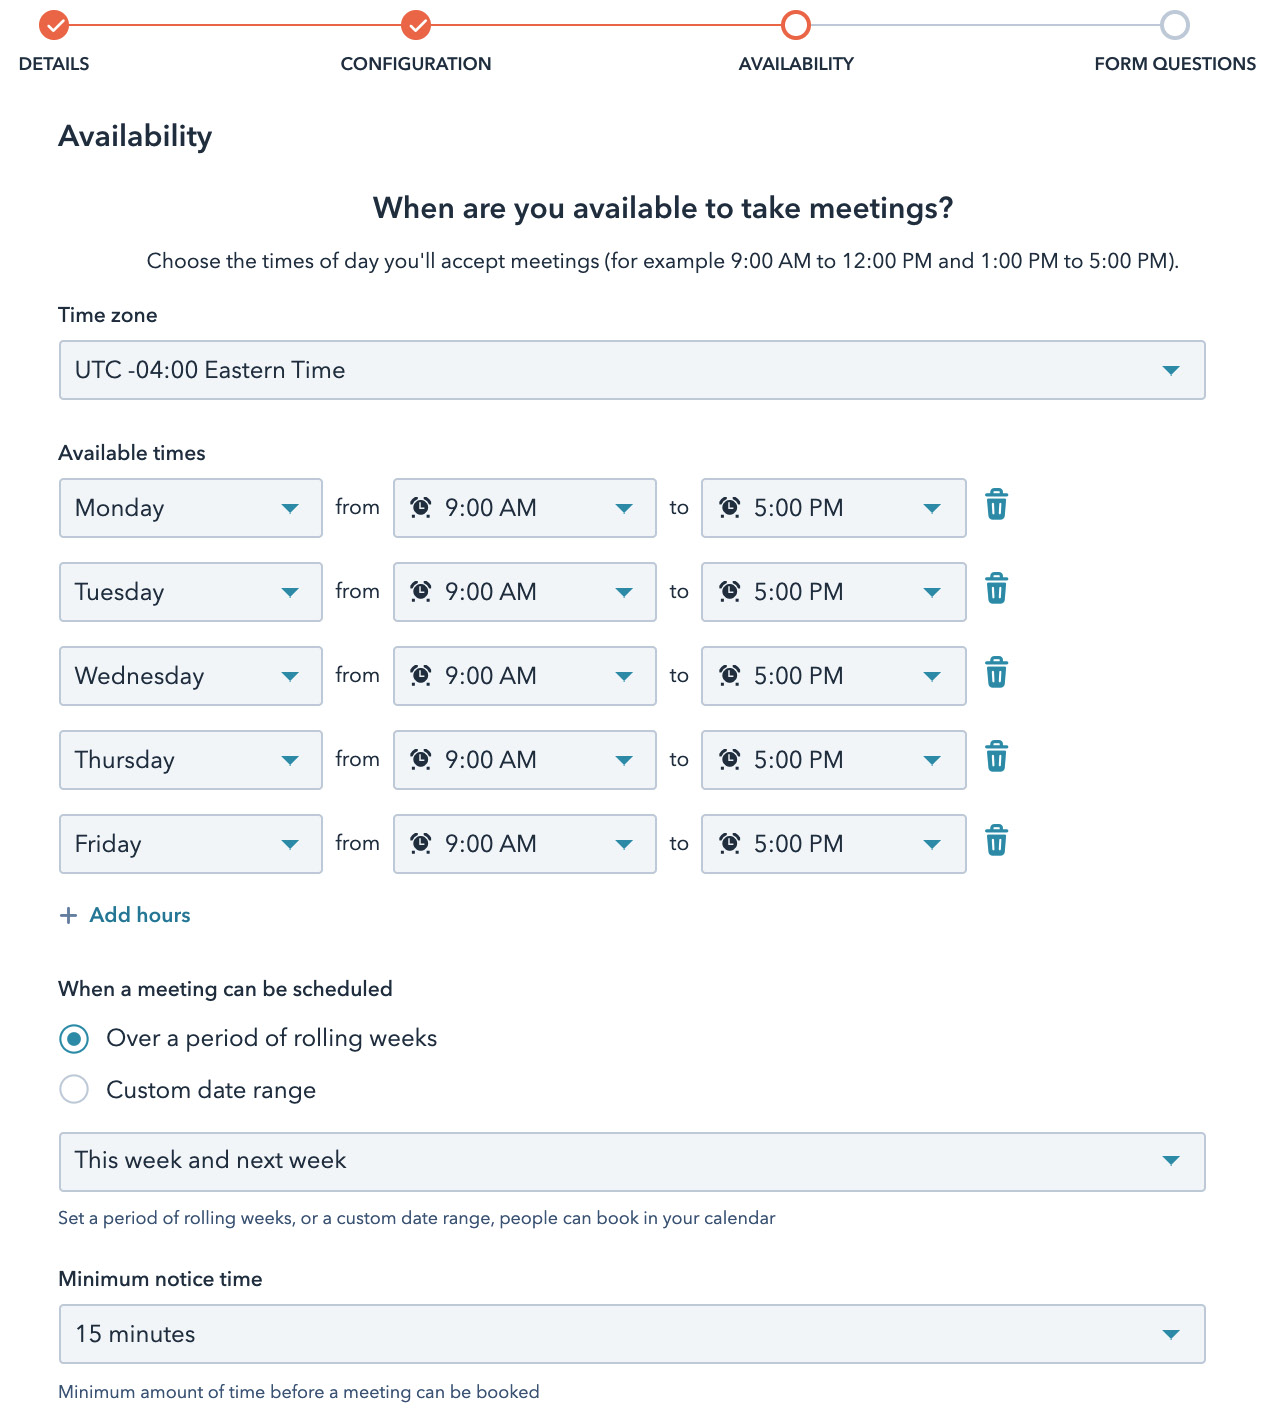
Figure 4.18 – Choosing your availability in the meetings tool
- First, select the time zone you typically operate in. This will adjust automatically for international visitors to your calendar link.
- Then, select the days and times you wish to be available. Note, if you want to show your availability between select hours of a day, for instance, Fridays 09:00-11:00 and then again 17:00-21:00, you will need to select the day twice, as shown:

Figure 4.19 – Selecting multiple time ranges on the same day
You can then choose how you wish your calendar to be seen, either constantly over a period of time or just for a select period because you are going to a trade show or conference between specific dates and are inviting prospects to book a meeting with you.
And finally, you choose the following:
- Minimum notice time: The minimum time a meeting can be booked for. Recommended notice time is 24 hours.
- Buffer time: The time between meetings, so you aren't booked for one meeting after the other.
- Start time increment: The frequency of your meeting start times, for instance, every 15 minutes, 30 minutes, or 1 hour.

Figure 4.20 – Setting minimum time, buffer time, and start time increment on the meetings tool
- In order for a prospect to book a meeting with you, they must answer the minimum questions of First Name, Last Name, and Email. However, if you have upgraded to Sales Professional, you can then also add a custom question, which can be used as a further qualifier before someone books a meeting with you:
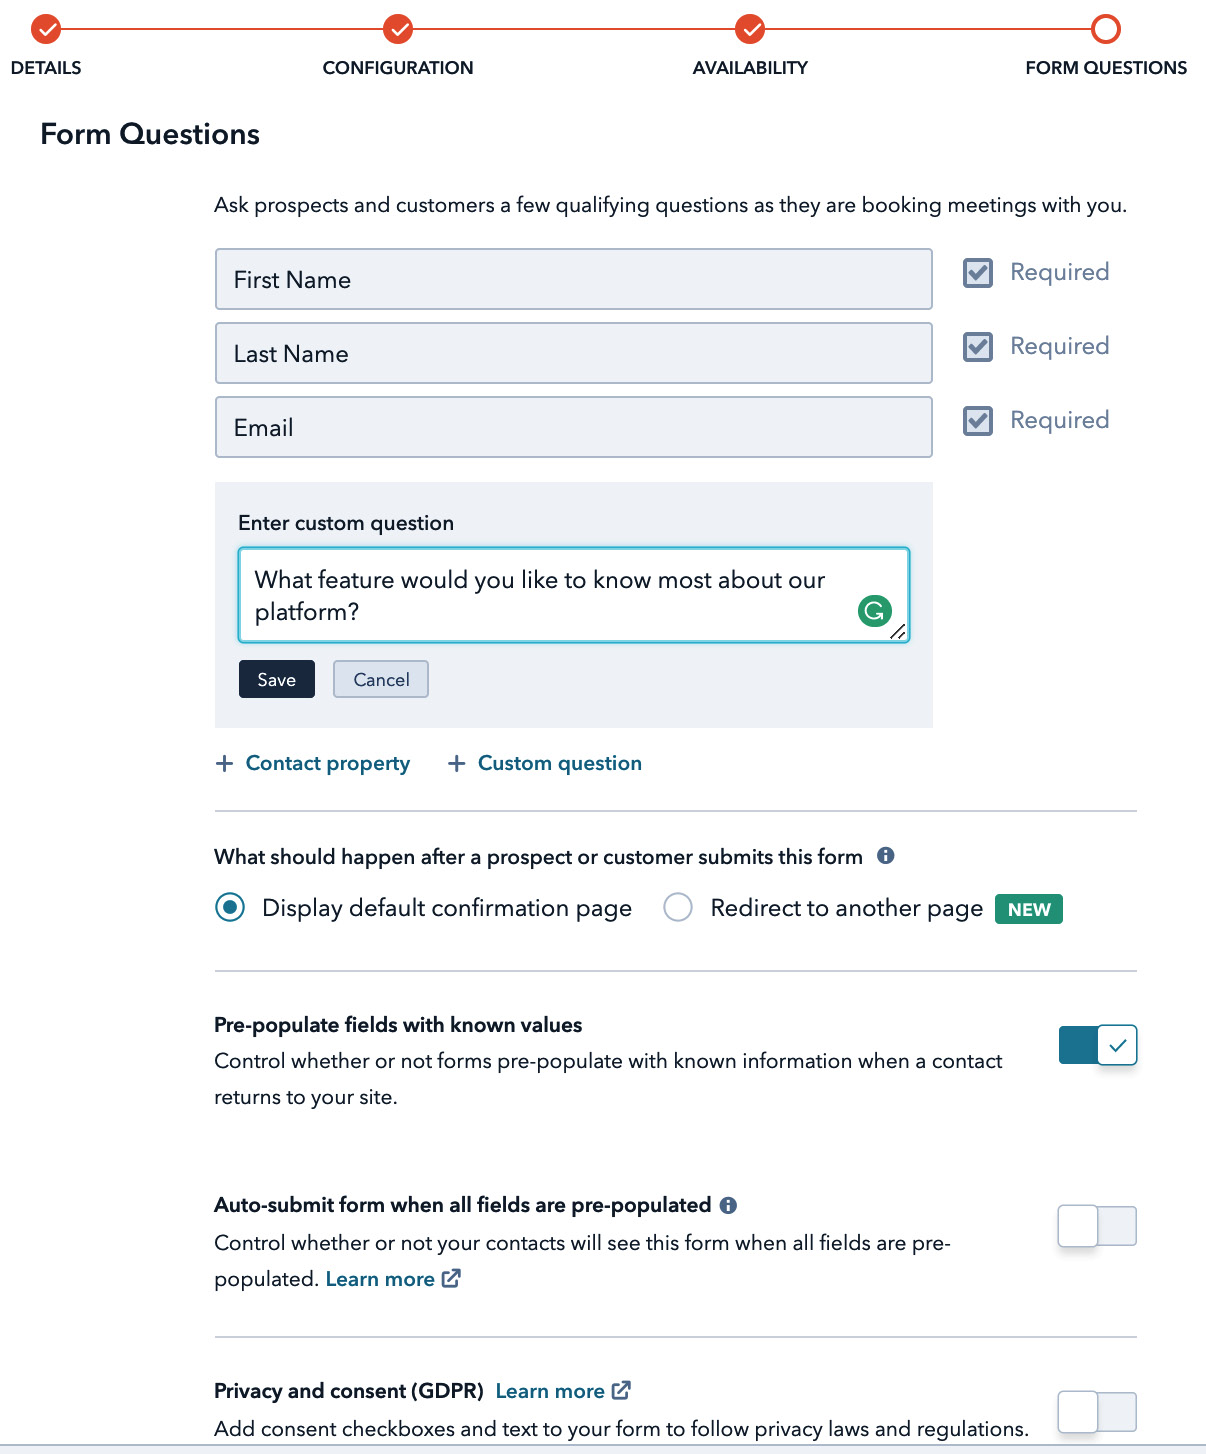
Figure 4.21 – Adding questions to your meeting link

Figure 4.22 – Meeting link
You now have two options to use this meeting link:
- In an email: You can use it within the body by hyperlinking text when sending an email to a prospect to book a meeting with you or in your signature so people can easily book time with you.
- On a website page: You can use the embed code to include the link on a website page so visitors can easily book time with you.
Sending documents and knowing if they were read
HubSpot has two places where you can store files you wish to use in your marketing or sales outreach campaigns. Those two places are Files and Templates and Documents. Files and Templates will be discussed in later chapters, but in a nutshell, it is used to store all collateral that is used in marketing campaigns, for instance, images, assets such as case studies, ebooks, and so on. The documents feature in HubSpot is used for sales outreach campaigns, especially when sending sensitive data such as contracts, or specifications based on a client's requirements. The good thing is that they are both free features of HubSpot and can give the sales teams much-needed insights as to where a prospect stands when trying to close them as a customer.
The advantages of using Documents instead of Files and Templates are as follows:
- You can get real-time notifications of who opened it and how much of it they read.
- You can limit access so only those to whom it was sent can read it.
- You can add a requirement that new eyeballs need to enter their email addresses so you can see who else within the organization read the document and if the email was forwarded to others.
All in all, the documents feature is meant to give the sales teams more insights into how their sales collaterals are being received.
To access Documents, navigate to the top menu and Sales | Documents:

Figure 4.23 – Navigation bar to the documents feature
Once you are there, you can upload any document you wish to share with a prospect. So, next time you send them an email, you can insert a link to the document that is hosted here and see the analytics of how people interacted with it:

Figure 4.24 – Analytics from documents
By turning on the GDPR consent button, people are prompted to enter their email addresses before accessing the document. This is quite a handy feature to increase qualified leads as when your sales teams are doing cold outreach to contacts who are not yet in your database, they would be automatically added should they choose to access the document.
Using the quotes tool to get signed deals
The quotes tool in HubSpot is an integral part of helping sales teams achieve their KPIs as it makes it easy for them to create, send, and track how prospects view their quote. The quotes tool is a paid feature of HubSpot Sales Professional and can be found by navigating to the top menu and clicking on Sales | Quotes:
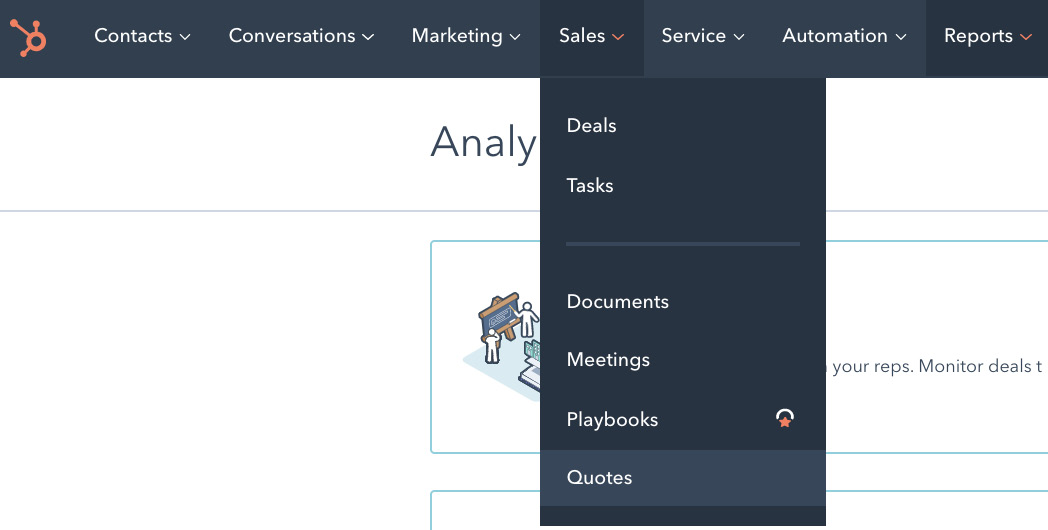
Figure 4.25 – Navigation bar to the quotes tool
Once in the Quotes section, follow these steps to create a quote:
- Associate an existing deal with the quote. This means you have to create a deal first, which is discussed in Chapter 3, Using HubSpot for Managing Sales Processes Effectively.
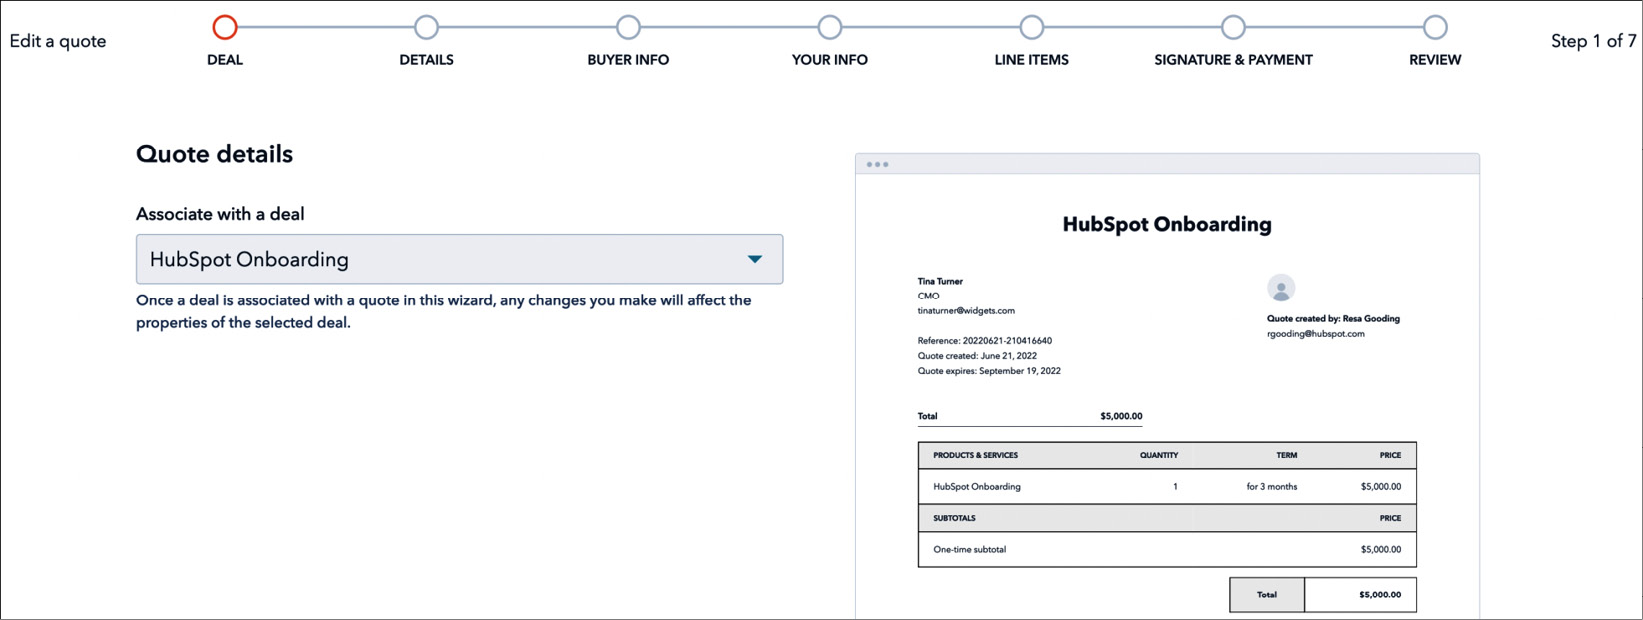
Figure 4.26 – Quote details
- Quote template: HubSpot gives you three options of design to decide upon.
- Quote name: The name you wish to have on the quote as it reflects the service or product from which you are quoting.
- Expiration date: How long this offer is valid.
- Comments to buyer: Any additional information you wish the buyer to know.
- Purchase terms: Any information regarding the purchase terms can be added here:

Figure 4.27 – Quote details – template, name, and expiration date
Add the buyer's information and company name, which is typically the person who will be responsible for ensuring the quote is signed off internally in their company:

Figure 4.28 – Buyer's information
Add your information as the sales representative sending the quote:

Figure 4.29 – Seller's information
- You can add the products that should be included in the quote. These should be previously added to the product library or can be added at the quote stage by clicking on Add product:

Figure 4.30 – Review products
- Add the signature and payment options. Currently, HubSpot only supports Stripe if you wish to add a payment option. In the near future, there will be further options. However, to currently add Stripe, you must first visit the HubSpot App Marketplace, download the Stripe app, and follow the instructions to connect the app to HubSpot.
- If you simply need to receive a signature on the quote to confirm the purchase, you have the option to allow the recipient to sign by e-signature or to physically print and sign the document. If you select e-signature, you will see the following:
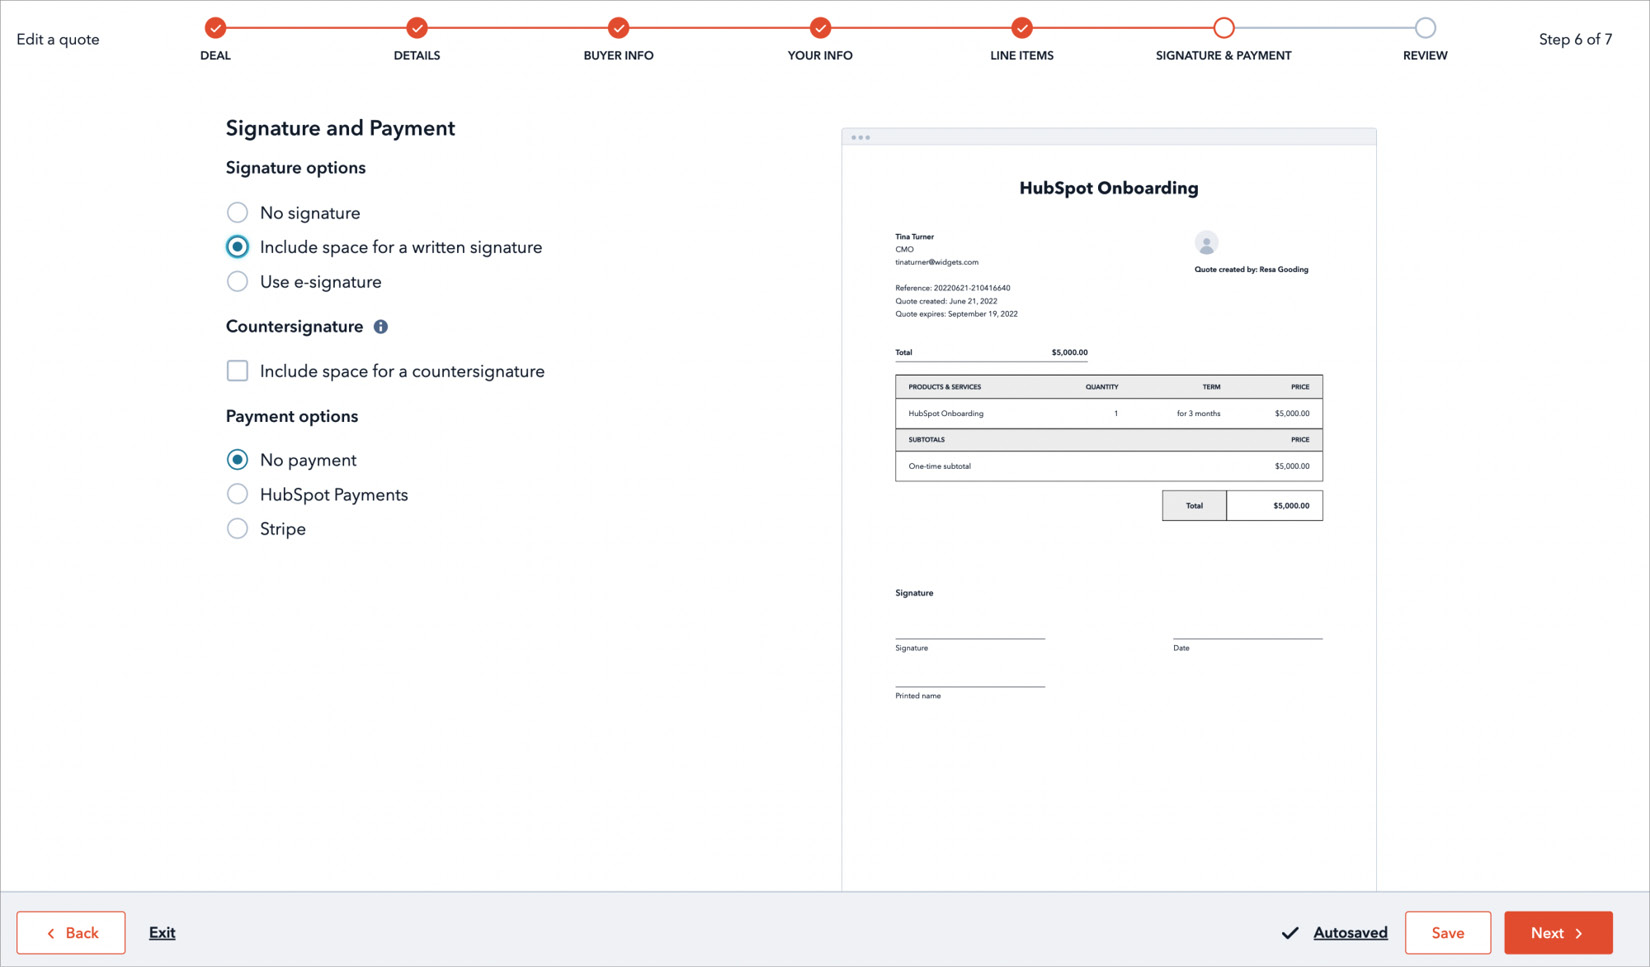
Figure 4.31 – Signature and Payment with space for signature
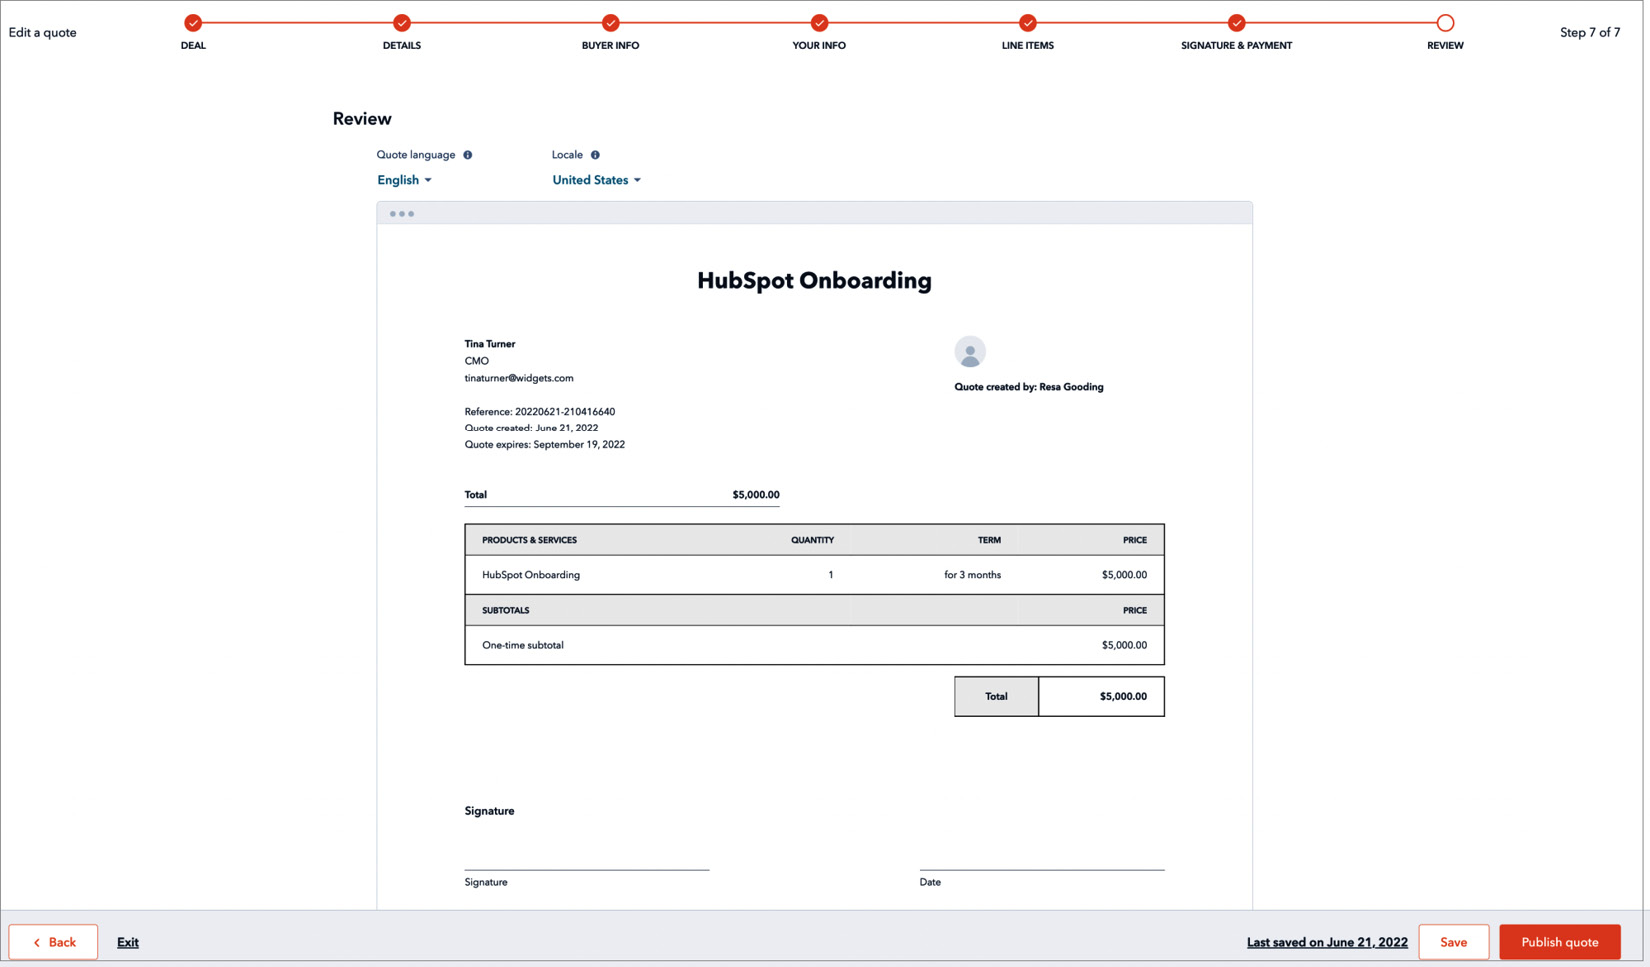
Figure 4.32 – Final review of the quote
- Click on Save, and the link that is created with the quote can be inserted in an email when sending the quote:
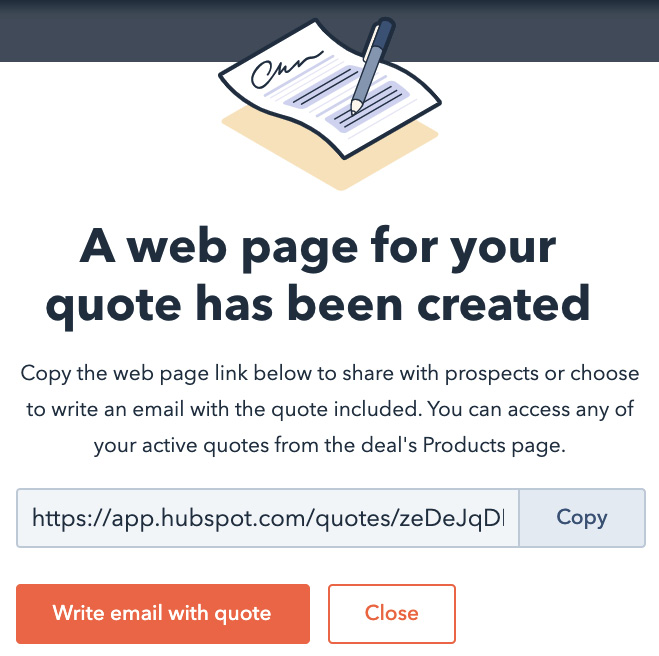
Figure 4.33 – Link for the quote
It is understandable that most businesses might require a more sophisticated quoting tool as there might be many nuances to be added before a quote is accepted. However, on many occasions, these businesses have used HubSpot's quote tools as a pro forma invoice so the prospect can at least sign an intent to purchase, and then a more official quote can be sent from your finance team.
All in all, the sales tools provided in this chapter can be quite useful to your sales teams as they help them to reduce the amount of administrative work needed as well as close any gaps where deals might be falling through the cracks. Most of the features are free, as we identified, and are quite sufficient to bring real value to their everyday tasks. So, do try them.
Summary
Overall, we discussed the sales tools in this chapter, such as email scheduling, calling, templates, sequences, the meetings tool, documents, and prospects, among others.However, the upgraded version of HubSpot Sales Professional further empowers your team to reach potential customers with a more personalized and human approach without leaving anything to chance.
The bottom line is that there is no better time than now to improve the way your sales teams sell.
In the next chapter, we will take you back to marketing, as we explore how to ensure leads find your products and services online so your sales team can actually use these tools.
Questions
For most businesses, it is imperative to help their sales teams focus more on selling instead of dealing with administrative tasks. So, let's make sure you understand the value of implementing some of these free tools right away:
- Which sales tool helps a sales team member to send personalized yet automated responses – sequences or workflows?
- Does HubSpot have a meeting calendar tool that allows prospects to see your availability and book a mutually convenient time?
- What is the benefit of using the documents tool to send a contract instead of just sending it as a regular email attachment?
Further reading
To learn more about HubSpot's sales tools and some creative ways businesses are empowering their sales teams, do check out the following resources:
- HubSpot sales blog: https://blog.hubspot.com/sales
- HubSpot case studies: https://www.hubspot.com/case-studies-directory?product=crm