Chapter 10: Revive Your Database with HubSpot Email Marketing Tools
Email marketing is one of the most fundamental tactics within the inbound marketing toolkit. It is also one of the oldest forms of communication since the invention of the internet. Regardless of the many new shiny tools that have surfaced as customers became more sophisticated shoppers, it remains one of the most effective means of converting a prospect. Therefore, it is imperative for marketers and sales teams to understand how to effectively use this tool in order to maintain authentic conversations with their audience and, at the same time, not abuse this privilege by sending spammy content.
In this chapter, you will learn about the following topics:
- Building an effective email marketing strategy
- Setting up an email successfully in HubSpot
- Analyzing the results of an email
- Optimizing the email for best performance
To get the most out of this chapter, you will need access to the HubSpot marketing emails, which are available in the Free, Starter, Professional, and Enterprise versions.
Technical requirements
To get the most out of this chapter, you will need to have the following:
- Marketing access to HubSpot to create emails
- Access to reports in order to analyze the email results
Building an effective email marketing strategy
When was the last time you received an email from an unfamiliar source and were excited to open it? Even if you vaguely remembered subscribing to a blog or interacting with a company after a few days of getting an email from them, were you in a rush to prioritize reading the content received or did you simply click open to get rid of the number of unread messages in your inbox? And for more savvy inbox users, I guess you either simply open another generic email used for collecting such content or filter them into folders never to be seen again, right?
Well, guess what? Your contacts are probably doing the same thing. In this section, we will teach you how to build the right strategy in order to create an email campaign that will deliver useful and helpful content to your contacts at the right time:
- Define your goals: The first step of any successful email campaign is understanding your goals. Are you trying to get people to open your newsletter, sign up for a webinar, or simply receive updates from you about new products or services you offer? Understanding your goal helps to define the metrics by which you will measure your success.
- Build your email lists: In order to send an email, you must have contacts within your database to send it to. So, you must think of ways to capture people's email addresses. Some popular ways are to give free offers of something of value, such as an e-book to capture these emails.
- Segment your lists: Once you have built your emails, the next step is to make sure your lists are segmented so that the correct people are receiving relevant emails. Taking the time to do this will help you to avoid high unsubscribe rates or reports of spam and, therefore, protect your email deliverability.
- Make a send schedule: Understanding the best time to reach your target audience is crucial to email marketing success. According to Campaign Monitor, 53% of people open their emails on weekdays during the hours of 9 a.m. and 11 a.m. However, after sending thousands of emails on behalf of my clients, I have found that the best time to send emails depends on the type of email. For example, when sending event emails, the best time to send them is often after work hours or on weekends. This is because people are, generally, browsing through their emails at that time and are more inclined to sign up for an event during their downtime, as they don't think about how busy they are. Additionally, for newsletters or general content emails, the best time to send them is during weekends and holidays, as people are more likely to read content to help improve their work or business.
- Create the content of the emails: Content is crucial to emails. Without it, there is no point in sending the email. However, it is important to remember to keep the length of those emails reasonably short. People no longer have the attention span to read lengthy emails. So, in order to get your contact to take action, keep it to 3–4 lines maximum.
- Format the content of the emails: Formatting your emails is important so that they can be easily scanned. Having a line space of at least 1.5, a font size of at least 11, and a font color that is legible makes a big difference. Of course, ensuring your emails are optimized for different devices and email clients, as we shall discuss in later sections, is also important.
- Send the emails: Pressing the send button is always nerve-wracking. But there comes a point when you simply must press send. The important thing to check before sending is that there are no spelling errors, the links work as they should, and the email displays correctly on both mobile and desktop devices.
- Track and monitor your success: Now that your contacts have received your emails, it is time to see who has actually engaged with it. Understandably, you will want to check the open rates and the click-through rates. However, it is also just as important to check the quality of the contacts that are opened and clicked on. So, doing some deep diving into understanding the contacts that engaged in your email can help you justify the results.
Now that you understand how to build a successful email strategy, the next step is to understand how to actually set up an email in HubSpot.
Setting up an email in HubSpot
HubSpot's email marketing tool has a host of features to ensure that you can reach your target audience and optimize your email campaigns for maximum results. To set up an email in HubSpot, follow these steps:
Navigate to Marketing | Email in the top-level menu and click on Create email:

Figure 10.1 – Creating your email
Following this, you will be prompted to choose the type of email you wish to create. A regular email can be used for sending emails just once, for instance, a newsletter or an announcement. Automated emails are used when you wish to send a series of emails through the workflow function. In comparison, blog/RSS emails are emails you wish to automatically publish whenever you publish a blog:

Figure 10.2 – Different types of emails in HubSpot
Choosing Regular or Automated has the same steps described next to create an email. In this example, we choose Regular, and then you are prompted to choose a template under the Drag and drop section. The Custom tab allows you to design and create your own template to match your brand.
In the free version or starter version of HubSpot, you will only have access to the basic templates, but for those with HubSpot Professional or Enterprise, you will have access to more templates. In this example, we will choose the Simple template in the Basic section:

Figure 10.3 – Selecting a template
Once you've selected a template, in this case, Simple, you will be taken to the New email screen. This allows you to build and customize your template as you wish. The right-hand side of the screen includes modules for adding images, text, CTA buttons, videos, social icons, and more that you can simply click on and drag and drop to the desired position in the email:

Figure 10.4 – The email template
For instance, clicking on the image icon allows you to add an email header on top of your email. If you don't have any design skills, don't worry. The next few steps will show you some shortcuts to overcome this.
To add an image without having a designer, click on the Select Image button and a box will appear, prompting you to add an image or design with Canva, as shown in the following screenshot:

Figure 10.5 – Adding an image module to your email
Clicking on the Design with Canva option allows you to connect with your Canva account or create one for free if you don't yet have one.
Then, search for the email header option and click on it. It will direct you to the Canva platform:

Figure 10.6 – Accessing Canva to create images within your email
You will be redirected to the Canva platform where you will see a host of email header designs to choose from, as shown in the following screenshot. Choose any template you wish and customize it to your needs:

Figure 10.7 – Choosing an email header template
Customize the image by adding your own images, changing the colors, and adding new text as needed. Once you are done, click on Save in the upper-right corner. You will be redirected back to the HubSpot platform:

Figure 10.8 – Designing your email header in Canva
Once you have been redirected to HubSpot, click on the image that is saved in your library and it will appear in the email header space, as shown in the following screenshot:

Figure 10.9 – Adding the email header to your HubSpot email
Pay attention to the completion of the sections in the module to will help your readers have a more optimized experience. For example, adding alt text allows your email to be found online if there is a web version applied to it. Also, adding a link to the content you would like your readers to access ensures that if they click on the image, they will have another entry point to the content:

Figure 10.10 – Filling out the Alt text and Link sections
The next step is to decide which other modules you would like to add to the email, for instance, a call-to-action (CTA) button. To add any modules, just click on them and drag and drop them to the place in the email where you want them to appear:

Figure 10.11 – Adding the CTA modules to your email
Once the CTA module has been added, a box will appear on the left-hand side where you can customize the CTA, as needed. Add a URL that users can be redirected to once clicked. Change the text to whatever action is needed; for example, Download Now, Sign up Here, and more. Customize the color of your button, text, type of font, font size, and font color for posting, as shown in the following screenshot:

Figure 10.12 – Customizing your CTA
Once this has been completed, your CTA will be included in the email, as shown in Figure 10.11. Now, you can proceed to edit the text in order to complete the content of your email:

Figure 10.13 – Adding your CTA to the email
The last part of creating your content is to ensure you add a footer to your email. For marketing emails, you will need to include your company's address and an Unsubscribe button at the bottom of the emails. To include your company's address, click on the footer section of the email. A box will appear prompting you to include your company's physical address. Click on Save Changes:

Figure 10.14 – Editing the footer of your emails
Once this is complete, you can add the Unsubscribe and Manage Preferences buttons to your email. At this stage of your business, you generally should not open more than one type of email since it is already difficult to get people to subscribe to your emails, and every different type of email will require contacts to subscribe to it in order for them to receive your emails. Therefore, it is advised to just use the default marketing email subscription type that already exists within HubSpot. Therefore, there is no need to include the option for Manage Preferences in the footer of your email. So, by clicking on the footer, you can change the option from Both to just Unsubscribe:

Figure 10.15 – Selecting your subscription type
Now that the content of your email is ready, the next step is to add the sender and subject lines and preview the text. To do this, click on the Settings tab in the middle section of the email. Here, you can decide where the email should be sent from. By default, it will be set to be sent from the person creating the email, but this can be easily changed by clicking on the From name and From address boxes and choosing or adding new senders. It is important to note that it is always better to send these emails from a real person instead of [email protected] or [email protected]. You can also add the subject line and preview the text the reader will see before they open the email:

Figure 10.16 – Setting the sender's name and email, subject line, and previewing the text
With the settings and content complete, your next step is to decide on the contacts that should receive the email. To do this, click on the Send or Schedule tab in the middle section of the email screen and choose the lists of contacts that should receive this email. You also have the option to choose contacts or a list of contacts you do not want to receive the email. This is often a good feature to use when you wish to exclude customers or current opportunities from the list:

Figure 10.17 – Selecting recipients for the email
Before clicking on the send button, check how the email looks on a desktop and mobile and even how it will appear to different email clients. You can do this by clicking on Actions in the upper-right corner of the email and then clicking on Preview:

Figure 10.18 – Previewing your email on a desktop and mobile
Following this, you will be redirected to the desktop and mobile version, as shown in the following screenshot. Here, you can see the layout of the content to ensure the flow is exactly as you intend:

Figure 10.19 – The desktop and mobile preview of the email content
For users with a HubSpot Professional or Enterprise account, you can also see how the emails look on different email clients such as Outlook and Gmail alongside different mobile devices such as Samsung, iPad, and iPhone. To access this feature, click on the middle banner that says Clients, select the different email clients and devices from the left-hand side that you wish to test, and then click on Test my email now:

Figure 10.20 – Testing your email on different email clients
Once this is done, you can click through to see what your email will look like according to the different email clients you chose. Note that if any changes are required, you will need to go back to the edit section of the email to make any changes. In addition, it is important to note that the goal is not to optimize for every single type of email client but, instead, to optimize for the top three or so email clients and devices that are the most popular among your contacts.
Figure 10.18 shows an example of what it would look like on Outlook Windows 10:

Figure 10.21 – The Microsoft Outlook email preview
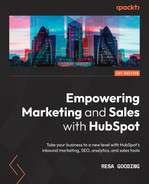
In comparison, Figure 10.19 shows the mobile version of what the email will look like on Gmail App on the iOS platform version 14.2 (yes, it's that precise):
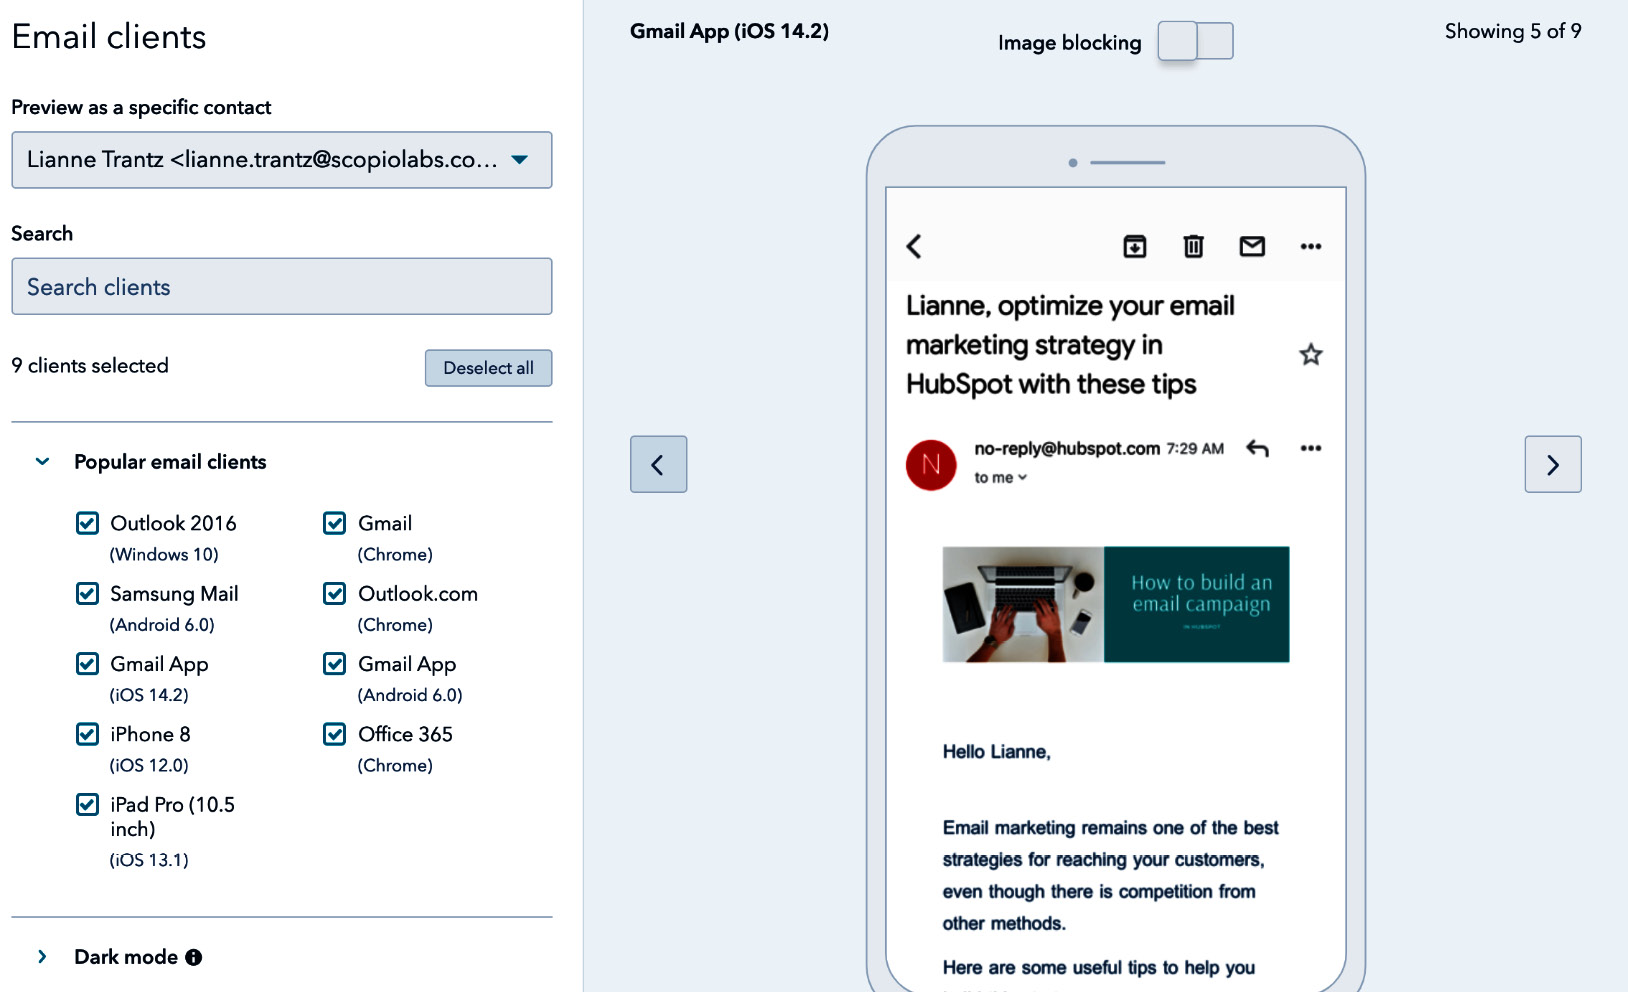
Figure 10.22 – Gmail App on the iPhone email preview
After ensuring your email's content and layout are ready, it's time for distribution. Using some of the initial tips mentioned at the beginning, we will ensure the emails are going out to the right contacts at the right time by using the following features.
First, click on the top-level menu and select Send or Schedule. The next step is to choose a list of contacts to whom you would like to send the email. In this section, notice that you also have the option to select a list of contacts that you do not want to receive the email. So, for example, if it's a promotional email you are sending and you wish to ensure that none of your existing customers receive it, you can exclude them.
The next step is to choose whether you wish to send it immediately or to schedule it to be sent at a later date and time. If you choose the latter, be sure to choose a date and time in the future. Additionally, note that you will also have the option to ensure that the email arrives at a specified time according to the time zone of the recipients. For instance, if you chose to send the email at 11:33 am, it will be sent at 11:33 a.m. across all the time zones of the recipients:

Figure 10.23 – Sending or scheduling your email
Once you've sent your email, the next nail-biting moment is to check the results. Often, you will be anxious to know the open rate and the click-through rate of your email and exactly who has opened and clicked on it. HubSpot offers all of these analytics and more so that you can then take any necessary actions for future email sends.
Analyzing the results of your email
To see the results of your sent email, simply return to the email under Marketing | Email and click on the email that was sent. The Performance page will appear with the following charts.
The following chart shows your open rate, click rate, and even the reply rate. Generally, for most industries, the benchmark lies around a 30% open rate and a 3% click rate:

Figure 10.24 – The overall performance rate of the email
The following chart shows the delivery rate. Here, you want to pay attention to any unsubscribes or spam reports to ensure you remove those email addresses from your database:

Figure 10.25 – Delivery rates
Understanding the statistics described so far is important, but HubSpot also presents a heat map so that you can better understand how your content has performed. The heat map clearly shows where readers have spent the most time. So, for future emails, you can determine where to place the most important information.
On the right-hand side of the heat map, as shown in the following screenshot, you can also see which links were clicked on the most and which contacts were the most engaged. Both are measured by the number of times they opened your email along with the number of times they clicked on your emails:

Figure 10.26 – Heat map for email engagement
Next, we would want to better understand the level of engagement your contacts had with the email. The following graph shows how many people actually read the email compared to those who skimmed it or just took a glance at it. This statistic allows you to gauge the interest level of the content that was sent:

Figure 10.27 – Time spent viewing the email
In comparison, the engagement over time graph, as shown in the following screenshot, allows you to better understand the timeframe in which your emails extracted a response. You can change the filters to see the results either within the first 24 hours or for longer periods, as follows:

Figure 10.28 – Engagement over time
One of the most important, but often overlooked, statistics is understanding not just which devices opened your emails but which email clients were the most popular for opening your emails. This guides your process for optimizing your email layout, as described in the previous section:

Figure 10.29 – The number of opens by email client
The next step is to go a bit deeper and gain a better understanding of exactly which contacts in your database were engaged with your content. By clicking on the Recipients bar at the top, you shift from just seeing overall numbers to seeing the details of every contact who received your email, opened it, and clicked on it along with those contacts who unsubscribed or whose email might have bounced.
The value of having this level of detail allows you to collect these contacts in specific lists so that you can use this information in the future. For example, should you wish to resend the email to contacts who didn't open the email, you can make a list of contacts who opened the email and then resend the email to all contacts in your original list, excluding those who have already opened it:
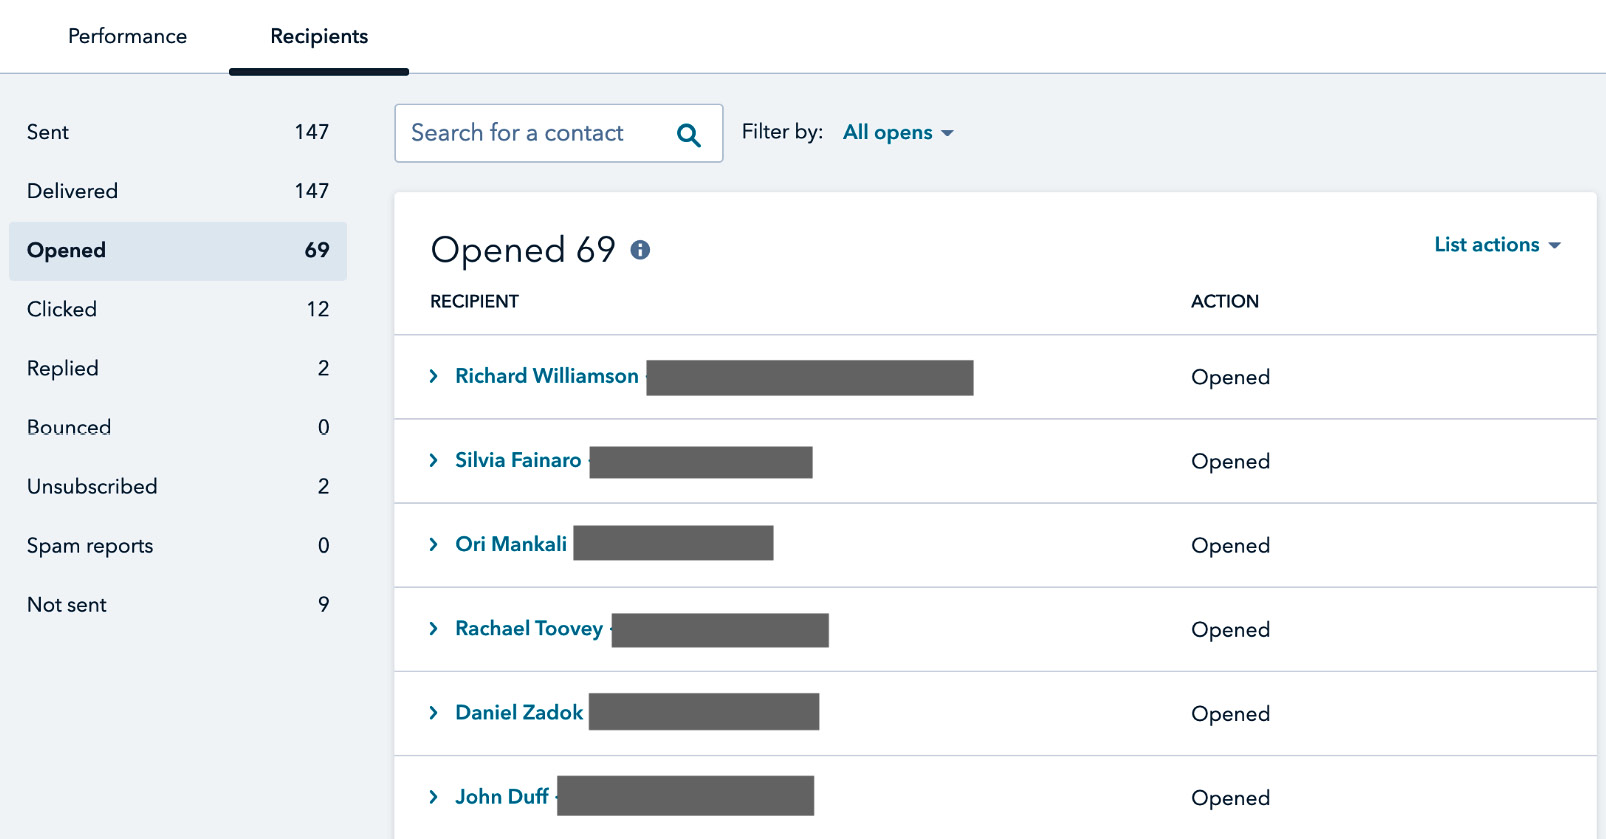
Figure 10.30 – The open rates of the email
After analyzing the statistics of your email, you might still be wondering how you can improve your results. How do you get more people to open your emails and take action on the content you've sent them? In the next section, we will discuss the different tools within HubSpot that can help you to optimize your results.
Optimizing the email for best performance
When it comes to email marketing, there are only a handful of techniques that can be used to optimize the performance of an email:
- Improving/testing the subject line, click rate, and click-through rate
- Simplifying the content
- Creating more targeted content for specific audiences
- Personalizing the content
- Improving/testing sending times
In HubSpot, you have the ability to do all of these optimizations using the tools explained in the following sub-sections.
A/B testing
The A/B testing tool allows you to test the open rate, click rate, and click-through rate of your emails over a specific period of time. To run an A/B test, go to the email, and from the upper-left corner, click on the Run a Test button:

Figure 10.31 – Running an A/B test
Clicking on this button reveals a pop-up box that prompts you to first choose another subject line that will be used for the second version of the email. Then, you can choose which metric you wish to test for, such as the open rate, click rate, or click-through rate, and, finally, the length of time that you wish to test for. Once this is complete, click on Create test:

Figure 10.32 – Setting up an A/B test
Once the test has been created, you now have two versions of the email that can be accessed by clicking on the upper-left subject lines and switching between them. This allows you to edit both versions of the email so that you can test different elements of the email. In Figure 10.29, you can see the option of switching between each of the emails in the A/B test:

Figure 10.33 – Setting up two versions of the email
Some suggestions of items to test are listed as follows:
- Changing the content by making one email slightly longer than the other
- Changing the colors of the CTA button
- Changing the placement of the CTA button
- Making one version of the email in plain text without any images:
Figure 10.34 – A plain text email as version B
After your email has been sent, the A/B testing tool will return the results of your email and determine which version of your email performed better for the metric you tested. Here's what the test results look like:

Figure 10.35 – The A/B test results
A/B tests are essential to your strategy, as they allow you to improve the conversion rates, which can make a difference to your bottom line.
The smart module
Another tool to test within the emails is the smart module. In HubSpot, the smart module allows you to send different versions of your subject line to different types of contacts. To access the smart module, go to Settings in your email settings, and click on Add smart rule right below the subject line:

Figure 10.36 – Adding a smart module
Clicking on Add smart rule will reveal a pop-up box that prompts you to choose a group of people that will see different content. You can choose them based on Contact list membership or Contact lifecycle stage:

Figure 10.37 – Choosing a category
Choosing either category prompts another filter option to appear, allowing you to choose between the list you want and the life cycle stage. Once you have made your choice, click on Create:

Figure 10.38 – Choosing the sub-category
You will then be returned to the Settings section of the email where you will be prompted to enter another subject line:

Figure 10.39 – Entering the subject line that the separate segment of contacts can receive
Smart rules are one of those tools that are often overlooked in HubSpot, but when implemented right, they can make a significant difference as it often gives readers the feeling that the content has been personalized.
Personalizing the content
Personalization is the art of using your contact's data within the email itself. It gives you the feeling that the message has been written specifically for them. In HubSpot, to access the personalization feature, you can click on the personalize buttons shown in the email body, or the subject lines, and choose to include any of the fields that collect personal information about the contact. Some of the most commonly used fields are the user's first name, company name, and more:

Figure 10.40 – Setting up a personalization token
Additionally, you have the option to choose a default token in cases where the information does not exist. For example, if the first name is missing, then it won't appear blank. Or worse still, the personalization token might appear but a generic alternative such as there or colleague will be shown instead. To set up the default token, click on Settings | Marketing | Email, scroll to the bottom of the page, and then click on Edit defaults for Contact property defaults or Company property defaults:

Figure 10.41 – Email personalization tokens
Following this, you choose a generic default name you wish to insert if the information is missing. So, for example, if the first name is missing, the word "there" can be used as the default. Then, click on Save:

Figure 10.42 – Setting up a generic default
No one ever sends an email campaign that gets great results each and every time. Therefore, your strategy must include some element of optimization so that you can always make your campaigns better. One simple and quick way to implement a strategy in each email campaign is to resend the emails to contacts who did not open the emails the first time around by using a different subject line.
Summary
As you can see, for a successful email marketing campaign, a lot of thought and trial and error must be exercised in order to achieve the results you seek. Implementing just one or two of the tips mentioned earlier should help you see improvements in your email campaigns.
Here are a few reminders to pay attention to:
- Pay attention to the subject lines and ensure they are short but click-worthy.
- Keep the content short. Any email that is over 60 words must offer great value and not just be a long-winded sales pitch.
- Use personalization wherever possible – in the subject line, in the preview of the text, in the body of the email, and, of course, in the salutation.
- Try not to add too many links to the email, which take users to different content. Ensure the links are relevant to the action you want the contacts to take.
As often as possible, ensure the emails are coming from a person and not a generic email such as [email protected] or [email protected].
In the next chapter, you will learn how to create reporting and tracking within HubSpot and how to identify key trends in their data.
Questions
Email is probably the most important weapon in a marketer's arsenal. So, we won't want you to leave this chapter without ensuring you understand the important concepts of gaining great results from your email campaigns. Let's recap with a few short questions:
- Which elements do you need to consider when building an email strategy?
- Can you design images within HubSpot for your email campaigns?
- What are two best practices you can implement right now to improve your email campaigns?
Further reading
- The Modern Guidebook to Email Marketing: https://www.campaignmonitor.com/resources/guides/modern-guidebook-email-marketing/
- The Ultimate Guide to Email Marketing: https://blog.hubspot.com/marketing/email-marketing-guide
- 23 Simple Email Marketing Tips to Improve Your Open and Clickthrough Rates: https://blog.hubspot.com/marketing/make-emails-more-clickable-list