
26
Command Bars
The CommandBars collection is an object contained in the Office Object Model, documented in Appendix C. It contains all the menus, toolbars, and shortcut popup menus that are already built into Excel and the other Office applications, as well as any of those objects that you create yourself. You access commandbars through the CommandBars property of the Application object.
Commandbars were first introduced into Office in Office 97. Excel 5 and 95 supported menu bars and toolbars as separate object types. Shortcut menus, or popups, such as those which appear when you right-click a worksheet cell, were a special type of menu bar. In Excel 97 and later versions, the “command bar” is a generic term that includes menu bars, toolbars, and shortcut menus.
Commandbars contain items that are called controls. When clicked, some controls execute operations, such as Copy. Until we get down to the nuts and bolts, we will refer to these types of controls as commands. There are other controls, such as File, that produce an additional list of controls when clicked. We will refer to these controls as menus.
In this chapter, we will show you how to create and manipulate these useful tools.
Toolbars, Menu Bars, and Popups
The screenshot in Figure 26-1 shows the standard Worksheet menu bar at the top of the Excel window.
The Worksheet menu bar contains menus, such as File and Edit. When you click a menu, you see another list containing commands and menus.
- Cut and Copy are examples of commands in the Edit menu
- Clear is an example of a menu contained within the Edit menu
Figure 26-2 shows the Standard toolbar.
Toolbars contain controls that can be clicked to execute Excel commands. For example, the button with the scissors icon carries out a Cut. Toolbars can also contain other types of controls such as the Zoom combo box (two from the end of the Standard toolbar in the Figure 26-2) that allows you to select, or type in, a zoom factor, displayed as a percentage. Some toolbars contain buttons that display menus, such as the PivotTable button in the PivotTable toolbar.
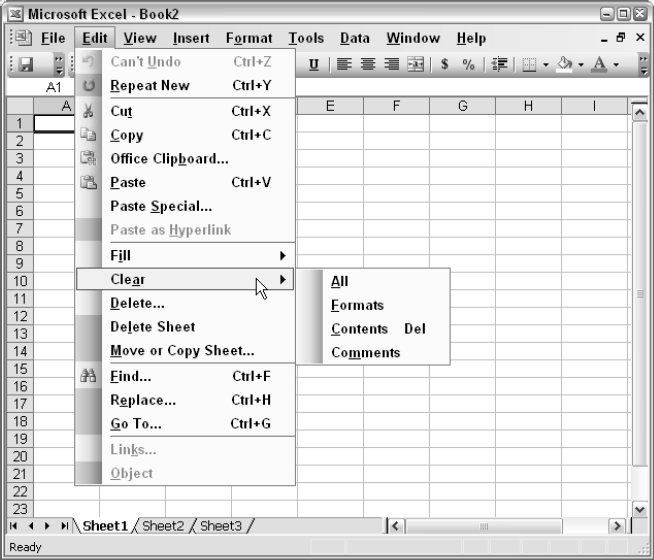
Figure 26-1
Figure 26-2
Figure 26-3 shows the shortcut menu that appears when you right-click a worksheet cell.
This shortcut menu contains commands, such as Paste, and menus, such as Delete…, for those operations appropriate to the selected context, in this case, a cell.
Excel 2003 has approximately 124 different built-in command bars containing many thousands of controls. In addition, you can create your own commandbars or tailor existing commandbars to suit your needs. This can be accomplished manually using View ![]() Toolbars
Toolbars ![]() Customize…, or you can do it programmatically.
Customize…, or you can do it programmatically.
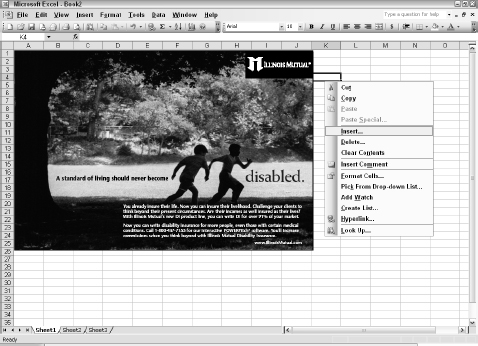
Figure 26-3
You may be able to accomplish all the customization you need manually, including attaching commandbars to workbooks, but some tasks can only be carried out using VBA code. For example, you need VBA if you want to:
- Automatically remove or hide a command bar when its related workbook is closed or deactivated
- Add a custom menu to a built-in menu bar when a workbook is opened and remove it when the workbook is closed
- Dynamically change your commandbars in response to user actions
- Use some types of controls, such as combo boxes that can only be created and controlled using VBA
To summarize, a command bar can be any one of three types. It can be a menu, toolbar, or shortcut popup menu. When you create a command bar using VBA, you specify which of the three types it will be, using the appropriate parameters of the Add method of the CommandBars collection. You will see examples of this in the following table. You can find out what type an existing command bar is by testing its Type property, which will return a numeric value equal to the value of one of the following intrinsic constants:
| Constant | Command Bar Type |
| MsoBarTypeNormal | Toolbar |
| MsoBarTypeMenuBar | Menu Bar |
| MsoBarTypePopup | Shortcut Menu |
Controls on commandbars also have a Type property similar to the preceding msoXXX constants. The control that is used most frequently has a Type property of msoControlButton, which represents a command such as the Copy command on the Edit menu of the Worksheet menu bar, or a command button on a toolbar, such as the Cut button on the Standard toolbar. This type of control runs a macro or a built-in Excel action when it is clicked.
The second most common control has a Type property of msoControlPopup. This represents a menu on a menu bar, such as the Edit menu on the Worksheet menu bar, or a menu contained in another menu, such as the Clear submenu on the Edit menu on the Worksheet menu bar. This type of control contains its own Controls collection, to which you can add further controls.
Controls have an Id property. For built-in controls, the Id property determines the internal action carried out by the control. When you set up a custom control, you assign the name of a macro to its OnAction property to make it execute that macro when it is clicked. Custom controls have an Id property of 1.
Many built-in menu items and most built-in toolbar controls have a graphic image associated with them. The image is defined by the FaceId property. The Id and FaceId properties of built-in commands normally have the same numeric value. You can assign the built-in FaceId values to your own controls, if you know what numeric value to use. You can determine these values using VBA, as you will see in the next example.
Excel's Built-In Commandbars
Before launching into creating our own commandbars, it will help to understand how the built-in commandbars are structured and find out just what is already available in Excel 2003. You can use the following code to list the existing commandbars and any that you have added yourself. It lists the name of each command bar in column A and the names of the controls in the commandbar's Controls collection in column B, as shown in Figure 26-4. The code does not attempt to display lower level controls that belong to controls such as the File menu on the Worksheet menu bar, so the procedure has been named ListFirstLevelControls.
The macro also shows the control's Id property value, in all cases, and its image and its FaceId property value when such an image exists. Note that some listed controls might not be visible on your own screen. For example, the Standard toolbar's & Mail Recipient button will not be visible if you do not have a mail system.
Make sure you are in an empty worksheet when you run this macro and the following two examples. They contain tests to make sure they will not overwrite any data in the active sheet.
If you are testing this code, remember that it should be placed in a standard code module, not in a class module. Don't put the code in the ThisWorkbook module or a class module behind a worksheet. You should also include the IsEmptyWorksheet function listed further down:
You will notice in the figure that most, if not all, of the controls have an ampersand in the name. When programming an ampersand defines the shortcut key used to access the command. For example: &File would be displayed as File and an Alt+F key combination could be used to access the item.
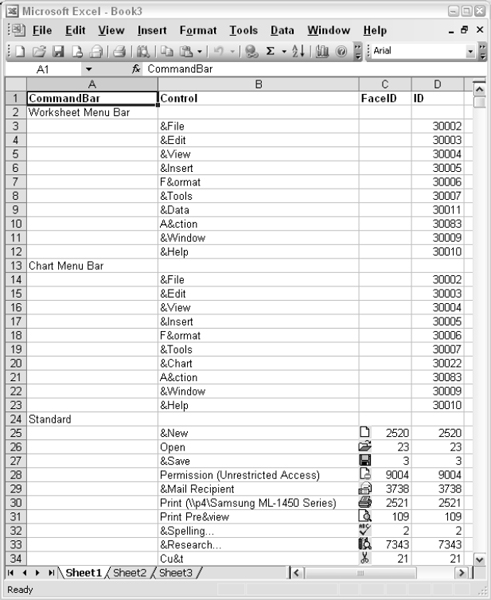
Figure 26-4
Here is the code to list the first level controls:
Sub ListFirstLevelControls()
   Dim cbCtl As CommandBarControl
   Dim cbBar As CommandBar
   Dim i As Integer
   If Not IsEmptyWorksheet(ActiveSheet) Then Exit Sub
   On Error Resume Next
   Application.ScreenUpdating = False
   Cells(1, 1).Value = “CommandBar”
   Cells(1, 2).Value = “Control”
   Cells(1, 3).Value = “FaceID”
   Cells(1, 4).Value = “ID”
   Cells(1, 1).Resize(1,4).Font.Bold = True
   i = 2
   For Each cbBar In CommandBars
      Application.StatusBar = “Processing Bar ” & cbBar.Name
      Cells(i, 1).Value = cbBar.Name
      i = i + 1
      For Each cbCtl In cbBar.Controls
         Cells(i, 2).Value = cbCtl.Caption
     cbCtl.CopyFace
     If Err.Number = 0 Then
        ActiveSheet.Paste Cells(i, 3)
        Cells(i, 3).Value = cbCtl.FaceID
     End If
     Cells(i, 4).Value = cbCtl.ID
     Err.Clear
     i = i + 1
      Next cbCtl
   Next cbBar
   Range(“A:B”).EntireColumn.AutoFit
   Application.StatusBar = False
End Sub
This example, and the two following, can take a long time to complete. You can watch the progress of the code on the status bar. If you only want to see part of the output, press Ctrl+Break after a minute or so to interrupt the macro, click Debug and then Run ![]() Reset.
Reset.
ListFirstLevelControls first checks that the active sheet is an empty worksheet using the IsEmptyWorksheet function that is shown next. It then uses On Error Resume Next to avoid runtime errors when it tries to access control images that do not exist. In the outer For Each…Next loop, it assigns a reference to each command bar to cbBar, shows the Name property of the command bar on the status bar so you can track what it is doing, and places the Name in the A column of the current row, defined by i.
The inner For Each…Next loop processes all the controls on cbBar, placing the Caption property of each control in column B. It then attempts to use the CopyFace method of the control to copy the control's image to the clipboard. If this does not create an error, it pastes the image to column C and places the value of the FaceId property in the same cell. It places the ID property of the control in column D. It clears any errors, increments i by one and processes the next control.
The IsEmptyWorksheet function, shown next, checks that the input parameter object Sht is a worksheet. If so, it checks that the count of entries in the used range is 0. If both checks succeed, it returns True. Otherwise, it issues a warning message and the default return value, which is False, is returned:
Function IsEmptyWorksheet(Sht As Object) As Boolean
   If TypeName(Sht) = “Worksheet” Then
      If WorksheetFunction.CountA(Sht.UsedRange) = 0 Then
         IsEmptyWorksheet = True
     Exit Function
      End If
   End If
   MsgBox “Please make sure that an empty worksheet is active”
End Function
Controls at All Levels
Figure 26-5 and the accompanying code take the previous procedure to greater levels of detail. All controls are examined to see what controls are contained within them. Where possible, the contained controls are listed. Some controls, such as those containing graphics, can't be listed in greater detail. The information on subcontrols is indented across the worksheet. The code is capable of reporting to as many levels as there are, but Excel does not have controls beyond the third level:
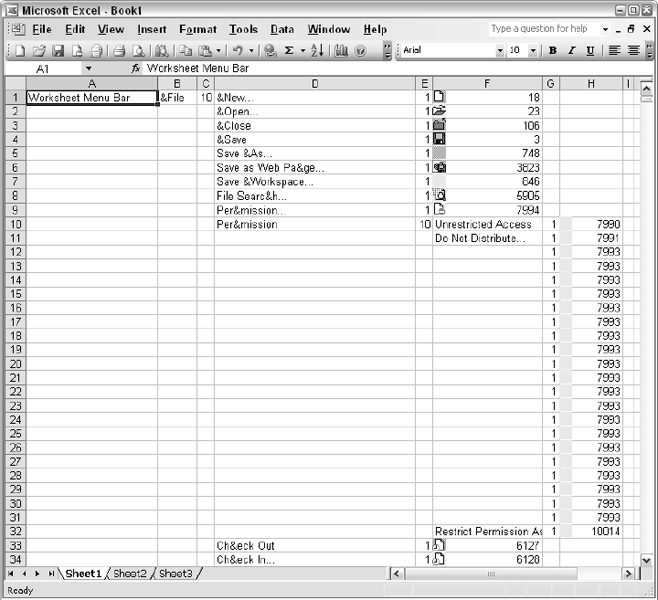
Figure 26-5
Here is the code to list controls at all levels:
Sub ListAllControls()
  Dim cbBar As CommandBar
  Dim Rng As Range
  Dim cbCtl As CommandBarControl

  If Not IsEmptyWorksheet(ActiveSheet) Then Exit Sub
  Application.ScreenUpdating = False
  Set Rng = Range(“A1”)
  For Each cbBar In Application.CommandBars
    Application.StatusBar = “Processing Bar ” & cbBar.Name
    Rng.Value = cbBar.Name
    For Each cbCtl In cbBar.Controls
      Set Rng = Rng.Offset(ListControls(cbCtl, Rng))
    Next cbCtl
  Next cbBar
  Range(“A:I”).EntireColumn.AutoFit
  Application.StatusBar = False
End Sub
ListAllControls loops through the CommandBars collection, using Rng to keep track of the current A column cell of the worksheet it is writing to. It posts the name of the current command bar in a message on the status bar, so you can tell where it is up to, and also enters the name of the command bar at the current Rng location in the worksheet. It then loops through all the controls on the current CommandBar, executing the ListControls function, which is shown next.
In Chapter 23, you will need to get listings of the VBE CommandBars. This can be easily accomplished by changing the following line:
For Each cBar in Application.CommandBars
to:
For Each cBar in Application.VBE.CommandBars
ListControls is responsible for listing the details of each control it is passed and the details of any controls under that control, starting at the current Rng location in the worksheet. When it has performed its tasks, ListControls returns a value equal to the number of lines that it has used for its list. Offset is used to compute the new Rng cell location for the start of the next commandbar's listing:
Function ListControls(cbCtl As CommandBarControl, Rng As Range) As Long
  Dim lOffset As Long 'Tracks current row relative to Rng
  Dim ctlSub As CommandBarControl 'Control contained in cbCtl

  On Error Resume Next
  lOffset = 0
  Rng.Offset(lOffset, 1).Value = cbCtl.Caption
  Rng.Offset(lOffset, 2).Value = cbCtl.Type
  'Attempt to copy control face. If error, don't paste
  cbCtl.CopyFace
  If Err.Number = 0 Then
    ActiveSheet.Paste Rng.Offset(lOffset, 3)
    Rng.Offset(lOffset, 3).Value = cbCtl.FaceId
  End If
  Err.Clear

  'Check Control Type
  Select Case cbCtl.Type
    Case 1, 2, 4, 6, 7, 13, 18
      'Do nothing for these control types
    Case Else
      'Call function recursively
      'if current control contains other controls
      For Each ctlSub In cbCtl.Controls
        lOffset = lOffset + _
        ListControls(ctlSub, Rng.Offset(lOffset, 2))
      Next ctlSub
      lOffset = lOffset - 1
  End Select
  ListControls = lOffset + 1
End Function
ListControls is a recursive function, and runs itself to process as many levels of controls as it finds. It uses lOffset to keep track of the rows it writes to, relative to the starting cell Rng. It uses very similar code to ListFirstLevelControls, but records the control type as well as the caption, icon, and face ID. Most of the control types are:
- 1 – msoControlButton
- 10 – msoControlPopup
However, you will see other types in the list as well:
- 2 – msoControlEdit
- 4 – msoControlComboBox
- 6 – msoControlSplitDropdown
- 7 – msoControlOCXDropdown
- 13 – msoControlSplitButtonPopup
- 18 – msoControlGrid
The Select Case construct is used to avoid trying to list the subcontrols where this is not possible.
When ListControls finds a control with subcontrols it can list, it calls itself with a Rng starting point that is offset from its current Rng by lOffset lines down and two columns across. ListControls keeps calling itself as often as necessary to climb down into every level of subcontrol and then climbs back to continue with the higher levels. Each time it is called, it returns the number of lines it has written to relative to Rng.
FaceIds
The following code gives you a table of the built-in button faces, shown in Figure 26-6. There are about 3,500 faces in Office 97, about 5,500 faces in Office 2000, about 7,000 faces in Office 2002, and over 10,000 faces in Office 2003. Note that many FaceId values represent blank images and that the same images appear repeatedly as the numbers get higher:
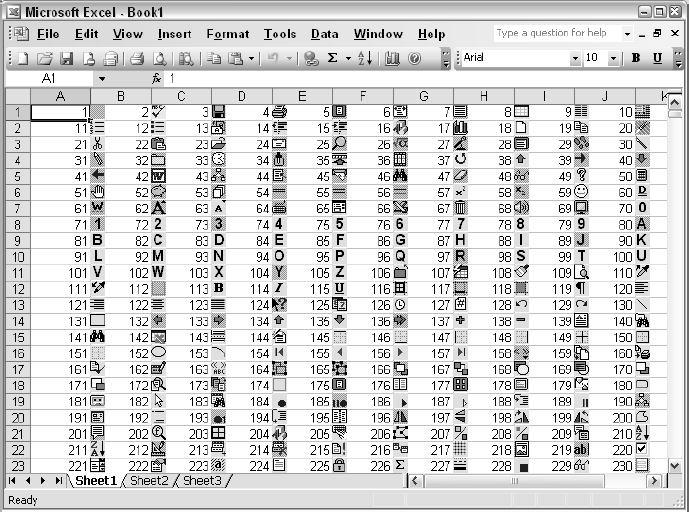
Figure 26-6
Here is the code to list all the FaceIds:
Sub ListAllFaces()
  Dim i As Integer 'Tracks current FaceId
  Dim j As Integer 'Tracks current column in worksheet
  Dim k As Integer 'Tracks current row in worksheet
  Dim cbCtl As CommandBarControl

  Dim cbBar As CommandBar

  If Not IsEmptyWorksheet(ActiveSheet) Then Exit Sub
  On Error GoTo Recover
  Application.ScreenUpdating = False
  'Create temporary command bar with single control button
  'to hold control button face to be copied to worksheet
  Set cbBar = CommandBars.Add(Position:=msoBarFloating, _
                              MenuBar:=False, _
                  temporary:=True)
  Set cbCtl = cbBar.Controls.Add(Type:=msoControlButton, _
                                 temporary:=True)
  k = 1
  Do
    For j = 1 To 10
      i = i + 1
      Application.StatusBar = “FaceID = ” & i

      'Set control button to current FaceId
      cbCtl.FaceId = i
      'Attempt to copy Face image to worksheet
      cbCtl.CopyFace
      ActiveSheet.Paste Cells(k, j + 1)
      Cells(k, j).Value = i
      ' Allow windows messages to process
      DoEvents
    Next j
    k = k + 1
    ' Allow windows messages to process
    DoEvents
  Loop
  Application.StatusBar = “Total Items=” & i

Recover:
  If Err.Number = 1004 Then Resume Next
  Application.StatusBar = False
  cbBar.Delete
End Sub
Note that this code contains two DoEvents commands. When these lines are encountered, Windows releases control and allows for standard Windows messages to process. Without these commands it would appear as if Excel had locked up when, in fact, it was just processing the FaceIDs. While running this code you should be able to view the status bar of the Excel window which will display a counter of all the totals items processed.
ListAllFaces creates a temporary toolbar, cbBar, using the Add method of the CommandBars collection. The toolbar is declared:
- Temporary, which means that it will be deleted when you exit Excel, if it has not already been deleted
- Floating, rather than docked at an edge of the screen or a popup
- Not to be a menu bar, which means that cbBar will be a toolbar
A temporary control is added to cbBar using the Add method of the Controls collection for the command bar, and assigned to cbCtl.
The Do…Loop continues looping until there are no more valid FaceId values. The Do…Loop increments k, which represents the row numbers in the worksheet. On every row, j is incremented from 1 to 10. j represents the columns of the worksheet. The value of i is increased by one for every iteration of the code in the For…Next loop. i represents the FaceId. The FaceId property of cbCtl is assigned the value of i, and the resulting image is copied to the worksheet.
Some button images are blank and some are missing. The blank images copy without error, but the missing images cause an error number 1004. When an error occurs, the code branches to the error trap at Recover. If the error number is 1004, the code resumes executing at the statement after the one that caused the error, leaving an empty slot for the button image. Eventually, the code gets to the last FaceId in Office. This causes error number −2147467259. At this point, the code clears the status bar, removes the temporary command bar, and exits.
The information you have gathered with the last three exercises is not documented in any easily obtainable form by Microsoft. It is valuable data when you want to modify the existing command bar structures or alter command bar behavior, and as a guide to the built-in button faces at your disposal. There is an Add-in application, CBList.xla, available with the code that accompanies this book that makes it easy to generate these lists.
Creating New Menus
If you want to provide a user with extra functionality, without removing any of the standard commands, you can add a new menu to the existing Worksheet menu bar. The screen in Figure 26-7 shows a new menu called Custom, inserted between the Window and Help menus:
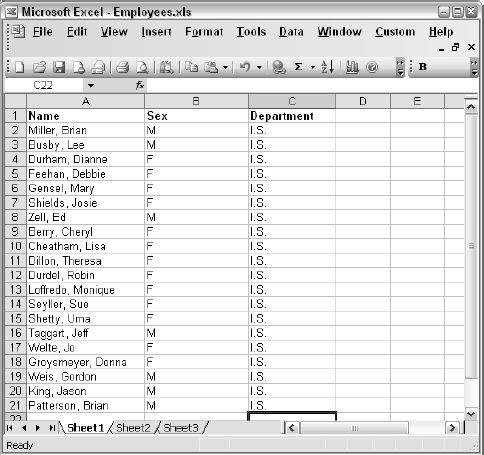
Figure 26-7
The code to create this menu is as follows:
Public Sub AddCustomMenu()
  Dim cbWSMenuBar As CommandBar
  Dim muCustom As CommandBarControl
  Dim iHelpIndex As Integer

  Set cbWSMenuBar = Application.CommandBars(“Worksheet Menu Bar”)
  iHelpIndex = cbWSMenuBar.Controls(“Help”).Index
  Set muCustom = cbWSMenuBar.Controls.Add(Type:=msoControlPopup, _
                                          Before:=iHelpIndex)
  With muCustom
     .Caption = “&Custom”
     With .Controls.Add(Type:=msoControlButton)
        .Caption = “&Show Data Form”
    .OnAction = “ShowDataForm”
     End With
     With .Controls.Add(Type:=msoControlButton)
        .Caption = “&Print Data List”
    .OnAction = “PrintDataList”
     End With
     With .Controls.Add(Type:=msoControlButton)
        .Caption = “Sort Names &Ascending”
    .BeginGroup = True .OnAction = “SortList”
    .Parameter = “Asc”
     End With
     With .Controls.Add(Type:=msoControlButton)
        .Caption = “Sort Names &Descending”
    .OnAction = “SortList”
    .Parameter = “Dsc”
     End With
   End With
End Sub
AddCustomMenu creates an object variable cbWSMenuBar referencing the Worksheet menu bar. If you want to add a menu before an existing menu, you need to know the index number of that menu. You can determine the Index property of the control as shown.
AddCustomMenu uses the Add method of the menu bar's Controls collection to add the new menu. The Type property is declared msoControlPopup so that other controls can be attached to the menu. The Before parameter places the new menu just before the Help menu. If you do not specify the position, it will be placed at the end of the menu bar. The Caption property of the new menu is assigned &Custom. The & does not appear in the menu, it causes an underscore to be placed under the character it precedes and indicates that you can activate this menu from the keyboard with Alt+C.
The Add method of the new menu's Controls collection is then used to add four commands to the menu. They are all of type msoControlButton so they can each run a macro. Each is given an appropriate Caption property, including shortcut keys indicated with an &. The OnAction property of each command is assigned the name of the macro it is to run. The first of the sort menu items has its BeginGroup property set to True. This places the dividing line above it to mark it as the beginning of a different group. Both sort commands are assigned the same OnAction macro, but also have their Parameter properties assigned text strings that distinguish them.
The Parameter property is a holder for a character string. You can use it for any purpose. Here it is used to hold the strings “Asc”, for ascending, and “Dsc”, for descending. As you will see next, the SortList procedure will access the strings to determine the sort order required.
The OnAction Macros
The macro assigned to the OnAction property of the Show Data Form menu item is as follows:
Private Sub ShowDataForm()
   fmPersonal.Show
End Sub
It displays exactly the same data form as in the previous chapter on UserForms. The macro assigned to the Print Data List menu item is as follows:
Private Sub PrintDataList()
   Range(“Database”).PrintPreview
End Sub
PrintDataList shows a print preview of the list, from which the user can elect to print the list.
The macro assigned to the Sort menu items is as follows:
Private Sub SortList()
   Dim iAscDsc As Integer

   Select Case CommandBars.ActionControl.Parameter
      Case “Asc”
         iAscDsc = xlAscending
      Case “Dsc”
         iAscDsc = xlDescending
   End Select
   Range(“Database”).Sort Key1:=Range(“A2”), Order1:=iAscDsc, Header:=xlYes
End Sub
SortList uses the ActionControl property of the CommandBars collection to get a reference to the command bar control that caused SortList to execute. This is similar to Application.Caller, used in user-defined functions to determine the Range object that executed the function.
Knowing the control object that called it, SortList can examine the control's Parameter property to get further information. If the Parameter value is “Asc”, SortList assigns an ascending sort. If the Parameter value is “Dsc”, it assigns a descending sort. Controls also have a Tag property that can be used, in exactly the same way as the Parameter property, to hold another character string. You can use the Tag property as an alternative to the Parameter property, or you can use it to hold supplementary data.
Passing Parameter Values
In the previous example, we used the Parameter property of the control on the menu to store information to be passed to the OnAction macro, and pointed out that you can also use the Tag property. If you have more than two items of information to pass, it is more convenient to use a macro procedure that has input parameters.
Say, you wanted to pass three items of data such as a product name and its cost and selling price. The macro might look like the following:
Sub ShowProduct(sName As String, dCost As Double, dPrice As Double)
  MsgBox “Product: ” & sName & vbCr & _
      “Cost: ” & Format(dCost, “$0.00”) & vbCr & _
      “Price: ” & Format(dPrice, “$0.00”)
End Sub
To execute this macro from a command bar control, you need to assign something like the following code to the OnAction property of the control:
‘ShowProduct “Apple”, 3, 4’
The entire expression is enclosed in single quotes. Any string parameter values within the expression are enclosed in double quotes. In order to define this as the OnAction property of a control referred to by an object variable, Ctl, for example, you need to use the following code:
Ctl.OnAction = “‘ShowProduct ”“Apple”“, 3, 4’”
The mix of single and double quotes is tricky to get right. The entire string is enclosed in double quotes, while any internal double quotes need to be shown twice.
Deleting a Menu
Built-in and custom controls can be deleted using the control's Delete method. The following macro deletes the Custom menu:
Public Sub RemoveCustomMenu()
   Dim cbWSMenuBar As CommandBar

   On Error Resume Next
   Set cbWSMenuBar = CommandBars(“Worksheet Menu Bar”)
   cbWSMenuBar.Controls(“Custom”).Delete
End Sub
On Error is used in case the menu has already been deleted.
You can use a built-in commandbar's Reset method to make the entire command bar revert to its default layout and commands. This is not a good idea if users have customized their commandbars, or use workbooks or Add-ins that alter the setup, as all their work will be lost.
The following event procedures should be added to the ThisWorkbook module to add the Custom menu when the workbook is opened and delete it when the workbook is closed:
Private Sub Workbook_BeforeClose(Cancel As Boolean)
   Call RemoveCustomMenu
End Sub

Private Sub Workbook_Open()
   Call AddCustomMenu
End Sub
It is important to recognize that command bar changes are permanent. If you do not remove the Custom menu in this example, it will stay in the Excel Worksheet menu bar during the current session and future sessions. Trying to use this menu with another active workbook could cause unexpected results.
Creating a Toolbar
If you are creating a simple toolbar with buttons and drop-downs, you can do it manually. However, there are more complex controls, such as those of type msoControlEdit, msoControlDropdown, and msoControlComboBox, which you can only fully manipulate in VBA code. The toolbar we will create here contains three controls.
The first is of type msoControlButton and displays the user form for the data list, as shown in Figure 26-8.
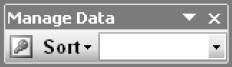
Figure 26-8
The second control, shown in Figure 26-9, is of type msoControlPopup and displays two controls of type msoControlButton.
The third control, shown in Figure 26-10, is of type msoControlDropdown and applies an AutoFilter on Department.
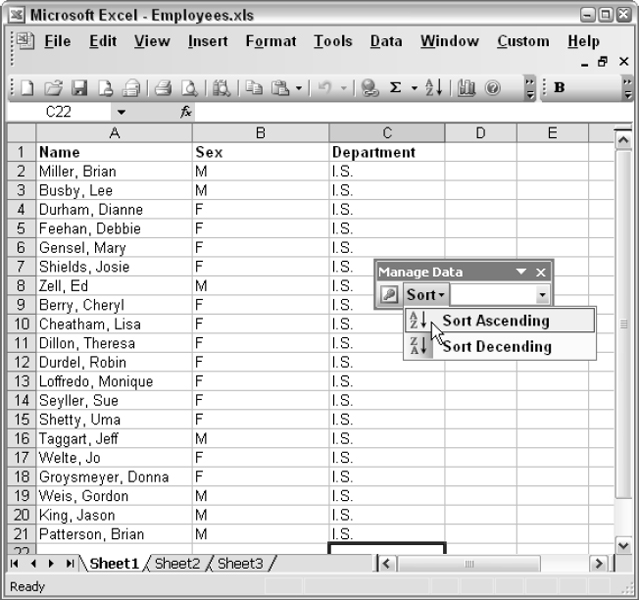
Figure 26-9
The following code creates the toolbar:
Public Sub CreateToolbar()
   'Get rid of any existing toolbar called Manage Data
   On Error Resume Next
   CommandBars(“Manage Data”).Delete
   On Error GoTo 0

   'Create new toolbar
   With CommandBars.Add(Name:=“Manage Data”)
      With .Controls.Add(Type:=msoControlButton)
         .OnAction = “ShowDataForm”
     .FaceId = 264
     .TooltipText = “Show Data Form”
      End With

      With .Controls.Add(Type:=msoControlPopup)
         .Caption = “Sort”
     .TooltipText = “Sort Ascending or Descending”
      With .Controls.Add(Type:=msoControlButton)
         .Caption = “Sort Ascending”
     .FaceId = 210
     .OnAction = “SortList”
     .Parameter = “Asc”
      End With
      With .Controls.Add(Type:=msoControlButton)
           .Caption = “Sort Decending”
       .FaceId = 211
       .OnAction = “SortList”
       .Parameter = “Dsc”
         End With
      End With

      With .Controls.Add(Type:=msoControlDropdown)
         .AddItem “(All)”
         .AddItem “AD”
         .AddItem “CR”
         .AddItem “DS”
         .AddItem “HR”
         .AddItem “I.S.”
         .AddItem “MF”
         .AddItem “MK”
         .AddItem “RD”
         .AddItem “SL”
         .OnAction = “FilterDepartment”
         .TooltipText = “Select Department”
      End With
      .Visible = True
   End With
End Sub

Figure 26-10
The toolbar itself is very simple to create. CreateToolbar uses the Add method of the CommandBars collection and accepts all the default parameter values apart from the Name property. The first control button is created in much the same way as a menu item, using the Add method of the Controls collection. It is assigned an OnAction macro, a FaceId, and a ToolTip.
The second control is created as type msoControlPopup. It is given the Caption of Sort and a ToolTip. It is then assigned two controls of its own, of type msoControlButton. They are assigned the SortList macro and Parameter values, as well as FaceIds and captions.
Finally, the control of type msoControlDropdown is added. Its drop-down list is populated with department codes and its OnAction macro is FilterDepartment. It is also given a ToolTip. The last action is to set the toolbar's Visible property to True to display it.
The FilterDepartment macro follows:
Sub FilterDepartment()
   Dim stDept As String

   With CommandBars.ActionControl
      stDept = .List(.ListIndex)
   End With
   If stDept = “(All)” Then
      Range(“Database”).Parent.AutoFilterMode = False
   Else
      Range(“Database”).AutoFilter Field:=5, Criteria1:=stDept
   End If
End Sub
A drop-down control has a List property that is an array of its list values and a ListIndex property that is the index number of the current list value. The ActionControl property of the CommandBars object, which refers to the currently active control, is a quick way to reference the control and access the List and ListIndex properties to get the department code required. The code is then used to perform the appropriate AutoFilter operation. If the (All) option is chosen, the AutoFilterMode property of the worksheet that is the parent of the Database Range object is set to False, removing the AutoFilter drop-downs and showing any hidden rows.
It is a good idea to run CreateToolbar from the Workbook_Open event procedure and to delete the toolbar in the Workbook_BeforeClose event procedure. The toolbar will remain permanently in Excel if it is not deleted and will give unexpected results if its buttons are pressed when other workbooks are active. If you do refer to CommandBars directly in workbook event procedures, you need to qualify the reference with Application:
Application.CommandBars(“Manage Data”).Delete
Typically, when the commandbar appears, it will be placed in a location determined by Windows. If you want consistency you could use some standard Win32 API calls to specify the location of the bar when it appears on the screen. To accomplish this, you will need to add a Module to the VBA Project. Within this new module place the following declare statement:
Declare Function GetSystemMetrics32 Lib “User32” _
  (ByVal Index As Long) As Long
This Declare statement defines the GetSystemMetrics32 call that handles returning the screen size to us in points. Using this information, we can find a center point and display the command bar. Change your command bar code to the following to make use of the Win32 API:
Public Sub CreateToolbar()
   'Get rid of any existing toolbar called Manage Data
   On Error Resume Next
   CommandBars(“Manage Data”).Delete
   On Error GoTo 0

   'Create new toolbar
   With CommandBars.Add(Name:=“Manage Data”)
      With .Controls.Add(Type:=msoControlButton)
         .OnAction = “ShowDataForm”
         .FaceId = 264
         .TooltipText = “Show Data Form”
      End With

      With .Controls.Add(Type:=msoControlPopup)
         .Caption = “Sort”
         .TooltipText = “Sort Ascending or Descending”
         With .Controls.Add(Type:=msoControlButton)
           .Caption = “Sort Ascending”
           .FaceId = 210
           .OnAction = “SortList”
           .Parameter = “Asc”
         End With
         With .Controls.Add(Type:=msoControlButton)
           .Caption = “Sort Decending”
           .FaceId = 211
           .OnAction = “SortList”
           .Parameter = “Dsc”
         End With
         End With

         With .Controls.Add(Type:=msoControlDropdown)
           .AddItem “(All)”
           .AddItem “AD”
           .AddItem “CR”
           .AddItem “DS”
.AddItem “HR”
           .AddItem “I.S.”
           .AddItem “MF”
           .AddItem “MK”
           .AddItem “RD”
           .AddItem “SL”
           .OnAction = “FilterDepartment”
           .TooltipText = “Select Department”
         End With
         .Visible = True
      End With
Dim lWidth As Long
   Dim lHeight As Long
   lWidth = Module1.GetSystemMetrics32(0) ' Width of the screen in points
   lHeight = Module1.GetSystemMetrics32(1) ' Height of the screen in point
   With CommandBars(“Manage Data”)
      .Position = msoBarFloating
      .Left = lWidth / 2 - .Width / 2
      .Top = lHeight / 2 - .Height / 2
   End With
End Sub
In this code block, we declare two variables to hold the height and width of the screens. We then return information into these variables using the Win32 API GetSystemMetrics32. Bypassing different parameters to the API we are able to request different information. With this screen size information, we perform the appropriate math and set the properties of the command bar as it is displayed on the screen. API usage in VBA is used in a similar fashion and greatly extends what can be accomplished.
Pop-Up Menus
Excel's built-in shortcut menus are included in the command bar listing created by the macro, ListFirstLevelControls, which we saw earlier in this chapter. The modified version of this macro shows only the commandbars of type msoBarTypePopup, as displayed in Figure 26-11.
The code to display the pop-ups is shown in the following:
Sub ListPopups()
Dim cbCtl As CommandBarControl
   Dim cbBar As CommandBar
   Dim i As Integer

   If Not IsEmptyWorksheet(ActiveSheet) Then Exit Sub
   On Error Resume Next
   Application.ScreenUpdating = False
   Cells(1, 1).Value = “CommandBar”
   Cells(1, 2).Value = “Control”
   Cells(1, 3).Value = “FaceId”
   Cells(1, 4).Value = “ID”
   Cells(1, 1).Resize(1, 4).Font.Bold = True
   i = 2
For Each cbBar In CommandBars
Application.StatusBar = “Processing Bar ” & cbBar.Name
      If cbBar.Type = msoBarTypePopup Then
         Cells(i, 1).Value = cbBar.Name
     i = i + 1
     For Each cbCtl In cbBar.Controls
        Cells(i, 2).Value = cbCtl.Caption
        cbCtl.CopyFace
        If Err.Number = 0 Then
        ActiveSheet.Paste Cells(i, 3)
        Cells(i, 3).Value = cbCtl.FaceID
     End If
        Cells(i, 4).Value = cbCtl.ID
        Err.Clear
        i = i + 1
     Next cbCtl
      End If
Next cbBar
   Range(“A:B”).EntireColumn.AutoFit
   Application.StatusBar = False
End Sub
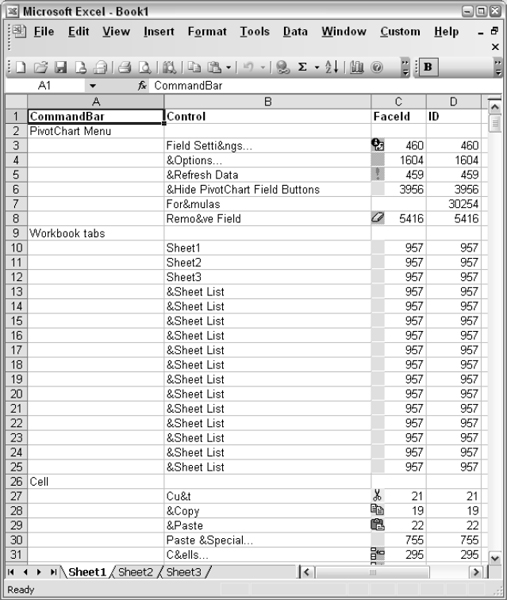
Figure 26-11
The listing is identical to ListFirstLevelControls, apart from the introduction of a block If structure that processes only commandbars of type msoBarTypePopup. If you look at the listing produced by ListPopups, you will find you can identify the common shortcut menus. For example, there are commandbars named Cell, Row, and Column that correspond to the shortcut menus that popup when you right-click a worksheet cell, row number, or column letter.
You might be confused about the fact that the Cell, Row, and Column commandbars are listed twice. The first set is for a worksheet in Normal view. The second set is for a worksheet in Page Break Preview.
Another tricky one is the Workbook Tabs command bar. This is not the shortcut that you get when you click an individual worksheet tab. It is the shortcut for the workbook navigation buttons to the left of the worksheet tabs. The shortcut for the tabs is the Ply command bar.
Having identified the shortcut menus, you can tailor them to your own needs using VBA code. For example, the screen in Figure 26-12 shows a modified Cell command bar that includes an option to Clear All:
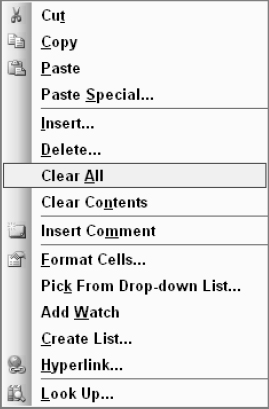
Figure 26-12
The Clear All control was added using the following code:
Public Sub AddShortCut()
   Dim cbBar As CommandBar
   Dim cbCtl As CommandBarControl
   Dim lIndex As Long

   Set cbBar = CommandBars(“Cell”)
   lIndex = cbBar.Controls(“Clear Contents”).Index
   Set cbCtl = cbBar.Controls.Add(Type:=msoControlButton, _
                                  ID:=1964, Before:=lIndex)
   cbCtl.Caption = “Clear &All”
End Sub
AddShortCut starts by assigning a reference to the Cell command bar to cbBar.
If you want to refer to the Cell command bar that is shown in Page Break view in Excel 2003, you can use its Index property:
Set cbBar = CommandBars(31)
You need to take care here, if you want code compatible with other versions of Office. In Excel 2000, the Index property of the Cell command bar in Page Break view is 26 and in Excel 97 it is 24.
AddShortCut records the Index property of the Clear Contents control in lIndex, so that it can add the new control before the Clear Contents control. AddShortCut uses the Add method of the Controls collection to add the new control to cbBar, specifying the ID property of the built-in Edit ![]() Clear
Clear ![]() All menu item on the Worksheet menu bar.
All menu item on the Worksheet menu bar.
The Add method of the Controls collection allows you to specify the Id property of a built-in command. The listing from ListAllControls allows you to determine that the Id property, which is the same as the FaceId property, of the Edit ![]() Clear
Clear ![]() All menu item, is 1964.
All menu item, is 1964.
The built-in Caption property for the newly added control is All, so AddShortCut changes the Caption to be more descriptive.
You can safely leave the modified Cell command bar in your commandbars collection. It is not tied to any workbook and does not depend on having access to macros in a specific workbook.
Showing Pop-Up Command Bars
If you want to display a shortcut menu without having to right-click a cell, or chart, you can create code to display the shortcut in a number of ways. For example, you might like to display the shortcut Cell commandbar from the keyboard, using Ctrl+Shift+C. You can do this using the following code:
Sub SetShortCut()
   Application.OnKey “^+c”, “ShowCellShortCut”
End Sub
Private Sub ShowCellShortCut()
   CommandBars(“Cell”).ShowPopup x:=0, y:=0
End Sub
ShowCellShortCut uses the ShowPopup method to display the Cell shortcut menu at the top-left corner of the screen. The parameters are the x and y screen coordinates for the top left of the menu.
You can also create a popup menu from scratch. The f popup shown in Figure 26-13 appears when you right-click inside the range named Database. Outside the range, the normal Cell popup menu appears.
Figure 26-13
The following code created the popup menu:
Sub MakePopup()
   With CommandBars.Add(Name:=“Data Popup”, Position:=msoBarPopup)
With .Controls.Add(Type:=msoControlButton)
         .OnAction = “ShowDataForm”
         .FaceID = 264
         .Caption = “Data Form”
         .TooltipText = “Show Data Form”
      End With
      With .Controls.Add(Type:=msoControlButton)
.Caption = “Sort Ascending”
         .FaceID = 210
         .OnAction = “SortList”
         .Parameter = “Asc”
      End With
      With .Controls.Add(Type:=msoControlButton)
         .Caption = “Sort Decending”
         .FaceID = 211
         .OnAction = “SortList”
         .Parameter = “Dsc”
      End With
   End With
End Sub
The code is similar to the code that created the custom menu and toolbar in previous examples. The difference is that, when the popup is created by the Add method of the CommandBars collection, the Position parameter is set to msoBarPopup. The Name property here is set to Data Popup.
You can display the popup with the following BeforeRightClick event procedure in the code module behind the worksheet that displays the Database range:
Private Sub Worksheet_BeforeRightClick(ByVal Target As Range, _
                                       Cancel As Boolean)
   If Not Intersect(Range(“Database”), Target) Is Nothing Then
      CommandBars(“Data Popup”).ShowPopup
      Cancel = True
   End If
End Sub
When you right-click the worksheet, the event procedure checks to see if Target is within Database. If so, it displays Data Popup and cancels the right-click event. Otherwise, the normal Cell shortcut menu appears.
Disabling Commandbars
Commandbars have an Enabled property and a Visible property. If a commandbar is enabled, and it is not of type msoBarTypePopup, it appears in the Tools ![]() Customize dialog box. If it is checked in the Tools
Customize dialog box. If it is checked in the Tools ![]() Customize dialog box, it is visible on the screen.
Customize dialog box, it is visible on the screen.
You cannot set the Visible property of a command bar to True unless the Enabled property is also set to True. Setting the Visible property of an enabled command bar of type msoBarTypeNormal to False removes it from the screen. Setting the Worksheet menu bar's Visible property to False does not work. Excel treats it as a special case and insists on showing it when a worksheet is active. The only way to remove the Worksheet menu is to set its Enabled property to False.
The following code removes any visible toolbars and the Worksheet menu bar from the screen:
Sub RemoveToolbarsAndWorksheetMenuBar()
   Dim cbBar As CommandBar
   For Each cbBar In CommandBars
      If cbBar.Enabled And cbBar.Type = msoBarTypeNormal Then
         cbBar.Visible = False
      End If
   Next cbBar
   CommandBars(“Worksheet Menu Bar”).Enabled = False
   Application.OnKey “%-”, “”
End Sub
The screen looks like Figure 26-14.
Figure 26-14
The final action carried out by RemoveToolbarsAndWorksheetMenuBar is to disable the Alt +− key combination that displays the workbook window's control menu. If you don't do this when you remove the Worksheet menu bar, the user can still access the control menu using Alt + −, and then use the cursor movement keys to make a phantom copy of the Worksheet menu bar slowly appear.
You can restore the Worksheet menu bar and the Standard and Formatting toolbars, with the following code, assuming the toolbars have not had their Enabled property set to False:
Sub RestoreToolbarsAndWorksheetMenuBar()
   CommandBars(“Worksheet Menu Bar”).Enabled = True
   Application.OnKey “%-”
   CommandBars(“Standard”).Visible = True
   CommandBars(“Formatting”).Visible = True
End Sub
Disabling Shortcut Access to Customize
If you want to stop users from making changes to your custom commandbars or built-in commandbars, you can prevent access to the customization dialog box and toolbar with the following code. The code could be placed in the Personal.xls workbook so that it is automatically applied at the beginning of an Excel session:
Private Sub Workbook_Open()
   'Code to customize commandbars goes here…
   Application.CommandBars(“Tools”).Controls(“Customize…”).Enabled = False
   Application.CommandBars(“Toolbar List”).Enabled = False
End Sub
The first line of code disables the Tools ![]() Customize… menu item. The second line of the code disables the shortcut menu that appears when you right-click a command bar and also disables the View
Customize… menu item. The second line of the code disables the shortcut menu that appears when you right-click a command bar and also disables the View ![]() Toolbars menu item. As the code is in a workbook event procedure, the reference to Application is required.
Toolbars menu item. As the code is in a workbook event procedure, the reference to Application is required.
Note the syntax in the preceding code. We have been able to treat the Tools control on the Worksheet menu bar as if it were a command bar itself. If you search the table generated by ListAllControls, you will find a command bar called Built-in Menus. The controls on this command bar can be directly addressed as commandbars.
The Toolbar List command bar was introduced in Excel 97 Service Release 1. You cannot use this command bar in earlier releases of Excel 97—it is a special hidden command bar. Like the Built-in Menus command bar controls, ToolBar List has no Index property in the CommandBars collection, although it can be addressed by its Name property.
If you only want to protect some commandbars, you can use the Protect property of the commandbars. The following code applies all protection options to the Standard toolbar. You can omit the constants for any options that are not wanted:
Sub ProtectToolbar()
   CommandBars(“Standard”).Protection = msoBarNoCustomize + _
                                        msoBarNoResize + _
                    msoBarNoMove + _
                    msoBarNoChangeVisible + _
                    msoBarNoChangeDock + _
                    msoBarNoVerticalDock + _
                    msoBarNoHorizonaldock
End Sub
You can remove the protection with:
Sub UnProtectToolbar()
   CommandBars(“Standard”).Protection = msoBarNoProtection
End Sub
Table-Driven Command Bar Creation
Very few professional Excel developers write code to add their menu items and toolbars one-by-one. Most of us use a table-driven approach, whereby we fill out a table with information about the items we want to add, then have a routine which generates all the items based on this table. This makes it much easier to define and modify the design of our commandbars.
Say, we want to create the Custom menu, which we set up earlier in this chapter, using this new method. The first thing we need is a table for the menu information. Insert a new worksheet, change its name to MenuTable and fill out the sheet as shown in Figures 26-15 and 26-16. The worksheet named Data contains our employee database and DataLists will be used later to define a list of departments.

Figure 26-15

Figure 26-16
The columns of the MenuTable are:
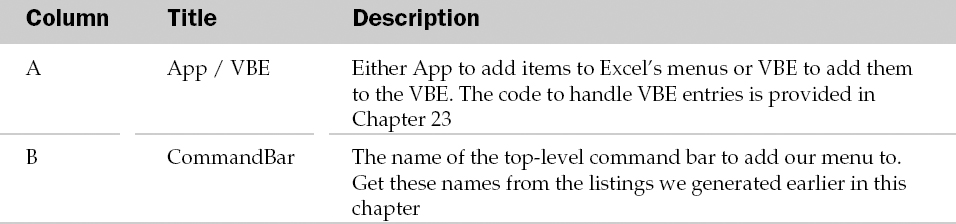
As the MenuTable sheet will be referred to a number of times in code, it is a good idea to give it a meaningful “code name”, such as shMenuTable. To do this, locate and select the sheet in the Project Explorer in the VBE, and change its name in the Properties window. It should now be shown as shMenuTable (MenuTable) in the Project Explorer. Using the code name allows you to refer directly to that sheet as an object, so the following two lines are equivalent:
Debug.Print ThisWorkbook.Worksheets(“MenuTable”).Name
Debug.Print shMenuTable.Name
The DataLists sheet needs to be renamed as shDataLists in the same way.
The code to create the menu from this table is shown next. The code should be copied into a new module called modSetupBars.
At the top of the module, a number of constants are declared, which correspond to each column of the menu table and you will use these throughout your code. If the menu table structure changes, all you need to do is renumber these constants—you don't need to search through the code:
'Constants for the columns in the commandbar creation table
Const miTABLE_APP_VBE        As Integer = 1
Const miTABLE_COMMANDBAR_NAME    As Integer = 2
Const miTABLE_CONTROL_ID    As Integer = 3
Const miTABLE_CONTROL_TYPE    As Integer = 4
Const miTABLE_CONTROL_CAPTION    As Integer = 5
Const miTABLE_CONTROL_POSITION    As Integer = 6
Const miTABLE_CONTROL_GROUP    As Integer = 7
Const miTABLE_CONTROL_BUILTIN    As Integer = 8
Const miTABLE_CONTROL_PROC    As Integer = 9
Const miTABLE_CONTROL_FACEID    As Integer = 10
Const miTABLE_CONTROL_TOOLTIP    As Integer = 11
Const miTABLE_CONTROL_PARAMETER As Integer = 12
Const miTABLE_CONTROL_DATALIST    As Integer = 13
Const miTABLE_POPUP_START    As Integer = 14

'Constant to determine whether commandbars are temporary or permanent
'If you set this to False, users will not loose any additional controls
'that they add to your custom commandbars
Const mbTEMPORARY        As Boolean = False

'The following Application ID is used to identify our menus, making it easy to
'remove them
Const psAppID As String = “TableDrivenCommandBars”
The mbTEMPORARY constant allows you to make the menu changes temporary or permanent. psAppID provides an identifying string that will be assigned to the Tag property of our added controls, which makes it easy to find and remove them.
The routine to actually set up the menus is called from our workbook's Auto_Open procedure or Workbook_Open event procedure:
' Subroutine: SetUpMenus
‘ Purpose:    Adds the commandbars defined in the shMenuTable worksheet’

Sub SetUpMenus()
   Dim rgRow As Range
   Dim cbAllBars As CommandBars
   Dim cbBar As CommandBar
   Dim cbBtn As CommandBarControl
   Dim iBuiltInID As Integer, iPopUpCol As Integer, vaData As Variant

   On Error Resume Next 'Just ignore errors in the table definition

   'Remove all of our menus before adding them.
   'This ensures we don't get any duplicated menus
   RemoveMenus

   'Loop through each row of our menu generation table
   For Each rgRow In shMenuTable.Cells(1).CurrentRegion.Rows
   'Ignore the header row
   If rgRow.Row > 1 Then
      'Read the row into an array of the cells' values
      vaData = rgRow.Value

      Set cbBar = Nothing
A single routine can be used to add menu items to both the Excel and VBE menus. The only difference is the CommandBars collection that is used – Excel's or the VBE's. This code does not contain all the elements necessary to add VBE menus. We have discussed the additional requirements in Chapter 23:
'Get the collection of all commandbars, either in the VBE or Excel
If vaData(1, miTABLE_APP_VBE) = “VBE” Then
   Set cbAllBars = Application.VBE.CommandBars
Else
   Set cbAllBars = Application.CommandBars
End If

'Try to find the commandbar we want
Set cbBar = cbAllBars.Item(vaData(1, miTABLE_COMMANDBAR_NAME))

'Did we find it - if not, we must be adding one!
If cbBar Is Nothing Then
   Set cbBar = cbAllBars.Add( _
       Name:=vaData(1, miTABLE_COMMANDBAR_NAME), _
                                     temporary:=mbTEMPORARY)
End If
If you want to look for a built-in popup menu to add your control to, you can recursively search for it in the CommandBars collection. For example, if you want to add a menu item to the Edit ![]() Clear menu, you can enter the ID of the Clear menu (30021) in the Sub Control ID column of the table. Alternatively, you can enter one or more control name entries in the PopUp columns of the table. Entering Edit under PopUp1 and Clear under PopUp2 accomplishes the same result as placing 30021 under Sub Control ID. The first method is convenient when adding controls to the built-in menus. The alternative method is necessary to add items to the menus you create yourself:
Clear menu, you can enter the ID of the Clear menu (30021) in the Sub Control ID column of the table. Alternatively, you can enter one or more control name entries in the PopUp columns of the table. Entering Edit under PopUp1 and Clear under PopUp2 accomplishes the same result as placing 30021 under Sub Control ID. The first method is convenient when adding controls to the built-in menus. The alternative method is necessary to add items to the menus you create yourself:
'If set, locate the built-in popup menu bar (by ID) to add our
'control to.
'e.g. Worksheet Menu Bar > Edit
If Not IsEmpty(vaData(1, miTABLE_CONTROL_ID)) Then
   Set cbBar = cbBar.FindControl(ID:=vaData(1, _
                  miTABLE_CONTROL_ID), Recursive:=True).CommandBar
End If

'Loop through the PopUp name columns to navigate down the
'menu structure
For iPopUpCol = miTABLE_POPUP_START To UBound(vaData, 2)
   'If set, navigate down the menu structure to the next popup menu
   If Not IsEmpty(vaData(1, iPopUpCol)) Then
      Set cbBar = cbBar.Controls(vaData(1, iPopUpCol)).CommandBar
   End If
Next
If you are adding an existing Excel control, you can specify its Id property value in the BuiltIn ID column. If you want the control to run your own procedure, you specify the name of the procedure in the Procedure column:
'Get the ID number if we're adding a built-in control
iBuiltInID = vaData(1, miTABLE_CONTROL_BUILTIN)

'If it's empty, set it to 1, indicating a custom control
If iBuiltInID = 0 Then iBuiltInID = 1

'Now add our control to the command bar
If IsEmpty(vaData(1, miTABLE_CONTROL_POSITION)) Or_
           vaData(1, miTABLE_CONTROL_POSITION) > _
                                     cbBar.Controls.Count Then
   Set cbBtn = cbBar.Controls.Add(Type:=vaData(1, _
                          miTABLE_CONTROL_TYPE), ID:=iBuiltInID, _
                              temporary:= mbTEMPORARY)
Else
   Set cbBtn = cbBar.Controls.Add(Type:=vaData(1, _
                         miTABLE_CONTROL_TYPE), ID:=iBuiltInID, _
             temporary:= mbTEMPORARY, _
             before:=vaData(1, _
             miTABLE_CONTROL_POSITION))
End If

'Set the rest of button's properties
With cbBtn
   .Caption = vaData(1, miTABLE_CONTROL_CAPTION)
   .BeginGroup = vaData(1, miTABLE_CONTROL_GROUP)
   .TooltipText = vaData(1, miTABLE_CONTROL_TOOLTIP)
You can either use one of the standard Office tool faces, by supplying the numeric FaceId, or provide your own picture to use. To use your own picture, just give the name of the Picture object in the FaceId column of the menu table:
'The FaceId can be empty for a blank button, the number of
'a standard button face, or the name of a picture object on
'the sheet, which contains the picture to use.
If Not IsEmpty(vaData(1, miTABLE_CONTROL_FACEID)) Then
   If IsNumeric(vaData(1, miTABLE_CONTROL_FACEID)) Then
      'A numeric face ID, so use it
      .FaceId = vaData(1, miTABLE_CONTROL_FACEID)
   Else
      'A textual face ID, so copy the picture to the button
      shMenuTable.Shapes(vaData(1, _
                          miTABLE_CONTROL_FACEID)).CopyPicture
      .PasteFace
   End If
End If
It is a good idea to set a property for all your menu items that identifies it as one of yours. If you use the Tag property to do this, you can use the FindControl method of the CommandBars object to locate all of your menu items, without having to remember exactly where you added them. This is done in the RemoveMenus procedure later in the module:
'Set the button's tag to identify it as one we created.
'This way, we can still find it if the user moves or renames it
.Tag = psAppID

'Set the control's OnAction property.
'Surround the workbook name with quote marks, in case the
'name includes spaces
If Not IsEmpty(vaData(1, miTABLE_CONTROL_PROC)) Then
  .OnAction = “'” & ThisWorkbook.Name & “'!” & vaData(1, _
                                          miTABLE_CONTROL_PROC)
End If
If your procedure expects to find information in the control's Parameter property, you enter that information under the Parameter column of the table:
'Assign Parameter property value, if specified
If Not IsEmpty(vaData(1, miTABLE_CONTROL_PARAMETER)) Then
  .Parameter = vaData(1, miTABLE_CONTROL_PARAMETER)
End If
For a drop-down control or combo box, you enter a list of values in the DataLists worksheet and assign a name to the list. You enter the name in the DataList column of the table:
'Assign data list to ComboBox
          If Not IsEmpty(vaData(1, miTABLE_CONTROL_DATALIST)) Then
            For Each Rng In shDatalists.Range(vaData(1, _
                                               miTABLE_CONTROL_DATALIST))
             .AddItem Rng.Value
          Next Rng
          End If
        End With
      End If
   Next rgRow
End Sub
When the application workbook is closed, you need to run some code to remove your menus. Some developers just use CommandBars.Reset, but this removes all other customizations from the commandbars as well as their own. It is much better to locate all the menu items and commandbars that were created for your application and delete them. This takes two routines. The first removes all the menus from a specific CommandBars collection, by searching by its Tag value:
Private Sub RemoveMenusFromBars(cbBars As CommandBars)
   Dim cbCtl As CommandBarControl

   'Ignore errors while deleting our menu items
   On Error Resume Next

   'Using the application or VBE CommandBars …
   With cbBars

      'Find a CommandBarControl with our tag
      Set cbCtl = .FindControl(Tag:=psAppID)

      'Loop until we don't find one
      Do Until cbCtl Is Nothing
         'Delete the one we found
     cbCtl.Delete

     'Find the next one
     Set cbCtl = .FindControl(Tag:=psAppID)
      Loop
   End With
End Sub
The second removal routine calls the first to remove the menu items from the Excel commandbars and the VBE commandbars and removes any custom bars that might have been created, as long as the user has not added their own controls to them:
Sub RemoveMenus()
   Dim cbBar As CommandBar, rgRow As Range, stBarName As String

   'Ignore errors while deleting our menu items and commandbars
   On Error Resume Next

   'Delete our menu items from the Excel and VBE commandbars
   RemoveMenusFromBars Application.CommandBars
   RemoveMenusFromBars Application.VBE.CommandBars

   'Loop through each row of our menu generation table
   For Each rgRow In shMenuTable.Cells(1).CurrentRegion.Rows
      'Ignore the header row
      If rgRow.Row > 1 Then
         stBarName = rgRow.Cells(1, miTABLE_COMMANDBAR_NAME)

     Set cbBar = Nothing
     'Find the command bar, either in the VBE or Excel
     If rgRow.Cells(1, miTABLE_APP_VBE) = “VBE” Then
        Set cbBar = Application.VBE.CommandBars(stBarName)
     Else
        Set cbBar = Application.CommandBars(stBarName)
     End If
     'If we found it, delete it if it is not a built-in bar
     If Not cbBar Is Nothing Then
        If Not cbBar.BuiltIn Then
           'Only delete blank commandbars - in case user
           'or other applications added menu items to the
           'same custom bar
           If cbBar.Controls.Count = 0 Then cbBar.Delete
        End If
         End If
      End If
   Next
End Sub
You should run the SetUpMenus procedure from the Auto_Open procedure or the Workbook_Open event procedure and the RemoveMenus procedure from the Auto_Close procedure or the Workbook_BeforeClose event procedure.
You now have a complete template, which can be used as the basis for any Excel application (or just in a normal workbook where you want to modify the menu structure).
The first table entry, shown previously in Figures 26-15 and 26-16, adds a new popup menu to the Worksheet menu bar called Custom. The second entry adds a menu item called Show Data Form to the Custom menu, as shown in Figure 26-17.
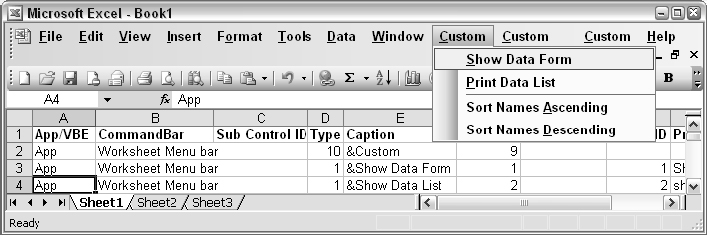
Figure 26-17
You can expand the table to add more items to the custom menu and create new commandbars and controls as shown in Figures 26-18 and 26-19.
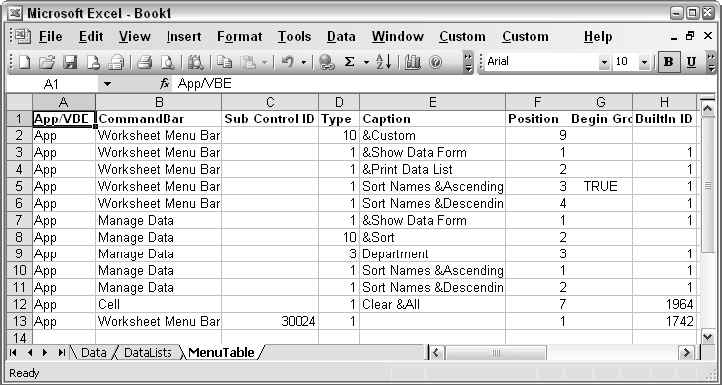
Figure 26-18
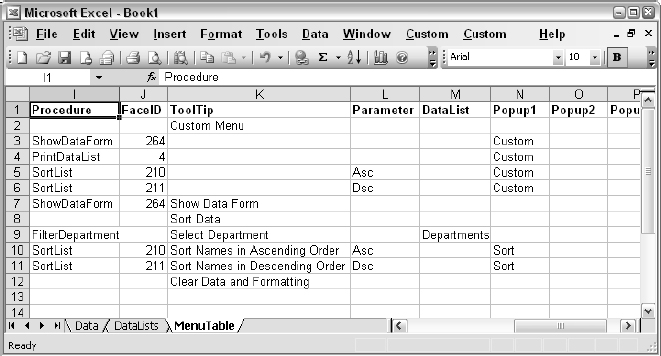
Figure 26-19
The following procedures will automate the running of the code as the workbook is opened and closed:
' Subroutine: Auto_Open
' Purpose: Adds our menus and menuitems to the application
Sub Auto_Open()
   SetUpMenus
   CommandBars(“Manage Data”).Visible = True
End Sub

' Subroutine: Auto_Close
' Purpose:    Removes our menus and menu items from the application
Sub Auto_Close()
   RemoveMenus
End Sub
The data in rows 2 through 6 of the MenuTable table create the Custom menu shown in Figure 26-20, which is identical to the Custom menu we created earlier in this chapter, apart from some added icons.
Rows 7 through 11 create a Manage Data toolbar identical to the one we created earlier. The data required for the drop-down list of departments is in the DataLists worksheet as shown in Figure 26-21. The highlighted range has been given the name Departments.
Row 12 of the table creates a Clear All entry in the popup menu that appears when you right-click a worksheet cell.
Row 13 adds the built-in Merge Across control to the Format ![]() Row menu, as shown in Figure 26-22.
Row menu, as shown in Figure 26-22.
Although the code we have presented allows you to add items to existing shortcut menus, it is not able to create a new popup shortcut menu. However, you could easily add an extra column that allows you to specify this, as long as you adapt the code accordingly. The technique is flexible enough to accommodate whatever options you need.
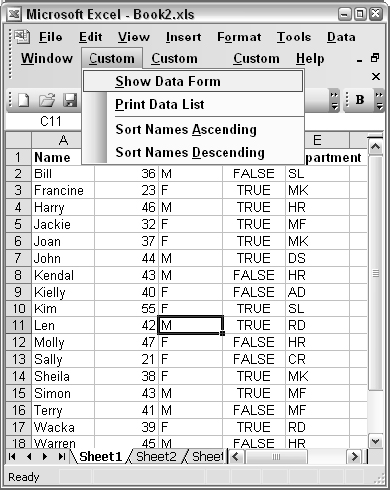
Figure 26-20
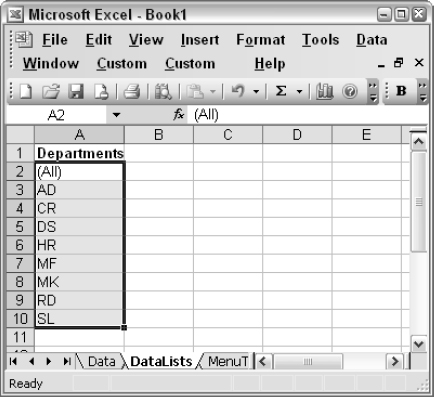
Figure 26-21
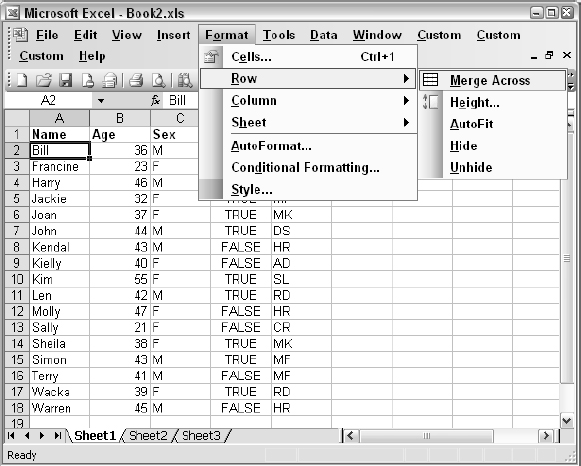
Figure 26-22
Summary
In this chapter, you have seen how the Excel commandbars are structured and learned how to create:
- Lists of the built-in control images with their Id and FaceId properties
- An entire list of the FaceIds that are available
- A complete list of popup menu items
You have also seen how to create your own commandbars and how to add controls to your commandbars. The differences between the three types of commandbars, that is toolbars, menu bars, and popup menus, have been described and methods of creating them programmatically have been presented. In addition, you have been shown how to enable and disable commandbars and controls, as well as how to protect commandbars so that users cannot change them.
Finally, you have seen how you can create a table to define the changes you want to make to a CommandBar structure while your application is open. This approach simplifies the task of customizing menus and makes it very easy to make changes.