
25
Office Files and Folders
Most of the objects discussed in this book come from the Excel Object Model. That is not the only object model available when you are writing Excel VBA code. A number of object models, or type libraries, are automatically associated with each Excel VBA project. You can see them listed in the drop-down menu at the top of the Object Browser or by clicking Tools ![]() References in the VB Editor window and noting the libraries with check marks. There are libraries for Excel, VBA, Office, OLE Automation and, if you attach a UserForm, there will be a Forms library. You can attach more libraries by checking items in the Tools
References in the VB Editor window and noting the libraries with check marks. There are libraries for Excel, VBA, Office, OLE Automation and, if you attach a UserForm, there will be a Forms library. You can attach more libraries by checking items in the Tools ![]() References dialog box. This process is discussed in later chapters such as Customizing the VBE.
References dialog box. This process is discussed in later chapters such as Customizing the VBE.
The Office Object Model is made available to all Microsoft Office applications. It contains objects that are used by all Office applications such as CommandBars, which are discussed in Chapter 26. In this chapter, we will examine two objects contained in the Office Object Model that you use to search for, open and save files and the properties associated with them:
- FileSearch
- FoundFiles
- PropertyTests
- FileTypes
- SearchScopes
- ScopeFolders
- SearchFolders
- FileDialog
- FileDialogFilters
- FileDialogSelectedItems
FileSearch was introduced in Office 97 and was considerably enhanced in Office XP. It allows you to search for files with a wide range of search criteria such as file type, file size, file location, and date of last modification. FileSearch places the names of the files it finds in the FoundFiles collection.
You can use FileSearch instead of the VBA Dir function for a range of file operations. FileSearch is useful for maintenance of files. You can locate files of a certain age and delete them or move them to an archive directory, for example. FileSearch is also useful when you need to retrieve data from a number of related files. You can find all the Excel files in a certain directory that start with a client's name, before you consolidate the information in them into a summary file, for example.
FileDialog was a new object introduced in Office XP. You use it to display the File Open and File Save As dialog boxes as well as a subdirectory browser. FileDialog is a more powerful version of the GetOpenFileName and GetSaveAsFileName methods of the Excel Application object, which have been available in all the previous versions of Excel with VBA, but have not been available to other Office applications. FileDialog, being an Office object, is available to all Office XP applications.
FileSearch
The following code searches the C:Temp subdirectory, including any subdirectories beneath it, looking for Excel files:
Option Explicit

Public Sub FindClientExcelFiles()
  Dim FileName As Variant
  Dim Message As String
  Dim I As Long
  Dim Count As Long

  With Application.FileSearch

    ' Prepare search criteria
    .NewSearch
    .LookIn = “C:Temp”
    .SearchSubFolders = True
    .FileType = MsoFileTypeExcelWorkbooks
    .LastModified = MsoLastModified.msoLastModifiedAnyTime
    Count = .Execute

    ' Prepare output text
    Message = Format(Count, “0 ”“Files Found”“”)
    For Each FileName In .FoundFiles
      Message = Message & vbCr & FileName
    Next FileName

    Call MsgBox(Message, vbInformation)

  End With

End Sub
In the listing we use the With End With construct to obtain a reference to the Office.FileSearch object through the Application.FileSearch property. One could assign the Application.FileSearch property to a local variable, but this generally only adds extra lines of code and little else.
Next, we need to initialize the search criteria. In summary, we provided information like the file location, file masks, and any extra desired parameters. The LookIn property tells FileSearch which subdirectory to search. NewSearch is a method that clears all of the FileSearch properties except LookIn. As these properties persist while you have Excel open, it is a good idea to specifically decide whether you are executing a new search—calling NewSearch if that is the case—each time you use FileSearch. The SearchSubFolders property controls whether we look in subdirectories below the LookIn subdirectory.
FileType determines what file extensions will be included in the search criteria. The constant msoFileTypeExcelWorkbook directs the search to include all the Excel file extensions .xls, .xlt, .xlm, .xlc, and .xla. See the following listing for a table of the other constants available.
| msoFileType Constants |
| MsoFileTypeAllFiles |
| MsoFileTypeBinders |
| MsoFileTypeCalendarItem |
| MsoFileTypeContactItem |
| MsoFileTypeCustom |
| MsoFileTypeDatabases |
| MsoFileTypeDataConnectionFiles |
| MsoFileTypeDesignerFiles |
| MsoFileTypeDocumentImagingFiles |
| MsoFileTypeExcelWorkbooks |
| MsoFileTypeJournalItem |
| MsoFileTypeMailItem |
| MsoFileTypeNoteItem |
| MsoFileTypeOfficeFiles |
| MsoFileTypeOutlookItems |
| MsoFileTypePhotoDrawFiles |
| MsoFileTypePowerPointPresentations |
| MsoFileTypeProjectFiles |
| MsoFileTypePublisherFiles |
| MsoFileTypeTaskItem |
| MsoFileTypeTemplates |
| MsoFileTypeVisioFiles |
| MsoFileTypeWebPages |
| MsoFileTypeWordDocuments |
The LastModified property can use the following constants:
| mso Last Modified Constants |
| MsoLastModifiedAnyTime |
| MsoLastModifiedLastMonth |
| MsoLastModifiedLastWeek |
| MsoLastModifiedThisMonth |
| MsoLastModifiedThisWeek |
| MsoLastModifiedToday |
| MsoLastModifiedYesterday |
Instead of the FileType property, you can specify the FileName property to specify a file mask, as shown below:
.FileName = “*.xls”
FileName allows you to be more specific than the FileType constant. If you use both FileType and FileName, the FileName property overrides the FileType property.
You can also search the text contained in the properties of a file or in the body of the file itself by assigning the text to the TextOrProperty property of FileSearch.
FoundFiles
The Execute method of FileSearch carries out the search and adds an object representing each file to the FoundFiles collection. Execute also returns a value that is the number of files found.
You use the FoundFiles collection to access the names, including the path, of the files found. The preceding code uses a For Each…Next loop to process the list, adding each name to Message, separated by a carriage return. The result will look similar to Figure 25-1 (but results will vary based on the actual files on your computer).
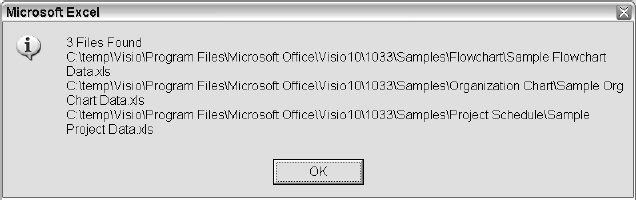
Figure 25-1
PropertyTests
When you use the File ![]() Open dialog box in Office 97 and 2000, you can click the Advanced button to open the Advanced Find dialog box. Here you can specify one or more search criteria for locating files. In VBA, you can use the PropertyTests collection to set up tests that mimic the Advanced Find test criteria.
Open dialog box in Office 97 and 2000, you can click the Advanced button to open the Advanced Find dialog box. Here you can specify one or more search criteria for locating files. In VBA, you can use the PropertyTests collection to set up tests that mimic the Advanced Find test criteria.
The Advanced Find dialog box has been superseded by the new File ![]() Search facilities in Office XP but you can still use the PropertyTests collection in Office XP VBA code.
Search facilities in Office XP but you can still use the PropertyTests collection in Office XP VBA code.
The following procedure searches for Excel files that are larger than 5,000 bytes (with the new code shown in bold font):
Public Sub FindLargeClientExcelFiles()
  Dim FileName As Variant
  Dim Message As String
  Dim I As Long
  Dim Count As Long

  With Application.FileSearch

    .NewSearch
    .LookIn = “C:WINDOWS”
    .SearchSubFolders = True

    With .PropertyTests
       For I = .Count To 1 Step -1
     .Remove I
       Next I

       .Add Name:=“Files of Type”, _
            Condition:=msoConditionFileTypeExcelWorkbooks

       .Add Name:=“Size”, _
            Condition:=msoConditionAtLeast, _
            Value:=5000, _
            Connector:=msoConnectorAnd
     End With

    .LastModified = msoLastModifiedAnyTime
    Count = .Execute

    Message = Format(Count, “0 ”“Files Found”“”)

    For Each FileName In .FoundFiles
      Message = Message & vbCr & FileName
    Next FileName

    Call MsgBox(Message, vbInformation)

  End With

End Sub
The PropertyTests collection operates independently of any settings in the Advanced Find dialog box. It does not recognize any conditions in that dialog box and it does not change the settings in that dialog box. If you add tests to the PropertyTests collection, they persist until you execute NewSearch.
The Add method of the PropertyTests collection adds the new tests, which are specified by assigning a string to the Name parameter that is identical to the string that appears in the Property combo box in the Advanced Find dialog box. The first one added is “Files of Type”, which gives us yet another way to specify that we want Excel files by providing the appropriate constant for the Condition parameter. The available constants are too numerous to tabulate here. IntelliSense ensures that they are listed automatically as you type in your code module and are self-explanatory.
A trap with PropertyTests is that there is a default condition defined in the collection when you start an Excel session, and after you execute NewSearch, that specifies the “Files of Type” parameter to be msoFileTypeOfficeFiles. Therefore, it is a good idea to empty the collection before entering new tests so that you are starting from a clear base. The code in the For…Next loop removes items in the collection in reverse order. It removes the items with the highest index numbers first so that the index numbers do not change as each item is deleted. The second test specifies that the “Size” of the file must be at least 5,000 bytes. The Connector parameter, msoConnectorAnd, specifies that the second test is joined to the first test with And. The alternative is msoConnectorOr. See Appendix C for a complete list of the parameters available.
If you specify msoConnectorOr instead of msoConnectorAnd in our example, and you are using Office 97 or 2000, VBA crashes with an error message when you try to execute the code. As usual, the error message is of little help in understanding the problem. The problem is that you are not allowed to combine a “Files of Type” test with any other test using Or. If you try to do it manually in the Advanced Find dialog box you get a clear message telling you this. If you break this rule in Office XP code a runtime error does not occur, but the result is based on And. So, beware.
FileTypes
In Office 97 and 2000, you can specify only a single FileType property for FileSearch. Office XP introduced a FileTypes collection that allows you to specify multiple file types. The following Office XP code finds all the Excel and Word files in the directories specified:
Public Sub FindClientExcelAndWordFiles()
  Dim FileName As Variant
  Dim Message As String
  Dim I As Long
  Dim Count As Long

  With Application.FileSearch
    .NewSearch

    .FileType = msoFileTypeExcelWorkbooks
    .FileTypes.Add msoFileTypeWordDocuments
    .LookIn = “C:WINDOWS”
    .SearchSubFolders = True
    .LastModified = msoLastModifiedAnyTime
    Count = .Execute

    Message = Format(Count, “0 ”“Files Found”“”)

    For Each FileName In .FoundFiles
      Message = Message & vbCr & FileName
    Next FileName

    Call MsgBox(Message, vbInformation)

  End With

End Sub
The FileTypes collection persists until you execute NewSearch, which clears the collection and places the value of msoFileTypeOfficeFiles in the collection. However, there is no need to empty the FileTypes collection before adding new entries. If you assign an entry to the FileType parameter any existing entries in the FileTypes collection are destroyed and the new entry becomes the first and only entry in the collection. You can then use the Add method of the collection to add more entries. You can use the same file type constants that are listed earlier.
SearchScopes
All of the preceding code assumes that you know the directory organization of the computer you are searching and can specify the subdirectories you want to search. What if you do not know the structure and need to map it for yourself? If you are designing a utility that must run on any computer, you will need to do this.
The SearchScopes collection, introduced in Office XP, provides a mechanism for carrying out the directory mapping process. The following code examines each member of the collection. Each member is a SearchScope object:
Public Sub ListSearchScopeObjects()
  Dim SearchScope As SearchScope
  Dim Message As String

  For Each SearchScope In Application.FileSearch.SearchScopes
    Message = Message & SearchScope.ScopeFolder.Name & vbTab
    Message = Message & “ Type=” & SearchScope.Type & vbCr
  Next SearchScope

  Call MsgBox(Message, vbInformation)

End Sub
The code will produce something similar to the message box shown in Figure 25-2.
The SearchScope objects represent the structures you can examine. The Type property identifies the category of each structure. The presence of My Computer and Network Places is no surprise.
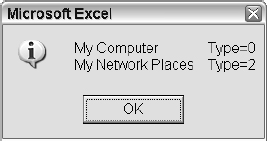
Figure 25-2
Help lists the following constants that hold the possible type values:
| msoSearchIn Constants |
| MsoSearchInCustom |
| MsoSearchInMyComputer |
| MsoSearchInMyNetworkPlaces |
| MsoSearchInOutlook |
You can't add members to or delete members from the SearchScope collection. The custom type is probably provided for future development.
ScopeFolder
Each SearchScope object has a ScopeFolder property that references a ScopeFolder object. This ScopeFolder object represents the top level of the structure. In the preceding code, the Name property of the ScopeFolder object associated with the top of each structure provides the description of that structure.
The ScopeFolder representing the top of the structure contains a ScopeFolders collection that contains more ScopeFolder objects. The following code displays the Name and Path properties of the ScopeFolders under the top-level ScopeFolder of each structure:
Public Sub ListScopeFolderObjects()
  Dim SearchScope As SearchScope
  Dim ScopeFolder As ScopeFolder
  Dim Message As String

  Application.FileSearch.RefreshScopes

  For Each SearchScope In Application.FileSearch.SearchScopes
    Select Case SearchScope.Type

    Case msoSearchInMyComputer
      Message = SearchScope.ScopeFolder.Name & vbCr
      For Each ScopeFolder In SearchScope.ScopeFolder.ScopeFolders
        Message = Message & ScopeFolder.Name & vbTab & vbTab
    Message = Message & “Path=” & ScopeFolder.Path & vbCr
      Next ScopeFolder
    Case msoSearchInMyNetworkPlaces
      Message = Message & vbCr & SearchScope.ScopeFolder.Name & vbCr
      For Each ScopeFolder In SearchScope.ScopeFolder.ScopeFolders
    Message = Message & ScopeFolder.Name & vbTab
    Message = Message & “Path=” & ScopeFolder.Path & vbCr
      Next ScopeFolder

    Case msoSearchInOutlook
      Message = Message & vbCr & SearchScope.ScopeFolder.Name & vbCr
      For Each ScopeFolder In SearchScope.ScopeFolder.ScopeFolders
    Message = Message & ScopeFolder.Name & vbTab & vbTab
    Message = Message & “Path=” & ScopeFolder.Path & vbCr
      Next ScopeFolder

    Case Else
      Message = Message & vbCr & “Unknown SearchScope object”

    End Select
  Next SearchScope

  Call MsgBox(Message, vbInformation)
End Sub
The code produces a message box like Figure 25-3 (while disconnected from the network).

Figure 25-3
The Select Case statements provide a convenient way to isolate and examine each of the top-level structures. Each top-level ScopeFolders collection contains ScopeFolder objects that represent the root directories of the file structures available to it. Each of these ScopeFolder objects contains another ScopeFolders collection that represents the subdirectories under it. This provides a mechanism for drilling down through the directory trees.
SearchFolders
Another new object in the Office XP object model is the SearchFolders collection. You use the LookIn property of FileSearch to define a single directory path to be searched, by assigning the directory path as a character string to the property. You use the SearchFolders collection to define additional directory paths to be searched, by adding ScopeFolder objects to the collection.
SearchFolders is not like the FileTypes collection that is recreated when you assign a value to the FileType property. SearchFolders is not affected when you assign a value to the LookIn property or when you execute NewSearch. The LookIn value is additional to the SearchFolders entries.
Because the SearchFolders collection persists during the current Excel session, it is a good idea to empty it before carrying out a new search. The following code searches through all the subdirectories in the root directory of the C drive. When it finds a directory starting with the letters “System32”, it adds that directory to the SearchFolders collection:
Public Sub SetupSearchFoldersCollection()
  Dim FileSearch As FileSearch
  Dim SearchScope As SearchScope
  Dim ScopeFolder As ScopeFolder
  Dim SubFolder As ScopeFolder
  Dim Message As String
  Dim I As Long

  Set FileSearch = Application.FileSearch

  For I = FileSearch.SearchFolders.Count To 1 Step -1
    FileSearch.SearchFolders.Remove I
  Next I

  For Each SearchScope In FileSearch.SearchScopes
    Select Case SearchScope.Type
      Case msoSearchInMyComputer
        For Each ScopeFolder In SearchScope.ScopeFolder.ScopeFolders
          If (ScopeFolder.Path = “C:”) Then
           For Each SubFolder In ScopeFolder.ScopeFolders
             If UCase(Left(SubFolder.Name, 6)) = “SYSTEM32” Then
               SubFolder.AddToSearchFolders
             End If
           Next SubFolder
        End If
      Next ScopeFolder
  End Select

  Next SearchScope

  PerformSearch

End Sub
The code empties the SearchFolders collection and then drills down through the SearchScopes collection and ScopeFolders collection to locate the C drive. It then examines the Name property of each ScopeFolder in the root directory of the C drive to determine if the name begins with “SYSTEM32.” It converts the name to upper case so that the comparison is not case-sensitive.
When the code finds a matching directory it uses the AddToSearchFolders method of the ScopeFolder object to add the object to the SearchFolders collection. The code then runs the PerformSearch routine, which is listed in the following, to display the names of the Excel files in the SYSTEM32 directories:
Public Sub PerformSearch()
  Dim FileName As Variant
  Dim Message As String
  Dim Count As Long

  With Application.FileSearch
     .NewSearch
     .LookIn = “”
     .SearchSubFolders = True
     .FileName = “*.xls”
     .LastModified = msoLastModifiedAnyTime
     Count = .Execute

     Message = Format(Count, “0 ”“Files Found”“”)

     For Each FileName In .FoundFiles
       Message = Message & vbCr & FileName
     Next FileName
   End With

   MsgBox Message

End Sub
PerformSearch sets the LookIn property of FileSearch to a zero-length string to ensure that it does not contain any directory references from previous FileSearch operations.
Office XP users who have used code to populate the SearchFolders collection should modify the code of the procedures presented earlier in this chapter so that the SearchFolders collection is cleared before the search is executed.
FileDialog
Office XP introduced the FileDialog object that allows you to display the File ![]() Open and File
Open and File ![]() Save As dialog boxes using VBA. Excel users of the previous versions can use the GetOpenFileName and GetSaveAsFileName methods of the Application object to carry out similar tasks and they can continue to do so in 2003 if backward compatibility is required. One advantage of FileDialog is that it has one extra capability that allows you to display a list of directories, rather than files and directories. FileDialog also has the advantage of being available to all Office applications.
Save As dialog boxes using VBA. Excel users of the previous versions can use the GetOpenFileName and GetSaveAsFileName methods of the Application object to carry out similar tasks and they can continue to do so in 2003 if backward compatibility is required. One advantage of FileDialog is that it has one extra capability that allows you to display a list of directories, rather than files and directories. FileDialog also has the advantage of being available to all Office applications.
We will set up a worksheet to display images that we will allow the user to choose through the File Open dialog box. Figure 25-4 shows how the application looks.
The worksheet contains an Image control created using the Control Toolbox toolbar, with the default name of “Image1”. We have set the PictureSizeMode property of the control to zoom so that the picture is automatically fitted in the control. The command button above it uses the default name, and the caption is modified to “Select File”. The class module behind Sheet1 contains the following event procedure:
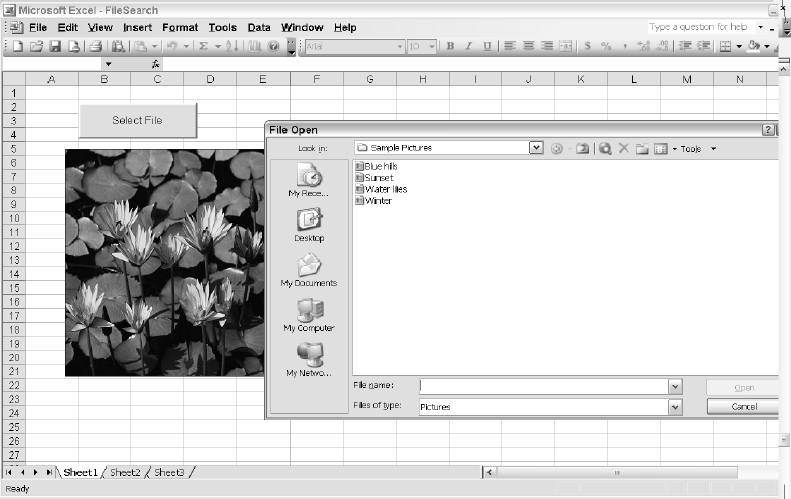
Figure 25-4
Private Sub CommandButton1_Click()
  Dim Filters As FileDialogFilters
  Dim FileName As String

  On Error GoTo Catch

  With Application.FileDialog(MsoFileDialogType.msoFileDialogOpen)
    Set Filters = .Filters

    With Filters
    .Clear
    .Add “Pictures”, “*.jpg”
  End With

  .AllowMultiSelect = False

  If .Show = False Then Exit Sub

  Image1.Picture = LoadPicture(.SelectedItems(1))
End With
  Exit Sub

Catch:
  Call MsgBox(“Invalid picture file”, vbExclamation)
End Sub
The FileDialog property of the Application object returns a reference to the Office FileDialogs object. We can use the following msoFileDialogType constants to specify the type of dialog box:
| MsoFileDialog Constants |
| MsoFileDialogFilePicker |
| MsoFileDialogFolderPicker |
| MsoFileDialogOpen |
| MsoFileDialogSaveAs |
FileDialogFilters
We use the Filters property of the FileDialog object to return a reference to the FileDialogFilters collection for the FileDialog. The filters control the types of files that are displayed. By default, there are 24 filters preset that the user can select from the drop-down menu at the bottom of the File Open dialog box. The Clear method of the FileDialogFilters collection removes the preset filters and we add our own filter that shows only .jpg files.
The Show method of the FileDialog object displays the dialog box. When the user clicks the Open button the Show method returns a value of “True”. If the user clicks the Cancel button, the Show method returns “False” and we exit from the procedure.
FileDialogSelectedItems
The Show method does not actually open the selected file but places the file name and path into a FileDialogSelectedItems collection. As we will see later, it is possible to allow multiple file selection. In the present example, the user can only select one file. The name of the file is returned from the first item in the FileDialogSelectedItems collection, which is referred to by the SelectedItems property of the FileDialog object.
We use the LoadPicture function to assign the file to the Picture property of the image control.
Dialog Types
There is very little difference between the four possible dialog box types apart from the heading at the top of the dialog box. The file picker and folder picker types show Browse in the title bar while the others show File Open and File Save As as appropriate. All the dialog boxes show directories and files except the folder picker dialog box, which shows only directories.
Execute Method
As we have seen, the Show method displays the FileDialog and the items chosen are placed in the FileDialogSelectedItems object without any attempt to open or save any files. You can use the Execute method with the File Open and Save As dialog boxes to carry out the required Open or SaveAs operations immediately the user clicks the Open or Save button, as shown in the following code:
With Application.FileDialog(xlDialogOpen)
  If .Show Then .Execute
End With
MultiSelect
The application shown in Figure 25-5 has been modified to allow the user to select multiple file names by holding down Shift or Control while clicking file names. The file names are then loaded into the combo box, called ComboBoxl, at the top of the screen, from which the files can be chosen for viewing.
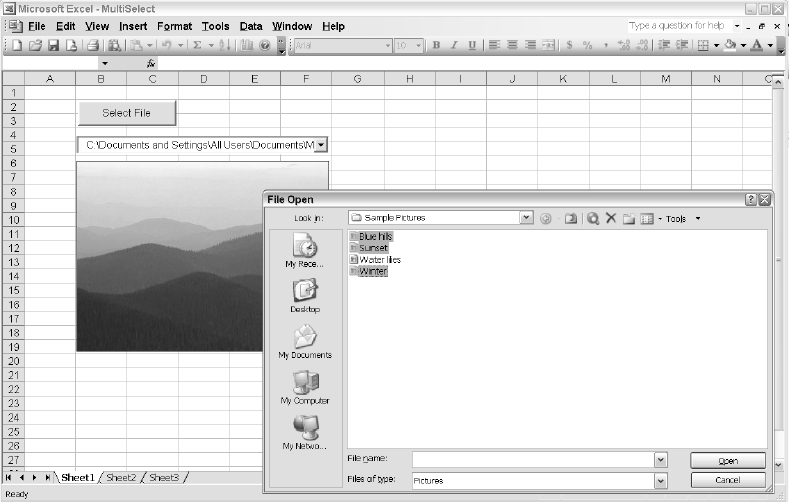
Figure 25-5
The code has been modified as follows:
Option Explicit

Private Sub ComboBox1_Change()
  Image1.Picture = LoadPicture(ComboBox1.Text)
End Sub
Private Sub CommandButton1_Click()
  Dim FileName As String
  Dim Item As Variant

  On Error GoTo Catch

  With Application.FileDialog(msoFileDialogOpen)

    With .Filters
      .Clear
      .Add “Pictures”, “*.jpg”
    End With

    .AllowMultiSelect = True

    If .Show = False Then Exit Sub
    ComboBox1.Clear

    For Each Item In .SelectedItems
      Call ComboBox1.AddItem(Item)
    Next Item

    ComboBox1.ListIndex = 0

  End With

  Exit Sub

Catch:
 Call MsgBox(Err.Description, vbExclamation)
End Sub
We set the AllowMultiSelect property to True. The combo box list is cleared of any previous items and we use a For Each…Next loop to add the items in the FileDialogSelectedItems collection to the combo box list. When we set the combo box ListIndex property to zero, it triggers the Change event and the event procedure loads the first picture into the image control.
Summary
FileSearch and FileDialog provide useful facilities to VBA programmers wanting to write file-handling code. Because these objects are part of the Office object model, they have the advantage of being available to all Office VBA applications.
FileSearch is available in Excel 97 and all later Windows versions with considerable enhancements since Office XP. You use it to locate files with common characteristics, such as similar file names or similar locations, so that those files can be processed in subsequent code.
FileDialog was introduced in Office XP and allows you to display the File Open and File Save As dialog boxes as well as a directory browser. It provides more powerful facilities than the GetOpenFileName and GetSaveAsFileName functions that are only available in Excel.