
9
UserForms
Rows, columns, and cells represent a simple and utilitarian means of entering information but not a very engaging one. UserForms play the role of a blank slate, a palette, upon which you can create visual metaphors that permit you to engage your users in the process of entering data.
To create the visual metaphors, you add UserForms in the VBE using Insert ![]() UserForm. The metaphor for adding a custom form is painting and the form is the blank canvas. This metaphor is supported by dragging controls from the Toolbox onto the UserForm. The forms and the controls you add to the forms already define methods, properties, and events that permit you to orchestrate the interaction between the user and the code. The visual appeal of any form is limited only by your imagination, as is the capability and responsiveness.
UserForm. The metaphor for adding a custom form is painting and the form is the blank canvas. This metaphor is supported by dragging controls from the Toolbox onto the UserForm. The forms and the controls you add to the forms already define methods, properties, and events that permit you to orchestrate the interaction between the user and the code. The visual appeal of any form is limited only by your imagination, as is the capability and responsiveness.
Displaying a UserForm
Historically, batch applications accepted a few input arguments and then proceeded in a linear fashion to some predetermined and constrained result. The windowing metaphor vastly improved the flexibility of computer programmers by turning mostly linear batch processing into a dynamic array of opportunistic progressions to a litany of possible outcomes. That is, the flexibility of applications has increased in a windowing environment.
Taking advantage of the window metaphor is a matter of adding UserForms to your workbook. You can add as many or as few UserForms as you need. The tempo and order in which they are displayed reflects the guided limitations and opportunities your workbook exposes as a customized Windows application. This orchestration is managed by loading, showing, hiding, and unloading UserForms based on the feedback from the user.
To load a UserForm named UserForm1 (by default) into memory, without making it visible, you use the Load statement:
Load UserForm1
You can unload UserForm1 from memory using the Unload statement:
UnLoad UserForm1
To make UserForm1 visible, use the Show method of the UserForm object:
UserForm1.Show
If you show a UserForm that has not been loaded, it will be automatically loaded. You can use the Hide method to conceal a UserForm from the screen without removing it from memory call the UserForm.Hide method as demonstrated:
UserForm1.Hide
Figure 9-1 shows a simple UserForm in action. We will develop it over the course of this chapter. It has been designed to allow you to see the current values in cells B2:B6 and to make changes to those values. It is linked directly to the cells in the worksheet, which makes it very easy to set up with a minimum of VBA code.
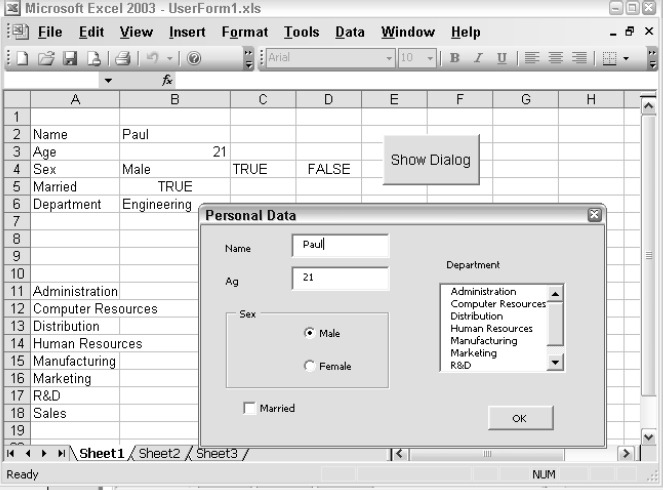
Figure 9-1
The ActiveX command button in the worksheet, with the caption Show Dialog contains the following event procedure:
Private Sub CommandButton1_Click()
  PersonalData.Show
End Sub
The default behavior of the Show method is to display the UserForm as a modal form. This means that the UserForm behaves like a dialog box maintaining the focus whether the form is hidden or unloaded. The user cannot interact with any other part of Excel until the UserForm is dispensed with.
We will discuss modeless UserForms, which do allow the user to perform other tasks while they are visible, later in this chapter.
Creating a UserForm
UserForms are designed in the VBE. Figure 9-2 illustrates what the design time environment of the VBE looked like while we were designing the Personal Data UserForm.

Figure 9-2
The name of the UserForm was changed from the default name UserForm1 to PersonalData. You do this in the first entry, (Name), in the Properties window. The Caption property is changed to PersonalData. The controls were added from the ToolBox.
There are two TextBox controls at the top of the form for name and age data. There are two option buttons (also known as radio buttons) for Male and Female, which are inside a frame control. To create the buttons in the frame appearance, add the Frame control first and then place the OptionButtons in the frame. The PersonalData UserForm also contains a CheckBox for indicating marital status, a ListBox for Department, and an OK CommandButton.
It is a good idea to give a descriptive name to the controls you will be writing code to interact with. For example, you might name the TextBox for capturing the person's name, Name. If you want to know the class of the control you can introduce some additional information such as the class of the control as a prefix or suffix, resulting in the TextBox used to store the name being called NameTextBox or TextBoxName. NameTextBox reads better; TextBoxName results in all controls of the same type being sorted in the Properties window by class. The most important thing is to be consistent.
We like the controls being ordered by class in the Properties window, so we named the TextBox TextBoxName. To associate some data from the worksheet with the TextBoxName control we changed the ControlSource property to Sheet1!B2. The following table shows the revisions made to each of the controls on the PersonalData UserForm.

When you assign a ControlSource property to a worksheet cell, the cell and the control are linked in both directions. Any change to the control affects the cell and any change to the cell affects the control.
The descriptive titles on the form to the left of the TextBoxes and above the ListBox showing the departments are Label controls. The Caption properties of the Labels were changed to Name, Age, and Department. The Caption property of the frame around the OptionButton controls was changed to Sex, and the Caption properties of the option buttons were changed to Male and Female. The Caption property of the CheckBox was changed to Married.
The Male and Female option buttons can't be linked to B4. It is not appropriate to display the values of these controls directly, so the following IF function in cell B4 converts the True or False value in cell C4 to the required Male or Female result:
=IF(C4=TRUE, “Male”, “Female”)
Although, you only need to set cell C4 to get the required result, you need to link both option buttons to separate cells if you want the buttons to display properly when the UserForm is shown.
The RowSource property of ListBoxDepartment was entered as Sheet1!A11:A18. It is good practice to create names for the linked cells and use those names in the ControlSource, rather than the cell references used here, but this extra step has been omitted to simplify our example.
The following Click event procedure was created for the button in the code module behind the UserForm:
Me is a shortcut keyword that refers to the UserForm object containing the code. Me can be used in any class module to refer to the object the class module represents. If you want to access the control values later in your VBA code, you must use the Hide method, which leaves the UserForm in memory. Otherwise, the Unload statement removes the UserForm from memory and the control values are lost. You will see examples that use Hide shortly.
Clicking the [x] button in the top right corner of the UserForm will also dismiss the UserForm. This unloads the UserForm so that it is removed from memory.
Directly Accessing Controls in UserForms
Linking UserForm controls to cells is not always the best way to work. You can gain more flexibility by directly accessing the data in the UserForm. Figure 9-3 shows a revised version of our previous example. We want to display essentially the same UserForm, but we want to store the resulting data as shown. Sex will be stored as a single letter code, M or F. The Department name will be stored as a two-character code, as shown in Figure 9-3.

Figure 9-3
We have added a Cancel button to the UserForm so that any changes made to the controls while the UserForm is being shown can be discarded if the user wishes, rather than being automatically applied to the worksheet. The module behind PersonalData now contains the following code:
Option Explicit

Public Cancelled As Boolean

Private Sub CommandButtonCancel_Click()
  Cancelled = True
  Me.Hide
End Sub

Private Sub CommandButtonOK_Click()
  Cancelled = False
  Me.Hide
End Sub
The Public variable Cancelled will provide a way to detect that the Cancel button has been pressed. If the OK button is pressed, Cancelled is assigned the value False. If the Cancel button is pressed, Cancelled is assigned a value of True. Both buttons hide PersonalData so that it remains in memory. The following event procedure has also been added to the module behind PersonalData:
Private Sub UserForm_Initialize()

  Dim Departments As Variant
  Departments = VBA.Array(“Administration”, _
    “Computer Resources”,  _
    “Distribution”,  _
    “Human Resources”,  _
    “Manufacturing”,  _
    “Marketing”,  _
    “R&D”,  _
    “Sales”)

  Dim DepartmentCodes As Variant
  DepartmentCodes = VBA.Array(“AD”,  _
    “CR”,  _
    “DS”,  _
    “HR”,  _
    “MF”,  _
    “MK”,  _
    “RD”,  _
    “SL”)

  Dim Data(8, 2) As String
  Dim I As Integer
  For I = 0 To 7
    Data(I, 0) = Departments(I)
  Next I
  For I = 0 To 7
    Data(I, 1) = DepartmentCodes(I)

  Next

  ListBoxDepartment.List = Data

End Sub
The UserForm_Initialize event is triggered when the UserForm is loaded into memory. It does not occur when the form has been hidden and is shown again. It is used here to load ListBox Department with two columns of data. The first column contains the department names and the second column the department codes to be displayed.
Departments and DepartmentCodes are assigned arrays in the usual way using the Array function, except that VBA.Array has been used to ensure that the arrays are zero-based. Data is a dynamic array and the Dim statement is used to dimension it to the same number of elements in the Departments and DepartmentCodes arrays.
The For…Next loop assigns the department codes and names to the two columns of Data, and then Data is used to initialize the ListBox. If you prefer, you can maintain a table of departments and codes in a worksheet range and set the ListBox's RowSource property equal to the range, as we saw in the first example in this chapter.
When you have a multicolumn ListBox, you need to specify which column contains the data that will appear in a link cell and be returned in the control's Value property. This column is referred to as the bound column. The BoundColumn property of ListBox Department has been set to 1. This property is one-based, so the bound column is the department codes column. The ColumnCount property has been set to 2, as there are two columns of data in the list.
Based on the arbitrary width of the ListBox we can only see the first column in the ListBox. We can use a semicolon delimited list of widths to specify the width of each column of data in the ListBox. For example, hiding the first column and setting the second column width to 80 would be entered in the ColumnWidths field I the Properties window as 0;80. In our implementation we want to show the complete name and hide the codes, so we'll use 93;0 to use the full width of the ListBox for the long names and hide the codes.
The following code has been placed in the module behind Sheet1:
1:  Option Explicit
2:
3:  Private Sub CommandButton1_Click()
4:  Dim RangeData As Range
5:  Dim Data As Variant
6:
7:  Set RangeData = Range(“Database”) .Rows(2)
8:  Data = RangeData.Value
9:
10: PersonalData.TextBoxName = Data(1, 1)
11: PersonalData.TextBoxAge = Data(1, 2)
12:
14:   Case “F”
15:     PersonalData.OptionButtonFemale.Value = True
16:   Case “M”
17:     PersonalData.OptionButtonMale = True
18:  End Select
19:
20:  PersonalData.CheckBoxMarried.Value = Data(1, 4)
21:
22:  PersonalData.Show
23:   If (Not PersonalData.Cancelled) Then
24:     Data(1, 1) = PersonalData.TextBoxName
25:     Data(1, 2) = PersonalData.TextBoxAge
26:
27:     Select Case True
28:       Case PersonalData.OptionButtonFemale.Value
29:         Data(1, 3) = “F”
30:       Case PersonalData.OptionButtonMale.Value
31:         Data(1, 3) = “M”
32:     End Select
33:
34:     Data(1, 4) = PersonalData.CheckBoxMarried.Value
35:     Data(1, 5) = PersonalData.ListBoxDepartment.Text
36:     RangeData.Value = Data
37:   End If
38:
39:   Call Unload(PersonalData)
40: End Sub
Due to the length of the listing, line numbers were added for reference. Remember to remove the line numbers when you add this code to VBE.
Line 4 declares a range and line 5 declares a variant. Line 7 reads the range named Database and selects row 2 from this range, assigning the value of the range to the variant Data. Basically, we have copied the values of Sheet1 to a local array. Lines 10 and 11 copy the name and age into the appropriate controls on the form. The Select Case statement on lines 13 through 18 discerns whether the current sheet's data refers to a female or male, setting the appropriate option button. We only need to change one option button because the frame causes the buttons to be treated as a group, permitting only one button to be checked at a time. Line 20 sets the marital status Checkbox's state.
When we are ready to show the PersonalData form on line 22 we have copied all of the values from the worksheet into the UserForm, and on line 22 we show the form. If the user clicks OK on the PersonalData UserForm then the test on line 23 passes and the values are copied from the PersonalData UserForm back to the fields on the worksheet. Finally, the UserForm is unloaded. By disconnecting the worksheet and the form we have provided the user with an opportunity to cancel changes.
Stopping the Close Button
One problem with the above code is that, if the user clicks the [x] button, which is the Close button at the top right of PersonalData, the event procedure does not exit. Instead, it transfers any changes back to the worksheet. This is because the default value for Cancelled is False. Normally, clicking the [x] button would also unload the form and the code would fail when it tries to access the controls on the form. The following example uses the UserForm's QueryClose event to prevent the form from closing when the user clicks the [x] close button. You can use the QueryClose event of the UserForm object to discover what is closing the UserForm and cancel the event, if necessary. Adding the following code to the PersonalData UserForm blocks the Close button exit:
Private Sub UserForm_QueryClose(Cancel As Integer, CloseMode As Integer)
   If CloseMode = vbFormControlMenu Then
             Cancel = True

  Beep
   End If
End Sub
The QueryClose event can be triggered in four ways. You can determine what caused the event by usin the following intrinsic constants to test the CloseMode parameter:

Maintaining a Data List
The code we have developed can now be extended to maintain a datalist without too much extra effort. However, we will take a different approach to the last example. This time we will build all the code into PersonalData, apart from the code behind the command button in the worksheet that shows the UserForm. The code behind this button now becomes the following:
Private Sub CommandButton1_Click()
  PersonalData.Show
End Sub
It is really much easier to maintain a datalist in a proper database application, such as Microsoft Access, but it can be done in Excel without too much trouble if your requirements are fairly simple.
If we are going to manage more than one row of data, we need to be able to add new rows, delete existing rows, and navigate through the rows. PersonalData needs some extra controls, as shown in Figure 9-4.
We added four buttons and replaced the ListBox with a ComboBox. The button labeled Previous Record will be used to navigate to a previous row in the worksheet. The button labeled Next Record will be used to navigate to the next record in worksheet. New Record will be used to add a row to the worksheet, and Delete Record will be used to remove a row from the worksheet. The ComboBox was used to demonstrate an alternate way to permit selections.

Figure 9-4
The code in PersonalData is discussed next. It is important to note first that the following module-level variables have been declared at the top of the PersonalData UserForm code module:
Dim aRangeData As Range
Dim Data As Variant
These variables are used in exactly the same way as they were used in the previous example, except that the row referred to can vary. The object variable RangeData is always set to the current row of data in the named range Database, which currently refers to A1:E11 in the preceding worksheet. Data always holds the values from RangeData as a VBA array.
The code from the command button event procedure in our previous example has been converted to two utility procedures that reside in PersonalData's code module:
Private Sub LoadRecord()
   'Copy values in RangeData from worksheet to vaData array
   Data = RangeData.Value
   'Assign array values to Personal controls
   TextBoxName.Value = Data(1, 1)
   TextBoxAge.Value = Data(1, 2)

   Select Case Data(1, 3)
      Case “F”
        OptionButtonFemale.Value = True
      Case “M”
        OptionButtonMale.Value = True
    End Select
      CheckBoxMarried.Value = Data(1, 4)

      ComboBoxDepartment.Value = Data(1, 5)

    End Sub

   Private Sub SaveRecord()
     'Copy values from Personal controls to Data array
     Data(1, 1) = TextBoxName.Value
     Data(1, 2) = TextBoxAge.Value

   Select Case True
      Case OptionButtonFemale.Value
         Data(1, 3) = “F”
      Case OptionButtonMale.Value
         Data(1, 3) = “M”
   End Select

   Data(1, 4) = CheckBoxMarried.Value
   Data(1, 5) = ComboBoxDepartment.Value

   'Assign Data array values to current record in Database
   RangeData.Value = Data
End Sub
As the code is in the PersonalData module, there is no need to refer to PersonalData when referring to a control, so all controls are directly addressed in the code.
LoadRecord and SaveRecord are the only procedures that are tailored to the datalist structure and the controls. As long as the datalist has the name Database, none of the other code in PersonalData needs to change if we decide to add more fields to the data list or remove fields. It also means that we can readily apply the same code to a completely different datalist. All we have to do is redesign the UserForm controls and update LoadRecord and SaveRecord.
The key navigation device in PersonalData is the scroll bar, which has been named Navigator. It is used by the other buttons when a change of record is required, as well as being available to the user directly. The Value property of Navigator corresponds to the row number in the range named Database.
The minimum value of Navigator is fixed permanently at two, as the first record is the second row in Database, so you need to set the Min property of the scroll bar in the Properties window. The maximum value is altered as needed by the other event procedures in PersonalData so that it always corresponds to the last row in Database:
Private Sub Navigator_Change()
   'When Scrollbar value changes, save current record and load
   'record number corresponding to scroll bar value
   Call SaveRecord
   Set RangeData = Range(“Database”) .Rows(Navigator.Value)
   Call LoadRecord
End Sub
When the user changes the Navigator.Value property (or when it is changed by other event procedures) the Change event fires and saves the current record in PersonalData, redefines RangeData to be the row in Database corresponding to the new value of Navigator.Value, and loads the data from that row into PersonalData.
The UserForm_Initialize event procedure has been updated from the previous exercise to set the correct starting values for sbNavigator:
Private Sub UserForm_Initialize()
   'Sets up Department list values
   'and loads first record in Database
   Dim DepartmentCode As Variant
   Dim DepartmentList() As String
   Dim I As Integer

   DepartmentCode = VBA.Array(“AD”,  _
         “CR”,  _
     “DS”,  _
     “HR”,  _
     “MF”,  _
     “MK”,  _
     “RD”,  _
     “SL”,  _
     “NA”)

   ReDim DepartmentList(0 To UBound(DepartmentCode))

   For I = 0 To UBound(DepartmentCode)
      DepartmentList(I) = DepartmentCode(I)
   Next I

   ComboBoxDepartment.List = DepartmentList

   'Load 1st record in Database and initialize scroll bar
   With Range(“Database”)
      Set RangeData = .Rows(2)
      Call LoadRecord
      Navigator.Value = 2
      Navigator.Max = .Rows.Count
   End With
End Sub
After initializing the CheckBoxDepartment.List property, the code initializes RangeData to refer to the second row of Database, row two being the first row of data under the field names on row one, and loads the data from that row into PersonalData. It then initializes the Value property of Navigator to two and sets the Max property of Navigator to the number of rows in Database. If the user changes the scroll bar, they can navigate to any row from row two through to the last row in Database.
The Click event procedure for the button labeled Next Record is as follows:
Private Sub CommandButton2_Click()
   without Range(“Database”)
     If RangeData.Row < .Rows(.Rows.Count).Row Then
       'Load next record only if not on last record
       Navigator.Value = Navigator.Value + 1
       'Note: Setting Navigator.Value runs its Change event procedure
     End If
   End With
End Sub
The If test checks that the current row number in Database is less than the last row number in Database to ensure that we don't try to go beyond the data. If there is room to move, the value of Navigator is increased by one. This change triggers the Change event procedure for Navigator, which saves the current data, resets RangeData, and loads the next row's data.
The code for the button labeled Previous Record is similar to the behavior for the Next Button record (the sample shows the code without the With construct for variety):
Private Sub CommandButton1_Click()
  If RangeData.Row > Range(“Database”) .Rows(2).Row Then
    'Load previous record if not on first record
    Navigator.Value = Navigator.Value - 1
    'Note: Setting Navigator.Value runs its Change event procedure
  End If
End Sub
The check ensures that we don't try to move to row numbers lower than the second row in Database. The if conditional checks comparing the row to the extent of the range could have been implemented using the Value, Max, and Min properties of scrollbar named Navigator, but the technique used demonstrates how to determine the row number of the last row in a named range, which is a technique that it is very useful to know. It is important to carry out these checks as trying to set the Navigator.Value property outside the Min to Max range causes a runtime error.
The code for the Delete Record button is as follows:
Private Sub CommandButton4_Click()
   'Deletes current record in PersonalData
   If Range(“Database”) .Rows.Count = 2 Then
      'Don't delete if only one record left
      MsgBox “You cannot delete every record”,  vbCritical
      Exit Sub
   ElseIf RangeData.Row = Range(“Database”) .Rows(2).Row Then
    'If on 1st record, move down one record and delete 1st record
    'shifting the rows below up to fill the gap
    Set RangeData = RangeData.Offset(1)
    RangeData.Offset(-1).Delete shift:=xlUp
    Call LoadRecord
  Else Select Case Data(1, 3)
     'If on other than 1st record, move to previous record before delete
     Navigator.Value = Navigator.Value - 1
     'Note: Setting sbNavigator.Value runs its Change event procedure
     RangeData.Offset(1).Delete shift:=xlUp
  End If
  Navigator.Max = Navigator.Max - 1
End Sub
This procedure carries out the following actions:
- It aborts if you try to delete the last remaining record in Database.
- If you delete the first record, RangeData field is assigned a reference to the second record. Navigator.Value is not reset, as row 2 becomes row 1, once the original row 1 is deleted. LoadRecord is called to load the data in RangeData into the UserForm.
- If you delete a record that is not the first one, Navigator.Value is reduced by one. This causes the previous record to be loaded into the UserForm.
- At the end, the count of the number of rows in Database held in Navigator.Max, is decreased by 1.
The code for the button labeled New Record is shown next:
Private Sub CommandButton3_Click()
  'Add new record at bottom of database
  Dim RowCount As Integer

  With Range(“DatabaseM)
    'Add extra row to name
    Database RowCount = .Rows.Count + 1
    .Resize(RowCount).Name = “Database”
    Navigator.Max = iRowCount
    Navigator.Value = iRowCount
    'Note: Setting Navigator.Value runs its Change event procedure
 End With

 'Set default values
 OptionButtonMale.Value = True

 CheckBoxMarried = False
 CheckBoxDepartment.Value = “NA”
End Sub
This event procedure defines RowCount to be one higher than the current number of rows in Database. It then generates a reference to a range with one more row than Database and redefines the name Database to refer to the larger range. It then assigns RowCount to both the Max property of Navigator and the Value property of Navigator. Setting the Value property fires the Change event procedure for Navigator, which makes the new empty row the current row and loads the empty values into PersonalData. Default values are then applied to some of the PersonalData controls.
The only remaining code in PersonalData is for the code for the OK button and Cancel button click events as demonstrated:
Private Sub CommandButtonCancel_Click()
  Cancelled = True
  Me.Hide
End Sub

Private Sub CommandButtonOK_Click()
 Cancelled = False
 SaveRecord
 Me.Hide
End Sub
Both buttons unload PersonalData. Only the OK button saves any changes to the current record in the UserForm.
Modeless UserForms
Excel 2000, 2002, and 2003 provide the ability to show modeless UserForms. The modal UserForms that we have dealt with so far do not allow the user to change the focus away from the UserForm while it is being displayed. You cannot activate a worksheet, menu, or toolbar, for example, until the UserForm has been hidden or unloaded from memory. If you have a procedure that uses the Show method to display a modal UserForm, that procedure cannot execute the code that follows the Show method until the UserForm is hidden or unloaded.
A modeless UserForm does allow the user to activate worksheets, menus, and toolbars. It floats in the foreground until it is hidden or unloaded. The procedure that uses the Show method to display a modeless UserForm will immediately continue to execute the code that follows the Show method. PersonalData, from our previous example that maintains a data list, can easily be displayed modeless. All you need to do is change the code that displays it as follows:
Private Sub CommandButton1_Click()
Call PersonalData(vbModeless)
End Sub
When the UserForm is modeless, you can carry on with other work while it is visible. You can even copy and paste data from TextBoxes on the UserForm to worksheet cells.
It is important to note that our recent example does not bind the worksheet to the form; the data is copied from worksheet top form. Thus, if we show PersonalData modeless and change data in the worksheet, the data in the form will not automatically be reflected to show the changed data. As defined, our example would necessitate us defining a scheme for manually notifying the UserForm that the worksheet had changed. Can you think of a way that we might update the PersonalData UserForm if the worksheet changed? (Here is a hint: Think about the behavior of the Worksheet Change event.)
Summary
In this chapter, we demonstrated how to create and use modal and modeless forms. The examples demonstrated how to refer to the data by using ranges in a worksheet or by copying data from those ranges. Several event handlers demonstrated how to add and delete data from a spreadsheet, treating the spreadsheet like a database.
In all candor, a spreadsheet is great for managing data and numbers in cells but is a weaker database. The difficulty is that database technology has evolved greatly in the last decade or so, and validation, constraints, complex relationships, indexing, search capabilities, and much more are things supported by a database. If you really need data management capabilities then we encourage you to look at Microsoft's Access. There are other database providers, but the VBA you learned in Excel works in Access.
Additionally, Excel and Access can talk to each other via the VBA language. So, consider Access for managing non-numerical data and Excel for number crunching. You know if you need to you can create forms and manage things like names and addresses in Excel, but Access will do a better job with less effort on your part. For raw number crunching, Excel is superlative.
The beauty of Microsoft Office is that the applications in Office represent some of the most powerful and complete components in each of their respective classes. In addition, they all talk to each other through a common language, VBA. If Excel is understood to be a powerful number crunching engine that is also a big component then you know that Excel can be used to build stand-alone solutions replete with forms or as a powerful math engine for enterprise solutions.