
14
Customizing the VBE
There is an object library provided that is shown as Microsoft Visual Basic for Applications Extensibility 5.3 in the VBE's Tools ![]() References list. The objects in this library and their methods, properties, and events enable us to:
References list. The objects in this library and their methods, properties, and events enable us to:
- Programmatically create, delete, and modify the code, UserForms, and references in our own, and other workbooks
- Program the VBE itself, to create useful Addins to assist us in our development efforts and automate many of your development tasks
Between Office 97 and Office 2000, the Click event was added to the CommandBarButton object, which is used to respond to the user clicking the buttons that we add to the VBE's commandbars. The Addin will not, therefore work in Office 97, although all of the code that manipulates the VBE and its objects is still applicable.
The one difference introduced between Excel 2000 and Excel 2002 is related to security. Macro viruses work by using the methods shown in this chapter to modify the target file's code, thus infecting it. To prevent this, Microsoft has made it possible to disable access to all workbooks VBProjects. By default, access is disabled, so none of the code in this chapter will work. To enable access to the VBProjects, check the Trust Access to Visual Basic Project check box on Excel 2003's Tools ![]() Macros
Macros ![]() Security
Security ![]() Trusted Sources dialog box.
Trusted Sources dialog box.
This chapter explains how to write code to automate the VBE by walking you through the development of a VBE Toolkit to speed up your application development. You will then add a few utilities to the toolkit that demonstrate how to programmatically manipulate code, UserForms, and references. For simplicity, most of the code examples in this chapter have not been provided with error handling.
Identifying VBE Objects in Code
All the objects that form the VBE, and their properties and methods, are contained in their own object library. You need to create a reference to this library before you can use the objects, by switching to the VBE, selecting the menu item Tools ![]() References, checking the Microsoft Visual Basic for Applications Extensibility 5.3 library, as shown in Figure 14-1, and clicking OK.
References, checking the Microsoft Visual Basic for Applications Extensibility 5.3 library, as shown in Figure 14-1, and clicking OK.

Figure 14-1
In code, this library is referred to as the VBIDE object library.
The full VBIDE Object Model is documented in Appendix B. The more important objects are summarized next.
The VBE Object
The top-level object of the Visual Basic Editor is known as the VBE object and is itself a property of the Excel Application object. Hence, to create an object variable to refer to the VBE, we need code such as:
Dim VBE As VBIDE.VBE
Set VBE = Application.VBE
The VBProject Object
This object is the container for all the “programming” aspects of a workbook, including UserForms, standard modules, class modules, and the code behind each worksheet and the workbook itself. Each VBProject corresponds to one of the top-level items in the Project Explorer. A specific VBProject object can be located either by iterating through the VBE's VBProjects collection, or through the VBProject property of a workbook.
To find the VBProject that corresponds to the workbook Book1.xls, the following code can be used:
Dim project As VBIDE.VBProject
Set project = Workbooks(“Book1.xls”).VBProject
When creating Addins for the VBIDE itself, we often need to know which project is currently highlighted in the Project Explorer. This is given by the ActiveVBProject property of the VBE:
Dim project As VBIDE.VBProject
Set project = Application.VBE.ActiveVBProject
Note that the ActiveVBProject is the project that the user is editing within the VBE. It is not related in any way to the ActiveWorkbook given by Excel. In fact, since the Developer Edition of Office 2000, it is possible to create self-contained VB Projects that are not part of an Excel workbook.
The VBComponent Object
The UserForms, standard modules, class modules, and code modules behind the worksheets and workbook are all represented as VBComponent objects in the extensibility model. Each VBComponent object corresponds to one of the lower-level items in the Project Explorer tree. A specific VBComponent can be located through the VBComponents collection of a VBProject. Hence, to find the VBComponent that represents the UserForm1 form in Book1.xls, code like this can be used:
Dim component As VBIDE.VBComponent
Set component = Workbooks(“Book1.xls”).VBProject.VBComponents(“UserForm1”)
The name of the VBComponent that contains the code behind the workbook, worksheets, and charts is given by the CodeName property of the related Excel object (the workbook, worksheet, or chart object). Hence, to find the VBComponent for the code behind the workbook (where code can be written to hook into workbook events), this code can be used:
Dim component As VBIDE.VBComponent

Set component = Workbooks(“Book1.xls”).VBProject.VBComponents( _
  Workbooks(“Book1.xls”).CodeName)
MsgBox component.Name
Dim component As VBIDE.VBComponent
Dim aWorkbook As Workbook
Set aWorkbook = Workbooks(“Book1.xls”)
Set component = aWorkbook.VBProject.VBComponents( _
   aWorkbook.Worksheets(“Sheet1”).CodeName)
MsgBox component.Name
Note that the name of the workbook's VBComponent is usually “ThisWorkbook” in the Project Explorer. Do not be tempted to rely on this name. If your user has chosen a different language for the Office User Interface, it will be different. The name can also be easily changed by the user in the VBE. For this reason, do not use code such as:
Dim component As VBIDE.VBComponent

With Workbooks(“Book1.xls”)
   Set component = .VBProject.VBComponents(“ThisWorkbook”)
End With
When developing Addins for the VBE, you often need to know the VBComponent that the user is editing (the one highlighted in the Project Explorer). This is given by the SelectedVBComponent property of the VBE:
Dim component As VBIDE.VBComponent
Set component = Application.VBE.SelectedVBComponent
Each VBComponent has a Properties collection, corresponding approximately to the list shown in the Properties Window of the VBE when a VBComponent is selected in the Project Explorer. One of these is the Name property, shown in the following test routine:
Public Sub ShowNames()
  With Application.VBE.SelectedVBComponent
    Debug.Print .Name & “: ” & .Properties(“Name”)
  End With
End Sub
For most VBComponent objects, the text returned by .Name and .Properties(“Name”) is the same. However, for the VBComponent objects that contain the code behind workbooks, worksheets, and charts, .Properties(“Name”) gives the name of the Excel object (the workbook, worksheet or chart). You can use this to find the Excel object that corresponds to the item that the user is working on in the VBE or the Excel workbook that corresponds to the ActiveVBProject. The code for doing this is shown later in this chapter.
The CodeModule Object
All of the VBA code for a VBComponent is contained within its CodeModule object. Through this object you can programmatically read, add, change, and delete lines of code. There is only one CodeModule for each VBComponent. Every type of VBComponent has a CodeModule, though this may not be the case in the future versions. For example, you may get a tool to help design, execute and debug SQL queries that only has a graphical interface, like MS query, but does not have any code behind it.
The CodePane Object
This object gives us access to the user's view of a CodeModule. Through this object you can identify such items as the section of a CodeModule that is visible on the screen, and the text that the user has selected. You can identify which CodePane is currently being edited by using the VBE's ActiveCodePane property:
Dim codePane As VBIDE.codePane
Set codePane = Application.VBE.ActiveCodePane
MsgBox codePane.TopLine
For example, the preceding code will display the top, visible line in the current code pane. If you have scrolled down the page, then the top line might actually be the 34th line in the module; this value would be displayed.
The Designer Object
Some VBComponents (such as UserForms) present both code and a graphical interface to the developer. While the code is accessed through the CodeModule and CodePane objects, the Designer object gives you access to the graphical part. In the standard versions of Office, UserForms are the only components with a graphical interface for you to control. However, the Developer Editions include a number of other items (such as the Data Connection Designer), which have graphical interfaces; these too are exposed to us through the Designer object.
These preceding objects are the main objects that we'll be using throughout the rest of this chapter, as we create our VBE Toolkit Addin.
Starting Up
There is very little difference in Excel 2003 between a workbook Addin and a COM Addin. The code and UserForms can be modified in the same manner, and they both offer the same level of protection (locking the Project from view). The two advantages of using a COM Addin to hold your tools are that the source is invisible within the Excel User Interface, and that it can be loaded using Excel's Tools ![]() Addins menu (though each activated Addin will slow down Excel's startup as it is loaded). This chapter uses the term “Addin” to mean a container for tools that you're adding to Excel or the VBE. In fact, during the development of the Addin, you will actually keep the file as a standard workbook, only converting it to an Addin at the end.
Addins menu (though each activated Addin will slow down Excel's startup as it is loaded). This chapter uses the term “Addin” to mean a container for tools that you're adding to Excel or the VBE. In fact, during the development of the Addin, you will actually keep the file as a standard workbook, only converting it to an Addin at the end.
This is the basic structure our Addin will have:
- We will add a startup module to trap the opening and closing of the Addin
- We will add some code to add our menu items to the commandbars on opening and remove them when closing
- We will add a class module to handle the menu items' Click events
- And, we'll add some code to perform custom menu actions.
To begin, open a new workbook and delete all of the worksheets apart from the Sheet1. Press Alt+F11 to switch to the VBE, and find your workbook in the Project Explorer. Select the VBProject entry for it. In the Properties Window, change the project's name to VBETools. Add a new module to the project, give it the name of Common and type in the following code, which will be tasked to run when the workbook is opened and closed:
Option Explicit
Option Compare Text

Public Const AddinID As String    = “VBETools”
Public Const Title As String =    “VBE Tools”

Sub Auto_Open()
  SetUpMenus
End Sub

Sub Auto_Close()
  RemoveMenus
End Sub
The Auto_Open and Auto_Close procedures just call some other routines (which will be created in the following section) to add to and remove the menus and menu items from the VBE commandbars. A global constant has also been defined to uniquely identify our Addin's menus, and another to use as a standard title for the Addin's message boxes.
Adding Menu Items to the VBE
The VBE uses the same commandbar code as the rest of the Office suite, so the procedure for adding your own menus to the VBE is very little different from the examples provided in Chapter 26. There is one major difference, which is how to run your routine when the menu item is clicked. When adding menu items to Excel, we set the CommandBarButton's OnAction property to the name of the procedure to run. In the VBE, CommandBarButtons still have an OnAction property, but it is ignored.
Instead, MS has added the Click event to the CommandBarButton (and the Change event to the CommandBarComboBox). In order to use these events, we have to use a class module containing a variable of the correct type declared with WithEvents. To prepare a variable to respond to commandbar events, add a class module to the project, give it the name of CommandBarEventsClass and add the following implementation for the CommandBarEvents Click event:
Private WithEvents CommandBarEvents As CommandBarButton

Private Sub CommandBarEvents_Click(ByVal Ctrl As Office.CommandBarButton, _
  CancelDefault As Boolean)
  On Error Resume Next
  Application.Run Ctrl.OnAction
  CancelDefault = True
End Sub
The key things to note here are:
- An object, CommandBarEvents, is declared to receive the Click event for the menu items.
- The Click event is raised by the CommandBarButtonEvents object (the only one exposed by it).
- The Click event passes the Ctrl object (the menu item or toolbar button) that was clicked.
- The code runs the routine specified in the control's OnAction property. The code is simulating the behavior that occurs when adding menu items to Excel's menus.
Here is some code that declares a reference to the CommandBarEventsClass. We create an instance of this class and associate the AboutMe event handler with the class's CommandBarEvents public variable:
Dim Events As CommandBarEventsClass

Public Sub AddMenu()
  Dim AddinBar As CommandBar
  Dim Button As CommandBarButton

  Set AddinBar = Application.VBE.CommandBars.FindControl(ID:=30038).CommandBar
  Set Button = AddinBar.Controls.Add(msoControlButton)

  Button.Caption = “About My Addin”
  Button.Tag = “MyAddin”
  Button.OnAction = “AboutMe”

  Set Events = New CommandBarEventsClass

  Set Events.CommandBarEvents = Button

End Sub

Sub AboutMe()
  MsgBox “About Me”
End Sub
In order to use this class, we have to hook it up to any CommandBarButtons we add, using the previous code, which can be typed into a new standard module. When we hook the event handler to the CommandBarButton in this way, we're actually linking the event handler (the CommandBarEvents variable in the CommandBarEventsClass class) to the button'ss .Tag property:
Option Explicit
Dim Events As CommandBarEventsClass

Public Sub AddMenu2()
Dim AddinBar As CommandBar
Dim Button As CommandBarButton

Set AddinBar = Application.VBE.CommandBars.FindControl(ID:=30038).CommandBar
Set Button = AddinBar.Controls.Add(msoControlButton)

Button.Caption = “About My Addin”
Button.Tag = “MyAddin”
Button.OnAction = “AboutMe”

Set Events = New CommandBarEventsClass
Set Events.CommandBarEvents = Button

Set Button = AddinBar.Controls.Add(msoControlButton)

Button.Caption = “About My Addin Too”
Button.Tag = “MyAddin”
Button.OnAction = “AboutMeToo”

End Sub

Sub AboutMe()
  MsgBox “About Me”
End Sub

Sub AboutMeToo()
  MsgBox “About Me Too”
End Sub
All buttons that have the same Tag will also fire the Click event in the single instance of our CommandBarEventsClass class, as shown in the preceding example, where we're just adding a “Me Too” button. The clicks of both buttons are handled by the single Events object. Note that the previous code is not part of our VBE Toolkit Addin, so delete the module before continuing.
Table-Driven Menu Creation
Very few professional Excel developers write code to add their menu items one-by-one. Most use a table-driven approach, whereby a table is filled with information about the menu items we want to add, before a routine generates all the menu items based on this table. The same technique will be used here. Using a table-drive approach has the following advantages:
- The same menu-creation code can be reused in different projects.
- It is much easier and quicker to add lines to a table than to modify code.
- It is much easier to see the resulting menu structure by examining the table than to trace through the equivalent code.
The first thing that is needed is a table for the menu information. In Excel, rename the worksheet in our example workbook to MenuTable and fill out the sheet as shown in Figure 14-2.
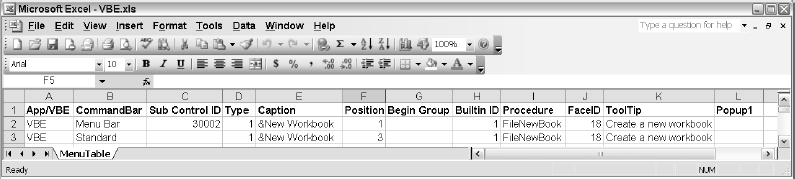
Figure 14-2
The columns of the MenuTable are:
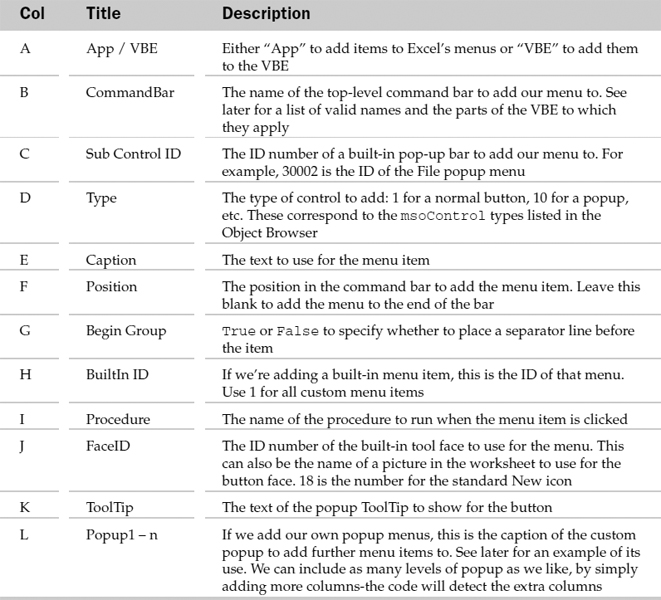
The names for each of the top-level commandbars in the VBE (i.e. the names to use in column B of the menu table) are shown in the following table. Note that Excel should always recognize these names, regardless of the user's choice of language for the Office User Interface (apart from a few rare exceptions, such as the Dutch menus, in which case we'll get a runtime error). The same is not true for the menu items placed on these toolbars. The only language-independent way to locate specific built-in menu items is to use their ID number. A routine to list the ID numbers of built-in menu items is provided in Chapter 26.
As this sheet will be referred to a number of times in code, it is a good idea to give it a meaningful “code name,” such as MenuTable. To do this, locate and select the sheet in the Project Explorer in the VBE, probably shown as Sheet1 (MenuTable), and change its name in the Properties window. It should now be shown as MenuTable (MenuTable) in the Project Explorer. Using the code name allows you to refer directly to that sheet as an object, so the following two lines are equivalent:
Debug.Print ThisWorkbook.Worksheets(“MenuTable”).Name
Debug.Print MenuTable.Name
The code to create the menus from this table is shown next. The code should be copied into a new module called SetupCommandBars.
At the top of the module, a number of constants are declared, which correspond to each column of the menu table, and we will use these throughout the code. If the menu table structure changes, all you need to do is renumber these constants—you don't need to search through the code:
Option Explicit
Option Compare Text

Const TABLE_APP_VBE          As Integer = 1
Const TABLE_COMMANDBAR_NAME  As Integer = 2
Const TABLE_CONTROL_ID       As Integer = 3
Const TABLE_CONTROL_TYPE     As Integer = 4
Const TABLE_CONTROL_CAPTION  As Integer = 5
Const TABLE_CONTROL_POSITION As Integer = 6
Const TABLE_CONTROL_GROUP    As    Integer = 7
Const TABLE_CONTROL_BUILTIN  As    Integer = 8
Const TABLE_CONTROL_PROC     As Integer = 9
Const TABLE_CONTROL_FACEID   As Integer = 10
Const TABLE_CONTROL_TOOLTIP  As Integer = 11
Const TABLE_POPUP_START      As Integer = 12

Dim Events As CommandBarEventsClass
As explained just now, the Click event for all our commandbars can be routed through a single instance of our event handler, by ensuring they all share the same Tag string.
Public Sub SetUpMenus()
  Dim aRange As Range
  Dim items As CommandBars
  Dim item As CommandBar
  Dim control As CommandBarControl
  Dim builtInId As Integer
  Dim column As Integer
  Dim data As Variant

  On Error Goto Catch

  RemoveMenus

  For Each aRange In MenuTable.Cells(1).CurrentRegion.Rows
    If aRange.row > 1 Then
      data = aRange.Value
      Set item = Nothing
The routine to actually set up the menus is called from our Addin's Auto_Open procedure:
If data(1, TABLE_APP_VBE) = “VBE” Then
  Set items = Application.VBE.CommandBars
Else
  Set items = Application.CommandBars
End If

Set item = items.item(data(1, TABLE_COMMANDBAR_NAME))

If item Is Nothing Then
  Set item = items.Add(name:=data(1, TABLE_COMMANDBAR_NAME), _
    temporary:=True)
End If
A single routine can be used to add menu items to both the Excel and VBE menus. The only difference is whether we are referring to Excel's CommandBars collection or the VBE's CommandBars collection:
If Not IsEmpty(data(1, TABLE_CONTROL_ID)) Then
  Set item = item.FindControl(ID:=data(1, TABLE_CONTROL_ID), _
    Recursive:=True).CommandBar
End If
For column = TABLE_POPUP_START To UBound(data, 2)
    If Not IsEmpty(data(1, column)) Then
      Set item = item.Controls(data(1, column)).CommandBar
    End If
Next

builtInId = data(1, TABLE_CONTROL_BUILTIN)

If builtInId = 0 Then builtInId = 1

If IsEmpty(data(1, TABLE_CONTROL_POSITION)) Or _
  data(1, TABLE_CONTROL_POSITION) > item.Controls.Count Then

  Set control = item.Controls.Add(Type:=data(1, TABLE_CONTROL_TYPE), _
    ID:=builtInId, temporary:=True)
Else
  Set control = item.Controls.Add(Type:=data(1, TABLE_CONTROL_TYPE), _
    ID:=builtInId, temporary:=True, before:=data(1, TABLE_CONTROL_POSITION))
End If

control.Caption = data(1, TABLE_CONTROL_CAPTION)
control.BeginGroup = data(1, TABLE_CONTROL_GROUP)
control.TooltipText = data(1, TABLE_CONTROL_TOOLTIP)
If you want to add your control to a built-in popup menu, you can recursively search for it in the CommandBars collection. For example, if you wanted to add a menu item to the Format ![]() Make same size menu, you can specify the ID of the Make same size menu (32790) in the SubControlID column of the table:
Make same size menu, you can specify the ID of the Make same size menu (32790) in the SubControlID column of the table:
If Not IsEmpty(data(1, TABLE_CONTROL_FACEID)) Then
  If IsNumeric(data(1, TABLE_CONTROL_FACEID)) Then
    control.FaceId = data(1, TABLE_CONTROL_FACEID)
  Else
    MenuTable.Shapes(data(1, TABLE_CONTROL_FACEID)).CopyPicture
    control.PasteFace
  End If
End If

control.Tag = AddinID
control.OnAction = “'” & ThisWorkbook.name & “'!” & _
  data(1, TABLE_CONTROL_PROC)
You can either use one of the standard Office tool faces, by supplying the numeric FaceID, or provide your own picture to use. To use your own picture, just give the name of the Picture object in the FaceID column of the menu table. The picture should be 32 × 32 pixels for the small icon view, or 64 × 64 pixels when viewing large icons:
If builtInId = 1 And data(1, TABLE_APP_VBE) = “VBE” Then
        If Events Is Nothing Then
          Set Events = New CommandBarEventsClass
          Set Events.CommandBarEvents = control
        End If
      End If
    End If
  Next
  Exit Sub
Catch:
  MsgBox Err.Description
End Sub
(If you get an error indicating that “Programmatic access to Visual Basic Projects is not trusted” then in Excel select Tools ![]() Options
Options ![]() Security and on the Security tab click Macro Security, change to the Trusted Publishers tab and check “Trust access to Visual Basic Project”.) This is the code that sets up the menu event handler. It only needs to be done once, as it will respond to the Click events raised by all our buttons.
Security and on the Security tab click Macro Security, change to the Trusted Publishers tab and check “Trust access to Visual Basic Project”.) This is the code that sets up the menu event handler. It only needs to be done once, as it will respond to the Click events raised by all our buttons.
When the Addin is closed, you need to run some code to remove the menus from the VBE. Some developers just use CommandBars.Reset, but this removes all other customizations from the commandbars as well as their own. It is much better programming etiquette to locate all the menu items and commandbars that were created for your Addin and delete them. This takes two routines. The first removes all the menus from a specific CommandBars collection, by searching for its Tag:
Private Sub RemoveMenusFromBars(ByVal items As CommandBars)
  Dim control As CommandBarControl

  On Error Resume Next
  Set control = items.FindControl(Tag:=AddinID)

  Do Until control Is Nothing
    control.Delete
    Set control = items.FindControl(Tag:=AddinID)
  Loop
End Sub
The second removal routine calls the first to remove the menu items from the Excel commandbars and the VBE commandbars, removes any custom bars that might have been created, and clears the module-level event handler:
Public Sub RemoveMenus()
  Dim aCommandBar As CommandBar
  Dim aRange As Range
  Dim name As String

  On Error Resume Next

  Call RemoveMenusFromBars(Application.CommandBars)
  Call RemoveMenusFromBars(Application.VBE.CommandBars)

  For Each aRange In MenuTable.Cells(1).CurrentRegion.Rows

    If aRange.row > 1 Then
      name = aRange.Cells(1, TABLE_COMMANDBAR_NAME)
      Set aCommandBar = Nothing
      If aRange.Cells(1, TABLE_APP_VBE) = “VBE” Then
        Set aCommandBar = Application.VBE.CommandBars(name)
      Else
        Set aCommandBar = Application.CommandBars(name)
      End If

      If Not aCommandBar Is Nothing Then
        If Not aCommandBar.BuiltIn Then
          If aCommandBar.Controls.Count = 0 Then aCommandBar.Delete
        End If
      End If
    End If
  Next

  Set Events = Nothing
End Sub
You now have a complete template, which can be used as the basis for any Excel or VBE Addin (or just in a normal workbook where you want to modify the menu structure).
Let's add this procedure and test the Addin. Add a new module called MenuFile and copy in the following code. We will be adding more file-related routines to this module later:
Public Sub FileNewBook()
  On Error Resume Next
  Application.Workbooks.Add

  Application.VBE.MainWindow.Visible = False
  Application.VBE.MainWindow.Visible = True
End Sub
The FileNewWorkbook method just adds a new blank workbook and refreshes the VBE display. Note that the VBE Project Explorer does not always update correctly when workbooks are added and removed through code. The easiest way to refresh the VBE display is to hide and then reshow the main VBE window.
First, check that the Addin compiles, using the Debug ![]() Compile menu. If any compile errors are highlighted, check your code against the previous listings. To run the Addin, click Tools
Compile menu. If any compile errors are highlighted, check your code against the previous listings. To run the Addin, click Tools ![]() Macros, select the Auto_Open procedure and click the Run button. If all goes well, a new menu item will be added to the VBE File menu and a standard New icon will appear on the VBE toolbar, just to the left of the Save icon (see Figures 14-3 and 14-4).
Macros, select the Auto_Open procedure and click the Run button. If all goes well, a new menu item will be added to the VBE File menu and a standard New icon will appear on the VBE toolbar, just to the left of the Save icon (see Figures 14-3 and 14-4).
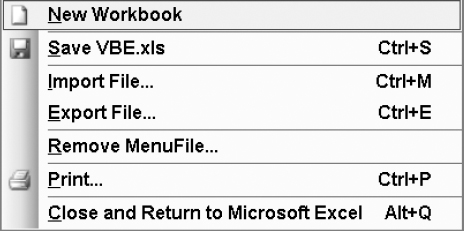
Figure 14-3

Figure 14-4
When you click the button, a new workbook will be created in Excel and you will see its VBProject added to the Project Explorer. Congratulations, you have successfully customized the VBE.
Displaying Built-in Dialogs, UserForms, and Messages
The ability to save a workbook from the VBE is built in to Office 2003, but you have also added the ability to create new workbooks. For a full complement of file operations, you need to add routines to open and close workbooks as well. Adding a “Most Recently Used” list to the VBE is left as an exercise for the reader.
By the end of this chapter, you'll have functionality within the VBE to:
- Create a new workbook
- Open an existing workbook
- Save a workbook (this is built into the VBE)
- Close a workbook
- Display a workbook's Properties dialog box
For the Open routine, another menu item will be added to the File menu, and another standard button to the toolbar. For the Close routine, an item will once again be added to the File menu, but it will also be added to the Project Explorer popup menu, allowing you to close a VBProject by right-clicking it in the Project Explorer. Figure 14-5 shows additions to the menu table that will achieve this.
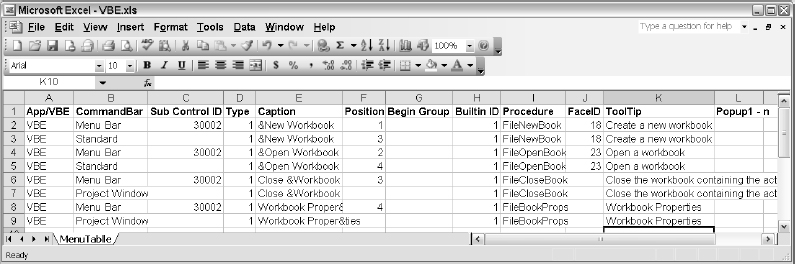
Figure 14-5
Note that the Close menu does not have a standard image, so the FaceID column has been left empty, and by not specifying a position, it is added to the bottom of the Project Explorer popup menu.
To accurately simulate Excel's functionality, a test should be made to see if the Shift key is held down when the menu button is clicked, and turn off any events if this is the case. Holding the Shift key when a workbook is opened used to kill a subroutine (see MS KnowledgeBase article Q175223 for the gory details at http://support.microsoft.com/support/kb/articles/Q175/2/23.asp), but this problem appears to have been fixed in Excel 2003. The best that can be done is to use the Ctrl key for the same effect. Back in the Common module, add the following declaration at the top:
Private Declare Function GetAsyncKeyState Lib “user32” (ByVal vKey As Long) As Integer
This tells VBA about a function available in the Windows API-see Chapter 16 for more information about calling Windows API methods. At the bottom of the Common module, add the following function:
Public Function GetShiftCtrlAlt() As Integer
  Dim Keys As Integer

  Const VK_SHIFT As Long = &H10
  Const VK_CONTROL As Long = &H11
  Const VK_ALT As Long = &H12

  'Check to see if the Shift, Ctrl and Alt keys are pressed
  If GetAsyncKeyState(VK_SHIFT) <> 0 Then Keys = Keys + 1
  If GetAsyncKeyState(VK_CONTROL) <> 0 Then Keys = Keys + 2
  If GetAsyncKeyState(VK_ALT) <> 0 Then Keys = Keys + 4

  GetShiftCtrlAlt = Keys
End Function
For the Open routine, Excel's GetOpenFilename method will be used to retrieve the name of a file, and then open it. If the user holds down the Ctrl key, the application events will be turned off, so that the user can open the workbook without triggering any other code-either within the workbook being opened, or Excel's own Workbook_Open event. If the user is not holding down the Ctrl key, an attempt is made to run any Auto_Open routines in the workbook:
Public Sub FileOpenBook()
  Dim FileName As Variant
  Dim IsControlKeyPressed As Boolean
  Dim aWorkbook As Workbook

  On Error GoTo Catch

  IsControlKeyPressed = (GetShiftCtrlAlt And 2) = 2
  Application.Visible = False
  FileName = Application.GetOpenFilename
  Application.Visible = True

  If Not (FileName = False) Then
    If IsControlKeyPressed Then
      Application.EnableEvents = False

      Set aWorkbook = Workbooks.Open(FileName:=FileName, _ UpdateLinks:=0, AddToMru:=True)
      Application.EnableEvents = True
    Else
      Set aWorkbook = Workbooks.Open(FileName:=FileName, AddToMru:=True)
      aWorkbook.RunAutoMacros xlAutoOpen
    End If
  End If

  Application.VBE.MainWindow.Visible = False
  Application.VBE.MainWindow.Visible = True
  Exit Sub

Catch:
  Application.Visible = False
  MsgBox Err.Description, vbCritical
  Application.Visible = True
End Sub
Whenever a dialog box is used that would normally be shown in the Excel window (including the built-in dialog boxes, any UserForms, and even MsgBox and InputBox calls), Excel automatically switches to its own window to show the dialog box. When developing applications for the VBE, however, we really want the dialog box to appear within the VBE window, not Excel's. The easiest way to achieve this effect is to hide the Excel window before showing the dialog box then unhide it afterwards:
Public Function ActiveProjectBook() As Workbook
  Dim project As VBIDE.VBProject
  Dim component As VBIDE.VBComponent
  Dim name As String

  On Error GoTo Finally

  Set project = Application.VBE.ActiveVBProject

  If project.Protection = vbext_pp_locked Then
    name = project.FileName

    If InStrRev(name, “”) <> 0 Then
      name = Mid(name, InStrRev(name, “”) + 1)

      If IsWorkbook(name) Then
        Set ActiveProjectBook = Workbooks(name)
        Exit Function
      End If
    End If
  Else
    For Each component In project.VBComponents
      If component.Type = vbext_ct_Document Then
        name = component.Properties(“Name”)
        If IsWorkbook(name) Then
          If Workbooks(name).VBProject Is project Then
            Set ActiveProjectBook = Workbooks(name)
            Exit Function
          End If
        End If
      End If
    Next
  End If

Finally:
  Application.Visible = False
  MsgBox “Workbook not found”, vbExclamation
  Application.Visible = True

  Set ActiveProjectBook = Nothing
End Function
The Close routine presents us with a new challenge. We are adding a Close Workbook menu item to the popup menu for the Project Explorer, and hence need to determine which VBProject was clicked. The ActiveVBProject property of the VBE provides this, but a way is needed to get from the VBProject object to the workbook containing it. The method for doing this was described in the Identifying VBE Objects in Code section at the start of this chapter and the code is shown next. Add the following code to the Common module, along with the Auto_Open and end function:
Auto_Close routines, as you will be using these    behaviors later:
Public Function IsWorkbook(ByVal book As String) As Boolean

  On Error GoTo Catch
  IsWorkbook = Workbooks(book).name <> “”
  Exit Function

Catch:
  IsWorkbook = False
Note that the Excel window is being hidden before displaying our error message, and is “unhidden” afterwards. The following routine is needed to check if the result is the name of a workbook:
Public Sub FileCloseBook()
  Dim aWorkbook As Workbook
  Dim isCtrlKeyPress As Boolean

  On Error GoTo Catch

  Set aWorkbook = ActiveProjectBook
  If aWorkbook Is Nothing Then Exit Sub

  isCtrlKeyPress = (GetShiftCtrlAlt And 2) = 2

  If isCtrlKeyPress Then
    Application.EnableEvents = False
    aWorkbook.Close
    Application.EnableEvents = True
  Else
    aWorkbook.RunAutoMacros xlAutoClose
    aWorkbook.Close
  End If
  Exit Sub

Catch:
  Application.Visible = False
  MsgBox Err.Description, vbCritical
  Application.Visible = True
End Sub
Now that you can get the workbook that corresponds to the active VB Project, you can use it in the Close routine, which should be added to the MenuFile module:
Public Sub FileBookProps()
  Dim aWorkbook As Workbook
  Dim IsAddin As Boolean
  Dim IsVisible As Boolean

  On Error Resume Next
  Set aWorkbook = ActiveProjectBook
  If aWorkbook Is Nothing Then Exit Sub

  Application.Visible = False
  IsAddin = aWorkbook.IsAddin
  aWorkbook.IsAddin = False

  IsVisible = aWorkbook.Windows(1).Visible
  aWorkbook.Windows(1).Visible = True
  Application.Dialogs(xlDialogProperties).Show
  aWorkbook.Windows(1).Visible = IsVisible
  aWorkbook.IsAddin = IsAddin

  Application.Visible = True
End Sub
The last workbook-related tool to be defined displays the File Properties dialog box for the active VB Project's workbook. One of the main uses for the workbook properties is to provide the information shown in the Tools ![]() Addins dialog box. The list box shows the Addin's title from its Properties dialog box, while the description shown when an Addin is selected, is obtained from its Comments box.
Addins dialog box. The list box shows the Addin's title from its Properties dialog box, while the description shown when an Addin is selected, is obtained from its Comments box.
Excel's built-in Properties dialog box can be used for this, but we cannot tell it which workbook to show the properties for—the active workbook is used. Therefore, any Addins need to be temporarily converted to normal workbooks and “unhidden” if they are hidden. After showing the Properties dialog box, the workbooks must be converted back to Addins.
To test the Addin so far, just run the Auto_Open routine using Tools ![]() Macros to recreate our menu items, then check that each item works as intended.
Macros to recreate our menu items, then check that each item works as intended.
Note that attempting to close the Addin itself using the menu might cause the computer to lock up.
Working with Code
So far in this chapter, we have been working at a fairly high level in the VBIDE and Excel Object Models (limiting ourselves to the VBProject and Workbook objects), to add typical file operations to the Visual Basic environment. You now have the ability to create new workbooks (and hence their VB Projects), open existing workbooks, change a workbook's properties, and save and close workbooks from within the VBE.
In this section, we will plunge to the lowest level of the VBE Object Model and learn how to work with the user's code. We will limit ourselves to detecting the line of code the user is editing (and even identifying the selected characters within that line), and getting information about the procedure, module, and project containing that line of code. We will leave adding and changing code until the next section, where we'll be creating a UserForm, adding some buttons to it and adding code to handle the buttons' events.
To demonstrate how to identify the code that the user is working on, right-click access will be added to provide a print routine, with individual buttons to print the current selection, current procedure, module, or project. First some additional rows will be added to our menu table (see Figure 14-6).

Figure 14-6
The first thing to note is that we're adding our own cascading menu to the Code Window popup menu (type 10 is a custom popup menu), then adding four menu items to the cascading menu, each of which has its own face ID. The result is shown in Figure 14-7.
The code for the four printing routines will be placed into their own module, so add a new module to the project called MenuCode.
Unfortunately, the VBIDE Object Model does not include a Print method for any of its objects. To provide right-click printing, there are three options:
- Show the VBE's Print dialog box and operate it using SendKeys
- Copy the code to a worksheet range and print it from there
- Copy the code to a private instance of Word, reformat to show the Excel reserved words, etc. in their correct colors and then print it from Word
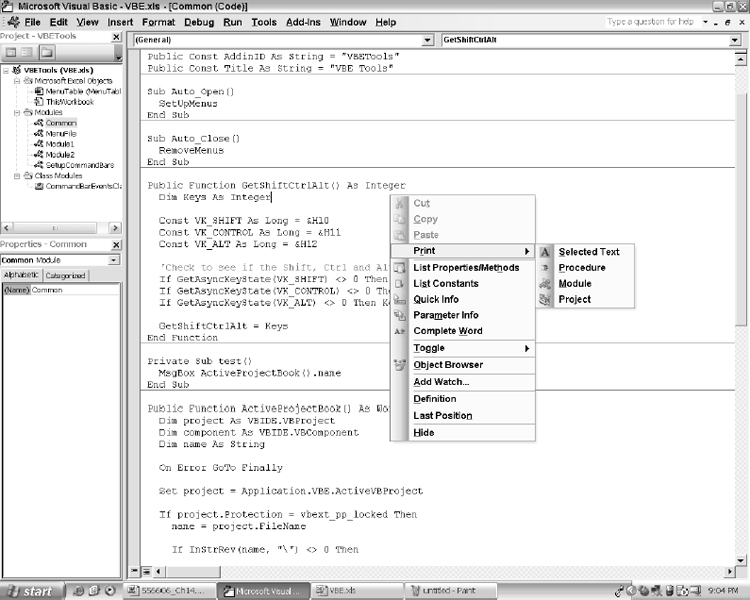
Figure 14-7
For the sake of simplicity, the first option will be implemented. The main problem that this presents is how to select the Selected Text, Module, or Project option buttons on the Print dialog box, using SendKeys, especially as the Selected Text option is only enabled when some text is actually selected.
The answer is to identify if any text is selected, then send the appropriate number of DownArrow keys to the dialog box to select either the Module or Project options. If we could rely on our users only ever having an English user interface language, we could send Alt+M or Alt+J keystrokes—sending DownArrows works with any choice of user interface language.
The code for the Selected Text menu item is the simplest and is presented next. All that is required is to identify if the user has actually selected anything and if so, to send some keystrokes to the Print dialog box to print it:
Option Explicit

Public Sub CodePrintSel()
  Dim StartLine As Long
  Dim StartColumn As Long
  Dim EndLine As Long
  Dim EndColumn As Long

  Application.VBE.ActiveCodePane.GetSelection StartLine, _ StartColumn, EndLine, EndColumn

  If StartLine <> EndLine Or StartColumn <> EndColumn Then
    Application.SendKeys “{ENTER}”
    Application.VBE.CommandBars.FindControl(ID:=4).Execute
  End If
End Sub
The main items to note are:
- The ActiveCodePane property of the VBE is being used to identify which module the user is editing.
- The variables sent to the GetSelection method are sent ByRef and actually get filled by the method. After the call to GetSelection, they contain the start and ending line numbers and start and ending columns of the currently selected text.
- A simple Enter keystroke is sent to the keyboard buffer. Then the VBE Print dialog box is immediately shown by running the File
 Print menu item (ID = 4) directly. This technique of running menu items directly is introduced in Chapter 17, in connection with the RunMenu routine presented there. By default (if some text is selected) when the VBE Print dialog box is shown, the Selected Text option is selected so this does not need to be changed:
Public Sub CodePrintMod()
  Dim StartLine As Long
  Dim StartColumn As Long
  Dim EndLine As Long
  Dim EndColumn As Long

  Application.VBE.ActiveCodePane.GetSelection StartLine, _ StartColumn, EndLine, EndColumn

  If StartLine <> EndLine Or StartColumn <> EndColumn Then
    Application.SendKeys “{DOWN}{ENTER}”
  Else
    Application.SendKeys “{ENTER}”
  End If

  Application.VBE.CommandBars.FindControl(ID:=4).Execute
End Sub

Public Sub CodePrintProj()
  Dim StartLine As Long
  Dim StartColumn As Long
  Dim EndLine As Long
  Dim EndColumn As Long

  Application.VBE.ActiveCodePane.GetSelection StartLine, _ StartColumn, EndLine, EndColumn
  If StartLine <> EndLine Or StartColumn <> EndColumn Then
    Application.SendKeys “{DOWN}{DOWN}{ENTER}”
  Else
    Application.SendKeys “{DOWN}{ENTER}”
  End If

  Application.VBE.CommandBars.FindControl(ID:=4).Execute
End Sub
To print the current module and project, very similar code can be used. The only difference is to check if any text is selected (that is, if the Selected Text option in the Print dialog box is enabled), then send a number of down keystrokes to the dialog box to select the correct option. Both of these routines can be added to the MenuCode module:
Public Sub CodePrintProc()
  Dim StartLine As Long
  Dim StartColumn As Long
  Dim EndLine As Long
  Dim EndColumn As Long
  Dim ProcedureType As Long
  Dim ProcedureName As String
  Dim ProcedureStart As Long
  Dim ProcedureEnd As Long

  With Application.VBE.ActiveCodePane
    .GetSelection StartLine, StartColumn, EndLine, EndColumn

    With .CodeModule
      If StartLine <= .CountOfDeclarationLines Then
        ProcedureStart = 1
        ProcedureEnd = .CountOfDeclarationLines
      Else
        ProcedureName = .ProcOfLine(StartLine, ProcedureType)
        ProcedureStart = .ProcStartLine(ProcedureName, ProcedureType)
        ProcedureEnd = ProcedureStart + _ .ProcCountLines(ProcedureName, ProcedureType)
      End If
    End With

    Call .SetSelection(ProcedureStart, 1, ProcedureEnd, 999)

    Application.SendKeys “{ENTER}”
    Application.VBE.CommandBars.FindControl(ID:=4).Execute
    DoEvents
    Call .SetSelection(StartLine, StartColumn, EndLine, EndColumn)
  End With
End Sub
The code to print the current procedure is slightly more complex, as the Print dialog box does not have a Current Procedure option. The steps we need to perform are:
- Identify and store away the user's current selection
- Identify the procedure (or declaration lines) containing the user's selection
- Expand the selection to encompass the full procedure (or all the declaration lines)
- Show the Print dialog box to print this expanded selection
- Restore the user's original selections
Doing this on some PCs raises an interesting issue—the final step of restoring the user's original selection sometimes gets run before the Print dialog box has been shown. This is presumably because the printing is done asynchronously. The easy fix is to include a DoEvents statement immediately after showing the Print dialog box, to let the print routine carry out its task. This will also yield control to the operating system, allowing it to process any pending or queued events.
The main item to note in this code is that the ProcOfLine method accepts the start line as input, fills the ProcedureType variable with a number to identify the procedure type (Sub, Function, Property Let, Property Get, or Property Set), and returns the name of the procedure. The procedure type and name are used to find the start of the procedure (using ProcStartLine) and the number of lines within the procedure (ProcCountLines), which are then selected and printed.
Working with UserForms
The code examples presented in this chapter so far have been extending the VBE, to provide additional tools for the developer. In this section, we move our attention to programmatically creating and manipulating UserForms, adding controls, and adding procedures to the UserForm's code module to handle the controls' events. While the example provided in this section continues to extend the VBE, the same code and techniques can be applied in end-user applications, including:
- Adding UserForms to workbooks created by the application
- Sizing the UserForm and moving and sizing its controls to make the best use of the available screen space
- Adding code to handle events in UserForms created by the application
- Changing the controls shown on an existing UserForm in response to user input
- Creating UserForms on-the-fly, as they are needed (for example, when the number and type of controls on the UserForm will vary significantly depending on the data to be shown)
The preceding techniques will be demonstrated by writing code to add a UserForm to the active project, complete with standard-sized OK and Cancel buttons, as well as code to handle the buttons' Click events and the UserForm's QueryClose event. The UserForm's size will be set to 2/3 of the width and height of the Excel window and the OK and Cancel buttons' position will be adjusted accordingly.
The example shown here is the difficult way to achieve the desired result, and is intended to be an educational, rather than a practical, example. The easy way to add a standardized UserForm is to create it manually and export it to disk as a .frm file, then import it using the following code (do not type this in)
Dim component As VBComponent
Set component = Application.VBE.ActiveVBProject. _ VBComponents.Import (“MyForm.frm”)
When you need to include it in another project, just import it again. The only advantage to doing it through code is that the UserForm can be given a size appropriate to the user's screen resolution and size, and its controls positioned correctly.
Start by adding another row to the menu table, which should now give you the screen shown in Figure 14-8.

Figure 14-8
The result of this addition will be the Standard Form item shown in Figure 14-9.
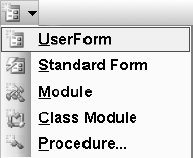
Figure 14-9
Add a new module for this routine, called MenuForm and copy in the following code:
Option Explicit
Option Compare Text

Private Declare Function LockWindowUpdate Lib “user32” _ (ByVal hwndLock As Long) As Long
Application.ScreenUpdating does not affect the VBE, and FormNewUserform results in quite a lot of screen activity as the form is sized and the controls are drawn. A simple Windows API call can be used to freeze the VBE window at the start of the routine and unfreeze it at the end. See Chapter 16 for more information about using this and other API functions:
Public Sub FormNewUserForm()
  Dim component As VBIDE.VBComponent
  Dim DesignForm As UserForm
  Dim Line As Long
  Dim Button As CommandBarButton
  Dim Popup As CommandBarPopup

  Const Gap As Double = 6
Microsoft's Windows design guidelines recommend a gap of 6 points (approximately four pixels) between buttons, and between a button and the edge of a form:
On Error GoTo Catch
This is one of the more complex routines in the Addin, so some error handling code will be added to it. Every routine in this chapter should really be given similar error-handling code:
LockWindowUpdate Application.VBE.MainWindow.Hwnd
We will use the Windows API call to freeze the VBE's window. Note that HWnd is a hidden property of the MainWindow object. To display the hidden properties for an object, open the Object Browser, right-click in its window, and click the Show Hidden Members item:
Set component = Application.VBE.ActiveVBProject.VBComponents.Add( _ vbext_ct_MSForm)
component.Properties(“Width”) = Application.UsableWidth * 2 / 3
component.Properties(“Height”) = Application.UsableHeight * 2 / 3
The VBComponent object (component in the code) provides the “canvas” (background) of the UserForm, its Properties collection, and its CodeModule. When a new UserForm is added to a project, a VBComponent object is passed back that contains the form. The VBComponent's Properties collection can be used to change the size (as shown in Figure 14-10), and change other properties like color, font, and caption of the form's background.

Figure 14-10
Set DesignForm = component.Designer

  With DesignForm
    With .Controls.Add(“Forms.CommandButton.1”, “OKButton”)
      .Caption = “OK”
      .Default = True
      .Height = 18
      .Width = 54
    End With

    With .Controls.Add(“Forms.CommandButton.1”, “CancelButton”)
      .Caption = “Cancel”
      .Cancel = True
      .Height = 18
      .Width = 54
    End With
The VBComponent's Designer object provides access to the content of the UserForm and is responsible for the area inside the form's borders and below its title bar. In this code, two controls are added to the normal blank UserForm, to provide standard OK and Close buttons. The name to use for the control (Forms.CommandButton.1 in this case) can be found by adding the control from Excel's Control Toolbox to a worksheet, then examining the resulting =EMBED function:
With .Controls(“OKButton”)
      .Top = DesignForm.InsideHeight - .Height - Gap
      .Left = DesignForm.InsideWidth - .Width *    2 - Gap * 2
    End With

    With .Controls(“CancelButton”)
      .Top = DesignForm.InsideHeight - .Height - Gap
      .Left = DesignerForm.InsideWidth - .Width    - Gap
    End With
End With
This could be extended to add listboxes, labels, checkboxes, and other controls. From this point on, you could just as easily be working with an existing UserForm, changing its size and the position and size of its controls to make the best use of the available screen resolution. The preceding code just moves the OK and Cancel buttons to the bottom-right corner of the UserForm, without adjusting their size. The same technique can be used to move and size all of a UserForm's controls.
Now that buttons have been added to the UserForm at the desired position, some code can be added to the UserForm's module to handle the buttons' and UserForm's events. In this example, the code is being added from strings. Alternatively, the code could be kept in a separate text file and imported into the UserForm's module:
.AddFromString “Sub OKButton_Click()”
We'll first add simple code for the OK and Cancel buttons' Click events. Code like this could be used to create the routine:
With component.CodeModule
  Line = .CreateEventProc(“Click”, “OKButton”)
  .InsertLines Line, “'Standard OK button handler”
  .ReplaceLine Line + 2, “ mbOK = True” & vbCrLf & “    Me.Hide”

  .AddFromString vbCrLf & _
  “'Standard Cancel button handler” & vbCrLf & _
  “Private Sub CancelButton_Click()” & vbCrLf & _
  “ mbOK = False” & vbCrLf & _
  “Me.Hide” & vbCrLf & _
  “End Sub”
However, if CreateEventProc is used, all of the procedure's parameters are filled in on our behalf. There is very little difference between the two techniques. Note that the CreateEventProc adds the 'Private Sub…' line, the 'End Sub' line, and a space between them. Do not type this code snippet into the Addin:
Private Sub OKButton_Click()

End Sub
CreateEventProc returns the number of the line in the module where the 'Private Sub…' was added, which is then used to insert a comment line and to replace the default blank line with the code:
Line = .CreateEventProc(“QueryClose”, “UserForm”)
    .InsertLines Line, “'Standard Close handler, treat same as Cancel”
    .ReplaceLine Line +2, “ CancelButton_Click”
    .CodePane.Window.Close
  End With

  LockWindowUpdate 0&
  Exit Sub

Catch:
The code for the UserForm's QueryClose event is the same as that of the Cancel button, so some code will be added just to call the CancelButton_Click routine:
Catch:
  LockWindowUpdate 0&
  Application.Visible = False
  MsgBox Err.Description, vbExclamation
  Application.Visible = True
End Sub
The standard error handler unfreezes the window, displays the error message and closes. Such error handling should be added to all the routines in the Addin.
The Addin is now complete. Switch back to Excel and save the workbook as an Addin (at the bottom of the list of available file types), with an .xla extension. Then, use Tools → Addins to install it.
Working with References
One of the major enhancements in recent versions of VBA is the ability to declare a reference to an external object library (using the Tools ![]() References dialog box), then use the objects defined in that library as if they were built into Excel. In this chapter, for example, you have been using the objects defined in the VBA Extensibility library without thinking about where they came from.
References dialog box), then use the objects defined in that library as if they were built into Excel. In this chapter, for example, you have been using the objects defined in the VBA Extensibility library without thinking about where they came from.
The term for this is “early binding,” so named because we are binding the external object library to our application at design-time. Using early binding gives the following benefits:
- The code is much faster, as all the links between the libraries have been checked and compiled
- The New operator can be used to create instances of the external objects
- All of the constants defined in the object library can be utilized, thus avoiding numerous “magic numbers” throughout the code
- Excel displays the Auto List Members, Auto Quick Info, and Auto Data Tips information for the objects while the application is being developed
This will be explained in more detail in Chapter 16.
There is, however, one minor inconvenience to early binding. If you try to run your application on a computer that does not have the external object library installed, you will get a compiletime error that cannot be trapped using standard error-handling techniques—usually showing a perfectly valid line of code as being the culprit. Excel will display the error when it runs some code in a module, which contains:
- An undeclared variable in a procedure—and you didn't use Option Explicit
- A declaration of a type defined in the missing object library
- A constant defined in the missing object library
- A call to a routine, object, method, or property defined in the missing object library
The VBIDE References collection provides a method of checking that all the application's references are functioning correctly, and that all the required external object libraries are installed, and are the correct version. The code to check this should be put in your Auto_Open routine and the module that contains the Auto_Open must not contain any code that uses the external object libraries. If there is a broken reference, it is unlikely that any other code will run, so the routine simply stops after displaying which references are missing. Typical Auto_Open code is:
Public Sub Auto_Open()
  Dim o As Object
  Dim IsBroken As Boolean
  Dim Description As String

  For Each o In ThisWorkbook.VBProject.References
    If o.IsBroken Then
      On Error Resume Next
      Description = “<Not known>”
      Description = o.Description
      On Error GoTo 0
      MsgBox “Missing reference to:” & vbCrLf & _
             “     Name: ” & Description & vbCrLf & _
             “     Path: ” & o.FullPath & vbCrLf & _
             “Please reinstall this file.”

      IsBroken = True
    End If
  Next

  If Not IsBroken Then
    ' SetupMenus
  End If
End Sub
Summary
The Microsoft Visual Basic for Applications Extensibility 5.3 object library provides a rich set of objects, properties, methods, and events for controlling the VBE itself. Using these objects, developers can create their own labor-saving Addins to help in their daily development tasks.
Many end-user applications can also utilize these objects to manipulate their own code modules, UserForms and references, to provide a feature-rich, flexible, and robust set of functionality.