
C
Office 2003 Object Model
Common Properties with Collections and Associated Objects
Most of the objects in the Office Object Model have objects with associated collections. The collection object is usually the plural form of the associated object. For example, the CommandBars collection holds a collection of CommandBar objects. For simplicity, each object and associated collection will be grouped together under the same heading.
In most cases, the purpose of the collection object is only to hold a collection of the same objects. The common properties of the collection objects are listed in the following section. Only unique properties, methods, or events will be mentioned in each object section.
Common Collection Properties

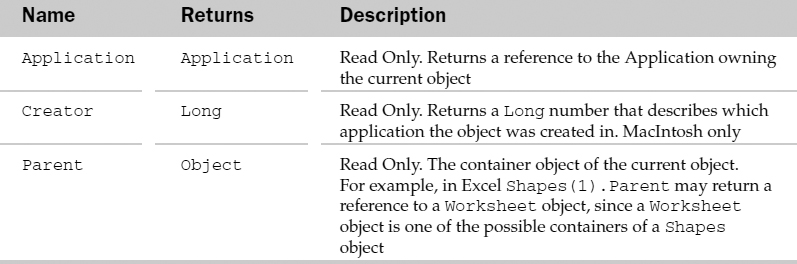
Common Object Properties
Objects also have some common properties. To avoid redundancy, the common properties of all objects are listed next. They will be mentioned in each object description as existing but are only defined here.
Office Objects and Their Properties and Events
The objects are listed in alphabetical order. Each object has a general description of the object and possible parent objects. This is followed by a table format of each of the object's properties and methods. The last section of each object describes some code examples of the object's use.
AnswerWizard Object
The AnswerWizard object is part of the AnswerWizardFiles collection. It's used to control which files are used when using the Answer Wizard dialog box.
AnswerWizard Common Properties
The Application, Creator, and Parent properties are defined at the beginning of this Appendix.
AnswerWizard Properties

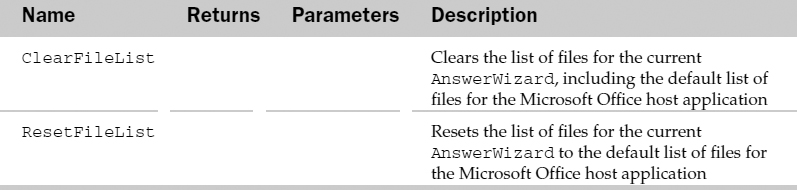
AnswerWizard Methods
AnswerWizardFiles Collection Object
A collection of references to Answer Wizard files: the AnswerWizardFiles collection contains all of the Answer Wizard files (with the file name extension .AW) available to the active Microsoft Office application.
AnswerWizardFiles Collection Common Properties
The Application, Count, Creator, and Parent properties are defined at the beginning of this Appendix.
AnswerWizardFiles Properties

AnswerWizardFiles Collection Methods

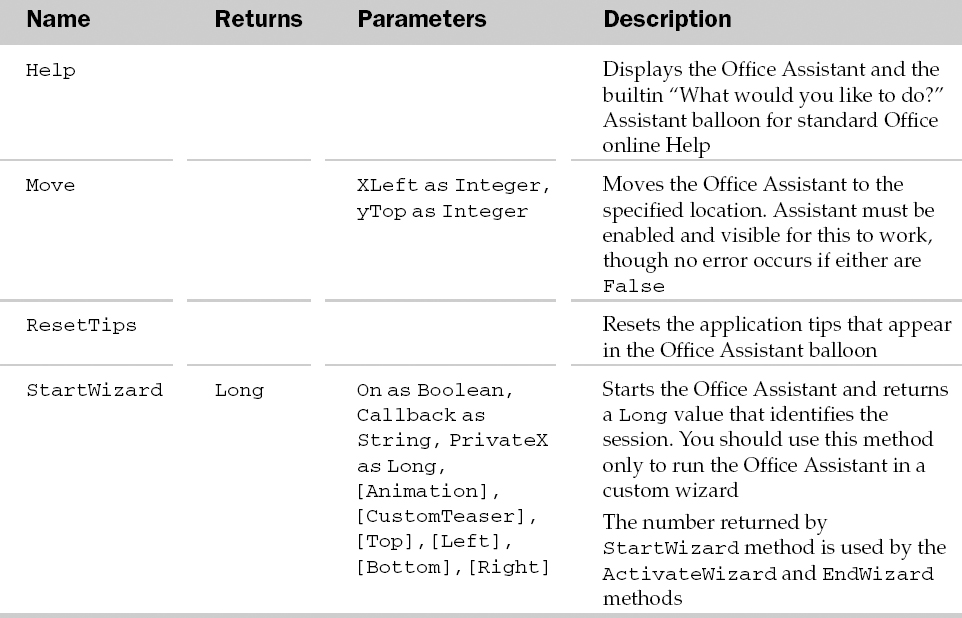
Assistant Object
The Assistant object controls how the Office Assistant appears and what it displays. For example, you can use the Assistant object to display your own custom messages as an alternative to the MsgBox function. Many of the Assistant's properties relate to the choices found in the Assistant's Options dialog box.
Assistant Common Properties
The Application, Creator, and Parent properties are defined at the beginning of this Appendix.
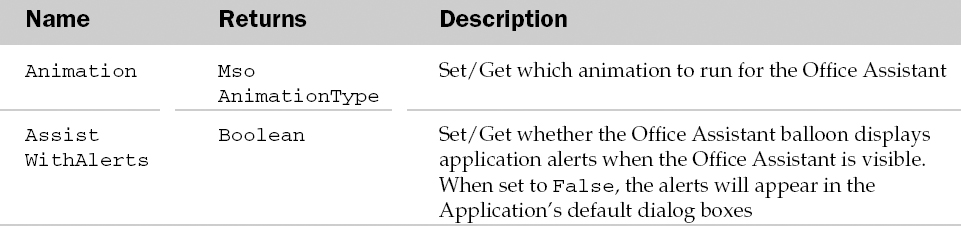
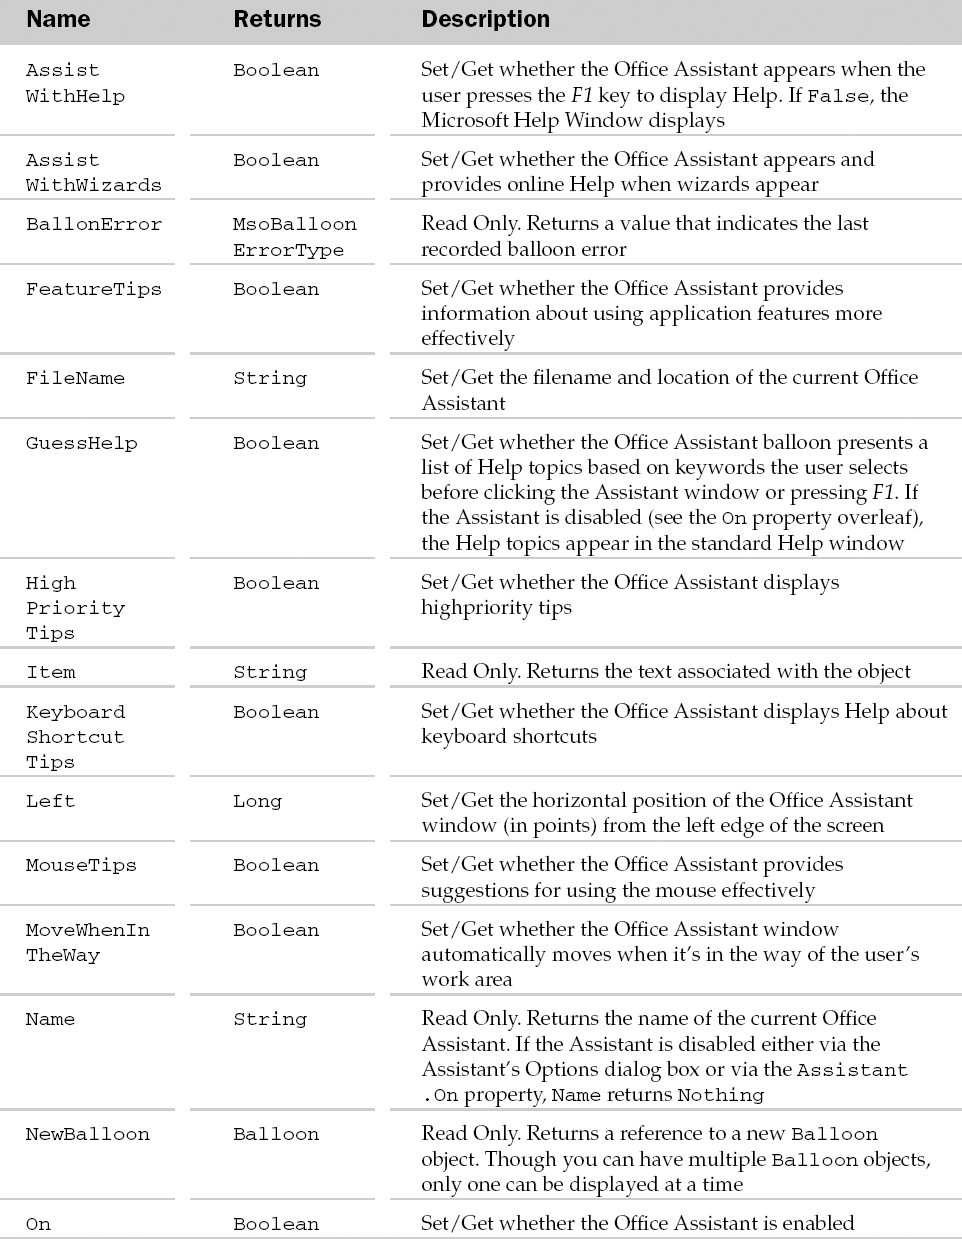
Assistant Properties
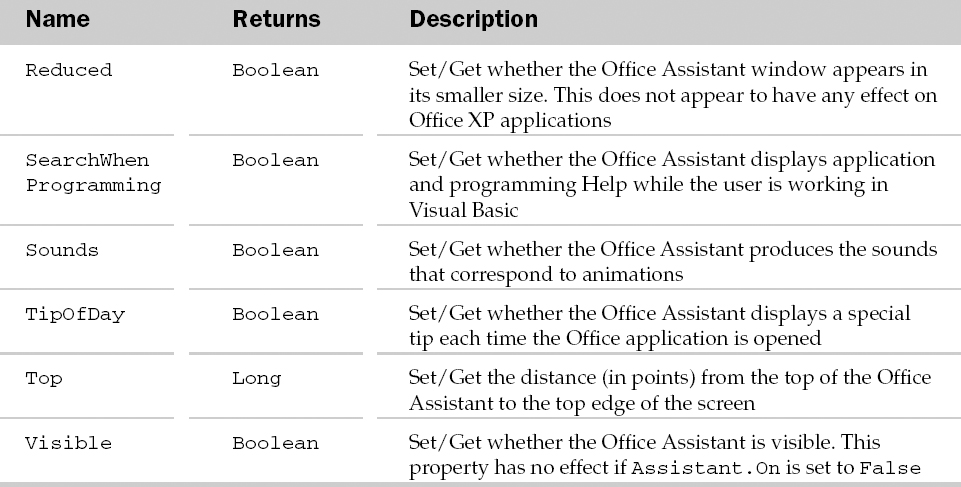
Assistant Methods

Example: Assistant Object
The following routine uses some of the properties of the Assistant object to display the Assistant, ask a question, and then react to the user's response:
'Public user defined type used to hold current Assistant's properties
       Public Type AssistInfo
           bOn As Boolean
       bVisible As Boolean
       sFileName As String
       End Type

       Sub Opening()

           Dim lReturnValue As Long
           Dim oBalloon As Balloon
           Dim udAssistCurr As AssistInfo

           'Store current Assistant settings
       With udAssistCurr
                .bOn = Assistant.On
        .bVisible = Assistant.Visible
        .sFileName = Assistant.Filename
            End With

     'Customize the Assistant and display a custom balloon
            With Assistant
                .On = True
                .Visible = True
                .Filename = “C:Program FilesMicrosoft OfficeOffice10dot.acs”
                .Animation = msoAnimationCheckingSomething

     'Create a new balloon
            Set oBalloon = .NewBalloon

     'Customize the new balloon
            With oBalloon
                .Heading = “Wrox Press Welcomes You”
                .Text = “Do you want to load the Wrox Press custom workbook?”
                .Button = msoButtonSetYesNo
                lReturnValue = .Show
            End With

            If lReturnValue = msoBalloonButtonYes Then 'They clicked Yes
         'Open the workbook and display a custom animation
                Workbooks.Open “C:My DocumentsWroxWrox Examples.xls”
                .Animation = msoAnimationGetTechy
                .Animation = msoAnimationAppear
            Else
         'Reset the Assistant properties
                If udAssistCurr.bOn Then .Animation = msoAnimationGoodbye
                If Len(udAssistCurr.sFileName) Then _
                    .Filename = udAssistCurr.sFileName
                .Visible = udAssistCurr.bVisible
                .On = udAssistCurr.bOn
            End If
        End With
    End Sub
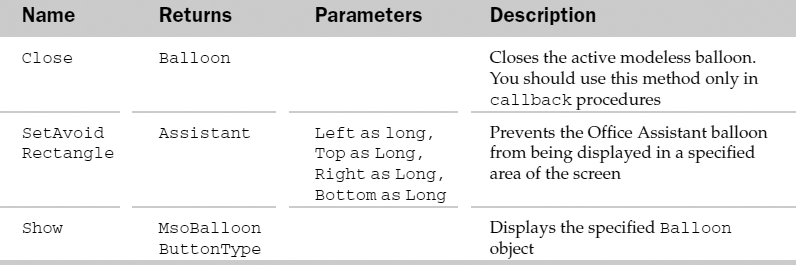
Balloon Object
The Balloon object is used to reference and create messages using the Office Assistant. In most cases, it's used to create a custom balloon containing text, labels, check boxes, and/or command buttons by setting an object variable equal to the NewBalloon property. See Assistant object for an example.
Balloon Common Properties
The Application, Creator, and Parent properties are defined at the beginning of this Appendix.
Balloon Properties


Balloon Methods
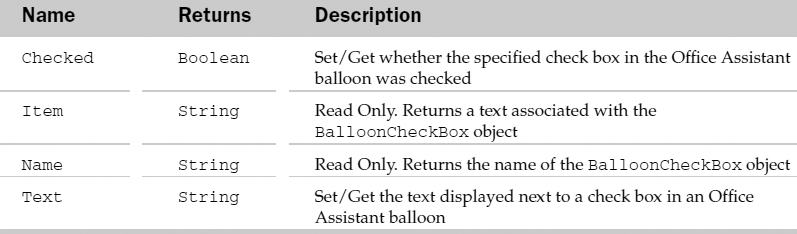
BalloonCheckBox Collection
This collection comprises all of the check boxes that appear in a Balloon object. It's used to iterate through all of the BalloonCheckBox objects to determine which ones were checked when the Balloon object was closed.
BalloonCheckBox Collection Common Properties
The Application, Count, Creator, and Parent properties are defined at the beginning of this Appendix.
BalloonCheckBox Collection Properties
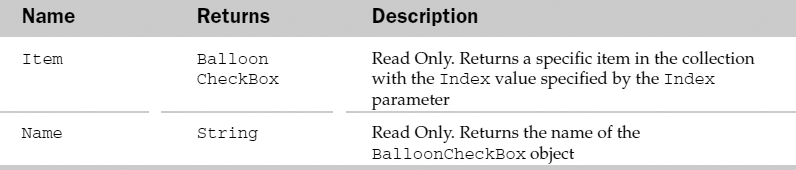
BalloonCheckBox Object
Represents one of the check boxes in a collection of check boxes that appear in a Balloon object.
BalloonCheckBox Common Properties
The Application, Creator, and Parent properties are defined at the beginning of this Appendix.
BalloonCheckBox Properties
BalloonLabels Collection
This collection comprises all of the labels that appear in a Balloon object. It's used to iterate through all of the BalloonLabels objects to determine which ones were checked when the Balloon object was closed.
BalloonLabels Collection Common Properties
The Application, Count, Creator, and Parent properties are defined at the beginning of this Appendix.
BalloonLabels Collection Properties

BalloonLabels Object
Represents one of the check boxes in a collection of check boxes that appear in a Balloon object.
BalloonLabels Common Properties
The Application, Creator, and Parent properties are defined at the beginning of this Appendix.
BalloonLabels Properties


Example: BalloonCheckBox Collection Object
The following routine uses both the BalloonCheckBox Collection and BalloonCheckBox to display a list of city choices in a custom Balloon object, then reports the results using the DoAlert method of the Assistant object:
Sub CustomBalloon()

   Dim lItem As Long
   Dim lReturnValue As Long
   Dim oBalloon As Balloon
   Dim oCheckBox As BalloonCheckbox
   Dim sMessage As String
   Dim vCities As Variant

   'Create an array of cities you want displayed in the balloon
   vCities = Array(” New York” , “London” , “Paris” )

   'Display a custom balloon
   With Assistant
      .On = True
      .Visible = True
      'Create a new balloon
      Set oBalloon = .NewBalloon

      'Customize the new balloon
      With oBalloon
         'Add heading text with both blue color and underlined
     .Heading = “{cf 252}{ul 1}Wrox Press{ul 0}{cf 0}”
     'Add a picture to the balloon,
         ' then two lines below add green instructional text
     .Text = _
” {WMF “” C:Program FilesMicrosoft OfficeClipartOfficeTRAVEL.WMF” ” }” & _
                                        vbCrLf & vbCrLf & _
                                        “ {cf 2}Please check the cities you want to visit.{cf 0}”
       'Create a series of checkboxes with each checkbox's text
       ' equal to one of the cities in the array
       For lItem = 1 To 3
          'Arrays start at 0 by default
      .CheckBoxes(lItem).Text = vCities(lItem - 1)
       Next lItem

       'Show the balloon
       .Show
       ' Loop through the BalloonCheckBox collection and
       ' determine which ones were checked
       For Each oCheckBox In .CheckBoxes
          If oCheckBox.Checked Then _
             sMessage = sMessage & oCheckBox.Text & vbCrLf
       Next oCheckBox

    End With

    'Report the results using the .DoAlert method
    If Len(sMessage) Then
       'They chose at least one of the cities
       sMessage = “Cities chosen:” & vbCrLf & vbCrLf & sMessage
    Else
       'Report that they chose none
       sMessage = “Guess you're a hermit!”
       End If

       .DoAlert “{cf 2}Wrox{cf 0}” , “{cf 1}” & sMessage & “{cf 0}” , _
                                                   msoAlertButtonOK, msoAlertIconInfo, _
                           msoAlertDefaultFirst, msoAlertCancelDefault, False
     End With

End Sub
COMAddins Collection Object
The COMAddins collection is a list of all COMAddins objects for a Microsoft Office host application, in this case, Excel. COMAddins are custom solutions for use with several Office applications like Excel, Access, Word, and Outlook developed in any language (VB, C++, or J++) that supports COM (Component Object Model) components.
COMAddins Collection Common Properties
The Application, Count, Creator, and Parent properties are defined at the beginning of this Appendix.
COMAddins Collection Methods

COMAddinObject
Represents a single COM Addin in the Microsoft Office host application and is also a member of COMAddins collection. COMAddins are custom solutions for use with several Office applications like Excel, Access, Word, and Outlook developed in any language (VB, C++, or J++) that supports COM (Component Object Model) components.
COMAddin Common Properties
The Application, Creator, and Parent properties are defined at the beginning of this Appendix.
COMAddinProperties

Example: COMAddin Object
The following routine loops through the list of COMAddins and displays its relevant information in a table on Sheet1 of the workbook containing the code:
Sub COMAddinInfo()

      Dim lRow As Long
      Dim oCom As COMAddIn

      'Set up the headings on Sheet1 of this workbook
       With Sheet1.Range(“A1:D1”)
             .Value = Array(“Guid”, “ProgId”, “Creator”, “Description”)
             .Font.Bold = True
             .HorizontalAlignment = xlCenter
       End With
       ' Loop through the COMAddins collection and place
       ' its information in cells below the headings
       If Application.COMAddIns.Count Then
           For Each oCom In Application.COMAddIns
        With Sheet1.Range (” A2” )
             .Offset(lRow, 0) .Value = oCom.GUID
             .Offset(lRow, 1) .Value = oCom.progID
             .Offset(lRow, 2) .Value = oCom.Creator
             .Offset(lRow, 3) .Value = oCom.Description
             lRow = lRow + 1
         End With
     Next oCom
 End If

 ' Autofit the table
 Sheet1.Range(” A1:D1” ).Ent ireColumn. .AutoFit
End Sub
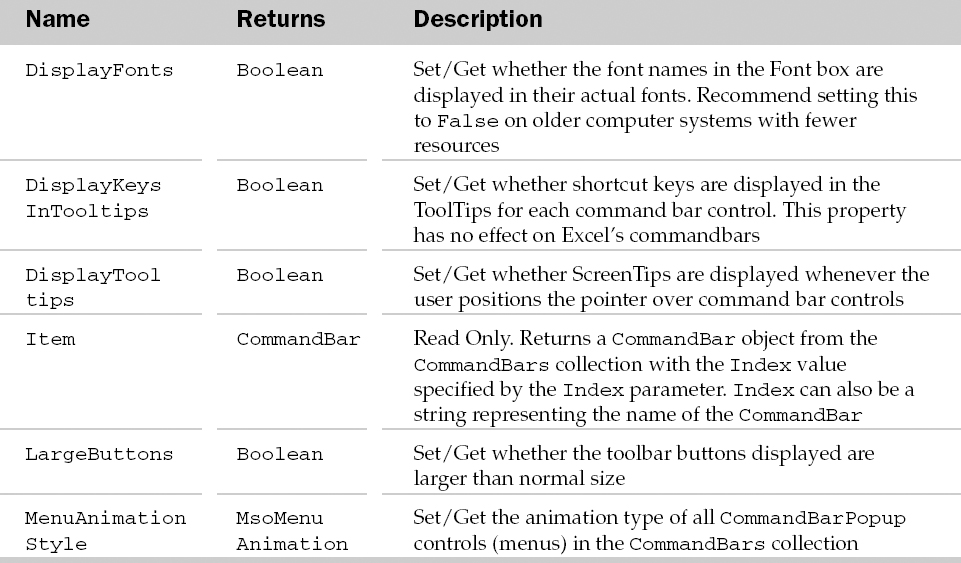
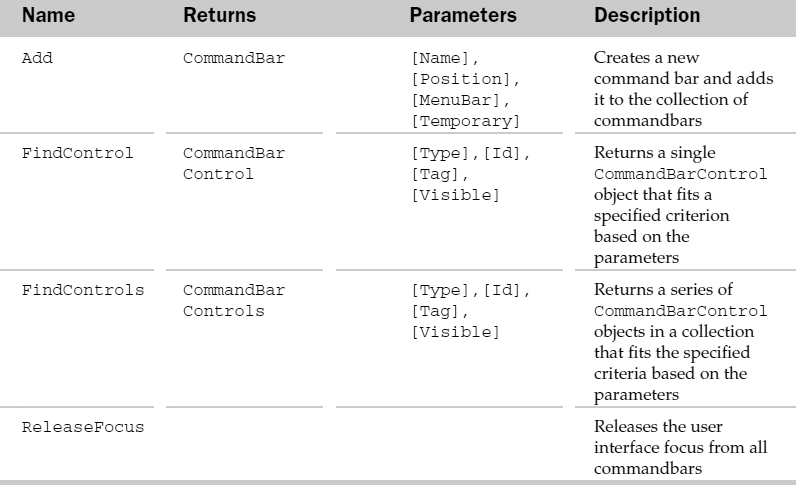
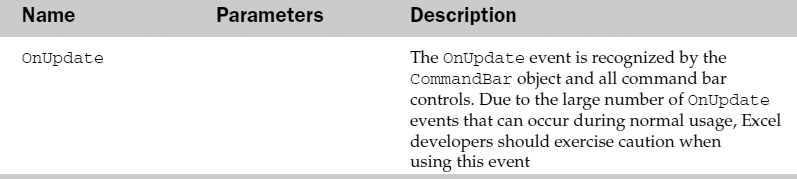
CommandBars Collection Object
The Commandbars collection contains a list of all Commandbars (known as Toolbars to most users) in the container application. See Commandbars object for more information. It contains properties related to the settings found in the Options tab of the Customize command.
CommandBars Collection Common Properties
The Application, Count, Creator, and Parent properties are defined at the beginning of this Appendix.
CommandBars Collection Properties

CommandBars Collection Methods
CommandBars Collection Events
Example: CommandBars Collection Object
The following routine sets some options for all CommandBars, then displays a count of CommandBars for the current container application as well as which menu bar is active:
Sub CountCommandBars()

    'Customize some settings for all CommandBars
    With CommandBars
       ' Enable the recently used menus feature
         .AdaptiveMenus = True

     ' Remove the Help box that appears on the right side of the Menu
     ' Note: This does not affect the VBE's Help box
     .DisableAskAQuestionDropdown = True

         ' Don't allow any customization of any CommandBar
     .DisableCustomize = True

         ' Don't display the look of the Fonts in the Font Dropdown button '
     Saves resources and speeds up computer
     .DisplayFonts = False

         ' Have the menus randomly animate when clicked
     .MenuAnimationStyle = msoMenuAnimationRandom

         ' Display tooltip text when hovering over CommandBar controls
     .DisplayTooltips = True

         ' Display shortcut keys in the ToolTips (Has no effect in Excel)
     .DisplayKeysInTooltips = True

         ' Have CommandBar buttons appear large for easier readability
     .LargeButtons = True

         ' Tell the user how many CommandBars there are and which menu is active.

         MsgBox “There are “ & .Count & “ CommandBars in “ _
            & .Parent.Name & “.” & vbCrLf _
                & “The active menu is the “ _
                & .ActiveMenuBar. Name & “. “ _
                , vbInformation, “Wrox”
    End With

End Sub
CommandBar Object
This object holds the properties and methods for a specific Commandbar in the CommandBars collection. The properties and methods are similar to the Commandbars collection but only apply to the individual Commandbar referenced. Use Commandbars(Index) to return a reference to a specific CommandBar, like:
Dim oBar As CommandBar
Set oBar = CommandBars(” Wrox” )
CommandBar Common Properties
The Application, Creator, and Parent properties are defined at the beginning of this Appendix.
CommandBar Properties
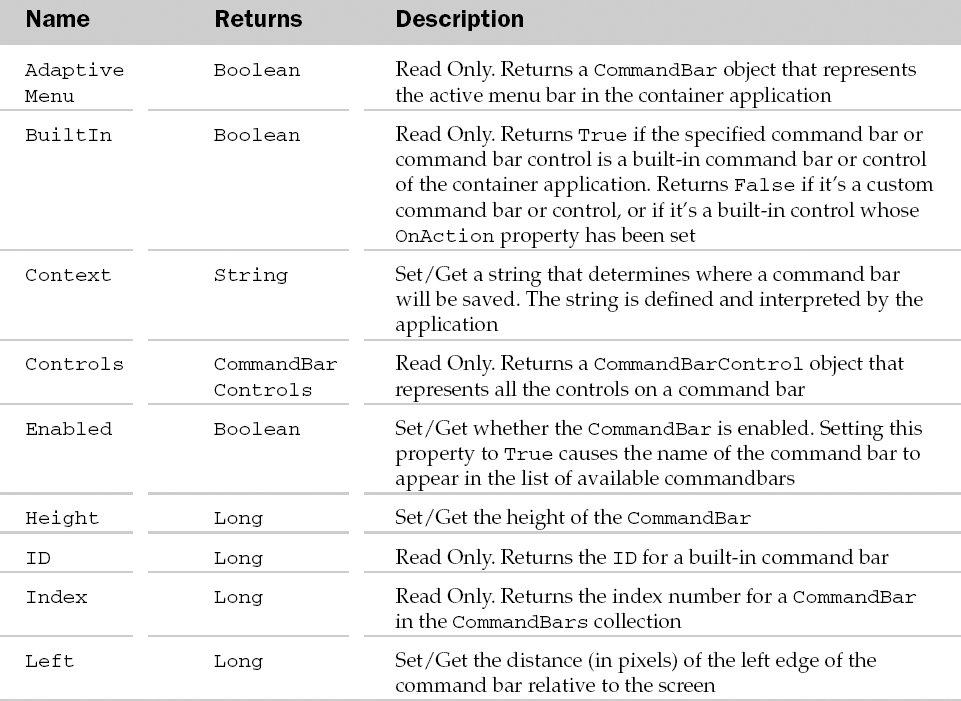

CommandBar Methods

Example: CommandBar Object
The following routine customizes a custom toolbar (CommandBar) called “Wrox”:
Sub CustomizeWroxBar()

   Dim oBar As CommandBar
   Dim oMenu As CommandBarPopup
   ' Determine if the CommandBar exists.
   On Error Resume Next
   Set oBar = Application.CommandBars(” Wrox” )

   On Error GoTo Error

   ' If CommandBar exists, go ahead and customize it
   If Not oBar Is Nothing Then
       With oBar
           ' Add a separator before the 2nd control on the bar
       .Controls(2).BeginGroup = True

           ' Move it to the right
       .Position = msoBarRight

           ' Don't allow it to be customized by the user
       .Protection = msoBarNoCustomize

           ' Make it visible
       .Visible = True

           ' Obtain a reference to the first control on the Wrox bar,
       ' which is a menu holding additional controls
       Set oMenu = CommandBars(” Wrox” ).Controls(1)
       With oMenu
               ' Change the menu text
           .Caption = “Member Info”

               ' Change the text for the popup tooltip
           .TooltipText = “Insert Member Info”

               ' Add a separator before the 3rd control on the menu
           .Controls(3).BeginGroup = True
       End With

      End With
   Else
        ' A CommandBar named “Wrox” doesn't exist.
    ' Error out and display the custom error message
    Err.Raise Number:=glERROR_CUSTOM, _
                  Description:=“ Wrox commandbar not found.”
   End If

  Exit Sub
Error:
    ' Display the error
    MsgBox Err.Number & vbLf & Err.Description

End Sub
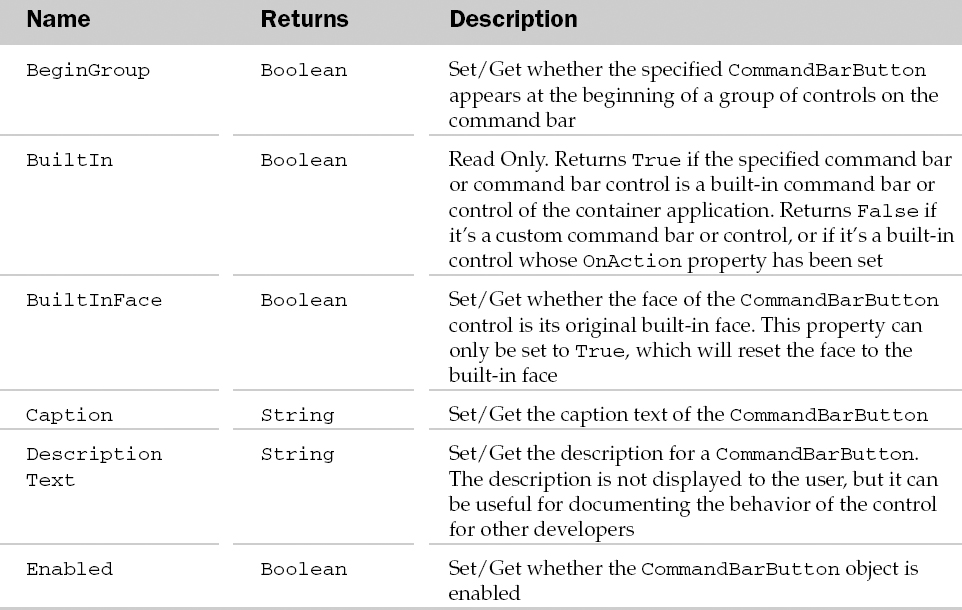
CommandBarButton Object
A CommandBarButton is any button or menu item on any CommandBar. You access a specific CommandBarButton by referencing the Commandbar it's located in and by using Controls(Index). Index can either be the CommandBarButton's number position on the menu or toolbar or its Caption.
For example, we can refer to the first control on a Commandbar called “Wrox” using:
CommandBars(” Wrox” ).Controls(1)
or:
CommandBars(” Wrox” ).Controls(” Member Info” )
CommandBarButton Common Properties
The Application, Creator, and Parent properties are defined at the beginning of this Appendix.
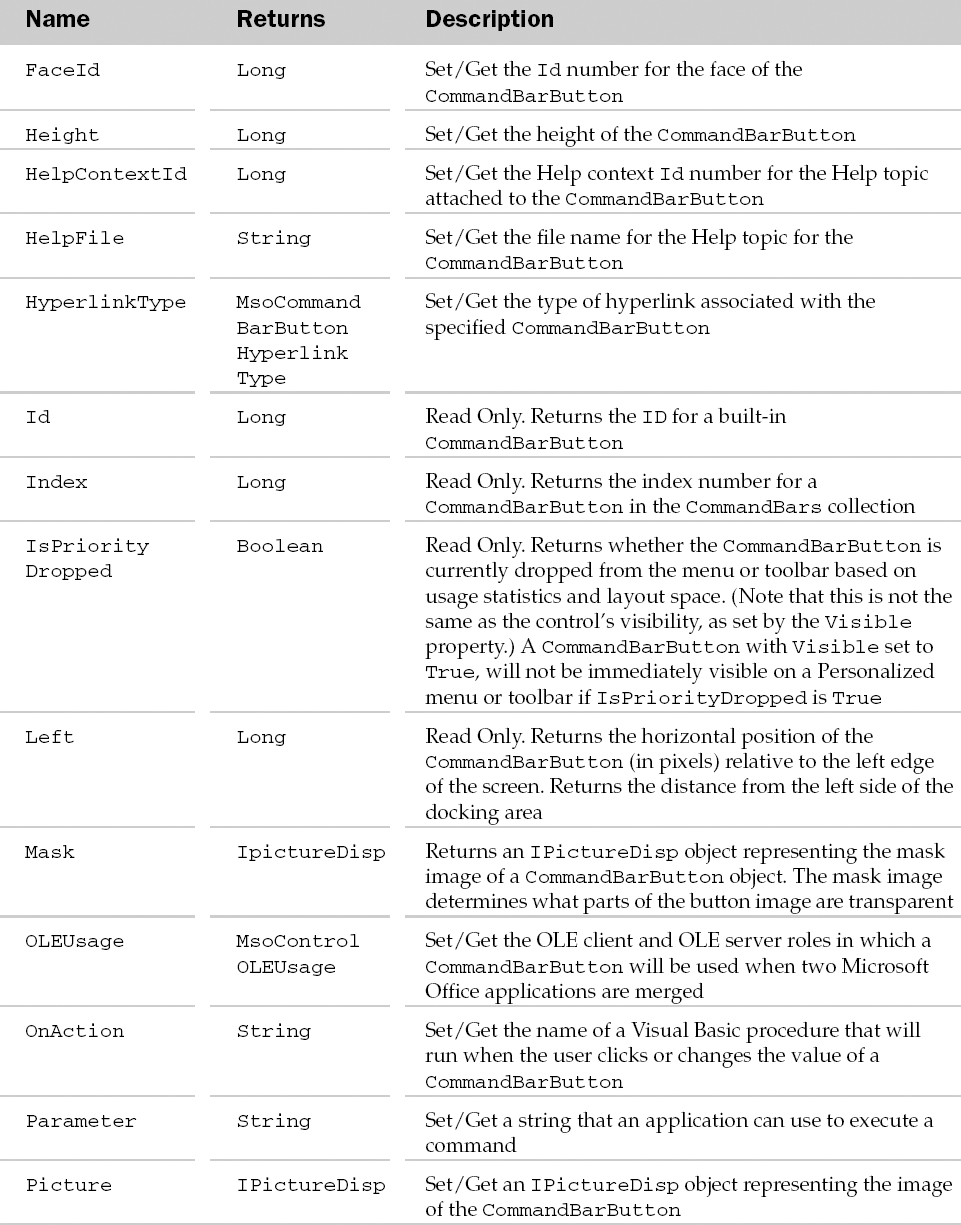
CommandBarButton Properties

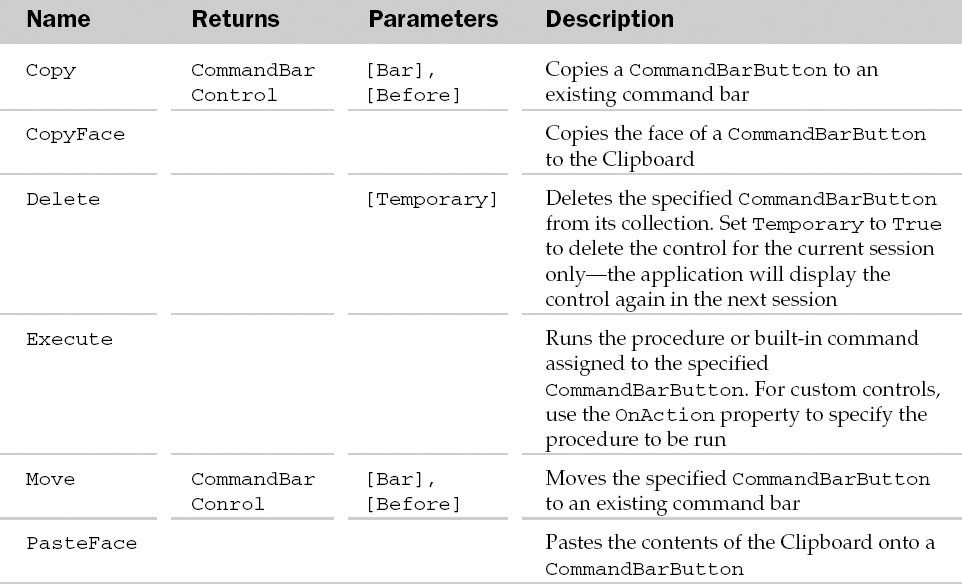
CommandBarButton Methods
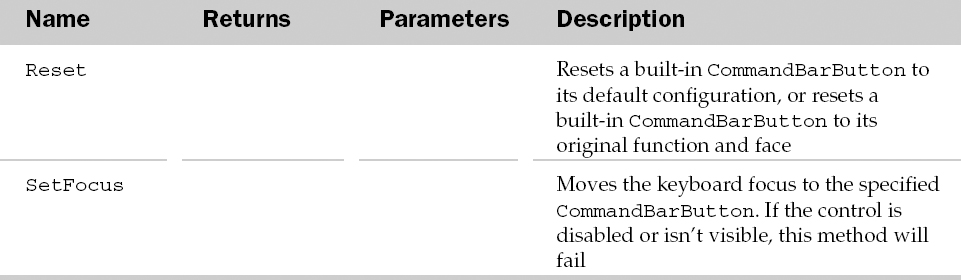
CommandBarButton Events

Example: CommandBarButton Object
The following first routine creates a CommandBarButton on the custom Wrox CommandBar, assigns it a ToolTip text and a button image, then assigns it the SelectNumericValues routine:
Sub AddCommandBarButton()

    Const sSELECT_NUMERIC As String = “SelectNumericValues”

    Dim ctlButton As CommandBarButton

    ' Add the CommandBarButton
    Set ctlButton = CommandBars(” Wrox” ).Controls.Add(msoControlButton)

   With ctlButton

        ' Assign it the same button image as the
        ' Select Visible Cells button in Excel
        .FaceId = 441

        ' Add ToolTip text
        .TooltipText = “Select Numeric Values”

        ' Store a custom name in its Tag property which can be
        ' used by the FindControl method to locate the control without
        ' knowing its position
        .Tag = sSELECT_NUMERIC

        ' Assign the CommandBarButton control the routine
        .OnAction = sSELECT_NUMERIC
    End With

End Sub

Sub SelectNumericValues()

    Dim rng As Range

    ' Suppress any errors (like no worksheet/workbook active)
    On Error Resume Next

    ' Make sure the current selection is a Range
    If TypeOf Selection Is Range Then

        If Selection.Cells.Count = 1 Then
            ' If they're only selecting one cell,
            ' grab all of the numeric constants for the worksheet
        ActiveSheet.UsedRange.SpecialCells( _
                 xlCellTypeConstants, xlNumbers).Select
        Else
            ' Grab the selection's numeric constants
            Selection.SpecialCells(xlCellTypeConstants, xlNumbers).Select
        End If
    End If

End Sub
CommandBarComboBox Object
This object represents a drop-down list, custom edit box, or ComboBox (combination of the first two) control on any CommandBar. These types of controls only appear on the command bar—when it's either floating or docked at either the top or bottom of the Application window.
CommandBarComboBox Common Properties
The Application, Creator, and Parent properties are defined at the beginning of this Appendix.
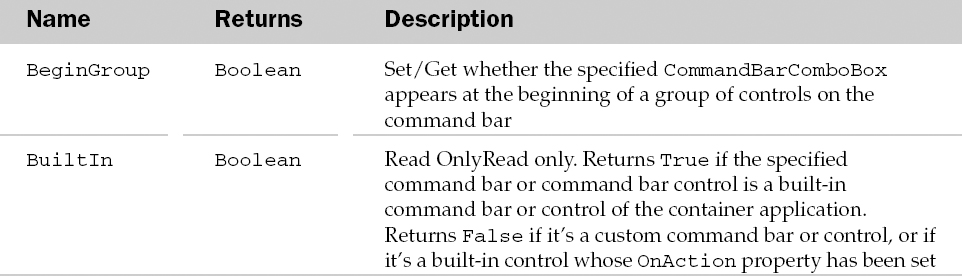
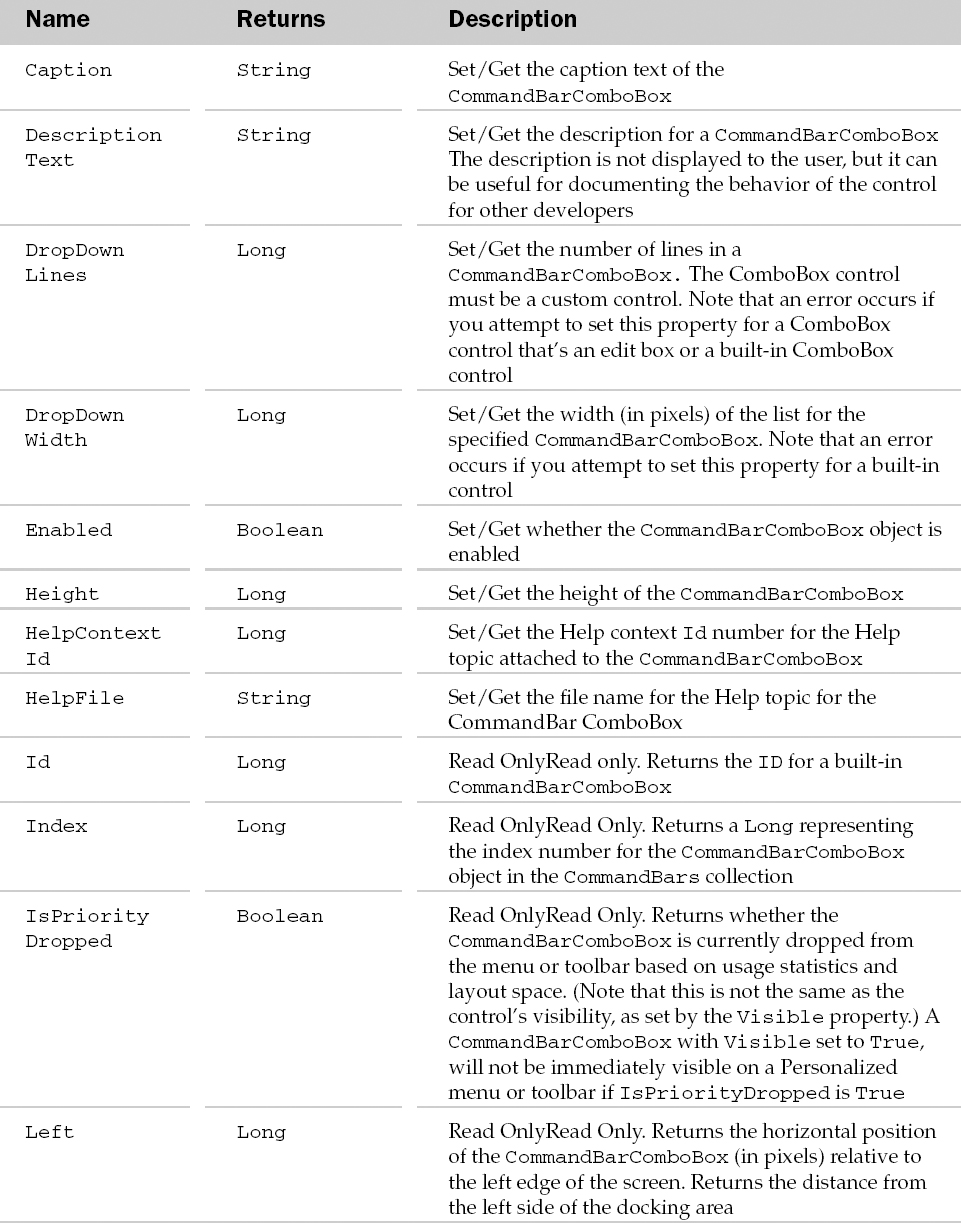
CommandBarComboBox Properties

CommandBarComboBox Methods

CommandBarComboBox Events

Example: CommandBarComboBox Object
The following routine adds a CommandBarComboBox control to a custom Commandbar named Wrox. It populates the control's list using an e-mail address list on a worksheet in the workbook containing the code. We assign a MailTo routine to the combo box, which then sends the activeworkbook to the person chosen in the combo box:
Sub AddComboBox()

    Const sTAG_RUN As String = “MailTo”

    Dim ctlCombo As CommandBarComboBox
    Dim litem As Long
    Dim vaItems As Variant
    Dim szttt As String

    ' Grab the list of items from a list on a worksheet in this workbook
    vaItems = wksListData.Range(” Items” )

    ' Add the CommandBarComboBox
    Set ctlCombo = CommandBars(” Wrox” ).Controls.Add(msoControlComboBox)

    With ctlCombo
        ' Add the list of items from the worksheet to
        ' the CommandBarComboBox
        For 1Item = LBound(vaItems) To UBound(vaItems)
            .AddItem vaItems(lItem, 1), 1Item
        Next 1Item

        ' Add ToolTip text
        .TooltipText = “Send Workbook To”

        ' Store a custom name in its Tag property which can be used by the
        ' FindControl method to locate control without knowing its position
        .Tag = sTAG_RUN

        ' Assign the CommandBarComboBox control the routine
        .OnAction = sTAG_RUN
    End With

End Sub

Sub MailTo()
    Dim ctlCombo As CommandBarComboBox
    Dim lChoice As Long

    ' Suppress errors in case there is no active workbook
    On Error Resume Next

    ' Access the control
    Set ctlCombo = CommandBars.ActionControl

    ' Which one on the list did they choose?
    lChoice = ctlCombo.ListIndex

    If lChoice Then
       ' They chose someone Send the active workbook using the name chosen
       ' from the combo box
       ActiveWorkbook.SendMail _
           Recipients:=ctlCombo.List(lChoice), _
       Subject:=ActiveWorkbook.Name, ReturnReceipt:=True
   End If

End Sub
CommandBarControls Collection Object
This collection holds all of the controls on a CommandBar. This collection's name can only be seen when declaring it as a variable type. You can access all the controls for a Commandbar directly using:
CommandBars(Index).Controls
Where Index can either be an number representing its position on the list of Commandbars or a String representing the Name of the CommandBar.
CommandBarControls Collection Common Properties
The Application, Count, Creator, and Parent properties are defined at the beginning of this Appendix.
CommandBarControls Collection Properties

CommandBarControls Collection Methods

Example: CommandBarControls Collection Object
The following routine lists all of the controls on a custom CommandBar named Wrox with some of its property information on a worksheet:
Sub ListAllControls()

    Dim ctl As CommandBarControl
    Dim ctlAll As CommandBarControls
    Dim lRow As Long

    ' Store all of the controls for the Wrox CommandBar
    Set ctlAll = CommandBars(” Wrox” ).Controls

    ' Initialize the Row Counter
    lRow = 2

    ' On a worksheet in this workbook…
    With wksControls
        ' Clear the old list
        .UsedRange.ClearContents

        ' Place the headings on the worksheet
        .Cells(1, 1).Value = “CAPTION”
        .Cells(1, 2).Value = “BUILTIN”
        .Cells(1, 3).Value = “ID”
        .Cells(1, 4).Value = “TAG”
        .Cells(1, 5).Value = “TOOLTIP”
        .Cells(1, 6).Value = “TYPE”

        ' Loop through all of the controls placing information about each
        ' control in columns on the worksheet
        For Each ctl In ctlAll
            .Cells(lRow, 1).Value = ctl.Caption
            .Cells(lRow, 2).Value = ctl.BuiltIn
            .Cells(lRow, 3).Value = ctl.ID
            .Cells(lRow, 4).Value = ctl.Tag
            .Cells(lRow, 5).Value = ctl.TooltipText
            .Cells(lRow, 6).Value = ctl.Type
            lRow = lRow + 1 'Increment the row counter
        Next

    ' AutoFit the columns
        .UsedRange.EntireColumn.AutoFit

     End With

End Sub
CommandBarControl Object
Represents a generic control on a CommandBar. A control usually consists of a CommandBarButton, CommandBarComboBox, or a CommandBarPopup. When using one of these controls, you can work with them directly using their own object reference. Doing so will yield all of the properties and methods specific to that control.
Use the Control object when you are unsure which type of Commandbar object you are working with or when using controls other than the three mentioned earlier. Most of the methods and properties for the CommandBarControl Object can also be accessed via the CommandBarButton, CommandBarComboBox, and CommandBarPopup controls.
CommandBarControl Common Properties
The Application, Creator, and Parent properties are defined at the beginning of this Appendix.
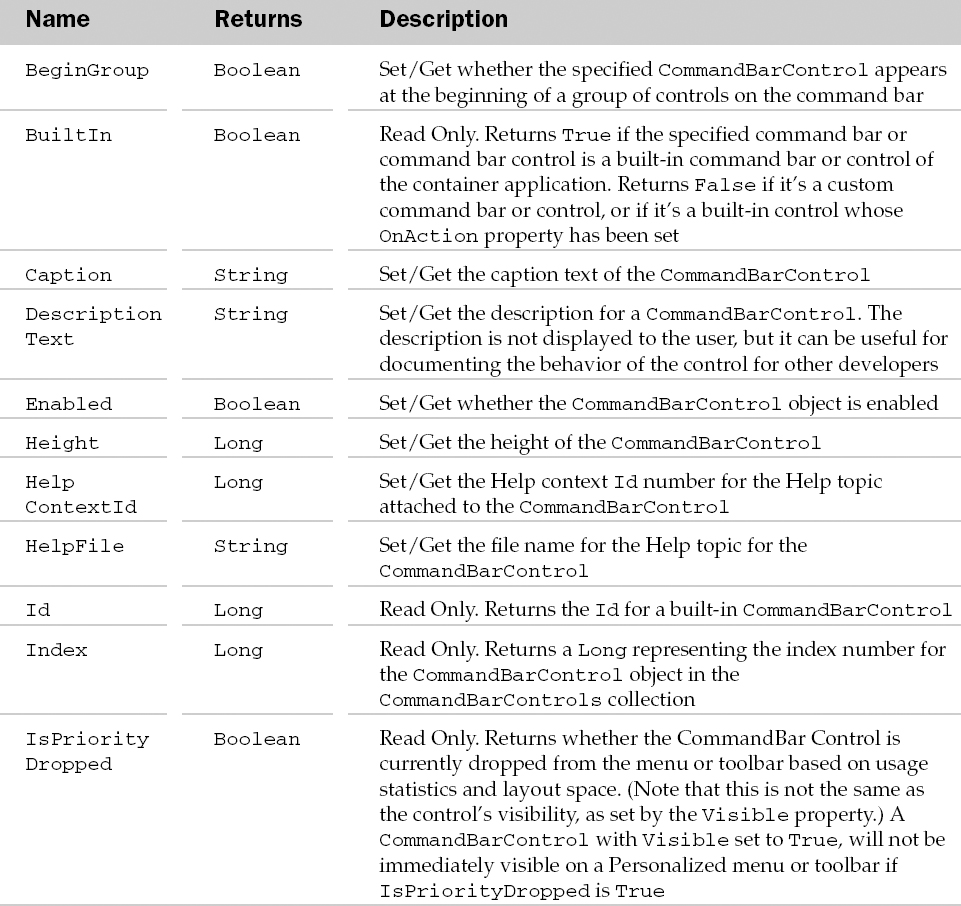
CommandBarControl Properties

CommandBarControl Methods

Example: CommandBarControl Object
The following routine searches for a CommandBarControl using its Tag property, then depending on the type of control found, accesses a unique property or method for that control. The State and Commandbar properties as well as the Clear method used next will not appear on the Properties/Methods list of a generic CommandBarControl object, but still work assuming the control is the correct type:
Sub FindCommandBarControl()

    Dim ctl As CommandBarControl
    ' Find a control on the Wrox CommandBar based on its Tag property
    ' Recursive:=True means search through the controls in any
    ' submenus(CommandBarPopup)
    Set ctl = CommandBars(” Wrox” ).FindControl(Tag:=” MailTo” / _
                                                              Recursive:=True)

    If Not ctl Is Nothing Then 'We found the control
        ' Access a property or method unique to that control
    Select Case ctl.Type
            Case msoControlButton
                ' Make the button appear pressed
        ctl.State = msoButtonDown
        Case msoControlComboBox
                ' Clear the items in the combo box
        ctl.Clear
        Case msoControlButtonPopup
                ' Access the 2nd control on this menu/submenu
                ' using its unique CommandBar property
                ctl.CommandBar.Controls(2).Enabled = False
            Case Else
                MsgBox ctl.Type
        End Select
    End If

End Sub
CommandBarPopup Object
This object represents a menu or submenu on a CommandBar, which can contain other Commandbar controls within them. For example, the File and Edit menus on the menu bar are both considered CommandBarPopup controls. The SendTo submenu on the File menu and the Fill submenu on the Edit menu are also CommandBarPopup controls.
Because CommandBarPopup controls can have other controls added to them, they are in effect a separate CommandBar. For example, assuming the first control on a custom Commandbar named Wrox is a CommandBarPopup control, the following code can be used to reference and treat the control as if it were just another CommandBar:
Dim oBar as CommandBar
Set oBar = CommandBars(“Wrox” ).Controls(1).CommandBar
To reference the same control as a CommandBarPopup:
Dim ctl As CommandBarPopup
Set ctl = CommandBars(” Wrox” ).Controls(1)
CommandBarPopup Common Properties
The Application, Creator, and Parent properties are defined at the beginning of this Appendix.
CommandBarPopup Properties


CommandBarPopup Methods

Example: CommandBarPopup Object
The following routine adds a custom Popup menu with three CommandBarButtons to an existing Popup menu on the custom Wrox CommandBar. The information used to add the three CommandBarButtons is drawn from a table located on a worksheet inside the workbook containing the code:
Sub AddCommandBarPopup()

    Dim ctlButton As CommandBarButton
    Dim ctlPopup As CommandBarPopup
    Dim ctlMenuPopup As CommandBarPopup
    Dim rngControls As Range, rngControl As Range

   ' Find the Special popup (menu) on the Wrox CommandBar
   Set ctlMenuPopup = CommandBars(” Wrox” ).FindControl( _
                          Type:=msoControlPopup, _
                          Tag:=” PopupSpecial” , _
                          Recursive:=True)
   ' Continue if found
   If Not ctlMenuPopup Is Nothing Then
       ' Add a popup control to the Special popup control found,
       ' placing it in the first position
       Set ctlPopup = ctlMenuPopup.Controls.Add( _
                         Type:=msoControlPopup, _
                         Before:=ctlMenuPopup.Controls(1) .Index)
       ' Set the range to the table containing the
       ' information for the controls I want added
       With wksPopup
           Set rngControls = .Range(.Range(” A2” ), .Range(” A2” ).End(xlDown))
       End With

       ' Set the caption to the new popup with the letter E underlined (&E)
       ctlPopup.Caption = “&Edit”

       ' Loop through the table adding the controls to the new popup
       For Each rngControl In rngControls
           ' If it's a built-in control,
           ' use the ID parameter of the Add method
           If Len(rngControl.Offset(0, 3).Value) Then
               Set ctlButton = ctlPopup.Controls.Add( _
                                   Type:=rngControl.Offset(0, 1).Value, _
                                   ID:=rngControl.Offset(0 , 3).Value)
           Else
              Set ctlButton = ctlPopup.Controls.Add( _
                                  Type:=rngControl.Offset(0, 1).Value)
           End If

       ' Set the properties for the new control
           With ctlButton
               ' Add a separator if there's something in
               ' the BeginGroup column of the table
               .BeginGroup = (Len(rngControl.Offset(0, 2). Value) > 0)

               ' Set the control's picture face if there's something
           ' in the FaceID column of the table. If it's a built-in
           ' control, there should be nothing in this column.
           If Len(rngControl.Offset(0, 4).Value) Then _
           .FaceId = rngControl.Offset(0, 4).Value

               ' If it's a custom control, assign it a macro
           If Len(rngControl.Offset(0, 5).Value) Then _
           .OnAction = rngControl.Offset(0, 5).Text

               ' Set a Tag value for future searches of the control
           If Len(rngControl.Offset(0, 6).Value) Then _
           .Tag = rngControl.Offset(0, 6).Text

               ' If there's ToolTip text, use it to set the
           ' control's Caption and ToolTip
           If Len(rngControl.Offset(0, 7).Value) Then
               .Caption = rngControl.Offset(0, 7).Text
               .TooltipText = rngControl.Offset(0, 7).Text
           End If
       End With
       Next rngControl

Else
   'Special Popup not found, report it
   MsgBox “Could not locate Member Info control” , vbCritical, “Wrox”
 End If
End Sub
Below is the table used to generate the three CommandBarButtons in the routine above.

DocumentLibraryVersion Object
The DocumentLibraryVersion object represents a single saved version of a shared document which has versioning enabled and which is stored in a document library on the server. Each DocumentLibraryVersion object is a member of the active document's DocumentLibraryVersions collection.
DocumentLibraryVersion Properties

DocumentLibraryVersion Methods

DocumentLibraryVersions Collection Object
Represents a collection of DocumentLibraryVersion objects.
DocumentProperties Collection Object
Represents all of the Document Properties listed in the host application's Summary and Custom tabs of the Properties command (File menu) for a document. The document would be the Workbook object in Excel and the Document object in Word.
The DocumentProperties collection consists of two distinct types: Built-in properties and Custom properties. Built-in properties are native to the host application and are found on the Summary tab of the Properties command. Custom properties are those created by the user for a particular document and are found on the Custom tab of the Properties command.
It's important to note that when accessing DocumentProperties for a document, you must use either the BuiltinDocumentProperties property for properties native to the host application, or the CustomDocumentProperties property for properties created by the user. Strangely enough, BuiltinDocumentProperties and CustomDocumentProperties are not found in the Office object model but are part of the host application's model. In other words, you will not find these two properties within the DocumentProperties or DocumentProperty objects of the Microsoft Office XP model.
To access the built-in author document property, you use:
MsgBox ActiveWorkbook.BuiltinDocumentProperties(“Author” ).Value
or:
MsgBox ActiveWorkbook.BuiltinDocumentProperties(3).Value
You need to know that the Index value for Author is 3. See the following DocumentProperties Collection example for more details.
To access a custom property in a document, use:
MsgBox ActiveWorkbook.CustomDocumentProperties(” BillingNumber” ).Value
or:
MsgBox ActiveWorkbook.CustomDocumentProperties(1).Value
The assumption here is that BillingNumber is the first custom property.
The Custom Tab of the Properties command in Excel contains numerous suggestions for custom properties, but only those suggested custom properties that are assigned a value will be part of the CustomDocumentProperties list.
Several built-in properties are specific to certain host applications. For example, the Number of Paragraphs property is native to Microsoft Word and any attempt to reference it from another application will result in a runtime error.
DocumentProperties Collection Common Properties
The Application, Count, Creator, and Parent properties are defined at the beginning of this Appendix.
DocumentProperties Collection Properties

DocumentProperties Collection Methods
Example: DocumentProperties Collection Object
The following routine creates a list of all document properties. It includes the property's Name, whether it's a built-in or custom property, its Type, Index and Value. The Index was obtained using a counter variable. The Index specifies its position in the list and can be used to access the property without knowing its name. For example, the previous code used the number 3 to access the Author built-in property:
Sub ListDocumentProperties()
    Dim oProperty As DocumentProperty
    Dim lIndex As Long, lRow As Long

    ' Disable the screen
    Application.ScreenUpdating = False

    ' Start the counters
    lIndex = 1
    lRow = 2

    ' Access a worksheet within this workbook. Note that a worksheet can be
    ' accessed directly using its Property Name (in the Properties box of
    ' the VBE) so long as the code is in the same workbook as the worksheet
    With wksBuiltInProperties

        ' Clear the worksheet except for the titles in the first row
    .UsedRange.Offset(1, 0).ClearContents

        ' Supress errors when a value from a
    ' property cannot be accessed from Excel
    On Error Resume Next

        ' Loop through the Built in properties
        For Each oProperty In .Parent.BuiltinDocumentProperties
        .Cells(lRow, 1) = oProperty.Name
        .Cells(lRow, 2) = “Built in”
        .Cells(lRow, 3) = oProperty.Type
        .Cells(lRow, 4) = lIndex
        .Cells(lRow, 5) = oProperty.Value

            lIndex = lIndex + 1
        lRow = lRow + 1
    Next oProperty

        ' Reset the Index counter and loop through the custom properties
    lIndex = 1
        For Each oProperty In .Parent.CustomDocumentProperties
            .Cells(lRow, 1) = oProperty.Name
        .Cells(lRow, 2) = ” Custom”
        .Cells(lRow, 3) = oProperty.Type
        .Cells(lRow, 4) = lIndex
        .Cells(lRow, 5) = oProperty.Value 1
        lIndex = lIndex + 1
        lRow = lRow + 1
        Next oProperty

    ' Select the 1st cell
    .Cells(1, 1).Select

    End With
End Sub
DocumentProperty Object
Represents a single property in the DocumentProperties collection. The property can either be a built-in or custom property. Use BuiltinDocumentProperties or CustomDocumentProperties to reference a single DocumentProperty.
DocumentProperty Common Properties
The Application, Creator, and Parent properties are defined at the beginning of this Appendix.
DocumentProperty Properties

DocumentProperty Methods

Example: DocumentProperty Object
The following routine adds a custom document property called BillingNumber and sets the Value property based on a user prompt:
Sub AddDocumentProperty()

    Dim oProperty As DocumentProperty
    Dim vAnswer As Variant
    Dim wkb As Workbook

   ' Check for an active workbook
   On Error Resume Next
      Set wkb = ActiveWorkbook
   On Error GoTo 0

   ' If a workbook is active…
   If Not wkb Is Nothing Then

       ' Prompt the user to select a cell or type a number
       ' If user selects a range, only the first cell will be used
       vAnswer = Application.InputBox(” Billing Number?” , _
                                      ” Billing Number” , , , , , , 1)

       ' If they didn't cancel…
       If vAnswer <> “False” Then

           ' Check to see if the custom property already exists
       On Error Resume Next
          Set oProperty = _
                  ActiveWorkbook.CustomDocumentProperties(” BillingNumber” )
           On Error GoTo 0

           ' If it doesn't exist, create it
       If oProperty Is Nothing Then
              Set oProperty = ActiveWorkbook.CustomDocumentProperties.Add _
                              (Name:=” BillingNumber” , _
                    LinkToContent:=False, _
                    Type:=msoPropertyTypeNumber, Value:=1)
           End If
           ' Set the value based on the InputBox return value
       oProperty.Value = vAnswer
       End If
    Else
       ' No Book is active. Tell them.
               MsgBox “No Workbook active.” , vbCritical, “Add Property”
    End If
End Sub
FileDialog Object
This object is now a more structured and more flexible alternative to both the GetSaveAsFilename and GetOpenFilename methods. It includes the ability to customize the action button (for example, the Save button in Save As dialog), choose from a list of different dialog types (above and beyond the Open & Save As), adds more flexibility when using custom file types/filters (for example, “*.bil” ), and allows you to set a default view that the user will see when the dialog appears (for example, Detail or Large Icon views).
Note that some of the properties and methods for this object depend on the MsoFileDialogType chosen in the FileDialogType property. For example, the following will encounter an error when attempting to use the Add method of the Filters property with the msoFileDialogSaveAs dialog type:
Application.FileDialog(msoFileDialogSaveAs).Filters.Add _
    “Billing Files” , “*.bil” , 1
FileDialog Common Properties
The Application, Creator, and Parent properties are defined at the beginning of this Appendix.
FileDialog Properties

FileDialog Methods

Example: FileDialog Object
The following routine prompts the user to save the active workbook using the FileDialog object. Once the user exits the Save As dialog, the routine converts the billing workbook filled with formulas and range names to values with only no range names:
Sub ConvertBillingStatement()

    ' Use this constant to insure that the company's keyword used for
    ' Billing remains consistent throughout this procedure
    Const sNAME_BILLING As String = “Billing”

    Dim nm As Excel.Name
    Dim sPath As String
    Dim wks As Excel.Worksheet
    Dim wkb As Excel.Workbook

    ' Check whether this is a billing workbook
    ' by checking for the existence of a hidden name
    On Error Resume Next
        Set wkb = ActiveWorkbook
    On Error GoTo 0

    ' If a workbook is active…
    If Not wkb Is Nothing Then
        On Error Resume Next
            Set nm = wkb.Names(sNAME_BILLING)

    ' If this is a billing file…
    If Not nm Is Nothing Then

            ' Store the current path
        sPath = CurDir

            ' Set the properties of the File Save As dialog
        With Application.FileDialog(msoFileDialogSaveAs)

                ' Change the default dialog title
        .Title = “Save “ & sNAME_BILLING & “ Number”

        ' Change the name of the Save button in the Dialog
        .ButtonName = “Save “ & sNAME_BILLING

                ' Switch to the Billing folder
        .InitialFileName = “C:” & sNAME_BILLING & “”

                ' Display the Details view in the dialog
        .InitialView = msoFileDialogViewDetails

        ' Show the dialog -1 means they didn't cancel
        If .Show = -1 Then

                    ' Convert all formulas to values
            For Each wks In wkb.Worksheets
            wks.UsedRange.Copy
                    wks.UsedRange.PasteSpecial xlPasteValues
        Next wks

        ' Remove all range names except the one that
        ' identifies it as a Billing workbook
        For Each nm In wkb.Names
                    If nm.Name <> sNAME_BILLING Then nm.Delete
        Next nm

        ' Save the file
        .Execute

            End If
                ' Return the current path to its original state
                ChDir sPath

        End With
        Else
           ' The Billing range name is not there,
           ' so this cannot be a Billing file
           MsgBox wkb.Name & 11 is not a 11 & sNAME_BILLING & 11 workbook” , _
                  vbInformation, “Convert 11 & sNAME_BILLING & 11 Statement”
        End If
    End If

End Sub
FileDialogFilters Collection Object
Represents all the filters shown in the new FileDialog object, including custom filters created using the Add method of the Filters property for the FileDialog object.
Note that filters created using the Add method of the Filters property do not appear in the standard Open and Save As dialogs.
FileDialogFilters Collection Common Properties
The Application, Count, Creator, and Parent properties are defined at the beginning of this Appendix.
FileDialogFilters Collection Methods

Example: FileDialogFilters Collection Object
The following routine uses the FileDialog object to display an Open dialog. The routine uses the Add method of the Filters property to add a custom Billing file type to the Files of Type drop-down in the Open dialog. Note that the custom filter is persistent, which is why this routine removes the filter once the dialog box is dismissed:
Sub UsingFileDialogOpen()

   Const lFILTER_POSITION As Long = 1

   Dim lCount As Long
   Dim sChosen As String

   ' Set the properties of the File Open dialog
   With Application.FileDialog(msoFileDialogOpen)
   ' Change the default dialog title
   .Title = “Open Billing Files”

   ' Allow the user to select multiple files
   .AllowMultiSelect = True

   ' Set the filter description and filter position
   .Filters.Add “Billing Files” , “*.bil” , lFILTER_POSITION

   ' Switch to the custom filter before showing the dialog
   .FilterIndex = lFILTER_POSITION

   ' Show the dialog -1 means they didn't cancel
   If .Show = -1 Then
       ' Initialize the message string
       sChosen = “The following files were chosen:” & vbCrLf

       ' Dump filename (and path) of each file chosen in the
       ' message string
       For lCount = 1 To .SelectedItems.Count
           sChosen = sChosen & vbCrLf & .SelectedItems(lCount)
       Next lCount

       ' Display the list of each file chosen
       MsgBox sChosen, vbInformation

   End If

   ' Remove the filter when done
   .Filters.Delete lFILTER_POSITION

   End With
End Sub
FileDialogFilter Object
Represents a single filter in the FileDialogFilter collection. To reference an individual filter, use:
Application.FileDialog(msoFileDialogOpen).Filters(lIndex)
FileDialogFilter Common Properties
The Application, Creator, and Parent properties are defined at the beginning of this Appendix.
FileDialogFilter Properties

Example: FileDialogFilter Object
The following routine removes all custom billing file types from the list of filters in the msoFileDialogSaveAs type FileDialog:
Sub RemoveCustomBillingFilters()

    Dim lIndex As Long

    With Application.FileDialog(msoFileDialogOpen)
        ' Loop through the filter list backwards. When looping from top to
    ' bottom, deleted filters cause the filter below it (on the list)
    ' to move up one, causing the loop to skip over all filters
    ' below the deleted ones.
        For lIndex = .Filters.Count To 1 Step -1

        ' If the extension has a “bi” in it, it's our
        ' custom filter. Remove it.
            If .Filters(lIndex).Extensions Like “*.bi*” Then
                .Filters.Delete lIndex
        End If
    Next lIndex
    End With

End Sub
FileDialogSelectedItems Collection Object
This collection returns all of the chosen items in a FileDialog. It consists of more than one item when the FileDialog's AllowMultiSelect property is set to True, unless the msoFileDialogSaveAs FileDialog is used (where only one item is always returned). The FileDialogSelectedItems collection is a collection of strings.
FileDialogSelectedItems Collection Common Properties
The Application, Count, Creator, and Parent properties are defined at the beginning of this Appendix.
FileDialogSelectedItems Collection Methods

Example: FileDialogSelectedItems Collection Object
The following routine is an altered version of the previous ConvertBillingStatement procedure. This version uses the SelectedItems collection to return the path and filename from the msoFileDialogSaveAs FileDialog. It then checks the return value to insure that the phrase “Wrox Billing” appears and redisplays the FileDialog if it does not:
Sub ConvertBillingStatement2()

    ' Use this constant to insure that the company's keyword used for
    ' Billing remains consistent throughout this procedure
    Const sNAME_BILLING As String = “Billing”

    Dim bBillName As Boolean
    Dim nm As Excel.Name
    Dim sPath As String
    Dim wks As Excel.Worksheet
    Dim wkb As Excel.Workbook

    ' Check whether this is a billing workbook
    ' by checking for the existence of a hidden name
    On Error Resume Next
       Set wkb = ActiveWorkbook
    On Error GoTo 0

    ' If a workbook is active…
    If Not wkb Is Nothing Then
       On Error Resume Next
          Set nm = wkb.Names(sNAME_BILLING)

       ' If this is a billing file…
       If Not nm Is Nothing Then

          ' Store the current path
      sPath = CurDir

          ' Set the properties of the File Save As dialog
      With Application.FileDialog(msoFileDialogSaveAs)

             ' Change the default dialog title
             .Title = “Save “ & sNAME_BILLING & “ Number”

         ' Change the name of the Save button in the Dialog
         .ButtonName = “Save “ & sNAME_BILLING
             ' Switch to the Billing folder
         .InitialFileName = “C:” & sNAME_BILLING &
         .AllowMultiSelect = True

             ' Display the Details view in the dialog
         .InitialView = msoFileDialogViewDetails

             ' Loop until the path or filename has the phrase
         ' Wrox Billing in it (or they cancel)
         Do
                ' Assume the path or filename does have the phrase “Wrox
        ' Billing” in it by setting the BillName check to True
        bBillName = True

        ' Show the dialog -1 means they didn't cancel
        If .Show = -1 Then

        ' Set the boolean check by searching for the
        ' phrase Wrox Billing in the path or filename
        bBillName = (InStr(1, .SelectedItems(1), _
                             “ Wrox ” & sNAME_BILLING, vbTextCompare) > 0)

            ' If the phrase is there…
        If bBillName Then
                   ' Convert all formulas to values
           For Each wks In wkb.Worksheets
              wks.UsedRange.Copy
                      wks.UsedRange.PasteSpecial xlPasteValues
                   Next wks

                   ' Remove all range names except the one that
           ' identifies it as a Billing workbook
           For Each nm In wkb.Names
                       If nm.Name <> sNAME_BILLING Then nm.Delete
                   Next nm

                   ' Save the file
           .Execute

        Else
                   ' Warn them that they need the phrase “Wrox Billing”
           ' in the path or filename
                   MsgBox “The filename must contain the phrase “ & _
                  “'Wrox Billing'” , vbExclamation, _
              “Convert Workbook”
                End If
             End If
          Loop Until bBillName

          ' Return the current path to its original state
      ChDir sPath

          End With
     Else
     ' Billing range name is not there, so this is not a Billing file.
     MsgBox wkb.Name & 11 is not a 11 & sNAME_BILLING & 11 workbook” , _
            vbInformation, “Convert “ & sNAME_BILLING & “ Statement”
  End If
 End If

End Sub
FileSearch Object
The FileSearch object programmatically mimics the search feature in the host applications Open dialog (Tools ![]() Search command). This feature allows you to search for any file type in any group of folders, based on almost any criteria. Note that search settings are persistent and should be reset using the NewSearch method each time the FileSearch object is used. Note also that the NewSearch method does not reset the LookIn property.
Search command). This feature allows you to search for any file type in any group of folders, based on almost any criteria. Note that search settings are persistent and should be reset using the NewSearch method each time the FileSearch object is used. Note also that the NewSearch method does not reset the LookIn property.
FileSearch Common Properties
The Application, Creator, and Parent properties are defined at the beginning of this Appendix.
FileSearch Properties
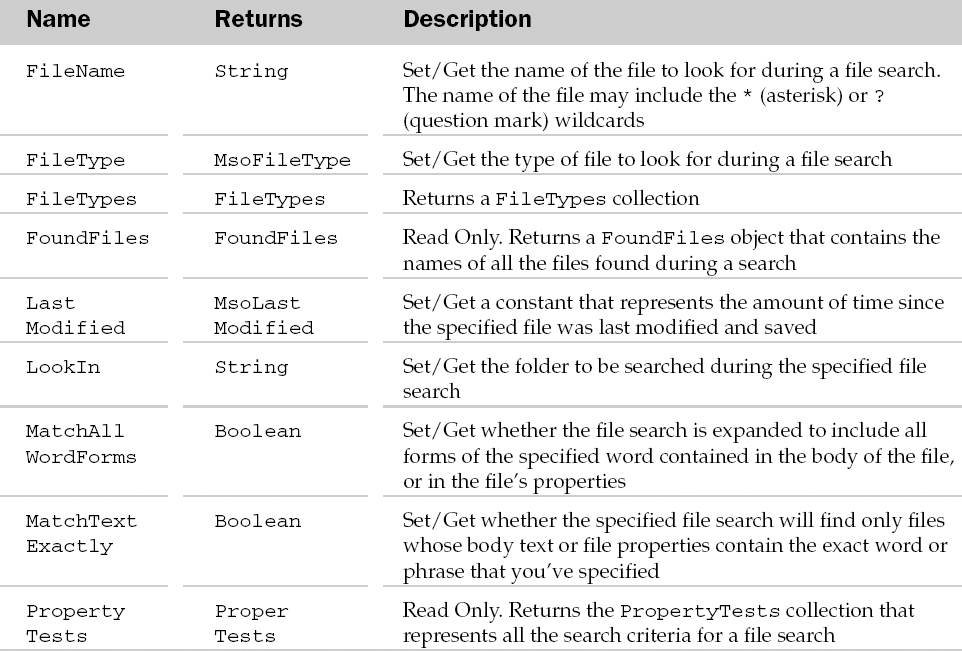
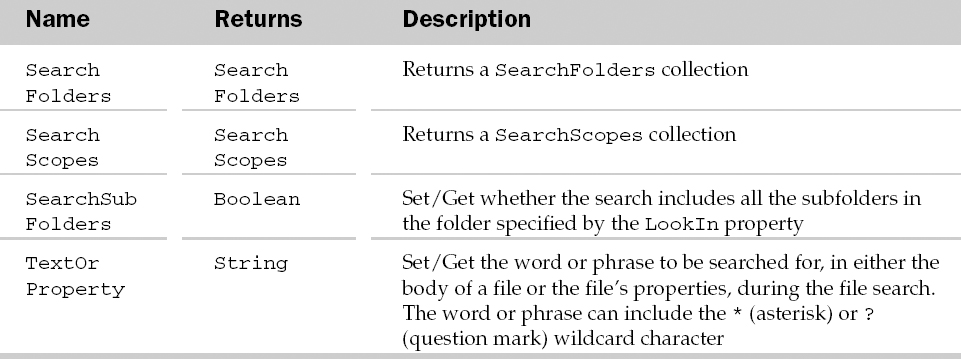
FileSearch Methods

Example: FileSearch Object
The following routine searches for any files containing the word “billing” in a billing folder that were modified in the last seven days and displays the results in a message box:
Sub SearchForRecentBilling()

    Dim lCount As Long
    Dim sFiles As String

    With Application.FileSearch

        ' Clear the previous search settings
    .NewSearch

        ' Search for any xls file with the word Billing
    .Filename = “*Billing*.xls”

        ' Search for Billing files this week
        .LastModified = msoLastModifiedThisWeek

        ' Look in the billing folder including subfolders
    .LookIn = “C:Billing”
    .SearchSubFolders = True

        ' Perform the search and return the results
    If .Execute > 0 Then
            sFiles = “Files Found:” & vbCrLf
        For lCount = 1 To .FoundFiles.Count
                sFiles = sFiles & vbCrLf & .FoundFiles(lCount)
            Next lCount
            MsgBox sFiles, vbInformation, “Billing Files”
        End If

    End With

End Sub
FileTypes Collection Object
Represents a set of file types you want to search for when using the FileSearch object. The file types in this collection persist from one search to another, so when searching for new or different file types, it's important to remove all of the file types from the FileTypes collection by using either the Remove method of this collection object or by setting a new file type using the FileType property.
FileTypes Collection Common Properties
The Application, Count, and Creator properties are defined at the beginning of this Appendix.
FileTypes Collection Properties

FileTypes Collection Methods

Example: FileTypes Collection Object
The following function resets the FileSearch object by calling the NewSearch method, resetting the Lookin property to a default path of C: and by removing each FileType from the FileTypes collection using a backward loop:
Sub NewSearch()
    ' Reset the FileSearch Object
    ResetFileSearch

    With Application.FileSearch
        ' Place code here for your new search
    End With

End Sub

Function ResetFileSearch()

    Dim lCount As Long
    Dim oFileTypes As FileTypes
    Dim oPropertyTests As PropertyTests

    With Application.FileSearch

    ' Clear the previous search settings
    .NewSearch

    ' Reset the Lookin property by setting it to a default
    ' The NewSearch method does not reset this property
    .LookIn = “C:”

    ' Remove all FileType items from the FileTypes Collection
    Set oFileTypes = .FileTypes

    ' When removing FileTypes, PropertyTests, and SearchFolders the
    ' index of the Type below the one you remove changes (decreases by
    ' one), so you need to step backwards in the collection to prevent
    ' the Subscript Out of Range error
    For lCount = oFileTypes.Count To 1 Step -1
        oFileTypes.Remove lCount
    Next lCount

    ' Remove the Property Tests
    Set oPropertyTests = .PropertyTests
    For lCount = oPropertyTests.Count To 1 Step -1
        oPropertyTests.Remove lCount
    Next lCount

    ' Reset the SearchFolders collection
    For lCount = .SearchFolders.Count To 1 Step -1
    .SearchFolders.Remove lCount
    Next lCount

  End With

End Function
FoundFiles Object
The FoundFiles object contains the list of files returned from a file search.
FoundFiles Common Properties
The Application, Creator, and Parent properties are defined at the beginning of this Appendix.
FileTypes Collection Properties

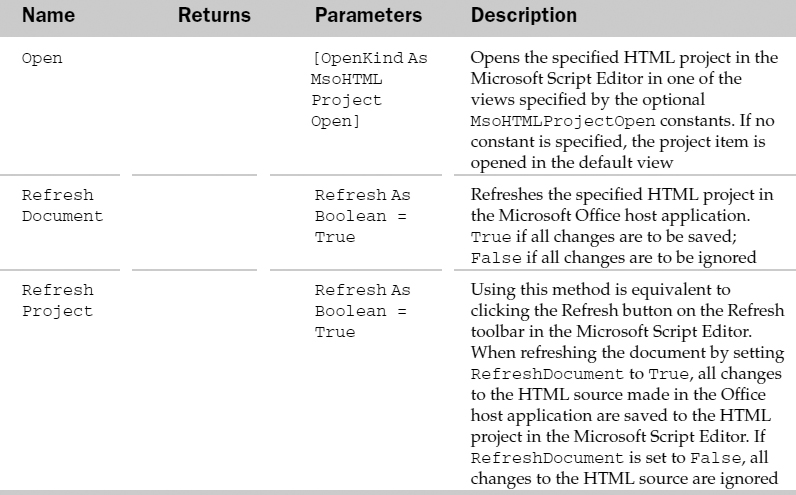
HTMLProject Object
Represents the HTML code used to display the Office document as an HTML document. You can use Microsoft's Script Editor to access the HTML version of the Office document.
Learning how to manipulate objects and settings using Microsoft's Script Editor and programming using HTML is beyond the scope of this book. However, a brief description is warranted before you using the Office model's HTML objects.
The Script Editor is similar the Visual Basic Editor (VBE). It contains a Project Explorer, a Properties window, a Toolbox for adding controls, and a Code window for creating HTML code, similar to the VBE. Changing settings and manipulating the document via the Script Editor changes the office document itself, similar to using the VBE to change settings and using VBA code to manipulate the document. In Excel, the data is displayed in a worksheet format, with WYSIWYG (What You See Is What You Get) formatting displayed. The Script Editor gives you access to all of the formatting, settings, data, and HTML code in one window. You don't see the formatting, but can see the HTML code that comprises the formatting.
You use the Script Editor to customize the HTML version of the Office Document similar to using the VBE to customize—a Workbook in the VBE—by adding/editing HTML code, changing object settings, adding events, etc. Editing the settings and HTML code in the Script Editor will in most cases change the Office document itself.
An HTML Project holds objects similar to that of a VBProject for a Workbook. For example, each VBProject for a Workbook contains Sheet objects for each Sheet in the Workbook. The HTML Project for the same Workbook also contains an object for each Sheet in the Workbook. The Script Editor allows you to edit the properties of the HTML objects using a Properties window, just like the Properties window in the VBE, though most of the properties between Editors don't match. For example, in the Script Editor, you can double-click one of the Sheet objects and in the Properties window change the Background setting so that it points to an image on the harddrive. When you save the project from within the Script Editor, you can see the new background appear when viewing that sheet in the Excel window. There is no such Property for the Sheet object in the VBE, but in Excel this feature can be accessed using the Format ![]() Sheet
Sheet ![]() Background command or by using VBA code to programmatically change the background.
Background command or by using VBA code to programmatically change the background.
The HTML objects in this Office model allow access to and manipulation of the HTML objects of an Office document, similar to the VBE object model allowing access to the VBProject and its objects.
HTMLProject Common Properties
The Application, Creator, and Parent properties are defined at the beginning of this Appendix.
HTMLProject Properties

HTMLProject Methods
Example: HTMLProject Object
The following routine sets a reference to the ActiveWorkbook's HTMLProject and then uses that reference to provide a count of items, the locked state of the project. It then displays the project in the Script Editor:
Sub HTMLProjectInfo()

    Dim oHTMLProject As HTMLProject

    ' Store a reference to the HTML project
    Set oHTMLProject = ActiveWorkbook.HTMLProject
    With oHTMLProject
       ' Display the number of items in the project and
       ' whether the document or project is locked or not
       MsgBox “Project Items: “ & .HTMLProjectItems.Count & vbCrLf & _
              “Locked State: “ & .State, vbInformation, _
              “HTML Project Details”
       ' Display the Project in the Script Editor
       .Open (msoHTMLProjectOpenSourceView)
   End With

End Sub
HTMLProjectItems Collection Object
Represents all of the objects (items) contained in an HTMLProject. All projects contain a StyleSheet object, which contains styles used by the entire project (similar to the Styles feature in Excel and Word). All projects contain an object representing the document (workbook).
For example, a workbook called “Wrox Examples.xls” will contain an HTMLProjectItem called WroxExamples.xls in the HTMLProjectItems Collection for that workbook's HTMLProject. This item in the project stores information about the application it runs in, the objects inside the project (for example, sheets in workbook), as well as Document Properties (both built-in and custom) like those discussed in the DocumentProperties collection section of this index. In addition, each Sheet in Excel is also an object in the HTMLProjectItems collection.
HTMLProjectItems Collection Common Properties
The Application, Count, Creator, and Parent properties are defined at the beginning of this Appendix.
HTMLProjectItems Collection Methods

HTMLProjectItem Object
Represents one item in the HTMLProjectItems collection.
HTMLProjectItem Common Properties
The Application, Creator, and Parent properties are defined at the beginning of this Appendix.
HTMLProjectItem Properties
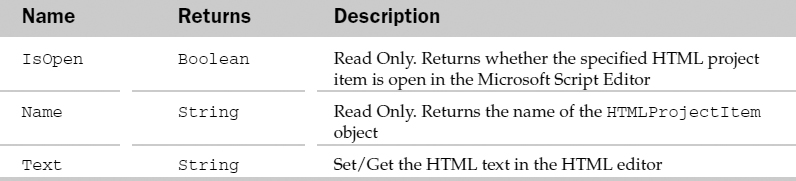
HTMLProjectItem Methods

Example: HTMLProjectItem Object
The following routine stores the HTML code for the Workbook item in the HTMLProjectItems Collection in a text file and then displays the code in the Script Editor:
Sub OpenAndExportWorkbookItem()
    Dim oHTMLItem As HTMLProjectItem

    ' Store a reference to the Workbook object of this project
    ' Note: Use 1 when running this code in a multi-language environment
    ' 1 is always the Workbook (Document) object in the HTMLProject
    Set oHTMLItem = _
             ThisWorkbook.HTMLProject.HTMLProjectItems(” WroxExamples.xls” )

    With oHTMLItem
        ' Store the HTML code for the Workbook Item
    .SaveCopyAs “C:BillingWorkbookSettings.txt”

        ' Display it in the Scrip Editor
    .Open
    End With

End Sub
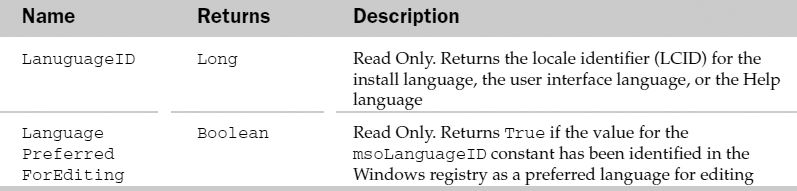
LanguageSettings Object
Returns information about the language settings currently being used in the host application. These are Read Only and can affect how data is viewed and edited in certain host applications.
LanguageSettings Common Properties
The Application, Creator, and Parent properties are defined at the beginning of this Appendix.
LanguageSettings Properties
Example: LanguageSettings Object
The following routine displays a message if additional language modes are not available. In Access and Excel, additional language modes can affect how the program is viewed and edited:
Sub ChangeLanguageID()

    Dim oLanguage As LanguageSettings

    ' Grab the reference to the Language Settings
    Set oLanguage = Application.LanguageSettings

    ' Test for any additional language support and report
    ' the result if none are available
    If oLanguage.LanguageID(msoLanguageIDExeMode) = 0 Then
        MsgBox “Support for multiple language viewing and editing is “ & _
           “not currently available. Please install additional “ & _
           “languages to enable. See search for LanguageID in your “ & _
               “application's VBA help for more details” ,
               vbInformation, “Language ID”
    End If

End Sub
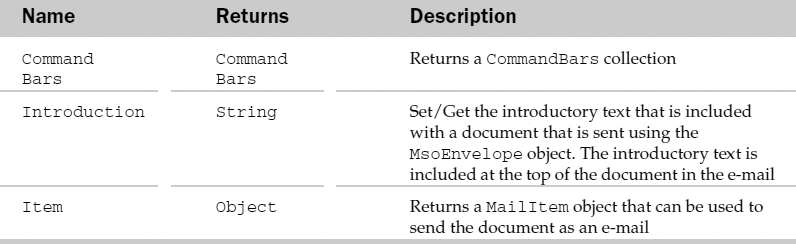
MsoEnvelope Object
This new Office object allows you to send data from a host application using an Outlook mail item without having to reference and connect to the Outlook Object model. Using the Index property of this object allows access to a host of Outlook features not available through the SendMail feature, such as Voting Options, CC, and BCC fields, Body Formatting choices (HTML, Rich text, Plain text) and much more.
Note that the MsoEnvelope object sends the document as inline (formatted) text. It does not attach the document to an e-mail, though you can add attachments using the Attachments property of the MailItem object, which you can access via this object's Index property. For Excel, this object can only be accessed through a Worksheet or a Chart object, which means it only sends those objects (and not the entire workbook). Similar to the SendMail feature in Excel, except that this exposes a CommandBar object associated with this feature and allows for setting of Introduction text.
The properties you set are saved with the document/workbook and are therefore persistent.
MsoEnvelope Common Properties
The Parent property is defined at the beginning of this Appendix.
MsoEnvelope Properties
MsoEnvelope Events

Example: MsoEnvelope Object
The following routine creates an Outlook MailItem for a worksheet (using its Name property from the Properties window in the VBE) and sets the subject, introduction text and recipient, adds the entire workbook as an attachment, and sends it:
Sub SendSheet()
    SendMsoMail “Robert Rosenberg”
End Sub

Function SendMsoMail(ByVal strRecipient As String)

     Dim oMailEnv As MsoEnvelope
     Dim oMailItem As MailItem

     ' Grab a reference to the MsoEnvelope
     Set oMailEnv = wksIncome.MailEnvelope

     ' Set up the Envelope
     With oMailEnv

         ' Add intro text, which appears just above the data
     ' in the Outlook Mail Item
         .Introduction = “Here are the figures you asked for.” & _
       “Attached is the entire workbook for your convenience.”

       ' Grab a reference to the MailItem which allows us access to
       ' Oulook MailItem properties and methods
       Set oMailItem = .Item

       ' Set up the MailItem
       With oMailItem

           ' Attach this workbook
           .Attachments.Add ThisWorkbook.FullName

           ' Make sure the email format is HTML
       .BodyFormat = olFormatHTML

       ' Add the recipient name and resolve it using
       ' Outlook's Check Name feature)
       .Recipients.Add strRecipient
       .Recipients.ResolveAll

           ' Add the Subject
           .Subject = “Here is the document.”

       ' Send it off. The Display method does not work
       .Send

        End With

    End With

End Function
NewFile Object
Represents a new document listing in the Task Pane of the host application. In Excel, this object allows you to add workbooks to any of the five sections in the Task Pane: Open a Workbook, New, New from existing workbook, New from template, or the bottom section (which has no name). When clicking added workbooks in the New, New from existing workbook, or New from template sections, Excel, by default, creates a copy of the file unless you override it using the Action parameter of the Add method.
NewFile Common Properties
The Application and Creator properties are defined at the beginning of this Appendix.
NewFile Methods

Example: NewFile Object
The following routine adds a new file to the New From Existing Workbook section of the Task Pane. It will display on the Task Pane as New Billing Workbook, but when clicked will open a copy of the NewFile.xls workbook in the Billing folder on the harddrive:
Sub AddNewWorkbookToTaskPane()

    Dim oNewFile As NewFile

    ' Grab a reference to the NewFile object
    Set oNewFile = Application.NewWorkbook

    ' Add the file to the task pane. It places it in the New From Existing
    ' Workbook section of the Task Pane
    oNewFile.Add Filename:=” C:BillingNewFile.xls” , _
                 Section:=msoNewfromExistingFile, _ DisplayName:=” New Billing Workbook” , _
         Action:=msoCreateNewFile

    ' The new listing on the Task Pane will not show up
    ' until you hide and display the Task pane
    Application.CommandBars(” Task Pane” ).Visible = False
    Application.CommandBars(” Task Pane” ).Visible = True

End Sub
ODSOColumns Collection Object
Represents a set of data fields (columns) in a Mail Merge Data Source.
Cannot be implemented at this time. Requires that the OfficeDataSourceObject be referenced via the Application object of the host application. No OfficeData SourceObject exists in any of the Application objects in Microsoft Office XP.
ODSOColumn Object
Represents a single field in a MailMerge Data Source.
Cannot be implemented at this time. Requires that the OfficeDataSourceObject be referenced via the Application object of the host application. No OfficeData SourceObject exists in any of the Application objects in Microsoft Office XP.
ODSOFilters Collection Object
Represents a set of filters applied to a Mail Merge Data Source. Filters are essentially queries that restrict which records are returned when a Mail Merge is performed.
Cannot be implemented at this time. Requires that the OfficeDataSourceObject be referenced via the Application object of the host application. No OfficeData SourceObject exists in any of the Application objects in Microsoft Office XP.
ODSOFilter Object
Represents a single Filter in the ODSO (Office Data Source Object) Filters collection.
Cannot be implemented at this time. Requires that the OfficeDataSourceObject be referenced via the Application object of the host application. No OfficeData SourceObject exists in any of the Application objects in Microsoft Office XP.
OfficeDataSourceObject Object
Represents a data source when performing a Mail Merge operation. Allows you to return a set of records that meet specific criteria.
Cannot be implemented at this time. Requires that the OfficeDataSourceObject be referenced via the Application object of the host application. No OfficeData SourceObject exists in any of the Application objects in Microsoft Office XP.
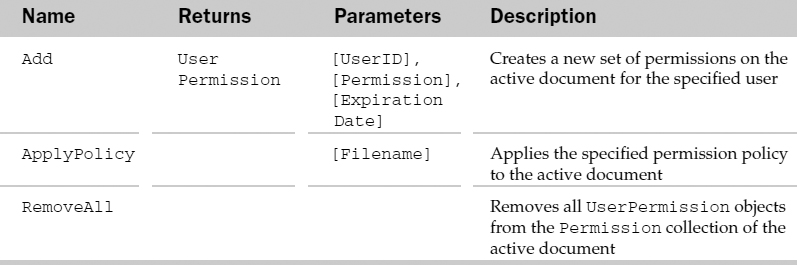
Permission Object
Use the Permission object to restrict permissions to the active document and to return or set specific permissions settings.
Permission Properties


Permission Methods
PropertyTests Collection Object
This collection object represents the list of search criteria when using the FileSearch object. They are analogous to viewing the list of criteria on the Advanced tab of the Search dialog box (accessed via the Tools ![]() Search command inside the File
Search command inside the File ![]() Open dialog box. This object collection is used when you need to set multiple criteria during a File Search.
Open dialog box. This object collection is used when you need to set multiple criteria during a File Search.
Use the Add method of this collection object to add advanced criteria to your file search.
PropertyTests Collection Common Properties
The Application, Count, and Creator properties are defined at the beginning of this Appendix.
PropertyTests Collection Properties

PropertyTests Collection Methods

Example: PropertyTests Collection Object
The following routines prompt a user for a billing number, then search for all Excel workbooks in a billing folder on the harddrive whose custom document property called BillingNumber is greater than or equal to their answer:
Sub SearchBillingNumber()
    Dim lCount As Long, lNumber As Long
    Dim oFiles As FoundFiles
    Dim sFiles As String
    ' Ask them which number they want for the lower bound of the
    ' Billing Number search
    lNumber = Application.InputBox( _
           “What billing number (starting with 1) do you” & _
       “want the search to start with?” , _
       “Search for Billing Numbers” , , , , , , 1)

   ' If they gave a number greater than 1…
   If lNumber > 0 Then
       ' Assume no files were found
       sFiles = “No Files found”

       ' Use the ReturnBillingNumbers function to return a list of billing
       ' files with Billing Numbers greater than lNumber
       Set oFiles = ReturnBillingNumbers(lNumber)

       ' Report the results
       If Not oFiles Is Nothing Then
           sFiles = “Files Found:” & vbCrLf
       For lCount = 1 To oFiles.Count
               sFiles = sFiles & vbCrLf & oFiles(lCount)
       Next lCount
       End If

       ' Display the search results
       MsgBox sFiles, vbInformation, “Billing Files”
    End If
End Sub
Function ReturnBillingNumbers(lNumber As Long) As FoundFiles

    With Application.FileSearch

        ' Reset the previous search including the FileTypes, Lookin values,
    ' and property tests
        ' See the FileTypes Collection example for this routine.
    ResetFileSearch

        ' Add 1st condition: Excel Workbooks only. Use the And value of
    ' Connector parameter to insure that both conditions are met
    .PropertyTests.Add _
             Name:=” Files of Type” , _
             Condition:=msoConditionFileTypeExcelWorkbooks, _
         Connector:=msoConnectorAnd

        ' Add 2nd Condition:
        'CustomDocumentProperty called BillingNumber is greater than lNumber
    .PropertyTests.Add _
            Name:=” BillingNumber” , _
        Condition:=msoConditionMoreThan, _
        Value:=lNumber

        ' Search the Billing folder
    .LookIn = “C:Billing”

        ' Perform the search and return the results
    If .Execute > 0 Then
            Set ReturnBillingNumbers = .FoundFiles
    End If

    End With

End Function
PropertyTest Object
Represents a single criteria in the PropertyTests collection.
PropertyTest Common Properties
The Application, Creator, and Parent properties are defined at the beginning of this Appendix.
PropertyTest Properties


Example: PropertyTest Object
The following routine removes the PropertyTest that is searching for Excel workbooks:
Sub RemoveExcelPropertyTest()

    Dim lItem As Long
    Dim oProperty As PropertyTest

    ' Initialize the property test counter
    lItem = 1

    With Application.FileSearch
        ' Loop through the PropertTests collection
        For Each oProperty In .PropertyTests
            ' Remove the property test that's searching for Excel workbooks
            If oProperty.Condition = msoConditionFileTypeExcelWorkbooks Then
                .PropertyTests.Remove lItem
                Exit For

            Else
                lItem = lItem + 1
            End If
        Next oProperty
    End With

End Sub
ScopeFolders Collection Object
This collection contains a list of subfolders in a ScopeFolder object. It's used by the FileSearch object's SearchFolders collection to determine which folders and subfolders are used in a search. Each item in a ScopeFolders collection is a ScopeFolder, a folder that can be (but is not necessarily) used in a search. Each ScopeFolder that contains subfolders has in effect its own ScopeFolders collection, similar to folders having subfolders having more subfolders and so on.
ScopeFolders Collection Common Properties
The Application, Count, and Creator properties are defined at the beginning of this Appendix.
ScopeFolders Collection Properties

ScopeFolder Object
Represents a single folder in a ScopeFolders collection. Each ScopeFolder can contain a ScopeFolders collection, which represents a ScopeFolder's subfolders. Both ScopeFolder and the ScopeFolders collection can be analyzed to determine whether they will be used in a search by the FileSearch object. Any ScopeFolder you want used in a search is added to the SearchFolders collection using the ScopeFolder's AddToSearchFolders method.
ScopeFolder Common Properties
The Application and Creator properties are defined at the beginning of this Appendix.
ScopeFolder Properties

ScopeFolder Methods

Example: ScopeFolder Object
The following routines dump a list of Excel workbooks from all of the folders in the harddrive that contain the word billing:
Sub FindBillingFiles()

    Dim lCount As Long
    Dim oSearchFolders As SearchFolders
    Dim sFiles As String

    With Application.FileSearch

        ' Reset the Search. See FileTypes collection for this routine
    ResetFileSearch

        ' Search for Excel workbooks
    .FileType = msoFileTypeExcelWorkbooks
        ' Search all folders containing the word “Billing” in the hard drive
    Set oSearchFolders = BillingFolders(” RCOR HD (C:)” , “Billing” )
    If Not oSearchFolders Is Nothing Then
             .LookIn = oSearchFolders(1)
        End If

    ' Assume no files will be found
    sFiles = “No Files found”

        ' If we found any files, list them
    If .Execute > 0 Then
       sFiles = “Files Found:” & vbCrLf
       For lCount = 1 To .FoundFiles.Count
               sFiles = sFiles & vbCrLf & .FoundFiles(lCount)
           Next lCount
       End If

   End With

   ' Report the results
   MsgBox sFiles, vbInformation, “Billing Files”

End Sub
This function is called by the main FindBillingFiles routine and creates the set of Search Folders for the FileSearch object.
Function oSetSearchFolders(sDrive As String, _
                           sKeyName As String) As SearchFolders

   Dim lCount As Long
   Dim oSearchScope As Searchscope
   Dim oScopeFolder As ScopeFolder

   With Application.FileSearch

   ' Search only the local machine (not Network neighborhood)
   For Each oSearchScope In .SearchScopes
       ' Only look in the local hard drive
       If oSearchScope.Type = msoSearchInMyComputer Then
           'Loop through each ScopeFolder in the ScopeFolders
           ' collection within the SearchScope object.
           For Each oScopeFolder In _
                        oSearchScope.ScopeFolder.ScopeFolders
               If oScopeFolder.Name = sDrive Then
                   ' This function adds any folders containing
                   ' the word Billing to the SearchFolders collection.
                   AddFolders oScopeFolder.ScopeFolders, sKeyName
               End If
           Next oScopeFolder
         End If
     Next oSearchScope
     ' If any billing folders were found pass the search folders back to
     ' the calling routine
       If .SearchFolders.Count > 0 Then
           Set oSetSearchFolders = .SearchFolders
       End If

    End With

End Function
This routine is called by the oSetSearchFolders function and adds a ScopeFolder to the SearchFolders collection:
Sub AddFolders(ByVal oScopeFolders As ScopeFolders, ByRef sFolder As String)

    ' Declare a variable as a ScopeFolder object
    Dim oScopeFolder As ScopeFolder

    ' Loop through each ScopeFolder object in the ScopeFolders collection.
    For Each oScopeFolder In oScopeFolders
        ' Don't bother looking in the WINNT or Windows folders
    If LCase(oScopeFolder.Name) <> “winnt” And _
                LCase(oScopeFolder.Name) <> “windows” Then
        ' Test to see if the folder name of the ScopeFolder
        ' matches the value of sFolder. Use LCase to ensure
        ' that case does not affect the match.
        If InStr(1, LCase(oScopeFolder.Name), _
                 LCase(sFolder), vbTextCompare) > 0 Then

             ' Add the ScopeFolder to the SearchFolders collection.
             oScopeFolder.AddToSearchFolders

        End If

        ' Allow this process to continue handling events
         DoEvents

        ' If the current ScopeFolder has ScopeFolders (subfolders)…
        ' Supress errors resulting from certain folders not being
        ' perceived as folders
        On Error Resume Next
        If oScopeFolder.ScopeFolders.Count > 0 Then
            ' Call this routine again (recursively) to handle the '
            subfolders
            AddFolders oScopeFolder.ScopeFolders, sFolder
        End If

        On Error GoTo 0

    End If

 Next oScopeFolder

End Sub
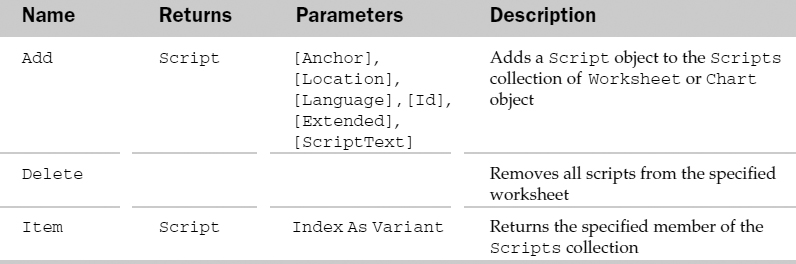
Scripts Collection Object
Represents all of the scripts in a document, like an Excel worksheet, a PowerPoint slide, or a Word document. Scripts are blocks of code written in ASP, Java, Visual Basic, or any other language able to run in an HTML environment. Scripts are run when the document they are contained within is displayed as an HTML document.
Understanding how to create HTML scripts is beyond the scope of this book.
Scripts Collection Common Properties
The Application, Count, Creator, and Parent properties are defined at the beginning of this Appendix.
Scripts Collection Methods
Example: Scripts Collection Object
The following routine adds a simple script to the body (cell A1) of a worksheet called Income Report. When the page is displayed in either a browser or in Excel's Web Page Preview, a simple message box is displayed warning the user that the figures are based on last year's data:
Sub AddScriptToReport()

    Const sSCRIPT_NAME As String = “DataWarning”

    Dim oScript As Script

    On Error Resume Next
       ThisWorkbook.Worksheets(” Income Report” ).Scripts(sSCRIPT_NAME).Delete
    On Error GoTo 0

    ThisWorkbook.Worksheets(” Income Report” ).Scripts.Add _
       Anchor:=ThisWorkbook.Worksheets(” Income ReportM).Range(MA1” ), _
       Location:=msoScriptLocationInBody, _
       ID:=sSCRIPT_NAME, _
       ScriptText: = “MsgBox “” Income Report based on last year's data
End Sub
Script Object
A Script object represents one block of HTML code within the Scripts collection. You can reference a Script object using the Item method of the Scripts collection object, as follows:
ThisWorkbook.Worksheets(” Income Report” ).Scripts(1)
or:
ThisWorkbook.Worksheets(” Income Report” ).Scripts.Item(1)
You can also reference a Script object by specifying its ID:
ThisWorkbook.Worksheets(” Income Report” ).Scripts(” DataWarning” )
Script Common Properties
The Application, Creator, and Parent properties are defined at the beginning of this Appendix.
Script Properties

Script Methods

Example: Script Object
The following routine removes all of the scripts from every sheet (chart or worksheet) in the active workbook:
Sub RemoveScripts()

    Dim oScript As Script
    Dim sh As Object

    ' Suppress errors (ex: no active workbook)
    On Error Resume Next

    ' Remove all of the scripts objects in this workbook
    For Each sh In ActiveWorkbook.Sheets
        For Each oScript In sh.Scripts
            oScript.Delete
        Next oScript
    Next sh

End Sub
SearchFolders Collection Object
Represents all of the folders used in a File Search (by the FileSearch object). SearchFolders consist of ScopeFolder objects (with the corresponding ScopeFolders collection), which are simply folders. Use the Add method of the SearchFolders object to add ScopeFolder objects to its collection.
SearchFolders Collection Common Properties
The Application, Count, and Creator properties are defined at the beginning of this Appendix.
SearchFolders Collection Properties

SearchFolders Collection Methods

Example: SearchFolders Collection Object
The following routine searches for all Excel workbooks in folders containing the word “billing” on the F drive (on the network) and displays the results on a worksheet:
Sub ReportBillingFilesFromNetWorkDrive()

    Dim lCount As Long, lRow As Long
    Dim oSearchScope As SearchScope
    Dim oScopeFolder As ScopeFolder
    Dim oScopeSubFolder As ScopeFolder

    With Application.FileSearch

         ' Reset FileSearch object. See FileTypes collection for this routine
     ResetFileSearch

     ' Loop through the SearchScopes collection
     ' looking for the My Computer area (scope)
     For Each oSearchScope In .SearchScopes
             If oSearchScope.Type = msoSearchInMyComputer Then
         Set oScopeFolder = oSearchScope.ScopeFolder
         Exit For
     End If
     Next oSearchScope

     ' Now loop through the My computer area (scope)
     ' until we find the mapped “F Billing” drive on the network
     For Each oScopeSubFolder In oScopeFolder.ScopeFolders
         If oScopeSubFolder.Name = “Billing (F:)” Then
         Set oScopeFolder = oScopeSubFolder
         Exit For
     End If
     Next oScopeSubFolder

     ' Now loop through each top-level folder in the F drive adding any
     ' folder that contains the name Billing to the SearchFolders
     ' collection
     Set oScopeSubFolder = Nothing
     For Each oScopeSubFolder In oScopeFolder.ScopeFolders
         If InStr(1, oScopeSubFolder.Name, _
                  “ billing” , vbTextCompare) > 0 Then
             .SearchFolders.Add oScopeSubFolder
     End If
     Next oScopeSubFolder

     ' Look for Excel workbooks
     .FileType = msoFileTypeExcelWorkbooks

     ' Don't search subfolders. Setting this to True will override the
     ' SearchFolders collection and will search the entire contents of
     ' the F drive
     .SearchSubFolders = False

     If .Execute > 0 Then 'Files were found

         ' Dump the files found on the wksBillingFiles worksheet
             wksBillingFiles.UsedRange.Offset(1, 0).ClearContents

         ' The first row contains the column heading
         lRow = 2
                 For lCount = 1 To .FoundFiles.Count
                     wksBillingFiles.Cells(lRow, 1).Value = .FoundFiles(lCount)
               lRow = lRow + 1
           Next lCount
        Else
            MsgBox “No Files found” , vbInformation, “Billing Files”
        End If

    End With

End Sub
SearchScopes Collection Object
Represents the list of top-level searchable areas when performing a File Search using the FileSearch object. Top level areas include My Computer, My Network Places, Outlook (folders), and Custom, if available.
SearchScopes Collection Common Properties
The Application, Count, and Creator properties are defined at the beginning of this Appendix.
SearchScopes Collection Properties

Example: SearchScopes Collection Object
The following routine lists all of the SearchScopes on the current computer.
Sub FindSearchScopes()

    Dim lRow As Long
    Dim oSearchScope As SearchScope

    With Application.FileSearch

        ' Clear the old results
        wksSearchScopes.Range(” Info” ).ClearContents

    ' Set the starting row
        lRow = wksSearchScopes.Range(” Info” ).Cells(1, 1).Row

        ' Loop through the SearchScopes collection
    ' looking for the My Computer area (scope)
    For Each oSearchScope In .SearchScopes
            ' Dump the info found on the wksSearchScopes worksheet
           wksSearchScopes.Cells(lRow, 1).Value = _
               oSearchScope.ScopeFolder.Name
           wksSearchScopes.Cells(lRow, 2).Value = oSearchScope.Type
           lRow = lRow + 1
       Next oSearchScope

       ' Sort the list by Scope Type
       With wksSearchScopes
            .Range(” Info” ).Sort Key1:=.Cells(1, 2), Order1:=xlAscending
        End With

    End With

End Sub
SearchScope Object
An individual top-level area in the SearchScopes Collection object that can be searched when using the FileSearch object.
SearchScope Common Properties
The Application and Creator properties are defined at the beginning of this Appendix.
SearchScope Properties
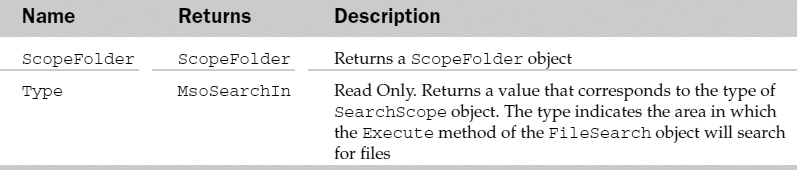
SharedWorkspace Object
The SharedWorkspace property returns a SharedWorkspace object which allows the developer to add the active document to a Microsoft Windows SharePoint Services document workspace on the server and to manage other objects in the shared workspace.
SharedWorkspace Properties

SharedWorkspace Methods

SharedWorkspaceFile Object
The SharedWorkSpaceFile object represents a file that has been saved in a shared document workspace. This shared document workspace would typically be a Sharepoint server.
SharedWorkspaceFile Properties

SharedWorkspaceFile Methods

SharedWorkspaceFolder Object
Represents a folder in a shared document workspace.
SharedWorksapceFolder Properties

SharedWorkspaceFolder Methods

SharedWorkspaceLink Object
Represents a URL link saved in a shared document workspace.
SharedWorkspaceLink Properties
SharedWorkspaceLink Methods

SharedWorkspaceMember Object
The SharedWorkspaceMember object represents a user who has rights in a shared document workspace.
SharedWorkspaceMember Properties
SharedWorkspaceMember Methods

SharedWorkspaceMembers Collection Object
Contains a collection of SharedWorkspaceMember objects.
SharedWorkspaceTask Object
Represents a task saved in a shared document workspace.
SharedWorkspaceTask Properties
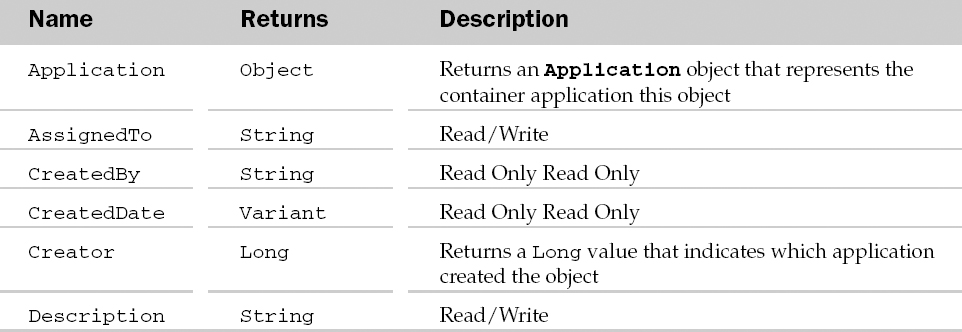
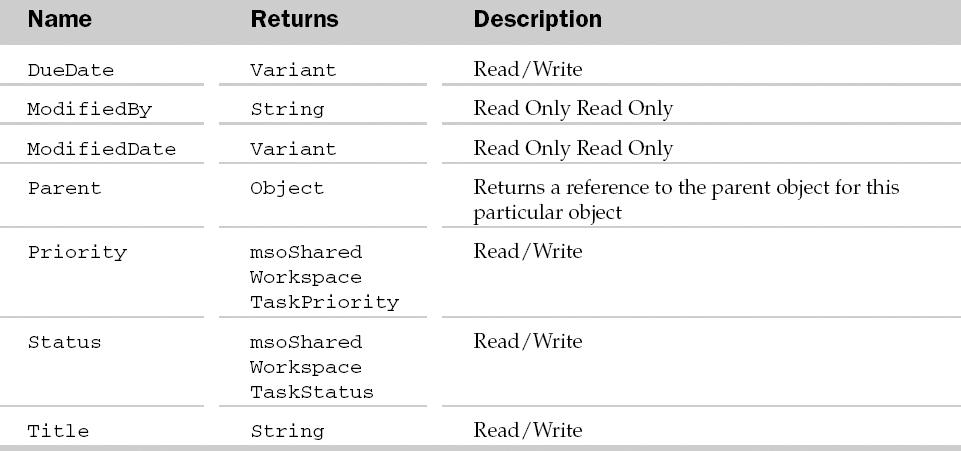
SharedWorkspaceTask Methods

SharedWorkspaceTasks Collection Object
Contains a collection of SharedWorkspaceTask objects.
Signature Object
This object represents a digital signature attached to a document. Digital Signatures are electronic versions of handwritten signatures. They enable other users of your document to uniquely identify and validate the source of the document.
When a document containing a digital signature contains macros, users who open the document have the option of trusting the author, or source of the signature. When macro security for an Office application is set to high, only macros from trusted sources are enabled. This protects those other users from opening documents that could contain macro viruses by allowing them to choose which sources they wish to trust.
Digital Signatures also add a level protection for the author of the document by insuring that the contents of the document remained unchanged. When you digitally sign a document, an encrypted key is added to the signature. When other users change the document, a message appears informing them that they do not have the key to unlock the signature. This causes the document to lose its signature.
This object is currently not accessible in Microsoft Excel, though it is available through the Document object in Microsoft Word and the Presentation object in Microsoft PowerPoint.
Signature Common Properties
The Application, Creator, and Parent properties are defined at the beginning of this Appendix.
Signature Properties
Signature Methods

SignatureSet Collection Object
Represents all of the Signature objects in a document.
SignatureSet Collection Common Properties
The Application, Count, Creator, and Parent properties are defined at the beginning of this Appendix.
SignatureSet Collection Properties

SignatureSet Collection Methods

Example: SignatureSet Collection Object
The following routine adds a digital signature to the active PowerPoint presentation, then displays the information contained within the signature chosen. Note that the Add method of the Signatures property prompts the user with a dialog box containing a list of digital signatures:
Sub AddSig()

    Dim lIcon As Long
    Dim ppt As Presentation
    Dim oSignature As Signature
    Dim sInfo As String

    ' Check for an active presentation
    On Error Resume Next
       Set ppt = ActivePresentation
    On Error GoTo 0
    'If there's a presentation active…
    If Not ppt Is Nothing Then

        ' Set the icon that will appear in the message box to information
    lIcon = vbInformation

        ' Add the signature to the presentation. This will prompt the user
    ' to select a signature and return all of the property settings to
    ' the oSignature object
    Set oSignature = ppt.Signatures.Add

    ' Commit the changes to disk. This will display a “Signed” message
    ' next to the presentation name
    ppt.Signatures.Commit

    ' Initialize the message string
        sInfo = “Signature Information:” & vbCrLf & vbCrLf

    ' Add the signature info to the message
    With oSignature
            sInfo = sInfo & “Issuer: “ & .Issuer & vbCrLf
        sInfo = sInfo & “Signer: “ & .Signer & vbCrLf
        sInfo = sInfo & “Sign Date: “ & .SignDate & vbCrLf
        sInfo = sInfo & “Expire Date: “ & .ExpireDate
    End With
     Else
        ' No presentation active, so set the message box icon to exclamation
    ' and the message to inform the user
    lIcon = vbExclamation
        sInfo = “No presentation is currently active”
    End If

    ' Display the message
    MsgBox sInfo, lIcon, “Add Signature”

End Sub
SmartDocument
This is used to manage the XML expansion pack attached to the currently active document.
SmartDocument Properties
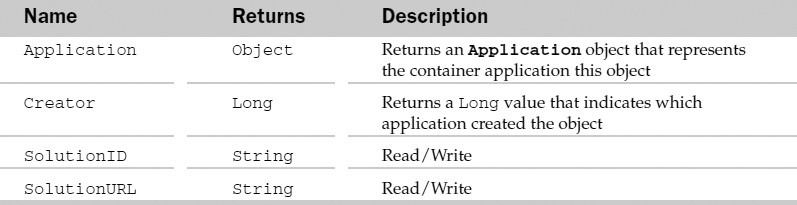
SmartDocument Methods

Sync Object
Use the Sync object to manage the synchronization of the local and server copies of a shared document stored in a Windows SharePoint Services document workspace. The Status property returns important information about the current state of synchronization. Use the GetUpdate method to refresh the sync status. Use the LastSyncTime, ErrorType, and WorkspaceLastChangedBy properties to return additional information.
Sync Properties
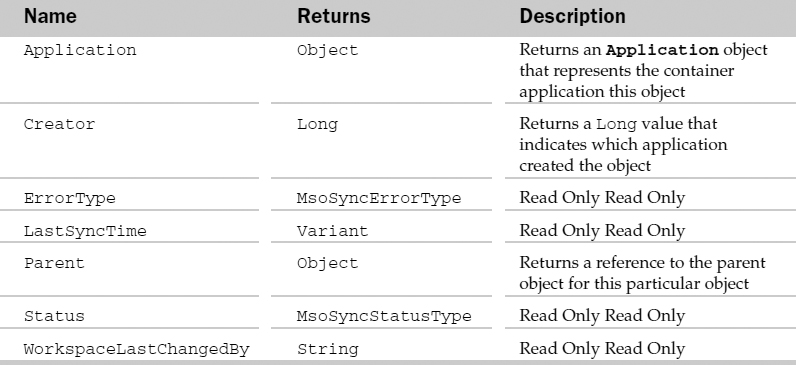
Sync Methods
UserPermission
Represents a set of permissions on a document for a single user.
UserPermission Properties

UserPermission Methods

WebPageFonts Collection Object
Represents a set of WebPageFont objects that allow you to set both the proportional and fixed font style and size used when documents are saved as Web pages. See the WebPageFont object for more details.
The collection can be referenced using the Fonts property of the DefaultWebOptions property in the host's Application object, like so:
Set oWebPageFonts = Application.DefaultWebOptions.Fonts
Note that as of this writing, the count property of the WebPageFonts Collection object always returns zero, even though there are 12 WebPageFont objects (Character Sets) in the collection.
WebPageFonts Collection Common Properties
The Application, Count, and Creator properties are defined at the beginning of this Appendix.
WebPageFonts Collection Properties

WebPageFont Object
This object represents which fixed and proportional font and size are used when the host application's documents are saved as Web pages. Microsoft Excel and Microsoft Word also use these settings when you open a Web page within the application, but the settings only take effect when the Web page being opened cannot display its own font settings or when no font information is contained within the HTML code.
Be aware that the FixedWidthFont and ProportionalFont properties will accept any valid String and FixedWidthFontSize and ProportionalFontSize will accept any valid Single value. For example, the following will not encounter an error, even though they aren't valid font and size settings.
Application.DefaultWebOptions.Fonts(msoCharacterSetEnglishWesternEuropean OtherLatinScript).ProportionalFont = “XXXXXXXX”

Application.DefaultWebOptions.Fonts(msoCharacterSetEnglishWesternEuropean OtherLatinScript).ProportionalFontSize = 1200
An error will occur when the application attempts to use these settings.
WebPageFont Common Properties
The Application and Creator properties are defined at the beginning of this Appendix.
WebPageFont Properties
Example: WebPageFont Object
The following routine loops through the WebPageFonts collection, and for each WebPageFont (character set), establishes the proportional and fixed font name and size based on data entered in a FontInfo range located on the wksWebPageFonts worksheet in the workbook containing this code:
Sub SetWebPageFonts()

    Const sRANGE_FONT_INFO As String = “FontInfo”

    Dim lCalc As Long
    Dim lCount As Long, lRow As Long
    Dim oWebFont As WebPageFont

    ' Turn off the screen and Calculation
    With Application
        ' Store the calculation mode
        lCalc = .Calculation
        ' Turn calculation off
        .Calculation = xlCalculationManual
        ' Turn off the screen
        .ScreenUpdating = False
    End With

    ' Set the row counter based on the input range's first cell
    lRow = wksWebPageFonts.Range(” InputRange” ).Cells(1, 1).Row

    ' Clear the old info
    wksWebPageFonts.Range(” InputRange” ).ClearContents

    ' There are twelve Font character sets. Need to use a hard-coded upper
    ' range (12) because Application.DefaultWebOptions.Fonts.Count
    ' always returns zero
    For lCount = 1 To 12
        ' Grab a reference to a single WebPageFont (or character set)
        Set oWebFont = Application.DefaultWebOptions.Fonts(lCount)

        With oWebFont
            ' Use the settings on the wksWebPageFonts worksheet to
            ' set the WebPageFont font settings
            .ProportionalFont = _
                wksWebPageFonts.Range(sRANGE_FONT_INFO).Cells(1, 1). Value
            .ProportionalFontSize = _
                wksWebPageFonts.Range(sRANGE_FONT_INFO).Cells(1, 2). Value
            .FixedWidthFont = _
                wksWebPageFonts.Range(sRANGE_FONT_INFO).Cells(1, 3). Value
            .FixedWidthFontSize = _
                wksWebPageFonts.Range(sRANGE_FONT_INFO).Cells(1, 4). Value

        ' Display the new WebPageFont settings in a table
            ' on the wksWebPageFonts worksheet
            wksWebPageFonts.Cells(lRow, 2) = lCount
            wksWebPageFonts.Cells(lRow, 3) = .ProportionalFont
            wksWebPageFonts.Cells(lRow, 4) = .ProportionalFontSize
            wksWebPageFonts.Cells(lRow, 5) = .FixedWidthFont
            wksWebPageFonts.Cells(lRow, 6) = .FixedWidthFontSize

        ' Move one row down for the next Character set
            lRow = lRow + 1
        End With
    Next lCount

    ' Reset the calculation mode
    Application.Calculation = lCalc

End Sub