
12
Creating and Using Add-ins
An Add-in is a chunk of code that is employed as a reusable augmentation to Excel. An Add-in might be implemented in a language like VB6 or more easily and commonly another Excel workbook containing some code that one might generally want to reuse. For example, it is practical and useful to reuse the DebugTools and EventLog modules from the Bulletproof.xls workbook in Chapter 7, so we might elect to add the Bulletproof.xls workbook to our list of Add-ins making it available to all future workbooks. In this chapter we will demonstrate how to make any workbook an Add-in, and as such, much more readily accessible to all workbooks.
Add-ins may but do not have to be compiled, external applications. However, since Office 2000 Developer Edition, support for compiling workbooks has been assisted. For more information on using compiled Add-ins refer to Chapter 13, Automation Add-ins and COM Add-ins.
In this chapter we will use the Bulletproof.xls workbook as an Add-in, and we will show you how to hide the implementation details of Add-in code to prevent it from being inadvertently changed by future consumers.
Hiding the Code
Workbooks are intellectual property. Workbooks used as Add-ins represent intellectual property that you may want to share or sell to other developers, but you may not necessarily want them to know the nuts and bolts of your solution. While you cannot prevent a consumer from knowing that your Add-in exists because it shows up in the Project Explorer window, you can prevent consumers from exploring, modifying or copying your code.
To conceal the implementation details of your intellectual property, you need to password protect your source code. To demonstrate, we have copied the Bulletproof.xls to the folder for Chapter 12 samples and opened the VBE. To password protect the source code (refer to Figure 12-1) in the VBE, click Tools ![]() VBA Project Properties, switch to the protection tab, and check Lock project for viewing and providing a password. To permit you—the trusted reader—access we used the word password as the password.
VBA Project Properties, switch to the protection tab, and check Lock project for viewing and providing a password. To permit you—the trusted reader—access we used the word password as the password.
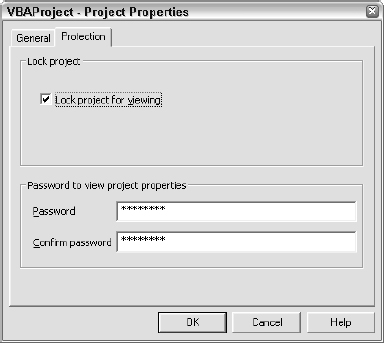
Figure 12-1
After you have entered the password and confirmed it, you will need to click OK and save the file. To see the effect, close the file and reopen it again. In Figure 12-2 you will see that the VBA Project in the Project Explorer is collapsed and cannot be expanded without providing the correct password. Password protection is only as good as the password is cryptic and the tool conceals it, but Excel VBE passwords should deter all but the most determined hackers.
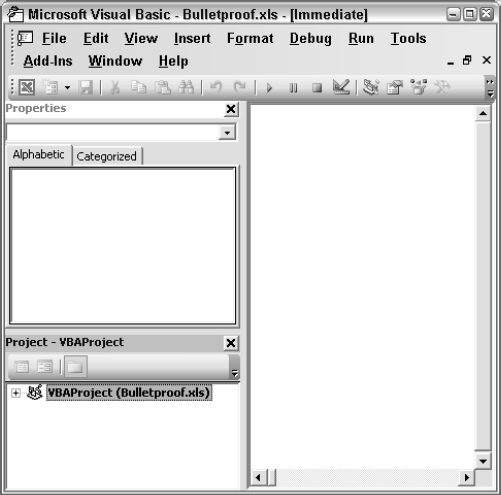
Figure 12-2
Converting the Workbook to an Add-in
To convert the workbook to an Add-in, switch to the workbook view and save the file with an .xla extension. Use the File ![]() Save As menu and pick the Save As Microsoft Office Excel Add-In (*.xla) file type (see Figure 12-3). This will change the extension and locate the Add-In in the C:Document and settings<username>Application DataMicrosoftAdd-ins folder.
Save As menu and pick the Save As Microsoft Office Excel Add-In (*.xla) file type (see Figure 12-3). This will change the extension and locate the Add-In in the C:Document and settings<username>Application DataMicrosoftAdd-ins folder.

Figure 12-3
You are not required to rename an .xls workbook extension to .xla. It is, however, a useful convention that helps Windows and consumers distinguish the file as an Add-in as opposed to a general workbook.
An alternate way to create an Add-in is to change the IsAddin property of the ThisWorkbook object in the VBE to True in the Properties window, as shown in Figure 12-4. (If you password-protect the workbook first then you will have to provide the password to modify the workbook's properties.)
The disadvantage to the second technique is that the workbook will be treated as an Add-in but still has the .xls extension. Keep in mind though that you can always use Windows Explorer to change the extension of the workbook from .xls to .xla.
Closing Add-ins
If you have just converted a workbook to an Add-in by changing its IsAddin property and saving it, or you have loaded the Add-in using File ![]() Open, there is no obvious way to close the workbook from the file without exiting Excel menu because the Close menu is disabled. One way to circumvent the File menu is to Add-inclose the workbook in the VBE from the Immediate window using the following command:
Open, there is no obvious way to close the workbook from the file without exiting Excel menu because the Close menu is disabled. One way to circumvent the File menu is to Add-inclose the workbook in the VBE from the Immediate window using the following command:
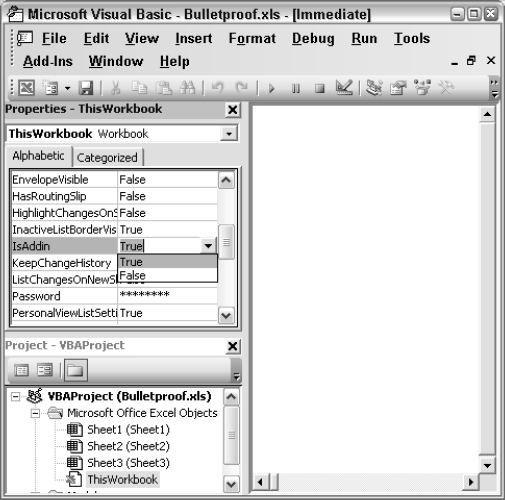
Figure 12-4
Add-inWorkbooks(“Add-inBulletproof.xls”).Close
Add-ins do not have an Index property value in the Workbooks collection and are not included in the Count property of the Workbooks collection, but they can be addressed by name as members of the Workbooks collection.
Another method you can use to close an Add-in is to click the file name in the recently used-file list at the bottom of the Excel File menu while holding down Shift. You may get a message about overwriting the copy in memory (depending on whether it has changed or not) and then you will get a message about not being able to open an Add-in for editing (a hangover from the previous versions). Click OK and the Add-in will be removed from memory.
Code Changes
Sometimes you need to make some changes to the VBA code that was written for a standard workbook to make it suitable for an Add-in. This is particularly true if you reference data within your Add-in workbook. Most Excel programmers write code that assumes that the workbook is the active workbook and that the worksheet is the active sheet. Nothing is active in an Add-in, so your code must explicitly reference the Add-in workbook and worksheet. Suppose our Add-in contained code like the following that assumes we are dealing with the active workbook:
With Range(“Database”)
   Set Data = .Rows(2)
   Call LoadRecord
   Navigator.Value = 2
   Navigator.Max = .Rows.Count
End With
This code only works if the workbook containing the name Database is active. In your Add-in code, you need to include a reference to the desired workbook and worksheet demonstrated here by a revision to the With statement: With Workbooks(“workbook.xls”).Sheets(“Data”).Range(“Database”):
A more useful way to refer to the workbook containing the code is to use the ThisWorkbook property of the Application object that refers to the workbook containing the code. This makes the code much more flexible: With ThisWorkbook.Sheets(“Data”).Range(“Database”)
You can also use the object name for the sheet that you see in the Project Explorer:
With Sheet1.Range(“Database”)
You can edit both the workbook's programmatic name and the sheet's programmatic name in the Properties window. If you change the sheet's programmatic name, you must also change your code. If you change the workbook's programmatic name, you can use the new name if you wish, but ThisWorkbook remains a valid reference, as it is a property of the Application object and a member of <globals>.
If you want to be able to ignore the sheet name, to allow the name Database to exist on any sheet, you can use the following construction:
With ThisWorkbook.Names(“Database”).RefersToRange
Saving Changes
Another potential problem with an Add-in that contains data is that changes to the data will not be saved automatically at the end of an Excel session. For example, our contrived example permits changes to a range of data named Database. To ensure any modifications by the Add-in are saved we could add the following statement to the Workbook's BeforeClose or Auto_Close event handlers:
If Not ThisWorkbook.Saved Then ThisWorkbook.Save
This technique does not work in Excel 5 or Excel 95. These versions do not allow you to save changes to an Add-in file.
Installing an Add-in
An Add-in can be opened from the worksheet File menu, as has been mentioned. However, you get better control over an Add-in if you install it using Tools ![]() Add-Ins, which displays the following dialog box shown in Figure 12-5.
Add-Ins, which displays the following dialog box shown in Figure 12-5.

Figure 12-5
Check the Bulletproof Add-in from the list of Add-Ins available. If the Add-in does not already appear in the list, you can click the Browse…button to locate it.
The friendly title and description are provided by filling in the workbook's Properties. If you have already converted the workbook to an Add-in, you can set its IsAddin property to False to make the workbook visible in the Excel window and use File ![]() Properties to display the following dialog box, as shown in Figure 12-6.
Properties to display the following dialog box, as shown in Figure 12-6.
The Title and Comments boxes supply the information for the Tools ![]() Add-Ins dialog box. When you have added the required information, you can set the IsAddin property back to True and save the file.
Add-Ins dialog box. When you have added the required information, you can set the IsAddin property back to True and save the file.
Once the Add-in is visible in the Tools ![]() Add-Ins dialog box, you can install and uninstall the Add-in by checking and unchecking the check box beside the Add-in's description. When it is installed, it is loaded into memory and becomes visible in the VBE window and will be automatically loaded in future Excel sessions. When it is uninstalled, it is removed from memory and is no longer visible in the VBE window and will no longer be loaded in future Excel sessions.
Add-Ins dialog box, you can install and uninstall the Add-in by checking and unchecking the check box beside the Add-in's description. When it is installed, it is loaded into memory and becomes visible in the VBE window and will be automatically loaded in future Excel sessions. When it is uninstalled, it is removed from memory and is no longer visible in the VBE window and will no longer be loaded in future Excel sessions.

Figure 12-6
Add-in Install Event
There are two special events that are triggered when you install and uninstall an Add-in. The following code, in the ThisWorkbook module, shows how to display a UserForm when the Add-in is installed:
Private Sub Workbook_AddinInstall()
   InstallUserForm.Show
End Sub
The user form—named InstallUserForm—displays the following information for the user, as shown in Figure 12-7.

Figure 12-7
The other event is the AddinUninstall event. You might elect to display a UserForm that acknowledges that the Bulletproof Add-in has been removed and calls to its utilities should be removed too.
Removing an Add-in from the Add-ins List
One way to remove and Add-in from the list of available Add-ins is to delete the file from the C:Document and settings<username>Application DataMicrosoftAdd-ins folder using Windows Explorer before opening Excel. An alternative way is to change the Add-in's file name before opening Excel. The following message, shown in Figure 12-8, will appear when you open Excel if the Add-in had been previously selected and then deleted or renamed.
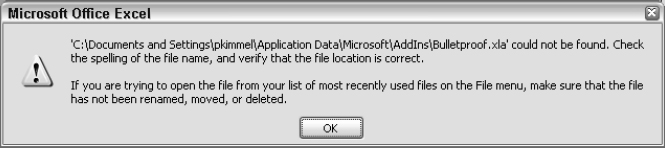
Figure 12-8
Open the Tools ![]() Add-ins…dialog box and click the check box against the Add-in's entry. You will get the following message shown in Figure 12-9.
Add-ins…dialog box and click the check box against the Add-in's entry. You will get the following message shown in Figure 12-9.

Figure 12-9
Click Yes and the Add-in will be deleted from the list.
Summary
Converting a workbook to an Add-in permits one to distribute code to other developers while concealing the implementation details of that code. In effect, this forces you and other consumers to use the Add-in code through its public methods and properties without focusing on the implementation details, permitting more intense focus on the details of the new problem while using the utility of an existing solution.
You will need to modify Add-in code that refers to specific workbooks and provide menu commands, controls, or toolbar buttons to provide access to macros, if they exist. Removing references to specific workbooks and worksheets was demonstrated in this chapter, and associating macros with commands and toolbar buttons is demonstrated in Chapter 26.