Chapter 5 Manage Recipients
In This Chapter
![]() Modify Recipient Configuration
Modify Recipient Configuration
![]() Create Mail-Enabled Contacts and Mail-Enabled Users
Create Mail-Enabled Contacts and Mail-Enabled Users
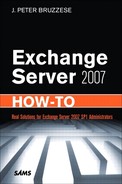
Solution: By default, Exchange displays the recipient scope from the domain-level perspective. If you alter the scope, you change the set of recipients displayed.
To change the recipient scope, perform the following:
1. Open the Exchange Management Console (EMC).
2. From the Navigation Tree, select the Recipient Configuration work center.
3. On the Actions pane, the option Modify Recipient Scope brings up the Recipient Scope dialog, as shown in Figure 5.1.
4. You can make the following changes:
![]() View All Recipients in Forest—This shows you more than the recipients within a specified Organizational Unit (OU), which is the default setting. If you want to use a specific Global Catalog, you can select the checkbox and choose Browse to locate it. If none is selected, Exchange chooses one for you.
View All Recipients in Forest—This shows you more than the recipients within a specified Organizational Unit (OU), which is the default setting. If you want to use a specific Global Catalog, you can select the checkbox and choose Browse to locate it. If none is selected, Exchange chooses one for you.
![]() View All Recipients in Specified Organizational Unit—This enables you to choose an OU and all OUs beneath it. If you wish, you can select the Recipient Domain Controller (DC) option and choose the DC you want. If not, Exchange chooses one for you.
View All Recipients in Specified Organizational Unit—This enables you to choose an OU and all OUs beneath it. If you wish, you can select the Recipient Domain Controller (DC) option and choose the DC you want. If not, Exchange chooses one for you.
If, instead, your problem is that you cannot see all of your recipients (let’s say you have 1,500 but you see only 1,000 in your Results pane), you need to adjust the Maximum Number of Recipients to Display option. Perform the following:
1. Open the EMC.
2. From the Navigation Tree, select the Recipient Configuration work center.
3. On the Actions pane, select the option Modify the Maximum Number of Recipients to Display.
4. Note that the maximum number by default is 1,000. You can alter this to no less than 1 and no more than 1,000,000.
NOTE You might be responsible for the entire organization and want to see as much as possible. However, if you are responsible for a section of the organization, you might want to adjust the scope to your particular OU and adjust the number of recipients shown to the level that benefits you, rather than seeing everything.
Solution: In this section, we look into the creation of a mailbox for an existing user and for a new user. Then we review how you remove a mailbox or simply disable one temporarily.
NOTE To create recipient mailboxes, you need to be a member of the Exchange Recipient Administrator role. You must also have the Account Operator role for the AD portions that apply.
To create a mailbox for a recipient named Joe User who already exists within AD, do the following:
1. Open the EMC.
2. From the Navigation Tree, select the Recipient Configuration work center.
3. From the Actions pane, select New Mailbox and the New Mailbox Wizard opens.
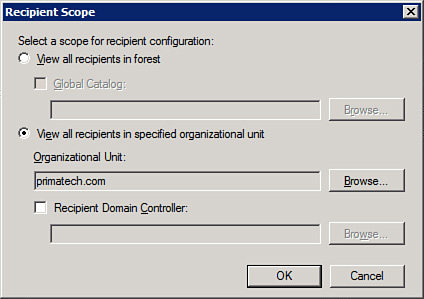
4. On the Introduction screen, shown in Figure 5.2, you are presented with the several different mailbox types that we discuss throughout this chapter. The first is User Mailbox, which is selected by default; keep this mailbox type selected. Click Next.
5. You are asked if you want to create a mailbox for a new user or existing user. In this case, choose Existing Users, and then click the Add button. You are shown only those users who do not currently have mailboxes; locate the user Joe User. After you select the user, click Next.
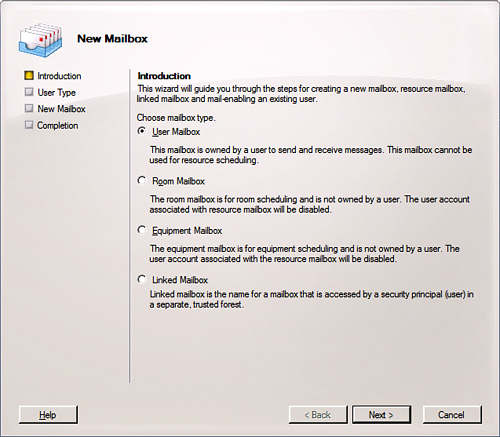
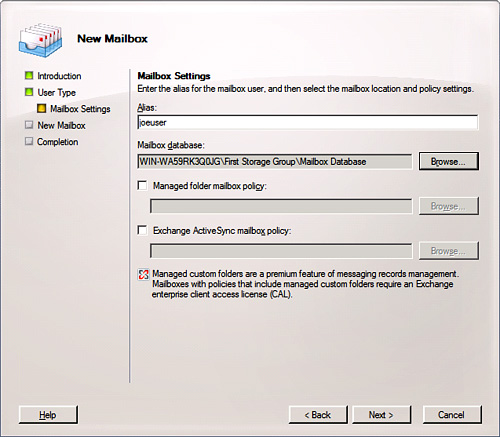
6. You are taken to the Mailbox Settings screen, shown in Figure 5.3. You are shown the Alias for the user, which you can change. You are also asked to provide the following:
a. Mailbox Database—Browse to the location of the database you want this mailbox to be a part of.
b. Managed Folder Mailbox Policy—If you have a policy you would like to enforce, you can choose it now; if not, you can add this policy later.
c. Exchange ActiveSync Mailbox Policy—This might not apply and depends on whether the user has a mobile device you allow to connect to the Exchange organization and if you have a policy you wish to apply.
7. After you have the information provided, click Next.
8. You can review the summary of your configuration and then click New.
9. After the mailbox is created, a Completed checkbox displays, and you can click Finish.
10. Note that you should now have another recipient in the Recipient Configuration Results pane.
PS NOTE The cmdlet through the Exchange Management Shell (EMS) used to enable a user that already exists, such as Joe User, would be Enable-Mailbox [email protected] -Database “ServerNameStorageGroupNameMailboxDatabaseName”.
If your goal is to create a new user (in our example, Jane User) at the same time you create a new mailbox for that user, perform the following:
1. Open the EMC.
2. From the Navigation Tree, select the Recipient Configuration work center.
3. From the Actions pane, select New Mailbox and the New Mailbox Wizard opens.
4. On the Introduction screen, User Mailbox is selected by default; keep this selected. Click Next.
5. You are asked if you want to create a mailbox for a new user or existing user. In this case, leave the default New User, and then click Next.
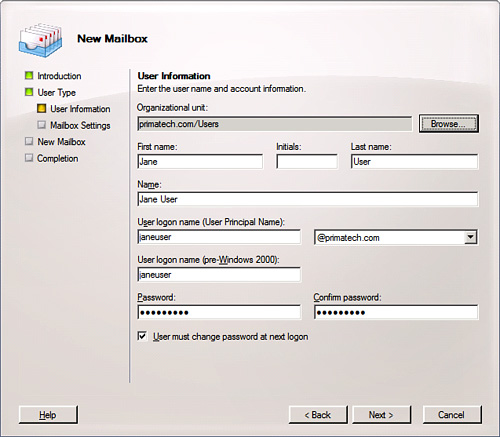
6. You are taken to the User Information screen, shown in Figure 5.4 where you are asked to provide the OU to place the new user, the name and logon information, and the password with confirmation. You can select a checkbox that says User Must Change Password at Next Logon. After you fill in this information, click Next.
7. You are then presented with the Mailbox Settings options, which include the database, managed folder mailbox policy, and ActiveSync mailbox policy. We describe these in the last scenario. Choose your options and click Next.
8. You are presented with a configuration summary that is somewhat longer than when you create a mailbox and the user is already created. Confirm your options and select New.
9. After the wizard completes, you see a Completed green check mark and you can click Finish.
PS NOTE The cmdlet through the EMS used to create and mail-enable a user is the New-Mailbox cmdlet, with a variety of different parameters you can locate at http://technet.microsoft.com/en-us/library/aa997663(EXCHG.80).aspx.
If you have a person leave the company and you need to remove a mailbox, perform the following:
1. Open the EMC.
2. From the Navigation Tree, select the Recipient Configuration work center.
3. Select Mailbox.
4. From the Results pane, find the mailbox you wish to remove.
5. From the Actions pane, choose Remove.
6. You are presented with a warning message that asks if you are sure you want to remove that user’s mailbox. Select Yes.
NOTE The default deleted mailbox retention time is 30 days. In the event the person returns within the 30-day period, you can restore the mailbox without seeking backup tapes for that user’s mailbox.
At times, you might want to disable, not remove, a mailbox, so that other users cannot send mail to or receive mail from it. The mailbox still exists, but it is unusable. To do this, perform the following:
1. Open the EMC.
2. From the Navigation Tree, select the Recipient Configuration work center.
3. Select Mailbox.
4. From the Results pane, find the mailbox you wish to disable.
5. From the Actions pane, choose Disable.
6. You are given an informational message that says, “Disabling the mailbox will remove the Exchange properties from the Windows user object and mark the mailbox in the database for removal. Are you sure you want to disable ‘UserName’?” Click Yes.
At this point, if you want to re-enable the mailbox (that is, connect the mailbox back up to the user account in AD), you need to go to Disconnected Mailbox, select the mailbox, and click Connect.
NOTE If you create a user and disable the mailbox before the user logs in and accesses his mail once, when you disable the mailbox, it does not go into the Disconnected Mailbox location.
PS NOTE The cmdlet through the EMS used to disable a user like [email protected] is Disable-Mailbox [email protected].
Solution: To create a linked mailbox, perform the following:
1. Open the EMC.
2. From the Navigation Tree, select the Recipient Configuration work center.
3. From the Actions pane, select New Mailbox, and the New Mailbox Wizard opens.
4. On the Introduction screen, select Linked Mailbox. Click Next.
5. On the User Type screen, you are asked if you want to have a New User or Existing User. You want to create a New User. Even if the user account exists in the trusted forest, you still need to associate this mailbox with an account in this forest. In the end, it is associated with a disabled user account that is associated with this linked mailbox. Click Next.
6. Fill in the user information on the User Information screen, but remember that these fields are for the disabled account, not the real user account for the user that he uses to log on. Click Next.
7. From the Mailbox Settings screen, you have to choose the Alias, the location of the database, and you have to indicate if you have policies (managed folder or ActiveSync) that you want to use. Click Next.
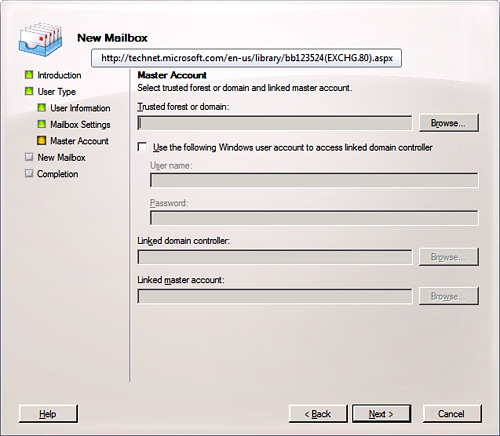
8. You are taken to the Master Account screen, as shown in Figure 5.5. The fields you have to complete include the following:
a. Trusted Forest or Domain—Select Browse to open the dialog and select the domain that has the master account. Then click OK. This enables the Linked Domain Controller field.
b. Use the Following Windows User Account to Access Linked Domain Controller—This is useful if you want to access the domain controller with credentials other than those you currently use. You can select the checkbox and put in the username and password of the other account.
c. Linked Domain Controller—Select Browse and from the dialog, you can select the linked domain controller and then click OK. This enables the Linked Master Account field.
d. Linked Master Account—Select Browse and you can choose the user account you want to use for the master account for the linked mailbox. Then click OK.
9. Select Next and review the configuration summary. Then click New.
10. When complete, a green checkbox displays and you can click Finish.
Solution: Absolutely. These are called resource mailboxes. You can create two different kinds: a room mailbox and an equipment mailbox. With the room mailbox, you can assign it to a conference room, auditorium, training room, and any other room that people share ordinarily. With an equipment mailbox, you can assign these to items that are usually shared among workers such as a projector, laptops, company cars, and equipment.
NOTE When you create a resource mailbox (room or equipment), an account is also created for those resources in AD. However, the accounts are disabled by default. This prevents a person from logging in to the network with a resource account.
To create a room resource mailbox, perform the following steps:
1. Open the EMC.
2. From the Navigation Tree, select the Recipient Configuration work center.
3. From the Actions pane, select New Mailbox and the New Mailbox Wizard opens.
4. On the Introduction screen, select Room Mailbox and click Next.
5. You are asked if you want to create a mailbox for a New User or Existing User. In this case, leave the default New User, and then click Next.
6. You are taken to the User Information screen, where you are asked to provide the OU to place the new user, the name and logon information, and the password with confirmation. There is also a User Must Change Password at Next Logon checkbox that you can select. (Note: This might seem odd considering that this is a room and not a person you are creating the mailbox for. So, fill in the information accordingly. Call it literally Conference Room 1 or CF1. The password ensures someone can take ownership of the schedule of that room.) After this information is complete, click Next.
7. You are then presented with the Mailbox Settings options, which include the database, managed folder mailbox policy, and ActiveSync mailbox policy. Choose your options and click Next.
8. You are presented with a configuration summary. Confirm your options and select New.
9. After the wizard completes, you see a Completed green check mark and you can click Finish.
The procedure for creating an equipment mailbox is a duplicate of what you would do when creating a room mailbox. The only difference is in choosing equipment rather than a room. To create an equipment mailbox, perform the following:
1. Open the EMC.
2. From the Navigation Tree, select the Recipient Configuration work center.
3. From the Actions pane, select New Mailbox and the New Mailbox Wizard opens.
4. On the Introduction screen, select Equipment Mailbox, and click Next.
5. You are asked if you want to create a mailbox for a New User or Existing User. In this case, leave the default New User, and then click Next.
6. You are taken to the User Information screen, where you are asked to provide the OU to place the new user, the name and logon information, and the password with confirmation. You can also select a User Must Change Password at Next Logon checkbox. (Note: This might seem odd considering you are creating the mailbox for equipment and not a person. Fill in the information accordingly. Call it literally Projector 1, Laptop 10, or whatever acronym and numerical order you wish to put in place. The password ensures someone can take ownership of the schedule of that piece of equipment.) After this information is filled in, click Next.
7. You are then presented with the Mailbox Settings options, which include the database, managed folder mailbox policy, and ActiveSync mailbox policy. Choose your options and click Next.
8. You are presented with a configuration summary. Confirm your options and select New.
9. After the wizard completes, you will see a Completed green check mark and you can click Finish.
You can configure many properties, and to do so properly takes command-line work. For starters, look at the Resource Information tab that is added in with a resource mailbox. To do this, perform the following steps:
1. Open the EMC.
2. From the Navigation Tree, select the Recipient Configuration work center.
4. From the Results pane, locate the resource mailbox you want to view (room or equipment). Right-click the mailbox and choose Properties or locate it from the Actions pane.
5. Note the Resource Information tab. You can specify the Resource Capacity and the Custom Properties.
6. The Resource Capacity is simply an indication of the number of people that can use the resource. For example, if it is a room, you indicate the number of people the room can handle.
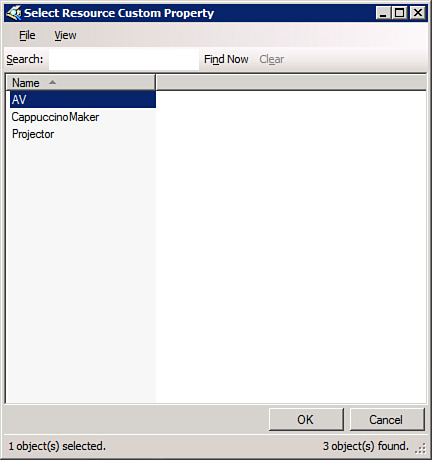
7. The Resource Custom Properties enables you to click the Add button and select from a list of certain features that are unique to that particular room. For example, you might select the room that includes the projector or other AV equipment, or the room with the cappuccino maker.
The difficult part for those who dislike the command-line work is that the options you can choose for the Resource Custom Properties have to be input through the EMS using the cmdlet Set-ResourceConfig.
In the example shown in Figure 5.6, you see the Resource Custom Properties with a variety of options included in the EMS using the following command:
Set-ResourceConfig -ResourcePropertySchema ("Room/Projector",
"Room/CappuccinoMaker", "Room/AV")
Solution: You want to allow permission for another user to have control over the resource mailbox. You can do this through the EMC (new in SP1) or the Exchange Management Shell. To perform the task through the EMC, do the following:
1. Open the EMC.
2. From the Navigation Tree, select the Recipient Configuration work center.
3. Select a resource mailbox in the result pane.
4. From the Actions pane, select the option Manage Full Access Permission.
5. To add a user and provide him with control, select the Add button.
6. Locate the user you wish to add, select the user, and click OK.
7. Click Manage.
8. When the task is complete, click Finish.
You might perform the same task through the EMS by typing the following command:
Add-MailboxPermission -Identity <Resource-Mailbox> -User <user> -
AccessRights <Access Allowed> -InheritanceType <Inheritance’s Type>
For example, to allow Jane User to have full access over ConferenceRoom1, you type:
Add-MailboxPermission -Identity 'ConferenceRoom1' -User 'Jane User'
-AccessRights FullAccess -InheritanceType All
After permissions are granted to the user, there are a few ways to manage the resource. One way is to go through Outlook Web Access. Log on using the account that has permission and then perform the following:
1. From within Outlook Web Access (OWA), select the drop-down arrow next to the user name you are logged in as in the top-right corner.
2. The Open Other Mailbox displays. Type the name of the resource mailbox and click OK.
3. Now your user account mailbox is open in one browser window and the resource mailbox is open in another.
4. Select the Options button from the top-right toolbar.
5. Some of the first things you might want to adjust are the Calendar Options. You can determine which days of the week a certain resource is made available to others.
6. Notice an option called Resource Settings, shown in Figure 5.7. This option exists only for resources, not for users. You have a variety of different settings you can configure.

Configuring resource settings can be done from the Exchange Management Shell, but it is much easier to do it from within the Outlook Web Access or Outlook tools. Under the Resource Settings, three sections of settings include the following:
![]() Resource Scheduling Options
Resource Scheduling Options
![]() Resource Scheduling Permissions
Resource Scheduling Permissions
![]() Resource Privacy Options
Resource Privacy Options
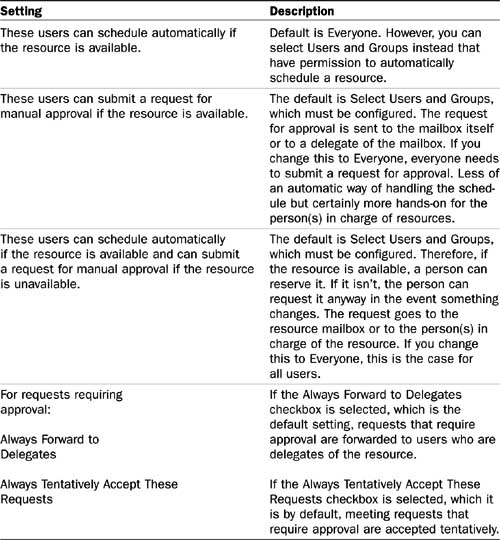
To enable these settings, you have to first click the checkbox Automatically Process Meeting Requests and Cancellations. These settings determine how the resource mailbox can be used and scheduled and how conflicts should be resolved, as shown in Table 5.1.
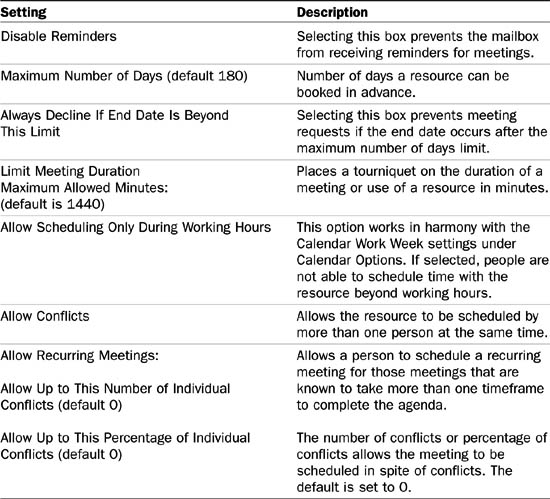
Logically, the resource can be reserved or scheduled by anyone by default. However, you might streamline that. You might have a specific room with specialized equipment that only a handful of executives can schedule the use of. In that case, permission settings need to be changed. Note the following permission settings in Table 5.2.
These settings help control what information is included in meeting requests and cancellations. They are checkboxes that are somewhat self-explanatory:
![]() Always Add the Organizer Name to the Meeting Subject
Always Add the Organizer Name to the Meeting Subject
![]() Always Remove the Private Flag On an Accepted Message
Always Remove the Private Flag On an Accepted Message
![]() When Declining Meeting Requests
When Declining Meeting Requests
![]() Include Detailed Information About Conflicting Meetings in Response
Include Detailed Information About Conflicting Meetings in Response
![]() Include Organizer’s Name in Conflict Information
Include Organizer’s Name in Conflict Information
![]() Always Delete the Following When Sent to This Resource:
Always Delete the Following When Sent to This Resource:
![]() Email Messages
Email Messages
![]() Attachments From Meeting Requests
Attachments From Meeting Requests
![]() Comments From Meeting Requests
Comments From Meeting Requests
![]() Subject of Meeting Requests
Subject of Meeting Requests
Solution: You might have a person who requires an email address in your company and you create a mail contact, which is an AD object with full information about the person, although the person is not able to access internal resources.
A mail-enabled user account is similar, but as a user account, these persons can log on to the network and can access resources if given permission.
Both a contact and a mail-enabled user can be shown in the Global Address List (GAL), both have external email addresses, and both involve users that do not usually work within company walls.
To create a new mail contact, perform the following steps:
1. Open the EMC.
2. From the Navigation Tree, select the Recipient Configuration work center.
3. Select Mail Contact.
4. From the Actions pane, select New Mail Contact.
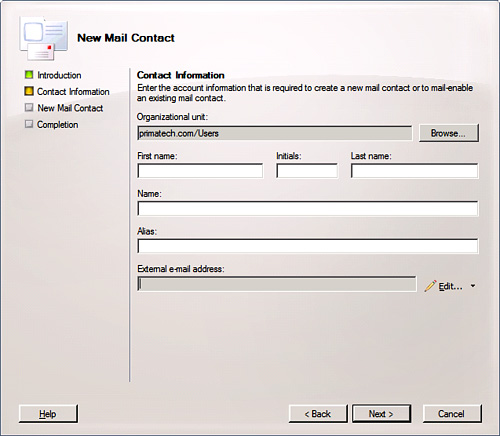
5. The New Mail Contact Wizard opens and begins with the Introduction screen that asks if you want to create a New Contact or work from an Existing Contact. Choose New Contact and click Next.
6. In Figure 5.8, note that some items are familiar, whereas others appear to be missing. Supply the following information:
a. Organization Unit—By default, this is the Users container, but you can place the contact wherever you like in AD.
b. First Fame, Initials, Last Name—All self-explanatory to provide some details about the contact.
c. Alias—The alias automatically fills in as you enter the other information about the person. You can alter this, however, to provide whatever you like for the alias.
d. External E-mail Address—If the address is a simple SMTP address, click Edit and provide the email address for the external client. However, if the person has an X.400, GroupWise, or Lotus Notes address, you can select the arrow next to Edit and choose Custom Address and supply the email address and the type.
7. After the Contact Information has been filled in, click Next.
8. On the New Mail Contact screen, review the Configuration Summary, and if it’s satisfactory, click New.
9. When complete, you are taken to the Completion screen and shown a green Completed sign. Click Finish.
Notice that the user is created in AD. If you open Active Directory Users and Computers, you find that the user exists but is listed as Type: Contact. There is no way to log on with this account because it doesn’t have any account logon information or a password. If you open the properties of the account, you find only a handful of tabs including General, Address, Telephones, Organization, and Member Of. Most of this is to allow contact information to be added to the object.
In the properties of the contact from within the EMC, you can see the same information, only it has spread across different tabs. Also note a couple of extra tabs:
![]() E-mail Addresses—Allows you to add more email addresses and determine which one is the external address and which one is the Set as Reply email address.
E-mail Addresses—Allows you to add more email addresses and determine which one is the external address and which one is the Set as Reply email address.
![]() Mail Flow Settings—Here you can configure message size restrictions. You can also configure message delivery restrictions (for accepting and rejecting messages from different senders).
Mail Flow Settings—Here you can configure message size restrictions. You can also configure message delivery restrictions (for accepting and rejecting messages from different senders).
You can disable or remove any of these contacts by simply locating them in the Mail Contact Results pane, selecting the account or accounts, and choosing the Disable option or the Remove option.
Creating a new mail-enabled user also creates an object in AD. However, it does not create a mailbox. Messages sent to the user are forwarded to the external address. To create a new mail user, perform the following:
1. Open the EMC.
2. From the Navigation Tree, select the Recipient Configuration work center.
3. Select Mail Contact.
4. From the Actions pane, locate and select New Mail User.
5. The New Mail User Wizard opens and the Introduction screen asks if you want to create a New User or work from an Existing User. Choose New User and click Next.
6. The information you must provide is the same user and account information you would provide for a standard mailbox, including a password. Enter that data and click Next.
7. You are taken to the Mail Settings screen, which asks only for two pieces of information. The first is an alias for your mail-enabled user. The second is the external email address. If the address is a simple SMTP address, click Edit and provide the email address for the external client. However, if the person has an X.400, GroupWise, or Lotus Notes address, you can select the arrow next to Edit and choose Custom Address and supply the email address and the type. When complete, click Next.
8. On the New Mail User screen, review the Configuration Summary and if it’s satisfactory, click New.
9. When complete, you are taken to the Completion screen and shown a green Completed sign. Click Finish.
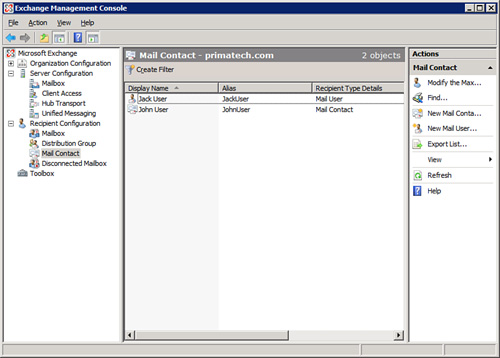
Note in Figure 5.9 that both users are located in the Mail Contact and have different icons depending on their types.
Solution: For starters, sending a mass email to a group that is already established is a logical thing to do and easy to set up. These are called distribution groups.
![]() Distribution Group—This is a group that is mail-enabled and has its own email address. When you send an email to the group, it results in expansion of the group and the messages are delivered to all the members of the group.
Distribution Group—This is a group that is mail-enabled and has its own email address. When you send an email to the group, it results in expansion of the group and the messages are delivered to all the members of the group.
![]() Dynamic Distribution Group—A group is usually managed by users being added or removed. Dynamic distribution groups are different in that they are populated by user attributes that are defined by filters.
Dynamic Distribution Group—A group is usually managed by users being added or removed. Dynamic distribution groups are different in that they are populated by user attributes that are defined by filters.
Exchange supports the following types of distribution groups:
![]() Mail-enabled universal distribution groups
Mail-enabled universal distribution groups
![]() Mail-enabled universal security groups
Mail-enabled universal security groups
![]() Mail-enabled non-universal groups
Mail-enabled non-universal groups
![]() Dynamic distribution groups
Dynamic distribution groups
To create a new distribution group (that is, a group that doesn’t previously exist that you wish to mail-enable but is an entirely new group), perform the following:
1. Open the EMC.
2. From the Navigation Tree, select the Recipient Configuration work center and click Distribution Group.
3. On the Actions pane, note the option to create a New Distribution Group or New Dynamic Distribution Group. Choose New Distribution Group to open the wizard.
4. From the Introduction screen, you are asked if you want to create a Distribution Group for a new or existing group. In this situation, choose New Group.
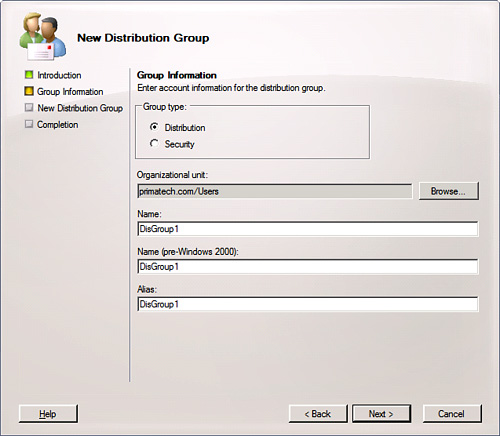
5. On the Group Information screen shown in Figure 5.10, you are asked for the following information:
a. Group Type—Leave as Distribution.
b. Organizational Unit—The default is Users, but you can browse and select another location.
c. Name—Provide the group name.
d. Name (pre-Windows 2000)—Based upon legacy naming, this name is automatically populated by the Name field and should be fine.
e. Alias—By default, this is also the name of the distribution group, but you can change that here.
6. After you have the information added, click Next.
7. You’ll be taken to the New Distribution Group screen, where you confirm the configuration summary and click New.
8. When the group is created, you are taken to the Completion screen and shown a green Completed checkmark. Click Finish.
Note that the group is now visible in your Recipient Configuration, Distribution Group node as well as from your Active Directory Users and Computers tool. If you open the group from the Active Directory Users and Computers tool, you will notice that it is a Universal distribution group. If you select the Members or Member Of tabs (in either location, the AD, or EMC), you will notice that these tabs are empty because this is a brand new group.
To mail-enable a preexisting distribution group, perform the following:
1. Open the EMC.
2. From the Navigation Tree, select the Recipient Configuration work center and click Distribution Group.
3. Over on the Actions pane, choose New Distribution Group to open the wizard.
4. From the Introduction screen, you are asked if you want to create a Distribution Group for a new or existing group. In this situation, choose Existing Group.
5. Select Browse. Notice that the options presented are Universal groups. You might have Universal distribution or security groups in place, both are presented but Local or Global groups are not shown.
6. Select the group you wish to have mail-enabled, and then click Next.
7. The Group Information screen is shown; however, in this scenario, the information is already filled out for you. The only item you can change is the Alias. Click Next.
8. Review the Configuration Summary before clicking New.
9. After the group is mail-enabled, you are notified with a green Completed checkmark. Click Finish.
NOTE To add or remove members of a Distribution Group, you can open the group from within the Recipient Configuration, Distribution Group node (or from within Active Directory Users and Computers), and you can select the Members tab and click the Add button. If you wish to remove members, you can select users and click the X to remove them.
Differing from the standard types of groups that are based upon memberships, dynamic groups are defined by filters and conditions each time a message is sent to the group. An individual might potentially be part of the group one moment and not part of the group the next moment if he falls out of the scope of the group.
To create a dynamic distribution group, perform the following:
1. Open the EMC.
2. From the Navigation Tree, select the Recipient Configuration work center and click Distribution Group.
3. Over on the Actions pane, choose New Dynamic Distribution Group to open the wizard.
4. From the Introduction screen, you are asked what OU you want the group placed in. The default is the Users container, but you can click Browse and adjust this. You are asked to provide a name and alias for the group, too. Provide the information and click Next.
5. From the Filter Settings screen, you are asked to select the recipient container where you want to apply this filter. The default is Users, but you can click Browse to locate a different container so that the group can be more narrowly defined to an OU. You are also asked if you want to include all recipient types or specific recipient types, such as the following:
a. Users with Exchange mailboxes
b. Users with external email addresses
d. Contacts with external email addresses
e. Mail-enabled groups
6. Select your options and click Next.
7. You are taken to the Conditions screen, shown in Figure 5.11. Note that the initial conditions are State or Province and Department or Company. However, then you have the various custom attributes that you can establish values for. You can select more than one condition, too. In Step 1, you select the condition, such as Recipient Is In a Department. Then you see a link in Step 2 that you click to specify the condition. For example, you might say Sales (for the Sales department).
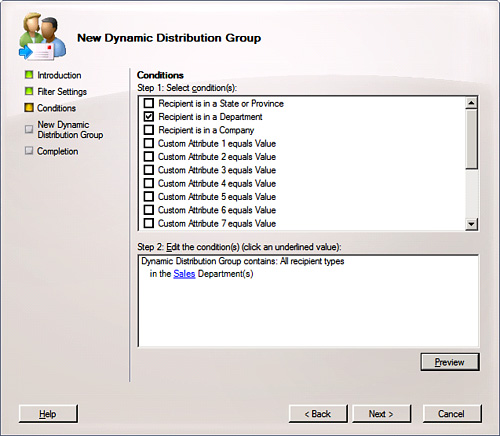
8. Before clicking Next, you can choose the Preview option, which shows you (based upon the filter settings and conditions you have established) what users are going to be in your Dynamic Distribution Group. After you are satisfied with the filter and condition settings, click Next.
9. Review the configuration summary and then click New.
10. After the group is created, you see a green checkmark and a Completed response. Click Finish.
After the group is created, you can always return to the properties of the group and change the filter and condition settings. The Dynamic Distribution Group has an object in AD and you can view it in the AD Users and Computers tool; however, you will find that because of the nature of the group, there are no properties you can configure within AD. It’s simply a named object.
NOTE Creating a dynamic distribution group set of conditions that relate to custom attributes might have you curious about where these attributes are configured. If you go to the Recipient Configuration/Mailbox node and go into the properties of any of the recipients, right on the General tab is a box at the bottom that says Custom Attributes. Select this and you can see that you can put any information within those boxes that you choose.
Solution: By default, a distribution group is simply expanded on any server in the organization. However, you can change this for the distribution group or dynamic distribution group by performing the following:
1. Open the EMC.
2. From the Navigation Tree, select the Recipient Configuration work center and click Distribution Group.
3. Select Distribution Group or Dynamic Distribution Group from the Results pane.
4. From the Actions pane, select Properties.
5. Go to the Advanced tab, shown in Figure 5.12.
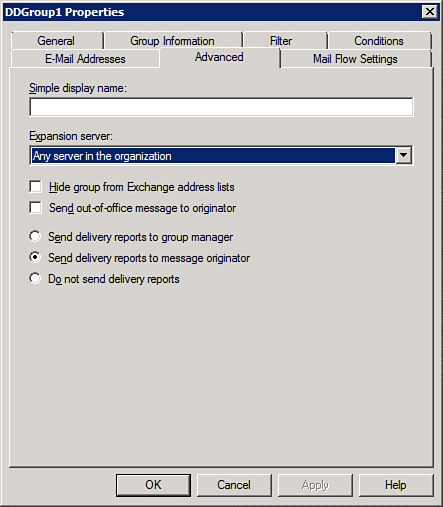
6. Notice the Expansion Server setting with the drop-down arrow. Use this list to select a Hub Transport (HT) server to handle the expansion list, or you can leave the default Any Server in the Organization. (Note: Extremely large distribution lists can affect performance on a production server, so it might be invaluable for you to offload this intense workload.)
7. Click OK to finish the process.
In determining your expansion server, you might have noticed that you can configure a few important settings from here, including the following:
Checkboxes:
![]() Hide Group From Exchange Address Lists—Users can still send messages to the group through the email address directly, but it does not show in the address lists.
Hide Group From Exchange Address Lists—Users can still send messages to the group through the email address directly, but it does not show in the address lists.
![]() Send Out-Of-Office Messages to Originator—If you email the group and someone has the out-of-office message turned on and this checkbox is selected, you receive the out-of-office reply. If you don’t want this extra traffic going through your server, leave this checkbox blank.
Send Out-Of-Office Messages to Originator—If you email the group and someone has the out-of-office message turned on and this checkbox is selected, you receive the out-of-office reply. If you don’t want this extra traffic going through your server, leave this checkbox blank.
Radio Buttons for Non-Delivery Reports (NDRs):
![]() Send Delivery Reports to Group Manager—Sends the NDR only to the distribution group manager.
Send Delivery Reports to Group Manager—Sends the NDR only to the distribution group manager.
![]() Send Delivery Reports to Message Originator—This is the default.
Send Delivery Reports to Message Originator—This is the default.
![]() Do Not Send Delivery Reports—This option minimizes traffic that you might consider unnecessary.
Do Not Send Delivery Reports—This option minimizes traffic that you might consider unnecessary.