Chapter 8 Administrate Transport Settings
In This Chapter
![]() Implement Email Address Policies
Implement Email Address Policies
![]() Manage Connectors (Send and Receive)
Manage Connectors (Send and Receive)
![]() Establish EdgeSync Subscriptions
Establish EdgeSync Subscriptions
Solution: To begin, what is the difference among all these different domain types? How do they provide you great flexibility when configuring your organization? The following are domain types:
![]() Accepted domains—If an Exchange organization is configured to send and receive email for a particular SMTP namespace, it considers that an accepted domain. This doesn’t necessarily mean that mailboxes are hosted within the organization for that namespace. It could simply mean that email is relayed through your organization.
Accepted domains—If an Exchange organization is configured to send and receive email for a particular SMTP namespace, it considers that an accepted domain. This doesn’t necessarily mean that mailboxes are hosted within the organization for that namespace. It could simply mean that email is relayed through your organization.
![]() Authoritative domains—These are accepted domains that officially host mailboxes for a domain namespace. An Exchange organization can have more than one authoritative domain. For example, if your company has two different products and therefore two different namespaces, you can have persons send email to users at either one, but your Exchange server will be able to determine, by namespace, where that mail should go. When you first install Exchange, you are given one authoritative, accepted domain configured on your Hub Transport server. You are not provided an automatic accepted domain on your Edge Transport server, however.
Authoritative domains—These are accepted domains that officially host mailboxes for a domain namespace. An Exchange organization can have more than one authoritative domain. For example, if your company has two different products and therefore two different namespaces, you can have persons send email to users at either one, but your Exchange server will be able to determine, by namespace, where that mail should go. When you first install Exchange, you are given one authoritative, accepted domain configured on your Hub Transport server. You are not provided an automatic accepted domain on your Edge Transport server, however.
![]() Relay domains—When a person sends an email that is by namespace designed to come to your Exchange servers, if the email is not for an internal mailbox (in other words, if the email was not sent to the authoritative domain), it checks to see whether there is a relay domain it should send the email toward. There are both external and internal ways to configure these relay domains. On the external side, you configure your Edge Transport server to relay over to the other domain’s Edge Transport server (if it has one; if not, it can be the other domain’s Hub Transport). On the internal side, you allow the message to come through the Edge Transport server and then the Hub Transport server will relay it over to the other domain’s Hub Transport server.
Relay domains—When a person sends an email that is by namespace designed to come to your Exchange servers, if the email is not for an internal mailbox (in other words, if the email was not sent to the authoritative domain), it checks to see whether there is a relay domain it should send the email toward. There are both external and internal ways to configure these relay domains. On the external side, you configure your Edge Transport server to relay over to the other domain’s Edge Transport server (if it has one; if not, it can be the other domain’s Hub Transport). On the internal side, you allow the message to come through the Edge Transport server and then the Hub Transport server will relay it over to the other domain’s Hub Transport server.
NOTE Because an Edge Transport server is a recommended role whereas a Hub Transport server is mandatory, we perform most actions from the viewpoint of the Hub Transport role. Performing the tasks on the Edge Transport is identical, with the exception of having additional elements in the Exchange Management Console to be visually concerned with.
To quickly see (or alter) the type of domain you have configured on your transport server, perform the following:
1. Open the Exchange Management Console (EMC).
2. From the Navigation Tree, expand the Organization Configuration work center and click Hub Transport.
3. From the Results pane, select the Accepted Domains tab.
4. Select a domain (in most cases, you see only the first one created when you install the server).
5. From the Actions pane, choose Properties.
6. From the General tab (shown in Figure 8.1), you can see whether the domain is an accepted domain. You can also choose one of the following options:

![]() Authoritative Domain—Email is delivered to a recipient in this Exchange organization.
Authoritative Domain—Email is delivered to a recipient in this Exchange organization.
![]() Internal Relay Domain—Email is relayed to an email server in another Active Directory forest within the organization.
Internal Relay Domain—Email is relayed to an email server in another Active Directory forest within the organization.
![]() External Relay Domain—Email is relayed to an email server outside this Exchange organization by the Edge Transport server.
External Relay Domain—Email is relayed to an email server outside this Exchange organization by the Edge Transport server.
7. After you complete your check or make a change, click OK to return to the console.
Remember, an accepted domain is one that allows inbound email routing. If you need to create additional accepted domains, perform the following:
1. Open the EMC.
2. From the Navigation Tree, expand the Organization Configuration work center and click Hub Transport. (To create an accepted domain on an Edge Transport server, within the console tree, from that computer, select Edge Transport, and then within the Work pane, click the Accepted Domains tab.)
3. From the Actions pane, select the New Accepted Domain link to open the wizard.
4. Provide a display name for the accepted domain.
5. Provide the accepted domain SMTP namespace.
6. Select the type of accepted domain you wish to create: Authoritative, Internal Relay, or External Relay.
7. Click New.
8. When the domain has been created, click Finish.
Solution: Every user, resource (room, equipment, and so on), contact, or group that is mail-enabled receives a mailbox and an email address. That email address is generated because of an email address policy. By default, when you install Exchange, a simple, all-encompassing policy is created that applies a primary SMTP address to the objects you mail-enable. This default policy takes the recipient’s alias and places it before the @ sign and then appends the default accepted domain at the end.
One of the changes you can make within your organization, for example, is that you can alter how the email address is configured. Rather than using the alias, you can always go with [email protected]. You can also configure additional email addresses for a single recipient.
The default policy is automatically applied to all recipient types. You cannot alter that fact. If, however, you need to make a change that will affect all recipient types, you can open and edit the default policy. For example, if you wanted to alter the manner in which email addresses are configured, you can do so at the organizational level through the policy itself.
To alter the default email policy, perform the following:
1. Open the EMC.
2. From the Navigation Tree, expand the Organization Configuration work center and click Hub Transport.
3. Select the E-mail Address Policies tab.
4. Select Default Policy. From the Actions pane, select Edit to open the wizard.
5. The Introduction screen shows all recipients types and is grayed out so you cannot alter this aspect of the policy. Click Next.
6. The Conditions screen displays, and again, this cannot be altered. Click Next.
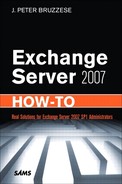
7. The Email Addresses screen displays. Here, you can see the default SMTP address scheme. Click Add to include other SMTP addresses. Click Edit to make changes to the email configuration, as you can see in Figure 8.2. As you can see, you can alter the configuration and the accepted domain for the email address. Click OK when you are finished making changes. Then click Next.
8. On the Schedule screen, you can determine whether you want this policy to go into effect immediately or at a specific time. Then click Next.
9. Review the Configuration Summary, and if changes are needed, go Back. If not, click Edit.
10. When the edit is complete, click Finish.
You can create additional policies and then order the priority level of those policies so that the default policy is ignored over another policy you design. These created policies can be directed toward specific recipient types and conditions can be placed upon them, so that you can really control the application of the policy.
To create a new email policy, perform the following:
1. Open the EMC.
2. From the Navigation Tree, expand the Organization Configuration work center, and click Hub Transport.
3. Select the E-mail Address Policies tab.
4. From the Actions pane, select New E-mail Address Policy to open the wizard.
5. On the Introduction screen, you need to provide a name. Then choose the recipient types you need included. You can leave the default option All Recipient Types or you can select The Following Specific Types and choose one or more of the following:
![]() Users with Exchange Mailboxes
Users with Exchange Mailboxes
![]() Users with External Email Addresses
Users with External Email Addresses
![]() Resource Mailboxes
Resource Mailboxes
![]() Contacts with External Email Addresses
Contacts with External Email Addresses
![]() Mail-Enabled Groups
Mail-Enabled Groups
6. After you make your selections, choose Next.
7. The Conditions screen displays, and you can establish a filter of sorts by Department, State, Province, Company, or Custom Attributes. If you want to see the results of your conditions, click the Preview button. After you make your selections, click Next.
8. The Email Addresses screen displays. The options are initially blank. First, you have to click Add and then make the selections for how you want emails to display and the accepted domain you want them to be connected with. Then click Next.
9. On the Schedule screen, you can determine whether you want this policy to go into effect immediately or at a specific time. Then click Next.
10. Review the Configuration Summary, and if changes are needed, click Back. If not, click New.
11. When the new policy is created, click Finish.
NOTE The moment you create a new policy, it is given a priority level of 1. That is higher than the default policy level, which is lowest. You cannot alter the priority level of the default policy; however, as you add more policies, you can right-click a policy (or select the policy and look in the Actions pane) and choose a different priority level to assist you in organizing your policies.
Solution: You have the capability to make changes to the default remote domain settings or to create additional remote domain settings that are specific to a domain toward which you wish to control certain access.
For example, you can control the out-of-office message types delivered to a domain. You can also control the types of messages sent to that domain.
To alter the default remote domain settings, perform the following:
1. Open the EMC.
2. From the Navigation Tree, expand the Organization Configuration work center and click Hub Transport.
3. Select the Remote Domains tab.
4. From the Results pane, select the default policy. From the Actions pane, select Properties.
5. You can see the domain name is *.
NOTE Note that the default domain is for *, which translates to all domains that the Exchange organization doesn’t have as an accepted domain (authoritative, internal relay, external relay) or as an explicit remote domain.
6. From the General tab, you can select the out-of-office message types delivered to this remote domain. They include the following:
![]() Allow None
Allow None
![]() Allow External Out-of-Office Messages Only (default setting)
Allow External Out-of-Office Messages Only (default setting)
![]() Allow External Out-of-Office Messages, and Out-of-Office Messages Set by Outlook 2003 or Earlier Clients or Sent by Exchange Server 2003 or Earlier Servers
Allow External Out-of-Office Messages, and Out-of-Office Messages Set by Outlook 2003 or Earlier Clients or Sent by Exchange Server 2003 or Earlier Servers
![]() Allow Internal Out-of-Office Messages, and Out-of-Office Messages Set by Outlook 2003 or Earlier Clients or Sent by Exchange Server 2003 or Earlier Servers
Allow Internal Out-of-Office Messages, and Out-of-Office Messages Set by Outlook 2003 or Earlier Clients or Sent by Exchange Server 2003 or Earlier Servers
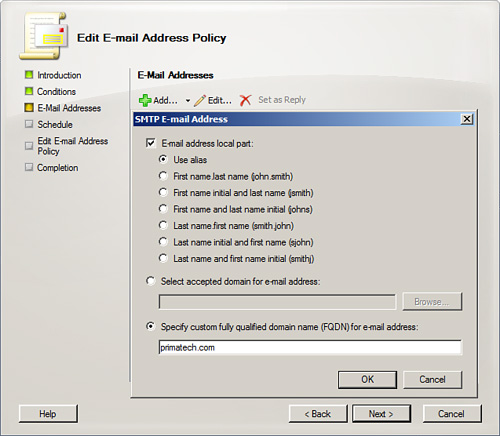
7. Next, you can select the Format of Original Message Sent as Attachment to Journal Report tab, as shown in Figure 8.3. From here you can select the following:
![]() Message Format Options (checkboxes)
Message Format Options (checkboxes)
![]() Allow Automatic Replies
Allow Automatic Replies
![]() Allow Automatic Forward
Allow Automatic Forward
![]() Allow Delivery Reports (default)
Allow Delivery Reports (default)
![]() Allow Non-delivery Reports (default)
Allow Non-delivery Reports (default)
![]() Display Sender’s Name on Messages (default)
Display Sender’s Name on Messages (default)
![]() Use Message Text Line Wrap at Column (indicate column number)
Use Message Text Line Wrap at Column (indicate column number)
![]() Exchange Rich-Text Format: (radio buttons)
Exchange Rich-Text Format: (radio buttons)
![]() Always Use
Always Use
![]() Never Use
Never Use
![]() Determined by Individual User Settings (default)
Determined by Individual User Settings (default)
![]() Character Sets
Character Sets
![]() MIME Character Set (default: Western European [ISO])
MIME Character Set (default: Western European [ISO])
![]() Non-MIME Character Set (default: Western European [ISO])
Non-MIME Character Set (default: Western European [ISO])
Perform the following to create a new remote domain:
1. Open the EMC.
2. From the Navigation Tree, expand the Organization Configuration work center, and click Hub Transport.
3. Select the Remote Domains tab, and from the Actions pane, select New Remote Domain to open the wizard.
4. On the New Remote Domain screen, enter the name of the remote domain and the domain name itself. You can also select a checkbox to include all subdomains.
5. Then click New. When complete, click Finish.
After the creation of the explicit remote domain, you can enter the Properties and configure the out-of-office settings and message format options the same way we did previously.
Solution: There are no default rules in place to control messaging within your organization. To establish these rules, you begin by starting the wizard and working through three main portions of the rule. You have your conditions to make the rule go into effect, the actions that should be taken if the condition(s) is met, and any exceptions that might disqualify a rule from being applied. Creating a rule doesn’t automatically mean it is enabled. You can disable a rule so that it is applied when you determine it is time to turn the rule on.
You might imagine a few different reasons to create transport rules. For example, let’s say you have to append a legal disclaimer to all messages that leave your organization and go to outside persons. You might tell your users to ensure the message is included at the bottom of their emails, but that would be putting a great deal of trust on the part of your people with something that can easily be forgotten. Rather, you can use a transport rule to ensure it is done automatically.
Another possible rule is one that prevents individuals from different departments from communicating with each other in the event they are not legally allowed to do so. This might seem a bit odd, but in larger companies where legal obligations are in place, one side of the company cannot discuss things with another side. Rather than leave it up to employees to follow the rules on this, you can establish a transport rule to ensure it happens.
You can use transport rules to filter confidential information, to prevent known virus extensions from running rampant through your organization, to track or archive messages that are sent to or received from specific individuals, to redirect inbound and outbound messages for inspection before delivery, and much more.
You can create hundreds of different rules. It’s simply impossible to review all the different methods of combining conditions, actions, and exceptions. We review the options for each.
![]() From people
From people
![]() From a member of distribution list
From a member of distribution list
![]() From user inside or outside the organization
From user inside or outside the organization
![]() Sent to people
Sent to people
![]() Sent to a member of distribution list
Sent to a member of distribution list
![]() Sent to user inside or outside organization
Sent to user inside or outside organization
![]() Between members of distribution list and distribution list
Between members of distribution list and distribution list
![]() When any of the recipients in the To field are people
When any of the recipients in the To field are people
![]() When any of the recipients in the To field is a member of distribution list
When any of the recipients in the To field is a member of distribution list
![]() When any of the recipients in the Cc field are people
When any of the recipients in the Cc field are people
![]() When any of the recipients in the Cc field is a member of distribution list
When any of the recipients in the Cc field is a member of distribution list
![]() When any of the recipients in the To or Cc field are people
When any of the recipients in the To or Cc field are people
![]() When any of the recipients in the To or Cc field is a member of distribution list
When any of the recipients in the To or Cc field is a member of distribution list
![]() Marked with classification
Marked with classification
![]() When the Subject field contains specific words
When the Subject field contains specific words
![]() When the Subject field or body of the message contains specific words
When the Subject field or body of the message contains specific words
![]() When a message header contains specific words
When a message header contains specific words
![]() When the From address contains specific words
When the From address contains specific words
![]() When the Subject field contains text pattern
When the Subject field contains text pattern
![]() When the Subject field or the body of the message contains text pattern
When the Subject field or the body of the message contains text pattern
![]() When the message header contains text pattern
When the message header contains text pattern
![]() When the From address contains text pattern
When the From address contains text pattern
![]() When any attachment file name contains text patterns
When any attachment file name contains text patterns
![]() When a spam confidence level (SCL) rating is greater than or equal to limit
When a spam confidence level (SCL) rating is greater than or equal to limit
![]() When the size of any attachment is greater than or equal to limit
When the size of any attachment is greater than or equal to limit
![]() Mark with importance
Mark with importance
![]() Log an event with message
Log an event with message
![]() Prepped the subject with string
Prepped the subject with string
![]() Apply message classification
Apply message classification
![]() Append disclaimer text using font, size, color with separator and fallback to action if unable to apply
Append disclaimer text using font, size, color with separator and fallback to action if unable to apply
![]() Set the spam confidence level to value
Set the spam confidence level to value
![]() Set header with value
Set header with value
![]() Remove header
Remove header
![]() Add a recipient in the To field addresses
Add a recipient in the To field addresses
![]() Copy the message to addresses
Copy the message to addresses
![]() Blind carbon copy (Bcc) the message to addresses
Blind carbon copy (Bcc) the message to addresses
![]() Redirect the message to addresses
Redirect the message to addresses
![]() Send bounce message to sender with enhanced status code
Send bounce message to sender with enhanced status code
![]() Silently drop the message
Silently drop the message
![]() Except when the message is from people
Except when the message is from people
![]() Except when the message is from members of distribution list
Except when the message is from members of distribution list
![]() Except when the message is from users inside or outside the organization
Except when the message is from users inside or outside the organization
![]() Except when the message is sent to people
Except when the message is sent to people
![]() Except when the message is sent to a member of distribution list
Except when the message is sent to a member of distribution list
![]() Except when the message is sent to users inside or outside the organization
Except when the message is sent to users inside or outside the organization
![]() Except when the message is sent between members of distribution list and distribution list
Except when the message is sent between members of distribution list and distribution list
![]() Except when any of the recipients in the To field are people
Except when any of the recipients in the To field are people
![]() Except when any of the recipients in the To field is a member of distribution list
Except when any of the recipients in the To field is a member of distribution list
![]() Except when any of the recipients in the Cc field are people
Except when any of the recipients in the Cc field are people
![]() Except when any of the recipients in the Cc field is a member of distribution list
Except when any of the recipients in the Cc field is a member of distribution list
![]() Except when any of the recipients in the To field or Cc field are people
Except when any of the recipients in the To field or Cc field are people
![]() Except when any of the recipients in the To field or Cc field is a member of distribution list
Except when any of the recipients in the To field or Cc field is a member of distribution list
![]() Except when the message is marked as classification
Except when the message is marked as classification
![]() Except when the text specific words appear in the subject
Except when the text specific words appear in the subject
![]() Except when the text specific words appear in the subject or body of the message
Except when the text specific words appear in the subject or body of the message
![]() Except when the text specific words appear in a message header
Except when the text specific words appear in a message header
![]() Except when the From address contains specific words
Except when the From address contains specific words
![]() Except when the text pattern appears in the subject
Except when the text pattern appears in the subject
![]() Except when the text pattern appears in the subject or body of the message
Except when the text pattern appears in the subject or body of the message
![]() Except when the text pattern appears in the header
Except when the text pattern appears in the header
![]() Except when the From address contains text patterns
Except when the From address contains text patterns
![]() Except when the text pattern appears in any attachment file name
Except when the text pattern appears in any attachment file name
![]() Except when the spam confidence level (SCL) is greater than or equal to limit
Except when the spam confidence level (SCL) is greater than or equal to limit
![]() Except when the size of any attachment is greater than or equal to limit
Except when the size of any attachment is greater than or equal to limit
On a Hub Transport server, there is a Transport Rules agent, whereas on an Edge Transport server, there is an Edge Rules agent. They are similar in concept but different in usage. If you use an Edge Transport server, you want to ensure rules you might apply on your Hub Transport servers ordinarily are also included on the Edge Transport for further protection. For example, in the event a virus is detected and you know the extension you are looking to drop, you would place the rule on both the Hub and Edge Transport servers to ensure it is dropped internally and from external messages as well. Prior to the update of your antivirus software, you might create a quick transport rule that drops messages with that extension, but you need to create the rule on both the Hub and Edge transport sides.
Rules created for the Hub Transport servers are established at the organizational level and will apply throughout your organization. Those created on an Edge Transport server apply only on that server. The rules are not shared and so must be individually established on each Edge Transport server.
NOTE The instructions to follow and corresponding screenshots are from an Edge Transport server. The only distinction you would make on the Hub Transport side is that you would select the Organization Configuration work center and click Hub Transport and then the Transport Rules tab. On the Edge Transport server, you have less in the Navigation pane to be concerned with but the wizard is the same. You might notice that the Edge Transport server doesn’t allow for as many options to configure, and that is because it has a limited scope of application, whereas the Hub Transport server offers all the options previously mentioned.
To create a transport rule on the Edge Transport server, perform the following:
1. Open the EMC.
2. From the Navigation Tree, select Edge Transport.
3. Select the Transport Rules tab, and from the Actions pane, select the New Transport Rule link to open the wizard.
4. On the Introduction screen, you are asked for a name for the rule and a comment where you can explain the purpose of the rule you are creating. You can also select/deselect a checkbox for the rule to be automatically enabled or disabled after it is created. Enter the information and click Next.
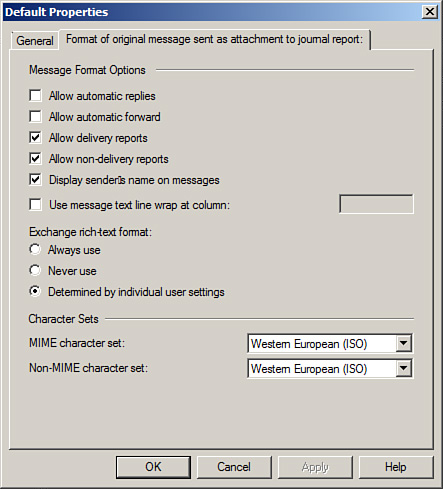
5. The Conditions screen, shown in Figure 8.4, enables you to choose one or more conditions you want met before action is taken on a message. In Step 1, you select the condition, and in Step 2, you alter the condition by selecting an underlined value and indicating your personal need. If you want to have emails from a group moved into a certain folder, you can select the option in the first part and indicate the exact group in the second. After you have your condition(s) established, click Next.
6. The Actions screen enables you to select an action or actions to perform in the event the condition is met. After the action(s) is determined, click Next.
7. The Exceptions screen is not mandatory. Here you can select a variety of exceptions to this transport rule if you need them. Configure your exceptions and choose Next.
8. After the three aspects of the rule are in place, the Create Rule screen allows you to review the Configuration Summary for the rule. If something is amiss, click Back. If everything is fine, click New.
9. After the rule has been created, click Finish.
After the rule is in place, you can select the rule at any time and from the Actions pane choose to disable the rule, remove the rule, or edit the rule.
Solution: One of the ways we have already discussed in Chapter 4, “Manage Storage and Databases,” is the capability to journal messages going to and from a mailbox database. This requires setting up a journaling mailbox and sending all duplicates of the message to that mailbox. The journaling mailbox is a simple SMTP address, which means it can be another Exchange mailbox within your organization, it can be a SharePoint location, or some other solution you have in place for archiving.
A journaled message is wrapped in a “journaling envelope.” The journaled message contains information regarding the sender, the recipient, the subject, and other information regarding that message that should be retained for informative or legal purposes.
However, because all mail goes through the Hub Transport role, we can configure journal rules that give us a great deal of control over duplicating our incoming and outgoing mail.
NOTE Exchange has two different journaling options—Standard and Premium. As we examined in Chapter 4, with Standard, you can journal a mailbox database (also called per-mailbox database journaling). Premium requires an Enterprise CAL and allows you to use the rules from the Hub Transport role to focus on a specific mailbox or group (also called per-recipient journaling).
To configure a journal rule, perform the following:
1. Open the EMC.
2. From the Navigation Tree, expand the Organization Configuration work center, and click Hub Transport.
3. Select the Journaling tab.
4. From the Actions pane, select New Journal Rule to open the wizard.
5. The New Journal Rule Wizard opens, as shown in Figure 8.5. Here you are asked to provide the following information:
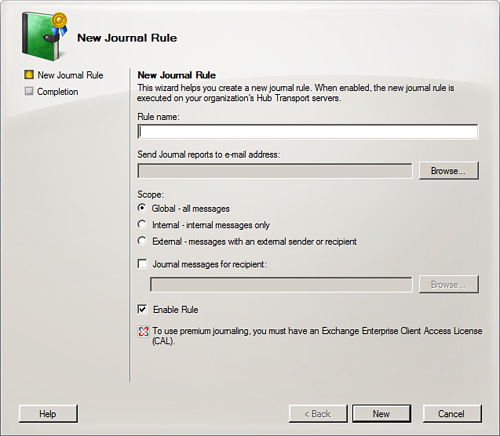
![]() Rule Name—Choose a name that will make it easy to remember the purpose of the rule.
Rule Name—Choose a name that will make it easy to remember the purpose of the rule.
![]() Send Journal Reports to Email Address—Select Browse and choose the mailbox that will receive reports regarding the journaling process. This mailbox receives the “journaling envelopes” with all the additional information that is wrapped within.
Send Journal Reports to Email Address—Select Browse and choose the mailbox that will receive reports regarding the journaling process. This mailbox receives the “journaling envelopes” with all the additional information that is wrapped within.
![]() Scope—You can choose one of the following:
Scope—You can choose one of the following:
![]() Global—All Messages
Global—All Messages
![]() Internal—Internal Messages Only
Internal—Internal Messages Only
![]() External—Messages with an External Sender or Recipient
External—Messages with an External Sender or Recipient
![]() Journal Messages for Recipient—Here you can select Browse and choose an individual mailbox or distribution group if you need to journal a specific person or group email. Note that if you leave this blank, it focuses on the entire organization by default.
Journal Messages for Recipient—Here you can select Browse and choose an individual mailbox or distribution group if you need to journal a specific person or group email. Note that if you leave this blank, it focuses on the entire organization by default.
![]() Enable Rule—This checkbox is selected by default but you can deselect it to enable the rule at a later time.
Enable Rule—This checkbox is selected by default but you can deselect it to enable the rule at a later time.
6. After the settings are configured, click New.
7. After the rule has been created, click Finish.
Solution: Although two default Receive connectors are automatically created on each Hub Transport server when you install Exchange, the Send connectors are not. Send connectors are needed to send messages from your organization either to your Edge Transport server or directly to the Internet.
NOTE If an Edge Subscription is made with an Edge Transport server, a Send connector with an address space of “*” is configured automatically on the Hub Transport so that the Hub will send outgoing messages to the Edge Transport, which will send it to the Internet.
The Send connectors are configured at the Organization level, whereas the Receive connectors are configured on the Server level within the Navigation pane of your EMC. When you create these connectors, they are stored within the Active Directory.
Hub Transport servers can communicate between each other automatically because of implicit connectors that exist based upon the AD site topology. So, the primary focus of your Send and Receive connectors is to structure what happens when an email needs to come into your organization from an external source (either the Internet or an Edge Transport server) or when email needs to be sent out of your organization. When an email goes through a Hub Transport server and it sees that the SMTP address is not for any of the domains within the organization, it will route the message to a Send connector source server or servers (you can configure multiple source servers).
NOTE One of the interesting aspects of the default Receive connectors is that although they exist, they are not configured to allow you to receive email from anonymous users. Persons who attempt to send you email will most likely receive the message NDR with the error “530 5.7.1 Client was not authenticated.” You must alter the configuration of the Receive connector to allow anonymous users.
To create a Send connector, perform the following:
1. Open the EMC.
2. From the Navigation Tree, expand the Organization Configuration work center, and click Hub Transport.
3. Select the Send Connectors tab.
4. From the Actions pane, select New Send Connector to open the wizard.
5. On the Introduction screen, you have to provide a name for the connector and choose its intended use: Custom, Internal, Internet, or Partner. In the event you are configuring a Hub Transport without an Edge Transport, you might call it Internet and choose Internet for the intended use. Then click Next.
6. On the Address Space tab, you need to configure the SMTP address space. In the event you are configuring all mail to be sent through this connector, you can use a “*”. Then click Next.
7. Under Network Settings, you can use DNS MX records or smart hosts. Configure your options and choose Next.
8. On the Source Server screen, you can associate the connector with one or more Hub Transport servers or with Edge Subscriptions. When complete, click Next.
9. You are shown a Configuration Summary. When satisfied with your options, click New.
10. After the connector is created, click Finish.
After the Send connector is created, you can go into the properties of the connector and make changes to any of the settings.
To create a Receive connector, perform the following:
1. Open the EMC.
2. From the Navigation Tree, expand the Server Configuration work center and click Hub Transport.
3. Select the Receive Connectors tab.
4. From the Actions pane, select New Receive Connector to open the wizard.
5. On the Introduction screen, you have to provide a name for the connector and choose its intended use: Custom, Internal, Internet, Client, or Partner. For example, you might call it From Internet and choose Internet for the intended use. Then click Next.
6. You are now faced with Local or Remote Internet Settings. Note that depending on the type of intended purpose you selected for your connector, you might be presented with local or remote Internet settings to configure (or both). This includes configuration of IP addresses for receiving mail and the ports to look for. After configuration, choose Next.
7. Review your options on the Configuration Summary and choose New.
8. When complete, click Finish.
Having mail come into your organization through a Receive connector allows you a modicum of control over the security involved and authentication allowed for that mail. After you have the Receive connector created, you can return to the Properties of the connector and make adjustments. Two tabs available to you that were not part of the creation process are the Authentication tab and the Permission Groups tab.
Under the Authentication tab, shown in Figure 8.6, you can specify which security mechanisms are available for incoming connections, including the following:
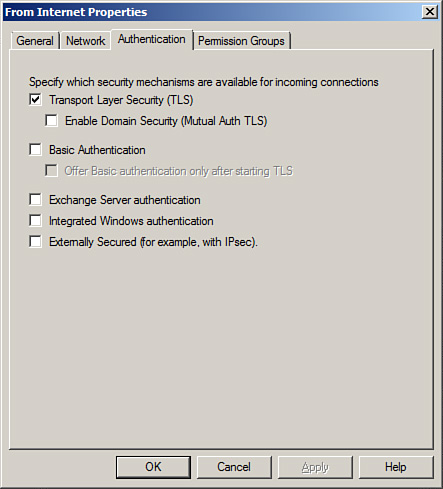
![]() Transport Layer Security (TLS)
Transport Layer Security (TLS)
![]() Enable Domain Security (Mutual Auth TLS)
Enable Domain Security (Mutual Auth TLS)
![]() Basic Authentication
Basic Authentication
![]() Offer Basic Authentication Only After Starting TLS
Offer Basic Authentication Only After Starting TLS
![]() Exchange Server Authentication
Exchange Server Authentication
![]() Integrated Windows Authentication
Integrated Windows Authentication
![]() Externally Secured (for example, with IPsec)
Externally Secured (for example, with IPsec)
Permission Groups options include the following:
![]() Anonymous Users
Anonymous Users
![]() Exchange Users
Exchange Users
![]() Exchange Servers
Exchange Servers
![]() Legacy Exchange Servers
Legacy Exchange Servers
![]() Partners
Partners
Solution: EdgeSync Subscriptions allow you to connect your Edge Transport and Hub Transport servers together. To create an EdgeSync Subscription, you have to begin the process on the Edge Transport server. Perform the following:
1. Open the Exchange Management Shell (EMS).
2. Type New-EdgeSubscription -FireName “c:EdgeSubscriptionInfo.xml” and press Enter. (Note that you can call the file whatever you like. This is just an easy-to-remember example.)
3. You will be asked to confirm the process. Type Y and press Enter.
4. Now, take the file that was created and move it (with a thumb drive or through some other valid means) over to the Hub Transport server.
On the Hub Transport server, perform the following to complete the EdgeSync Subscription process:
1. Open the EMC.
2. From the Navigation Tree, expand the Server Configuration work center and click Hub Transport.
3. Select the Edge Subscriptions tab.
4. From the Actions pane, select New Edge Subscription to open the wizard.
5. On the New Edge Subscription screen, shown in Figure 8.7, Provide the Active Directory Site toward which you want this subscription to apply. You also have to Browse to the location of the .xml file that was created from the Edge Transport server. After you have the options selected, click New.
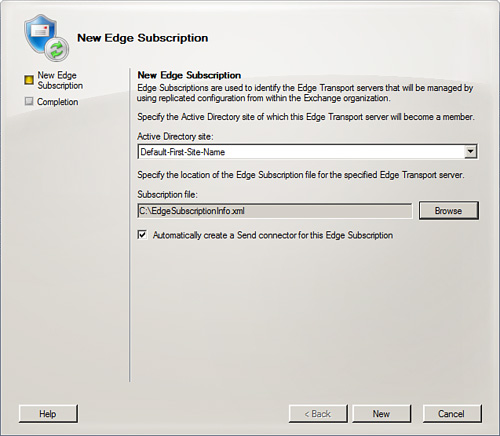
6. After the EdgeSync Subscription is complete, click Finish.
Solution: The recommendation is to work with your antispam settings on your Edge Transport server. However, in the event you do not have an Edge Transport server, you can enable these same features on your Hub Transport server. To do this, perform the following:
1. Open the EMS.
2. If you installed Exchange to the default directory, change your directory location within the shell to C:program filesMicrosoftExchange ServerScripts.
3. Then type ./install-AntiSpamAgents.ps1.
4. Next, restart your Transport Service.
5. Return to the EMC, and under the Organization work center and Hub Transport settings, look for the Anti-Spam tab (which didn’t exist before).
To locate the tools on the Edge Transport server, open the EMC, select Edge Transport, and then look for them on the Anti-Spam tab.
As you can see in Figure 8.8, you can configure nine different antispam features. Each one has its own ability to protect (some might be used more than others). This is not to say you shouldn’t consider additional antispam or antivirus products. Many solutions can assist in the battle against spam.
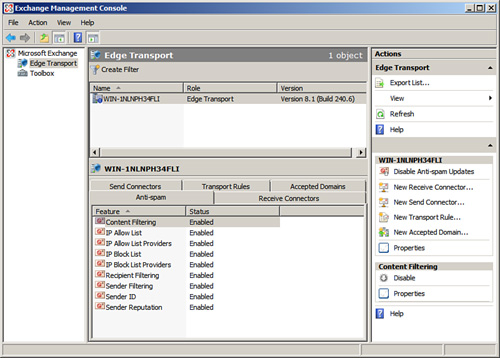
To work with the antispam features, double-click any of them from within the list. The key then is to know how to configure the settings. Let’s review each of the options and how they work.
![]() Content Filtering—Filters junk email by using a probability-based algorithm that can learn what is and what isn’t spam. Use the Content Filtering feature to filter junk email based on the content of the message. You can set the filtering threshold actions, how content is analyzed, recipient exceptions, and specific words and phrases for the Content Filtering feature to act upon. You can configure custom words and exceptions. You can also determine Spam Confidence Level (SCL) rating thresholds, as shown in Figure 8.9.
Content Filtering—Filters junk email by using a probability-based algorithm that can learn what is and what isn’t spam. Use the Content Filtering feature to filter junk email based on the content of the message. You can set the filtering threshold actions, how content is analyzed, recipient exceptions, and specific words and phrases for the Content Filtering feature to act upon. You can configure custom words and exceptions. You can also determine Spam Confidence Level (SCL) rating thresholds, as shown in Figure 8.9.
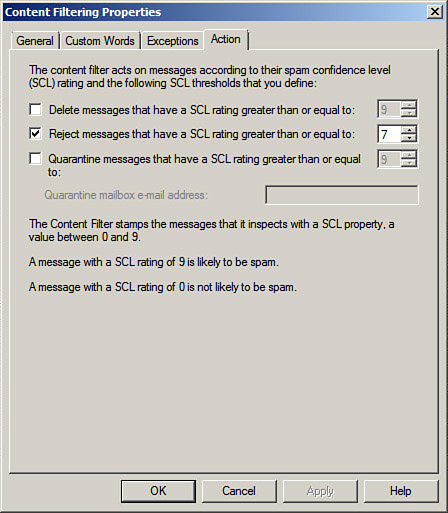
NOTE Messages with an SCL of 9 are more likely to be spam, whereas those of 0 are likely not to be spam. Depending on the types of issues found with an email, the SCL rating will rise. You can configure the SCL response to delete the message if it reaches a threshold, or to quarantine it or reject the message. If you quarantine it, you have to provide a quarantine mailbox for the server to use.
![]() IP Allow List—Specifies IP addresses that you are always allowed to connect to and transmit email messages to this server. Accept connections from individual IP addresses or from ranges of IP addresses.
IP Allow List—Specifies IP addresses that you are always allowed to connect to and transmit email messages to this server. Accept connections from individual IP addresses or from ranges of IP addresses.
![]() IP Allow List Providers—Maintains lists of sender domains that can be relied on not to send junk email. Use this feature to determine which IP Allow List provider to use.
IP Allow List Providers—Maintains lists of sender domains that can be relied on not to send junk email. Use this feature to determine which IP Allow List provider to use.
![]() IP Block List—Similar to its Allow List counterpart, you specify IP addresses that you are blocking from connecting to and transmitting email messages to and from.
IP Block List—Similar to its Allow List counterpart, you specify IP addresses that you are blocking from connecting to and transmitting email messages to and from.
![]() IP Block List Providers—Maintains lists of sender domains that cannot be relied on and that must be blocked from connecting to and transmitting email messages to and from. These block list providers can be invaluable in that they maintain up-to-date lists that you can connect to and utilize.
IP Block List Providers—Maintains lists of sender domains that cannot be relied on and that must be blocked from connecting to and transmitting email messages to and from. These block list providers can be invaluable in that they maintain up-to-date lists that you can connect to and utilize.
![]() Recipient Filtering—A simple feature where you can specify a list of email recipients from which the server will not accept messages. You can block individuals or domains. There is also a checkbox option on the Blocked Recipient tab that enables you to, with one click, block messages sent to recipients not listed in the Global Address List.
Recipient Filtering—A simple feature where you can specify a list of email recipients from which the server will not accept messages. You can block individuals or domains. There is also a checkbox option on the Blocked Recipient tab that enables you to, with one click, block messages sent to recipients not listed in the Global Address List.
![]() Sender Filtering—Specifies a list of email senders that you want to block completely. You can block individuals, domains, or whole domain hierarchies. You can also specify how Exchange Transport servers respond when a blocked sender or domain transmits a message. The Sender Filter feature also lets you block messages that do not specify who sent a message. This means no messages with blank senders.
Sender Filtering—Specifies a list of email senders that you want to block completely. You can block individuals, domains, or whole domain hierarchies. You can also specify how Exchange Transport servers respond when a blocked sender or domain transmits a message. The Sender Filter feature also lets you block messages that do not specify who sent a message. This means no messages with blank senders.
![]() Sender ID—Intended to combat email spoofing and to provide enhanced protection against phishing schemes. Use Sender ID to examine a senders purported responsible address (PRA). If the check fails, you can determine whether you want to reject or delete the message, or send it along with a stamped message of Sender ID results.
Sender ID—Intended to combat email spoofing and to provide enhanced protection against phishing schemes. Use Sender ID to examine a senders purported responsible address (PRA). If the check fails, you can determine whether you want to reject or delete the message, or send it along with a stamped message of Sender ID results.
![]() Sender Reputation—Collects information about recent email messages received, and if a sender appears to be the source of junk email, the address is added to a list. There is some flexibility as to the length of time a sender can be blocked, and you can also enable/disable open proxy testing.
Sender Reputation—Collects information about recent email messages received, and if a sender appears to be the source of junk email, the address is added to a list. There is some flexibility as to the length of time a sender can be blocked, and you can also enable/disable open proxy testing.
To update the Edge Transport servers’ antispam agents, you can disable and then re-enable the updates from the Actions pane. This presents you with the Enable Anti-Spam Updates Wizard, shown in Figure 8.10.
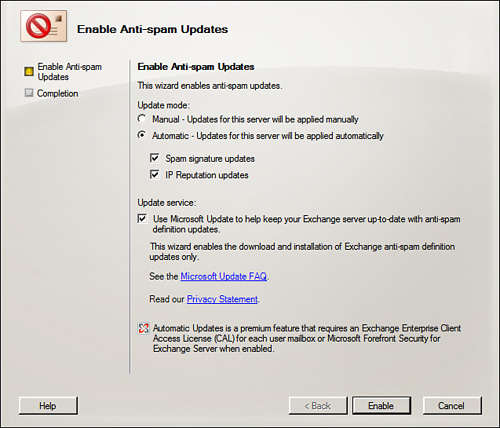
You can configure the updates to occur manually or automatically. You can allow/deny spam signature updates and IP reputation updates. You can also configure the update service to use the Microsoft Update process to keep definitions up to date.