Chapter 9 Design and Deploy Disaster Recovery Settings
In This Chapter
![]() Recover Deleted Items and Mailboxes
Recover Deleted Items and Mailboxes
![]() Backup and Recover Data (Server 2003 and 2008)
Backup and Recover Data (Server 2003 and 2008)
![]() Implement Database Portability
Implement Database Portability
Solution: You can hope for the best, as long as you plan for the worst. In the world of Exchange 2007, what is the worst? Certainly, in modern times we have seen situations in which an entire site (with all our servers and onsite backup data) is lost in a moment. A business can be permanently ruined by the loss of its data and equally so through the loss of its mailbox databases.
What does an Exchange administrator need to know to design a solution? To begin with, it’s good to remember that five server roles (with clustered services perhaps, or high availability solutions in place) need to be prepared for in terms of restoring your environment. It’s also important to consider the solutions that Exchange 2007 offers, such as dial-tone restores and recovery storage groups. You might want to keep in mind third-party solutions that can offer you features that Microsoft hasn’t provided in terms of disaster recovery.
However, you cannot fight what you cannot see. You need to see the various situations that can come your way. What if someone simply deletes mail messages? This might not be a disaster but is a situation that might require you to reach for your backup tapes. What if a mailbox is deleted? What if a database or storage group is corrupted? What if the server was literally picked up and thrown out of a window? (It can happen, and you need to be prepared!) External services can fail (Active Directory [AD], Domain Name Service [DNS], and so forth).
What solutions are in place to assist you?
Keep in mind that fault-tolerant disk solutions and high-availability solutions (which are discussed in Chapter 10, “Design and Deploy High Availability for Exchange 2007”) are not what we are referring to when discussing disaster recovery.
Here are the solutions we are referring to:
![]() Deleted item and deleted mailbox retention
Deleted item and deleted mailbox retention
![]() Backup and recovery solutions
Backup and recovery solutions
![]() VSS backups
VSS backups
![]() Recovery storage groups
Recovery storage groups
![]() Database relocation solutions
Database relocation solutions
![]() Dial-tone recovery
Dial-tone recovery
![]() Non-mailbox server restoration
Non-mailbox server restoration
Although the majority of this book has focused on the step-by-step, “how-to” aspect of Exchange, preparing for disaster requires a brief step into the what-if world. It’s true, you hope to never face a major disaster that forces you to recover your Exchange environment, and you might spend a great deal of time focusing on the common problems (failed disk, server crash, and so forth), but in the event you face fire, flood, and so on, you need to think about the following:
![]() Have a documented disaster recovery plan for as many different scenarios (mailbox to entire site) for all of your servers, roles, and certificates (if you are using Secure Socket Layers [SSL], which you most likely will be) you can think of. Ensure that document is in multiple locations so you can access it off-site if needed. Perhaps keep a copy with your off-site backup solution.
Have a documented disaster recovery plan for as many different scenarios (mailbox to entire site) for all of your servers, roles, and certificates (if you are using Secure Socket Layers [SSL], which you most likely will be) you can think of. Ensure that document is in multiple locations so you can access it off-site if needed. Perhaps keep a copy with your off-site backup solution.
![]() Have a daily, weekly, and monthly backup plan in place. Whether you back up to tape, disk and then to tape, to a mirrored location, or to an Internet site, you must have an off-site location for your backup.
Have a daily, weekly, and monthly backup plan in place. Whether you back up to tape, disk and then to tape, to a mirrored location, or to an Internet site, you must have an off-site location for your backup.
![]() Document the configuration of each of your servers. Ensure you have the entire structure on paper for yourself, or the next person who handles the servers. This includes information such as your mailbox policies, ActiveSync policies, UM configuration settings, and so forth. Document as much as possible.
Document the configuration of each of your servers. Ensure you have the entire structure on paper for yourself, or the next person who handles the servers. This includes information such as your mailbox policies, ActiveSync policies, UM configuration settings, and so forth. Document as much as possible.
![]() Restoration drills. It all comes down to if you can fix it if a disaster strikes. The only way to know is to run drills that put the planning to the test. Ensure your people know where the documentation server software, service pack software, Exchange software, hardware replacement solutions, and so on are located.
Restoration drills. It all comes down to if you can fix it if a disaster strikes. The only way to know is to run drills that put the planning to the test. Ensure your people know where the documentation server software, service pack software, Exchange software, hardware replacement solutions, and so on are located.
Solution: Although not true disasters, these are items that usually come under the disaster recovery discussion because there is a point of no return where an item or a mailbox has to be restored from a backup. A backup/restore is definitely within the category of recovery.
To mitigate the amount of frustration that an administrator deals with over deleted items and deleted mailboxes, we have to configure Deleted Item Retention and Deleted Mailbox Retention, as discussed in Chapter 4, “Manage Storage and Databases.” The default on items is 14 days, and on mailboxes, it is 30 days.
In the event that you do need to restore a deleted message or mailbox, how would you go about doing it?
To recover a deleted item or assist a user in recovering his own deleted items, perform the following:
1. Open Outlook 2007.
2. Select the Deleted Items folder.
3. Select Tools, and then click Recover Deleted Items.
4. Locate the message you want to restore. Select the message and click Recover Selected Items.
When you restore the item, you will not see it back in your Inbox. It will restore back to your Deleted Items folder. If it is important, you might want to move it to another folder.
NOTE If the message that needs to be restored has been permanently deleted beyond the 14-day mark, you have to first make a decision. Is the individual requesting the restoration worth the time and effort it might take to locate and restore the message? If she is, you might ask her directly, “Is the message you are looking for something that is irreplaceable and absolutely necessary to have restored?” If the answer is yes to both questions, consider some of the other backup restoration solutions.
When you delete a mailbox, you essentially disconnect it from the user’s AD user account. If you delete the AD account, the mailbox is disconnected automatically from the deleted account. That disconnected mailbox is placed in the Disconnected Mailbox section under the Recipient Configuration work center. You can reconnect that mailbox (as long as you do so prior to the 30-day deleted mailbox retention time expiring).
To connect a mailbox with a new account or with an existing AD user account, perform the following:
1. Open the Exchange Management Console (EMC).
2. From the Navigation Tree, expand the Recipient Configuration work center and click Disconnected Mailbox.
3. Locate and select the mailbox you wish to connect.
4. From the Actions pane, select Connect to open the wizard.
5. Initially, you are taken to the Introduction screen, where you are asked to choose the mailbox type: User, Room, Equipment, or Linked. Make your choice and select Next.
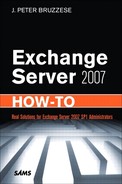
6. Next, you are presented with the Mailbox Settings screen, shown in Figure 9.1. Here you can choose the following:
![]() Matching User—Select the Browse button to locate a user object in AD that should match the mailbox.
Matching User—Select the Browse button to locate a user object in AD that should match the mailbox.
![]() Existing User—If you select this option, you can click Browse to locate a list of users that do not currently have connected mailboxes associated with them.
Existing User—If you select this option, you can click Browse to locate a list of users that do not currently have connected mailboxes associated with them.
![]() Alias—Supply an alias name.
Alias—Supply an alias name.
![]() Managed Folder Mailbox Policy—Select Browse to select a policy.
Managed Folder Mailbox Policy—Select Browse to select a policy.
![]() Exchange ActiveSync Mailbox Policy—Select Browse to select a policy.
Exchange ActiveSync Mailbox Policy—Select Browse to select a policy.
7. After your options have been selected, click Next.
8. After the wizard completes, select Finish.
Solution: NTBackup is a tool that has been included with Windows Server since NT 4.0. However, this product is discontinued after Server 2003 and now with Server 2008, we have Windows Server Backup. This cannot be used to obtain backups of Exchange. Let’s first look at Server 2003 and performing backups with the NTBackup utility, and then discuss options for Server 2008.
NOTE If you obtain Small Business Server 2008, which includes Exchange 2007, you actually can obtain backups of your Exchange server with the Windows Server Backup tool.
NTBackup performs a streaming backup (not a Volume Shadow [VSS] backup, which we discuss shortly). It can back up only the local system that Exchange is running on (as opposed to backing up remote Exchange servers). It can back up to a network share, though. So, if you have multiple Exchange servers, you can back them up to a network share and then use software that can back up the shared location.
To use NTBackup to back up your data on Server 2003, perform the following:
1. Select Start, Run, and type ntbackup.exe.
2. There is a Wizard Mode that you can use, but it isn’t for Exchange admins. Select the Advanced Mode link.
3. You are on the Welcome tab. Select the Backup tab.
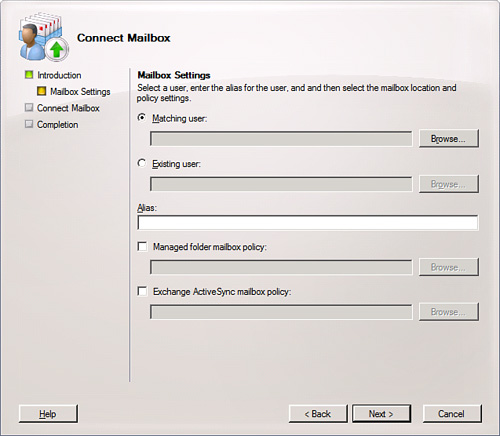
4. Click the plus sign to expand the information beneath the Microsoft Exchange Server option.
5. If you expand the settings, you see the Server, Information Store, and then the various storage groups, as you can see in Figure 9.2.
6. Select individual storage groups or all of them.
7. In the Backup media or file name, type the path.
8. Select the Tools menu option and click Options. Confirm that the backup is Normal.
9. Click Start Backup.
10. Before the job begins, you are shown the Backup Job Information. You can change the backup description, or determine how you want the backup to perform when it comes to the media already having backups. You can choose Append This Backup to the Media or Replace the Data On the Media With This Backup. You can establish a label for media that is overwritten by the backup.
11. Choose Advanced and verify the data of the backup.
12. Click Start Backup.
13. When the backup completes, you can view the detailed report or click Close.
When performing the backup with NTBackup, we checked to see that the backup was normal. There are different backup types we might decide to use. Some backup solutions might work with a reduced backup window (where you have a short amount of time to back up the data and lots of data to back up). Other solutions might work when you have a need to restore quickly.
Backup types include the following:
![]() Full—A full backup backs up your Exchange storage groups and databases and all transaction logs associated with the databases. It then purges the transaction logs from the database. If possible, you should always run full backups because they provide the fastest restore from a failure. If you perform full backups and the server needs to be restored, simply restore the latest full backup. For many, this isn’t a possibility and so it is recommended that you at least perform one full backup a week.
Full—A full backup backs up your Exchange storage groups and databases and all transaction logs associated with the databases. It then purges the transaction logs from the database. If possible, you should always run full backups because they provide the fastest restore from a failure. If you perform full backups and the server needs to be restored, simply restore the latest full backup. For many, this isn’t a possibility and so it is recommended that you at least perform one full backup a week.
![]() Incremental—These back up the changes that are made to a database and back up the transaction logs and purges them. The incremental backup backs up only the changes made since the last full or last incremental backup. So, every day the incremental backup takes a relatively short period of time to perform and remains somewhat consistent in that. However, as the week progresses, if the server requires a restoration, you need to restore the last full backup and each incremental backup since that time. So, it is a shorter backup process but a longer restoration.
Incremental—These back up the changes that are made to a database and back up the transaction logs and purges them. The incremental backup backs up only the changes made since the last full or last incremental backup. So, every day the incremental backup takes a relatively short period of time to perform and remains somewhat consistent in that. However, as the week progresses, if the server requires a restoration, you need to restore the last full backup and each incremental backup since that time. So, it is a shorter backup process but a longer restoration.
![]() Differential—These back up the changes made to the database since the last full backup. The transaction logs are not purged using this type of backup, and throughout the week, the backup takes a little longer each day. However, in the event of a restoration, you need only to restore the last full backup and the last differential backup. So, you have a shorter restoration period if you use differential backups.
Differential—These back up the changes made to the database since the last full backup. The transaction logs are not purged using this type of backup, and throughout the week, the backup takes a little longer each day. However, in the event of a restoration, you need only to restore the last full backup and the last differential backup. So, you have a shorter restoration period if you use differential backups.
How do you structure your backup schedule? That depends upon many things, and you have to consider your own environment. Can you perform nightly full backups? Or do you perform a full backup on Sunday night and incremental or differential backups throughout the week?
When do you perform your backups? Have you considered alternative solutions to your backup media type? Are you using tape? Would it be faster if you backed up to disk and then performed a backup of your backup (which you can perform any time because users are not directly accessing it) to tape that you can take off-site?
Have you considered a third-party solution that uses improved methods over NTBackup, such as VSS (which we discuss later in this chapter)?
You might need to use that backup to restore a database. There are times when the entire server might have crashed or the disk itself has crashed, or perhaps you have simply had a corruption of the database. In the latter, the simplest of scenarios, your Exchange server is still up and running and the disks seem to be functioning, but you need to restore the database. To restore a database from your backup, perform the following:
1. Open the EMC.
2. From the Navigation Tree, expand the Server Configuration work center and click Mailbox.
3. Select Mailbox Server from the Results pane.
4. Select the storage group with the database you want to restore.
5. Select the database, and from the Actions pane, click Properties.
6. From the General tab, select the option This Database Can Be Overwritten by a Restore. Click OK.
7. From the EMC, select Dismount Database from the Actions pane for that database.
8. Although the database is dismounted, open your NTBackup application (Start, Run, NTBackup.exe).
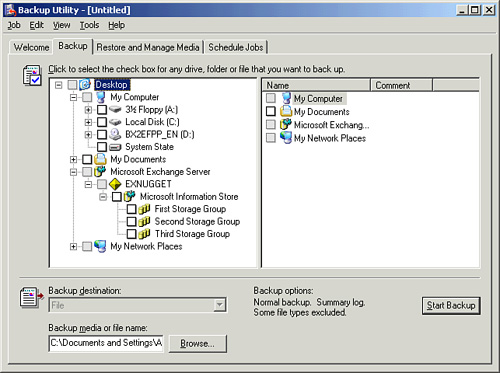
9. Select the Restore and Manage Media tab.
10. Locate the storage group with the database you want to restore, as you can see in Figure 9.3.
11. Click Start Restore.
12. You are presented with the Restoring Database Store dialog. You can restore to another server, but in this case, you are restoring to the same server, so you can leave the server you have or click Browse to locate the other server.
13. You can provide a temporary location for log and patch files.
14. To get your database up and running quickly, select the Last Restore Set (Log File Replay Will Start After This Restore Completes) and then also check Mount Database After Restore, which will become available after you click the former.
15. When you are ready, click OK.
16. You can watch the restore progress, and when complete, you can view the detailed report or click Close.
The Server 2003 backup application works for these local streaming online backups. However, they don’t provide VSS copies and they aren’t included in Server 2008.
Logically, if Server 2008 doesn’t support a streaming online backup of Exchange databases, you have to pursue a third-party solution. The support is still in place internally for streaming backups (although remote streaming backup support has been removed on Server 2008). What you are looking for in a backup solution is one that supports both streaming and VSS solutions.
You might look into a third-party solution that can perform the streaming backup (or VSS backup), but remember that you cannot make a remote streaming backup regardless of the solution you employ because a remote backup with Exchange 2007 SP1 and Server 2008 is not supported.
Microsoft offers a solution called Microsoft System Center Data Protection Manager (DPM) 2007, shown in Figure 9.4. The Microsoft System Center product line is designed to assist administrators with managing their server infrastructures. Data protection is a key aspect of administrative management and so the DPM is designed to assist with Exchange, SQL, SharePoint Services, and even file shares from 2003/2008 Windows servers.
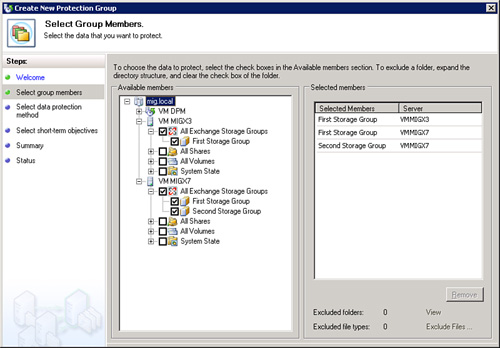
NOTE Both Server 2003 and 2008 have VSS capabilities. With Server 2003, the NTBackup program cannot perform VSS backups, so you require a third-party solution to take advantage of this solution. Server 2008 Windows Server Backup does include this feature; however, as already mentioned, not for Exchange. In both cases, you can install Data Protection Manager. This provides VSS support for your Server 2003 system and provides VSS and standard backup support for both Server 2003 and Server 2008.
We can say much regarding the capabilities of DPM. A few items that stand out are that it has the capability to perform more than a storage group or database backup and restoration. You can also restore an individual mailbox or Public Folder, which is a time saver and eliminates an administrative headache. Keep in mind though that third-party solutions offer that capability too, and DPM, although not a third-party solution, is still an external solution. It’s a solution that doesn’t come with the operating system, costs you money, and requires time to learn, similar to a third-party backup solution. It simply comes from Microsoft and that might appeal to you in that it should function well with other Microsoft products, in this case Exchange 2007 with all of its features.
One of the features supported by DPM is the high availability options and creating copies of your data from the passive nodes of your clusters. You have the capability to go from disk to disk and then to tape for your offline solution.
Finally, DPM uses VSS shadow copies (a feature not supported by NTBackup) to create quick block-level difference backups.
Volume Snapshot Service, or Volume Shadow Copies (typically expressed as VSS) is a feature that we might be more familiar with functionally than technologically. The reason we say this is because it isn’t a new concept; in fact, we have had aspects of VSS in our Windows operating system since Windows XP SP1. Server 2003, 2008, and Vista all have aspects of VSS implemented. If you have used the System Restore or Previous Versions features, you have used a form of VSS.
However, the question is: What is VSS?
Simply put, your system takes a point-in-time snapshot of your data. It first looks at what you have from the first snapshot and then, rather than performing complete backups going forward, looks for changes to data and only backs up the changes.
Here is the overall process of an Exchange backup using VSS:
1. The VSS requester (your backup software, which is going to have to be a third-party solution for Exchange with either Server 2003 or 2008) is told to begin the VSS backup or create the shadow copy.
2. The VSS writer (the Exchange database information store) freezes the databases to ensure you have no new writes to the databases. Note that for this reason, with continuous replication solutions and clusters, it is recommended you use the passive copy of the database because you have less of a chance that the procedure will fail due to writes coming in.
3. The VSS provider (the hardware and software that create the snapshot) creates the snapshot.
4. The VSS writer is told when the copy is complete and will allow writes to the database again.
5. The VSS requester (your backup software) lets you know the copy was complete.
There are varieties of ways the technology is advancing on all fronts (software and hardware) to improve the way these copies work. However, overall they are faster and take up less disk space then a traditional backup would.
Solution: You can restore any mailbox database to any server within the same organization. This is a new aspect to database recovery, which only allowed a database to be restored to a recovery storage group or a server with the same name as the original server or from another server within the same administrative group.
How does it work? You might have a situation where a database is up and running just fine on a server and you simply want to move the database, or you need to perform an upgrade maintenance on the server and decide to move the database to another server. This can be handled without using backup/recovery software.
If you have a system crash and you don’t want to wait until the server is up and running again to restore your backup of the database, you can restore it to another server in your organization. In that case, you need backup/recovery software.
Let’s review both.
To relocate a database, we dismount the database we want to move and then, on the relocation server, we configure the storage group and database for the move.
NOTE Before you begin this procedure you will want to make sure your database is in a Clean Shutdown state. You can type ESEUTIL /R <Enn> to commit uncommitted log files and ensure a clean starting point. Note: Enn is the log prefix for the storage group you are performing the clean shutdown on. If you are unsure what that is, you can type Get-StorageGroup ServerNameStorageGroupName ¦ fl LogFilePrefix in the EMS.
To relocate a database, perform the following steps:
1. Open the EMC.
2. From the Navigation Tree, expand the Server Configuration work center and click Mailbox.
3. Locate the server from the Results pane and select it.
4. From the Work pane, select the Storage Group and the Database you want to move.
5. From the Actions pane, select Dismount Database.
PS NOTE A much easier and faster way to dismount a database is with the EMS by typing dismount-database “ServerNameStorageGroupNameDatabaseName”.
6. Now, select the server where you want to move the database.
7. Create a new storage group that has the same name as the source storage group.
8. Create a new database with the same name as the source database. (Note: Do not mount the database.)
9. Select the new database and then Properties from the Actions pane.
10. On the General tab, select the option This Database Can Be Overwritten by a Restore.
11. Move over all the database files (.edb, log, and catalog files) to the new database folder location.
12. Now you can mount the database through the EMC. Although through the EMS, you simply type mount-database DatabaseName.
13. You need to modify the mailbox configuration to know that the accounts point to a new server. To move these in the EMS, type the following:
Get-Mailbox -Database <SourceDatabase> |where {$_.ObjectClass
-NotMatch
'(SystemAttendantMailbox|ExOleDbSystemMailbox)'}| Move-Mailbox
-ConfigurationOnly -
TargetDatabase <TargetDatabase>
Modifying the user account settings through the Move-Mailbox cmdlet should work for your Outlook 2007 and OWA clients, who will be redirected through the Autodiscover service.
Keep in mind that this requires backup/recovery software (either NTBackup in Server 2003 or some other third-party solution, or a third-party solution in Server 2008).
If you need to perform a restoration from backup to a new server, perform the following:
1. Open the EMC.
2. From the Navigation Tree, expand the Server Configuration work center and click Mailbox.
3. Select the server where you want to restore the database to from the Results pane.
4. From the Work pane, create a new storage group with the same name as the source (original) storage group.
5. Next, create a new database with the same name as the source (original) database. Do not mount the new database.
6. Select the new database and from the Actions pane, select Properties.
7. On the General tab, select the option This Database Can Be Overwritten by a Restore.
8. At this point, on the physical server where you are attempting to restore the database, click Start, Run, and then type ntbackup.exe.
9. Choose Advanced Mode.
10. Select the Restore and Manage Media tab.
11. Select the Storage Group or database you want to restore.
12. Click Start Restore.
13. The Restoring Database Store dialog displays, as shown in Figure 9.5.
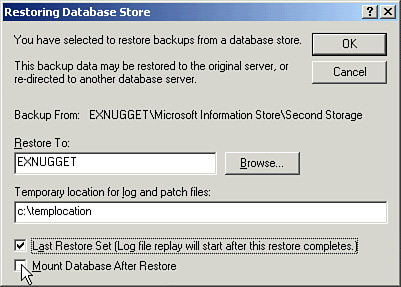
14. Make sure the Restore To field has the target server’s name. If it doesn’t, you can type it or click Browse to locate the server.
15. Type a path for the temporary location for log and patch files.
16. Select the checkbox Last Restore Set (Log File Replay Will Start After This Restore Completes). You can also select the Mount Database After Restore checkbox if you like, or you can mount afterward.
17. Select OK.
Solution: This scenario is describing the use of a Recovery Storage Group (RSG), which has been available since Exchange 2003. You can use an existing server and create a recovery storage group, to which you can then restore your databases. The backup application is not aware of the difference and so it performs the restoration without issue.
You can use an RSG in different ways. You can use it as a same server dial-tone recovery or alternate server dial-tone recovery (which we discuss in the next section). You can also use it to recover a mailbox that cannot be brought back from the deleted mailbox retention time. You can recover specific information and messages if need be (although a third-party solution might perform these features better).
Keep in mind that RSGs are not your best solution if you are trying to recover Public Folders (because they aren’t supported; only mailbox databases are) or if you need to restore an entire server.
To create an RSG, perform the following steps:
1. Open the EMC.
2. From the Navigation Tree, expand the Toolbox work center.
3. From the options, open the Database Recovery Management tool.
4. Select the Go to Welcome Screen link.
5. The tool checks for updates for the Microsoft Exchange Troubleshooting Assistant. You can cancel the check by clicking the Cancel link.
6. You are asked for some information regarding the Exchange server name and domain controller name. Click Next.
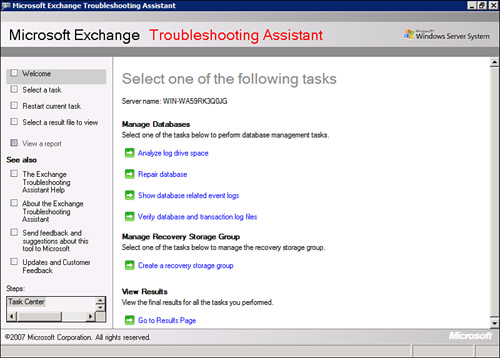
7. The Troubleshooting Assistant provides a long list of options, as you can see in Figure 9.6. Locate the option under Manage Recovery Storage Group to create a recovery storage group.
8. When asked to select the storage group to link with the RSG, locate the storage group and click Next.
9. On the Create the Recovery Storage Group screen, perform the following:
![]() Provide a name for the RSG.
Provide a name for the RSG.
![]() Confirm the location of the original Transaction log folder and the Recovery log path.
Confirm the location of the original Transaction log folder and the Recovery log path.
![]() Confirm the location of the original System folder and checkpoint file folder and the Recovery path.
Confirm the location of the original System folder and checkpoint file folder and the Recovery path.
![]() Confirm the location of the original Database folders and the file names and the Recovery database path.
Confirm the location of the original Database folders and the file names and the Recovery database path.
10. Then select Create the Recovery Storage Group.
11. You receive a message indicating the success or failure of the creation of the RSG, and you can confirm that the new folders and files exist.
After you have the RSG in place, perform a restoration of the data you have backed up for that storage group the same way you usually would. You can choose to mount the restored database during the restoration process. However, if you do not, you will need to go back to the task center and select the Mount or Dismount databases in the RSG and mount the recovery group database. After it is restored and mounted, return to the Database Recovery Management Tool; however, this time perform the following:
1. Select Merge or Copy Mailbox Contents.
2. From the Select a Mounted Database in the Recovery Storage Group screen, select the Gather Merge Information link.
3. From the Select Merge Options screen, you can move forward with restoring the whole mailbox by selecting Perform Pre-merge Tasks. However, if you want to filter items that you want to restore (for example, a specific range of dates or a specific subject), you can select Show Advanced Options, shown in Figure 9.7.
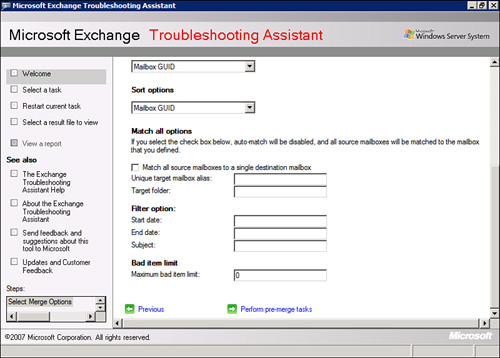
4. After you select your options, choose Perform Pre-merge Tasks.
5. You are shown the results of your request.
6. You see mailboxes you can select if you want to merge or copy data. Select Perform Merge Actions.
7. Confirm the results, and click Go Back to Task Center.
8. Dismount the databases in the RSG and remove the RSG.
The reason you delete the RSG is because you can have only one at a time. You might want to clear the RSG now in preparation for a future time. After deleting it, however, you want to make sure you clean up the recovery files from their locations manually.
To remove the RSG, perform the following:
1. From the Database Recovery Management task center, select Mount or Dismount Database in the Recovery Storage Group.
2. Select the database you want to dismount. Click Dismount Selected Database.
3. After you dismount, you will receive the report that it was dismounted.
4. Select Go Back to Task Center.
5. Now select Remove the Recovery Storage Group.
6. Confirm the database name. Then select the Remove the Recovery Storage Group link.
7. You should receive a message saying the RSG has been removed successfully.
Solution: Because the mailbox itself is part of Active Directory and the actual mailbox data is within the Exchange databases, it is possible to restore an Exchange server quickly to the point of users having the capability to send and receive email again. This provides time for the actual database restoration to occur. This is called a dial-tone restore (also called the recover now, restore later method).
Some of the stress of this method comes from merging the two sets of data (the old recovered data with the new email sent back and forth in the dial-tone recovery database).
Keep in mind that there are several reasons to perform a dial-tone restore. One is that you have a failed server, and you need to use an alternate server for the restoration of email services. Another is that you simply have a failed or corrupt database that is just going to take too long to restore and your users need email now (so you might use the same server). You have to make some decisions regarding leaving the data on the recovery server or moving it back when the crisis is under control.
To mimic the failed database, you can dismount the database and locate the database file and delete it (or move it to another location). In Step 2, you create a new database, which does not require mailbox movements because this is the same server and storage group you are recreating. This gives you the time to recover the data to the RSG while your users have up-and-running mailboxes.
To achieve dial-tone recovery, perform the following:
1. If you have any log files from the failed database, you might want to move them to another location. They might be useful.
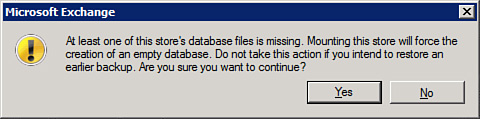
2. Open the EMC.
3. Attempt to mount the database and you receive the message shown in Figure 9.8 regarding the creation of an empty database. Click Yes to continue.
4. From the Navigation Tree, expand the Toolbox work center.
5. From the options, open the Database Recovery Management tool.
6. Create a recovery group for the failed database.
7. Restore the backup you have of the failed database, but do not mount the database if you have any log files from the failed database. Place those in the proper location before mounting.
8. Mount the database from the task center.
9. From the task center, select the Swap Databases for Dial-Tone scenario.
10. Make sure the database is correct.
11. Select Gather Swap Information.
12. Select Perform Swap Action after confirming the information is accurate.
13. After the procedure is complete, the configurations for the original and recovery databases are swapped and remounted.
Swapping databases provides users the original mailboxes they had, but moves over the dial-tone database. The two should be merged to ensure no data is lost.
To do this, go back to the task center and use the Merge or Copy Mailbox Contents settings (just as you would with a normal recovery group) and merge that content over to the recovered and swapped database.
When you are done, remove the RSG.
The steps for a “new server” dial-tone recovery are almost identical to that of a “same server” dial-tone recovery. Here are some changes and additions:
![]() You have to create a new storage group and database with the names of the original on the new server.
You have to create a new storage group and database with the names of the original on the new server.
![]() You need to use the
You need to use the Move-Mailbox -ConfigurationOnly command to point the user’s mailboxes to the new database. In doing this, you are moving the configuration information, but the data will be restored with the restoration process. The official command is:
Get-Mailbox -Database <Mailbox Server NameStorage Group
Namedatabase name> ¦![]() Move-Mailbox -ConfigurationOnly -TargetDatabase <Mailbox Server
Move-Mailbox -ConfigurationOnly -TargetDatabase <Mailbox Server
NameStorage group
NameDial Tone database
name>
![]() If you plan to restore your backup to the new server, the steps are the same as previously explained. If you plan to restore your backup to the failed server, you need to use the same EMS command to move the mailboxes back when you are done.
If you plan to restore your backup to the new server, the steps are the same as previously explained. If you plan to restore your backup to the failed server, you need to use the same EMS command to move the mailboxes back when you are done.
NOTE Users might be somewhat surprised when they have no email. However, they might be even more surprised if they have email but no access to all their messages. You will want to alert them with a message about what is happening. Some people receive a message that gives them the capability to see their old data if they have Outlook 2007 in cached mode. However, if they choose to use old data, they cannot send and receive. They will be presented with the option to use a temporary mailbox, and this is the option they need to select to send and receive messages.
Solution: A variety of ways to restore servers exist; however, Exchange makes the procedure much easier with many of the server roles because the primary configuration data is stored in AD.
So, imagine a server has crashed with one of the four roles internal to your network (MB, CAS, HT, or UM). You can restore the roles themselves (let’s not worry about MB at this point; we’ve covered quite a bit already regarding the restoration of the databases) by running the setup /m:RecoverServer command.
Perhaps you’ve purchased a whole new server and want that server role back up and running, or let’s say you have another server that is running a different role and you want to put the role back on that server. You can do this thanks to the AD connection.
To start with, you need to reset the computer account within AD. Then the new server can join up without a conflict with the older configuration data. To do this, perform the following:
1. Select Start, Administrative Tools, and then Active Directory Users and Computers.
2. Locate the computer object for the failed server.
3. Right-click the server and choose Reset Account.
With the new server, you need to configure the same number of disk drives as the original and assign the disks with the same drive letters. After you have everything in place, install Windows Server and make sure the name is the same as the failed server and join the domain.
When you go to install Exchange, type setup.com /m:recoverserver, which will ask AD to restore the roles and settings that are stored to this server.
Keep in mind that customized settings and files on the server (depending on the type of server it was, such as UM, CAS, and so on) might require manual restoration.
Each server role still has pieces you might want to be aware of and ensure the recovery of in the event of a problem. For example:
![]() Client Access Server—Has IIS services running that require you to back up and restore the IIS metabase data. Microsoft offers direction to back up the data and a script to restore it at: http://technet.microsoft.com/en-us/library/bb124359(EXCHG.80).aspx.
Client Access Server—Has IIS services running that require you to back up and restore the IIS metabase data. Microsoft offers direction to back up the data and a script to restore it at: http://technet.microsoft.com/en-us/library/bb124359(EXCHG.80).aspx.
![]() Unified Messaging—Some of the audio recordings that are associated with the UM server may be located in AD (such as the recorded name). If the UM server was the prompt publishing point for a dial plan, those files might be missing. If it wasn’t the publishing point, those files might be intact.
Unified Messaging—Some of the audio recordings that are associated with the UM server may be located in AD (such as the recorded name). If the UM server was the prompt publishing point for a dial plan, those files might be missing. If it wasn’t the publishing point, those files might be intact.
![]() Hub Transport Server—You might want to alter the procedure with these. Instead type
Hub Transport Server—You might want to alter the procedure with these. Instead type setup.com /m:RecoverServer /DoNotStartTransport. The reasoning is that you do not want to have the server come to life and begin sending messages here and there. Ensure the configuration is correct before you start up the transport service.
The data is not held in AD logically, so these require a bit of manual intervention to recover. You need to export the configuration of the server. Microsoft provides a script to do this.
To use the script, perform the following:
1. On the Edge Transport server, open the EMS.
2. Navigate to the scripts folder, which is usually located where you installed Exchange. The standard location you are looking for is C:Program FilesMicrosoftExchange ServerScripts.
3. Type ./ExportEdgeConfig.ps1 -cloneConfigData: “DriveLetter:EdgeBackupFile.xml” and then press Enter.
4. After you see the confirmation message, you can locate and move that file to another server for backup.
5. If you need to restore an Edge Transport server that has crashed—whether with a new server or new disk—install Server and all the service packs and hotfixes.
6. Install Exchange normally as an Edge Transport server. Use the same server name.
7. Run the ImportEdgeConfig.ps1 script. This creates an answer file based upon the .xml file you created earlier. You might need to edit the answer file to ensure you have the proper data, log paths, Send connector information, and so forth.
8. Run the ImportEdgeConfig.ps1 script again, but this time it will restore the server using the answer file you adjusted and bring your server back to its original configuration.
9. After you finish, run the EdgeSync process between a Hub Transport server and your newly restored Edge Transport server to restore communications between the two.