Chapter 6 Manage Organization Permissions and Mailbox Settings
Solution: To begin with, open the Exchange Management Console and select the Organization Configuration work center. Notice in the Results pane that there is only one tab—Exchange Administrators. In that tab are five default objects, some of which are based upon Exchange Security Groups that are automatically created when you install Exchange. You can see these groups from within the Active Directory Users and Computers console:
![]() Exchange Organization Administrators
Exchange Organization Administrators
![]() Exchange Public Folder Administrators
Exchange Public Folder Administrators
![]() Exchange Recipient Administrators
Exchange Recipient Administrators
![]() Exchange Servers
Exchange Servers
![]() Exchange View-Only Administrators
Exchange View-Only Administrators
![]() ExchangeLegacyInterop
ExchangeLegacyInterop
With the exception of the ExchangeLegacyInterop group, which is designed for inter-operability with Exchange 2003 servers within the same forest, the other security groups directly relate to the roles that you can assign from within the Exchange Management Console.
The roles you can assign include the capabilities shown in Table 6.1.
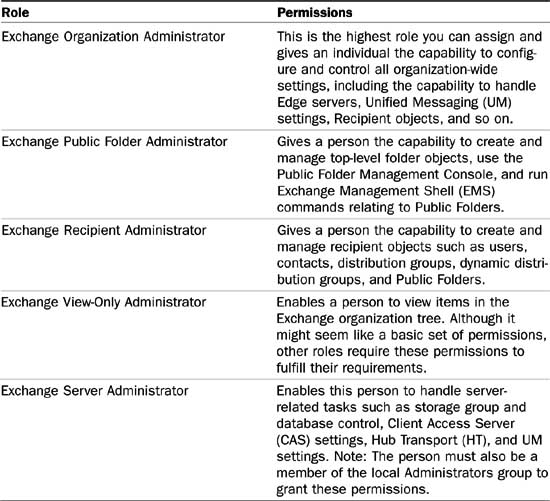
To assign an administrative role to a user or group, perform the following steps:
1. Open the Exchange Management Console (EMC).
2. From the Navigation Tree, expand the Organization Configuration work center.
3. From the Actions pane, select Add Exchange Administrator.
4. The Add Exchange Administrator Wizard displays and the first screen has you select a user or group and choose a role and scope for the Exchange administrator (as you can see in Figure 6.1).
5. Select the server(s) that the role has access to by selecting the Add option and choosing those servers you want the person or group to be able to control.
7. After the wizard is complete, you are taken to the Completion screen where a green checkmark and Completed affirmation is given and you can click Finish.
To remove any of the Exchange Administrators, you simply select the user or group from the Results pane and select Remove from the Actions pane.
PS NOTE The cmdlet through the EMS used to create an Exchange Administrator is Add-ExchangeAdministrator -Identity "Name of Person or Group" -Role (OrgAdmin, PublicFolderAdmin, RecipientAdmin, ServerAdmin, or ViewOnlyAdmin) -Scope "Server Names". To view all Exchange Administrators, type Get-ExchangeAdministrator.
Solution: As a user, when you work with your client application (for example, Outlook or Outlook Web Access) and you attempt to send an email or select the Address Book icon, you are shown address lists that have been created by default. These include the following:
![]() Default Global Address List—Shows all mail-enabled users, contacts, groups, and resource mailboxes in your organization. Almost anything that has an email address in your organization is automatically added to the Global Address List (GAL).
Default Global Address List—Shows all mail-enabled users, contacts, groups, and resource mailboxes in your organization. Almost anything that has an email address in your organization is automatically added to the Global Address List (GAL).
![]() All Contacts—For mail-enabled contacts. You can hide these from the address lists if you like by going into the properties of the contact and on the General tab, selecting the option to Hide from Exchange Address Lists.
All Contacts—For mail-enabled contacts. You can hide these from the address lists if you like by going into the properties of the contact and on the General tab, selecting the option to Hide from Exchange Address Lists.
![]() All Groups—For mail-enabled groups (for example, distribution groups).
All Groups—For mail-enabled groups (for example, distribution groups).
![]() All Rooms—For those resource mailboxes that relate to rooms that can be scheduled or reserved.
All Rooms—For those resource mailboxes that relate to rooms that can be scheduled or reserved.
![]() All Users—Shows your mail-enabled users without all the extras you usually see in your GAL.
All Users—Shows your mail-enabled users without all the extras you usually see in your GAL.
![]() Public Folders—Shows all the Public Folders in the organization.
Public Folders—Shows all the Public Folders in the organization.
As an administrator, you view your address list information through the Organization Configuration/Mailbox node under the Address Lists tab. From here, you can perform a variety of address list maintenance, editing, adding, and removing.
You have the ability to structure your mail-enabled objects into customized address lists based upon specific attributes that can be populated dynamically. To create an address list, perform the following:
1. Open the EMC.
2. From the Navigation Tree, expand the Organization Configuration work center.
3. Select Mailbox and note the Address Lists tab.
4. From the Actions pane, select New Address List to begin the wizard.
5. On the Introduction screen, begin by providing a Name. Then you can choose a Container for your list. The indicates that it is a root list. If you select the Browse button, you can nest the list within another list.
6. For recipient types you can choose None, All Recipient Types, or the following specific types:
![]() Users with Exchange mailboxes
Users with Exchange mailboxes
![]() Users with external e-mail addresses
Users with external e-mail addresses
![]() Resource mailboxes
Resource mailboxes
![]() Contacts with external e-mail addresses
Contacts with external e-mail addresses
![]() Mail-enabled groups
Mail-enabled groups
7. Make your selections and choose Next.
8. You are taken to the Conditions screen where, in Step 1, you can choose specific conditions (based upon state, province, department, or company) or custom attributes. Then, in Step 2, you can define those options.
9. You can select the Preview button to view a list of all those recipients who will be a part of your list based upon the criteria you’ve already established. Click Next when you are ready.
10. You now have the Schedule screen, where you specify when the address list should be applied and the maximum length of time it should run. The default setting is Immediately, but you can set a scheduled time. You can also select the checkbox Cancel Tasks That Are Still Running After (Hours) and specify a number of hours. Then click Next.
11. You are shown in the Configuration Summary that the list is both created and applied. When you are satisfied with the settings, click New.
12. When complete, click Finish.
An address list is usually “applied” when the filter rule has been edited, unless you make a request for the list to be applied manually. The idea of applying the list is that the membership is updated to include new recipients and remove those that are no longer in harmony with the criteria.
To apply an address list, perform the following steps:
1. Open the EMC.
2. From the Navigation Tree, expand the Organization Configuration work center.
3. Select Mailbox, and then click the Address Lists tab.
4. From the Actions pane, select Apply to begin the Apply Address List Wizard.
5. On the Introduction screen, you specify when the address list should be applied and the maximum length of time it should run. The default setting is Immediately, but you can set a scheduled time. You can also select the checkbox Cancel Tasks That Are Still Running After (Hours) and specify a number of hours. Then, click Next.
6. The Apply Address List screen provides you a Configuration Summary you can review, and then click Apply.
7. When complete, select Finish.
To edit an address list after it has been created, perform the following steps:
1. Open the EMC.
2. From the Navigation Tree, expand the Organization Configuration work center.
3. Select Mailbox, and then select the Address Lists tab.
4. Select the address list you want to edit, and then click Edit from the Actions pane.
5. The screens are somewhat reminiscent of the creation screens for an address list, although certain items (such as the container) are not changeable. Make changes to the recipient types on the Introduction screen and click Next.
6. Adjust Conditions and Custom Attributes and click Next.
7. Review and adjust the schedule for the application of the list. Then click Next.
8. Review the Configuration Summary and click Edit.
9. When complete, click Finish.
You can always review the members of an address list by editing the list and on the Conditions screen clicking the Preview button to see which objects are part of the list.
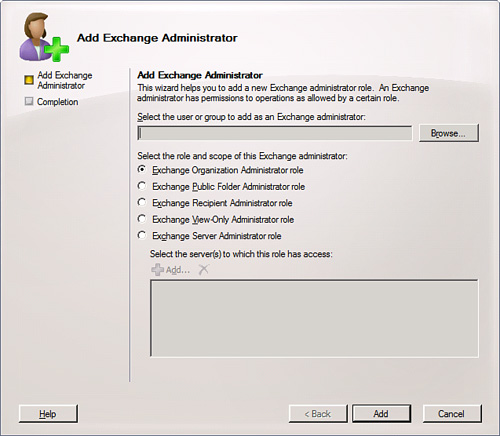
Another approach is through the EMS. For example, if you want to find the same list, you first need to retrieve some information from the Address List called the Distinguished Name. To do this for a list called Research in an organization called PrimaTech, you type the following:
Get-AddressList -Identity "Research" | fl DistinguishedName
You can see in Figure 6.2 that the response provided is quite long. You will need that response when typing in the Get-Recipient cmdlet using the Distinguished Name as the filter. To retrieve the list, you type:
Get-Recipient -Filter {AddressListMembership -eq 'CN=Research,CN=All![]() Address Lists,
Address Lists,
CN=Address Lists Container,CN=PrimaTech,CN=MicrosoftExchange,
CN=Services,CN=Configuration,DC=primatech,DC=com'}
Ordinarily, the GAL, which houses all your email-enabled objects, is sufficient for your organization. Whether it is a small organization or a large one, rarely do you require more than one GAL. No matter how many you create, your users can see only one.
Possible reasons for creating additional GALs include the following:
![]() You have a single Exchange server organization hosting multiple companies within and users need to see only the GAL for the company for which they work.
You have a single Exchange server organization hosting multiple companies within and users need to see only the GAL for the company for which they work.
![]() You have a large company that has multiple branch offices and you want to ensure users see only a subset of the organization based upon location.
You have a large company that has multiple branch offices and you want to ensure users see only a subset of the organization based upon location.
Creating the additional GALs is done through the EMS. Creating them isn’t difficult; the important part is to follow up with assigned permissions so that users will see the GAL you’ve created as opposed to the default GAL.
To create additional GALs, perform the following steps:
We have created a new GAL with the name we’ve chosen. This won’t provide us any recipient or conditional filter properties for that GAL. So, let’s say you specifically want to create a GAL called CompanyTwo and you want all mailbox users that have their Company condition set to CompanyTwo. To do this, type:
New-GlobalAddressList -Name "CompanyTwo" -ConditionalCompany "CompanyTwo"![]() -IncludedRecipients "MailboxUsers"
-IncludedRecipients "MailboxUsers"
Keep in mind that you can establish other conditions or include recipients using different parameters that you can research with the New-GlobalAddressList cmdlet. This is an example of creating a second GAL.
However, you might notice that the GAL does not update as quickly as you would like.
If you want to speed up the process of the GAL updating its recipients, type the following:
Update-GlobalAddressList "Name of List"
Or, if you want all of your GALs to update (not that you would have too many of them), type the following:
Get-GlobalAddressList | Update-GlobalAddressList
Having your name be a part of a specially created GAL is one thing. If you meet the criteria, you are included in the list. However, for clients to see one GAL over another, some changes have to be made. By default, all clients choose the default GAL. To change this, we need to open the ADSI Edit tool. To do this, go to the Start button, click Administrative Tools, and then click ADSI Edit.
Imagine we have a secondary GAL called CompanyTwo. To ensure access to one GAL over another, we use permissions. You might want to create two security groups: one for the default GAL and the other for the C2 GAL that you can organize objects into each group.
From within ADSI Edit, if you enter the Configuration and navigate to Services, Microsoft Exchange, the Organization Name, Address Lists Container, All Global Address Lists, you can see in Figure 6.3 that in this case we have two GALs.

To configure access, you can right-click the GAL and go into the Properties. Select the Security tab. If you select Authenticated Users, you will see they have the Read and Open address list permissions. Clear these items for authenticated users and add the users or group to your permission settings with the Read and Open address list permissions.
Perform the same task for the default GAL. Clear all authenticated users, just assign the security group with the users you wish to have access.
Solution: The purpose of an OAB is to provide access to the address information while offline, so there are a few things administrators can configure. They can create additional address books, they can choose which ones are made available, and they can determine the distribution method used (either web-based or Public Folder distribution).
1. Open the EMC.
2. From the Navigation Tree, expand the Organization Configuration work center.
3. Select Mailbox and select Offline Address Book.
4. Notice the Default Offline Address Book. From the Actions pane, select New Offline Address Book to open the wizard. On the Introduction screen (shown in Figure 6.4), you are asked to provide the following information:
![]() You are asked to provide a name.
You are asked to provide a name.
![]() You are asked to Browse and choose an Offline Address Book Generation Server, which is the mailbox server where OABs are generated.
You are asked to Browse and choose an Offline Address Book Generation Server, which is the mailbox server where OABs are generated.
![]() There is a checkbox to Include the Default Global Address List.
There is a checkbox to Include the Default Global Address List.
![]() You can select the checkbox Include the Following Address Lists and click Add to include additional lists.
You can select the checkbox Include the Following Address Lists and click Add to include additional lists.
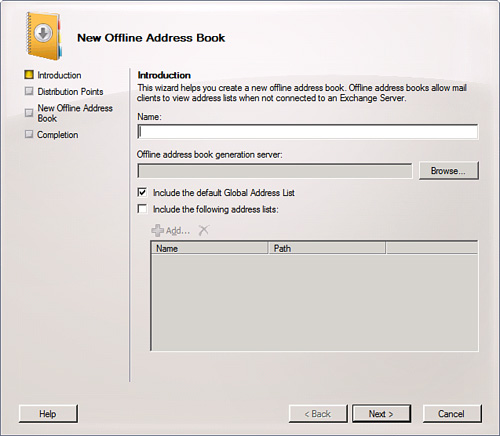
5. After you answer the questions, select Next.
6. You are taken to the Distribution Points screen, where you can select the following:
![]() Enable Web-Based Distribution—This is only for clients that run Outlook 2007. If you select it, you have to also choose the virtual directory it will be distributed from.
Enable Web-Based Distribution—This is only for clients that run Outlook 2007. If you select it, you have to also choose the virtual directory it will be distributed from.
![]() Enable Public Folder Distribution—For Outlook clients 2003 SP1 or earlier. This will use the Public Folder database to ensure the OAB is available to clients.
Enable Public Folder Distribution—For Outlook clients 2003 SP1 or earlier. This will use the Public Folder database to ensure the OAB is available to clients.
7. After you choose your distribution method, choose Next.
8. Review your Configuration Summary on the New Offline Address Book screen, and choose New.
9. When complete, click Finish.
To move the OAB generation server (which handles the creation and update process of the OAB before placing the files on a share) after the OAB has been created, perform the following steps:
1. Open the EMC.
2. From the Navigation Tree, expand the Organization Configuration work center.
3. Select Mailbox, and select Offline Address Book.
4. Select the OAB you want to move the generation server on.
5. From the Actions pane, select Move.
6. Click the Browse button to locate the other server you want to serve as the generation server, and click Move.
7. When complete, click Finish.
Although it’s not something you would consider doing often, you can alter the default OAB. To do this, after you have the new OAB created, perform the following steps:
1. Open the EMC.
2. From the Navigation Tree, expand the Organization Configuration work center.
3. Select Mailbox, and then select Offline Address Book.
4. Select the OAB you want to make the default.
5. From the Actions pane, select Set as Default.
6. You receive a warning message that asks, “Are you sure you want to set ‘Name of OAB’ as the default offline address book for all new mailbox databases?” Click Yes.
To access the properties of the OAB after it is created (or the default OAB), perform the following steps:
1. Open the EMC.
2. From the Navigation Tree, expand the Organization Configuration work center.
3. Select Mailbox, and then select Offline Address Book.
4. Select the OAB you want to access the properties of. From the Actions pane, choose Properties.
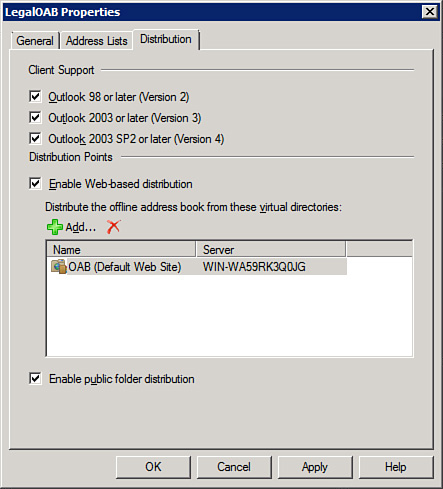
5. Notice there are three tabs—General, Address Lists, and Distribution:
![]() General—Shows the name of the OAB and some other information, such as which server is the generation server, whether this OAB the default, and when it was last modified. It also shows the Update Schedule, which can be modified.
General—Shows the name of the OAB and some other information, such as which server is the generation server, whether this OAB the default, and when it was last modified. It also shows the Update Schedule, which can be modified.
![]() Address Lists—Here you can modify the selections you made initially when you created the OAB. You can include the default Global Address List or not. You can add or remove other address lists.
Address Lists—Here you can modify the selections you made initially when you created the OAB. You can include the default Global Address List or not. You can add or remove other address lists.
![]() Distribution—This tab, shown in Figure 6.5, enables you to configure different types of distribution methods (web-based and Public Folder-based). You can select the clients that will be supported (if Outlook 2007, the web-based version is needed). You can select different Outlook clients pre-2007. You can configure web-based distribution by selecting the location of the OAB virtual directory, which is normally the default OAB directory with the IIS default site. You can enable Public Folder distribution as long as you have a Public Folder database.
Distribution—This tab, shown in Figure 6.5, enables you to configure different types of distribution methods (web-based and Public Folder-based). You can select the clients that will be supported (if Outlook 2007, the web-based version is needed). You can select different Outlook clients pre-2007. You can configure web-based distribution by selecting the location of the OAB virtual directory, which is normally the default OAB directory with the IIS default site. You can enable Public Folder distribution as long as you have a Public Folder database.
In the event you are working with all Outlook 2007 clients and using a virtual directory through your IIS server, you might feel that a Secure Socket Layer (SSL) connection is a necessary aspect to security.
To require SSL for your OAB virtual directory, perform the following:
1. Click Start, click Administrative Tools, and then click Internet Information Services (IIS) Manager.
2. You can see your server in the Navigation pane. You can expand Sites by clicking the plus sign.
3. You should see the Default Web Site option, which can be expanded by clicking the plus sign.
4. Locate the OAB folder, and in the Results pane, scroll down to the IIS category and choose SSL Settings.
5. Click the checkbox Require SSL and the secondary checkbox Require 128-bit SSL, as you can see in Figure 6.6.
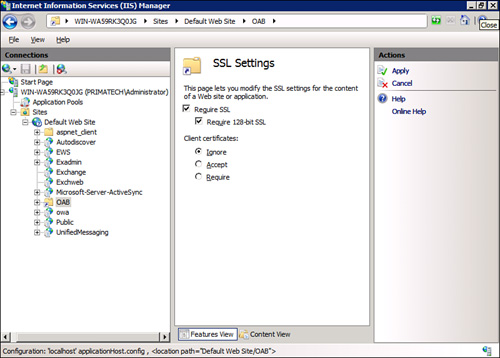
6. In the Actions pane, select Apply to apply the changes.
Eventually you have to make a decision about which OABs should go to which persons. You can perform this on a database level or on an individual mailbox level.
To establish an OAB for an entire database, perform the following:
1. Open the EMC.
2. From the Navigation Tree, expand the Server Configuration work center.
3. Select Mailbox and the server you wish to make adjustments to the mailbox database on in the Results pane.
4. Select the mailbox database from the Work pane and go into the Properties of the mailbox database.
5. Select the Client Settings tab, and under the Offline address book settings, choose Browse.
6. Select the OAB you want all mailboxes to use within this mailbox database. When finished, click OK.
7. Then click OK to close the Properties.
PS NOTE The cmdlet through the EMS used to configure the database to use a Public Folder database and offline address book is Set-MailboxDatabase. You use it in the following way: Set-MailboxDatabase -Identity <DatabaseIdParameter> -OfflineAddressBook <OfflineAddressBookIdParameter> -PublicFolderDatabase <DatabaseIdParameter>
To configure the OAB for an individual recipient, you should use the Set-Mailbox cmdlet from the EMS. You can configure multiple recipients by filtering and pipelining them into the Set-Mailbox cmdlet
Set-Mailbox -Identity <MailboxIDParameter> -OfflineAddressBook![]() <OfflineAddressBookIdParameter>
<OfflineAddressBookIdParameter>
Note that you cannot configure the Public Folder side from the recipient level. This must be done at the database level.
Solution: Before we begin, it’s important to learn the real-world application to managed content settings for your organization before you learn the steps involved in implementing it. Otherwise you might have a difficult time grasping the purpose of any of this. Let’s review a few scenarios where this technology is going to help you do your job as an administrator better.
The umbrella that this topic comes under is Messaging Records Management (MRM), which is another acronym relating to working with messages when they are at rest—that is, they are sitting somewhere, not flying around your network. They are in an Inbox, Deleted Items, a custom folder, but they are sitting and have been sitting, perhaps for some time.
So, what does a user have in his mailbox? He has default folders (Inbox, Sent Items, Deleted Items, and so on). He might have custom folders (you will soon learn how to create custom folders for all users through policy application). All those folders hold messages that might include emails, voicemails or faxes. Certainly these are included if you use the UM features in Exchange 2007. Will Journal, RSS, and Task Items be included? Perhaps, you might be surprised at the various items in a user’s mailbox that are all at rest, taking up storage space, and are most likely never to be accessed again in the majority of cases.
Managed content settings help in the following ways:
![]() Establish rules to move content
Establish rules to move content
![]() Establish rules to journal content
Establish rules to journal content
![]() Establish rules to purge content
Establish rules to purge content
![]() Use a mixture of the preceding to move, journal, and purge content
Use a mixture of the preceding to move, journal, and purge content
It sounds a bit overwhelming. However, consider a situation in which your users delete content, but it goes into their Deleted Items folder. Therefore, it is still in their mailboxes and still part of their storage spaces. You can create a policy that purges the data in their Deleted Items folder automatically after a period of time.
A buildup of voicemail in a user’s Inbox can be handled by moving those items from the Inbox to a custom folder with the understanding that after 30, 60, or 90 days, they will be purged (giving your users the opportunity to move them elsewhere if they are important).
There are several uses for this technology to ensure that the data is protected while the storage is preserved. Let’s consider the steps to creating a policy.
To begin with, open your EMC, expand the Organization Configuration, and select Mailbox. Note the three remaining tabs that we haven’t discussed in this chapter:
![]() Managed Default Folders
Managed Default Folders
![]() Managed Custom Folders
Managed Custom Folders
![]() Managed Folder Mailbox Policies
Managed Folder Mailbox Policies
Note that these tabs are empty with the exception of Managed Default Folders. That includes all the standard folders that a user would have.
Each instance of a folder has managed content settings attached. If you select the Inbox or the Deleted Items folder, in the Actions pane you see the option New Managed Content Settings. It is here that you can define a set of criteria that can be added later on to a policy.
You might find it odd that there is an option in the Actions pane called New Managed Default Folder. This is not going to create additional copies of the default folders (in other words, you cannot create two Inboxes for a user); it creates additional instances that can then have additional managed content settings.
Ultimately, you put a policy together and you place those custom folders and managed default folder instances together under a policy that you apply to a user. You can apply only one policy per user, so you might want to have different instances and managed content settings to create different policies for different users. It can easily become complicated if you let it.
You can create a custom folder without any additional settings simply to have a special folder, perhaps for users to use for certain items. You might also create a voicemail folder that users can create rules to put their voicemails in. Then again, you can create managed content settings that apply rules over those voicemails past a certain timeframe. It’s up to you.
The process for creating managed content settings is as follows:
1. Create instances of default folders (or use the default instances), and create those custom folders you wish to use (if any).
2. Create managed content settings over those instances.
3. Create a policy (or policies) pulling together the instances that have settings applied already.
4. Apply a policy to a user.
5. Make sure the Managed Folder Assistant is running.
Let’s break this down into the steps.
To begin with, determine which folder you want to create another instance of. You can use the folders that currently exist to establish managed content settings on, but it might be better to create instances to stay organized. To do this, follow these steps:
1. Open the EMC.
2. From the Navigation Tree, expand the Organization Configuration work center.
3. Select Mailbox and then select Managed Default Folders.
4. From the Actions pane, choose the New Managed Default Folder link to open the wizard.
5. Provide a name and then choose the Default Folder Type. Click the down arrow, and select a folder type.
6. You can enter a comment to be displayed when the folder is viewed in Outlook. You can also click the checkbox Do Not Allow Users to Minimize This Comment in Outlook.
7. When all the options are configured, click New.
8. When complete, click Finish.
Now that you have a default folder to apply settings to, you want to create managed content settings over that folder. To do this, perform the following:
2. From the Navigation Tree, expand the Organization Configuration work center.
3. Select Mailbox and then select Managed Default Folders.
4. Locate the instance of the default folder to which you want to apply settings. Right-click the folder, or from the Actions pane, select the New Managed Content Setting link to open the wizard.
5. On the Introduction screen shown in Figure 6.7, you are told that the settings allow you to control the lifespan of items of the specified message type. First, you have to provide a name for the managed content settings.
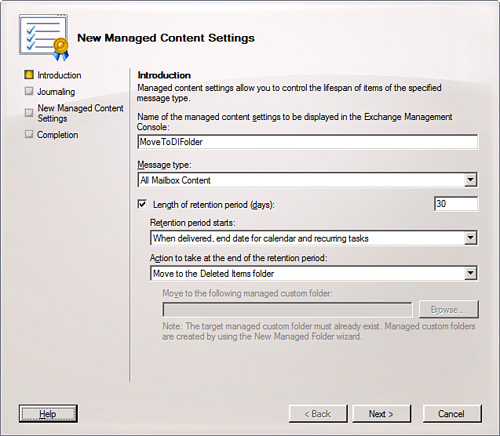
6. Select the down arrow to choose a message type. You can leave the default All Mailbox Content or select other types.
7. Select the checkbox Length of Retention Period (Days) and provide the number of days the items can reside within the folder before action is taken.
8. Under Retention Period Starts, you can select one of the following:
![]() When Delivered, End Date for Calendar and Recurring Tasks
When Delivered, End Date for Calendar and Recurring Tasks
![]() When Item Is Moved to the Folder
When Item Is Moved to the Folder
9. Then choose Action to take at the end of the retention period, which can be one of the following:
![]() Move to the Deleted Items Folder
Move to the Deleted Items Folder
![]() Move to a Managed Custom Folder
Move to a Managed Custom Folder
![]() Delete and Allow Recovery
Delete and Allow Recovery
![]() Permanently Delete
Permanently Delete
![]() Mark as Past Retention Limit
Mark as Past Retention Limit
10. If you chose Move to a Managed Custom Folder, you can select Browse and locate the folder. After all answers are provided, click Next.
11. On the Journaling screen, you can use journaling to automatically forward a copy of an item of the specified message type to another location. To do this, click Forward Copies To, and then choose an email address. Then in the Assign the Following Label to the Copy of the Message dialog, write your message. You can select the Outlook Message Format (.msg) or the Exchange MAPI Message Format (TNEF). When you finish, click Next.
12. Confirm the Configuration Summary, and then click New.
13. When complete, click Finish.
14. Notice that now, beneath your folder, you have the managed content settings that you can alter by going into the Properties.
If you want to create a new managed custom folder that can also be deployed through a policy or in harmony with content settings that you establish for a default folder, perform the following:
1. Open the EMC.
2. From the Navigation Tree, expand the Organization Configuration work center.
3. Select Mailbox and then select Managed Custom Folders.
4. From the Actions pane, choose the New Managed Custom Folder link to open the wizard.
5. You have one screen with information you need to fill out, as you can see in Figure 6.8. Input the information in the following fields:
![]() Name
Name
![]() Display the Following Name When the Folder Is Viewed in Office Outlook
Display the Following Name When the Folder Is Viewed in Office Outlook
![]() Checkbox: Storage Limit (KB) for This Folder and Its Subfolders
Checkbox: Storage Limit (KB) for This Folder and Its Subfolders
![]() Display the Following Comment When the Folder Is Viewed in Outlook
Display the Following Comment When the Folder Is Viewed in Outlook
![]() Checkbox: Do Not Allow Users to Minimize This Comment in Outlook
Checkbox: Do Not Allow Users to Minimize This Comment in Outlook
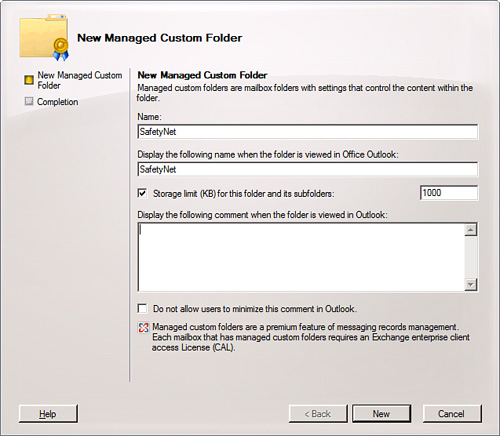
6. After all information is entered, click New.
7. When complete, click Finish.
NOTE There is a note when you create a custom folder that says, “Managed custom folders are a premium feature of messaging records management. Each mailbox that has managed custom folders requires an Exchange enterprise client access License (CAL).”
At this point, you can simply add the custom folder to the mailbox policy and it will appear in those recipients’ mailboxes, or you can use that folder in folder settings from your default folders. However, you can also select the custom folder and, from the Actions pane, create new managed content settings for that folder. It is completely up to you and the needs you have for your organization and your users.
After you have the default and custom folders you need and all of the managed content settings you require, it is time to create policies. Note that although you can create many policies, in the end you can apply only one policy per user. The goal is to ensure that the one policy includes everything you need.
To create a managed folder mailbox policy, perform the following:
1. Open the EMC.
2. From the Navigation Tree, expand the Organization Configuration work center.
3. Select Mailbox and then select Managed Folder Mailbox Policies.
4. From the Actions pane, choose the New Managed Folder Mailbox Policy link to open the wizard.
5. The actual policy creation process is simple. You provide a name and then click the Add button to specify the managed folders that you want to link to this policy. Click Add.
6. You are not shown the folder settings, only the folders themselves. So, you can choose only folder instances to apply through the policy. Choose those default and custom folders you want to apply and click OK.
7. After you make the choices for the policy, click New.
8. When complete, click Finish.
You can go into the properties of the policy to add or remove certain folders. You can always go back to the settings of certain folders to make changes to those settings, too.
Many ways to apply a policy to a recipient exist. One way is during the creation of the mailbox account itself. During the Mailbox Settings configuration, you are asked if you want to apply a managed folder mailbox policy, and you can click Browse to choose the policy.
If you already created a recipient and want to make changes to the policy you selected or add a policy, you would enter the properties for the user and go to the Mailbox Settings tab. Select the Messaging Records Management option and enter the properties. Then you can select a folder policy for the recipient.
However, it might be easier to use the EMS to accomplish this task. You can use the Set-Mailbox cmdlet for a user:
Set-Mailbox -ManagedFolderMailboxPolicy “name of policy here”
Now you can use this cmdlet with an individual mailbox. Imagine you had a mailbox for Joel User and the policy was called Executive Policy. You would type:
Set-Mailbox "JoelUser" -ManagedFolderMailboxPolicy "Executive Policy"
However, if you want to really enforce in bulk, you would probably want to try and apply policies to larger groups, such as distribution groups.
You might first use the Get-DistributionGroupMember cmdlet, or the Get-Mailbox cmdlet if you know the parameters you are looking for, and then pipeline the results (using the | for the pipeline) with the Set-Mailbox cmdlet using the -Managed FolderMailboxPolicy setting.
There is one more step in this. You have to actually configure the mailbox server(s) to schedule and run the managed folder assistant. If this assistant doesn’t run, nothing happens. No custom folders are created and no policy settings are enforced.
To ensure the Managed Folder Assistant is running, perform the following:
1. Open the EMC.
2. From the Navigation Tree, select the Server Configuration work center.
3. From the Results pane, select the server you need to run the assistant on. Click Properties from the Actions pane.
4. Select the Messaging Records Management tab.
5. By default, the assistant is set to Never Run. You can select the down arrow to choose Use Custom Schedule and then configure a schedule for the assistant to run on. You don’t want this to take up more time on your server than needed, so you might do well to select 15-minute increments a few times per day.
Solution: It’s true, these tabs might involve a bit more knowledge to configure the mailbox settings properly. Let’s consider them individually and see what settings they each contain and how they can benefit you.
Under Mailbox Settings, by default you have two options:
![]() Messaging Records Management
Messaging Records Management
![]() Storage Quotas
Storage Quotas
If you select each, you are provided a description at the bottom of the tab. You can also select the Help button in any location to learn more about that set of options.
If you select Messaging Records Management and choose Properties, you are given the option we discussed earlier to provide a mailbox policy, as you can see in Figure 6.9.
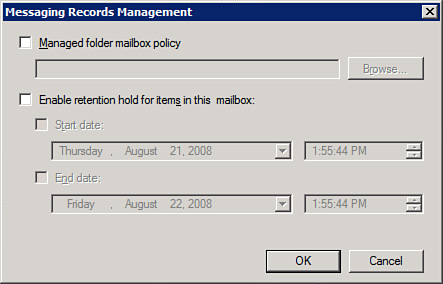
However, you can also select the Enable Retention Hold for Items in This Mailbox option and provide start and end dates. This allows a time where you suspect the expiration of items from the mailbox. The policy is still in force, but for that period of time it will not be applied.
You also have Storage Quotas, which has two portions that you are welcome to leave as the database defaults:
![]() Storage Quotas—Here you can configure an individual mailbox warning, prohibit send and prohibit send and receive quota.
Storage Quotas—Here you can configure an individual mailbox warning, prohibit send and prohibit send and receive quota.
![]() Deleted Item Retention—Here you can change the deleted item retention time and enable the option Do Not Permanently Delete Items Until You Back Up the Database.
Deleted Item Retention—Here you can change the deleted item retention time and enable the option Do Not Permanently Delete Items Until You Back Up the Database.
Under Mail Flow Settings, you have the following three options by default:
![]() Delivery Options
Delivery Options
![]() Message Size Restrictions
Message Size Restrictions
![]() Message Delivery Restrictions
Message Delivery Restrictions
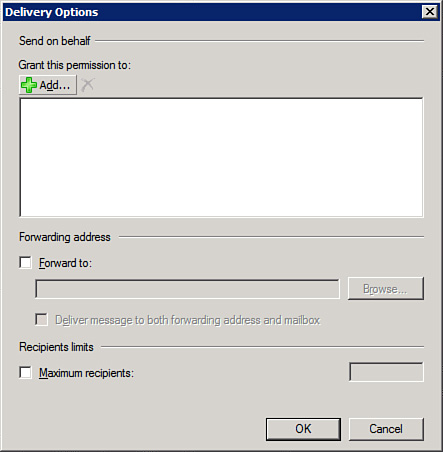
Starting with Delivery Options, as you can see in Figure 6.10, there are several interesting options such as:
![]() Send On Behalf—Gives permission to other recipients (who you select using the Add button) to send emails on behalf of your account. If a user has this capability, he can put your mailbox in the From field for email messages he sends. You might give this capability to a person’s assistant.
Send On Behalf—Gives permission to other recipients (who you select using the Add button) to send emails on behalf of your account. If a user has this capability, he can put your mailbox in the From field for email messages he sends. You might give this capability to a person’s assistant.
NOTE Another way to allow users or a group the capability to send messages as the owner of another mailbox is by using Manage Send As Permission. This is found by selecting the user and from the Actions pane choosing the Manage Send As Permission link to open the wizard. From the wizard, you can click the Add (or Remove) buttons to grant or deny users or groups the capability to send messages as that mailbox.
![]() Forwarding Address—This allows a person’s mail to be forwarded to another address. Also, a checkbox enables mail to be delivered to both a forwarding address and the mailbox itself.
Forwarding Address—This allows a person’s mail to be forwarded to another address. Also, a checkbox enables mail to be delivered to both a forwarding address and the mailbox itself.
![]() Maximum Recipients—This setting places a limit on the maximum number of persons that the user can send an email message to at one time.
Maximum Recipients—This setting places a limit on the maximum number of persons that the user can send an email message to at one time.
The next option is Message Size Restrictions. This enables you to determine a sending and receiving message size. To do this, you select the checkbox and indicate the restriction in KB.
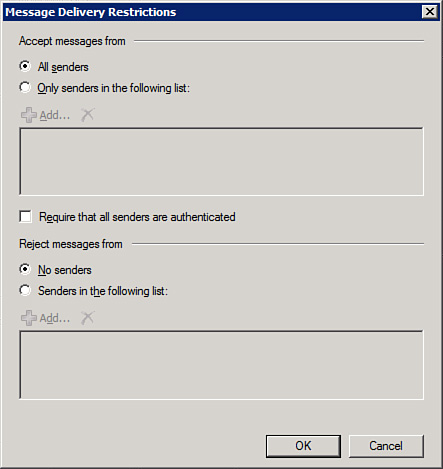
The final option is Message Delivery Restrictions. By default, the settings, as shown in Figure 6.11, are set to accept messages from all senders and reject messages from no senders. However, you can alter this to Only Senders in the Following List, where you add persons to a list for either accepting and rejecting messages. You can also select the Require That All Senders Are Authenticated checkbox.
The Mailbox Features tab is a simple but important group of settings for your recipients. You’ll notice in Figure 6.12 all the settings that you can enable or disable (most of which are enabled by default). These settings include the following:
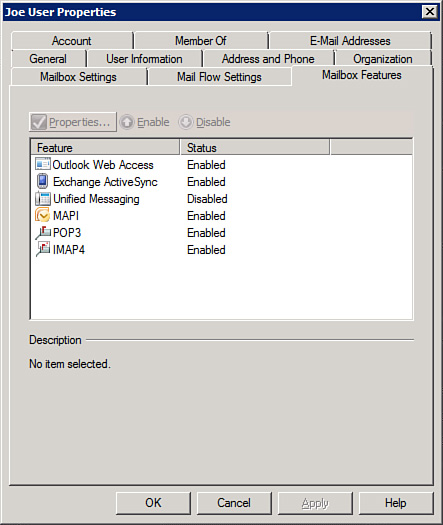
![]() Outlook Web Access
Outlook Web Access
![]() Exchange ActiveSync
Exchange ActiveSync
![]() Unified Messaging
Unified Messaging
![]() MAPI
MAPI
![]() POP3
POP3
![]() IMAP4
IMAP4
You can do more than select any one of these and choose Enable or Disable from the options. Some also have Properties. When you select an option, you see the Properties button light up and in some cases, such as with ActiveSync, you can choose a policy for the recipient. In other cases, such as MAPI or Outlook Web Access, there are no additional property configuration changes you can make.