Chapter 4 Manage Storage and Databases
Solution: We work through the following scenarios:
![]() Create a new storage group
Create a new storage group
![]() Remove a storage group
Remove a storage group
![]() Move a storage group path
Move a storage group path
![]() Enable or disable circular logging for a storage group
Enable or disable circular logging for a storage group
![]() Storage group properties from the EMS
Storage group properties from the EMS
To create a new storage group, make sure you are logged in as an Exchange Server Administrator role and as part of the local Administrators group and perform the following:
1. Open the Exchange Management Console (EMC).
2. From the Navigation Tree, expand the Server Configuration work center and click Mailbox.
3. From the Result pane, choose the server on which you want to create a new storage group.
4. Now, either right-click in the white space within the Work pane or look at the Actions pane, and choose the New Storage Group option.
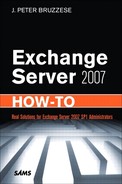
5. The New Storage Group Wizard displays, as shown in Figure 4.1. You can supply the storage group name. Then you can browse for locations other than the default for the log files and the system files. The default location is C:Program FilesMicrosoftExchange ServerMailbox<name of storage group>.
6. When ready, select New.
7. The Completion screen should show you that the wizard was successful and you have the storage group you want. Click Finish.
NOTE You might have noticed while completing the New Storage Group Wizard steps that there was an option to enable local continuous replication for this storage group, which we chose to ignore at this time. We discuss this setting and its purpose and use in Chapter 10, “Design and Deploy High Availability for Exchange 2007.”
PS NOTE The cmdlet through the Exchange Management Shell (EMS) used to create the storage group is New-StorageGroup <Name of Storage Group> -Server <Name of Server>. You can take advantage of other parameters. In fact, if you press Ctrl+C when the wizard is complete, you are given the exact command for creating the storage group you created. You can then paste that into Wordpad or Notepad to learn more about how PowerShell works.
Keep in mind that you cannot remove a storage group that still contains databases. To remove a storage group, perform the following steps:
1. Open the EMC.
2. From the Navigation Tree, expand the Server Configuration work center and click Mailbox.
3. From the Result pane, choose the server from which you want to remove the storage group.
4. Select the storage group you want to remove from the Work pane.
5. Right-click the storage group, or look at the Actions pane and choose Remove.
6. A warning displays asking, “Are you sure you want to remove <name of storage group>?” Select Yes.
7. You are notified that the storage group has been removed, but you have to remove the log file manually. Click OK.
There are times, either because of performance improvements or fault tolerance concerns, when you might want to move the location of the storage group path. Recall that the default location is in the same location as your Exchange files, which might be your c: drive. This is not the best location for your log and system files. To alter this, perform the following:
1. Open the EMC.
2. From the Navigation Tree, expand the Server Configuration work center and click Mailbox.
3. From the Result pane, choose the server that you want to move the storage group paths to.
4. In the Work pane, select the storage group.
5. Right-click the storage group or look at the Actions pane and choose Move Storage Group Path.
6. The Move Storage Group Path Wizard displays with the current location for the log and system files. You can choose the Browse buttons next to either one to select new locations for each. (Note: If Local Continuous Replication [LCR] is enabled for the storage group, you are also given the opportunity to move the location of the LCR files.)
7. After you choose the new locations, click Move.
8. You are warned that to move the files, the databases need to be dismounted, so they are inaccessible for a short period of time. To continue, click Yes.
9. You are taken to the Completion screen, where you can see whether the operation completed successfully.
10. Click Finish.
By default, circular logging is disabled on storage groups. The purpose of circular logging is to reduce disk storage requirements by limiting the number of transaction log files. As you learned in Chapter 1, “Introduction to Exchange 2007 SP1,” transaction logs help to ensure recoverability of data in the event of a failure of the disk holding the database or the database corrupts in some way. By enabling circular logging, you reduce your chances of being able to completely recover because circular logging enables Exchange to overwrite transaction logs after the data within the log file has been committed to the database.
NOTE Within a production environment, it’s rare to use circular logging. However, there are times when you might not be as concerned about recoverability so much as disk space. You might also use circular logging temporarily when moving large amounts of mailboxes to a target server because traditionally you need to ensure you have on the transaction log drive 20 percent more space than the total size of the mailboxes you move. If you don’t have that space, turn on circular logging until you can get the space worked out.
To enable circular logging (or disable it by deselecting the checkbox), perform the following:
1. Open the EMC.
2. From the Navigation Tree, expand the Server Configuration work center and click Mailbox.
3. From the Result pane, choose the server.
4. In the Work pane, select the storage group.
5. Right-click the storage group or look at the Actions pane, and then choose Properties.
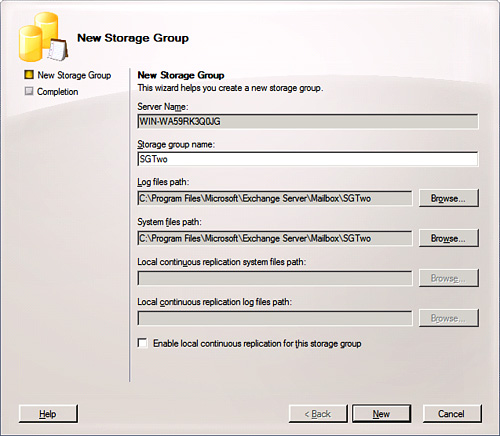
6. Notice that you can change the name of the storage group, and you can see from Figure 4.2 that there is an Enable Circular Logging option that you can select. Select the checkbox.
7. Click OK.
By going into the properties of a storage group from within the EMC, you are presented with a bare minimum in terms of information about that storage group. You can find a lot more information through the EMS.
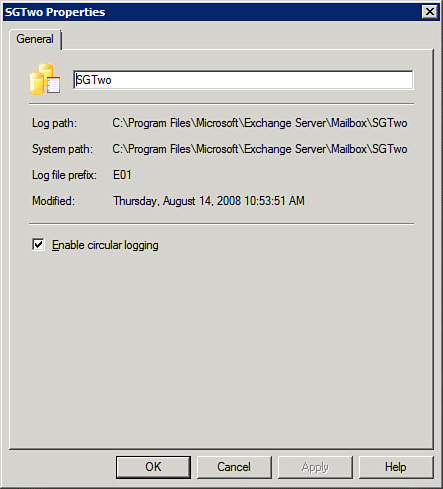
To do so, you need to use the Get-StorageGroup cmdlet, but you also need to pipeline it as a format list (fl for short).
If the name of the storage group is SGTwo, the command you would type is:
Get-StorageGroup "SGTwo" | fl
As you can see from Figure 4.3, the information returned is quite extensive. Ordinarily you might not need that depth of information, but in the event you do, it is available.
Solution: To create a new mailbox database, perform the following:
1. Open the EMC.
2. From the Navigation Tree, expand the Server Configuration work center and click Mailbox.
3. From the Result pane, choose the server.
4. In the Work pane, select the storage group where you want to place the mailbox database.
5. From the Actions pane select New Mailbox Database, which begins the New Mailbox Database Wizard.
6. Enter the following information:
a. Mailbox Database Name—Up to 64 characters without using characters like /, “, =, and ;.
b. Database File Path—Here you can click Browse and choose a new location for the .edb file that will be your database. Otherwise, it goes into the default location.
c. Mount This Database—Selected by default, but you can deselect it if you want to wait on having this database become available for use.
d. Note—If you have LCR enabled for the storage group, you see another dialog for the LCR path for the database.
7. Click New.
8. When complete, you are taken to the Completion screen.
PS NOTE The cmdlet through the EMS used to create a new mailbox database is New-MailboxDatabase -Name <name of database> -StorageGroup ServerName StorageGroupName. To mount the database type: Mount-Database -Identity <name of database>.
If you decide you no longer need a certain database and want to remove it, first ensure you have moved all your mailboxes over to an available database. Then perform the following:
1. Open the EMC.
2. From the Navigation Tree, expand the Server Configuration work center and click Mailbox.
3. From the Result pane, choose the server.
4. In the Work pane, select the storage group that holds the mailbox database and select the database you want to remove.
5. From the Actions pane, select Remove.
6. You will be warned and asked if you want to continue. Select Yes.
7. When the dialog displays telling you the database has been removed, you should note the location of your .edb file because you have to delete it manually.
8. Click OK.
Solution: To dismount a database, perform the following:
1. Open the EMC.
2. From the Navigation Tree, expand the Server Configuration work center and click Mailbox.
3. From the Result pane, choose the server.
4. In the Work pane, select the storage group that holds the mailbox database and select the database you wish to dismount.
5. From the Actions pane, select Dismount Database.
6. Click Yes when you receive a warning message that says, “Are you sure you want to dismount database <name of database>?”
To remount that database, you perform the same actions as stated previously except this time you select Mount Database.
Solution: To understand the various settings within the properties of a mailbox database, we are going to break it down into tabs and sections as follows:
![]() General
General
![]() Limits: Storage Limits and Deletion Settings
Limits: Storage Limits and Deletion Settings
![]() Client Settings
Client Settings
To locate the properties of a database, perform the following:
1. Open the EMC.
2. From the Navigation Tree, expand the Server Configuration work center and click Mailbox.
3. From the Result pane, choose the server.
4. In the Work pane, select the storage group that holds the mailbox database and select the database you wish to view the properties of.
5. From the Actions pane, select Properties.
The General tab initially shows you a lot of dynamic information, as you can see in Figure 4.4. In addition to seeing the name of your database and the database path (and copy path if there is one), you see items such as your last full backup and your last incremental backup, indicating whether transaction logs were purged and when. Status shows you the mounted or dismounted state of your database. Additionally, you can see when the last time database properties in Active Directory (AD) were changed.
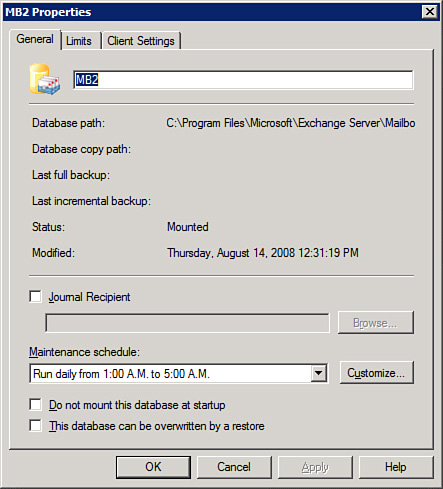
You should also take note of the two checkboxes at the bottom of the screen. The first is Do Not Mount This Database At Startup, which prevents the database from being mounted with the startup of the Information Store. This is helpful if an administrator wants to bring databases back online in a certain order rather than all at once.
The other checkbox is This Database Can Be Overwritten By a Restore, which is used when you need to restore from an offline backup. This occurs if the database is backed up by making a copy, not with an online backup of the database.
Solution: Notice the Journal Recipient checkbox. If you select this and choose a recipient (that is, a mailbox specifically set up to be the journal recipient for this database), mail going to and from all mailboxes in this database is copied and that copy is sent to the journal recipient.
Solution: On the General tab of the database properties, note the Maintenance Schedule option from which you can select the down arrow and choose from a variety of different time schedules provided. Or, you can choose the Customize option and configure a schedule that better suits the needs of your organization.
Under the properties of the database, the second tab is the Limits tab, shown in Figure 4.5. Here, we have two sections: Storage Limits and Deletion Settings. Each has a unique purpose and poses unique scenarios to consider.
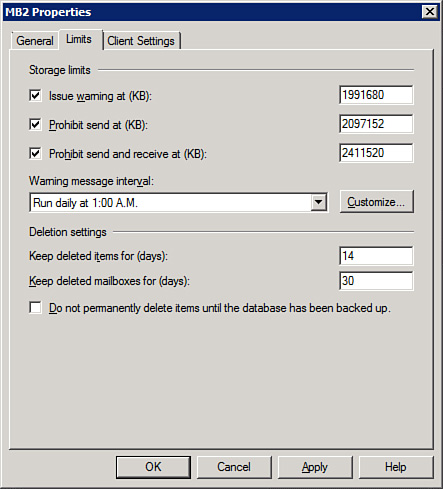
Solution: On the Limits tab, as you can see from Figure 4.5, you have a warning issued to the user at close to 2GB. Shortly thereafter, the user is no longer able to send email. Then at the final limit, the user cannot send or retrieve email.
A warning message interval sends a message to users when they reach these milestones of limitations. Users receive simple messages explaining that they either are getting close to their limits and should delete a few items to reduce the size of their mailbox or, if the size continue to grow, they are told they cannot send (or cannot send and receive). You can alter the warning interval by selecting the down arrow or choosing the Customize option.
It might be difficult as an administrator to know exactly how much disk space you need. There are calculators to assist so that you can determine the number of users, the amount of space left for deleted items and mailbox retention, and so on. However, just as a simple example plan, let’s say you wanted every user to have 500MB of space. If you have 1,000 users, you are looking at 500,000 MB, or roughly 488GB. That is just for the standard mailbox sizes. Now you need to consider if you have some people (such as the CEO of the company) you wish to give larger mailboxes to.
With a 500MB mailbox size, you might try a warning at 400MB, with a prohibition of sending at 450MB and prohibition of sending and receiving at 500MB.
Solution: The real benefit of deleted item or mailbox retention times is to avoid getting backup tapes. Imagine a scenario in which you have a database with 100 mailboxes. All 100 people within that database have about 100MB of mailbox space. They are temporary workers or document processors and they do not require a great deal of email real estate. By extension, if they delete something and say, “Excuse me, but 10 days ago I deleted an important email,” you might not feel obligated to go looking to restore that email. If the deleted item retention time is still at 14, you can tell them how to retrieve their own email. However, in the interest of saving disk space, you might decide to lower the amount of time here. With persons of great importance, you might, in the interest of job security and a positive evaluation, increase the time to 30 days on deleted items so that a CEO can quickly retrieve messages he may have accidentally deleted.
As for deleted mailboxes, it depends on how often you delete a mailbox and need to restore it. You could always use backups, so you might want to lower this number.
The checkbox Do Not Permanently Delete Items Until the Database Has Been Backed Up is a good one to turn on; however, ideally you perform backups more often than once every 14 days. The odds of an item not being backed up should be small if you perform regular (daily) backup routines.
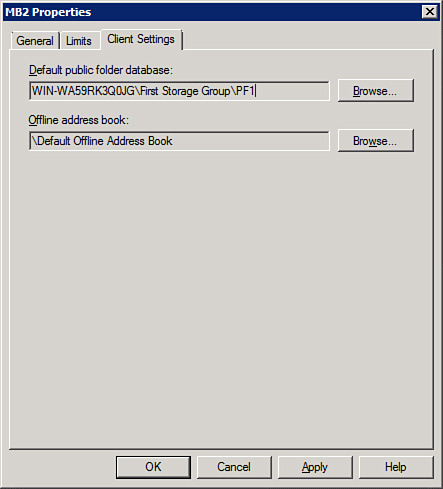
Under the properties of the database, the third tab is the Clients Settings tab shown in Figure 4.6. This tab enables you to configure two settings: the default Public Folder database, which is where mailbox clients within this database first go to retrieve the information about the Public Folder store, and the offline address book, which is where you specify which offline address book (OAB) a client should download. The default configuration (and one that is usually sufficient for small- to medium-sized companies) is the default offline address list.
There are always little things that we need to do to enhance our working experience or change the way certain defaults work. For example, consider the following scenarios.
Solution: First, Microsoft doesn’t mind if you make this change (although it encourages you to be careful editing your Registry). In fact, Microsoft tells us how to do it in the TechNet Center. To modify the database size limit, perform the following on the Exchange Server:
1. Click Start, Run.
2. Open your Registry Editor by typing regedit and pressing Enter.
3. Navigate to the following key: HKEY_LOCAL_MACHINESYSTEMCurrentControlSetServicesMSExchangeIS<SERVER NAME>Private-<database GUID> (Note: If you aren’t sure the GUID of your database, run the Get-MailboxDatabase "Name of Database" | fl command in the Exchange Management Shell and it tells you the GUID to look for.)
4. Look for the DWORD called Database Size Limit in GB. If you find it, change the subkey value to the size you want. If the key doesn’t exist, create a key with that name and put the value in.
Solution: It would be nice if you could type these in easily in the EMC, but unfortunately, these are some of the features they left for the EMS. The cmdlets you want to use are New-SystemMessage, Get-SystemMessage, Set-SystemMessage, and Remove-SystemMessage.
To create the correct message, use the WarningMailbox message (for mailboxes that are exceeding their warning threshold), the ProhibitSendMailbox message (for mailboxes that can no longer send email), and the ProhibitSendReceiveMailbox message (for mailboxes that have completely maxed out and can no longer send or receive). Logically, there are more parameters you can use in relation to mailboxes or Public Folders. There are plenty of messages; however, for now, we focus on the ones that relate to the database.
Let’s say you want to customize the WarningMailbox quota message. You could open the Exchange Management Shell and type the following:
New-SystemMessage -QuotaMessageType WarningMessage -Language EN -Text "Your mailbox is almost full and you should consider deleting items from your mailbox as well as your deleted items folder."
Now, this message is close to the real message, but it’s just an example of what you could use. You have to determine what you want. To learn more about managing quota messages, visit http://technet.microsoft.com/en-us/library/bb232089(EXCHG.80).aspx.
Solution: The answer is through the Event Viewer and Performance Monitor. You need to enable certain counters in the Registry. To start with, perform the following:
1. Click Start, Run.
2. Open your Registry Editor by typing regedit and pressing Enter.
3. Navigate to the following key: HKEY_LOCAL_MACHINESYSTEMCurrentControlSetServicesESEPerformance.
4. Right-click the word Performance and select New, and then select DWORD Value.
5. Call the new DWORD value Show Advanced Counters.
6. After it is created, double-click the new Show Advanced Counters and enter the value data field as 1.
7. Close the Registry Editor.
You can use the Event Viewer, as well as the Reliability and Performance Monitor (or simply the Performance Monitor in Server 2003), to search for online defragmentation information.
Within Event Viewer, you want to perform searches in the Application log for Event ID: 703.
You want to filter the log and look for online defragmentation completion at least every two weeks on every database on the server.
To filter events in Event Viewer in Windows Server 2008 for Event 703, perform the following:
1. Open Event Viewer. (Click Start, point to Administrative Tools, and then select Event Viewer.)
2. In Event Viewer, look at the left Navigation Tree, expand Windows Logs, and then expand Application to view the Application log.
3. To filter for Event 703, look at the Actions pane and click Filter Current Log. The Filter Current Log dialog box displays.
4. From the Filter Current Log dialog box, on the Filter tab, in the Includes/Excludes Event IDs box, type 703, and then click OK. All events with an ID of 703 display in the Result pane.
5. To view the event description, right-click the event, and select Event Properties.
The monitoring aspect through the Performance Monitor can be performed with standard counters and/or the counters you enable through the Registry. In either case, what are we looking for?
For starters, SP1 added some counters to look at, such as the following example:
MSExchange Database—Instances Online Defrag Pages Freed/Sec and
Online Defrag Data Moves/Sec
In addition, there are a handful of other Online Defrag counters that you can utilize. For more information, go to http://technet.microsoft.com/en-us/library/bb691410(EXCHG.80).aspx.
Solution: The following sections cover:
![]() Creating a new Public Folder database
Creating a new Public Folder database
![]() Creating and removing Public Folders
Creating and removing Public Folders
![]() Configuring Public Folder database settings
Configuring Public Folder database settings
![]() Configuring Public Folder settings
Configuring Public Folder settings
To accomplish the creation of a new Public Folder database, perform the following:
1. Open the EMC.
2. From the Navigation Tree, expand the Server Configuration work center and click Mailbox.
3. From the Result pane, choose the server on which you want to create a new Public Folder database.
4. From the Work pane, choose the storage group in which you want to create the new Public Folder database.
5. From the Actions pane (or by right-clicking the storage group), click New Public Folder Database. The New Public Folder Database Wizard displays.
6. Type the name of the new Public Folder database in the Public Folder Database Name box.
7. You can specify the location of the Public Folder database files by clicking Browse, and then entering the path for the Exchange database file (.edb) for the Public Folder. (This is optional.)
8. Leave the Mount This Database option selected.
9. Click New, and after the database is created, the Completion page displays.
Creating and removing Public Folders initially could be done only through the Outlook client (if a person had the correct permissions) or through the EMS. There was no GUI for working with Public Folders beyond the creation of the database itself. That has changed with the inclusion of the Public Folder Management Console tool found in the Toolbox options.
To create Public Folders from within SP1, perform the following:
1. Open the EMC.
2. From the Navigation Tree, expand the Toolbox work center, and from the Result pane, select Public Folder Management Console. You can double-click the tool or choose Open Tool from the Actions pane.
3. The SP1-added Public Folder Management Console displays separately from the EMC.
4. Select Default Public Folders, and you might note that there are currently no folders in your system.
5. Click New Public Folder, and the wizard begins.
6. All you are asked for is a name. Provide a name and click New.
7. After the folder is created, you are shown the Completion screen and a green circle. Click Finish.
To remove a Public Folder, you need to select it and choose Remove from the Actions pane. A warning displays and you need to confirm that you wish to remove it.
PS NOTE The cmdlet through the EMS used to create a new Public Folder is New-PublicFolder -Name "Name of Folder". You can also place a new Public Folder in other folders that are already in place using the -Path parameter. So, if you want to place a folder named Research within a folder named Legal, type New-Public Folder -Name "Research" -Path Legal -Server "ServerName".
By default, public folders do not receive email until you mail-enable them. They can receive posts from persons that have permission in the company, but not emails. To mail-enable a public folder, perform the following steps:
1. Open the EMC.
2. From the Navigation Tree, expand the Toolbox work center and from the Result pane, select Public Folder Management Console. You can double-click the tool or choose Open Tool from the Actions pane.
3. In the Navigation Tree of the Public Folder tool, expand Default Public Folders.
4. Find the folder you want to mail-enable. Then right-click on it or look in the Actions pane for the Mail Enable option.
5. You should note that the icon for the Public Folder changes. Now a small letter is shown next to the folder (whereas ordinarily it is inside the folder).
6. To disable the folder, select it again and choose Mail Disable.
NOTE After you mail-enable a public folder the properties will change. If you check a public folder that is not mail-enabled and one that is, you’ll notice that they both still retain their Public Folder settings, but the mail-enabled folder has settings that relate to email addresses, mail flow, and so forth, just like a regular mailbox would.
Public Folders can be managed as one entity under the database properties, or individually as folders. Often you establish your settings at the database level and not the folder level because it is easier to manage in bulk.
You’ll notice that some of the settings are similar on the database level. To look at the properties, perform the following:
1. Open the EMC.
2. From the Navigation Tree, expand the Server Configuration work center and click Mailbox.
3. From the Result pane, choose the server with your Public Folder database.
4. In the Work pane, select the Public Folder database.
5. Either right-click and choose Properties or select Properties from the Actions pane.
Note that all the information on the General tab, including the maintenance options, is the same as what we saw on the mailbox database earlier.
The Replication tab (shown in Figure 4.7) contains only a few settings:
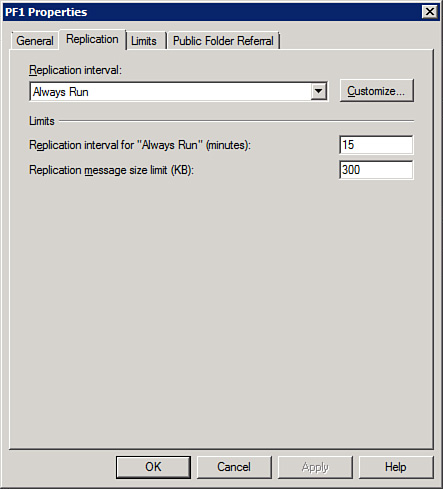
![]() Replication Interval determines when the replication of Public Folders occurs when content updates are made. The default is for it to Always Run, but you can turn it off completely or change the time frame, even customize the replication schedule.
Replication Interval determines when the replication of Public Folders occurs when content updates are made. The default is for it to Always Run, but you can turn it off completely or change the time frame, even customize the replication schedule.
![]() Replication Interval For “Always Run” (Minutes) shows the time interval that replication can occur.
Replication Interval For “Always Run” (Minutes) shows the time interval that replication can occur.
![]() Replication Message Size Limit (KB) shows the size limit of a replication message. Smaller items can be grouped together into a single replication message, while larger ones are handled differently.
Replication Message Size Limit (KB) shows the size limit of a replication message. Smaller items can be grouped together into a single replication message, while larger ones are handled differently.
The Limits tab is slightly different from its mailbox database counterpart, as you can see in Figure 4.8.
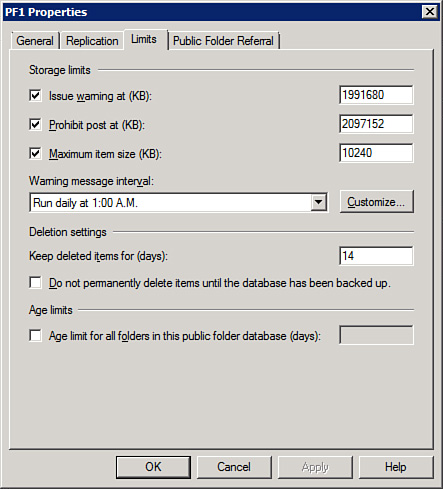
There is a still a warning and prohibit limit. There is also a maximum item size (KB) that prevents people from posting huge files to the public folders (although you can adjust this depending on the need, but you might find that it is better to adjust on a per folder basis, rather than at a database level).
The warning message interval works the same as it did for the mailbox database. Notice that there is only a deleted item retention time (the default is still 14 days) and the checkbox is still available for the permanent deletion of items.
There is an extra checkbox under the heading Age Limits. You select this checkbox to limit the age of all folders in the database. You can set a value of 0 to 24,855 days. After the items in the folder reach the specified age, Exchange deletes them and frees up the space automatically.
NOTE The big question you might have is why would you want to limit the age of a public folder? Well, you might use a public folder for a variety of reasons—perhaps to collect automated messages or spam. Or you might simply want to ensure that, beyond a certain number of years, the age limit is up.
The final tab is the Public Folder Referral tab. Here you can do one of two things: the default is to use Active Directory site costs, or you can create a custom list to use.
The purpose of this is to configure the folder replica that ultimately is accessed by the client application. The way referrals work is that a client tries to open a public folder and the server has to determine where the contents should come from. Ordinarily, you have several replicas of your public folders (although in a smaller environment you might only have a single location). After the server determines the best replica to offer, it gives the client a referral. If the replica exists on the server itself, it uses the local replica; if not, it tries to look in the same AD site (by default) unless you specify otherwise on this tab.
Public Folder settings on individual folders require you to go back to the Public Folder Management Console. Select the Default Public Folders, and then look for the individual folder you wish to make changes to in the Results pane. When you find the folder, select it, and click Properties from the Actions pane.
You see three tabs:
![]() General—Shows you standard information such as the total number of items, the size of the folder, when it was last modified, and so forth. There is one checkbox, Maintain Per-user Read and Unread Information For This Folder, which is selected by default. This enables a user to see whether a message has been read or unread in Outlook.
General—Shows you standard information such as the total number of items, the size of the folder, when it was last modified, and so forth. There is one checkbox, Maintain Per-user Read and Unread Information For This Folder, which is selected by default. This enables a user to see whether a message has been read or unread in Outlook.
![]() Replication—Here is where you can choose other servers, if you have them, to hold replicas of your public folders. Imagine several branch offices around the world that have people who want to access the same information. If it all resides in one location, that creates extra traffic. However, if you can create replicas in appropriate locations (not necessarily of every folder if you don’t want or need to, but those that are more interesting on the global level), it reduces traffic and improves performance. You can adjust the replication schedule or simply go with the one already established on the database. You can also determine a local replica age limit (in days).
Replication—Here is where you can choose other servers, if you have them, to hold replicas of your public folders. Imagine several branch offices around the world that have people who want to access the same information. If it all resides in one location, that creates extra traffic. However, if you can create replicas in appropriate locations (not necessarily of every folder if you don’t want or need to, but those that are more interesting on the global level), it reduces traffic and improves performance. You can adjust the replication schedule or simply go with the one already established on the database. You can also determine a local replica age limit (in days).
![]() Limits—This tab enables you to either use the database quota, item retention, and age limits or choose to use a different set of limits on this particular folder. You might decide a particular folder requires more of a maximum item size for posts, depending on the content in it. You might decide it requires a shorter age limit before content expires. Whatever the case, you configure those limits here.
Limits—This tab enables you to either use the database quota, item retention, and age limits or choose to use a different set of limits on this particular folder. You might decide a particular folder requires more of a maximum item size for posts, depending on the content in it. You might decide it requires a shorter age limit before content expires. Whatever the case, you configure those limits here.
Solution: First, your operating system is installed somewhere, traditionally on the c: drive. The entire hard drive is constantly read from and written to in an effort to keep your operating system up and running and functioning smoothly. No matter how good the drive is, how much memory you have, how fast your processor is, or how many cores you have, the fact is the operating system needs to be alone. You might install Exchange on the same drive (or on a different drive altogether, which would separate the calls made into two drives and speed up performance slightly), but you absolutely should keep all storage groups and databases off of the system drive.
Let’s say you put your transaction logs and database files on their own hard drive. That is a good step. However, keep in mind that messages come into the memory and are written to the transaction logs and the database almost simultaneously depending on the queue of traffic and the size of the messages. Having the transaction logs and system files on the same drive as the databases is going to affect performance. Not to mention that if that drive crashes, you might be able to restore from a backup, but your backup is only as good as the night before, which is hopefully when you performed the backup.
The transaction logs can replay into the database if you have to restore from a failed disk or a corrupted database. So, you are better off separating your transaction logs and database files onto separate disks, too.
Now we have performance increasing and fault tolerance, too. What more can we do? Earlier solutions for your logs and database were to create a mirror set for your transaction logs to ensure an immediate backup of all your logs. Your database was recommended to be placed on a RAID 5 Striped Set with Parity configuration. These are not bad practices, but you might try something a little more modern.
You can still create a mirror of your transaction logs. You might place your database on a striped volume with no parity (because that takes up disk space). Instead, you can use LCR to get an online copy of your database.
Using LCR, which we show you how to configure in Chapter 10, provides a duplicate of your database, where the log files (immediately or through a timed delay of your specification) can replay themselves over to the copy of the database. In this case, you always have your logs and database separate (upping performance and fault tolerance). You have your database on a fast disk arrangement (which improves performance even more although without the fault tolerance) and you have an LCR high availability solution that provides the fault tolerance to your database.
You might decide, going forward, to provide more in terms of fault tolerance and high availability and go with a cluster (and Cluster Continuous Replication) or with SP1 a Standby Continuous Replication. All these options are explained in greater detail in Chapter 10.
Keep in mind, no solution is best. However, by understanding what affects performance and fault tolerance, considering ways to avoid disaster recovery scenarios, and keeping in mind your individual budget, you can come up with solutions that improve performance, tolerance, availability, and recovery (if needed).