Chapter 3 Install Exchange 2007
In This Chapter
![]() Perform a Readiness Check Using the Exchange Best Practices Analyzer
Perform a Readiness Check Using the Exchange Best Practices Analyzer
![]() Perform a Typical Installation of Roles
Perform a Typical Installation of Roles
![]() Install an Edge Transport Server
Install an Edge Transport Server
Solution: Using the Best Practices Analyzer after Exchange is installed is simple because it is located in your Toolbox within your Exchange Management Console (EMC). However, on a system that doesn’t have Exchange, you need to download and install the tool. Here are the steps, from beginning to end.
1. To begin with, because the tool is not installed, go to www.exbpa.com and download the latest version of the tool onto the server you wish to install Exchange on.
2. Install the tool.
3. After installation, click Start, and then click Best Practices Analyzer Tool.
4. The first thing the tool does is check for updates from Microsoft. The tool might have updates, or the configuration files might have updates. The configuration file is what contains all the properties that the tool retrieves and the rules it uses to analyze those properties. You can select Cancel This Check or allow it to complete. We recommend you allow it to complete.
5. If a new version of the tool or configuration file is found, you are asked whether you want to download the latest updates or continue without making any updates. We recommend you download the latest updates.
6. After the download is complete, you see the Welcome screen. From here, you can perform a new scan by choosing Select Options For a New Scan or view a preexisting scan by choosing Select a Best Practices Scan To View. In this case, you want to have a new scan performed.
7. You are asked to connect to an Active Directory Server. Ordinarily one is already in the box, but you can change it if you like. You can also select the Show Advanced Login Options down arrow to make adjustments. Or, simply click Connect to the Active Directory Server.
8. First network and permissions are checked. Then you are taken to the options for the New Best Practices scan.
9. Enter an identifying label for the scan. You can name it something simple like Scan1.
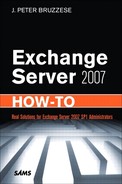
10. Scroll down to the Select The Type Of Scan To Perform section. Note that this tool can be useful for other tests later on and throughout the lifetime of your Exchange organization. However, you want to select the last option, Exchange 2007 Readiness Check, as seen in Figure 3.1.
11. You can choose the speed of the network (although this is usually determined automatically). Then select the Start scanning option unless you wish to schedule a scan time.
12. After scanning completes, you are offered the option to view a report of this Best Practices scan. The report is easy to read, with a tab for Critical Issues (that is, issues that will prevent the installation from going forward), All Issues (includes both warning and informational items), and Informational Items.
13. Based upon any critical issues that come back, make the needed and recommended adjustments so that you can go forward with the installation process.
The Exchange Best Practices Analyzer Readiness Check is prepared to perform a host of checks against your Active Directory, the system you are trying to install Exchange on, and, in the case of a transition, checks on the existing legacy Exchange organization. Here are a few checks that might cause problems for installation if you aren’t prepared:
![]() Checks to ensure the Schema Master is Windows 2003 SP1 or later.
Checks to ensure the Schema Master is Windows 2003 SP1 or later.
![]() Checks to make sure AD domains are in native mode, not mixed mode.
Checks to make sure AD domains are in native mode, not mixed mode.
![]() Checks to make sure the Global Catalog servers run Windows 2003 SP1 or later.
Checks to make sure the Global Catalog servers run Windows 2003 SP1 or later.
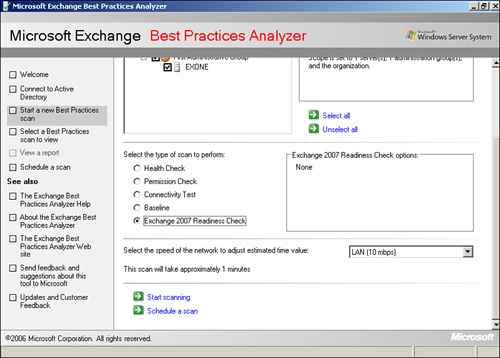
Solution: Assuming the installation of the .NET Framework, the 3.0 MMC Console and Windows PowerShell are taken care of when you place the DVD into the machine. or begin the installation from a mounted ISO file and the installation wizard begins and the opening splash screen already has you at the point where you must select Step 4: Install Microsoft Exchange Server 2007 SP1 (as shown in Figure 3.2). At this point you will perform the following:
1. Select the link from Step 4 to begin the installation wizard.
2. You are taken to the Introduction screen, which provides information regarding some of the new features and functionality included with SP1. After reading the information provided, select Next.
3. You are taken to the License Agreement screen where you can scroll down and read the entire agreement if you like. You can choose Print to get a portable, easy-to-read version of the agreement. There are two options. You either choose I accept the terms in the license agreement or I do not accept the terms in the license agreement. Note, if you do not accept, you cannot continue with the installation process. After you choose, select Next.
4. You are taken to the Error Reporting screen. Here you are asked to participate in a group effort with Microsoft to determine why certain errors occur on systems. If you choose Yes (Recommended), errors that occur automatically send reports to Microsoft without further permission. The other option is No. Choose one and then select Next.
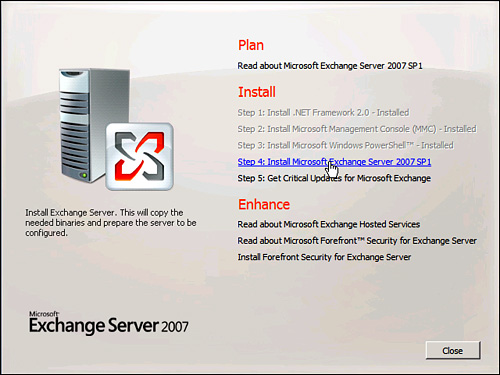
5. This brings you to the Installation Type screen shown in Figure 3.3; here, you can choose either a Typical or Custom Exchange Server installation. In this case, we select Typical Exchange Server Installation, which installs the Hub Transport server role, the Client Access server role, the Mailbox server role, and the Exchange Management tools on the server. Confirm the path for the Exchange Server installation files and choose Next.
6. If it is the first server in the organization, you are taken to the Exchange Organization screen, where you are asked to provide a name for your Exchange organization. When that is done, choose Next.
7. You are now taken to the Client Settings screen, which asks a simple yes-or-no question regarding the type of clients you use. If you use only Outlook 2007 clients, choose No. If you have Outlook 2003 or Entourage clients, choose Yes. Choosing Yes indicates that you have a need for a Public Folder database to be set up (because this is part of the requirements for legacy clients). After you choose, select Next.
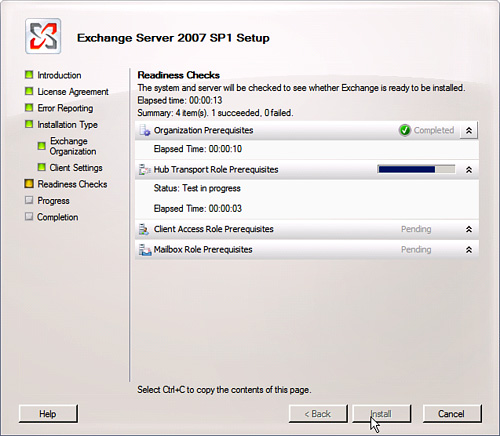
8. You are taken to the Readiness Checks screen, where the system is checked to see whether Exchange is ready to be installed or if something is missing. First, the Organization Prerequisites are checked and then the Hub Transport, Client Access, and Mailbox roles, as shown in Figure 3.4, are checked. When the checks are complete, select Install.
9. You are taken to the Progress screen, where you are shown the progress and elapsed time for the installation procedure to take place. Barring any unforeseen issue at this point, you simply need to give it a little time and it completes the installation.
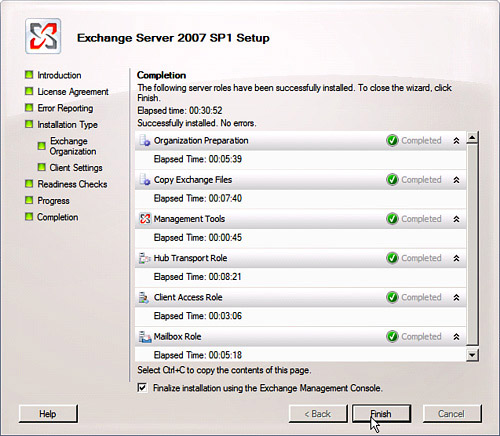
10. You are shown a Completion screen, as shown in Figure 3.5, with a view of which items completed installation (hopefully all of them), and there is a checkbox (Finalize Installation Using The Exchange Management Console) at the bottom that is checked by default. Select Finish.
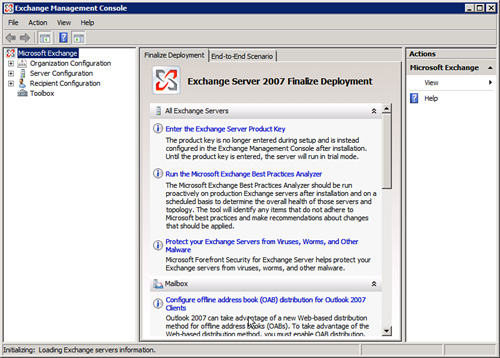
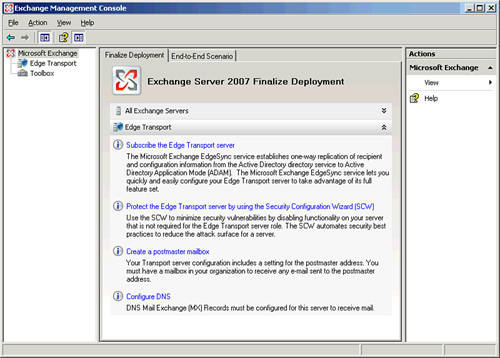
At this point, you can do one of two things. You can go back to the installation disk and perform Step 5, “Get Critical Updates for Microsoft Exchange.” Or, you can move forward with the EMC and follow the prompts prepared for you in Finalize Deployment, shown in Figure 3.6. This includes items such as Enter the Exchange Server Product Key, Run the Microsoft Exchange Best Practices Analyzer, and on, with instruction provided for each server role.
Solution: Following all of the same prerequisite rules for installing any Exchange 2007 server, you begin the installation in the same way you would the Typical installation, by performing the following:
1. Insert the DVD or mount the ISO for the Installation screen to display. Select the link from Step 4 to begin the installation wizard.
2. You are taken to the Introduction screen, which provides information regarding some of the new features and functionality included with SP1. After reading the information provided, select Next.
3. The License Agreement screen displays; scroll down and read the entire agreement if you like. You can choose Print to get a portable, easy-to-read version of the agreement. There are two options. You either choose I Accept The Terms In The License Agreement or I Do Not Accept The Terms In The License Agreement. Note that if you do not accept, you cannot continue with the installation process. Accept the agreement and select Next.
4. You are taken to the Error Reporting screen. Here you are asked to participate in a group effort with Microsoft to determine why certain errors occur on systems. If you say Yes (Recommended), errors that occur automatically send reports to Microsoft without further permission. The other option is No. Choose and then select Next.
5. This brings you to the Installation Type screen, where you can choose either a Typical or Custom Exchange Server installation. In this case, select Custom Exchange Server Installation. You are taken to the Server Role Selection screen shown in Figure 3.7.
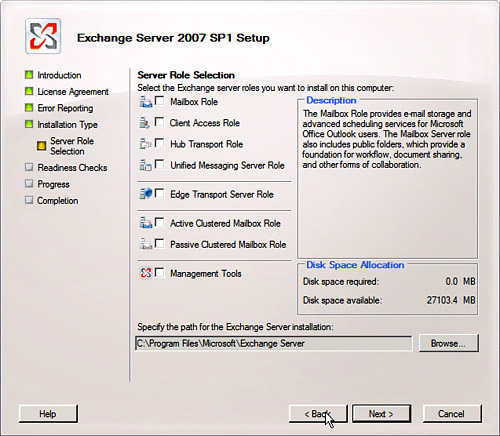
6. As you can see in Figure 3.7, the four main internal roles (the roles you can install together on the same machine if you wish but are all installed on a system connected to AD) are at the top. You can select one, some, or all four roles. Next is the Edge Transport Server role, which we save for the next section. You also have the two clustered Mailbox roles, which we discuss later. These are not the same as the standard Mailbox role because they work in harmony with clustering services provided by the server itself. Additionally, you have Management Tools (which you are welcome to install on your own, too). Select your options and choose Next.
7. The Readiness Checks screen checks to make sure your system is ready for the installation of the server options you’ve chosen. After you are clear to move forward, choose Install.
8. The Progress screen walks you through the process of the actual installation. When complete, it takes you to the Completion screen and shows you what has been installed successfully. Click Finish.
Additional servers to your organization show up within the EMC and you can manage them from a central location.
NOTE Installing Exchange from the command line in unattended mode is also a possibility. You use the setup.com command with a variety of switches, such as /mode, /roles, and so forth. You have quite a bit of flexibility and a ton of options. To learn about this, visit http://technet.microsoft.com/en-us/library/aa997281(EXCHG.80).aspx.
Solution: Because the server with the Edge Transport role doesn’t have access to the internal AD, configuration and recipient information is stored within the Active Directory Application Mode (ADAM) directory service (on pre-2008 Servers) and Active Directory Lightweight Directory Services (AD LDS) on a server that runs 2008.
So, for starters, ADAM or AD LDS must be installed. You should configure the Domain Name System (DNS) suffix on the Edge Transport server, too. Then the Edge Transport server must be installed. Finally, a connection must be made between a HT server and the Edge Transport server.
If you use Server 2003, you will need to install ADAM. To do this, perform the following:
1. Select Start, Control Panel, and then click Add or Remove Programs.
2. Select Add/Remove Windows Components.
3. Select Active Directory Services under Components, and then select Details.
4. Select the Active Directory Application Mode (ADAM) check box under Subcomponents of Active Directory Services, and then select OK.
5. Select Next on the Windows Components page.
6. Read and review the message that displays. Then do one of the following:
a. Select Finish if the message, “You have successfully completed the ADAM Setup Wizard” displays.
b. If an error message displays, make a note of the error, select Finish, and then review the ADAM event messages in Event Viewer.
If you plan to use Server 2008, you need to install AD LDS. To do that, perform the following:
1. Select Start, Server Manager.
2. From the console tree, right-click Roles, and then select Add Roles.
3. Review the information on the Before You Begin page of the Add Roles Wizard, and then select Next.
4. On the Select Server Roles page, in the Roles list, select the Active Directory Lightweight Directory Services checkbox, and then click Next.
5. Finish adding the AD LDS server role by following the instructions in the wizard.
The Edge Transport server, because it doesn’t have a connection to the AD and resides in the perimeter network, requires a manual intervention on a variety of configuration options that would ordinarily occur automatically if it were part of the AD. The configuration will fall on the administrator’s shoulders. To begin with, you should configure the DNS suffix for the server by performing the following:
1. Select Start, Control Panel, and then double-click System to open the System Properties.
2. Select the Computer Name tab.
3. Click Change.
4. From the Computer Name Changes page, click More.
5. In the Primary DNS Suffix Of This Computer: field, type a DNS domain name and suffix for the Edge Transport server.
6. Click OK three times and you are done.
NOTE Your Edge Transport server, depending on your configuration, might have two network connections: one to the outside firewall and one to the internal. The internal connection should be configured to use two internal DNS servers as the preferred and alternative DNS servers.
Creating a Host record requires work on the DNS server side. This is done on an internal DNS server. Perform the following:
1. Select Start, Administrative Tools, and from the expansion of tools, select DNS.
2. Expand Forward Lookup Zones and right-click the name of your domain. Select New Host (A).
3. From the New Host dialog, enter the name of the server in the Name field and the IP address in the IP Address field.
4. Check the Create Associated Pointer (PTR) Record box.
5. Select Add Host and then click Done.
The installation procedure is the same for the Edge as it is for the other server roles. However, unique factors include that it rests on the perimeter of the network, that you cannot install the Edge Transport role with other roles, and that you have to ensure another directory services is in place and that a connection is made to the HT afterward.
To perform the installation graphically, do the following:
1. Insert the DVD or mount the ISO for the Installation screen to display. Select the link from Step 4 to begin the installation wizard.
2. You are taken to the Introduction screen. Click Next.
3. You are taken to the License Agreement screen, where you can scroll down and read the entire agreement if you like. Choose I Accept The Terms In The License Agreement and select Next.
4. You are taken to the Error Reporting screen. Here you are asked to participate in a group effort with Microsoft to determine why certain errors occur on systems. If you say Yes (Recommended), errors that occur automatically send reports to Microsoft without further permission. The other option is No. Choose an option and then select Next.
5. This brings you to the Installation Type screen, where you can choose either a Typical or Custom Exchange Server installation. In this case, select Custom Exchange Server Installation.
6. Select Edge Transport Server Role, and then select Next.
7. The Readiness Checks screen checks to make sure your system is ready for the installation of the server options you chose. After you are clear to move forward, choose Install.
8. The Progress screen walks you through the process of the actual installation. When complete, it takes you to the Completion screen and shows you what has been installed successfully. Click Finish.
After the installation is complete and the EMC displays, as shown in Figure 3.8, you will notice the difference in the console immediately. Your finalization needs are different from the other server roles, but you will notice that the navigation console on the left is sparse. This is because the Edge Transport server can be installed alone only, so that the console is not cluttered with additional pieces that are not needed.
The process of linking an HT server and ET server together is known as the EdgeSync process. The process begins with exporting the EdgeSync subscription file and then taking the file and importing it on an HT server. The purpose of this process is to establish a one-way replication of recipient and configuration information from Active Directory to either ADAM or AD LDS (depending on the type of server you are using). The connection with the HT servers and the Edge Transport server(s) is a unique one of trust, so that the HT servers can route messages going to the Internet through the Edge Transport server that has been configured and is associated with the HT server.
To begin, you want to log on to the Edge Transport server and perform the following:
1. Open the Exchange Management Shell.
2. Type New-EdgeSubscription -FileName “c:edgesubscriptioninfo.xml” (note that the filename and location is completely your choice, this is just an example).
After the file is complete, copy it over to the HT server. Make sure you have fully qualified domain name (FQDN) connectivity between the servers by performing simple ping tests by name. On the HT server, perform the following:
1. Open the Exchange Management Shell.
2. Type New-EdgeSubscription -filename “C:EdgeSubscriptionInfo.xml” -CreateInternetSendConnector $true -site “Default-First-Site-Name”. (Note that the filename is your choice when you create the file, so enter the name you gave it. The default site name might have been changed, so make sure the site is correct, too.)
3. The synchronization process usually takes places at four-hour intervals. If you want to immediately begin the process of synchronization, you can type Start-EdgeSynchronization.
NOTE You can use the Test-EdgeSynchronization cmdlet to determine whether there is a problem between the Edge Transport servers and the HT servers. This is an Exchange 2007 SP1-only cmdlet. Simply typing in the cmdlet retrieves plenty of information; however, you can use switches that enable you to tailor your test. You can find these at http://technet.microsoft.com/en-us/library/aa996925(EXCHG.80).aspx.
Solution: It’s not so much that the installation of the Active and Passive Mailbox servers is any different from other installations we’ve performed. Rather, you must consider the preparation before you install these two.
First, you cannot install the Active or Passive Clustered Mailbox roles with any other roles. They must reside alone.
Second, they function properly only if you have installed the proper clustering services on either Server 2003 or Server 2008. You must ensure you have two servers configured with failover clustering and a File Share Witness. To learn more about this, see Chapter 10.
Third, those clustering services function only if you have the Enterprise Edition of Server running.
This can be done using the command line, but the Setup Wizard tends to be easier. To install, perform the following:
1. Insert the DVD or mount the ISO for the Installation screen to display. Select the link from Step 4: Install Microsoft Exchange 2007 SP1 to begin the installation wizard.
2. You are taken to the Introduction screen. Click Next.
3. You are taken to the License Agreement screen, where you can scroll down and read the entire agreement if you like. Choose I Accept The Terms In The License Agreement and select Next.
4. You are taken to the Error Reporting screen. Here you are asked to participate in a group effort with Microsoft to determine why certain errors occur on systems. If you say Yes (Recommended), errors that occur automatically send reports to Microsoft without further permission. The other option is No. Choose an option and select Next.
5. This brings you to the Installation Type screen, where you can choose either a Typical or Custom Exchange Server installation. In this case, select Custom Exchange Server Installation.
6. From the Server Role Selection screen, select Active Clustered Mailbox Role, and then select Next. (Note that the path you allow for the active installation files must match the path for the passive installation files.)
7. You are taken to the Cluster Settings screen. Here, you can choose Cluster Continuous Replication or Single Copy Cluster, depending on the type of cluster you have configured.
8. Next, specify the Clustered Mailbox Server Name and the path for the Clustered Mailbox Server database files. Then click Next. (Note that clustered mailbox server [CMS] names must be 15 characters or less.)
9. On the Cluster IP Address Configuration, enter a static IP address (IPv4 address) and click Next.
10. The Readiness Checks screen checks to make sure your system is ready for the installation of the server options you chose. After you are clear to move forward, choose Install.
11. The Progress screen walks you through the process of the actual installation. When complete, it takes you to the Completion screen and shows you what has been installed successfully. Click Finish.
After the CMS is online and functioning, you can install the passive side.
Without going through each step again, note that you can do more on the Cluster IP Address Configuration page. For example, you can choose to leave the IPv4 network option selected. You can choose to use a dynamic IP address for the CMS. You can also select an IPv6 network. If you are installing the cluster into a multiple subnet arrangement, you can choose the Second Subnet checkbox and configure the second subnet according to your configuration needs.
Installing the passive side to the clustered mailbox role is the easiest part. It’s as simple as installing a standard Mailbox server, although you select passive instead. To perform the installation on both Server 2003 and 2008, do the following:
1. Insert the DVD or mount the ISO for the Installation screen to display. Select the link from Step 4: Install Microsoft Exchange 2007 SP1 to begin the installation wizard.
2. You are taken to the Introduction screen. Click Next.
3. You are taken to the License Agreement screen, where you can scroll down and read the entire agreement if you like. Choose I Accept The Terms In The License Agreement, and then select Next.
4. You are taken to the Error Reporting screen. Here you are asked to participate in a group effort with Microsoft to determine why certain errors occur on systems. If you say Yes (Recommended), errors that occur automatically send reports to Microsoft without further permission. The other option is No. Choose an option and select Next.
5. This brings you to the Installation Type screen, where you can choose either a Typical or Custom Exchange Server installation. In this case, select Custom Exchange Server Installation.
6. From the Server Role Selection screen, select Passive Clustered Mailbox Role, and then select Next. (Note that the path you allow for the active installation files must match the path for the passive installation files.)
7. The Readiness Checks screen checks to make sure your system is ready for the installation of the server options you’ve chosen. After you are clear to move forward, choose Install.
8. The Progress screen walks you through the process of the actual installation. When complete, it takes you to the Completion screen and shows you what has been installed successfully. Click Finish.
Solution: Let’s review the interface options of the EMC and the command syntax behind the EMS.
Note from Figure 3.9 that the console layout is easy to work with. Many who have worked with System Manager in Exchange 2003 are quite pleased with the changes, which make it easier for us to locate and access those dialog boxes we need.
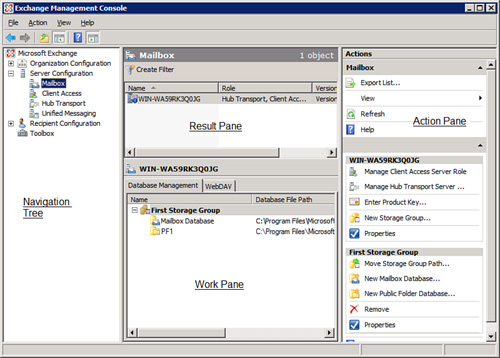
Note the Navigation Tree on the left hand side. We refer you to this tree often by instructing you to locate one of the four work centers, which include the following:
Note also the Result pane, the Work pane, and the Action pane. When being given instruction on how to locate a certain dialog or action, you are instructed to navigate the console initially, through the work centers and static containers. Then, you might need to select items in the Result or Work pane before choosing your action.
Up near the top, there is a Show/Hide Action Pane button that you can use to turn off the Action pane. At that point, you can right-click items in your other panes to see what actions are available or you can use the Action menu. You can also Show/Hide the Console Tree.
From the View menu, you can Add/Remove Columns. You can also select Customize and turn on or off various features of the console.
The EMS is not designed to confuse you or make your life harder. In fact, many situations occur where you won’t need to even consider the EMS, but for those times that you do, you’ll find that a simple line of code is going to pack a lot of power.
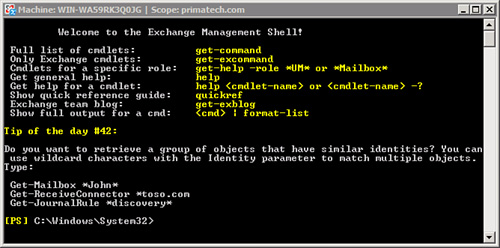
When you first open the EMS, you are presented with a Welcome, some basic commands to get you started, and a Tip of the Day (as shown in Figure 3.10).
Commands are created through verb-noun pairings called cmdlets. Consider using simple ones such as get-mailbox, move-mailbox, get-storagegroup, and so forth.
There are only 26 different verbs at your disposal, so it shouldn’t take you too long to catch on. These include the following:
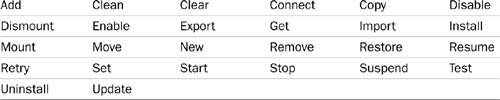
To see a full list of commands, you can type get-command at the EMS prompt. To see only the Exchange commands, you can type get-excommand. For help with any of these, you just type help and the cmdlet name. It provides you with information on the cmdlet and the parameters that go along with it to make that cmdlet more helpful. Those parameters might be -Identity, -WhatIf, -SortBy, and so on.
If you recall the verb part but not the noun, you can always type the verb and then press the Tab key. It continues to scroll through your options alphabetically until it reaches your cmdlet.
You are able to direct the output of your initial command to another command. This is called pipelining and the pipe symbol (|) is used to accomplish this. The second part of the command might process the results even further by filtering, sorting, grouping, or enabling aspects on the results of the first part of the command.
The primary goal of this section is not to overwhelm you, but is simply to get you started with PowerShell and the Exchange Management Shell. The majority of our lessons show you the EMC side to Exchange administration, but sometimes the CLI is unavoidable, as noted earlier when we performed the EdgeSync process.