Chapter 11 Configure a Unified Messaging Server
In This Chapter
![]() Envision Unified Messaging Within Your Environment
Envision Unified Messaging Within Your Environment
![]() Examine Your Hardware Needs for Unified Messaging
Examine Your Hardware Needs for Unified Messaging
![]() Configure a Unified Messaging Server
Configure a Unified Messaging Server
Solution: First, Unified Messaging in Exchange 2007 unifies voicemail and incoming faxes with your email services. It sounds easy, but consider that voicemail and faxes are typically analog services whereas email services are digital, and Exchange administrators traditionally are more aware of the digital side.
Pulling the voicemail and fax services into the digital world isn’t a new concept, but it might be new for Exchange admins. That might make you slightly nervous. Remember, though, if you already have a solution in place for voicemail and you have a telephony person or team assisting with that, they can assist you with this, too. You don’t have to become proficient at a new career. It might help, however, for you to be thoroughly familiar with the Exchange side and for you to become familiar with certain voice system terms.
On the surface, some have defined UM in Exchange as being a way to retrieve your voicemail, incoming faxes, and email all through your Inbox. That is true. It is also only a piece of the story. UM is more than just a glorified voicemail service connected to your inbox. Here is a look into some of the primary features that are provided with Unified Messaging:
![]() Outlook Voice Access (OVA)—Enables users to access their mailbox using a voice user interface (VUI), which can include a phone, cell phone, Office Communicator 2007 (or some other solution such as Skype, as long as your PBX/VOIP system allows you access to call in). Using either voice-enabled menus or touchtone, you can listen to your email (the UM Server will read the messages to you using text-to-speech capabilities), listen to your voicemail, and make a call to your personal contacts or to persons listed in the company directory. The only item you cannot voice is your PIN, which is not the same as your login to the network.
Outlook Voice Access (OVA)—Enables users to access their mailbox using a voice user interface (VUI), which can include a phone, cell phone, Office Communicator 2007 (or some other solution such as Skype, as long as your PBX/VOIP system allows you access to call in). Using either voice-enabled menus or touchtone, you can listen to your email (the UM Server will read the messages to you using text-to-speech capabilities), listen to your voicemail, and make a call to your personal contacts or to persons listed in the company directory. The only item you cannot voice is your PIN, which is not the same as your login to the network.
![]() Multiple Languages Speech-to-Text—Although OVA supports only English for voice commands coming in, there are features in UM that allow menus and speech-to-text where email can be read from the user’s mailbox in a variety of languages including English (U.S.), English (U.K.), English (Australia), French (France), French (Canada), German, Japanese, Italian, Spanish (Spain), Spanish (Mexico), Brazilian Portuguese, Korean, Mandarin (PRC), Mandarin (ROC), and Dutch. So, if you receive messages from different parts of the world, in different languages, the system will detect the language and read it to you in the correct language.
Multiple Languages Speech-to-Text—Although OVA supports only English for voice commands coming in, there are features in UM that allow menus and speech-to-text where email can be read from the user’s mailbox in a variety of languages including English (U.S.), English (U.K.), English (Australia), French (France), French (Canada), German, Japanese, Italian, Spanish (Spain), Spanish (Mexico), Brazilian Portuguese, Korean, Mandarin (PRC), Mandarin (ROC), and Dutch. So, if you receive messages from different parts of the world, in different languages, the system will detect the language and read it to you in the correct language.
![]() Calendar Management Through Phone—Through OVA, you can manage calendar appointments by accepting/declining meetings, sending notices to persons letting them know you will be late, or making calendar changes such as canceling appointments altogether.
Calendar Management Through Phone—Through OVA, you can manage calendar appointments by accepting/declining meetings, sending notices to persons letting them know you will be late, or making calendar changes such as canceling appointments altogether.
![]() Voice and Fax Messaging—Incoming voicemail or faxes are accepted by the UM Exchange Server and can be accessed through Outlook, OWA, Outlook Mobile, clients with an ActiveSync license, and OVA. Faxes come in as .tif files and are put in user’s mailboxes.
Voice and Fax Messaging—Incoming voicemail or faxes are accepted by the UM Exchange Server and can be accessed through Outlook, OWA, Outlook Mobile, clients with an ActiveSync license, and OVA. Faxes come in as .tif files and are put in user’s mailboxes.
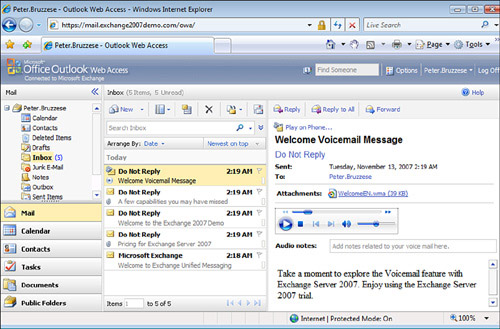
![]() Outlook and Outlook Web Access—UM extends the functionality of these Microsoft email applications in that you can retrieve your voicemail through your Inbox, as you can see from Figure 11.1. From there, you have various playback options where you can play, pause, or stop playback of a voicemail. You can also play the voicemail on a phone.
Outlook and Outlook Web Access—UM extends the functionality of these Microsoft email applications in that you can retrieve your voicemail through your Inbox, as you can see from Figure 11.1. From there, you have various playback options where you can play, pause, or stop playback of a voicemail. You can also play the voicemail on a phone.
![]() Play on Phone—When you check email and see you have a voicemail, instead of being forced to listen to it over your computer’s speakers (in the event you don’t have a headset waiting for you to plug in), you can route the voice messages to your phone. Just supply the number and it will go to your cell phone or your desk phone.
Play on Phone—When you check email and see you have a voicemail, instead of being forced to listen to it over your computer’s speakers (in the event you don’t have a headset waiting for you to plug in), you can route the voice messages to your phone. Just supply the number and it will go to your cell phone or your desk phone.
![]() Auto Attendant—This is your personal voicemail operator. You can configure this to enable for directory lookups of people within your organization, or route calls with menus such as “for technical support, please press 1.” A caller can speak to the Auto Attendant or use touchtone menus if the attendant is having a hard time understanding responses. You can even create custom greetings, holiday greetings, and more.
Auto Attendant—This is your personal voicemail operator. You can configure this to enable for directory lookups of people within your organization, or route calls with menus such as “for technical support, please press 1.” A caller can speak to the Auto Attendant or use touchtone menus if the attendant is having a hard time understanding responses. You can even create custom greetings, holiday greetings, and more.
NOTE For a full list and explanation of Unified Messaging features, visit http://www.microsoft.com/exchange/evaluation/features/unifiedmessaging.mspx. For a list of feature improvements/additions with SP1, visit http://technet.microsoft.com/en-us/library/bb691398.aspx.
So far, the features might seem worth the pain of learning new technology as an administrator. What do you really have to learn? Well, you have to grasp some of the basics of telephony from a physical standpoint—lines coming in, PBXs, Public Switched Telephone Networks (PSTNs), hunt groups, and so on. Then you need to learn the configuration aspects of UM on the Exchange server. From a positive perspective, you already know and feel comfortable with the Exchange interface, so that takes much of the stress out of the equation.
Solution: Consider the layout and equipment in Figure 11.2. The diagram shows that your company has multiple ways for users to access their mail from external sources. The method for external access to the UM server is through a PBX (through a VoIP Gateway) or an IP-PBX.

What exactly is a PBX? It stands for Private Branch Exchange. Its primary function is to allow a small number of incoming lines to be usable by however many people work within the company. So, imagine a company has five paid-for lines coming in from the phone company. However, the company might have 20 people working in the company. They share the collective bandwidth of those lines thanks to the PBX.
Although legacy PBXs are great devices, you need something more to connect to your Unified Messaging servers. You need to have a device that connects your circuit switched phone network with your IP-based packet switching network. That device is a VoIP Gateway.
However, if you don’t already have a legacy PBX, you might do well to purchase a single piece of equipment called an IP-PBX.
To find out whether your legacy PBX device, IP-PBX, or VoIP Gateway is supported by Microsoft, consult the Telephony Advisor at http://www.microsoft.com/technet/prodtechnol/exchange/telephony-advisor.mspx.
As far as the hardware involved for the UM server itself and the number of servers you need for deployment, you can install the UM role as a standalone role or with every other role, with the exceptions of the Edge Transport role or the Active and Passive mailbox roles. The actual processor and memory requirements are not that intense (one core with 2GB is the minimum; four cores with 1GB per core is recommended).
To perform the installation of the Unified Messaging server role, you perform a Custom installation (similar to what we considered in Chapter 3, “Install Exchange 2007”) and choose Unified Messaging Role from the Server Role Selection screen.
Solution: There is actually a method or pattern to the configuration process, and we are going to walk you through each set of steps. Obviously, certain choices are your decision based upon your particular environment. However, after the legacy PBX (with the IP Gateway) or the IP-PBX is functioning and the server role is installed, the next steps must be performed in the following order:
First, what is a dial plan? These are objects that are created in Active Directory. They are logical representations of an in-place telephony dial plan. If you are just testing these features, you can create whatever you like. However, if you are implementing UM in a real-world environment, you need to discuss the dial plans with your telephony administrator. Your UM server must have at least one UM dial plan to function (although in more complex environments you might have multiple dial plans in place). The whole purpose of the dial plan is to ensure that extensions are unique, which can sometimes be a problem if you have multiple PBXs.
Users within the same dial plan can call each other by using only the extension number, and each person has a unique extension within the same plan. So, for example, you might be 5-9898, and your friend in the cubicle next to you is 5-9899. Looking at it from that perspective, we can see that a user can only be part of one dial plan.
To create a dial plan, perform the following:
1. Open the Exchange Management Console (EMC).
2. From the Navigation Tree, expand the Organization Configuration work center and click Unified Messaging.
3. From the Actions pane, select New UM Dial Plan to open the wizard, shown in Figure 11.3.
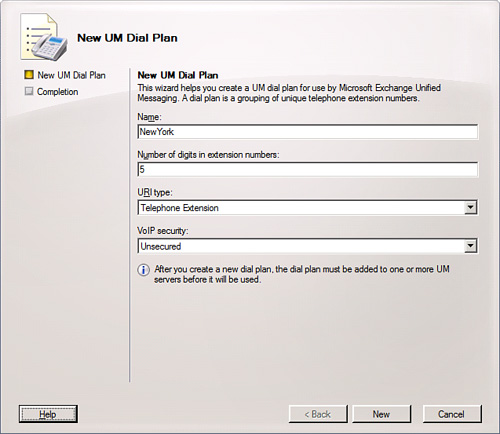
4. Provide a name for the dial plan, which might be a location, depending on how many dial plans you need to establish.
5. Enter a number in digits for the extension number.
6. Select a URI Type (Telephone Extension [default], E.164, or SIP URI) depending on your IP Gateway or IP PBX.
7. Select VoIP Security (SIP Secured, Unsecured [default], or Secured).
8. Click New.
9. When complete, click Finish.
Upon creation of the new dial plan, a UM mailbox policy is created and associated with that dial plan.
When you are asked for a URI type, this is a Uniform Resource Identifier (URI). By selecting a URI type with your dial plan, you have to ensure that your IP Gateway, IP PBX, or PBX supports the selection you make. The purpose of the URI is to enable your VoIP devices to communicate with the Unified Messaging server and services using agreed upon protocols.
When choosing VoIP security, the method you select can protect the network traffic being sent back and on to your Unified Messaging servers.
You might think creating a dial plan is simple. However, when you select the plan and go into its properties, you are presented with seven tabs to work with.
Here you can see basic information about the dial plan. Associated UM servers and IP Gateways are included. You can also select checkbox options including the following:
![]() Send a Nondelivery Report if Message Delivery Fails
Send a Nondelivery Report if Message Delivery Fails
![]() Enable Users to Receive Faxes (selected by default)
Enable Users to Receive Faxes (selected by default)
You can also select the down arrow to choose VoIP security, in the event you need to change your selection from when you originally created the dial plan.
On the Subscriber Access tab, shown in Figure 11.4, you are shown the Welcome Greetings section, where you can leave the default greeting or create a custom greeting. Select Modify and choose the .wav file to modify the greeting. This is a nice option for situations where the company president or perhaps a professional voice actor can replace the welcome for the company when someone calls in.
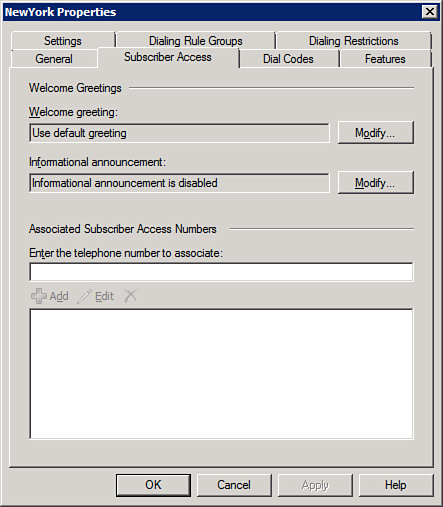
You can configure the informational announcement, which is disabled by default. This might be something that changes frequently (perhaps different promotional or informational information after the greetings that might change each month). You can select a checkbox to allow the informational announcement to be interrupted.
Under Associated Subscriber Access Numbers, you can provide a number to be associated for the OVA. You have to configure at least one number, be it an extension or external number (or SIP URI if you use an IP-PBX), so that you have OVA.
There is a section for both incoming and outgoing configuration. Options such as dialing a 9 to access an outside line, common in many company phone systems, are configurable here. You can also configure an international access code, national number prefix, and country/region code for outgoing configuration and in-country/region or international number formats for incoming configurations.
The Features tab, shown in Figure 11.5, enables you to configure important features of the dial plan. For example, there are checkboxes, turned on by default, for Allow Callers to Transfer to Users and Allow Callers to Send Voice Messages.
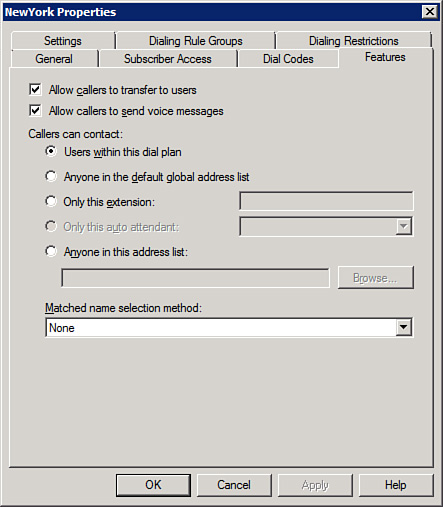
You can establish who callers can contact. For example, the default radio selection is Users Within This Dial Plan, but you can choose Anyone In the Default Global Address List; Only This Extension; Only This Auto Attendant; or Anyone In This Address List where you can browse to the address list you want to allow callers to access.
The Matched Name Selection Method field is used to differentiate people with the same names. If someone calls for Joe Smith and you have more than one, the caller can be offered the opportunity to select the person based upon their Title, Department, Location, or Alias.
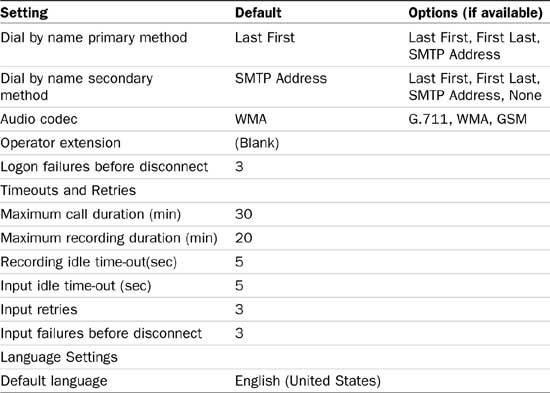
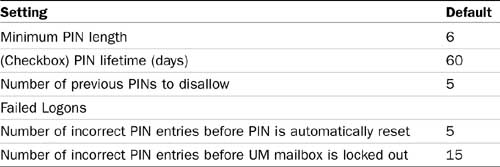
The Settings tab is filled with options for you to configure, including the ones listed in Table 11.1.
The Dialing Rule Groups tab enables you to add in-country/region rule groups or international rule groups. Essentially you can configure the rule group to determine the type of calls users can make within a group. However, after creating the group, you have to configure the mailbox policy to specifically use a rule group for policies that you will then apply to different users.
This tab enables you to configure dialing rules for those users who call in to a subscriber access number from a UM dial plan.
The Allow Calls to Users Within the Same Dial Plan checkbox is selected by default. The Allow Calls to Extensions option is deselected by default. If you enable this option, users who call in to the subscriber access number can place calls to other users who might not be UM-enabled. If disabled, they cannot place calls to users who are not UM enabled.
From there you can create allowed in-country/regional groups and allowed international rule groups by selecting the Add button and configuring the allowed groups.
Although the dial plan might represent the logical grouping of users within Active Directory, the UM IP Gateway represents the actual, physical connection between the Unified Messaging server and the physical gateway (IP-PBX or IP Gateway). UM IP Gateway creates a logical connection that links the IP Gateway device with a UM hunt group.
To create a UM IP Gateway, perform the following:
1. Open the EMC.
2. From the Navigation Tree, expand the Organization Configuration work center, and click Unified Messaging.
3. From the Actions pane, select New UM IP Gateway to open the wizard, shown in Figure 11.6.
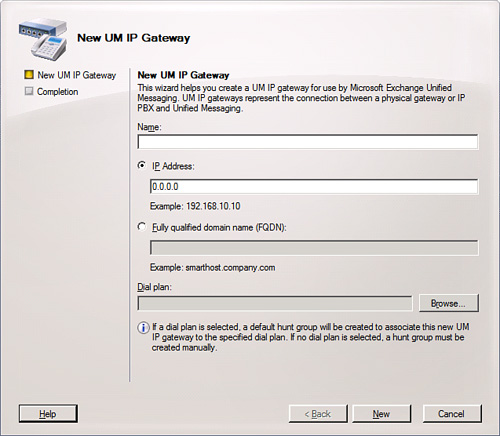
4. Provide a name for the UM IP Gateway.
5. Select the radio option to provide either of the following:
![]() IP Address
IP Address
![]() Fully Qualified Domain Name (FQDN)
Fully Qualified Domain Name (FQDN)
6. Select Browse, and choose a Dial Plan. (After a dial plan is selected, a default hunt group is created to associate this new UM IP Gateway to the specified dial plan.)
7. After the wizard is complete, select Finish.
After the UM IP Gateway is created, you can right-click the Gateway and go to the properties. The properties are the same as what we saw during the wizard creation; however, the Allow Outgoing Calls Through This UM IP Gateway is selected by default.
Beneath the UM IP Gateway, a default hunt group has been created. A hunt group represents a connection between a UM IP Gateway inbound call number and a UM dial plan. It associates that dial plan with a pilot identifier. The pilot identifier is an ID that is configured on the PBX or IP PBX. It can also be an extension number or SIP URI, depending on your IP PBX. So you might configure extension 5200 as the pilot number on the PBX. When a call comes in for that extension, it looks to see where it can deliver the call—perhaps 5201, 5202, and so on.
From a physical perspective, a hunt group is a grouping of lines. There is a group of extensions that a caller has available to him, and when he calls, he goes through the hunt group to gain access to that group of extensions. A line will usually be available if you have enough lines in your hunt group.
To create a new hunt group, perform the following:
1. Open the EMC.
2. From the Navigation Tree, expand the Organization Configuration work center and click Unified Messaging.
3. Select the UM IP Gateways tab.
4. Locate the UM IP Gateway you wish to create the hunt group in and select it.
5. From the Actions pane, select New UM Hunt Group to open the wizard.
6. Provide the name of the hunt group.
7. Select the Browse button to locate the Dial plan.
8. Type in the pilot identifier that relates to your device.
9. Click New.
10. When complete, click Finish.
With the creation of the UM dial plan, you also have a UM mailbox policy created and associated with that plan. You can create new policies, or you can configure the one you already have created.
To create a new policy, perform the following:
1. Open the EMC.
2. From the Navigation Tree, expand the Organization Configuration work center and click Unified Messaging.
3. Select UM Mailbox Policies to see the policies that currently exist.
4. From the Actions pane, select New UM Mailbox Policy to open the wizard.
5. Provide a name for the policy.
6. Then click Browse and locate the dial plan to associate the policy with.
7. Click New.
8. When complete, click Finish.
After you have the policy created, you want to access the properties of the policy to make adjustments. To do this, select the policy and from the Actions pane select Properties.
There are four tabs to work with (General, Message Text, PIN Policies, and Dialing Restrictions). The following four sections give a brief description of each tab:
Here you can alter the name of the policy and see the associated dial plan. You can also configure the maximum greeting duration (minutes) with the default set to 5 (and valid ranges being 1 to 10). This will determine the number of minutes that users have to record their greeting.
You also have a checkbox selected by default to allow missed call notifications. A missed call notification is an email sent to the user if the user didn’t answer an incoming call. If a user misses a call, she receives the voicemail a person leaves (if the person leaves one), and she receives an email that lets her know she missed a call. Sometimes this is thought to be unnecessary, so you can create a policy that turns it off for those users who don’t want it.
This enables the administrator to configure text to coincide with various events. In Figure 11.7, notice that you can include the fax identity at the top. When a sender’s fax machine sends a message, he will receive this text in return to identify the receiving system.
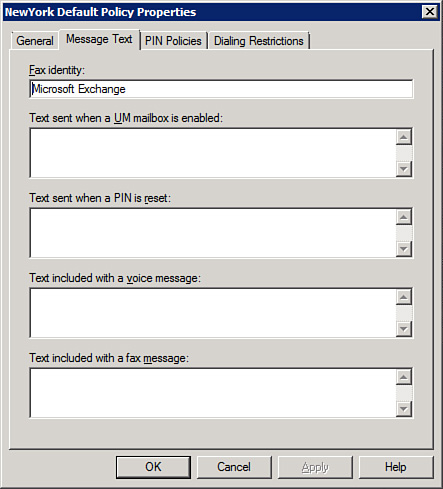
Some of the other messages you can configure include the following:
![]() Text Sent When a UM Mailbox Is Enabled
Text Sent When a UM Mailbox Is Enabled
![]() Text Sent When a PIN Is Reset
Text Sent When a PIN Is Reset
![]() Text Included With a Voice Message
Text Included With a Voice Message
![]() Text Included With a Fax Message
Text Included With a Fax Message
These settings have two checkboxes at the top that are enabled by default: Allow Calls to Users Within the Same Dial Plan and Allow Calls to Extensions.
Beyond that, you have the ability to add allowed in-country/region rule groups from the dial plan and allowed international rule groups from the dial plan. So, when we created the dial plan and configured the dialing rule groups from there, those are the rule groups we see when creating our policies and choosing the restrictions for the policies.
The Auto Attendant is helpful as a guide for users that call. Often you might find that when you call automated systems, the Auto Attendant is not helpful. The reason is that you ultimately want to speak to a human and feel the Auto Attendant is acting as a barrier to your ultimate goal. However, some situations are perfect for an automated guide.
UM is one of those situations because, if guided properly, you can accomplish the tasks of speaking to the person you want, leaving a voicemail, or of checking your voicemail, calendar, and so on.
To start, we have to create a new Auto Attendant. To do that, perform the following:
1. Open the EMC.
2. From the Navigation Tree, expand the Organization Configuration work center and click Unified Messaging.
3. Select the UM Auto Attendants to see the current attendants (the default is to have none).
4. From the Actions pane, select New UM Auto Attendant to open the wizard, shown in Figure 11.8.
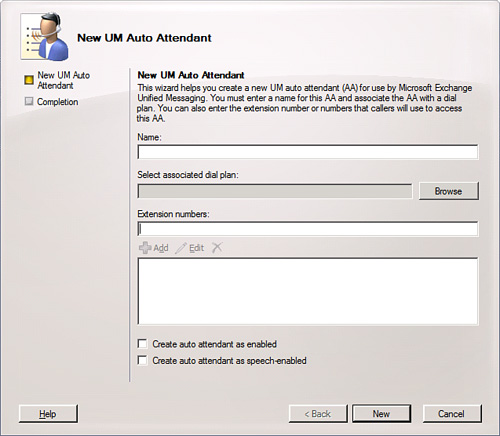
5. You are asked for a name for the Auto Attendant (AA).
6. You are asked to associate the AA with a specific dial plan.
7. You want to add the extension numbers that callers can use to reach the AA (up to 16 extensions). The number of digits for the AA doesn’t have to match the dial plan you have selected because direct calls to the AA are allowed.
8. You can select the checkbox Create Auto Attendant As Enabled to have the AA active immediately upon completion of the wizard.
9. You can select the checkbox Create Auto Attendant As Speech-enabled, which is not the default setting. Without this option, enabled users can only respond to the system or prompts with touchtone phone input. However, with it, enabled users can use voice input, too.
After you have the AA created, you can right-click it and select Properties or select it from the Actions pane. You are presented with six tabs that you can configure even further for the AA.
The General tab presents some basic information about the AA, such as the status, associated dial plan, and last time modified.
You can configure the extension numbers to associate with the AA here if you didn’t do so during its creation or you can add, edit, or remove extensions.
The option to speech-enable the AA is on this tab, and you can turn that on or off.
There is also an option to use the DTMF fallback AA. DTMF stands for dual tone multi-frequency and can be used only if the Speech-enable checkbox is selected. A DTMF AA is used when the AA cannot understand the speech being used. The DTMF doesn’t work from speech navigation but requires keypad input. It is recommended that you use either a DTMF fallback or include an operator extension so that the person calling has the ability to navigate the system with something other than voice (in case she has difficulty with voice automated systems).
Here we see that we can create a variety of greetings for our attendant to use. As you can see in Figure 11.9, you configure greetings for business hours and nonbusiness hours. You can add an information announcement.
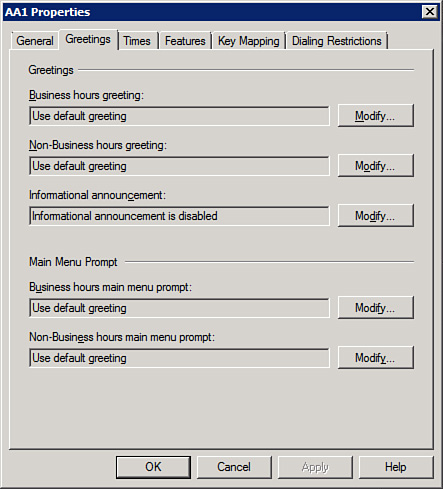
You can also configure the main menu prompt information for both business and nonbusiness hours. The main menu prompt is actually your list of options for users to choose to get started. For example, the prompt might say, “For Sales press or say 1.”
You might have noticed in the Greetings tab that there are business and nonbusiness hours. The Times tab enables you to establish the company business/nonbusiness hours. You can configure your time zone.
You can also configure the holidays that your company recognizes so that the system knows which days are not workdays (although ordinarily they would be). During the process of adding holiday dates, you can also include specific greetings for each holiday so that you can provide instructions on the number of days your company might be closed or simply provide a holiday greeting.
The Features tab, shown in Figure 11.10, includes features we’ve addressed for users, but this is from the perspective of the AA and persons calling in from the outside.
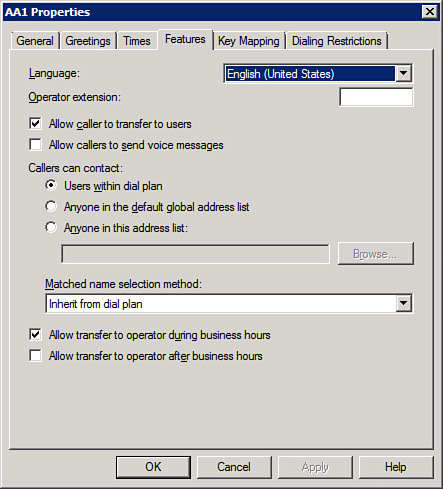
You can choose the language the caller hears when contacting the AA for this dial plan. By default, if you installed the English version of Exchange, the English language setting is chosen. However, you can go to the Microsoft website and download additional Unified Messaging language packs for Exchange Server 2007. Although every language is not available, there are many to choose from.
You can input an operator extension, which is used to connect a caller to an actual operator or perhaps a UM-enabled mailbox to leave a voicemail.
You can select the following checkboxes:
![]() Allow Caller to Transfer to Users—Enables users in the dial plan to transfer calls to other users in the same dial plan. After you select this, you can configure the section callers can contact.
Allow Caller to Transfer to Users—Enables users in the dial plan to transfer calls to other users in the same dial plan. After you select this, you can configure the section callers can contact.
![]() Allow Callers to Send Voice Messages—Enables callers to send voice messages to users.
Allow Callers to Send Voice Messages—Enables callers to send voice messages to users.
In the Callers Can Contact section, you can configure the caller to be able to connect with users within the dial plan, anyone in the default global address list, or anyone in this address list, where you have to browse for the address list of your choice. The matched name selection method can be inherited from the dial plan, or you can configure the method to include the Title, Department, Location, Alias, or None.
You can also configure the caller to allow transfer to operator during business hours or allow transfer to operator after business hours.
You can select the Enable Business Hours Key Mapping and the Enable Non-business Hours Key Mapping checkboxes. Here you can provide the connections for when users type or say a response. For example, if they press or say 1, they are sent to the extensions you provide. You might have one extension set for business hours and one set for nonbusiness hours.
If you click the Add button, you can see the Key Mapping Entry options (shown in Figure 11.11). From here you can determine what key must be pressed or expression said (and you can configure multiple phrases to ensure the system understands the response). Next, you configure the action that will occur. Perhaps you want an audio file to play (in the event it is nonbusiness hours), and sometimes you want the person transferred to another extension or another AA that is configured for that selection to handle additional choices.

NOTE You might connect with a primary AA that presents you with a group of options from which to choose. You make your selection, but now you are dealing with a different department and different options for you to choose. The way to accomplish this is to have your first AA pass you off to another AA that might be defined for Sales, Research, and so on. That AA might pass you off to still another AA until you narrow down for what or who you are looking.
This tab enables you to select the checkboxes Allow Calls to Users Within the Same Dial Plan or Allow Calls to Extensions. Then you can configure for the AA the incountry/region rule groups or international rule groups, which were already created for the dial group. You are just selecting the ones that apply to the AA.
Solution: To enable a user’s mailbox with Unified Messaging, perform the following:
1. Open the EMC.
2. From the Navigation Tree, expand the Recipient Configuration work center.
3. Select the user mailbox.
4. From the Actions pane, select the Enable Unified Messaging link to open the wizard.
5. On the Introduction screen, shown in Figure 11.12, you have to start by selecting a policy. Click Browse and locate the policy you want to apply to the mailbox.
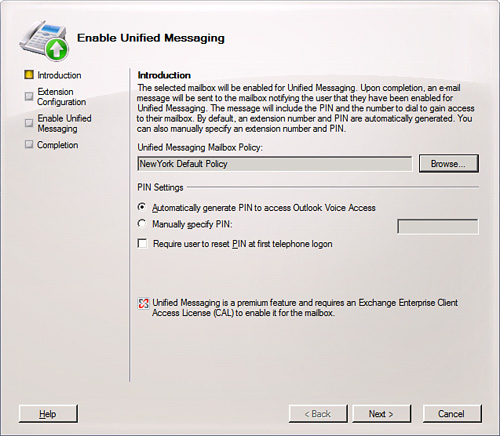
6. Under PIN Settings, you can choose the following:
![]() Automatically Generate PIN to Access Outlook Voice Access (the default)
Automatically Generate PIN to Access Outlook Voice Access (the default)
![]() Manually Specify PIN (and then indicate the PIN)
Manually Specify PIN (and then indicate the PIN)
![]() Require the User to Reset PIN at First Telephone Logon
Require the User to Reset PIN at First Telephone Logon
7. When you are done, click Next.
8. From the Extension Configuration options, you can provide the following information:
![]() Automatically Generated Mailbox Extension—This is grayed out unless you have the Business field on the Address and Phone tab of the user’s properties in the EMC populated with a number or the Telephone Number field on the General tab of the user account in the AD Users and Computers. This option is for a Telephone Extension plan, but not available if you have an SIP URI or E.164 dial plan.
Automatically Generated Mailbox Extension—This is grayed out unless you have the Business field on the Address and Phone tab of the user’s properties in the EMC populated with a number or the Telephone Number field on the General tab of the user account in the AD Users and Computers. This option is for a Telephone Extension plan, but not available if you have an SIP URI or E.164 dial plan.
![]() Manually Entered Mailbox Extension—With E.164 or SIP, you can provide the extension for the users manually. It must match the number of digits you specify for the dial plan itself.
Manually Entered Mailbox Extension—With E.164 or SIP, you can provide the extension for the users manually. It must match the number of digits you specify for the dial plan itself.
![]() SIP Resource Identifier—Here you can choose Automatically-Generated SIP Resource Identifier or Manually Entered SIP or E.164 Address.
SIP Resource Identifier—Here you can choose Automatically-Generated SIP Resource Identifier or Manually Entered SIP or E.164 Address.
9. When the settings are configured, click Next.
10. Review your Configuration Summary, and click Enable if everything checks out fine.
11. When complete, click Finish.
NOTE There is a note within the wizard that reminds us that UM is a premium feature and requires an Exchange Enterprise Client Access License (CAL) to enable it for the mailbox.
PS NOTE The cmdlet in the EMS to enable UM for a user’s mailbox is Enable-UMMailbox, but there are lots of different parameters involved. The easiest solution to perform bulk UM enabling is to use the EMC Wizard to enable one user with the proper configuration settings and then when the command completes, click Ctrl+C to copy the exact PowerShell command. Then you can use that (with some tweaks) to enable UM on multiple users.
After a user is enabled, you can enter the user’s Properties and locate the Mailbox Features tab. From here you can select the Unified Messaging option and select the Properties button. This takes you to some of the properties that you can change, as you can see in Figure 11.13.
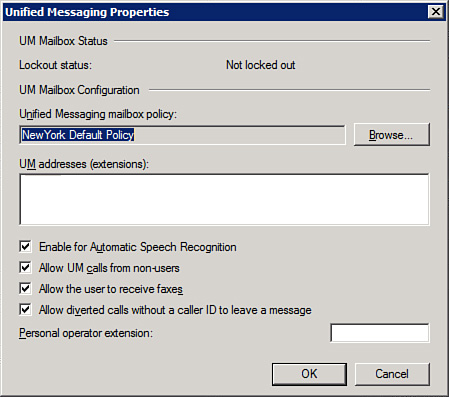
You can change the mailbox policy and UM address (extensions). You can also select or deselect the following checkboxes
![]() Enable for Automatic Speech Recognition
Enable for Automatic Speech Recognition
![]() Allow UM Calls from Non-users
Allow UM Calls from Non-users
![]() Allow the User to Receive Faxes
Allow the User to Receive Faxes
![]() Allow Diverted Calls Without a Caller ID to Leave a Message
Allow Diverted Calls Without a Caller ID to Leave a Message
You can also provide a personal operator extension.
Solution: That is an interesting question because the truth is that you are expected to establish and configure the logical structure of all of this without really understanding the underlying physical structure first. That is a hard thing to mentally put together. Let’s see if we can break this down, now that you know all the steps and pieces.
From the physical perspective, we have a PSTN. Imagine this as the equivalent to the Internet (which is an IP-based packet-switched network), but it is a circuit-switched telephone network. Put simply: two different types of networks.
There are lines you pay for from the phone company that are coming into your network. Now, you might have a fancy IP-oriented network in place, but let’s assume you have lines coming in, typically called trunk lines. The trunk lines connect to a PBX (or IP-PBX). The PBX takes the trunk lines and splits them into extensions that connect to individual phones that typically sit on a user’s desk. The idea is to have fewer trunk lines than extensions (hoping all users in the company don’t pick up their phones at the same time to make a call). This is where the hunt group concept comes from. A hunt group is a method that distributes calls from a person through an available line. The system hunts for an available line.
So you have this PBX with lines coming in, and you have extensions coming out that go to fax machines and phones and other devices. To get the PBX to communicate with your IP-based network, you need an IP Gateway. Or, perhaps you have an IP PBX, which enables you to connect your network with a PSTN and provide VoIP capabilities.
Physically, you have the connectivity and the devices. However, there must be protocols underneath all this that enable it all to work. This is where you start hearing terms like SIP (Session Initiation Protocol).
After you have your telephony folks come in and you have your PSTN all set, your PBX (with IP Gateway) or IP PBX all set up (which includes hunt groups configured and so on), you are now ready to install and configure the UM server.
Most of your UM configuration is the creation of logical objects that relate to and control the interaction with all of the physical objects we were just discussing.
So, imagine a dial plan as a logical grouping in Active Directory for your AAs under that plan, your mailbox policies under that plan, and your users. These are connected to UM gateways, which are logical representations of hunt groups that connect to real hunt groups off your PBXs.
Essentially, after you have the physical and logical pieces in place, there will be calls made. The numbers and extensions are all part of the configuration and take some planning on your part; this isn’t all automatic. Calls coming into the system or going from one user to another within the system will relate to voicemail, fax, OVA, Play on Phone, and the AA calls. All these will need to be configured and tested to ensure you have it all working properly.
NOTE One of the best parts to this entire discussion, unless you decide to become a UM-only Exchange Admin, is that you only have to know your system for your particular environment. The protocols in use, the extensions, and so on will be an investigation and discussion with your telephony team. However, in the end, after you document and configure the UM services, you won’t have to deal with all this on a daily basis.