
![]()
SportsStore: Preparation
In this chapter, I set the foundations for a more realistic project that incorporates all of the key aspects of Web API development and shows them working together. Later chapters zoom into specific features, which is a good way of getting into the detail, but it doesn’t provide any end-to-end context.
My application, called SportsStore, will follow the classic approach taken by online stores everywhere. I will create an online product catalog that customers can browse by category and page, a shopping cart where users can add and remove products, and a checkout where customers can enter their shipping details. I will also create an administration area that includes create, read, update, and delete (CRUD) facilities for managing the catalog, and I will protect it so that only logged-in administrators can make changes.
In this chapter, I create the database that contains the product information and configure the ASP.NET identity system so that I can restrict access to administrators in Chapter 6.
If you have read my other books—including Pro ASP.NET MVC 5 and Pro AngularJS—then you will have seen different versions of the SportsStore application. I use it in many of my books to show how key features and functions fit together and to demonstrate different technologies and to show how different development frameworks and toolkits can be used to solve common problems, such as database access and user security.
![]() Note The goal of the SportsStore project is to show a more realistic use of Web API, rather than accurately re-creating all of the aspects of an online store—many of which have nothing to do with HTTP web services at all. To that end, I use a simple product database and don’t address details such as card payments or order tracking.
Note The goal of the SportsStore project is to show a more realistic use of Web API, rather than accurately re-creating all of the aspects of an online store—many of which have nothing to do with HTTP web services at all. To that end, I use a simple product database and don’t address details such as card payments or order tracking.
This chapter is all preparation, and I don’t describe any Web API features. If you are already familiar with how Entity Framework Code First and ASP.NET Identity are set up and configured, you can skip to Chapter 6.
![]() Tip You don’t have to re-create the code yourself; you can download Visual Studio projects organized for every chapter in this book without charge from Apress.com.
Tip You don’t have to re-create the code yourself; you can download Visual Studio projects organized for every chapter in this book without charge from Apress.com.
Preparing the Example Project
To begin the process of creating the SportsStore application, I need to create the Visual Studio project and use NuGet to add the packages that I will rely on.
Select New Project from the File menu to open the New Project dialog window. Navigate through the Templates section to select the Visual C# ![]() Web
Web ![]() ASP.NET Web Application template and set the name of the project to SportsStore, as shown in Figure 5-1.
ASP.NET Web Application template and set the name of the project to SportsStore, as shown in Figure 5-1.
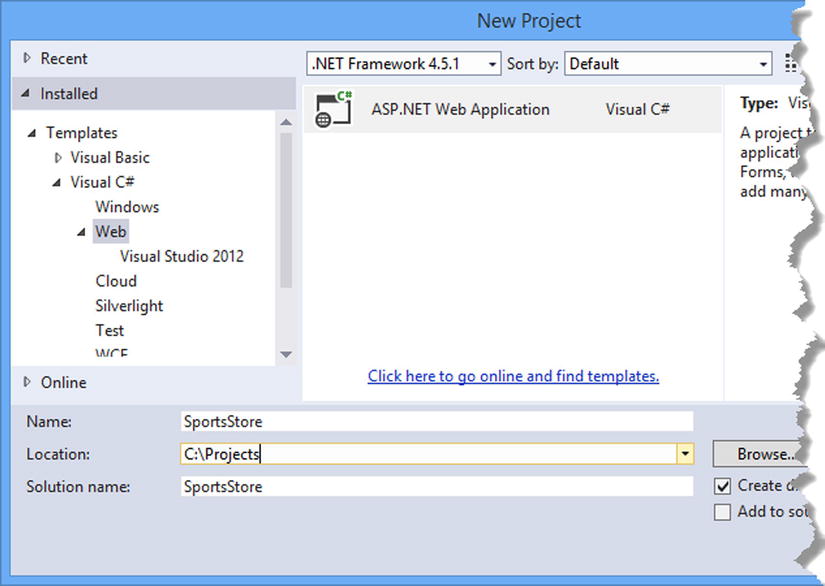
Figure 5-1. Creating the new project
Click the OK button to move to the New ASP.NET Project dialog window. Ensure that the Empty option is selected and check the MVC and Web API options, as shown in Figure 5-2. Click the OK button, and Visual Studio will create a new project called SportsStore.
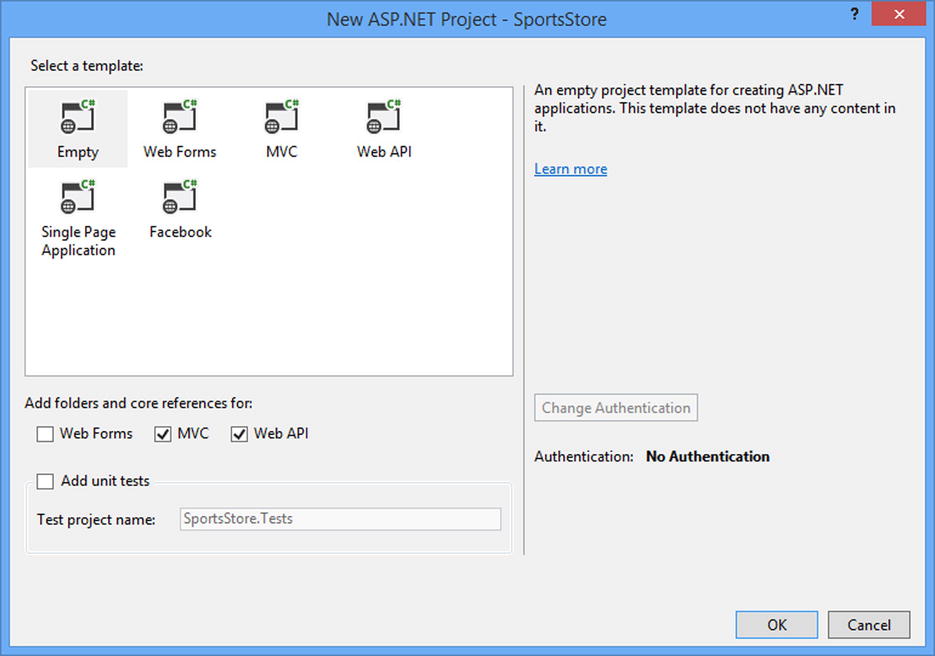
Figure 5-2. Selecting the ASP.NET project type
At this point, the Solution Explorer will have the basic folder structure for a web application, as illustrated by Figure 5-3, and it will soon become populated as I build out the foundations for the application.
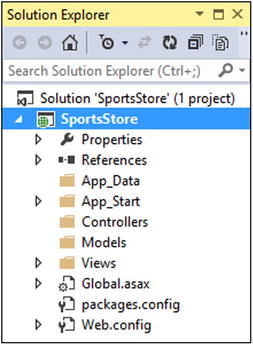
Figure 5-3. The Solution Explorer
Adding and Updating NuGet Packages
I am going to be working with specific versions of NuGet packages in this book to make sure you are able to re-create the examples and get the same results. This means the versions of the MVC and Web API that are added to projects by Visual Studio may not be the latest versions available, but it does mean that you will be able to follow all of the examples in the book without getting caught up in problems caused by minor version changes.
Select Package Manager Console from the Visual Studio Tools ![]() NuGet Package Manager menu and enter the following commands:
NuGet Package Manager menu and enter the following commands:
Update-Package Microsoft.Aspnet.Mvc -version 5.1.1
Update-Package Microsoft.Aspnet.Webapi -version 5.1.1
Update-Package Newtonsoft.Json -version 6.0.1
Install-Package Microsoft.AspNet.Identity.EntityFramework –Version 2.0.0
Install-Package Microsoft.AspNet.Identity.OWIN -Version 2.0.0
Install-Package Microsoft.Owin.Host.SystemWeb -Version 2.1.0
Install-Package Microsoft.AspNet.WebApi.Owin -Version 5.1.1
Install-Package jquery -version 2.1.0
Install-Package bootstrap -version 3.1.1
Install-Package knockoutjs –version 3.1.0
There are a lot of packages to add, and I describe what each of them does in Table 5-1.
Table 5-1. The Packages Required to Prepare for SportsStore
Name | Description |
|---|---|
Microsoft.Aspnet.Mvc | This package contains the MVC framework classes, which I will use for the HTML parts of the SportsStore application. |
Microsoft.Aspnet.Webapi | This package contains the Web API classes, which I will use to create HTTP web services. |
Newtonsoft.Json | This package contains classes used to serialize and deserialize JSON data. I describe the JSON serialization process in detail in Chapter 13. |
Microsoft.AspNet.Identity.EntityFramework | This package contains the Entity Framework support required for ASP.NET Identity, which I use for user management. |
Microsoft.AspNet.Identity.OWIN | This package contains the OWIN support required for ASP.NET Identity, which I use for user management. I describe OWIN and the hosting options it supports in Chapter 26. |
Microsoft.Owin.Host.SystemWeb | This package contains the OWIN support required for ASP.NET Identity, which I use for user management. I describe OWIN and the hosting options it supports in Chapter 26. |
Microsoft.AspNet.WebApi.Owin | This package contains the OWIN support required for Web API. I describe OWIN and the hosting options it supports in Chapter 26. |
jquery | This package contains the jQuery library, which I use to send Ajax requests from the browser. I described the jQuery support for Ajax in Chapter 3. |
bootstrap | This package contains the Bootstrap library, which I use to style HTML content. |
knockoutjs | This package contains the Knockout package, which I use to create a dynamic client-side application. I described the basic Knockout functionality in Chapter 3. |
You can create applications that consist of just web services created with Web API, in which case you would not need many of the packages that I have listed in the table. But Web API is rarely used in isolation, and most applications need to create a client, deliver HTML and JavaScript content, and apply some sort of security. As you will see, creating web services with Web API is relatively simple; it is the integration of those web services into a wider application that takes time, skill, and effort.
Creating a Prep Controller
I need to test the preparations that I made for the SportsStore application. I don’t want to get into Web API itself prematurely, so I am going to use a simple MVC framework controller to generate some basic diagnostic web pages. I right-clicked the Controllers folder, selected Add ![]() Controller, picked the MVC 5 Controller – Empty template, and clicked the Add button. I set the controller name to PrepController in the Add Controller dialog box and clicked the Add button, which caused Visual Studio to create the Controllers/PrepController.cs class file, the contents of which are shown in Listing 5-1.
Controller, picked the MVC 5 Controller – Empty template, and clicked the Add button. I set the controller name to PrepController in the Add Controller dialog box and clicked the Add button, which caused Visual Studio to create the Controllers/PrepController.cs class file, the contents of which are shown in Listing 5-1.
Listing 5-1. The Contents of the PrepController.cs File
using System;
using System.Collections.Generic;
using System.Linq;
using System.Web;
using System.Web.Mvc;

namespace SportsStore.Controllers {

    public class PrepController : Controller {

        public ActionResult Index() {
            return View();
        }
    }
}
This is the default content, as created by Visual Studio, but I will add action methods (and views for them to render) as I build out the foundation for the SportsStore application.
Creating a Razor Layout
Although this book is about Web API, I use the MVC framework to generate the HTML content that creates the browser-based client. To make sure I generate consistent HTML that contains all the JavaScript files I need, I created the Views/Shared folder and added a file called _Layout.cshtml to it, which I then used to create the layout shown in Listing 5-2. I will use this layout for the views I create throughout the SportsStore application.
Listing 5-2. The Content of the _Layout.cshtml File
<!DOCTYPE html>
<html>
<head>
    <meta name="viewport" content="width=device-width" />
    <script src="~/Scripts/jquery-2.1.0.min.js"></script>
    <script src="~/Scripts/knockout-3.1.0.js"></script>
    <link href="~/Content/bootstrap.css" rel="stylesheet" />
    <link href="~/Content/bootstrap-theme.css" rel="stylesheet" />
    <title>SportsStore</title>
    <style>
        body { padding-top: 10px; }
    </style>
    @RenderSection("Scripts", false)
</head>
<body class="container">
    @RenderBody()
</body>
</html>
![]() Tip The easiest way to create the view is to add the Views/Shared folder, right-click it, and select Add
Tip The easiest way to create the view is to add the Views/Shared folder, right-click it, and select Add ![]() MVC 5 Layout Page (Razor). Enter _Layout.cshtml as the file name and click the OK button, and Visual Studio will create and open the layout file.
MVC 5 Layout Page (Razor). Enter _Layout.cshtml as the file name and click the OK button, and Visual Studio will create and open the layout file.
Creating the OWIN Startup Class
The ASP.NET Identity packages look for a configuration class when the application starts. I will explain the role of this class in the “Configuring ASP.NET Identity” section, but I am going to define it here so that the SportsStore application will start without errors even though I won’t be setting up user accounts immediately. Listing 5-3 shows the content of the IdentityConfig.cs file, which I added to the App_Start folder.
Listing 5-3. The Contents of the IdentityConfig.cs File
using Microsoft.Owin;
using Owin;

[assembly: OwinStartup(typeof(SportsStore.IdentityConfig))]

namespace SportsStore {
    public class IdentityConfig {
        public void Configuration(IAppBuilder app) {}
    }
}
The important part of this file is the OwinStartup attribute, which specifies that the SportsStore.IdentityConfig class should be used for configuration. I’ll return to this class when I configure ASP.NET Identity later in the chapter.
![]() Tip When Visual Studio adds the outline for the class to the new file, it sets the namespace to SportsStore.App_Start, reflecting the location of the file. The convention is to define configuration classes in the top-level namespace of the project, which is why I changed the namespace to SportsStore.
Tip When Visual Studio adds the outline for the class to the new file, it sets the namespace to SportsStore.App_Start, reflecting the location of the file. The convention is to define configuration classes in the top-level namespace of the project, which is why I changed the namespace to SportsStore.
I will be building the web services part of the SportsStore application before I create an HTML/JavaScript client, and that means I will have to test URLs directly using the browser and the Postman tool. To make life easier, I am going to change the TCP port that the IIS Express server uses to listen to requests to a value that is easy to remember. IIS Express is a cut-down version of the Internet Information Services (IIS) product that is traditionally used to host ASP.NET applications and is included with Visual Studio so you can run and test applications during development.
![]() Tip IIS is no longer the only choice for deploying ASP.NET applications. In Chapter 8, I demonstrate how to deploy the SportsStore application to the Microsoft Azure cloud service, and in Chapter 26, I describe one additional hosting option for Web API applications.
Tip IIS is no longer the only choice for deploying ASP.NET applications. In Chapter 8, I demonstrate how to deploy the SportsStore application to the Microsoft Azure cloud service, and in Chapter 26, I describe one additional hosting option for Web API applications.
Select SportsStore Properties from the Visual Studio Project menu and click the Web button on the left side of the screen. In the Servers section, change the Project Url value as follows:
http://localhost:6100
Click the Create Virtual Directory button and close the settings document. IIS Express will listen for HTTP requests on port 6100 when the application is running.
Creating the Product and Order Models
At the heart of the SportsStore application is the database that stores details of the products that are available for sale and the orders that have been placed. Web API relies on model classes in just the same way as the MVC framework, and the model classes I create in this chapter will be used by both frameworks.
The glue that will connect the model classes to the database is the Entity Framework (EF), and I will create the database by using the Code First feature, which uses model objects to create the database schema. In the sections that follow, I’ll create the model classes and use EF Code First to set up the database.
Defining the Model Classes
My starting point is to define the model class that I will use to represent each product. I added a class file called Product.cs to the Models folder and used it to define the class shown in Listing 5-4.
Listing 5-4. The Contents of the Product.cs File
namespace SportsStore.Models {

    public class Product {
        public int Id { get; set; }
        public string Name { get; set; }
        public string Description { get; set; }
        public decimal Price { get; set; }
        public string Category { get; set; }
    }
}
This is a simple class that describes a basic description of a product. A real online store would have a more complex product model, of course, but the Product class shown in Listing 5-4 is sufficient for this book because I don’t need to get into the details of suppliers, inventory levels, returns, and all of the other issues that would have to be addressed for a real business.
I am also going to store orders that customers place. Listing 5-5 shows the contents of the Order.cs file, which I added to the Models folder.
Listing 5-5. The Contents of the Order.cs File
using System.Collections.Generic;

namespace SportsStore.Models {
    public class Order {

        public int Id { get; set; }
        public string Customer { get; set; }
        public decimal TotalCost { get; set; }
        public ICollection<OrderLine> Lines { get; set; }
    }

    public class OrderLine {
        public int Id { get; set; }
        public int Count { get; set; }

        public int ProductId { get; set; }
        public int OrderId { get; set; }

        public Product Product { get; set; }
        public Order Order { get; set; }
    }
}
The Order class defines Id, Customer, and TotalCost properties, which are simple types. The Lines property is an ICollection<OrderLine> object, which is a signal to the Entity Framework that there is a relationship between the Order and OrderLine classes. I will use the OrderLine class to represent an individual product selection, and the way I have defined the OrderLine class allows me to take advantage of some clever EF Code First features.
EF Code First will recognize that these two properties are to be used as foreign keys to reference Product and Order objects:
...
public int ProductId { get; set; }
public int OrderId { get; set; }
...
EF will recognize these as navigation properties:
...
public Product Product { get; set; }
public Order Order { get; set; }
...
Navigation properties allow for navigation around the data model without having to request separate objects from the database. I’ll configure their use when I create the classes that will manage the database in the next section.
Creating the Repository Classes
The repository pattern allows the complexity of how model objects are stored and retrieved to be isolated from the rest of the application. In the sections that follow, I will define the interface that describes the repository, create the database implementation classes, and then use them to define a repository class that implements the interface.
![]() Caution These classes are interdependent, and you won’t be able to compile and run the project until you have created all of them.
Caution These classes are interdependent, and you won’t be able to compile and run the project until you have created all of them.
Defining the Repository Interface
Listing 5-6 shows the contents of the IRepository.cs file, which I added to the Models folder and used to define a repository interface. This is the interface that I will implement shortly to provide access to data through the Entity Framework.
Listing 5-6. The Contents of the IRepository.cs File
using System.Collections.Generic;
using System.Threading.Tasks;

namespace SportsStore.Models {

    public interface IRepository {

        IEnumerable<Product> Products { get; }
        Task<int> SaveProductAsync(Product product);
        Task<Product> DeleteProductAsync(int productID);

        IEnumerable<Order> Orders { get; }
        Task<int> SaveOrderAsync(Order order);
        Task<Order> DeleteOrderAsync(int orderID);
    }
}
The Products and Orders properties provide access to all of the Product and Order objects in the repository, and the methods that I have defined—SaveProductAsync, DeleteProductAsync, SaveOrderAsync, and DeleteOrderAsync—will allow me to store and remove objects from the model.
Creating the Database Context and Initializer Classes
The database context class provides the link between the application and the database, and the initializer specifies when the schema will be created and provides the initial data added to the database when it is created. Listing 5-7 shows the contents of the ProductDbContext.cs file, which I added to the Models folder.
Listing 5-7. The Contents of the ProductDbContext.cs File
using System;
using System.Collections.Generic;
using System.Data.Entity;
using System.Linq;
using System.Web;

namespace SportsStore.Models {

    public class ProductDbContext : DbContext {

        public ProductDbContext() : base("SportsStoreDb") {
            Database.SetInitializer<ProductDbContext>(new ProductDbInitializer());
        }

        public DbSet<Product> Products { get; set; }
        public DbSet<Order> Orders { get; set; }
        public DbSet<OrderLine> OrderLines { get; set; }
    }
}
The ProductDbContext class is derived from DbContext, which is the Entity Framework class that does all the heavy lifting in accessing the database and translating C# model objects to and from SQL rows. The Products, Orders, and OrderLines properties return strongly typed DbSet objects, which provide access to the data in the database, expressed as a collection of model objects.
The constructor for the ProductDbContext class calls the base constructor, like this:
...
public ProductDbContext() : base("SportsStoreDb") {
...
The argument passed to the base constructor is the name of the connection string that is used to create the database. As you will see, when using EF Code First, I don’t have to create a connection string in the Web.config file, but the name I have specified—SportsStoreDb—will be important when I deploy the application in Chapter 8.
Within the constructor, I register the initializer class, as follows:
...
public ProductDbContext() : base("SportsStoreDb") {
    Database.SetInitializer<ProductDbContext>(new ProductDbInitializer());
}
...
This statement specifies that the ProductDbInitializer class will be used to initialize the database. To create the initializer, I added a ProductDbInitializer.cs file to the Models folder and defined the class shown in Listing 5-8.
Listing 5-8. The Contents of the ProductDbInitializer.cs File
using System.Collections.Generic;
using System.Data.Entity;

namespace SportsStore.Models {

    public class ProductDbInitializer : DropCreateDatabaseAlways<ProductDbContext> {

        protected override void Seed(ProductDbContext context) {

            new List<Product> {
                new Product() { Name = "Kayak", Description = "A boat for one person",
                    Category = "Watersports", Price = 275m },
                new Product() { Name = "Lifejacket",
                    Description = "Protective and fashionable",
                    Category = "Watersports", Price = 48.95m },
                new Product() { Name = "Soccer Ball",
                    Description = "FIFA-approved size and weight",
                    Category = "Soccer", Price = 19.50m },
                new Product() {
                    Name = "Corner Flags",
                    Description = "Give your playing field a professional touch",
                    Category = "Soccer", Price = 34.95m },
                new Product() { Name = "Stadium",
                    Description = "Flat-packed 35,000-seat stadium",
                    Category = "Soccer", Price = 79500m },
                new Product() { Name = "Thinking Cap",
                    Description = "Improve your brain efficiency by 75%",
                    Category = "Chess", Price = 16m },
                new Product() { Name = "Unsteady Chair",
                    Description = "Secretly give your opponent a disadvantage",
                    Category = "Chess", Price = 29.95m },
                new Product() { Name = "Human Chess Board",
                    Description = "A fun game for the family",
                    Category = "Chess", Price = 75m },
                new Product() { Name = "Bling-Bling King",
                    Description = "Gold-plated, diamond-studded King",
                    Category = "Chess", Price = 1200m },
            }.ForEach(product => context.Products.Add(product));

            context.SaveChanges();

            new List<Order> {
                new Order() { Customer = "Alice Smith", TotalCost = 68.45m,
                    Lines = new List<OrderLine> {
                        new OrderLine() { ProductId = 2, Count = 2},
                        new OrderLine() { ProductId = 3, Count = 1},
                    }},
                new Order() { Customer = "Peter Jones", TotalCost = 79791m,
                    Lines = new List<OrderLine> {
                        new OrderLine() { ProductId = 5, Count = 1},
                        new OrderLine() { ProductId = 6, Count = 3},
                        new OrderLine() { ProductId = 1, Count = 3},
                   }}
            }.ForEach(order => context.Orders.Add(order));

            context.SaveChanges();
        }
    }
}
Database initializers are derived from one of three base classes, which determine when the database contents are dropped and the schema is re-created. Table 5-2 describes the classes available, where T is the type of the database context class, which is ProductDbContext for the SportsStore application.
Table 5-2. The Database Initializer Base Classes
Name | Description |
|---|---|
DropCreateDatabaseAlways<T> | The database is dropped and re-created every time the database context is initialized. |
DropCreateDatabaseIfModelChanges<T> | The database is dropped and re-created when any of the model classes are changed. |
CreateDatabaseIfNotExists<T> | The database is created only if it does not already exist. |
I have used the DropCreateDatabaseAlways<T> base class, which means that the SportsStore database will be dropped and re-created every time the application starts. This is useful during the early stages of development because it allows me to make changes to the contents of the database and then reset them by simply restarting the application. I will change the base class for the initializer before I deploy the application in Chapter 8.
![]() Caution Do not deploy an application using the DropCreateDatabaseAlways class because all of your data will be lost each time the application is restarted.
Caution Do not deploy an application using the DropCreateDatabaseAlways class because all of your data will be lost each time the application is restarted.
I want to populate the database when it is created with some useful data, which I do by overriding the Seed method. I create a set of Product, Order, and OrderList objects and store them in the database using the ProductDbContext argument. Since my database will be reset each time, having some default data helps in the early stages of development, where I like to write small amounts of code and test their effect.
Defining the Repository Class
The final step in creating the repository is to create the repository class, which will implement the IRepository interface and use the Entity Framework context classes to provide the application with data. Listing 5-9 shows the contents of the ProductRepository.cs file, which I added to the Models folder.
Listing 5-9. The Contents of the ProductRepository.cs File
using System.Collections.Generic;
using System.Threading.Tasks;

namespace SportsStore.Models {

    public class ProductRepository : IRepository {
        private ProductDbContext context = new ProductDbContext();


        public IEnumerable<Product> Products {
            get { return context.Products; }
        }

        public async Task<int> SaveProductAsync(Product product) {
            if (product.Id == 0) {
                context.Products.Add(product);
            } else {
                Product dbEntry = context.Products.Find(product.Id);
                if (dbEntry != null) {
                    dbEntry.Name = product.Name;
                    dbEntry.Description = product.Description;
                    dbEntry.Price = product.Price;
                    dbEntry.Category = product.Category;
                }
            }
            return await context.SaveChangesAsync();
        }

        public async Task<Product> DeleteProductAsync(int productID) {
            Product dbEntry = context.Products.Find(productID);
            if (dbEntry != null) {
                context.Products.Remove(dbEntry);
            }
            await context.SaveChangesAsync();
            return dbEntry;
        }

        public IEnumerable<Order> Orders {
            get { return context.Orders.Include("Lines").Include("Lines.Product"); }
        }

        public async Task<int> SaveOrderAsync(Order order) {
            if (order.Id == 0) {
                context.Orders.Add(order);
            }
            return await context.SaveChangesAsync();
        }

        public async Task<Order> DeleteOrderAsync(int orderID) {
            Order dbEntry = context.Orders.Find(orderID);
            if (dbEntry != null) {
                context.Orders.Remove(dbEntry);
            }
            await context.SaveChangesAsync();
            return dbEntry;
        }
    }
}
This is the class that controllers will call to retrieve model data and store new objects in the database. The Products and Orders properties return a collection of model objects from the database context and the implementations of the SaveProductAsync, DeleteProductAsync, SaveOrderAsync, and DeleteOrderAsync methods use the database context to modify the data store.
![]() Note I have added support for modifying and saving Product objects, but only for saving Order objects; I am not going to allow SportsStore orders to be modified once they are saved.
Note I have added support for modifying and saving Product objects, but only for saving Order objects; I am not going to allow SportsStore orders to be modified once they are saved.
Testing the Repository
To test the repository, I am going to add some simple action methods to the Prep controller I created at the start of the chapter so that I can read, save, and delete model objects, as shown in Listing 5-10.
Listing 5-10. Adding Action Methods in the PrepController.cs File
using System.Threading.Tasks;
using System.Web.Mvc;
using SportsStore.Models;

namespace SportsStore.Controllers {

    public class PrepController : Controller {
        IRepository repo;

        public PrepController() {
            repo = new ProductRepository();
        }

        public ActionResult Index() {
            return View(repo.Products);
        }

        public async Task<ActionResult> DeleteProduct(int id) {
            await repo.DeleteProductAsync(id);
            return RedirectToAction("Index");
        }

        public async Task<ActionResult> SaveProduct(Product product) {
            await repo.SaveProductAsync(product);
            return RedirectToAction("Index");
        }

        public ActionResult Orders() {
            return View(repo.Orders);
        }

        public async Task<ActionResult> DeleteOrder(int id) {
            await repo.DeleteOrderAsync(id);
            return RedirectToAction("Orders");
        }

        public async Task<ActionResult> SaveOrder(Order order) {
            await repo.SaveOrderAsync(order);
            return RedirectToAction("Orders");
        }
    }
}
These are standard MVC framework actions that operate on the repository and pass data objects to Razor views so they can be rendered as HTML and sent to a browser. I need two views to test the repository: one for testing products and one for testing orders. Listing 5-11 shows the contents of the Index.cshtml file, which I added to the /Views/Prep folder.
![]() Tip Notice that I instantiate the ProductRepository class directly. This is poor practice in real projects, and dependency injection (DI) should be used instead. I explain how Web API handled DI in Chapter 10, but I don’t want to get distracted by the MVC framework, which works in a different way. See my Pro ASP.NET MVC 5 book for details if you are unfamiliar with DI within an MVC framework application.
Tip Notice that I instantiate the ProductRepository class directly. This is poor practice in real projects, and dependency injection (DI) should be used instead. I explain how Web API handled DI in Chapter 10, but I don’t want to get distracted by the MVC framework, which works in a different way. See my Pro ASP.NET MVC 5 book for details if you are unfamiliar with DI within an MVC framework application.
Listing 5-11. The Contents of the Index.cshtml File
@model IEnumerable<SportsStore.Models.Product>

<div class="panel panel-primary">
    <div class="panel-heading">Products</div>
    <table class="table table-striped">
        <tr><th>ID</th><th>Name</th><th>Category</th><th>Price</th></tr>
        @foreach (var p in Model) {
            <tr>
                <td>@p.Id</td><td>@p.Name</td><td>@p.Category</td><td>@p.Price</td>
            </tr>
        }
    </table>
</div>

@using(Html.BeginForm("SaveProduct", "Prep")) {
    <input type="hidden" name="Name" value="Zippy Running Shoes" />
    <input type="hidden" name="Category" value="Running" />
    <input type="hidden" name="Description" value="Set a new Record Time" />
    <input type="hidden" name="Price" value="159.99" />

    <button class="btn btn-primary" type="submit">Create</button>
    <a href="/prep/deleteproduct/2" class="btn btn-primary">Delete</a>
}
The view generates a Bootstrap-formatted table element that contains details of the Product objects contained in the repository. I have also added a Create button that invokes the SaveProduct action to save a new Product to the repository and a Delete button that invokes the DeleteProduct action to remove the Product whose Id is 2. (The Create and Delete buttons use hardwired values, so once you have clicked them, you will need to restart the application to reset the database; otherwise, the Delete operation will fail, and the Create operation will create a duplicate product.)
To test the repository support for products, start the application by selecting Start Debugging from the Visual Studio Debug menu and use the browser to navigate to the /Prep/Index URL. You will see a list of the products available, as shown in Figure 5-4, and can click the buttons to check that changes can be made to the database.
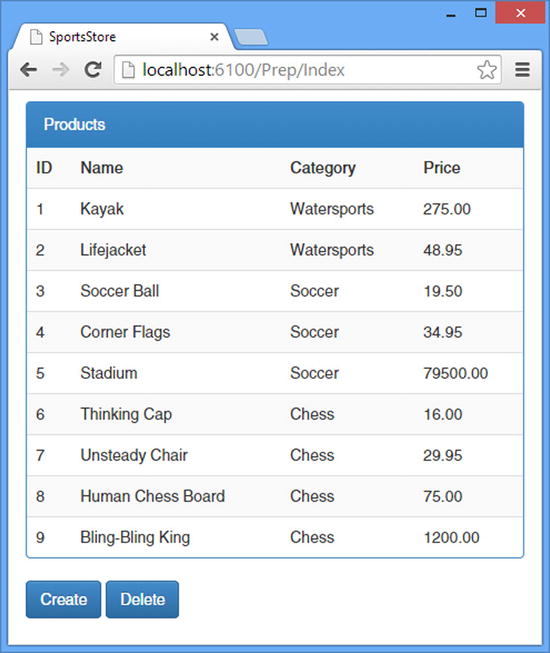
Figure 5-4. Testing the repository for products
![]() Tip The data that is displayed is created in the Seed method of the database initializer class, which I defined in Listing 5-8. Don’t forget that, at the moment, the data in the database is reset every time the application is started.
Tip The data that is displayed is created in the Seed method of the database initializer class, which I defined in Listing 5-8. Don’t forget that, at the moment, the data in the database is reset every time the application is started.
![]() Caution The database isn’t initialized and populated until the database context class is instantiated. This means you won’t see any database, schema, or data if you are using a tool like SQL Server Management Studio or the Visual Studio SQL Server Object Explorer until after the /Prep/Index or /Prep/Orders URL has been requested.
Caution The database isn’t initialized and populated until the database context class is instantiated. This means you won’t see any database, schema, or data if you are using a tool like SQL Server Management Studio or the Visual Studio SQL Server Object Explorer until after the /Prep/Index or /Prep/Orders URL has been requested.
The second view I need to create will allow me to perform a similar test on the repository support for Order objects. Listing 5-12 shows the contents of the Orders.cshtml file, which I added to the Views/Prep folder.
Listing 5-12. The Contents of the Orders.cshtml File
@model IEnumerable<SportsStore.Models.Order>

<div class="panel panel-primary">
    <div class="panel-heading">
        Orders
    </div>
    <table class="table table-striped">
        <tr>
            <th>ID</th>
            <th>Customer</th>
            <th colspan="3"></th>
            <th>Total Cost</th>
        </tr>
        @foreach (var o in Model) {
            <tr>
                <td>@o.Id</td>
                <td>@o.Customer</td>
                <td colspan="3"></td>
                <td>@string.Format("{0:c}", o.TotalCost)</td>
            </tr>
            <tr>
                <th colspan="2"></th>
                <th>Product</th>
                <th>Quantity</th>
                <th>Price</th>
                <th></th>
            </tr>
            foreach (var ol in o.Lines) {
                <tr>
                    <td colspan="2"></td>
                    <td>@ol.Product.Name</td>
                    <td>@ol.Count</td>
                    <td>@string.Format("{0:c}", ol.Product.Price)</td>
                    <td></td>
                </tr>
            }
        }
    </table>
</div>

@using (Html.BeginForm("SaveOrder", "Prep")) {
    <input type="hidden" name="Customer" value="John Poet" />
    <input type="hidden" name="TotalCost" value="91" />
    <input type="hidden" name="lines[0].productid" value="6" />
    <input type="hidden" name="lines[0].count" value="1" />
    <input type="hidden" name="lines[1].productid" value="8" />
    <input type="hidden" name="lines[1].count" value="1" />

    <button class="btn btn-primary" type="submit">Create</button>
    <a href="/prep/deleteorder/2" class="btn btn-primary">Delete</a>
}
This view is more complex because I need to deal with the OrderLine objects that are associated with each Order. To test the repository, start the application and navigate to the /Prep/Orders URL.
It is worth taking a moment to reflect how I created the SportsStore database. I defined my model classes and then defined the Entity Framework context and initializer classes that operate on them. Finally, I implemented my repository interface to act as the bridge between the application and the Entity Framework.
I didn’t have to create the database or define its schema. These tasks were performed automatically based on the structure of the model classes, following a set of well-defined conventions, which you can learn about here: http://msdn.microsoft.com/data/ef.aspx. Figure 5-5 shows a diagram of the schema that Entity Framework created for me, which I created using the SQL Server Management Studio tool (which is a free download from Microsoft).
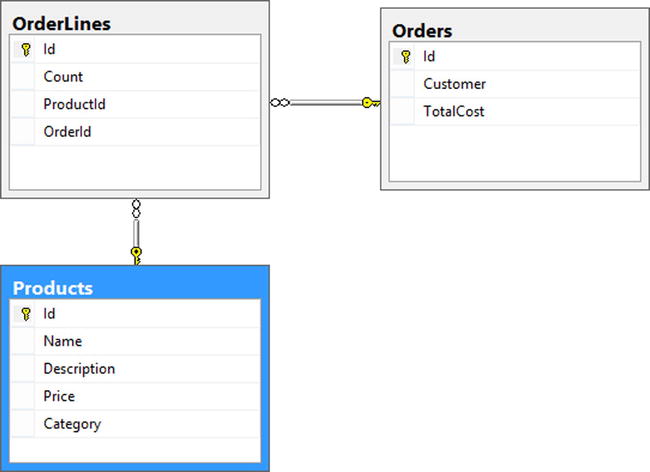
Figure 5-5. The structure of the SportsStore Products and Orders databases
This is, admittedly, a simple schema, and using Entity Framework Code First is no substitute for a professional data architect on complex projects, but it is an excellent tool for getting started and is entirely sufficient for simple databases.
Configuring ASP.NET Identity
ASP.NET Identity is the user management system for ASP.NET applications and has replaced the Membership system that Microsoft provided for the last few years. Identity is more flexible, is easier to extend, and relies on the same Entity Framework Code First features that I used in the previous section to set up the product database. In the sections that follow, I’ll create a simple ASP.NET Identity system that will allow me to authenticate users, check the membership of roles, and restrict some SportsStore features to administration users.
![]() Note I need only a simple ASP.NET Identity configuration to authenticate users and authorize access to the SportsStore web services. The Identity system has many features that go well beyond what I need for this book, including the ability to authenticate users through third parties (including Facebook, Twitter, and Google) and the ability to authorize users based on claims, which allows external data to be taken into consideration. I describe both features in my Pro ASP.NET 5 Platform book, which is published by Apress.
Note I need only a simple ASP.NET Identity configuration to authenticate users and authorize access to the SportsStore web services. The Identity system has many features that go well beyond what I need for this book, including the ability to authenticate users through third parties (including Facebook, Twitter, and Google) and the ability to authorize users based on claims, which allows external data to be taken into consideration. I describe both features in my Pro ASP.NET 5 Platform book, which is published by Apress.
Defining the User and Role Classes
The starting point when working with Identity is to create the class that will represent a user, known as the user class. This is a key part of how Identity works because it allows you to define custom properties that can be used to store application-specific data. I created the Infrastructure/Identity folder in the Solution Explorer and added the StoreUser.cs file, the contents of which are shown in Listing 5-13.
Listing 5-13. The Contents of the StoreUser.cs File
using Microsoft.AspNet.Identity.EntityFramework;

namespace SportsStore.Infrastructure.Identity {

    public class StoreUser : IdentityUser {
        // application-specific properties go here
    }
}
User classes are derived from the IdentityUser class, which is defined in the Microsoft.AspNet.Identity.EntityFramework namespace. The user class can be defined with application-specific properties that correspond to the user profile features of the old ASP.NET Membership system and which are added automatically to the database schema when it is created. I am going to create a basic Identity configuration and don’t need any custom properties, so I just have to create a class that is derived from IdentityUser but adds no new properties of methods. My StoreUser class inherits a number of useful properties, however, which I have described in Table 5-3. There are other properties, but these are the ones I need for the SportsStore application.
Table 5-3. Useful Properties Inherited from the IdentityUser Class
Name | Description |
|---|---|
Returns the e-mail address of the user | |
Id | Returns the unique ID of the user |
Roles | Returns a collection containing the roles to which the user has been assigned |
UserName | Returns the name of the user |
I also need to define a class that will represent a role. Once again, Identity provides a base class—called IdentityRole—from which an application-specific role class is derived. Listing 5-14 shows the contents of the StoreRole.cs file, which I added to the Infrastructure/Identity folder.
Listing 5-14. The Contents of the StoreRole.cs File
using Microsoft.AspNet.Identity.EntityFramework;

namespace SportsStore.Infrastructure.Identity {
    public class StoreRole : IdentityRole {

        public StoreRole() : base() { }
        public StoreRole(string name) : base(name) { }
    }
}
I don’t have any customizations to make for the SportsStore application, so the SportsStore class is derived from IdentityRole but doesn’t add any additional properties.
Creating the Database Context Classes
The next step is to create Entity Framework context classes that will be used to manage the storage of user and role records in the database. Listing 5-15 shows the contents of the StoreIdentityDbContext.cs file, which I added to the Infrastructure/Identity folder.
Listing 5-15. The Contents of the StoreIdentityDbContext.cs File
using Microsoft.AspNet.Identity.EntityFramework;
using System.Data.Entity;

namespace SportsStore.Infrastructure.Identity {

    public class StoreIdentityDbContext : IdentityDbContext<StoreUser> {

        public StoreIdentityDbContext() : base("SportsStoreIdentityDb") {
            Database.SetInitializer<StoreIdentityDbContext>(new
                StoreIdentityDbInitializer());
        }

        public static StoreIdentityDbContext Create() {
            return new StoreIdentityDbContext();
        }
    }
}
This is similar to the context class I created for the products database, but there are a couple of important differences. First, the class is derived from IdentityDbContext and not DbContext, which is why I don’t need to define any properties to expose the data in the database—everything is provided by the base class.
The second difference is that I have defined a Create method. Identity uses a convention of instantiating the classes it needs through static methods that are specified in the configuration file, and the Create method performs that task.
![]() Tip The StoreIdentityDbContext constructor calls the base class constructor with a string argument whose value is SportsStoreIdentityDb. This string specifies the connection string used for the database. I will need this name when I deploy the SportsStore application in Chapter 8, but I don’t need to create the database explicitly at the moment because the default setting is to create the database using LocalDb, which is a zero-configuration edition of SQL Server included with Visual Studio specifically intended to make it easy for developers to work with databases.
Tip The StoreIdentityDbContext constructor calls the base class constructor with a string argument whose value is SportsStoreIdentityDb. This string specifies the connection string used for the database. I will need this name when I deploy the SportsStore application in Chapter 8, but I don’t need to create the database explicitly at the moment because the default setting is to create the database using LocalDb, which is a zero-configuration edition of SQL Server included with Visual Studio specifically intended to make it easy for developers to work with databases.
The constructor for the StoreIdentityDbContext class registers an initializer class that I use to specify the initial data for the database and to control when the database will be dropped and re-created. Listing 5-16 shows the contents of the StoreIdentityDbInitializer.cs file, which I added to the Infrastructure/Identity folder.
Listing 5-16. The Contents of the StoreIdentityDbInitializer.cs File
using System;
using System.Collections.Generic;
using System.Data.Entity;
using System.Linq;
using System.Web;
using Microsoft.AspNet.Identity.EntityFramework;
using Microsoft.AspNet.Identity;

namespace SportsStore.Infrastructure.Identity {
    public class StoreIdentityDbInitializer :
        CreateDatabaseIfNotExists<StoreIdentityDbContext> {

        protected override void Seed(StoreIdentityDbContext context) {

            StoreUserManager userMgr =
                new StoreUserManager(new UserStore<StoreUser>(context));
            StoreRoleManager roleMgr =
                new StoreRoleManager(new RoleStore<StoreRole>(context));

            string roleName = "Administrators";
            string userName = "Admin";
            string password = "secret";
            string email = "[email protected]";

            if (!roleMgr.RoleExists(roleName)) {
                roleMgr.Create(new StoreRole(roleName));
            }

            StoreUser user = userMgr.FindByName(userName);
            if (user == null) {
                userMgr.Create(new StoreUser {
                    UserName = userName, Email = email
                }, password);
                user = userMgr.FindByName(userName);
            }

            if (!userMgr.IsInRole(user.Id, roleName)) {
                userMgr.AddToRole(user.Id, roleName);
            }

            base.Seed(context);
        }
    }
}
I have set the base class for the initializer to CreateDatabaseIfNotExists, which means that, as I described in Table 5-2, the schema will be created only if it doesn’t already exist in the database. It is especially important not to drop and re-create the database for user data because it will usually contain accounts, preferences, passwords, and other profile data that cannot be reseeded. For the SportsStore application, it doesn’t really matter because the Seed method creates the only user account that will be used and for which the password is fixed.
In the database initializer class shown in Listing 5-16, I used the StoreUserManager and StoreRoleManager classes to check whether the database contained the administration user and role and created them if needed. The StoreUserManager class is used to perform operations on StoreUser objects. I added a StoreUserManager.cs file to the Infrastructure/Identity folder and used it to define the class shown in Listing 5-17.
Listing 5-17. The Contents of the StoreUserManager.cs File
using Microsoft.AspNet.Identity;
using Microsoft.AspNet.Identity.EntityFramework;
using Microsoft.AspNet.Identity.Owin;
using Microsoft.Owin;

namespace SportsStore.Infrastructure.Identity {
    public class StoreUserManager : UserManager<StoreUser> {

        public StoreUserManager(IUserStore<StoreUser> store)
            : base(store) {}

        public static StoreUserManager Create(
                IdentityFactoryOptions<StoreUserManager> options,
                IOwinContext context) {

            StoreIdentityDbContext dbContext = context.Get<StoreIdentityDbContext>();
            StoreUserManager manager =
                new StoreUserManager(new UserStore<StoreUser>(dbContext));
            return manager;
        }
    }
}
The base class is UserManager, which provides the methods and properties required for common user management tasks, as described in Table 5-4. I don’t need any application-specific functionality for the SportsStore application, but I do have to follow two important patterns. The first is that the constructor to the StoreUserManager class is passed an IUserStore<StoreUser> parameter, which is used to access user data, and it is important to pass this on to the base constructor so that the class is initialized.
Table 5-4. Some of the Members Defined by the UserManager<T> Class
Name | Description |
|---|---|
Create(user, pass) | Creates a new user with the specified password. I use this method to create the administration user when seeding the database, as shown in Listing 5-16. |
Find(user, pass) | Locates the user account with the specific password. This method will return a result only if there is a user account and the provided password matches the one stored in the database. This method is used to perform authentication, and I use it in the “Testing ASP.NET Identity” section. |
FindByName(name) | Locates the user with the specified name and returns null if there is no such user. |
IsInRole(user, role) | Returns true if the specified user has been assigned to the specified role. |
Users | Returns an enumeration of the user objects stored by the Identity system. |
The second pattern is to define a static Create class, which will be called by ASP.NET Identity when it requires an instance of the StoreUserManager class. One of the parameters that is passed to the Create method is an IOwinContext object, through which I can obtain instances of the other classes I have defined. I use the strongly typed Get method to get an instance of the StoreIdentityDbContext class, like this:
...
StoreIdentityDbContext dbContext = context.Get<StoreIdentityDbContext>();
...
This has the effect of instantiating the context class and initializing the database and gives me the instance I require to call the StoreUserManager constructor.
![]() Tip All of the ASP.NET Identity methods are asynchronous, but there are some synchronous extension methods available that you can use instead. When it comes to working with Web API, which follows a similar pattern, then I prefer using the asynchronous methods, but for initializing databases I find the synchronous methods easier to work with.
Tip All of the ASP.NET Identity methods are asynchronous, but there are some synchronous extension methods available that you can use instead. When it comes to working with Web API, which follows a similar pattern, then I prefer using the asynchronous methods, but for initializing databases I find the synchronous methods easier to work with.
I also need to create a class for managing roles. Listing 5-18 shows the contents of the StoreRoleManager.cs file, which I added to the /Infrastructure/Identity folder.
Listing 5-18. The Contents of the StoreRoleManager.cs File
using Microsoft.AspNet.Identity;
using Microsoft.AspNet.Identity.EntityFramework;
using Microsoft.AspNet.Identity.Owin;
using Microsoft.Owin;

namespace SportsStore.Infrastructure.Identity {
    public class StoreRoleManager : RoleManager<StoreRole> {

        public StoreRoleManager(RoleStore<StoreRole> store) : base(store) { }

        public static StoreRoleManager Create(
                IdentityFactoryOptions<StoreRoleManager> options,
                IOwinContext context) {
            return new StoreRoleManager(new
                RoleStore<StoreRole>(context.Get<StoreIdentityDbContext>()));
        }
    }
}
I call the base constructor and define a Create method to make sure that the class is instantiated and configured correctly, just as I did for the StoreUserManager class. The base class is RoleManager, which provides methods and properties for operating on the roles defined by the application only, and Table 5-5 shows the ones that I use in this chapter.
Table 5-5. Some of the Members Defined by the RoleManager<T> Class
Name | Description |
|---|---|
RoleExists(name) | Returns true if the specified role exists |
Create(name) | Creates the specified role |
I do not require a great deal from the StoreRoleManager class in this chapter because I will be testing that roles are working by applying the MVC framework Authorize attribute, which takes care of checking that users are authenticated and in specific roles. The only use for the StoreRoleManager in this chapter is to see whether the Administrators role exists during database seeding and to create it if it doesn’t.
Adding the Configuration Statements
At the start of the chapter, I added the IdentityConfig.cs file to the App_Start folder so that I could start building the application without getting errors from ASP.NET Identity when the application starts. Now that I have created the classes that I need to create and manage user identities, the last step is to register them in the IdentityConfig.cs file and complete the configuration process. Listing 5-19 shows the additions I made to the IdentityConfig.cs file.
Listing 5-19. Adding Configuration Statements to the IdentityConfig.cs File
using Owin;
using Microsoft.Owin;
using Microsoft.AspNet.Identity;
using Microsoft.Owin.Security.Cookies;
using SportsStore.Infrastructure.Identity;

[assembly: OwinStartup(typeof(SportsStore.IdentityConfig))]

namespace SportsStore {
    public class IdentityConfig {

        public void Configuration(IAppBuilder app) {
            app.CreatePerOwinContext<StoreIdentityDbContext>(
                StoreIdentityDbContext.Create);
            app.CreatePerOwinContext<StoreUserManager>(StoreUserManager.Create);
            app.CreatePerOwinContext<StoreRoleManager>(StoreRoleManager.Create);

            app.UseCookieAuthentication(new CookieAuthenticationOptions {
                AuthenticationType = DefaultAuthenticationTypes.ApplicationCookie
            });
        }
    }
}
The first three statements register the StoreIdentityDbContext, StoreUserManager, and StoreRoleManager classes so that instances of them can be created as required by ASP.NET Identity. The final statement tells ASP.NET to set a cookie in authentication responses, which the browser will send to identify subsequent requests.
![]() Note There is some awkwardness in the way that ASP.NET Identity is set up because Microsoft is in transition between the legacy features in the System.Web assembly and the new world of OWIN and flexible hosting options. I return to OWIN and show you how it relates to Web API in Chapter 26, but until Microsoft completes the transition of ASP.NET, odd-looking configurations will remain.
Note There is some awkwardness in the way that ASP.NET Identity is set up because Microsoft is in transition between the legacy features in the System.Web assembly and the new world of OWIN and flexible hosting options. I return to OWIN and show you how it relates to Web API in Chapter 26, but until Microsoft completes the transition of ASP.NET, odd-looking configurations will remain.
I only need to test that ASP.NET Identity is configured and working for this chapter, which means I can take some shortcuts. Listing 5-20 shows the action methods and filters I added to the Prep controller.
Listing 5-20. Adding Action Methods and Filters in the PrepController.cs File
using System.Threading.Tasks;
using System.Web.Mvc;
using SportsStore.Models;
using SportsStore.Infrastructure.Identity;
using Microsoft.Owin.Security;
using Microsoft.AspNet.Identity;
using Microsoft.AspNet.Identity.Owin;
using System.Web;
using System.Security.Claims;

namespace SportsStore.Controllers {

    public class PrepController : Controller {
        IRepository repo;

        public PrepController() {
            repo = new ProductRepository();
        }

        public ActionResult Index() {
            return View(repo.Products);
        }

        [Authorize(Roles = "Administrators")]
        public async Task<ActionResult> DeleteProduct(int id) {
            await repo.DeleteProductAsync(id);
            return RedirectToAction("Index");
        }
        [Authorize(Roles = "Administrators")]
        public async Task<ActionResult> SaveProduct(Product product) {
            await repo.SaveProductAsync(product);
            return RedirectToAction("Index");
        }

        public ActionResult Orders() {
            return View(repo.Orders);
        }

        public async Task<ActionResult> DeleteOrder(int id) {
            await repo.DeleteOrderAsync(id);
            return RedirectToAction("Orders");
        }

        public async Task<ActionResult> SaveOrder(Order order) {
            await repo.SaveOrderAsync(order);
            return RedirectToAction("Orders");
        }

        public async Task<ActionResult> SignIn() {
            IAuthenticationManager authMgr = HttpContext.GetOwinContext().Authentication;
            StoreUserManager userMrg = HttpContext.GetOwinContext().GetUserManager<StoreUserManager>();

            StoreUser user = await userMrg.FindAsync("Admin", "secret");
            authMgr.SignIn(await userMrg.CreateIdentityAsync(user,
                DefaultAuthenticationTypes.ApplicationCookie));
            return RedirectToAction("Index");
        }

        public ActionResult SignOut() {
            HttpContext.GetOwinContext().Authentication.SignOut();
            return RedirectToAction("Index");
        }
    }
}
I have added a SignIn action that has hard-coded credentials for the administrative user and uses them to authenticate the request with the application and send the client a cookie that can be used to authenticate subsequent requests. I have also defined a SignOut method, which de-activates the cookie and signs the user out.
![]() Tip I am not going to describe the code in the SignIn action in this chapter. I get into a little more detail about authenticating users in Web API in Chapter 23 and again in Chapter 24, but ASP.NET Identity is a topic in its own right and is not the focus of this book. I get into more detail about ASP.NET Identity, including how to authenticate with Google, Facebook, and other providers, in my Pro ASP.NET MVC 5 Platform book, which is published by Apress.
Tip I am not going to describe the code in the SignIn action in this chapter. I get into a little more detail about authenticating users in Web API in Chapter 23 and again in Chapter 24, but ASP.NET Identity is a topic in its own right and is not the focus of this book. I get into more detail about ASP.NET Identity, including how to authenticate with Google, Facebook, and other providers, in my Pro ASP.NET MVC 5 Platform book, which is published by Apress.
I have applied the Authorize filter to the DeleteProduct and SaveProduct actions in order to restrict access to authenticated users who have been assigned to the Administrators role.
Passing the authorization test means that the client has to be able to invoke the SignIn action, and Listing 5-21 shows the additions I made to the Views/Prep/Index.cshtml file to add buttons that allow sign-in and sign-out.
Listing 5-21. Adding Authentication Controls to the Index.cshtml File
@model IEnumerable<SportsStore.Models.Product>

<div class="panel panel-primary ">
    <a href="/prep/signin" class="btn btn-sm btn-primary">Sign In</a>
    <a href="/prep/signout" class="btn btn-sm btn-primary">Sign Out</a>
    User: @(HttpContext.Current.User.Identity.Name)
</div>

<div class="panel panel-primary">
    <div class="panel-heading">Products</div>
    <table class="table table-striped">
        <tr><th>ID</th><th>Name</th><th>Category</th><th>Price</th></tr>
        @foreach (var p in Model) {
            <tr>
                <td>@p.Id</td>
                <td>@p.Name</td>
                <td>@p.Category</td>
                <td>@p.Price</td>
            </tr>
        }
    </table>
</div>

@using (Html.BeginForm("SaveProduct", "Prep")) {
    <input type="hidden" name="Name" value="Zippy Running Shoes" />
    <input type="hidden" name="Category" value="Running" />
    <input type="hidden" name="Description" value="Set a new Record Time" />
    <input type="hidden" name="Price" value="159.99" />

    <button class="btn btn-primary" type="submit">Create</button>
    <a href="/prep/deleteproduct/2" class="btn btn-primary">Delete</a>
}
I have added some styled a elements that will invoke the SignIn and SignOut action methods along with the name of the authenticated user, which will be blank when the browser isn’t authenticated. (I have hard-coded the URLs that the a elements make, which is poor practice in a real project, but I think this is fine for performing initial configuration testing like this.)
To test Identity, start the application and use the browser to navigate to the /Prep/Index URL. You will see the list of products in the database, along with the additional buttons from Listing 5-21, as illustrated by Figure 5-6.
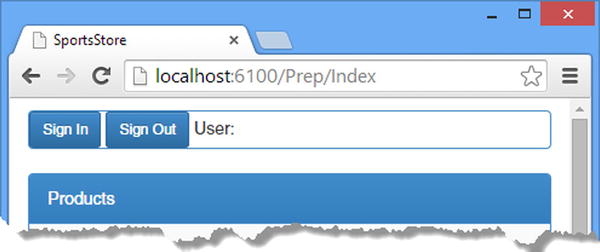
Figure 5-6. The authentication buttons and username
![]() Tip If you receive an error that states that Microsoft.Owin.Security or one its dependencies cannot be loaded, then rebuild the application using the Visual Studio Rebuild
Tip If you receive an error that states that Microsoft.Owin.Security or one its dependencies cannot be loaded, then rebuild the application using the Visual Studio Rebuild ![]() Rebuild Solution menu item and try again.
Rebuild Solution menu item and try again.
To make sure that the Authorize attributes are working, click the Create or Delete button. The browser hasn’t invoked the SignIn action method yet, so the request will be sent without an authentication cookie and should be rejected with a 401 (Unauthorized) response, as shown in Figure 5-7.
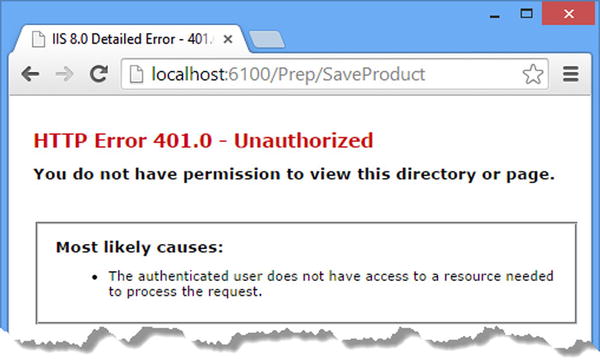
Figure 5-7. Invoking a restricted action without authentication
Return to the /Prep/Index URL and click the Sign In button. The browser will send a request that invokes the SignIn action method, which adds the authentication cookie to the response and redirects the browser to the /Prep/Index URL. The difference is that now the username will be displayed at the top of the page, indicating that the browser has been authenticated, as shown in Figure 5-8.
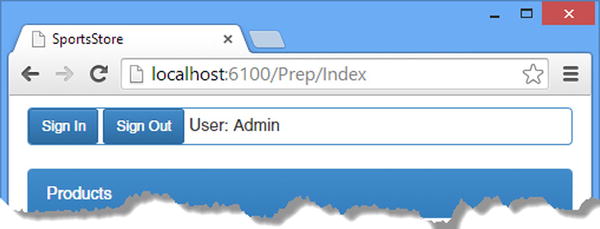
Figure 5-8. The effect of authenticating the browser
Now click the Create or Delete button again. This time, the HTTP request that the browser sends will contain an authentication cookie, which will allow the targeted action method to be successful invoked, either adding a product or removing one from the database. If you click the Sign Out button, you will return to making authenticated requests and receiving 401 (Unauthorized) responses.
Removing the Application Cookie
I configured ASP.NET Identity so that it will set a cookie when a request is successfully authenticated, which allows subsequent requests from the same client to be authorized without needing credentials. The cookie is required for round-trip applications, and the authentication test I have used in this chapter will not work without it. I will be using a different approach for the SportsStore application, which is to explicitly set an HTTP header to provide proof that the client has been authenticated. I explain this process in Chapter 6, but my final step in this chapter is to disable the cookie, as shown in Listing 5-22.
Listing 5-22. Disabling the Identity Cookie in the IdentityConfig.cs File
using Owin;
using Microsoft.Owin;
using Microsoft.AspNet.Identity;
using Microsoft.Owin.Security.Cookies;
using SportsStore.Infrastructure.Identity;

[assembly: OwinStartup(typeof(SportsStore.IdentityConfig))]

namespace SportsStore {
    public class IdentityConfig {

        public void Configuration(IAppBuilder app) {
            app.CreatePerOwinContext<StoreIdentityDbContext>(
                StoreIdentityDbContext.Create);
            app.CreatePerOwinContext<StoreUserManager>(StoreUserManager.Create);
            app.CreatePerOwinContext<StoreRoleManager>(StoreRoleManager.Create);

            //app.UseCookieAuthentication(new CookieAuthenticationOptions {
            //AuthenticationType = DefaultAuthenticationTypes.ApplicationCookie
            //});
        }
    }
}
![]() Caution This change means that the Prep controller will no longer be able to authenticate itself.
Caution This change means that the Prep controller will no longer be able to authenticate itself.
Summary
In this chapter, I created the foundation for the SportsStore application by creating the data model and using the Entity Framework Code First feature to store it persistently in a database. I also installed and configured the ASP.NET Identity system so that I can authenticate users and restrict access to the application’s administrative features, which I create in Chapter 6. In the next chapter, I define the Web API controllers that will provide the web services for the SportsStore application.