
CHAPTER 13
Beagle Board with a Rich User Interface
In this chapter, you are introduced to rich user interface (UI) architectures and application development on the Beagle board platform. Rich UIs allow for a depth of interaction with an application that is not possible with command-line interfaces (CLIs). In particular, the addition of graphical display elements can result in easier-to-use applications. Also introduced are different Beagle board architectures that can support rich UIs, such as general-purpose computing, touchscreen display modules, and virtual network computing (VNC). Different software application frameworks are examined for rich UI development, such as GTK+ and Qt. The Qt framework is the focus of the discussion, largely because of its comprehensive libraries of code. An example rich UI application is developed for a Beagle board that uses the TMP36 temperature sensor. Finally, a feature-rich remote fat-client application framework is developed, and two example applications are described—one that uses the TMP36 sensor and a second that uses the ADXL345 accelerometer.
EQUIPMENT REQUIRED FOR THIS CHAPTER:
- Beagle board (ideally one with a HDMI output)
- Analog Devices TMP36 temperature sensor
- USB/HDMI accessories from Chapter 1 (optional)
- ADXL345 accelerometer (optional)
Further resources for this chapter are available at www.exploringbeaglebone.com/chapter13/.
Rich UI Beagle Board Architectures
In Chapter 9, low-cost LED displays and character LCD displays were introduced. They can be coupled with sensors, switches, or keyboard modules to form simple low-cost UI architectures that are sufficient for many applications, such as for configuration or interaction with hardware devices (e.g., vending machines, printer control interfaces, etc.). However, Beagle boards have a powerful processor, which when coupled with the Linux OS is capable of providing sophisticated user interfaces—similar to those to which you are accustomed on your desktop machine and/or mobile devices.
The BeagleBone Black's (BBBs) LCD controller and HDMI framer enable it to be connected directly to a physical display (e.g., a monitor, television, or LCD touchscreen) to create a sophisticated self-contained physical UI device. This is one application of the BBB that demonstrates the strength of embedded Linux in particular, as it supports open-source UI development frameworks such as GTK+ and Qt. These frameworks provide libraries of visual components (aka widgets) that you can combine to create applications with considerable depth of interaction.
Before examining software development frameworks, this section introduces four UI hardware architectures that are available on a BBB board:
- General-purpose computing: By connecting the BBB to a monitor/television by HDMI and connecting a keyboard and mouse by USB, it can be used as a general-purpose computer.
- LCD touchscreen display: By attaching an LCD touchscreen cape to the BBB P8/P9 headers, it can be used as a stand-alone UI device.
- Virtual network computing (VNC): By using remote access and control software on a network-attached Beagle board, it can control UIs on a virtual display.
- Remote fat-client applications: By using custom client/server programming with a network-attached Beagle board, it can interact with remote UIs by sending and receiving messages.
These architectures are described in detail in this section, but to give the discussion some context, Table 13-1 summarizes the strengths and weaknesses of each approach when used with a Beagle board.
Table 13-1: Strengths and Weaknesses of Different UI Architectures
| APPROACH | STRENGTHS | WEAKNESSES |
| As a general-purpose computer (via HDMI) | Low-cost computing platform with low power consumption. Ideal for a network-attached information display point application, by connecting it to a TV/monitor. Can interact with it using a USB keyboard and mouse. | Requires a dedicated monitor/TV. Beagle boards lack the processing power to replace a modern desktop computer. BBB HDMI has a limited resolution and uses a large number of the P8/P9 header pins. |
| With an LCD touchscreen (via header pins) | Portable interactive display that can be battery powered. Ideal for custom UI process controls. A range of display sizes are available. | Expensive. Occupies many of the header pins (remainder not carried forward). Typically resistive touch, rather than capacitive touch. |
| VNC (via network) | No display required on the board (frees header pins). Board could be battery powered and wireless. | Requires a desktop computer/tablet device and network connection. Display update over the network connection can be sluggish. |
| Fat-client applications (via network) | No display is required on the board. Board could be battery powered and wireless. Low processor overhead, as the display is updated by the desktop computer. Many simultaneous displays possible. | Requires custom application development (e.g., using TCP socket programming). Requires network connection and a device on which to run the fat-client applications. |
Beagle Boards as General-Purpose Computers
The Beagle boards are capable embedded devices, largely because of their generous processor and memory specifications. When a HDMI video output capability is present on a board, it can be directly connected to a monitor/television, enabling it to be configured as a general-purpose desktop computer. For example, Figure 13-1(a) illustrates the use of a micro-HDMI adapter (described in Chapter 1) alongside the Kinivo Bluetooth adapter, together providing support for video output and keyboard/mouse input. Figure 13-1(b) displays a low-cost Bluetooth keyboard/touchpad that is used for this example—it is a compact device that is displayed to scale with the BBB.
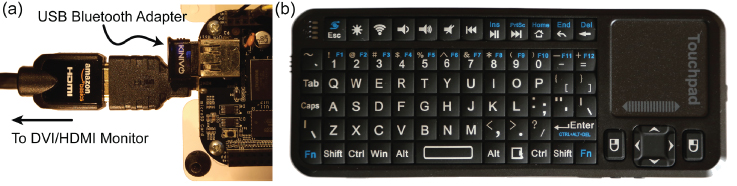
Figure 13-1: (a) Connection to an HDMI and a Bluetooth adapter, (b) a Bluetooth keyboard/touchpad
The Ethernet connector (or internet over USB) can be used to provide network support, and a powered USB hub can be connected to a Beagle board to provide support for more devices, such as Wi-Fi adapters or separate keyboard and mouse peripherals. Figure 13-2 displays a screen capture of the BBB display output when connected directly to a computer monitor using the HDMI interface.

Figure 13-2: Screen capture of the BBB monitor display in Figure 13-1
To be clear, this display is running on a stand-alone monitor, and the screen was captured on a BBB using a Linux tool called scrot that can be installed and executed from the CLI using the following:
debian@ebb:~$ sudo apt install scrotdebian@ebb:~$ scrot screenshot.png
Connecting a Bluetooth Input Peripheral
A regular USB keyboard and mouse can be directly connected to a Beagle board for this architecture. Bluetooth keyboard/touchpads are also useful, as they can be reused in other applications, such as wireless robotic control and home automation. The BeagleBone Black Wireless (BBBW) or any BeagleBone with the Kinivo Bluetooth adapter (see Chapter 9) can directly interface to devices such as the handheld iPazzPort Bluetooth keyboard and touchpad (~$20). Devices can be configured using the following steps:
debian@ebb:~$ sudo apt install bluez bluetoothbluetooth is already the newest version (5.43-2+deb9u1).bluez is already the newest version (5.43-2+deb9u1).debian@beaglebone:~$ sudo bluetoothctl[NEW] Controller 38:D2:69:E0:BB:06 beaglebone #2 [default][NEW] Controller 00:02:72:CB:C3:53 beaglebone[bluetooth]# agent KeyboardOnlyAgent registered[bluetooth]# default-agentDefault agent request successful[bluetooth]# scan onDiscovery started[CHG] Controller 38:D2:69:E0:BB:06 Discovering: yes[CHG] Device 54:46:6B:01:E2:13 Name: bluetooth iPazzport[CHG] Device 54:46:6B:01:E2:13 Alias: bluetooth iPazzport …[bluetooth]# pair 54:46:6B:01:E2:13Attempting to pair with 54:46:6B:01:E2:13[CHG] Device 54:46:6B:01:E2:13 Connected: yes[agent] PIN code: 218596
To pair the device, a pin code of 218596 is presented by the tool in the preceding instructions, so 218596 must also be keyed on the Bluetooth keyboard device (followed by Enter), which results in the following output:
[CHG] Device 54:46:6B:01:E2:13 Paired: yesPairing successful[CHG] Device 54:46:6B:01:E2:13 ServicesResolved: no[CHG] Device 54:46:6B:01:E2:13 Connected: no[bluetooth]# trust 54:46:6B:01:E2:13[CHG] Device 54:46:6B:01:E2:13 Trusted: yesChanging 54:46:6B:01:E2:13 trust succeeded[bluetooth]# connect 54:46:6B:01:E2:13Attempting to connect to 54:46:6B:01:E2:13[CHG] Device 54:46:6B:01:E2:13 Connected: yesConnection successful[CHG] Device 54:46:6B:01:E2:13 ServicesResolved: yes[bluetooth iPazzport]# info 54:46:6B:01:E2:13Device 54:46:6B:01:E2:13Name: bluetooth iPazzport Alias: bluetooth iPazzportClass: 0x002540 Icon: input-keyboardPaired: yes Trusted: yesBlocked: no Connected: yes
The Bluetooth keyboard/touchpad is now attached to the BBBW, and it will automatically connect from then on. It can control the general-purpose computing environment that is displayed in Figure 13-2.
BeagleBone with a LCD Touchscreen Cape
The AM335x system on a chip (SoC) includes an LCD controller (LCDC) that is capable of driving LCD modules (up to 2,048 × 2,048 with a 24-bits-per-pixel active TFT configuration) using TI Linux LCDC and backlight drivers. An LCD touchscreen display, such as the LCD4 cape discussed in Chapter 1, can be attached to the BBB as illustrated in Figure 13-3. The LCD4's 4.3″ TFT display has a resolution of 480 × 272 pixels, which limits the desktop space for general-purpose computing applications. The cape also occupies many of the P8/P9 header pins, including the ADC inputs, which are used for the touch interface and the control buttons. Despite these limitations, it can be used to build sophisticated UI applications.
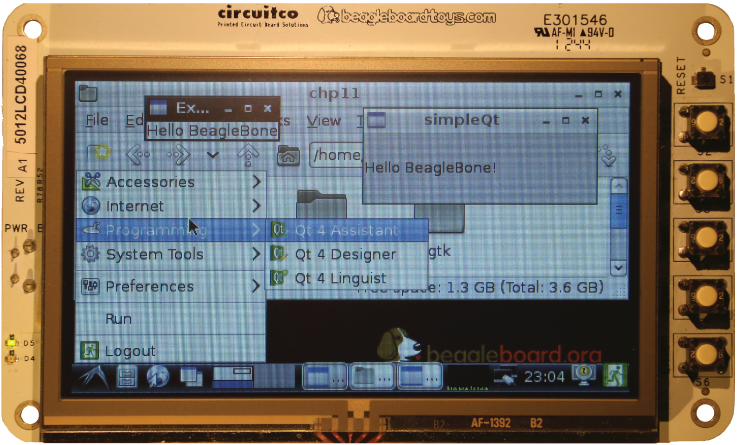
Figure 13-3: The CircuitCo LCD4 cape
The LCD capes from CircuitCo are fully compatible with the BBB, and the BeagleBoard.org Debian image does not require specific software configuration to use them. The touchscreen interface must be calibrated on its first use—for this task, and for general usage, a nylon-tipped stylus is a useful accessory, as pressure must be applied to resistive touchscreens that can result in scratches. The Bluetooth keyboard/touchpad from the last section can also be used to control the BBB when it is attached to an LCD display, which is useful because entering text using on-screen touch keyboards can be frustrating.
Virtual Network Computing
Virtual network computing (VNC) enables desktop applications on one computer (the server) to be shared and remotely controlled from another computer (the client). Keystrokes and mouse interactions on the VNC client are transmitted to the VNC server over the network. The VNC server determines the impact of these interactions and then updates the remote frame buffer (RAM containing bitmap image data) on the VNC client machine. VNC uses the remote frame buffer protocol, which is similar to the remote desktop protocol (RDP) that is tightly coupled to the Windows OS, but because VNC works at the frame buffer level, it is available for many OSs.
A Beagle board does not require a physical display to act as a VNC server, which means that any header pins that are allocated to HDMI output can be retasked. Importantly, with VNC the Linux applications are executing on the board using its processor, but the frame buffer display is being updated on the remote machine.
VNC Using VNC Viewer
Many VNC client applications are available, but VNC Viewer is described here because it is available for Windows, macOS, and Linux platforms. It can be downloaded and installed free from www.realvnc.com. Once it is executed, a login screen appears that requests the VNC server address. However, for this configuration you must ensure that your board is running a VNC server before you can log in. The tightvncserver is available under the BeagleBoard.org Debian distribution by default. The first time you execute the server, you will be prompted to define a password for remote access, as follows:
debian@ebb:~$ sudo apt install tightvncserverdebian@ebb:~$ tightvncserverYou will require a password to access your desktops.Password: MyPasswordVerify: MyPasswordWould you like to enter a view-only password (y/n)? nNew 'X' desktop is ebb:1Starting applications specified in /home/debian/.vnc/xstartupLog file is /home/debian/.vnc/ebb:1.log
To start a graphical display manually from a console, where you have a physical monitor, keyboard, and mouse connected to the board, use:
debian@ebb:~$ startx Once the server is running, you can check the process description to determine the port number—here it is running on port 5901:
debian@ebb:~$ ps aux | grep vncdebian 1914 1.3 1.3 7928 6516 pts/0 S 03:00 0:00 Xtightvnc :1 -desktopX -auth /home/debian/.Xauthority -geometry 1024x768 -depth 24 -rfbwait120000 -rfbauth /home/debian/.vnc/passwd -rfbport 5901 -fp …
The VNC Viewer session can then be started on your desktop machine using the server address and its port number (e.g., 192.168.7.2:5901). The Beagle board desktop is contained within a window frame, as displayed in Figure 13-4.
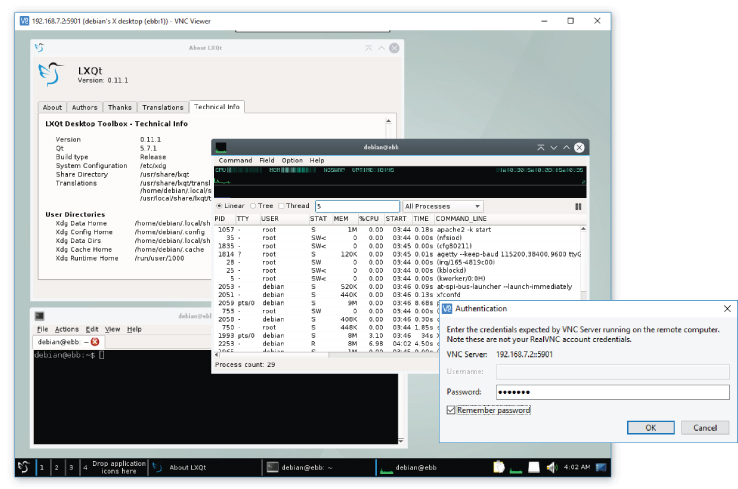
Figure 13-4: VNC Viewer on Windows connected to the LXQt window manager on a Beagle board
VNC with Xming and PuTTY
The Xming X Server (tiny.cc/beagle1301) for Windows, in combination with PuTTY, is a different approach to the same task; however, it does not require that a VNC server is running on the Beagle board. Once Xming is installed and executed, it appears only in the Windows taskbar with an “X” icon. The PuTTY Beagle board session can be configured using Connection → SSH → X11 to set “Enable SSH X11 forwarding” to the local X display location and to set the X display location to be :0.0.
When an SSH session is opened to a Beagle board, you can simply perform the following instructions, which result in the display of an xterm and xeyes display. The xterm window is the standard terminal emulator for the X Window System, and the “magical” xeyes follow your mouse cursor around the desktop computer. Remember that the xeyes display is being updated by the Beagle board, not the desktop computer.
debian@ebb:~$ sudo apt-get install x11-apps xtermdebian@ebb:~$ xterm &debian@ebb:~$ xeyes &
One advantage of this approach is that you can seamlessly integrate Beagle board applications and Windows applications on the desktop display. You can also start the board's LXQt standard panel by calling lxqt-panel, which results in the bottom-bar menu display (refer to Figure 13-4).
VNC with a Linux Desktop Computer
If you are running Linux as your desktop OS (e.g., Debian x64 on a VM), then you can usually start a VNC session using the following steps, where -X enables X11 forwarding and -C requests that compression is used in the transmission of frame buffer data.
molloyd@debian:~$ ssh -XC [email protected][email protected]'s password: MyPassworddebian@ebb:~$ xeyes &debian@ebb:~$ xterm &
Fat-Client Applications
At the beginning of Chapter 11, the Beagle board is configured as a web server—essentially, the Beagle board is serving data to a thin-client web browser that is executing on a client machine. The temperature sensor application executes on the Beagle board, and the data is served to the client's web browser using the Apache web server and CGI/PHP scripts. With thin-client applications, most of the processing takes place on the server machine (server-side). In contrast, fat-client (aka thick-client) applications execute on the client machine (client-side) and send and receive data messages to and from the server.
Recent computing architecture design trends have moved away from fat-client architectures and toward thin-client (and cloud) browser-based frameworks. However, the latter frameworks are usually implemented on a powerful cluster of server machines and are unsuitable for deployment on embedded devices. When working with the Beagle boards, it is likely that the client desktop machine is the more computationally powerful device.
A fat-client application is typically more complex to develop and deploy than a thin-client application, but it reduces the demands on the server while allowing for advanced functionality and user interaction on the client machine. Later in this chapter, fat-client UI applications are developed that execute on a desktop computer and communicate to the Beagle board via TCP sockets. In turn, the Beagle board interfaces to the TMP36 temperature sensor and the ADXL345 accelerometer and serves their sensor data to the remote UI applications. Importantly, the fat-client applications use the resources of the desktop computer for graphical display, and therefore there is a minimal computational cost on the Beagle board. As such, it is possible for many fat-client applications on different desktop computers to simultaneously communicate with a single Beagle board.
Rich UI Application Development
Once a display framework is available to your board, a likely next step is to write rich UI applications that can utilize its benefits. Such applications are termed graphical user interface (GUI) applications; if you have used desktop computers, tablet computers, or smartphones, then you are familiar with their use. There are many different ways to implement GUI applications on the Beagle boards—for example, Java has comprehensive built-in support for GUI development with its abstract windowing toolkit (AWT) libraries, and Python has libraries such as pyGTK, wxPython, and Tkinter.
To develop GUI applications under C/C++ for the Beagle board, there are two clear options: the GIMP Toolkit (GTK+) and the Qt cross-platform development framework. This section describes how you can get started with both of these options. It is important to note that the applications in this section will function regardless of whether they are used directly on the Beagle board (i.e., general-purpose computer or touchscreen form) or through VNC. GTK+ and Qt can also be used as the basis for building fat-client applications, which is covered later in this chapter.
Introduction to GTK+ on the Beagle Boards
GTK+ (www.gtk.org) is a cross-platform toolkit for creating GUI applications. It is most well-known for its use in the Linux GNOME desktop and the GNU Image Manipulation Program (GIMP). Figure 13-5 illustrates a sample GTK+ application running on the Beagle board using VNC. The same application also works perfectly if the application is running on the Beagle board directly.

Figure 13-5: The GTKsimple application
The “Hello World” GTK+ Application
The code for the application shown in Figure 13-5 is provided in Listing 13-1. The application consists of a single label, which contains the text “Hello Beagle Board” that has been added to a GTK+ window. Each line of the code has been commented in the listing to explain the important steps.
Listing 13-1: /exploringbb/chp13/gtk/GTKsimple.cpp
#include<gtk/gtk.h> // the GTK+ library header fileint main(int argc, char *argv[]){// This application will have a window and a single labelGtkWidget *window, *label;// Initialize the GTK+ toolkit, pass the command-line argumentsgtk_init(&argc, &argv);// Create the top-level window (not yet visible)window = gtk_window_new(GTK_WINDOW_TOPLEVEL);// Set the title of the window to “Exploring BB v2”gtk_window_set_title ( GTK_WINDOW (window), "Exploring BB v2");// Create a labellabel = gtk_label_new ("Hello Beagle Board");// Add the label to the windowgtk_container_add(GTK_CONTAINER (window), label);// Make the label visible (must be performed for every widget)gtk_widget_show(label);// Make the window visible on the displaygtk_widget_show(window);// Runs the main loop until gtk_main_quit() is calledgtk_main(); // for example, if Ctrl C is typedreturn 0;}
The application can be compiled using the following call, which is also captured in the Git repository build script (use the grave accent character `, not the single opening quotation mark character, ’):
…/chp13/gtk$ sudo apt install gtk+-2.0 glib-2.0 libgtk2.0-dev…/chp13/gtk$ g++ `pkg-config --libs --cflags glib-2.0 gtk+-2.0` →GTKsimple.cpp -o gtksimple…/chp13/gtk$ ./gtksimple
This call uses pkg-config, a tool that is useful when building applications and libraries under Linux, as it inserts the correct system-dependent options. It does this by collecting metadata about the libraries that are installed on the Linux system. For example, to get information about the current GTK+ library, you can use the following:
debian@ebb:~$ pkg-config --modversion gtk+-2.02.24.31
The application in Figure 13-5 does not quit when the X button (top-right corner) is clicked—the window itself disappears, but the program continues to execute. This is because the preceding code has not defined that something should happen when the X button is clicked—you need to associate a “close” function with the signal that is generated when the button is clicked.
The Event-Driven Programming Model
GUI applications typically use an event-driven programming model. Under this model, the application waits in its main loop until an event (e.g., the user action of clicking a button) is detected, which triggers a callback function to be performed. In GTK+, a user action causes the main loop to deliver an event to GTK+, which is initialized by the call to gtk_init(). GTK+ then delivers this event to the graphical widgets, which in turn emit signals. These signals can be attached to callback functions of your own design or to windowing functions. For example, the following GTK+ code quits the application if the window X button is clicked:
g_signal_connect(window, "destroy", G_CALLBACK (gtk_main_quit), NULL); The signal is attached to the window handle so that when a signal named destroy is received, the gtk_main_quit() function is called, which causes the application to exit. The last argument is NULL because no data is required to be passed to the gtk_main_quit() function.
The GTK+ Temperature Application
Listing 13-2 provides the full source code for a more complete GTK+ application, which executes on the Beagle board as shown in Figure 13-6. It uses the same TMP36 temperature sensor and ADC configuration used in Chapter 11 (Figure 11-2 and Listing 11-1). This example is a GUI application that reads the Beagle board ADC when a button is clicked and then displays the temperature in a label. In this example, a signal is connected to the button object, so when it is clicked, the callback function getTemperature() is called.

Figure 13-6: The GTKtemperature application
Listing 13-2: /exploringbb/chp13/gtk/GTKtemperature.cpp (Segment)
#include<gtk/gtk.h>…#define LDR_PATH "/sys/bus/iio/devices/iio:device0/in_voltage"// Same function as in Chp. 11 to read the ADC value (Listing 11-1)int readAnalog(int number){ … }// The callback function associated with the button. A pointer to the// label is passed, so that the label can display the temperaturestatic void getTemperature(GtkWidget *widget, gpointer temp_label){// cast the generic gpointer into a GtkWidget labelGtkWidget *temperature_label = (GtkWidget *) temp_label;int adc_value = readAnalog(0);float cur_voltage = adc_value * (1.80f/4096.0f);float diff_degreesC = (cur_voltage-0.75f)/0.01f;float temperature = 25.0f + diff_degreesC;stringstream ss;ss << "Temperature: " << temperature << " degrees C";// set the text in the labelgtk_label_set_text( GTK_LABEL(temp_label), ss.str().c_str());ss << endl; // add a to the string for the standard outputg_print(ss.str().c_str()); // output to the terminal (std out)}int main(int argc, char *argv[]){GtkWidget *window, *temp_label, *button, *button_label;gtk_init(&argc, &argv);window = gtk_window_new(GTK_WINDOW_TOPLEVEL);gtk_window_set_title(GTK_WINDOW (window), "Exploring BB v2");// Fix the size of the window so that it cannot be resizedgtk_widget_set_size_request(window, 220, 50);gtk_window_set_resizable(GTK_WINDOW(window), FALSE);// Place a border of 5 pixels around the inner window edgegtk_container_set_border_width (GTK_CONTAINER (window), 5);// Quit application if X button is pressedg_signal_connect(window, "destroy", G_CALLBACK (gtk_main_quit), NULL);// Set up the window to contain two vertically stacked widgets using a vboxGtkWidget *vbox = gtk_vbox_new(FALSE, 5); // spacing of 5gtk_container_add (GTK_CONTAINER (window), vbox); // add vbox to windowgtk_widget_show (vbox); // set the vbox visible// This is the label in which to display the temperaturetemp_label = gtk_label_new ("Temperature is Undefined");gtk_widget_show(temp_label); // make it visiblegtk_label_set_justify( GTK_LABEL(temp_label), GTK_JUSTIFY_LEFT);// Add the label to the vboxgtk_box_pack_start (GTK_BOX (vbox), temp_label, FALSE, FALSE, 0);// Create a button and connect it to the getTemperature() callback functionbutton = gtk_button_new();button_label = gtk_label_new ("Get Temperature"); // label for text on buttongtk_widget_show(button_label); // show labelgtk_widget_show(button); // show buttongtk_container_add(GTK_CONTAINER (button), button_label); // label for button// Connect the callback function getTemperature() to the button pressg_signal_connect(button, "clicked",G_CALLBACK (getTemperature), (gpointer) temp_label);// Add the button to the vboxgtk_box_pack_start (GTK_BOX (vbox), button, FALSE, FALSE, 0);gtk_widget_show(window);gtk_main();return 0;}
Introduction to Qt for the Beagle Board
Qt (pronounced “cute”) is a powerful cross-platform development framework that uses standard C++. It provides libraries of C++ code for GUI application development and for database access, thread management, networking, and more. Importantly, code developed under this framework can be executed under Windows, Linux, macOS, Android, and iOS, as well as on embedded platforms, such as the Beagle board. Qt can be used under open-source or commercial terms, and it is supported by freely available development tools, such as qmake and Qt Creator. The capability and flexibility of this framework make it an ideal candidate for GUI applications that are to run directly on the Beagle board or on devices that control the board.
Qt is described in greater detail in the next section, but it is useful to get started using a simple “hello world” example, as illustrated in Figure 13-7, which can be compiled and executed on the Beagle board either directly or using VNC.
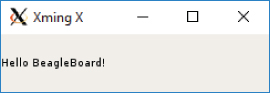
Figure 13-7: Qt “hello world” Beagle board example executing using VNC
Installing Qt Development Tools
The first step is to install the Qt development tools on the Beagle board. The last command in the following code snippet installs a full suite of tools (~20 MB to 200 MB of storage required depending on your current configuration). The middle command identifies the constituent components of the suite.
debian@ebb:~$ sudo apt updatedebian@ebb:~$ apt-cache search qt5debian@ebb:~$ sudo apt install qt5-default
You can then test the version of the installation using the following:
debian@ebb:~$ qmake -versionQMake version 3.0Using Qt version 5.7.1 in /usr/lib/arm-linux-gnueabihf
The “Hello World” Qt Application
Listing 13-3 is a concise Qt application that can be used as a test—it does not represent good Qt programming practice! It uses an object of the QLabel class, which is a subclass of the QWidget class, to display a message in the application. A widget is the primary UI element that is used for creating GUIs with Qt. The parent QWidget class provides the code required to render (draw) the subclass object on the screen display.
Listing 13-3: /exploringbb/chp13/simpleQt/simpleQt.cpp
#include <QApplication>#include <QLabel>int main(int argc, char *argv[ ]){QApplication app(argc, argv);QLabel label("Hello BeagleBoard!");label.resize(200, 100);label.show();return app.exec();}
The simpleQt.cpp file in Listing 13-3 is the only file required in a directory before the following steps take place. The qmake cross-platform makefile generator can then be used to create a default project.
debian@ebb:~/exploringbb/chp13/simpleQt$ lssimpleQt.cppdebian@ebb:~/exploringbb/chp13/simpleQt$ qmake -projectdebian@ebb:~/exploringbb/chp13/simpleQt$ lssimpleQt.cpp simpleQt.pro
Edit the project file to specify that you are using the nondefault widgets module by adding the line highlighted here:
debian@ebb:~/exploringbb/chp13/simpleQt$ more simpleQt.pro####################################################################### Automatically generated by qmake (3.0) Tue Aug 28 00:28:43 2018######################################################################TEMPLATE = appTARGET = simpleQtQT +=widgetsINCLUDEPATH += .# InputSOURCES += simpleQt.cpp
This project .pro file describes the project settings ; if required, it can be edited manually to add additional dependencies. The qmake makefile generator can then be executed again, this time with no -project argument:
debian@ebb:~/exploringbb/chp13/simpleQt$ qmakeInfo: creating stash file …/chp13/simpleQt/.qmake.stashdebian@ebb:~/exploringbb/chp13/simpleQt$ lsMakefile simpleQt.cpp simpleQt.pro
This step results in a Makefile file being created in the current directory that allows the executable to be built using a call to make, which in turn uses g++ to build the final application.
debian@ebb:~/exploringbb/chp13/simpleQt$ makeg++ -c -pipe -O2 -Wall -W -fPIC … -o simpleQt.o simpleQt.cpp …
The executable is now present in the directory and can be executed as follows, which results in the visual display shown earlier in Figure 13-7:
debian@ebb:~/exploringbb/chp13/simpleQt$ lsMakefile simpleQt simpleQt.cpp simpleQt.o simpleQt.prodebian@ebb:~/exploringbb/chp13/simpleQt$ ./simpleQt
Clearly, there are additional steps involved in using qmake to build a Qt application, but these are necessary to take advantage of the cross-platform nature of Qt. For example, you can perform similar steps on your desktop machine to build the same application, regardless of its OS.
Qt Primer
Qt is a full cross-platform development framework that is written in C/C++. It is used in the preceding section for UI programming, but it also provides support for databases, threads, timers, networking, multimedia, XML processing, and more. Qt extends C++ by adding macros and introspection, code that examines the type and properties of an object at run time, which is not natively available in C++. It is important to note that all the code is still just plain C++!
Qt Concepts
Qt is built in modules, each of which can be added to your project by including the requisite header files in your C++ program and by identifying that the module is used in the project .pro file. For example, to include the classes in the QtNetwork module, you add #include<QtNetwork> to your program code and link against the module by adding QT += network to the qmake .pro file. Table 13-2 provides a list of important Qt modules.
Table 13-2: Summary of the Important Qt Modules
| NAME | DESCRIPTION |
| QtCore | Contains the core non-GUI classes, such as QString, QChar, QDate, QTimer, and QVector. It is included by default in Qt projects, as all other Qt modules rely on this module. |
| QtGui | Core module that adds GUI support to the QtCore module, with classes such as QDialog, QWidget, QToolbar, QLabel, QTextEdit, and QFont. This module is included by default—if your application has no GUI, then you can add Qt -= gui to your .pro file. |
| QtMultimedia | Contains classes for low-level multimedia functionality, such as QVideoFrame, QAudioInput, and QAudioOutput. To use this module, add #include <QtMultimedia> to your source file and QT += multimedia to your .pro file. |
| QtNetwork | Contains classes for network communication over TCP and UDP, including SSL communications, with classes such as QTcpSocket, QFtp, QLocalServer, QSslSocket, and QUdpSocket. As earlier, use #include <QtNetwork> and QT += network. |
| QtOpenGL | The Open Graphics Library (OpenGL) is a cross-platform application programming interface (API) for 3-D computer graphics, which is widely used in industrial visualization and computer gaming applications. This module makes it straightforward to contain OpenGL in your application with classes such as QGLBuffer, QGLWidget, QGLContext, and QGLShader. As earlier, use #include <QtOpenGL> and QT += opengl. The AM335x has OpenGL hardware acceleration capability, but it is difficult to utilize. |
| QtScript | Enables you to make your Qt application scriptable. Scripts are used in applications such as Microsoft Excel and Adobe Photoshop to enable users to automate repetitive tasks. QtScript includes a JavaScript engine, which you can use within the core application to interlink functionality in scripts. It can also be used to expose the internal functionality of your application to users, enabling them to add new functionality without the need for C++ compilation. As earlier, use #include <QtScript> and QT += script. |
| QtSql | Contains classes for interfacing to databases using the SQL programming language, such as QSqlDriver, QSqlQuery, and QSqlResult. As earlier, use #include <QtSql> and QT += sql. |
| QtSvg | Contains classes for creating and displaying scalar vector graphics (SVG) files, such as QSvgWidget, QSvgGenerator, and QSvgRenderer. As earlier, use #include <QtSvg> and QT += svg. |
| QtTest | Contains classes for unit testing Qt applications using the QTestLib tool, such as QSignalSpy and QTestEventList. As earlier, use #include <QtTest> and QT += testlib. |
| QtWebKit | Provides a web browser engine and classes for rendering and interacting with web content, such as QWebView, QWebPage, and QWebHistory. As earlier, use #include <QtWebKit> and QT += webkit. |
| QtXml | Extensible markup language (XML) is a human-readable document format that can be used to transport and store data. The QtXml module provides a stream reader and writer for XML data, with classes such as QXmlReader, QDomDocument, and QXmlAttributes. As earlier, use #include <QtXml> and QT += xml. |
The QObject Class
The QObject class is the base class of almost all the Qt classes and all the widgets.1 This means most Qt classes share common functionality for handling memory management, properties, and event-driven programming.
Qt implements introspection by storing information about every class that is derived from QObject using a QMetaObject object within its Meta-Object System. When you build projects using Qt you will see that new .cpp files appear in the build directory—these are created by the Meta-Object Compiler (moc).2 The C++ compiler will then compile these files into a regular C/C++ objective file (.o), which is ultimately linked to create an executable application.
Signals and Slots
Similar to GTK+, Qt has an event-driven programming model that enables events and state changes to be interconnected with reactions using a mechanism termed signals and slots. For example, a Qt button widget can be configured so that when it is clicked, it generates a signal, which has been connected to a slot. The slot, which is somewhat like a callback function, performs a user-defined function when it receives a signal. Importantly, the signals and slots mechanism can be applied to non-GUI objects—it can be used for intercommunication between any object that is in any way derived from the QObject class. Signals and slots provide a powerful mechanism that is possibly the most unique feature of the Qt framework.
A full-featured Qt temperature sensor application is developed shortly that makes extensive use of signals and slots. For example, the application updates the temperature display every five seconds by reading the ADC value; Figure 13-8 illustrates how this takes place. In this example, the QTimer class has a signal called timeout() that is emitted whenever an object called timer “times out” (which it does after five seconds). This signal is connected to the on_updateTemperature() slot on an object of the QMainWindow class called mainWindow. The connection is made by a call of the following form:
QObject::connect(source,SIGNAL(signature),destination,SLOT(signature)); 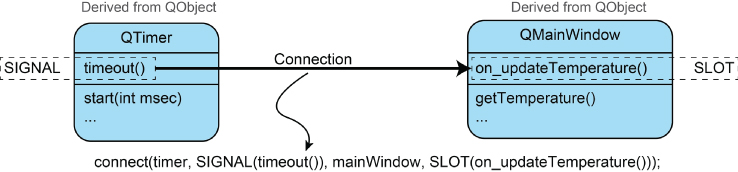
Figure 13-8: QTimer signals and slots example
where source and destination are objects of classes that are derived from the QObject class. The signature is the function name and argument types (without the variable names).
The website www.qt.io provides an excellent detailed description of the behavior of signals and slots, but here are some further summary points on signals, slots, and connections that will get you started:
- Signals can be connected to any number of slots.
- Signals are defined in the signals section of the code (under a
signals:label, which is usually in the class header file). - Signal “methods” must return
voidand may not have any implementation. - A signal can be explicitly emitted using the
emitkeyword. - Slots can be connected to any number of signals.
- Slots are defined in the slots section of the code (under a
slots:label that can be public, private, or protected). - Slots are regular methods with a full implementation.
- Connections can be explicitly formed (as in the timer example shown earlier) or automatically created when using the Qt graphical design tools in the next section.
Qt Development Tools
The Qt framework also has associated development tools. As well as the qmake tool, there is a full-featured IDE called Qt Creator, which is similar in nature to Eclipse, except that it is specifically tailored for Qt development. The IDE, which is illustrated in Figure 13-9, is available for Linux, Windows, and macOS, and its Qt Designer tool can even execute on the Beagle board directly. Qt Creator can be used to build native applications, or it can be used to cross-compile applications for the board by installing a cross-platform toolchain (similar to Eclipse).

Figure 13-9: Qt Creator IDE visual design editor running directly on the Beagle board (via VNC)
To install and execute Qt Creator on the Beagle board (e.g., via VNC), use the following steps, whereupon the IDE appears as in Figure 13-9. Qt Creator needs approximately 400 MB of installation space.
debian@ebb:~$ sudo apt install qtcreatordebian@ebb:~$ qtcreator &
One of the key features that Qt Creator provides is its visual design editor, which enables you to interactively drag and drop widgets onto window designs, called forms. The interface enables the properties of the widgets to be configured easily, and it provides a straightforward way of enabling signals and associating slots against the UI components. For example, to write code that executes when the Press Me button is clicked (refer to Figure 13-9), you can simply right-click the button and choose “Go to slot,” which provides a dialog with a list of available signals (such as clicked(), pressed(), and released()).3 Once a signal is chosen, the IDE will automatically enable the signal, provide a slot code template, and associate the signal with the slot. The form UI's properties are stored in an XML file and associated with the project (e.g., mainwindow.ui).
A First Qt Creator Example
You can create a simple Qt GUI application on a Beagle board using Qt Creator by following these steps:
- Using VNC or by developing on the Beagle board directly, start Qt Creator with the following call:
debian@ebb:~$ qtcreator & - Create a new project of type Qt Widgets Application. Call it
QtTestand create it in the/home/debian/directory. - Select the Desktop kit and choose the default class information. This results in a new project being created within Qt Creator, which appears as in Figure 13-9 when you double-click the
mainwindow.uiform entry. - In this window view, add a Push Button component and a Text Edit (
QTextEdit) component, as illustrated in Figure 13-9. - Right-click the text edit box and choose Change objectName. Change the object name to be
output. - Retitle the button to Press Me and then right-click the button. Choose Go to Slot and then pick a signal such as
clicked(). This creates a new function in themainwindow.cppfile calledon_pushButton_clicked(). See Figure 13-10. - You can then add a line of code to this method that sets the text of the
outputQTextEditcomponent, which is accessed via theuimain window.void MainWindow::on_pushButton_clicked() {ui->output->setText("Hello from the Beagle Board!");}
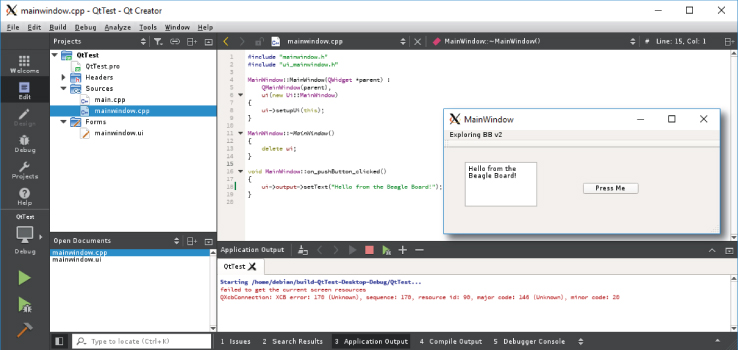
Figure 13-10: Qt Creator IDE test application
The application can be executed by clicking the Play button on the bottom-left side of Figure 13-10. The application window appears on the right side of the same figure. When the Press Me button is clicked, then the text “Hello from the Beagle Board!” appears in the outputQTextEdit component.
A Qt Temperature Sensor GUI Application
In this section, the Qt Creator IDE is used to build a full-featured GUI temperature sensor application, as illustrated in Figure 13-11. This application executes directly on a Beagle board, regardless of the UI architecture used. This application demonstrates some of the capabilities of Qt on a Beagle board, while being cognizant of the volume of code to be studied. It could be greatly extended. For example, it could also provide historical charting or fancy display dials. This example application supports the following features:
- A timer thread takes a reading every five seconds from a Beagle board ADC input using the TMP36 temperature sensor (see Chapter 11’s Figure 11-2).
- An LCD-style floating-point temperature display is used.
- A display of the minimum and maximum temperature is provided.
- A slider is used that enables you to choose a temperature at which to activate an alert. An alert triggers the display of a dialog box.
- A mechanism is provided to convert the main display from a Celsius scale to a Fahrenheit scale by clicking the Fahrenheit radio widget.
- A status display is used at the bottom of the window.
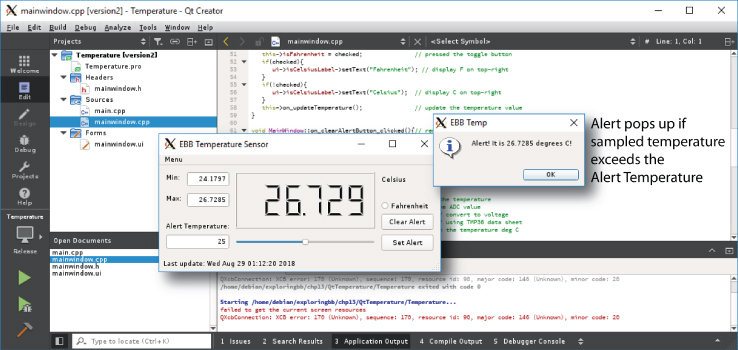
Figure 13-11: The Qt TMP36 temperature sensor GUI application
The full source code and executable for this application are available in the Git repository's /exploringbb/chp13/QtTemperature/ directory.
There are three important source files to describe for this application, the first of which is in Listing 13-4. It provides the main() starting point for the application in which an instance of the QApplication and MainWindow classes are created. The QApplication class manages the GUI application control flow (the main loop). The MainWindow class is defined in Listings 13-5 and 13-6.
Listing 13-4: /exploringbb/chp13/QtTemperature/main.cpp
#include "mainwindow.h"#include <QApplication>int main(int argc, char *argv[]){QApplication a(argc, argv); // manages GUI application control flowMainWindow w; // the user-defined classw.show(); // shows the user-defined class UIreturn a.exec(); // without a.exec() the program would end here} // it is the main loop that processes events
The MainWindow class is a child of the QMainWindow class (which is a child of QWidget and ultimately QObject). This means any methods that are available in the parent classes are also available in the MainWindow class.
Figure 13-12 illustrates the relationship between the UI components and the slots that are declared in Listing 13-5 and defined in Listing 13-6. The timer code is also summarized—it is not a GUI component, but it does generate a timeout() signal, which is connected to the on_updateTemperature() slot. The exact nature of the code in Listings 13-5 and 13-6 is described by the comments. However, the clearest way to fully understand the code is to edit it and see what impact your edits have. You do not require the temperature sensor to execute the code, but the temperature display will remain fixed at 25°C in its absence.
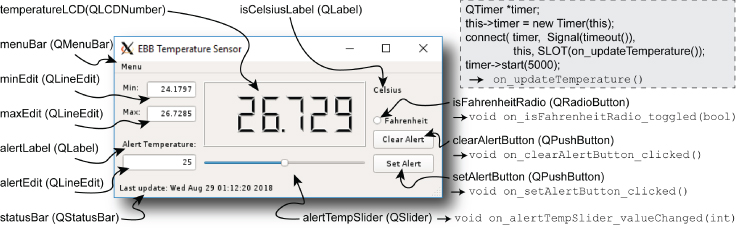
Figure 13-12: The UI components and associated slots
Listing 13-5: /exploringbb/chp13/QtTemperature/mainwindow.h
#include <QMainWindow> // for the main GUI interface#include <QTimer> // for a timer that periodically reads temperature#include <QDateTime> // to find out the date/time of the sample#include <QMessageBox> // for pop-up message boxes - e.g., alert!namespace Ui {class MainWindow; // Places class MainWindow in UI namespace}class MainWindow : public QMainWindow // a child of the QMainWindow class{// This macro must appear in the private section of a class that// declares its own signals and slotsQ_OBJECTpublic:explicit MainWindow(QWidget *parent = 0); // constructor~MainWindow(); // destructorprivate slots:void on_setAlertButton_clicked();void on_isFahrenheitRadio_toggled(bool checked);void on_clearAlertButton_clicked();void on_alertTempSlider_valueChanged(int value); // if alert slider movedvoid on_updateTemperature(); // this slot is triggered by the timerprivate:Ui::MainWindow *ui; // the main user interfaceQTimer *timer; // timer thread that triggers after a delaybool isFahrenheit; // is the main display deg C or deg Fint alertTemperature; // the alert temperature valuebool isAlertSet; // is the alert set?float minTemperature, maxTemperature; // min and max temp valuesfloat celsiusToFahrenheit(float valueCelsius); // function for conversionfloat getTemperature(); // get the temperature from the sensorint readAnalog(int number); // used by getTemperature to read the ADC};
Listing 13-6: /exploringbb/chp13/QtTemperature/mainwindow.cpp
#include "mainwindow.h"#include "ui_mainwindow.h"#include <fstream>#include <sstream>using namespace std;#define LDR_PATH "/sys/bus/iio/devices/iio:device0/in_voltage"// Constructor used to set up the default values for the created objectMainWindow::MainWindow(QWidget *parent) :QMainWindow(parent), ui(new Ui::MainWindow) {ui->setupUi(this);this->isFahrenheit = false; // default to Celsiusthis->isAlertSet = false; // no alert setstatusBar()->showMessage("No alert set"); // status at bottom of windowthis->timer = new QTimer(this); // create a new timer// when the timer times out, call the slot on_updateTemperature()connect(timer, SIGNAL(timeout()), this, SLOT(on_updateTemperature()));this->maxTemperature = -100.0f; // pick an impossible minthis->minTemperature = 200.0f; // pick an impossible maxthis->on_updateTemperature(); // explicitly update the displaytimer->start(5000); // set the time out to be 5 sec}MainWindow::~MainWindow() { delete ui; } // destructor, destroys UIvoid MainWindow::on_setAlertButton_clicked() { // set the alert temperatureint sliderValue = ui->alertTempSlider->value(); // get the slider valueif(sliderValue < getTemperature()){ // lower than current temp?QMessageBox::warning(this, "EBB Temperature","Alert setting too low!", QMessageBox::Discard);}else{ // alert value fineQString tempStr("Alert is set for: "); // form a messagetempStr.append(QString::number(sliderValue)); // with the alert tempstatusBar()->showMessage(tempStr); // display the messagethis->isAlertSet = true; // alert is setthis->alertTemperature = sliderValue; // alert temp set}}void MainWindow::on_isFahrenheitRadio_toggled(bool checked){this->isFahrenheit = checked; // pressed the toggle buttonif(checked){ui->isCelsiusLabel->setText("Fahrenheit"); // display F on top-right}if(!checked){ui->isCelsiusLabel->setText("Celsius"); // display C on top-right}this->on_updateTemperature(); // update the temperature value}void MainWindow::on_clearAlertButton_clicked(){// remove the alertthis->isAlertSet = false;statusBar()->showMessage("No alert set");}void MainWindow::on_alertTempSlider_valueChanged(int value) {ui->alertEdit->setText(QString::number(value)); // update alert text field}float MainWindow::getTemperature(){ … } // same as Chp.10 code (10-5)int MainWindow::readAnalog(int number){ … } // same as Chp.10 code (10-5)float MainWindow::celsiusToFahrenheit(float valueCelsius){return ((valueCelsius * (9.0f/5.0f)) + 32.0f);}// slot for the timer, called every 5 sec, and also explicitly in the code.void MainWindow::on_updateTemperature() { // called whenever temp updatedfloat temperature = this->getTemperature();QDateTime local(QDateTime::currentDateTime()); // display sample timestatusBar()->showMessage(QString("Last update: ").append(local.toString()));if(temperature >= this->maxTemperature){ // is this the max temperature?this->maxTemperature = temperature;ui->maxEdit->setText(QString::number(temperature));}if(temperature <= this->minTemperature){ // is this the min temperature?this->minTemperature = temperature;ui->minEdit->setText(QString::number(temperature));}if(this->isFahrenheit){ // is the display in Fahrenheit?ui->temperatureLCD->display((double)this->celsiusToFahrenheit(temperature));}else{ // must be Celsiusui->temperatureLCD->display((double)temperature);}if(this->isAlertSet){ // is the alert enabled?if(temperature>=this->alertTemperature){ // does it exceed alert temp?QString message("Alert! It is ");message.append(QString::number(temperature)).append(" degrees C!");QMessageBox::information(this, "EBB Temp", message, QMessageBox::Ok);}}}
The code can be executed on the Beagle board from within Qt Creator or manually from a terminal window as follows:
molloyd@desktop:~$ ssh -XC [email protected]debian@ebb:~$ cd ~/exploringbb/chp13/QtTemperature/debian@ebb:~/exploringbb/chp13/QtTemperature$ ./Temperature
Remote UI Application Development
In Chapter 11, a C++ client/server application was introduced that can be used for direct intercommunication between two processes that are running on two different machines (or the same machine) using TCP sockets. The machines could be situated on the same physical/wireless network or could even be on different continents. Direct socket communication requires programmers to frame their own intercommunication protocol. This results in programming overhead, but it also leads to efficient communication, which is only really limited by the speed of the network.
In this section, the functionality of the Qt temperature sensor GUI application and the C++ client/server application (from Chapter 11) are combined. This enables the creation of a fat-client GUI temperature application that can intercommunicate with a temperature service, which is running on the Beagle board. The temperature service server code is enhanced from that presented in Chapter 11, by making it multithreaded. This change enables many client applications to attach to the server at the same time. The architecture is illustrated in Figure 13-13.
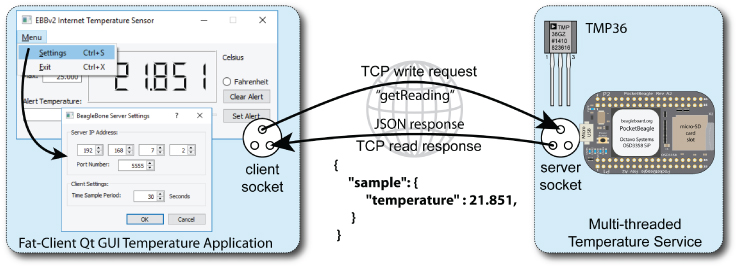
Figure 13-13: The Qt fat-client GUI application client/server architecture
The full source code for the Qt GUI application is available in the chp13/QtSocketsTemperature directory, and the server source code is available in the chp13/threadedTemperatureServer directory.
Fat-Client Qt GUI Application
In this section, the Qt temperature sensor GUI application from earlier in this chapter is modified so that it becomes “internet enabled.” This change means the application does not have to execute on the Beagle board; rather, the GUI application can run on a desktop machine and communicate to the board sensor using TCP sockets. To achieve this outcome, the following changes are made to the GUI application code:
- A new dialog window is added to the application that can be used to enter the server IP address, the service port number, and the reading refresh frequency. This dialog is illustrated in Figure 13-14.
- Rather than read from the Beagle board ADC, the GUI application must open a TCP socket and communicate to the Beagle board server application. The client application sends the string “getTemperature” to the server. The server is programmed to respond with the temperature, which it reads from the TMP36 sensor that is attached to an ADC input. The temperature is encoded in a JSON format.
- A menu is enabled on the application UI that can be used to open the Server Settings dialog or to quit the application. The respective key sequences Ctrl+S and Ctrl+X can also be used.
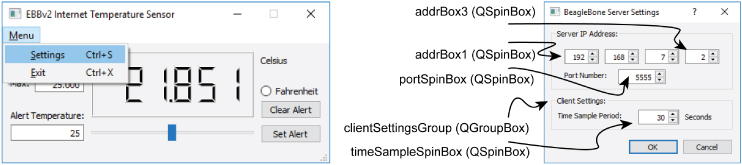
Figure 13-14: The Menu and the Server Settings dialog
The first change involves adding a new class to the project called ServerSettingsDialog, as described in Listing 13-7, which is associated with the dialog (and its serversettingsdialog.ui XML file). The role of this class is to act as a wrapper for the values that are entered in the dialog—for example, it will return the IPv4 address that a user entered in the QSpinBox widgets, by returning a single 32-bit unsigned int (quint32) when its getIPAddress() method is called.
Listing 13-7: /chp13/QtSocketsTemperature/serversettingsdialog.h
class ServerSettingsDialog : public QDialog{Q_OBJECT // the Qt macro required forpublic:explicit ServerSettingsDialog(QWidget *parent = nullptr); //pass ref to mainwindow~ServerSettingsDialog();quint32 virtual getIPAddress(); // return the IP address as a 32-bit intint virtual getTimeDelay() { return timeDelay; } // the sample timeint virtual getServerPort() { return serverPortNumber; } // the port numberprivate slots:void on_buttonBox_accepted(); // OK button is pressedvoid on_buttonBox_rejected(); // Cancel button is pressedprivate:Ui::ServerSettingsDialog *ui; // pointer to the UI componentsint serverPortNumber; // port number (default 5555)int timeDelay; // time delay sec (default 30)int address[4]; // IP address (default 192.168.7.2)};
The second change involves the addition of socket code to the getSensorTemperature() method, as provided in Listing 13-8. This code uses the QtNetwork module, which requires that you add the following:
QT += core gui network to the SocketsTemperature.pro project file so that the project links to that module. The QTcpSocket class is used to create a client connection to the Beagle board TCP temperature server. Regular TCP sockets are used on the Beagle board, which does not cause any difficulty in the transaction of string data. Interestingly, you could equivalently use Java socket code on either end of a connection—just be careful to ensure that the byte order is preserved.
Listing 13-8: /chp13/QtSocketsTemperature/mainwindow.cpp (Segment)
int MainWindow::getSensorTemperature(){// Get the server address and port from the settings dialog boxint serverPort = this->dialog->getServerPort(); // get from the dialog boxquint32 serverAddr = this->dialog->getIPAddress(); // from the dialog boxQTcpSocket *tcpSocket = new QTcpSocket(this); // create sockettcpSocket->connectToHost(QHostAddress(serverAddr), serverPort); // connectif(!tcpSocket->waitForConnected(1000)){ //wait up to 1s for a connectionstatusBar()->showMessage("Failed to connect to server…");return 1;}// Send the message "getTemperature" to the servertcpSocket->write("getTemperature");if(!tcpSocket->waitForReadyRead(1000)){ // wait up to 1s for the serverstatusBar()->showMessage("Server did not respond…");return 1;}// If the server has sent bytes back to the clientif(tcpSocket->bytesAvailable()>0){int size = tcpSocket->bytesAvailable(); // how many bytes are ready?char data[20]; // upper limit of 20 charstcpSocket->read(&data[0], static_cast<qint64>(size)); // read the number of bytes rec.data[size]='�'; // termintate the string//this->curTemperature = atof(data); // string -> float conversioncout << "Received the data [" << this->curTemperature << "]" << endl;this->parseJSONData(QString(data));}else{statusBar()->showMessage("No data available…");}return 0; // the on_updateTemperature() slot will update the display}void MainWindow::createActions(){QAction *exit = new QAction("&Exit", this);exit->setShortcut(QKeySequence(tr("Ctrl+X")));QAction *settings = new QAction("&Settings", this);settings->setShortcut(QKeySequence(tr("Ctrl+S")));QMenu *menu = menuBar()->addMenu("&Menu");menu->addAction(settings);menu->addAction(exit);connect(exit, SIGNAL(triggered()), qApp, SLOT(quit())); //quit applicationconnect(settings, SIGNAL(triggered()), this, SLOT(on_openSettings()));}void MainWindow::on_openSettings(){this->dialog->exec(); // display the dialog boxthis->timer->start(1000*this->dialog->getTimeDelay()); //update timer delay}int MainWindow::parseJSONData(QString str){QJsonDocument doc = QJsonDocument::fromJson(str.toUtf8());QJsonObject obj = doc.object();QJsonObject sample = obj["sample"].toObject();this->curTemperature = sample["temperature"].toDouble();cout << "The temperature is " << this->curTemperature << endl;return 0;}
The third change is implemented by the createActions() method in Listing 13-8, which creates the GUI menu when it is called by the class constructor. It adds two actions to the menu: The Exit item quits the application, and the Settings item triggers the execution of the on_openSettings() slot, which opens the Server Settings dialog.
The Beagle board does not have to update the client-side GUI of the application in this architecture. Rather, it manages TCP socket connections, processes strings, and reads values from an ADC input. Such operations have a low overhead on the Beagle board, and therefore it is capable of simultaneously handling many client requests. Unfortunately, the server code that is presented in Chapter 11 is not capable of handling multiple simultaneous requests; instead, it processes requests in sequence and would reject a connection if it is presently occupied.
Multithreaded Server Applications
For many server applications it is important that the server can handle multiple simultaneous requests. For example, if the Google search engine web page could handle requests only sequentially, then there might be a long queue and/or many rejected connections! Figure 13-15 illustrates the steps that must take place for a multithreaded server application on a BBB to communicate simultaneously with two individual client applications. The steps are as follows:
- TCP Client 1 requests a connection to the BBB TCP server. It must know the server's IP address (or name) and the port number.
- The BBB TCP server creates a new thread (connection handler 1) and passes the TCP client's IP address and port number to it. The BBB TCP server immediately begins listening for new connections (on port 5555). The connection handler 1 thread then forms a connection to the TCP client 1 and begins communicating.
- TCP client 2 requests a connection to the BBB TCP server. The connection handler 1 thread is currently communicating to TCP client 1, but the BBB TCP server is also listening for connections.
- The BBB TCP server creates a new thread (connection handler 2) and passes the second TCP client's IP address and port number to it. The BBB TCP server immediately begins listening for new connections. The connection handler 2 thread then forms a connection to the TCP client 2 and begins communication.

Figure 13-15: A multithreaded server on the BBB
At this point, communication is simultaneously taking place between both client/connection handler pairs, and the server main thread is listening for new connections. The client/connection handler communication session could persist for a long time—for example, for video streaming internet services such as YouTube or Netflix.
If the connection handler objects were not implemented as threads, then the server would have to wait until the client/connection handler communication is complete before it could listen again for new connections. With the structure described, the server is unavailable only while it is constructing a new connection handler threaded object. Once the object is created, the server returns to a listening state. Client socket connections have a configurable timeout limit (typically of the order of seconds), so a short processing delay by the server should not result in rejected connections.
A C++ multithreaded client/server example is available in the chp13/threadedclientserver directory. An artificial five-second delay is present in the ConnectionHandler class to prove conclusively that simultaneous communication is taking place. For example, you can open three terminal sessions on the board and start the server.
~/exploringbb/chp13/threadedclientserver$ lsbuild client client.cpp network server server.cpp~/exploringbb/chp13/threadedclientserver$ ./serverStarting EBB Server ExampleListening for a connection…
Then start TCP client 1 in the next terminal.
~/exploringbb/chp13/threadedclientserver$ ./client localhostStarting EBB Client ExampleSending [Hello from the Client]
Then start TCP client 2 in the last terminal (quickly—the delay is five seconds!).
~/exploringbb/chp13/threadedclientserver$ ./client localhostStarting EBB Client ExampleSending [Hello from the Client]
The fact that the second client is able to connect while the first client is awaiting an (artificially delayed) response means that the server must be multithreaded. The final output of the server is as follows:
~/exploringbb/chp13/threadedclientserver$ ./serverStarting EBB Server ExampleListening for a connection…Received from the client [Hello from the Client]Sending back [The Server says thanks!]but going asleep for 5 seconds first….Received from the client [Hello from the Client]Sending back [The Server says thanks!]but going asleep for 5 seconds first….
Both clients will display the same final output.
~/exploringbb/chp13/threadedclientserver$ ./client localhostStarting EBB Client ExampleSending [Hello from the Client]Received [The Server says thanks!]End of EBB Client Example
The class definition for the ConnectionHandler class is provided in Listing 13-9. This class has a slightly complex structure so that a thread is created and started when an object of the class is created. This code can be used as a template—just rewrite the threadLoop() implementation.
Listing 13-9: /chp13/threadedclientserver/network/ConnectionHandler.h
class SocketServer; // class declaration, due to circular reference problem// and C/C++ single definition rule.class ConnectionHandler {public:// Constructor expects a reference to the server that called it and// the incoming socket and file descriptorConnectionHandler(SocketServer *server, sockaddr_in *in, int fd);virtual ~ConnectionHandler();int start();void wait();void stop() { this->running = false; } // stop the thread loopvirtual int send(std::string message); // send a message to the clientvirtual std::string receive(int size); // receive a messageprotected:virtual void threadLoop(); // the user-defined thread loopprivate:sockaddr_in *client; // a handle to the client socketint clientSocketfd; // the client socket file desc.pthread_t thread; // the threadSocketServer *parent; // a handle to the server objectbool running; // is the thread running (default true)// static method to set the thread running when an object is createdstatic void * threadHelper(void * handler){((ConnectionHandler *)handler)->threadLoop();return NULL;}};
A Multithreaded Temperature Service
The code in the previous section is modified in this section to create the multithreaded temperature service in Listing 13-10, which is available in the chp13/threadedTemperatureServer/ directory. It is unlikely that you will need to check the room temperature every fraction of a second. Therefore, a multithreaded approach is overkill in this example. However, this structure is important for applications that stream data, so it is useful to be exposed to it.
Listing 13-10: /threadedTemperatureServer/network/ConnectionHandler.cpp
int ConnectionHandler::readAnalog(int number){ … // same as before }float ConnectionHandler::getTemperature(int adc_value){ … // same as before }void ConnectionHandler::threadLoop(){cout << "*** Created a Temperature Connection Handler threaded Function" << endl;string rec = this->receive(1024);if (rec == "getTemperature"){cout << "Received from the client [" << rec << "]" << endl;stringstream ss;ss << " { "sample": { "temperature" : ";ss << this->getTemperature(this->readAnalog(0)) << " } } "; //JSON stringthis->send(ss.str());cout << "Sent [" << ss.str() << "]" << endl;}else {cout << "Received from the client [" << rec << "]" << endl;this->send(string("Unknown Command"));}cout << "*** End of the Temperature Connection Handler Function" << endl;this->parent->notifyHandlerDeath(this);}
The temperature server code can be tested by using the temperatureClientTest CLI test application, which is in the same directory as the server, by using the following:
…/chp13/threadedTemperatureServer$ ./temperatureServerStarting EBB Server ExampleListening for a connection…
Then execute the test client in a different terminal.
…/…/threadedTemperatureServer$ ./temperatureClientTest localhostStarting EBB Temperature Client TestSending [getTemperature]Received [ { "sample": { "temperature" : 21.4551 } } ]End of EBB Temperature Client Test
The final output of the server is as follows:
…/chp13/threadedTemperatureServer$ ./temperatureServerStarting EBB Server ExampleListening for a connection…Starting the Connection Handler thread*** Created a Temperature Connection Handler threaded FunctionReceived from the client [getTemperature]Sent [ { "sample": { "temperature" : 21.4551 } } ]*** End of the Temperature Connection Handler Function …
The localhost hostname is resolved to the loopback address 127.0.0.1, which enables the board to communicate with itself. If the client application outputs a temperature (e.g., 21.4551°C), then this test is successful and the Qt fat-client GUI application should also connect to the server, as illustrated in Figure 13-14.
Parsing Stream Data
The obvious approach to sending data between a server and a client is to use byte data and to marshal and unmarshal the data values. This can be performed by manually converting numeric data into string values; however, manual conversion is prone to parsing errors, particularly as the complexity of communication increases. One solution to this problem is to use an XML format to communicate between the client and the server. For example, the sample data could be structured as a simple XML message format.
<sample><temperature>21.4551</temperature></sample> The Qt framework has full support for XML parsing in the QtXml module by using the QXmlStreamReader class.
An alternative solution is to use JavaScript Object Notation (JSON), which is also a human-readable format and is commonly used to transmit data between server and web applications. As you will have noticed, the sample data in the Qt temperature client/server application is transmitted in the JSON format as follows:
{"sample": {"temperature" : 21.4551,}}
The Qt framework also has full support for parsing JSON data using the QJsonDocument class. Listing 13-11 is a segment of code from the Qt temperature client application that parses the JSON data format and retrieves the floating-point temperature value. By converting the byte data into an sample object of the QJsonObject class, the data values can be retrieved by calling sample["name"].toDouble(), where name is the string name of the value to be retrieved. There are similar functions for other data types, for example, toInt(), toString(), toBool(), and toArray().
Listing 13-11: /chp13/QtSocketsTemperature/mainwindow.cpp (Segment)
int MainWindow::parseJSONData(QString str){QJsonDocument doc = QJsonDocument::fromJson(str.toUtf8());QJsonObject obj = doc.object();QJsonObject sample = obj["sample"].toObject();this->curTemperature = sample["temperature"].toDouble();cout << "The temperature is " << this->curTemperature << endl;return 0;}
This framework is flexible and can be applied to many client/server applications on the Beagle board. In fact, it can even be reversed so that the Beagle board is the client and a desktop/server machine acts as the TCP server. Regardless, the same multithreading and data interchange principles can be used.
The Fat Client as a Server
In the previous example, the Qt fat-client GUI application initiates contact with the temperature service using the IP address (or hostname) of the server and the port number of the service. It is possible to reverse this relationship, by programming the GUI application to be the server and the Beagle board to be a client. Clearly, such a change would mean that the Beagle board is responsible for establishing communication with the GUI application, so it would therefore need to know the desktop computer's IP address and service port number.
For a single-client-to-single-server arrangement, the choice of which device is to be the server is not that important. The choice is likely resolved by deciding which party is most likely to initiate contact and then choosing it as the client. In fact, it would be possible to build client and server functionality into both parties, but that would add significant complexity to the program design. However, for single-party-to-multiple-party relationships, the decision is clearer. For example, the temperature service application is designed so that many client applications can make contact with a single server. It would be extremely difficult to reverse the client/server relationship in that case, as the Beagle board temperature sensor would have to somehow identify and push the temperature reading to each and every GUI application.
There are applications for which it is appropriate for the GUI application to be the server and for the Beagle board to act as the client. This is especially the case if one GUI application is responsible for aggregating sensor readings from many services and/or Beagle board devices. Figure 13-16 illustrates one such example. In this example a BBB is attached to the ADXL345 accelerometer using the I2C bus. The BBB streams accelerometer data to the GUI application, which provides a “live” graphical display of the ADXL345's pitch and roll values. For brevity, this example uses one BBB client, but it could easily be adapted to use multiple clients and either display multiple GUI interfaces or average the sample data.
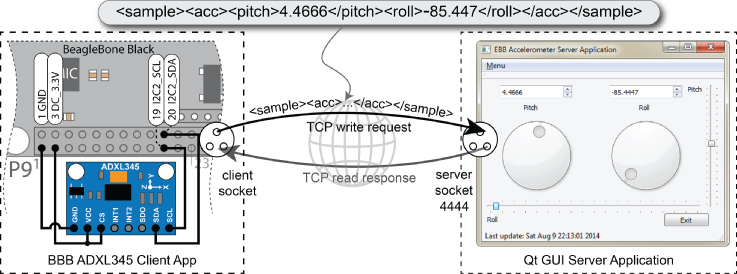
Figure 13-16: The Qt accelerometer client/server application
In this example, the controls on the Qt GUI Server application are not used for input; rather, they dynamically change according to the ADXL345's pitch and roll values—the only input controls on the GUI application are the Exit button and the menu. The current pitch and roll values are each described by three Qt widgets: a QDoubleSpinBox at the top, which displays the value as a double; a QDial, which rotates as the value changes from −90° to +90° (0° is when the dial indicator is at the very top); and a graduated QSlider, which slides from −90° to +90° (0° is the center value). This application differs from the previous Qt GUI application in a number of ways.
- The BBB is the client, and the GUI application is the server.
- The BBB sends a continuous stream of 1,000 readings, each sent every 50ms. The GUI display is updated instantly without latency problems (geographical distance would have an impact).
- The GUI application is threaded so that it can be “lively.” A thread object is created to handle communication with the client so that the main loop can continue its role. If a thread were not used, then you would not be able to exit by clicking the Exit button.
- The messaging protocol is much more sophisticated, as it uses XML data to communicate. This issue is discussed shortly.
The Qt GUI server application is available in the Git repository directory /chp13/QtSocketsAccelerometer, and the BBB client application is available in the directory /chp13/ADXL345Client. Listing 13-12 provides the core thread loop that is used to communicate with the ADXL345 sensor client. Using threads in this way means that the code structure could be easily adapted for simultaneous communication with many client devices.
Listing 13-12: /chp13/QtSocketsAccelerometer/serverthread.cpp (Segment)
void ServerThread::run(){ // the main thread loopQTcpSocket clientSocket; // the clientSocket objectthis->running = true; // the main thread loop bool flagif (!clientSocket.setSocketDescriptor(socketDescriptor)){ //set up socketqDebug() << "Failed to set up the Socket"; // debug output}while(running){ // loop forever until flag changesif(!clientSocket.waitForReadyRead(1000)){ // wait for up to 1 sec.this->running = false; // failed - exit the loop}while(clientSocket.bytesAvailable()>0) // are bytes available?{int x = clientSocket.bytesAvailable(); // how many?qDebug() << "There are " << x << " bytes available"; // debugchar data[2000]; // capacity for up to 2000 bytesx = (qint64) clientSocket.read(&data[0], (qint64) x);data[x] = '�'; // add null in case of print outputthis->parse(&data[0]); // parse the XML string}}clientSocket.close(); // if loop finished, close socketqDebug() << "The client just disconnected"; // debug output}
The Qt GUI Server application has a number of classes, as illustrated in Figure 13-17. The QMainWindow object is created when the application is executed. Its primary role is to update the UI, which it performs using a slot called sampleConsume() that receives an object of the SensorSample class when data is sent to the server. The SensorSample object contains a pitch value and a roll value, which are used to update the UI components.

Figure 13-17: The Qt accelerometer client/server application program structure
When the QMainWindow object is created, it instantiates an object of the AccelerometerServer class (child of QTcpServer). This server object awaits an incoming connection; and when it receives one, it creates an object of the ServerThread class (child of QThread). The ServerThread object then forms a read/write connection with the BBB ADXL345 client application. The client application sends the accelerometer data in XML form, which the ServerThread object parses to create a SensorSample object. If the data is parsed successfully, a signal is triggered that passes the SensorSample object to the sampleConsume() slot.
Parsing Stream Data with XML
As described earlier when discussing JSON, sending string data back and forth between the client and the server is prone to parsing errors, particularly as the complexity of communication increases. This example utilizes an XML format to communicate between the client and the server. This example uses a simple XML message to pass the sample data:
<sample><acc><pitch>4.4666</pitch><roll>-85.447</roll></acc></sample> The Qt framework has full support for XML parsing in the QtXml module by using the QXmlStreamReader class. It can be used to efficiently convert such an XML string into a data structure, which offers the following advantages:
- It is possible to recover from communication errors should the data stream be corrupted—for example, by searching for the next valid tag in the stream.
- Having a human-readable format can greatly help in debugging code.
- Additional tags can be added to the stream, and it will not affect legacy applications that are reading the stream. For example, a new
<gyro> … </gyro>tag could be introduced to the<sample>tag, and it would not prevent this application from running. - A DTD (document type definition) or XML Schema can be written to describe the rules (e.g., nesting and occurrence of elements) for the XML, to formally support third-party communication.
The downside is that the additional tag information increases the amount of data to be transmitted, and there is an overhead in processing XML. Listing 13-13 provides the source code that is used in this application to parse the XML data that is sent from the BBB ADXL345 client application.
Listing 13-13: /chp13/QtSocketsAccelerometer/serverthread.cpp (Segment)
int ServerThread::parse(char *data){QXmlStreamReader xml(data);while(!xml.atEnd() && !xml.hasError()){if((xml.tokenType()==QXmlStreamReader::StartElement) && // found <sample>(xml.name()=="sample")){// this is a data sample <sample> - need to loop until </sample>float pitch = 0.0f, roll = 0.0f;xml.readNext(); // read next tokenwhile(!((xml.tokenType()==QXmlStreamReader::EndElement)&& // </sample>(xml.name()=="sample"))){qDebug() << "Found a sample";if((xml.tokenType()==QXmlStreamReader::StartElement) // <acc>&&(xml.name()=="acc")){xml.readNext();qDebug() << "-- it has an acceleration element";while(!((xml.tokenType()==QXmlStreamReader::EndElement) // </acc>&&(xml.name()=="acc"))){if(xml.tokenType() == QXmlStreamReader::StartElement){ // <pitch>if(xml.name() == "pitch") {QString temp = xml.readElementText(); // read the valuepitch = (temp).toFloat(); // convert to float}if(xml.name() == "roll") { // <roll>QString temp = xml.readElementText();roll = (temp).toFloat();}}xml.readNext();}}xml.readNext();}SensorSample sample(pitch, roll); // create a sample object andemit sampleReceived(sample); // emit it as a signal -- caught} // by a slot in mainWindow, whichxml.readNext(); // updates the display widgets}return 0;}
An alternative solution is to use a JSON format once again. The same accelerometer data could be transmitted in the JSON format as follows:
{"acc": {"pitch": 32.55,"roll": 65.55}}
The Beagle Board Client Application
In this application example, the more complex programming is in the Qt GUI server application and not in the client. In fact, the code for the client application (provided in Listing 13-14) is quite straightforward. It uses the library of code that is developed throughout this book, as well as simple string processing to structure the XML messages that are transmitted.
Listing 13-14: /exploringbb/chp13/ADXL345Client/accClient.cpp
#include <iostream>#include "network/SocketClient.h" // using the EBB library#include "bus/I2CDevice.h" // I2CDevice class see CHP8#include "sensor/ADXL345.h" // ADXL345 see CHP8#include "sstream" // to format the string#include <unistd.h> // for the usleep()using namespace std;using namespace exploringBB;int main(int argc, char *argv[]){if(argc!=2){cout << "Usage: accClient server_name" << endl;return 2;}cout << "Starting EBB ADXL345 Client Example" << endl;I2CDevice i2c(1,0x53); // the I2C device P9_19 P9_20ADXL345 sensor(&i2c); // pass device to ADXL const.sensor.setResolution(ADXL345::NORMAL); // regular resolutionsensor.setRange(ADXL345::PLUSMINUS_4_G); // regular +/- 2GSocketClient sc(argv[1], 4444); // server addr and port numbersc.connectToServer(); // connect to the serverfor(int i=0; i<1000; i++){ // going to send 1000 samplesstringstream ss; // use a stringstream for msg.sensor.readSensorState(); // update the sensor statefloat pitch = sensor.getPitch(); // get pitch and rollfloat roll = sensor.getRoll(); // structure as XML stringss << "<sample><acc><pitch>" << pitch << "</pitch>";ss << "<roll>" << roll << "</roll></acc></sample>";cout << ss.str() << 'xd'; // print to output on one linecout.flush(); // flush to update the displaysc.send(ss.str()); // send the same str to serverusleep(50000); // 50ms between samples}cout << "End of EBB Client Example" << endl;}
The code can be built using the build script and can be executed by providing the address of the server machine, which is 192.168.7.1 in this case:
debian@ebb:~/…/ADXL345Client$ ./accClient 192.168.7.1Starting EBB ADXL345 Client Example<sample><acc><pitch>0.493899</pitch><roll>0.493899</roll></acc></sample>
The display continually updates on the same line while sending data to the server application. The use of XML messages and server threads means that the client application can be stopped and restarted without requiring the server application to be restarted.
Summary
After completing this chapter, you should be able to do the following:
- Configure the Beagle board as a general-purpose computing device and use Bluetooth peripherals to control it
- Acquire hardware for LCD touchscreen display applications
- Use virtual network computing (VNC) to remotely execute graphical user interface (GUI) applications on a Beagle board
- Build rich user interface (UI) applications that execute directly on a Beagle board using the GTK+ and Qt frameworks
- Build Qt applications with advanced interfaces that interface to hardware sensors on a Beagle board
- Build fat-client remote Qt applications that communicate using TCP sockets to a server that is executing on a Beagle board
- Enhance TCP server code to be multithreaded to allow multiple simultaneous connections from TCP client applications
- Build remote Qt GUI server applications that communicate, using TCP sockets and XML, to a client application on a Beagle board
Further Reading
The following additional links provide further information on the topics in this chapter:
- Chapter web page:
www.exploringbeaglebone.com/chapter13 - Core documentation on GTK+2.0:
tiny.cc/beagle1302 - Qt Signals and Slots:
tiny.cc/beagle1303