
CHAPTER 2
Beagle Software
In this chapter, you are introduced to the Linux operating system and software tools that can be used with the Beagle boards. This chapter aims to ensure that you can connect to your board and control it. By the end of this chapter, you should be able to “blink” a system LED having followed a step-by-step guide that demonstrates how you can use Linux shell commands in a Linux terminal window. In this chapter, you are also introduced to a library of software functions, called BoneScript, which can be used with Node.js and the Cloud9 integrated development environment to build code that flashes the same system LED.
EQUIPMENT REQUIRED FOR THIS CHAPTER:
- Any Beagle board
- USB cable (typically USB A male to mini- or micro-USB A male)
- Micro-SD card (4 GB or greater; Class 10+)
- Network infrastructure and cabling (optional)
Further details on this chapter are available here:
Linux on the Beagle Boards
A Linux distribution is a publicly available version of Linux that is packaged with a set of software programs and tools. There are many different Linux distributions, which are typically focused on different applications. For example, high-end server owners might install Red Hat Enterprise, CentOS, Debian, or OpenSUSE; desktop users might install Ubuntu, Debian, Fedora, or Linux Mint. The list is endless, but at the core of all distributions is a common Linux kernel, which was conceived and created by Linus Torvalds in 1991.
In deciding on a Linux distribution to use for your embedded system platform, it is sensible to choose one with these attributes:
- The distribution is stable and well supported.
- There is a good package manager.
- The distribution is lean and suited to a low storage footprint for embedded devices.
- There is good community support for your particular device.
- There is device driver support for any peripherals you want to attach.
Linux Distributions for Beagle Boards
There are many different distributions of Linux for embedded system platforms, including expensive proprietary versions for real-time programming. At their heart, they all use the mainline Linux kernel, but each distribution contains different tools and configurations that result in quite different user experiences. The main open-source distributions used by the community on the Beagle boards include Debian, Ångström, Ubuntu, and Arch Linux.
Debian (a contraction of “Debbie and Ian”) is a community-driven Linux distribution that has an emphasis on open-source development. There is no commercial organization involved in the development of Debian; in fact, there is a formal social contract (tiny.cc/beagle201) that states that Debian will remain entirely free (as in software freedom). The Debian distribution is used for many of the practical steps in this book; in fact, it is recommended as the distribution of choice for the Beagle boards, and it is currently distributed with new BeagleBone boards. In addition, Debian is used throughout this book as the distribution for the Linux desktop computer, as it provides excellent support for cross-platform development through Debian Cross-Toolchains (see wiki.debian.org/CrossToolchains). Currently, there are different versions of Debian available for download from the BeagleBoard.org website.
- Debian Stretch LXQt, which has the Lightweight Qt Desktop (LXQt) environment installed. This version should be used if you are attaching the board to a monitor or an LCD panel.
- Debian Stretch IoT, which is a headless image that has a much smaller footprint on the micro-SD card and (of greater consequence) the eMMC of a BeagleBone.
Ångström is a stable and lean Linux distribution that is widely used on embedded systems. The team of developers behind Ångström is experienced in customizing Linux distributions for embedded devices such as set-top boxes, mobile devices, and networking devices. Impressively, Ångström can scale down to devices with only megabytes of flash storage. Ångström makes extensive use of BusyBox, a multicall binary (a single executable that can do the job of many) used to create a compact version of command-line utilities that are found on Linux systems. Many of my YouTube videos use Ångström, as it was the primary distribution for the BeagleBone for quite some time.
Ubuntu is closely related to Debian; in fact, it is described on the Ubuntu website (www.ubuntu.com) as follows: “Debian is the rock upon which Ubuntu is built.” Ubuntu is one of the most popular desktop Linux distributions, mainly because of its focus on making Linux more accessible to new users. It is easy to install and has excellent desktop driver support, and there are binary distributions available for the Beagle boards.
Arch Linux is a lightweight and flexible Linux distribution that aims to “keep it simple,” targeting competent Linux users in particular by giving them complete control and responsibility over the system configuration. There are prebuilt versions of the Arch Linux distribution available for the Beagle boards; however, compared to the other distributions, it currently has less support for new Linux users (see www.archlinux.org).
Create a Linux Micro-SD Card Image
The easiest way to set up an SD card so that it can be used to boot the PocketBeagle or other Beagle boards is to download a Linux distribution image file (.img file in a compressed .xz wrapper) from beagleboard.org/latest-images and write it to an SD card using an image writer utility such as Etcher (etcher.io). Etcher is particularly useful because it can use the compressed image file directly. The application is available for Windows, Mac, and Linux host machines.
Communicating with the Boards
When you are ready to try your Beagle board, the first thing you should do is connect it to your desktop computer using a USB lead. After you apply power, the board will connect to the desktop in USB client mode. Once it's connected and discovered, your file manager, such as Windows Explorer, will display the contents of the board's FAT partition, as shown in Figure 2-1. The BeagleBoard.org team has put together a really excellent HTML guide on getting started with your board. You should double-click the START.htm file to display the guide, which is illustrated in Figure 2-1, within a web browser.
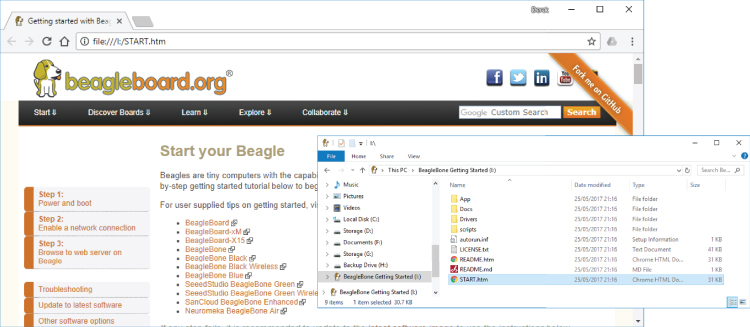
Figure 2-1: The START.htm guide to setting up your board (running under Windows 10)
Installing Drivers
Follow the steps in the guide displayed in Figure 2-1. With the latest Beagle board Linux images you should no longer have to install drivers for your operating system. If you have an older image and need to install drivers, browse to the Drivers folder and install the correct version. Once the board is fully booted, several new devices should be available on your desktop computer. For example, you will now have the following devices:
- Access to the FAT partition of the board (like a USB memory key).
- Serial access to the board using a new Gadget Serial driver COM port.
- A Linux USB Ethernet/RNDIS Gadget (for internet-over-USB). RNDIS stands for Remote Network Driver Interface Specification.
These new devices can be used to connect to the board. As you progress through the guide while the board is attached to your PC, the guide will highlight active connections, as illustrated in Figure 2-2. Similar steps for Linux and Mac desktop computers are available in the startup guide.
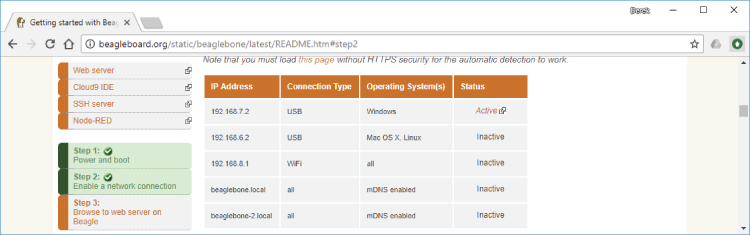
Figure 2-2: The START.htm guide will highlight active connections
Wired Network Connections
There are three main ways to connect to and communicate with the board over a wired network, each with its own advantages and disadvantages. The first way is to use internet-over-USB, which creates a “private” virtual LAN using a single USB cable. This approach works for all Beagle boards, but the following approaches require a board that has an Ethernet adapter. The second way is to use regular Ethernet, and the third is to use an Ethernet crossover cable. Connecting to the board over a network can be a stumbling block for beginners. It is usually straightforward if you are working at home with control of your own network; however, complex networks, such as those in universities, can have multiple subnets for wired and wireless communication. In such complex networks, routing restrictions may make it difficult, if not impossible, to connect to the board over regular Ethernet.
Internet-over-USB (All Boards)
The standard BeagleBoard.org Linux distributions provide support for internet-over-USB using the Linux USB Ethernet/RNDIS Gadget device. For new users and for users within complex network infrastructures, this is probably the best way to get started with your board. For this setup you need only the board, a USB cable, and access to a desktop computer, ideally with administrator access levels. Table 2-1 describes the advantages and disadvantages of internet-over-USB for connecting to a board.
Table 2-1: Advantages and Disadvantages of Internet-over-USB
| ADVANTAGES | DISADVANTAGES |
| Provides a stable network setup for beginners. | Without significant effort, you are limited to a single board per desktop. |
| When you do not have access to, or control of, network infrastructure hardware, you can still connect the board to the internet. | Network sharing configuration can be difficult, especially on Macintosh desktop computers. Additional configuration must also be performed on the board's Linux OS. |
| Power is supplied by your desktop machine over USB. | Your desktop machine must be running to transfer data to/from the internet. |
For example, if you fully installed the board drivers under Windows, you should now have a new network connection (click Start, type view network status and tasks, and select “Change adapter settings”). Figure 2-3 shows a typical Network Connections window under Windows. In this case, “Ethernet 3” is the Linux USB Ethernet/RNDIS Gadget device. The desktop computer remains connected to your regular LAN (via Ethernet 2 in my case), which provides access to the internet and to a new private LAN that contains only the desktop computer (e.g., 192.168.7.1) and your board (e.g., 192.168.7.2). You can open a web browser and connect to the board's web server by typing 192.168.7.2 (or 192.168.6.2 on a Mac/Linux machine) in the address bar, as illustrated in Figure 2-3.
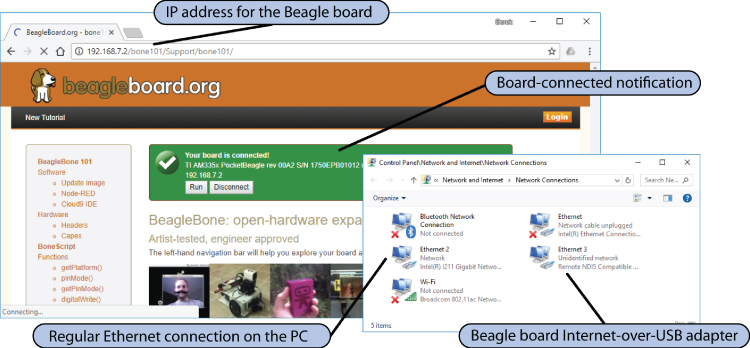
Figure 2-3: Windows network connections with Internet-over-USB connection and a web browser connection
At this point, you can connect to the board's web server using a web browser so you have a fully functional private network; however, you may also want the board to have full direct access to the internet so that you can download files and update Linux software directly on the board. To do this, you need to share your main network adapter so that traffic from the board can be routed through your desktop machine to the internet. For example, under Windows, use the following steps:
- Choose your desktop/laptop network adapter that provides you with internet access. Right-click it and choose Properties.
- In the dialog that appears, as shown on the left side of Figure 2-4, click the Sharing tab at the top and enable the option “Allow other network users….”
- In the drop-down list, choose your private LAN (e.g., referring to Figure 2-4, this is “Ethernet 3” in my case). Click OK.
- Right-click the private LAN (e.g., Ethernet 3) and select Properties.
- Double-click Internet Protocol Version 4. In this dialog, select “Obtain an IP address automatically” and enable “Obtain DNS server address automatically” (see Figure 2-4 on the right side).
- Click OK and then Close to save the configurations.
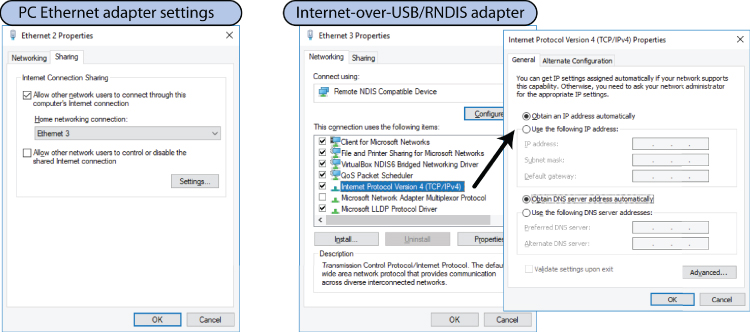
Figure 2-4: Configuring the network connection sharing properties under Windows
The steps are similar under macOS using Apple Menu → System Preferences → Sharing. If all goes well, you will not have noticed any difference at this point, and you should be able to reload the web page that is shown in Figure 2-3. It can take about one minute for the network configuration to finalize. Please note that the impact of the last two steps can be appreciated only when you open a terminal connection to the board.
Regular Ethernet (BBB and BeagleBoard Only)
By “regular” Ethernet, I mean connecting the board to a network in the same way you would connect your desktop computer using a wired connection. For the home user and power user of the BeagleBone Black (BBB), regular Ethernet is probably the best solution for networking and connecting to the board. Table 2-2 lists the advantages and disadvantages of using this type of connection. The main issue is the complexity of the network—if you understand your network configuration and have access to the router settings, then this is by far the best configuration. If your network router is distant from your desktop computer, you can use a small network switch, which can be purchased for as little as $10–$20. Alternatively, you could purchase a wireless access point with an integrated multiport router for $25–$35 so that you can integrate BeagleBone Black Wireless (BBBW) boards.
Table 2-2: Regular Ethernet Advantages and Disadvantages
| ADVANTAGES | DISADVANTAGES |
| You have full control over IP address settings and dynamic/static IP settings. | You might need administrative control or knowledge of the network infrastructure. |
| You can connect and interconnect many BBBs to a single network (including wireless devices). | The BBB needs a source of power (which can be a mains-powered adapter). |
| The BBB can connect to the internet without a desktop computer being powered on. | The setup is more complex for beginners if the network structure is complex. |
The first challenge with this configuration is finding your BBB on the network. By default, the board is configured to request a Dynamic Host Configuration Protocol (DHCP) IP address. In a home network environment, this service is usually provided by a DHCP server that is running on the integrated modem-firewall-router-LAN (or some similar configuration) that connects the home to an internet service provider (ISP).
DHCP servers issue IP addresses dynamically from a pool of addresses for a fixed time interval, called the lease time, which is specified in your DHCP configuration. When this lease expires, your board is allocated a different IP address the next time it connects to your network. This can be frustrating, as you may have to search for your board on the network again. It is possible to set the IP address of your board to be static so that it is fixed at the same address each time the board connects. Wireless connections and static IP connections are discussed in Chapter 12.
There are a few different ways to find your board's dynamic IP address.
- Use a web browser to access your home router (often address 192.168.1.1, 192.168.0.1, or 10.0.0.1). Log in and look under a menu such as Status for DHCP Table. You should see an entry that details the allocated IP address, the physical MAC address, and the lease time remaining for a device with hostname
beaglebone. Here's an example:Leased TableIP Address MAC Address Client Host Name Register Information192.168.1.116 c8:a0:30:c0:6b:48 beaglebone Remains 23:59:51 - Use a port-scanning tool like
nmapunder Linux or the Zenmap GUI version that is available for Windows (seetiny.cc/beagle202). The commandnmap -T4 -F 192.168.1.*will scan for devices on a subnet. You are searching for an entry that typically has five open ports (e.g., 22 for SSH, 53 for DNS, 80 for the BeagleBoard.org web guide, 3000 for the Cloud 9 IDE, and 8080 for an Apache web server). It should also identify itself with Texas Instruments. - You could use a serial-over-USB connection to connect to the board and type
ifconfigto find the IP address. The address is theinet addrvalue associated with theeth0adapter. This is discussed shortly.
Once you have the IP address, you can test that it is valid by entering it in the address bar of your web browser (it's 192.168.1.116 in the previous example). Your browser should display the same page shown in Figure 2-3.
Ethernet Crossover Cable (BBB and BeagleBoard Only)
An Ethernet crossover cable is a cable that has been modified to enable two Ethernet devices to be connected directly together, without the need for an Ethernet switch. It can be purchased as a cable or as a plug-in adapter. Table 2-3 describes the advantages and disadvantages of this connection type.
Table 2-3: Crossover Cable Network Advantages and Disadvantages
| ADVANTAGES | DISADVANTAGES |
| When you do not have access to network infrastructure hardware, you can still connect to the BBB. | If your desktop machine has only one network adapter, then you will lose access to the internet. It is best used with a device that has multiple adapters. |
| BBB may have internet access if the desktop has two network adapters. | BBB still needs a source of power (can be a mains-powered adapter). |
| Provides a reasonably stable network setup. | Replicates the functionality of internet-over-USB, so try that approach first. |
Most modern desktop machines have an automatic crossover detection function (Auto-MDIX) that enables a regular Ethernet cable to be used. The network interface on the Beagle boards also supports Auto-MDIX; therefore, this connection type can be used when you do not have access to network infrastructure. If you have two network adapters on your desktop machine (e.g., a laptop with a wired and wireless network adapter), then you can easily share the connection to the internet with your BBB by bridging both adapters. For example, these are the steps that you must take under the Windows OS:
- Plug one end of a regular (or crossover) Ethernet cable into the BBB and the other end into a laptop Ethernet socket.
- Power on the BBB by attaching a USB power supply.
- You can then bridge the two network connections—under Windows click Start, type view network status and tasks, select “Change adapter settings,” select the two network adapters (wired and wireless) at the same time, right-click, and choose Bridge Connections. After some time, the two connections should appear with the status “Enabled, Bridged,” and a network bridge should appear.
- Reboot the BBB. Once the board has rebooted, it should obtain an IP address directly from the DHCP server of your network.
You can then communicate with the BBB directly from anywhere on your network (including the PC/laptop itself) using the steps described in the next section. This connection type is particularly useful inside complex network infrastructures such as those in universities, as the laptop can connect to the BBB using the address that it is assigned. The BBB can also continue to connect to the internet.
Communicating with Your Board
Once you have networked the board, the next thing you will want to do is communicate with it. You can connect to the Beagle board using either a serial connection over USB, USB-to-TTL, or a network connection, such as that just discussed. The network connection should be your main focus, as that type of connection provides your board with full internet access. The serial connection is generally used as a fallback connection when problems arise with the network connection. As such, you may skip the next section, but the information is here as a reference for when problems arise.
Serial Connection over USB
If you installed the device drivers for the Beagle board in the previous section, the Gadget Serial device will allow you to connect to the board directly using a terminal emulator program. Serial connections are particularly useful when the board is close to your desktop computer and connected via the USB cable. It is often a fallback communications method when something goes wrong with the network configuration or software services on the board.
To connect to the board via the serial connection, you need a terminal program. Several third-party applications are available for Windows, such as RealTerm (realterm.sourceforge.io) and PuTTY (www.putty.org). PuTTY is also used in the next section. Most distributions of desktop Linux include a terminal program (try Ctrl+Alt+T or use Alt+F2 and type gnome-terminal under Debian). A terminal emulator is included by default under macOS (e.g., type screen/dev/tty.usbmodemfa133 115200).
To connect to the Beagle board over the USB serial connection, you need to know some information.
- COM port number: You can find this by opening the Windows Device Manager and searching under the Ports section. Figure 2-5 captures an example Device Manager, where the Gadget Serial device is listed as COM3. This will be different on different machines.
- Speed of the connection: By default you need to enter 115,200 baud to connect to the board.
- Other information you may need for other terminal applications: Data bits = 8; Stop bits = 1; Parity = none; and, Flow control = XON/XOFF.
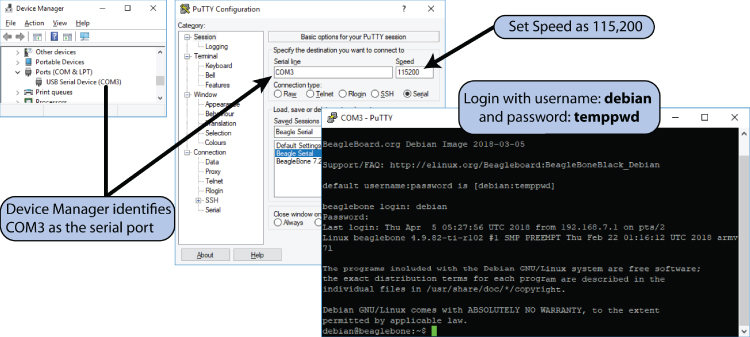
Figure 2-5: Windows Device Manager and opening a PuTTY serial connection to the board
Save the configuration with a session name so that it is available each time you want to connect. Click Open, and it is important that you press Enter when the window appears. When connecting to Debian, you should see the following output:
Debian GNU/Linux 9 beaglebone ttyGS0BeagleBoard.org Debian Image 2018-03-05Support/FAQ: http://elinux.org/Beagleboard:BeagleBoneBlack_Debiandefault username:password is [debian:temppwd]beaglebone login: debianPassword: temppwddebian@beaglebone:~$
This allows you to log in with username debian and password temppwd.
On a Linux desktop computer, you can install the screen program and connect to the serial-over-USB device with these commands:
molloyd@debian:~$ sudo apt-get install screenmolloyd@debian:~$ screen /dev/ttyUSB0/ 115200
Serial Connection with the USB-to-TTL 3.3 V Cable
For this serial connection type, you need the specialized cable (or the cheaper alternative in Figure 1-9(c)) that is described in Chapter 1. Find the COM port from Windows Device Manager that is associated with a device called USB Serial Port. Plug in the cable to the six-pin connector beside the P9 header (black lead to the white dot/J1), as illustrated in Figure 1-9(a), or to the PocketBeagle expansion header as illustrated in Figure 1-9(b).
You can then open a serial connection using PuTTY (115,200 baud), and you will see the same login prompt as earlier. However, when you reboot the board, you will also see the full console output as the board boots, which begins with the following (in the case of the PocketBeagle):
U-Boot SPL 2018.01-00002-ge9ff418fb8 (Feb 20 2018 - 20:14:57)Trying to boot from MMC1U-Boot 2018.01-00002-ge9ff418fb8 (Feb 20 2018 - 20:14:57 -0600),Build: jenkins-github_Bootloader-Builder-38CPU : AM335X-GP rev 2.1I2C: readyDRAM: 512 MiB…Model: BeagleBoard.org PocketBeagle…
This is the ultimate fallback connection, as it allows you to see what is happening during the boot process, which is described in the next chapter.
Connecting Through Secure Shell
Secure Shell (SSH) is a useful network protocol for secure encrypted communication between network devices. You can use an SSH terminal client to connect to the SSH server that is running on port 22 of your board, which allows you to do the following:
- Log in remotely to the board and execute commands
- Transfer files to and from the board using the SSH File Transfer Protocol (SFTP)
- Forward X11 connections, which allows you to perform virtual network computing (covered in Chapter 13)
By default, the BeagleBone Linux distributions run an SSH server (sshd on Debian and Dropbear on Ångström) that is bound to port 22. There are a few advantages in having an SSH server available as the default method by which you log in remotely to your board. In particular, you can open port 22 of the board to the internet using the port forwarding functionality of your router. Please ensure that you set a password on the root user account before doing this. You can then remotely log in to your board from anywhere in the world if you know its IP address. A service called dynamic DNS that is supported on most routers allows your router to register its latest address with an online service. The online service then maps a domain name of your choice to the latest IP address that your ISP has given you. The dynamic DNS service usually has an annual cost, for which it will provide you with an address of the form MyBeagle.servicename.com.
Secure Shell Connections Using PuTTY
PuTTY (www.putty.org) was mentioned earlier as a way of connecting to your board using serial-over-USB. PuTTY is a free, open-source terminal emulator, serial console, and SSH client that you can also use to connect to the board over the network. PuTTY has a few useful features.
- It supports serial and SSH connections.
- It installs an application called psftp that enables you to transfer files to and from the Beagle board over the network from your desktop computer.
- It supports SSH X11 forwarding, which is required in Chapter 13.
Figure 2-6 captures the PuTTY Configuration settings. Choose SSH as the connection type, enter the IP address for your board (192.168.7.2 or 192.168.6.2 if you are using internet-over-USB), use port 22 (the default), and then save the session with a useful name for future use. Click Open and log in using your username and password. You may get a security alert that warns about man-in-the-middle attacks, which may be a concern on insecure networks. Accept the fingerprint and continue. macOS and Linux users can run the Terminal application with similar settings (e.g., ssh -X [email protected]).
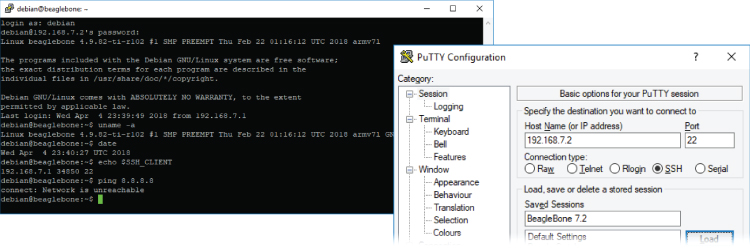
Figure 2-6: PuTTY SSH configuration settings on a Windows PC beside an open SSH terminal connection
You will see the basic Linux commands that can be issued later in this chapter, but first it is necessary to examine how you can transfer files to and from the board.
Chrome Apps: Secure Shell Client
The Chrome web browser has support for Chrome extensions—applications that behave like locally installed (or native) applications but are written in HTML5, JavaScript, and CSS. Many of these applications use Google's Native Client (NaCl, or Salt!), which is a sandbox for running compiled C/C++ applications directly in the web browser, regardless of the OS. The benefit of NaCl is that applications can achieve near-native performance levels, as they can contain code that uses low-level instructions.
There is a useful Chrome extension called Secure Shell Extension available. Open a new tab on the Chrome browser and click the Apps icon. Go to the Chrome Web Store and search the store for Secure Shell. Once it is installed, it will appear as the Secure Shell App when you click the Apps icon again. When you start up the Secure Shell App, you will have to set the connection settings as in Figure 2-6, and the application will appear as in Figure 2-7.
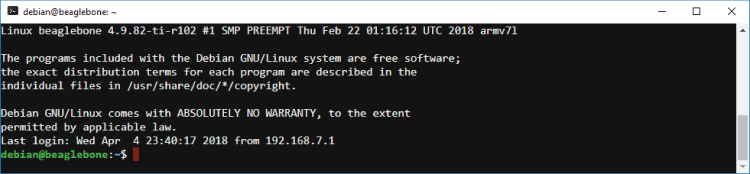
Figure 2-7: The Secure Shell Chrome extension
Transferring Files Using PuTTY/psftp over SSH
The PuTTY installation also includes File Transfer Protocol (ftp) support that enables you to transfer files to and from your board over your network connection. You can start up the psftp (PuTTY secure file transfer protocol) application by typing psftp in the Windows Start command text field.
At the psftp> prompt, you can connect to the board by typing open [email protected] (e.g., the board address for internet-over-USB on a Windows PC). Your desktop machine is now referred to as the local machine, and the Beagle board is referred to as the remote machine. When you issue a command, you are typically issuing it on the remote machine. After connecting, you are placed in the home directory of the user account you used. Therefore, under the Debian distribution, if you connect as the user debian, you are placed in the /home/Debian/ directory.
To transfer a single file c: emp est.txt from the local desktop computer to the Beagle board, you can use the following steps:
psftp: no hostname specified; use "open host.name" to connectpsftp> open [email protected]Using username "debian".Remote working directory is /home/debianpsftp> lcd c: empNew local directory is c: emppsftp> mkdir testmkdir /home/debian/test: OKpsftp> put test.txtlocal:test.txt => remote:/home/debian/test.txtpsftp> dir test.*Listing directory /home/debian-rw-r--r-- 1 debian debian 0 Apr 5 00:46 test.txt
Commands that are prefixed with an l refer to commands issued for the local machine, e.g., lcd (local change directory) or lpwd (local print working directory). To transfer a single file, the put command is issued, which transfers the file from the local machine to the remote machine. The get command can be used to transfer a file in reverse. To “put” or “get” multiple files, you can use the mput or mget command. Use help if you have forgotten a command.
There are free GUI-based SFTP applications available for Windows, such as WinSCP, which is displayed in Figure 2-8. It can be downloaded for free from winscp.net. Alternatives include FileZilla (filezilla-project.org) and Cyberduck (cyberduck.io) for Windows and Mac.
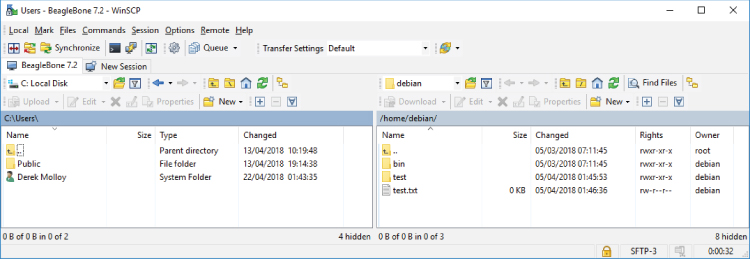
Figure 2-8: The WinSCP SFTP and FTP client for Windows connected to a PocketBeagle
If you are using a Linux client machine, you can use the command sftp instead of psftp. Almost everything else remains the same. The SFTP client application is also installed on the BeagleBoard.org Linux distribution by default, so you can reverse the order of communication, that is, having the board act as the client and another machine as the server.
Here are some useful hints and tips with the psftp/sftp commands:
mget -r *will perform a recursive get of a directory. This is useful if you want to transfer a folder that has several subfolders. The-roption can also be used on theget,put, andmputcommands.dir *.txtwill apply a filter to display only the.txtfiles in the current directory.mvcan be used to move a file/directory on the remote machine to a new location on the remote machine.regetcan be used to resume a download that was interrupted. The partially downloaded file must exist on the local machine.
Controlling the Beagle Board
At this point you should be able to communicate with your board using an SSH client application, so this section investigates the commands that you can issue for your first interactions with this Linux SBC.
Basic Linux Commands
When you first connect to the board with SSH, you are prompted to log in. Under Debian, you can log in with username debian and password temppwd.
login as: debian[email protected]'s password: temppwdLinux beaglebone 4.9.82-ti-r102 #1 SMP PREEMPT Thu Feb 22 01:16:12 UTC2018 armv7l The programs included with the Debian GNU/Linux system arefree software; the exact distribution terms for each program aredescribed in the individual files in /usr/share/doc/*/copyright.Debian GNU/Linux comes with ABSOLUTELY NO WARRANTY, to the extentpermitted by applicable law.Last login: Thu Apr 5 00:08:01 2018 from 192.168.7.1debian@beaglebone:~$
You are now connected to the board, and the Linux terminal is ready for your command. The $ prompt means you are logged in as a regular user account (superusers have a # prompt). For a new Linux user, this step can be quite daunting, as it is not clear what arsenal of commands is at your disposal. This section provides you with sufficient Linux skills to get by. It is written as a reference with examples so that you can come back to it when you need help. Some of the commands used are described in more detail in Chapter 3.
First Steps
The first thing you might do is determine which version of Linux you are running. This can be useful when you are asking a question on a forum.
debian@beaglebone:~$ uname -aLinux beaglebone 4.9.82-ti-r102 #1 SMP PREEMPT Thu Feb 22 01:16:12 UTC2018 armv7l GNU/Linuxdebian@beaglebone:~$ cat /etc/dogtagBeagleBoard.org Debian Image 2018-03-05
In this case, Linux 4.9.82 is being used, which was built for the ARMv7 architecture on the date that is listed and packaged for the BeagleBoard.org image on the date that is listed in the “dog tag.”
The Linux kernel version is described by numbers in the form X.Y.Z. The X number changes only rarely (version 3.0 was released in 2011 and 4.0 in 2015). The Y value changes several times per year (4.8 was released in October 2016 and 4.91 in December 2016). The Z value changes regularly.
Next, you could use the passwd command to set a nondefault debian user account password.
debian@beaglebone:~$ passwdChanging password for debian.(current) UNIX password: temppwdEnter new UNIX password: newpasswdRetype new UNIX password: newpasswdpasswd: password updated successfully
Table 2-4 lists other useful first-step commands.
Table 2-4: Useful First Commands in Linux
| COMMAND | DESCRIPTION |
more /etc/issue
|
Returns the Linux distribution you are using. |
ps -p $$
|
Returns the shell you are currently using (e.g., bash). |
whoami
|
Returns who you are currently logged in as (e.g., debian). |
uptime
|
Returns how long the system has been running. |
top
|
Lists all the processes and programs executing. Press Ctrl+C to close the view. |
Basic File System Commands
This section describes the basic commands that you will need to move around on, and manipulate, a Linux file system. When using Debian and Ubuntu user accounts, you often must prefix the word sudo at the start of certain commands. That is because sudo is a program that allows users to run programs with the security privileges of the superuser. User accounts are discussed in the next chapter. For the moment, the basic file system commands that you need are listed in Table 2-5.
Table 2-5: Basic File System Commands
| NAME | COMMAND | OPTIONS AND FURTHER INFORMATION | EXAMPLE(S) |
| List files |
ls
|
-a shows all (including hidden files).-l displays long format.-R gives a recursive listing.-r gives a reverse listing.-t sorts last modified.-S sorts by file size.-h gives human-readable file sizes.
|
ls –al
|
| Current directory |
pwd
|
Print the working directory.-P prints the physical location.
|
pwd -P
|
| Change directory |
cd
|
Change directory.cd and then Enter or cd~/ takes you to the home directory.cd / takes you to the file system root.cd .. takes you up a level.
|
cd /home/debian
cd / |
| Make a directory |
mkdir
|
Make a directory. |
mkdir test
|
| Delete a file or directory |
rm
|
Delete a file.-r recursive delete (use for directories).-d remove empty directories.
|
rm bad.txt
rm -r test |
| Copy a file or directory |
cp
|
-r recursive copy.-u copy only if the source is newer than the destination or the destination is missing.-v verbose copy (i.e., show output).
|
cp a.txt b.txt
cp -r test testa |
| Move a file or directory |
mv
|
-i prompts before overwrite.No -r for directory. Moving to the same directory performs a renaming.
|
mv a.txt c.txt
mv test testb |
| Create an empty file |
touch
|
Create an empty file or update the modification date of an existing file. |
touch d.txt
|
| View content of a file |
more
|
View the contents of a file. Use the Spacebar for the next page. |
more d.txt
|
| Get the calendar |
cal
|
Display a text-based calendar. |
cal 01 2019
|
That covers the basics, but there is so much more! The next chapter describes file ownership, permissions, searching, I/O redirection, and more. The aim of this section is to get you up and running. Table 2-6 describes a few shortcuts that make life easier when working with most Linux shells.
Table 2-6: Some Time-Saving Terminal Keyboard Shortcuts
| SHORTCUT | DESCRIPTION |
| Up arrow (repeat) | Gives you the last command you typed and then the previous commands on repeated presses. |
| Tab key | Autocompletes the file name, the directory name, or even the executable command name. For example, to change to the Linux /tmp directory, you can type cd /t and then press Tab, which will autocomplete the command to cd /tmp/. If there are many options, press the Tab key again to see all the options as a list. |
| Ctrl+A | Brings you back to the start of the line you are typing. |
| Ctrl+E | Brings you to the end of the line you are typing. |
| Ctrl+U | Clears to the start of the line. Pressing Ctrl+E and then Ctrl+U clears the line. |
| Ctrl+L | Clears the screen. |
| Ctrl+C | Kills whatever process is currently running. |
| Ctrl+Z | Puts the current process into the background. Typing bg then leaves it running in the background, and fg then brings it back to the foreground. This is discussed in the “Linux Processes” section in the next chapter. |
Here is an example that uses several of the commands in Table 2-5 to create a directory called test in which an empty text file hello.txt is created. The entire test directory is then copied to the /tmp directory, which is off the Linux root directory.
debian@beaglebone:~$ cd ~/debian@beaglebone:~$ pwd/home/debiandebian@beaglebone:~$ mkdir testdebian@beaglebone:~$ cd testdebian@beaglebone:~/test$ touch hello.txtdebian@beaglebone:~/test$ lshello.txtdebian@beaglebone:~/test$ cd ..debian@beaglebone:~$ cp -r test /tmpdebian@beaglebone:~$ cd /tmp/test/debian@beaglebone:/tmp/test$ ls -ltotal 0-rw-r--r-- 1 debian debian 0 Apr 5 00:50 hello.txt
Environment Variables
Environment variables are named values that describe the configuration of your Linux environment, such as the location of the executable files or your default editor. To get an idea of the environment variables that are set on your board, issue an env call, which provides you with a list of the environment variables on your account. Here, env is called on the Debian IoT image:
debian@beaglebone:~$ env…USER=debianPWD=/home/debianHOME=/home/debianSSH_CLIENT=192.168.7.1 6233 22SSH_TTY=/dev/pts/0PATH=/home/debian/bin:/usr/local/sbin:/usr/local/bin:/usr/sbin:/usr/bin:/sbin:/bin:/usr/local/games:/usr/games…
You can view and modify environment variables according to the following example, which adds the temp user directory to the PATH environment variable:
debian@beaglebone:~$ echo $PATH/home/debian/bin:/usr/local/sbin:/usr/local/bin:/usr/sbin:/usr/bin:/sbin:/bin:/usr/local/games:/usr/gamesdebian@beaglebone:~$ export PATH=$PATH:~/tempdebian@beaglebone:~$ echo $PATH/home/debian/bin:/usr/local/sbin:/usr/local/bin:/usr/sbin:/usr/bin:/sbin:/bin:/usr/local/games:/usr/games:/home/debian/temp
This change will be lost on reboot. Permanently setting environment variables requires modifications to your .profile file when using the sh, ksh, or bash shell; and to your .login file when using the csh or tcsh shell. To do this, you need to be able to perform file editing in a Linux terminal window.
Basic File Editing
A variety of editors are available, but perhaps one of the easiest to use for new users is also one of the most powerful—the GNU nano editor. You can start up the editor by typing nano followed by the name of an existing or new filename; for example, typing nano hello.txt will display the view captured in Figure 2-9 (after the text has been entered!). Typing nano -c hello.txt will also display line numbers, which is useful when debugging program code. You can move freely around the file in the window using the arrow keys and edit or write text at the cursor location. You can see some of the nano shortcut keys listed on the bottom bar of the editor window, but there are many more, some of which are presented in Table 2-7.
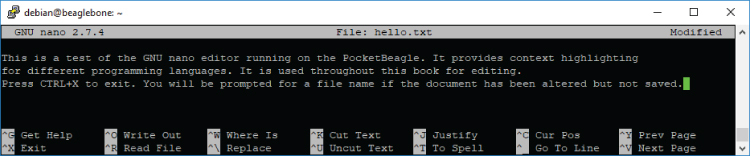
Figure 2-9: The GNU nano editor being used to edit an example file in a PuTTY Linux terminal window
Table 2-7: Nano Shortcut Keys—A Quick Reference
| KEYS | COMMAND | KEYS | COMMAND |
| Ctrl+G | Help | Ctrl+Y | Previous page |
| Ctrl+C | Cancel | Ctrl+_ or Ctrl+/ | Go to line number |
| Ctrl+X | Exit (prompts save) | Alt+/ | Go to end of file |
| Ctrl+L | Enable long line wrapping | Ctrl+6 | Start marking text (then move with arrows to highlight) |
| Ctrl+O | Save | Ctrl+K or Alt+6 | Cut marked text |
| Arrows | Move around | Ctrl+U | Paste text |
| Ctrl+A | Go to start of line | Ctrl+R | Insert content of another file (prompts for location of file) |
| Ctrl+E | Go to end of line | Ctrl+W | Search for a string |
| Ctrl+Spacebar | Next word | Alt+W | Find next |
| Alt+Spacebar | Previous word | Ctrl+D | Delete character under cursor |
| Ctrl+V | Next page | Ctrl+K | Delete entire line |
What Time Is It?
A simple question like this causes more difficulty than you can imagine. If you type date at the shell prompt, you may get the following:
debian@beaglebone:~$ dateThu Apr 5 01:06:59 UTC 2018
which is months out-of-date in this case, even where the board is connected to the desktop PC using an internet-over-USB connection. However, it is likely that the date and time are correct if you are connected via “regular” Ethernet.
If it is wrong, why did the BeagleBoard.org team not set the clock time on your board? The answer is that they could not. Unlike a desktop PC, there is no battery backup on the board to ensure that the BIOS/UEFI settings are retained—in fact, there is no BIOS or UEFI! That topic is examined in detail in the next chapter, but for the moment you need a way to set the time, and for that you can use the Network Time Protocol (NTP). The NTP is a networking protocol for synchronizing clocks between computers. If your board has the correct time, that is only because it is obtaining it from your network. On recent Debian images this is performed by a systemd special unit.
root@beaglebone:~# systemctl status time-sync.target• time-sync.target - System Time SynchronizedLoaded: loaded (/lib/systemd/system/time-sync.target; static;vendor preset: enabled)Active: active since Sun 2018-04-22 23:51:53 IST; 19min ago
If the time is incorrect, it is most likely the case that you do not have internet access. Please see the following feature, “Internet-over-USB Network Settings.”
Once the time is correct, use the following command, which provides a text-based user interface that allows you to choose your location. The board is now set for Irish standard time (IST) in this example.
debian@beaglebone:~$ sudo dpkg-reconfigure tzdataCurrent default time zone: 'Europe/Dublin'Local time is now: Mon Apr 23 00:06:21 IST 2018.Universal Time is now: Sun Apr 22 23:06:21 UTC 2018.
Package Management
At the beginning of this chapter, a good package manager is listed as a key feature of a suitable Linux distribution. A package manager is a set of software tools that automate the process of installing, configuring, upgrading, and removing software packages from the Linux operating system. Different Linux distributions use different package managers: Ångström uses OPKG, Ubuntu and Debian use APT (Advanced Packaging Tool) over DPKG (Debian Package Management System), and Arch Linux uses Pacman. Each has its own usage syntax, but their operation is largely similar. For example, the first row in Table 2-8 lists the command for installing a package using different managers. The table also lists other package management commands that can be used.
Table 2-8: Common Package Management Commands (Using nano as an Example Package)
| COMMAND | ÅNGSTRÖM | DEBIAN/UBUNTU |
| Install a package. |
opkg install nano
|
sudo apt install nano
|
| Update the package index. |
opkg update
|
sudo apt update
|
| Upgrade the packages on your system. |
opkg upgrade
|
sudo apt upgrade2
2
|
| Is nano installed? |
opkg list-installed |grep nano
|
dpkg-query -l |grep nano
|
Is a package containing the string nano available? |
opkg list|grep nano
|
apt search nano
|
| Get more information about a package. |
opkg info nano
|
apt show nano
apt policy nano |
| Get help. |
opkg
|
apt help
|
| Download a package to the current directory. |
opkg download nano
|
apt download nano
|
| Remove a package. |
opkg remove nano
|
sudo apt remove nano
|
| Clean up old packages. | Nontrivial. Search for opkg-clean script. |
sudo apt autoremove
sudo apt clean |
You should update the package lists at regular intervals (the sudo password is your Debian account password) using the apt update command. A call to apt update downloads the package lists from the internet locations identified in the file /etc/apt/sources.list. This does not install new versions of the software; rather, it updates the lists of packages and their interdependencies.
debian@beaglebone:~$ sudo apt update[sudo] password for debian:Ign:1 http://deb.debian.org/debian stretch InRelease…Get:14 http://repos.rcn-ee.com/debian stretch/main armhf Packages [516 kB]Fetched 10.7 MB in 11s (896 kB/s)Reading package lists… DoneBuilding dependency treeReading state information… Done75 packages can be upgraded. Run 'apt list --upgradable' to see them.debian@beaglebone:~$ sudo apt list --upgradableListing… Doneapache2/stable 2.4.25-3+deb9u4 armhf [upgradable from: 2.4.25-3+deb9u3]…
Once this is complete, you can automatically download and install the latest versions of the available software using the apt upgrade command. Clearly, you should always perform an apt update command before an apt upgrade. Please be aware that some of these steps (upgrade in particular) can take quite some time to complete—perhaps even several hours, depending on the currency of your image and the speed of your network connection.
Wavemon is a useful tool that you can use in configuring Wi-Fi connections (see Chapter 12). If you execute the command, you will see that the package is not installed.
debian@beaglebone:~$ wavemon-bash: wavemon: command not found
The platform-specific (Debian in this case) package manager can be used to install the package, once you determine the package name.
debian@beaglebone:~$ apt search wavemonSorting… Done … Full Text Search… Donewavemon/stable 0.8.1-1 armhfWireless Device Monitoring Applicationdebian@beaglebone:~$ sudo apt install wavemonReading package lists… Done…Setting up wavemon (0.8.1-1) …
The wavemon command now executes, but unfortunately it will not do anything until you configure a wireless adapter (see Chapter 12).
debian@beaglebone:~$ wavemonwavemon: no supported wireless interfaces found! Check manpage for help.
Beagle-Specific Commands
There are Beagle-specific tools available for configuring your board that have been developed by the BeagleBoard.org community. These tools simplify some tasks that would otherwise be quite difficult. They are located in the /opt/scripts/tools directory and are described in this section. Before you use the tools, check that you have the latest versions.
debian@beaglebone:~$ cd /opt/scripts/tools/debian@beaglebone:/opt/scripts/tools$ git pull || trueAlready up-to-date.debian@beaglebone:/opt/scripts/tools$ lsbeaglebone-black-eMMC-flasher.sh grow_partition.sh update_kernel.shdevelopers init-eMMC-flasher.sh version.shdtc non-mmc-rootfs wmeMMC readme.txtgraphics software
Expand the File System on an SD Card
If you have installed a BeagleBoard.org Linux image on a micro-SD card of greater than 4 GB capacity, then you should expand the file system to use the full card capacity. In this example, a 32 GB micro-SD card is used in a PocketBeagle, and the Debian IoT image size is 4 GB. Using the lsblk tool (see Chapter 3), you can see that most of the SD card is unavailable for use, with the df tool indicating that the Linux partition is 54 percent full.
debian@beaglebone:~$ lsblkNAME MAJ:MIN RM SIZE RO TYPE MOUNTPOINTmmcblk0 179:0 0 29.8G 0 disk└_mmcblk0p1 179:1 0 3.3G 0 part /debian@beaglebone:~$ df -kFilesystem 1K-blocks Used Available Use% Mounted onudev 219844 0 219844 0% /devtmpfs 49624 4972 44652 11% /run/dev/mmcblk0p1 3357264 1684596 1482412 54% /…
You can use the grow partition tool as follows:
debian@beaglebone:/opt/scripts/tools$ sudo ./grow_partition.shMedia: [/dev/mmcblk0]sfdisk: 2.26.x or greaterDisk /dev/mmcblk0: 29.8 GiB, 32010928128 bytes, 62521344 sectors…debian@beaglebone:/opt/scripts/tools$ sudo reboot
After reboot, it is clear that the micro-SD card is fully available for use by using the lsblk tool. Now that the full SD card is available, it is safe to call the apt upgrade command.
debian@beaglebone:~$ lsblkNAME MAJ:MIN RM SIZE RO TYPE MOUNTPOINTmmcblk0 179:0 0 29.8G 0 disk└_mmcblk0p1 179:1 0 29.8G 0 part /debian@beaglebone:~$ sudo apt upgradedebian@beaglebone:~$ df -kFilesystem 1K-blocks Used Available Use% Mounted onudev 219332 0 219332 0% /devtmpfs 49520 5012 44508 11% /run/dev/mmcblk0p1 30707172 1953168 27455072 7% /
Update the Kernel
You can also update to the latest kernel release that is made available by BeagleBoard.org using the update kernel tool as follows:
debian@beaglebone:~$ uname -aLinux beaglebone 4.9.82-ti-r102 #1 SMP PREEMPT Thu Feb 22 01:16:12 UTC 2018armv7l GNU/Linuxdebian@beaglebone:~$ cd /opt/scripts/tools/debian@beaglebone:/opt/scripts/tools$ sudo ./update_kernel.sh…Kernel version options:-----------------------------LTS44: --lts-4_4LTS49: --lts-4_9LTS414: --lts-4_14STABLE: --stableTESTING: --testinginfo:you are running:[4.9.82-ti-r102],latest is:[4.9.88-ti-r111] updating…debian@beaglebone:~$ sudo rebootdebian@beaglebone:~$ uname -aLinux beaglebone 4.9.88-ti-r111 #1 SMP PREEMPT Sun Apr 22 2018 armv7l GNU/Linux
After rebooting the board, you can see that the revision has been updated (from 102 to 111 in this case). You can also use this tool to select a specific kernel from the options displayed earlier. Here's an example:
/opt/scripts/tools$ sudo ./update_kernel.sh --ti-rt-channel --lts-4_14/opt/scripts/tools$ sudo rebootdebian@beaglebone:~$ uname -aLinux beaglebone 4.14.35-ti-rt-r44 #1 SMP PREEMPT RT Sun Apr 22 06:04:23
Interacting with the On-Board LEDs
In this section, you are going to examine how you can change the behavior of the Beagle board on-board user LEDs—the four blue LEDs that are grouped together on the boards. Each LED can provide information about the board's state.
- USR0 flashes in a heartbeat sequence, indicating the board is alive.
- USR1 flashes during micro-SD card activity.
- USR2 flashes depending on the level of CPU activity.
- USR3 flashes during eMMC activity (set to do nothing by default on the PocketBeagle).
You can change the behavior of these LEDs to suit your own needs, but you will temporarily lose this useful activity information.
Sysfs is a virtual file system that is available under recent Linux kernels. It provides you with access to devices and drivers that would otherwise be accessible only within a restricted kernel space. This topic is discussed in detail in Chapter 6; however, at this point, it would be useful to briefly explore the mechanics of how sysfs can be used to alter the behavior of the user LEDs.
Using your SSH client, you can connect to the board and browse to the directory /sys/class/leds/. The output is as follows:
debian@beaglebone:~$ cd /sys/class/ledsdebian@beaglebone:/sys/class/leds$ lsbeaglebone:green:usr0 beaglebone:green:usr2beaglebone:green:usr1 beaglebone:green:usr3
You can see the four (green!) LED sysfs mappings—usr0, usr1, usr2, and usr3. You can change the directory to alter the properties of one of these LEDs—for example, usr3 (use the Tab key to reduce typing).
debian@beaglebone:/sys/class/leds$ cd beaglebone:green:usr3debian@beaglebone:/sys/class/leds/beaglebone:green:usr3$ lsbrightness device max_brightness power subsystem trigger uevent
Here you see various different file entries that give you further information and access to settings. Please note that this section uses some commands that are explained in detail in the next chapter.
You can determine the current status of an LED by typing the following:
/sys/class/leds/beaglebone:green:usr3$ cat trigger[none] rc-feedback rfkill-any kbd-scrolllock kbd-numlock kbd-capslockkbd-kanalock kbd-shiftlock kbd-altgrlock kbd-ctrllock kbd-altlockkbd-shiftllock kbd-shiftrlock kbd-ctrlllock kbd-ctrlrlock usb-gadgetusb-host mmc0 timer oneshot disk-activity ide-disk mtd nand-diskheartbeat backlight gpio default-on panic
where you can see that the USR3 LED is not currently configured for any particular function (i.e., [none]). If it happens to be configured on your board, you can set it to none, as follows:
/sys/class/leds/beaglebone:green:usr3$ echo none > trigger You can turn the USR3 LED fully on or off using this:
/sys/class/leds/beaglebone:green:usr3$ echo 1 > brightness/sys/class/leds/beaglebone:green:usr3$ echo 0 > brightness
You can even set the LED to flash at a time interval of your choosing. If you watch carefully, you will notice the dynamic nature of sysfs. If you perform an ls command at this point, the directory will appear as follows but will shortly change:
/sys/class/leds/beaglebone:green:usr3$ lsbrightness device max_brightness power subsystem trigger uevent
To make the LED flash, you need to set the trigger to timer mode by typing echo timer > trigger. You will see the USR3 LED flash at a one-second interval. Notice that there are new delay_on and delay_off file entries in the beaglebone:green:usr3 directory, as follows:
/sys/class/leds/beaglebone:green:usr3$ echo timer > trigger/sys/class/leds/beaglebone:green:usr3$ lsbrightness delay_on max_brightness subsystem ueventdelay_off device power trigger
The LED flash timer makes use of these new delay_on time and delay_off time file entries. You can find out more information about these values by using the concatenate (catenate) command. Here's an example:
/sys/class/leds/beaglebone:green:usr3$ cat delay_on500
This reports the time delay in milliseconds. To make the USR3 LED flash at 10 Hz (i.e., on for 50 ms and off for 50 ms), you can use the following:
debian@beaglebone:/sys/class/leds/beaglebone:green:usr3$ sudo -iroot@beaglebone:~# cd /sys/class/leds/beaglebone:green:usr3root@beaglebone:/sys/class/leds/beaglebone:green:usr3# echo 50 > delay_onroot@beaglebone:/sys/class/leds/beaglebone:green:usr3# echo 50 > delay_off
You need to use the root account to perform the preceding operation because the delay_on and delay_off entries are owned by root.
root@beaglebone:/sys/class/leds/beaglebone:green:usr3# ls -l delay*-rw-r--r-- 1 root root 4096 Apr 24 02:08 delay_off-rw-r--r-- 1 root root 4096 Apr 24 02:07 delay_on
Typing echo none > trigger returns the LED to its default state on the PocketBeagle, which results in the delay_on and delay_off file entries disappearing.
Shutdown
One final issue to discuss in this section is the correct shutdown procedure for your board, as improper shutdown can potentially corrupt the ext4 file system and/or lead to increased boot times because of file system checks. Here are some important points on shutting down, rebooting, and starting your board:
- Typing
sudo shutdown -h nowshuts down the board correctly. You can delay this by five minutes by typingsudo shutdown -h +5. - Typing
sudo rebootwill reset and reboot the board correctly. - You can press the Power button (see Figure 1-4 and Figure 1-5) once to “soft” (as in software) shut down the board correctly.
- Holding the Power button for approximately eight seconds performs a hard system power down. This should be avoided unless the board is frozen and will not do a soft shutdown.
- Press the Power button to start the board. Try to avoid physically disconnecting and reconnecting the power jack or USB lead.
If your project design is enclosed and you need an external soft power down, it is possible to wire an external button to a GPIO input on the expansion header and write a shell script that runs on startup to poll the GPIO for an input. If that input occurs, then /sbin/shutdown -h now can be called directly.
Node.js, Cloud9, and BoneScript
The BeagleBoard.org Linux distribution comes complete with a set of technologies that you can use to quickly get started with developing software and hardware applications on the boards. These are called Node.js, Cloud9, and BoneScript—Node.js is a programming language, Cloud9 is an online software integrated development environment (IDE) in which you can write Node.js code, and BoneScript is a library of code for Node.js that allows you to interact with Beagle board hardware.
Introduction to Node.js
Node.js is a platform for building network applications that uses the same JavaScript engine as the Google Chrome web browser. JavaScript is the programming language that is often used to create interactive interfaces within web pages. Simply put, Node.js is JavaScript on the server side. Its runtime environment and library of code enables you to run JavaScript code applications, without a browser, directly at the Linux shell prompt.
Node.js uses an event-driven, nonblocking input/output model. Event-driven programming is commonplace in user-interface programming. It essentially means that the program's flow of execution is driven by user actions or messages that are transferred from other threads or processes. Interestingly, the fact that it uses nonblocking I/O means that it is suitable for interfacing to the input/output pins on your board, safely sharing resources with other applications. As with all new languages, you should start with a “Hello World!” example. Listing 2-1 sends the string “Hello World!” to the standard output, which is typically a Linux terminal.
Listing 2-1: /chp02/HelloWorld.js
console.log("Hello World!"); Open an SSH connection to the board, create a directory to contain the HelloWorld.js file, and then enter the code from 1 using nano.
debian@beaglebone:~$ cd ~/debian@beaglebone:~$ mkdir nodeTestdebian@beaglebone:~$ cd nodeTest/debian@beaglebone:~/nodeTest$ nano HelloWorld.js
To execute this code, type node HelloWorld.js in the directory containing the JavaScript file. You should see the following output:
debian@beaglebone:~/nodeTest$ lsHelloWorld.jsdebian@beaglebone:~/nodeTest$ node HelloWorld.jsHello World!
which should give you an idea of how you can write Node.js programs for the board. The call to the node command works because the Node.js runtime environment is preinstalled on the BeagleBoard.org Linux image.
Listing 2-2 provides a more complex Node.js example. It creates a web server that runs on the board at port 5050 and serves a simple “Hello World!” message. Write the program code in the same /nodeTest directory.
Listing 2-2: /chp02/SimpleWebServer.js
// A Simple Example Node.js Webserver Running on Port 5050var http = require('http'); // require the http modulevar server = http.createServer(function(req,res) {res.writeHead(200, {'Content-Type': 'text/plain'});res.end('Hello from the Beagle board! ');});server.listen(5050);console.log('Beagle Web Server running at http://192.168.7.2:5050/');
The example code in Listing 2-2 begins by requiring the Node.js http module. It then calls the http.createServer() method, which returns an http.Server object. The server.listen() method is called on the http.Server object, where it causes the server to accept connections on a defined port number (i.e., 5050). This method is asynchronous, meaning it does not have to finish before the console.log() method is called on the next line. In fact, unless you kill the process on the board, the server.listen() method will listen forever. When a connection is made to port 5050, the server will call the listening function, function(req,res), to which is passed a copy of the HTTP request and response references. In this case, the function responds with a short plaintext message.
To execute this program, you type node SimpleWebServer.js in the directory containing the source code file, and you should get the following:
debian@beaglebone:~/nodeTest$ lsHelloWorld.js SimpleWebServer.jsdebian@beaglebone:~/nodeTest$ node SimpleWebServer.jsBeagle Web Server running at http://192.168.7.2:5050/
where the output indicates that the server is running and listening on port 5050. You can then open a web browser and connect to this simple Node.js web server, where you will see the output, as shown in Figure 2-10. You can use Ctrl+C to kill the web server in the SSH window.

Figure 2-10: Connecting to the Node.js web server
Introduction to the Cloud9 IDE
Wouldn't it be great if there were a way to integrate the development of Node.js code with the execution environment? That is where the Cloud9 IDE is useful. The Cloud9 integrated development environment (IDE) is an impressive web-based coding platform that supports many different programming languages, including JavaScript and Node.js. It enables you to write, run, and debug code directly within your web browser without installing any operating-system-specific tools or applications. If that is not impressive enough, the Cloud9 service has a low enough overhead to run directly on a Beagle board, and it comes preinstalled on the BeagleBoard.org Linux images.
To use the Cloud9 IDE, open Google Chrome or Firefox and connect to your board's address on port 3000. For example, open 192.168.7.2:3000 using the address bar, as shown in Figure 2-11. When you first open Cloud9, it provides an excellent introduction to the user interface and controls.

Figure 2-11: The Cloud9 IDE running on the PocketBeagle, executing the SimpleWebServer.js example
Rather than having to write the code on your desktop machine and transfer it to your board, the Cloud9 interface can save files directly on your board's Linux file system and can even execute them too. In Figure 2-11, a new .js file is created, which contains the code in Listing 2-2. You must save the file using File → Save. You can click the Run button to execute the application. If the Debugger window appears, click Resume. You can click the hyperlink in the output console, and the application output will be visible in the browser window that appears, as in Figure 2-11.
Remember that this SimpleWebServer.js program is running on the Beagle board itself. In fact, if you SSH into the board (or use the Cloud9 bash terminal window) and execute the following command (described in Chapter 3), you can see that the application process is running, as follows:
debian@beaglebone:~# ps aux|grep SimpleWebServerdebian 2157 0.3 2.2 … node … "/var/lib/cloud9/EBB/SimpleWebServer.js" …
Clicking the Stop button in the Cloud9 IDE will kill this process.
Introduction to BoneScript
BoneScript is a library of Beagle-specific functionality that has been written for Node.js by BeagleBoard.org cofounder Jason Kridner. The BoneScript library provides the type of input/output functionality that would be familiar to Arduino users but with the advantage that it sits on top of the network capabilities of Node.js running on the Beagle platform. There are detailed descriptions of BoneScript and its functionality at beagleboard.org/support/bonescript.
You can use BoneScript to build a simple application to change the state of one of the system LEDs. The code in Listing 2-3 flashes the on-board USR3 LED, once every second, by utilizing the BoneScript library.
Listing 2-3: /chp02/BlinkLED3.js
var b = require('bonescript'); // using BoneScriptvar LED3Pin = "USR3"; // USR3 is D5 on the Beagle boardb.pinMode(LED3Pin, b.OUTPUT); // set up LED3Pin as an outputvar isOn = false; // isOn will be a Boolean flagsetInterval(toggleLED, 500); // each half second call toggleLED()function toggleLED(){isOn = !isOn; // invert the isOn state on each callif (isOn) b.digitalWrite(LED3Pin, 1); // light the LEDelse b.digitalWrite(LED3Pin, 0); // turn off the LEDconsole.log('LED On is: ' + isOn); // output the state}
This program requires the bonescript module, which is now referred to in the code as b—for example, by using b.someMethod(). Therefore, b.pinMode() uses the string literal "USR3" to identify the pin that is to be set to output mode. A temporary Boolean value isOn is used to retain the state of the LED in the code. The Node.js asynchronous global function setInterval() is set up to call the toggleLED() callback function every 500 ms. Each time the toggleLED() function is called, the isOn Boolean variable is inverted using the NOT operator (i.e., !true=false and !false=true). You set the LED pin to high if the value of isOn is true and to low if its value is false, and the state is outputted to the console.
This program can be executed directly within the Cloud9 IDE. However, it is important to remember that you can still run programs that include the BoneScript library calls directly at the Linux terminal prompt. Therefore, for example, executing the BlinkLED3.js code from the Cloud9 location on the Beagle board (as illustrated in Figure 2-12) will also work perfectly, flashing the USR3 LED once per second.
debian@beaglebone:/var/lib/cloud9/EBB$ lsBlinkLED3.js SimpleWebServer.jsdebian@beaglebone:/var/lib/cloud9/EBB$ node BlinkLED3.jsLED On is: trueLED On is: falseLED On is: trueLED On is: false …
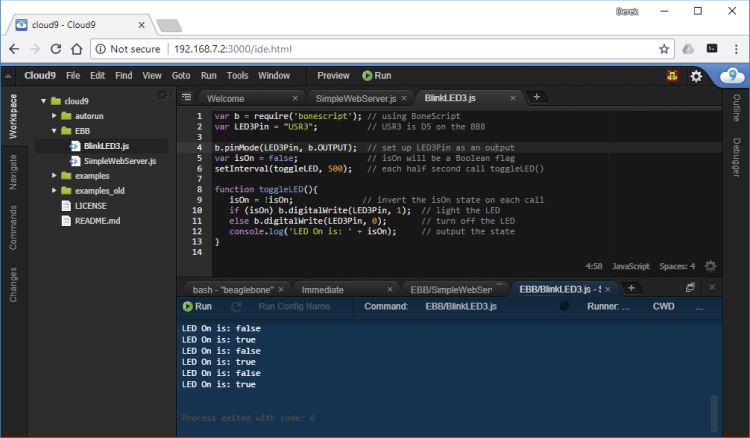
Figure 2-12: The Cloud9 IDE running on the PocketBeagle, executing the BoneScript BlinkLED3.js example
BoneScript is useful for the rapid prototyping of systems, particularly when those systems involve electronics that are to be connected to the internet. However, it is not ideal for high-performance large-scale applications—alternative languages and approaches are described throughout this book for such applications.
Summary
After completing this chapter, you should be able to do the following:
- Communicate with your Beagle board from your desktop computer using network connections such as internet-over-USB and regular Ethernet
- Communicate with your board using fallback serial connections such as serial-over-USB or by using a custom USB-to-TTL 3.3 V cable
- Interact with and control the board using simple Linux commands
- Perform basic file editing using a Linux terminal
- Manage Linux packages and set the system time
- Use Linux sysfs to affect the state of board hardware
- Safely shut down and reboot your board
- Use Node.js, Cloud9, and BoneScript to write basic applications and code that interact with your board's hardware
Further Reading
There are many links to websites and documents provided throughout this chapter. The following additional links provide further information on the topics covered:
- The chapter web page includes a video on getting started with internet-over-USB and burning a new image to the SD card:
www.exploringbeaglebone.com/chapter2/ - Node.js API documentation:
nodejs.org/api/ - BoneScript library guide:
beagleboard.org/support/bonescript