
CHAPTER 11
The Internet of Things
This chapter describes how the Beagle boards can be used as a core building block of the Internet of Things (IoT). In this chapter, you are introduced to the concepts of network programming, the IoT, and the connection of sensors to the internet. Several different communications architectures are described: The first architecture configures the Beagle board to be a web server that uses various server-side scripting techniques to display sensor data. Next, custom C/C++ code is described that can push sensor data to the internet and to platform as a service (PaaS) offerings, such as ThingSpeak and the Adafruit IO service using MQTT. Finally, a client/server pair for high-speed Transmission Control Protocol (TCP) socket communication is described. The latter part of the chapter introduces some techniques for managing distributed Beagle board sensors, and physical networking topics: setting the Beagle board to have a static IP address and using Power over Ethernet (PoE) with the Beagle board. By the end of this chapter you should be able to build your own connected embedded IoT devices.
EQUIPMENT REQUIRED FOR THIS CHAPTER:
- Beagle board (any model with a valid internet connection)
- TMP36 temperature sensor and an LED circuit
Further details on this chapter are available at http://exploringbeaglebone.com/chapter11/.
The Internet of Things
The terms Internet of Things (IoT) and cyber-physical systems (CPS) are broadly used to describe the extension of the web and the internet into the physical realm, by the connection of distributed embedded devices. Currently, the internet is largely an internet of people—the IoT concept envisions that if physical sensors and actuators can be linked to the internet, then a whole new range of applications and services are possible. For example, if sensors in a home environment could communicate with each other and the internet, then they could be “smart” about how they function—a home heating system that could retrieve the weather forecast may be more efficient and could provide a more comfortable environment (the Google Nest thermostat as an example). Within smart homes, IoT devices should be able to automate laborious tasks; manage security; and improve energy efficiency, accessibility, and convenience. However, the IoT also has broad application to many large-scale industries, such as energy management, security, healthcare, transport, and logistics.
In Chapter 9, interaction with the physical environment is discussed in detail. When the physical world can be acted upon by devices that are attached to the internet, such as actuators, then the devices are often called CPS. The terms IoT and CPS are often used interchangeably, with certain industries such as smart manufacturing favoring the term CPS. However, it is not unreasonable to consider a CPS to be a constituent building block, which when combined with web sensors and large-scale communications frameworks forms the IoT.
In this chapter, the implementation of several software communication architectures that can be used to realize IoT or CPS is described. Figure 11-1 summarizes the different communication architectures that are implemented in this chapter.
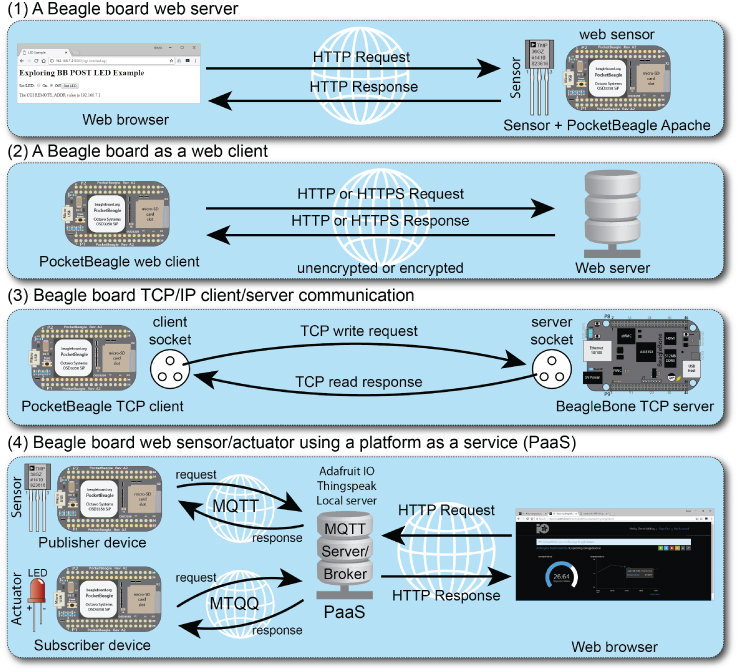
Figure 11-1: Different software communication architectures implemented in this chapter
Each of the architectures in Figure 11-1 has a different structure, and each can be applied to different communications applications.
- A Beagle board web server: A board that is connected to a sensor and running a web server can be used to present information to the web when it is requested to do so by a web browser. Communications take place using the Hypertext Transfer Protocol (HTTP).
- A Beagle board web client: A Beagle board can initiate contact with a web server using HTTP requests to send and receive data. A C/C++ program is written that uses TCP sockets to build a basic web browser, which can communicate over HTTP or, if necessary, securely over secure HTTP (HTTPS).
- A Beagle board TCP client/server: A custom C++ client and server are presented that can intercommunicate at high speeds with a user-defined communications protocol.
- A Beagle board web sensor using a PaaS: Code is written to enable the Beagle board to use HTTP and MQTT to send data to, and receive data from, web services such as ThingSpeak and Adafruit IO. This code enables you to build large arrays of sensors that can intercommunicate and store data on remote servers. In addition, these web services can be used to visualize the data that is stored.
Before examining these communication architectures, you need a thing to connect to the internet, for which you can use any sensor from earlier in the book.
A Beagle Board IoT Sensor
This book is filled with examples of sensors and actuators that you can use to create things. For example, the Beagle board can be turned into a thing by attaching a TMP36 temperature sensor directly to an ADC input to create a room temperature sensor.
The TMP36 provides an output of 750 mV at 25°C. It has a linear output, where the output scale factor is 10 mV/°C. This means that the minimum output voltage at −40°C is 0.75 V – (65 × 0.01 V) = 0.1 V, and the maximum output voltage at +125°C is 0.75 V + (100 × 0.01 V) = 1.75 V. It is therefore safe to connect it to a 1.8V ADC input as in Figure 11-2 as long as your room temperature does not exceed +130°C (266°F)1!

Figure 11-2: The PocketBeagle TMP36 temperature sensor circuit
You can read the current temperature from the TMP36 sensor as follows using the AIN0 input, which is attached to in_voltage0_raw:
debian@ebb:/sys/bus/iio/devices/iio:device0$ cat in_voltage0_raw1748
The temperature in degrees Celsius and degrees Fahrenheit can be calculated using the code in Listing 11-1.
Listing 11-1: /chp11/tmp36adc/tmp36adc.cpp
#include <iostream>#include <sstream>#include <fstream>using namespace std;#define ADC_PATH "/sys/bus/iio/devices/iio:device0/in_voltage"#define ADC 0float getTemperature(int adc_value) { // from the TMP36 datasheetfloat cur_voltage = adc_value * (1.80f/4096.0f); // Vcc = 1.8V, 12-bitfloat diff_degreesC = (cur_voltage-0.75f)/0.01f;return (25.0f + diff_degreesC);}int readAnalog(int number){stringstream ss;ss << ADC_PATH << number << "_raw";fstream fs;fs.open(ss.str().c_str(), fstream::in);fs >> number;fs.close();return number;}int main(){std::cout << "Starting the TMP36 example" << std::endl;std::cout << "The ADC value input is: " << readAnalog(ADC) << endl;float temp = getTemperature(readAnalog(ADC));float fahr = 32 + ((temp * 9)/5); // convert deg. C to deg. Fcout << "Temperature is " << temp << "°C (" << fahr << "°F)" << endl;}
The code can be built and executed as follows:
debian@ebb:~/exploringbb/chp11/tmp36adc$ g++ tmp36adc.cpp -o tmp36adcdebian@ebb:~/exploringbb/chp11/tmp36adc$ ./tmp36adcStarting the TMP36 exampleThe ADC value input is: 1735Temperature is 26.2891°C (79.3203°F)
You can use any sensor in place of the TMP36, for example the LDR analog circuit from Chapter 6.
The Beagle Board as a Sensor Web Server
One significant advantage of an embedded Linux device over more traditional embedded systems is the vast amount of open-source software that is available. In this section, a web server is installed and configured on the Beagle board. It is a straightforward process compared to the steps involved for a typical non-Linux embedded platform. In fact, one of the more difficult challenges is choosing which Linux web server to use! There are low-overhead servers available such as lighttpd, Boa, Monkey, and Nginx, and there are full-featured web servers such as the popular Apache server. The Apache web server is a sufficiently lightweight server that has an overhead that is suitable for running on a Beagle board. It is installed by default on the BeagleBoard.org Debian image distribution, which makes it a good choice for this section.
Running a web server on a Beagle board provides you with a number of application possibilities, including the following:
- Present general web content to the world
- Integrate sensors and display their values to the world
- Integrate sensors and use the web server to intercommunicate between devices
- Provide web-based interfaces to tools that are running on a Beagle board
Installing and Configuring a Web Server
As just mentioned, the Apache server is currently present in the BeagleBoard.org Debian Linux distribution. You can use the following commands to install or upgrade the Apache server:
debian@ebb:~$ dpkg --get-selections|grep apacheapache2 installapache2-bin installapache2-data installapache2-utils installdebian@ebb:~$ sudo apt updatedebian@ebb:~$ sudo apt install apache2… apache2 is already the newest version (2.4.25-3+deb9u4).
On the BeagleBoard.org Debian image, the Apache web server is running on port number 8080 by default. A port number is an identifier that can be combined with an IP address to provide an endpoint for a communications session. It is effectively used to identify the software service running on a server that is required by a client. For example, you can find out the list of services that are listening to ports on your board by using the network statistics (netstat) and systemctl commands:
debian@ebb:~$ hostname -I192.168.7.2 192.168.6.2debian@ebb:~$ sudo netstat -tlpnActive Internet connections (only servers)Proto Local Address Foreign Address State PID/Program nametcp6 :::80 :::* LISTEN 1/inittcp6 :::8080 :::* LISTEN 982/apache2tcp6 :::53 :::* LISTEN 1112/dnsmasqtcp6 :::22 :::* LISTEN 920/sshd …debian@ebb:~$ systemctl -all list-socketsLISTEN UNIT ACTIVATES[::]:1880 node-red.socket node-red.service[::]:3000 cloud9.socket cloud9.service[::]:80 bonescript.socket bonescript.service …
Therefore, when a network request is received for port 8080, it is directed to the apache2 web server application (process ID 982). The usual port number for unsecured web traffic is 80—this is assumed when you enter a URL in your web browser—and is currently directed to init. The init process then calls upon bonescript.service to provide the Bone101 web pages to the client browser. You can also see that traffic for port 22 is directed to the SSH server (sshd), and traffic for port 3000 is directed to the cloud9.service, which is demonstrated in Chapter 2.
debian@ebb:~$ service --status-all[ + ] apache-htcacheclean[ + ] apache2…
You can also get information about changes that you make to the server configuration before you perform a server restart, as follows:
debian@ebb:~$ apachectl configtestSyntax OKdebian@ebb:~$ sudo service apache2Usage: apache2 {start|stop|graceful-stop|restart|reload|force-reload}debian@ebb:~$ apachectlUsage: /usr/sbin/apachectl start|stop|restart|graceful|graceful-stop|configtest|status|fullstatus|help/usr/sbin/apachectl <apache2 args>/usr/sbin/apachectl -h (for help on <apache2 args>)
These tests are particularly useful in identifying configuration problems.
Configuring the Apache Web Server
Apache can be configured using the files in the /etc/apache2/ directory.
debian@ebb:/etc/apache2$ lsapache2.conf conf-enabled magic mods-enabled sites-availableconf-available envvars mods-available ports.conf sites-enabled
where the key configuration files are as follows:
apache2.confis the main configuration file for the server.ports.confis for configuring virtual server port numbers (set to port 8080 by default on the BeagleBoard.org Debian image).- The
sites-availabledirectory contains the configuration files for any virtual sites, and thesites-enableddirectory should contain a symbolic link to a configuration file in thesites-availabledirectory to activate a site. Thea2ensiteanda2dissitecommands should be used to enable and disable sites. There is an example configuration file present, in which you should set theServerAdmine-mail address and the document root (the default is/var/www).
In addition to the configuration files, the functionality of Apache can be further extended (e.g., to provide Python support) with the use of modules (see tiny.cc/beagle1101 for a full list). You can identify the current modules that have been compiled into Apache using the following:
debian@ebb:~$ apache2 -lCompiled in modules: core.c mod_so.c mod_watchdog.c http_core.cmod_log_config.c mod_logio.c mod_version.c mod_unixd.c
Creating Web Pages and Web Scripts
To create a simple web page for a Beagle board web server, you can use the nano text editor and some basic HTML syntax as follows:
debian@ebb:/var/www/html$ sudo nano index.htmldebian@ebb:/var/www/html$ more index.html<HTML> <TITLE>Beagle Board First Web Page</TITLE><BODY> <H1>Beagle Board First Page</H1>The Beagle board's test web page.</BODY> </HTML>
Now when you connect to the web server on the board using a web browser, you will see the output displayed as in Figure 11-3.

Figure 11-3: The first web page from the Apache web server running on port 8080
Web pages are ideal for the presentation of static web content, and by using an editor like KompoZer, CoffeeCup, or Notepad++, you can quickly build HTML content for a personal web server. You could then use the port forwarding functionality of your home router, as well as a dynamic DNS service, to share your static web content with the world.
More advanced dynamic web content can also be developed for the Beagle platform that interfaces to the physical environment for such tasks as reading sensor data or actuating motors. One relatively straightforward method of doing this is to use Common Gateway Interface (CGI) scripts. The configuration file (or linked to) in the sites-enabled directory specifies a directory location in which scripts can be placed so that they can be executed via a web browser request. The default location is the /usr/lib/cgi-bin/ directory, where a simple script can be created as follows (see /chp11/cgi-bin/test.cgi in the GitHub repository):
debian@ebb:~$ cd /usr/lib/cgi-bin/debian@ebb:/usr/lib/cgi-bin$ sudo nano test.cgidebian@ebb:/usr/lib/cgi-bin$ more test.cgi#!/bin/bashprintf "Content-type: text/html "printf "<html><head>"printf "<meta charset="UTF-8">"printf "<title>Hello Beagle Board</title></head>"printf "<body><h1>Hello Beagle Board</h1><para>"hostnameprintf " has been up "uptimeprintf "</para></html>"
The script must then be made executable and can be tested as follows:
debian@ebb:/usr/lib/cgi-bin$ sudo chmod ugo+x test.cgidebian@ebb:/usr/lib/cgi-bin$ ./test.cgiContent-type: text/html<html><head><meta charset="UTF-8"><title>Hello Beagle Board</title></head><body><h1>Hello Beagle Board</h1><para>ebb has been up02:48:42 up 3 days, 1:41, 2 users, load average: 0.04, 0.02, 0.00
Next, you must enable Apache to serve CGI scripts. To do this, perform the following steps:
…/usr/lib/cgi-bin$ cd /etc/apache2/mods-enabled/…/etc/apache2/mods-enabled$ sudo ln -s ../mods-available/cgi.load…/etc/apache2/mods-enabled$ ls -l cgi.loadlrwxrwxrwx 1 root root 26 Jul 7 02:36 cgi.load -> ../mods-available/cgi.load
And then restart the apache2 service.
debian@ebb:/etc/apache2/mods-enabled$ sudo service apache2 reload Finally, you can test the web server using the curl command, which connects to the web server in just the same way that a web browser does.
debian@ebb:~$ curl localhost:8080/cgi-bin/test.cgi<html><head><meta charset="UTF-8"><title>Hello Beagle Board</title></head><body><h1>Hello Beagle Board</h1><para>ebb has been up02:55:15 up 3 days, 1:48, 2 users, load average: 0.01, 0.01, 0.00
The script code is quite verbose, but you can see that it is easy to use it to call system commands (e.g., hostname and uptime). When the script is tested in the terminal window, its output displays HTML source code. However, when this output is viewed using a web browser, as in Figure 11-4, the HTML is rendered and presented correctly.

Figure 11-4: The output from a simple CGI script
As well as calling Linux system commands, you can also execute programs that have been written in C/C++. To demonstrate this capability, the tmp36adc.cpp program from Listing 11-1 can be modified so that it only outputs the raw temperature in degrees Celsius when it is executed. This new binary executable, called tmp36raw, can then be copied to the /usr/local/bin/ directory so that it is “permanently” installed on the board.
debian@ebb:~/exploringbb/chp11/tmp36adc$ g++ tmp36raw.cpp -o tmp36rawdebian@ebb:~/exploringbb/chp11/tmp36adc$ sudo cp tmp36raw /usr/local/bindebian@ebb:~/exploringbb/chp11/tmp36adc$ cd /usr/local/bin/debian@ebb:/usr/local/bin$ ./tmp36raw26.2012
The CGI script can then be modified to output the temperature value directly from the TMP36 sensor as follows (see chp11/cgi-bin/temperature.cgi):
debian@ebb:/usr/lib/cgi-bin$ sudo nano temperature.cgidebian@ebb:/usr/lib/cgi-bin$ sudo chmod ugo+x temperature.cgidebian@ebb:/usr/lib/cgi-bin$ more temperature.cgi#!/bin/bashprintf "Content-type: text/html "printf "<html><head>"printf "<meta charset="UTF-8">"printf "<title>Beagle Board Temperature</title></head>"printf "<body><h1>Beagle Board Temperature</h1><para>"printf "The temperature in the room is "/usr/local/bin/tmp36rawprintf " degrees Celsius</para></html>"
This script results in the output displayed in Figure 11-5. If you are experiencing difficulties with your CGI scripts, the log files that can help you diagnose problems are stored in /var/log/apache2/, which can be viewed with super user access.

Figure 11-5: Temperature sensor web page
PHP on the Beagle Board
CGI scripts work well for the short scripts used in the previous section—these are lightweight and easy to edit. However, as well as security concerns (e.g., attacks via URL manipulations), they do not scale very well (e.g., for interfacing with databases). One alternative is to use the PHP server-side scripting language. PHP is a reasonably lightweight open-source scripting language with a C-like syntax that can be written directly within HTML pages. It is capable of complex website delivery and is particularly well known as the language in which several content management systems (CMS), such as WordPress, are written. It can be installed for Apache as follows:
debian@ebb:~$ sudo apt install libapache2-mod-php7.0debian@ebb:~$ sudo a2enmod php7.0…Module php7.0 already enabled
To test the server is working correctly, you can copy the example hello.php from Listing 11-2 (see chp11/php/hello.php) to the /var/www/html/ directory (the location in which you previously wrote your first web page index.html).
debian@ebb:/var/www/html$ sudo cp ~/exploringbb/chp11/php/hello.php .debian@ebb:/var/www/html$ ls -ltotal 8-rw-r--r-- 1 root root 317 Jul 7 03:27 hello.php-rw-r--r-- 1 root root 138 Jul 7 00:27 index.html
Similarly to the CGI script, it interfaces to the TMP36 sensor by executing the tmp36raw program, resulting in the output shown in Figure 11-6.

Figure 11-6: A PHP temperature sensor example
Listing 11-2: /chp11/php/hello.php
<?php $temperature = shell_exec('/usr/local/bin/tmp36raw'); ?><html> <head> <title>Beagle Board PHP Test</title></head><body><h2>Hello from the Beagle Board!</h2></p>Your IP address is: <?php echo $_SERVER['REMOTE_ADDR']; ?></p></p>The temperature at the board is: <?php echo $temperature ?> ºC</p></body></html>
GNU Cgicc Applications (Advanced)
CGI allows a web browser to pass environment and application information to a script/program using HTTP POST or GET requests. Almost all programming languages can be used to build CGI applications, as their only roles in the transaction are to parse the input that is sent to these by the server and to construct a suitable HTML output response.
The GNU Cgicc is a C++ library for building CGI applications. It is powerful, and it greatly simplifies the process of building applications that allow you to interact with a Beagle board over the internet using an HTML form-based interface. It could be argued that this is a “dated approach” to solving the problem of having an embedded system web server interact with a web browser client—it has been around since the 1990s. To some extent that is true. There are powerful alternatives available such as Java servlets, Node.js, Dart, and PHP; however, this approach:
- has a very low overhead on the Beagle board, as the code is compiled rather than interpreted
- permits direct access to system calls
- can interface readily with hardware using code libraries
The downside is that it is not really suitable for novice programmers, the output format syntax can be verbose, and session management is complex. Even with that, it is worth pointing out that some large-scale web applications, including those by Google and Amazon, do use C++ on their servers for performance-critical systems. A Beagle board is not a high-end server, so any performance optimizations are always welcome, perhaps even at the cost of added complexity.
Cgicc can be downloaded and installed using the following steps:2
debian@ebb:~$ <b>mkdir cgicc</b>debian@ebb:~$ cd cgicc/debian@ebb:~/cgicc$ wget ftp://ftp.gnu.org/gnu/cgicc/cgicc-3.2.19.tar.gzdebian@ebb:~/cgicc$ tar xvf cgicc-3.2.19.tar.gzdebian@ebb:~/cgicc$ cd cgicc-3.2.19/debian@ebb:~/cgicc/cgicc-3.2.19$ ./configure --prefix=/usrdebian@ebb:~/cgicc/cgicc-3.2.19$ makedebian@ebb:~/cgicc/cgicc-3.2.19$ sudo make installdebian@ebb:~/cgicc/cgicc-3.2.19$ ls /usr/lib/libcgi*/usr/lib/libcgicc.a /usr/lib/libcgicc.so /usr/lib/libcgicc.so.3.2.10/usr/lib/libcgicc.la /usr/lib/libcgicc.so.3
As an example application, Cgicc can be used to control an LED that is attached to a GPIO on a Beagle board. Using the circuit from Figure 6-3 in Chapter 6, the LED can be attached to the Beagle board on GPIO1_28 (i.e., GPIO 60) and a web interface can be developed, as illustrated in Figure 11-7 to control the LED using only a web browser—this interface can be used from anywhere in the world!

Figure 11-7: The LED Cgicc form post example
Listing 11-3 provides a form POST example. The form can contain elements such as checkboxes, radio components, buttons, and text fields. The code dynamically generates the HTML web form in Figure 11-7 and updates the page output to display the current state of the LED by selecting the appropriate radio component.
The listing uses Cgicc functions such as HTTPHTMLHeader(), html(), and body() to generate the HTML content for the output. In addition, the example demonstrates how to interact with radio buttons, within HTML forms. It is important that the form data is parsed at the beginning of the program code, as the form data that was previously submitted needs to be propagated into the new output. Clearly, the first time this form is requested there is no data present, and the code at the beginning of the program assigns a default value (e.g., cmd="off"). If this is not performed, then the program will result in a segmentation fault. From that point onward, the form output needs to maintain the state, and that is why these values appear in the HTML generation code.
Listing 11-3: /chp11/cgicc/led.cpp
#include <iostream> // for the input/output#include <stdlib.h> // for the getenv call#include <sys/sysinfo.h> // for the system uptime call#include <cgicc/Cgicc.h> // the cgicc headers#include <cgicc/CgiDefs.h>#include <cgicc/HTTPHTMLHeader.h>#include <cgicc/HTMLClasses.h>#define LED_GPIO "/sys/class/gpio/gpio60/"using namespace std;using namespace cgicc;void writeGPIO(string filename, string value){fstream fs;string path(LED_GPIO);fs.open((path + filename).c_str(), fstream::out);fs << value;fs.close();}int main(){Cgicc form; // the CGI form objectstring cmd; // the Set LED commandwriteGPIO("direction", "out");// get the state of the form that was submitted - script calls itselfbool isStatus = form.queryCheckbox("status");form_iterator it = form.getElement("cmd"); // the radio commandif (it == form.getElements().end() || it->getValue()==""){cmd = "off"; // if it is invalid use "off"}else { cmd = it->getValue(); } // otherwise use submitted valuechar *value = getenv("REMOTE_ADDR"); // The remote IP address// generate the form but use states that are set in the submitted formcout << HTTPHTMLHeader() << endl; // Generate the HTML formcout << html() << head() << title("LED Example") << head() << endl;cout << body() << h1("Exploring BB POST LED Example") << endl;;cout << "<form action="/cgi-bin/led.cgi" method="POST"> ";cout << "<div>Set LED: <input type="radio" name="cmd" value="on""<< ( cmd=="on" ? "checked":"") << "/> On ";cout << "<!input type="radio" name="cmd" value="off""<< ( cmd=="off" ? "checked":"") << "/> Off ";cout << "<input type="submit" value="Set LED"/>";cout << "</div> </form>";// process the form data to change the LED stateif (cmd=="on") writeGPIO("value", "1"); // turn onelse if (cmd=="off") writeGPIO("value", "0"); // turn offelse cout << "<div> Invalid command! </div>"; // not possiblecout << "<div> The CGI REMOTE_ADDR value is " << value << "</div>";cout << body() << html();return 0;}
You can build and deploy this application as follows:
debian@ebb:~/exploringbb/chp11/cgicc$ g++ led.cpp -o led.cgi -lcgiccdebian@ebb:~/exploringbb/chp11/cgicc$ ls -l led.cgi-rwxr-xr-x 1 debian debian 33356 Jul 7 15:42 led.cgidebian@ebb:~/exploringbb/chp11/cgicc$ sudo cp led.cgi /usr/lib/cgi-bin/debian@ebb:~/exploringbb/chp11/cgicc$ sudo chmod +s /usr/lib/cgi-bin/led.cgi
This example just scratches the surface of what can be performed using CGI and C++ on the Beagle board. For complex applications you may be better placed to examine other frameworks, but for simple high-performance web interfaces, the GNU Cgicc library provides a perfectly appropriate solution.
It is worth noting that there is one important limitation with the current example. It is a single session solution—if two users access the led.cgi script at the same time, then the LED state that is displayed will be inconsistent. For more complex applications, session management is important.
For more information on the Cgicc library, please see the GNU Cgicc library documentation at tiny.cc/beagle1102. By browsing the Class List, you will see that the library is capable of handling cookies, file transfers, and much more.
Replacing Bone101 with Apache
The Bone101 web server provides valuable information about getting started with your Beagle board; however, it occupies the default web port (port 80). If you want to replace Bone101 with your custom web server, you can shut down the bonescript service and configure the custom server to use port 80. To shut down the bonescript service, you can use the following steps. The first call is shown here:
debian@ebb:~$ systemctl list-units -t service | grep bonescriptbonescript-autorun.service loaded active running Bonescript autorunbonescript.service loaded active running Bonescript server
It confirms that bonescript.service is running. To stop the service, you need to stop bonescript.socket first, and then you can disable the service, as follows:
debian@ebb:~$ sudo systemctl stop bonescript.socketdebian@ebb:~$ sudo systemctl stop bonescript.servicedebian@ebb:~$ sudo systemctl disable bonescript.socketRemoved /etc/systemd/system/sockets.target.wants/bonescript.socket.debian@ebb:~$ sudo systemctl disable bonescript.service
You can then configure the Apache2 server to use port 80 by modifying the ports.conf file to listen to port 80 as follows:
debian@ebb:/etc/apache2$ sudo nano ports.confdebian@ebb:/etc/apache2$ more ports.conf | grep 80Listen 80
And restart the Apache2 server as follows:
debian@ebb:/etc/apache2$ sudo systemctl restart apache2.service A C/C++ Web Client
Installing a web server on a Beagle board provides it with a simple, intuitive way to present information to a client web browser application. It is important to understand that the distinction between a client and a server has nothing to do with the hardware capability of the interconnected devices; rather, it relates to the role of each device at that particular point in time. For example, when retrieving a web page from the Beagle board using its Apache web server, a desktop computer's web browser is a client of the Beagle board's web server. Table 11-1 summarizes the characteristics of the two types of application, which when used together is termed the client-server model.
Table 11-1: Characteristics of Server vs. Client Applications
| SERVER APPLICATIONS | CLIENT APPLICATIONS |
| Special-purpose applications that are typically dedicated to one service. | Typically become a client temporarily, but perform other computation locally. |
| Typically invoked on system startup and they attempt to run forever. | Typically invoked by a user for a single session. |
| Wait passively, and potentially forever, for contact from client applications. | Actively initiate contact with the server. The client must know the address of the server. |
| Accept contact from client applications. | Can access several servers simultaneously. |
| Typically run on a shared machine. | Typically run on a local machine. |
When a Beagle board acts as a server, it waits passively for a connection from a client machine, but there are many cases when the board might need to actively contact a server on another machine. In such cases, the board must act as a client of that server. At this point in the book you have already used many such client network applications on the board, such as ping, wget, ssh, sftp, and so on, and these applications can be used within shell scripts. However, it would also be useful if you could generate client requests from within program code, and for this you can use network sockets.
Network Communications Primer
A socket is a network endpoint that is defined using an IP address and a port number. An IP address (version 4) is simply a 32-bit number, which is represented as four eight-bit values (e.g., 192.168.7.2), and a port number is a 16-bit unsigned integer (0–65,535) that can be used to enable multiple simultaneous communications to a single IP address. Ports under 1,024 are generally restricted to root access to prevent users from hijacking core services (e.g., 80 for HTTP, 20/21 for FTP, 22 for SSH, 443 for HTTPS).
The description of a socket must also define the socket type, indicating whether it is a stream socket or a datagram socket. Stream sockets use the Transmission Control Protocol (TCP), which provides for reliable transfer of data where the time of transmission is not a critical factor. Its reliability means that it is used for services such as HTTP, e-mail (SMTP), and FTP, where data must be reliably and correctly transferred. The second type of socket is a datagram socket that uses the User Datagram Protocol (UDP), which is less reliable but much faster than TCP, as there is no error-checking for packets. Time-critical applications such as voice over IP (VoIP) use UDP, as errors in the data will be presented in the output as noise, but the conversation will not be paused awaiting lost data to be resent.
When communication is established between two network sockets, it is called a connection. Data can then be sent and received on this connection using write and read functions. It is important to note that a connection could also be created between two processes (programs) that are running on a single machine and thus used for inter-process communication.
A C/C++ Web Client
Full C/C++ support for socket communication can be added to your program by including the sys/socket.h header file. In addition, the sys/types.h header file contains the data types that are used in system calls, and the netint/in.h header file contains the structures needed for working with internet domain addresses.
Listing 11-4 is the C source code for a basic web browser application that can be used to connect to an HTTP web server, retrieve a web page, and display it in raw HTML form—like a regular web browser but without the pretty rendering. The code performs the following steps:
- The server name is passed to the program as a string argument. The program converts this string into an IP address (stored in the
hostentstructure) using thegethostbyname()function. - The client creates a TCP socket using the
socket()system call. - The
hostentstructure and a port number (80) are used to create asockaddr_instructure that specifies the endpoint address to which to connect the socket. This structure also sets the address family to be IP-based (AF_INET) and the network byte order. - The TCP socket is connected to the server using the
connect()system call—the communications channel is now open. - An HTTP request is sent to the server using the
write()system call and a fixed-length response is read from the server using theread()system call. The HTML response is displayed. - The client disconnects, and the socket is closed using
close().
Listing 11-4: /chp11/webbrowser/webbrowser.c
#include <stdio.h>#include <sys/socket.h>#include <sys/types.h>#include <netinet/in.h>#include <netdb.h>#include <strings.h>#include <unistd.h>int main(int argc, char *argv[]){int socketfd, portNumber, length;char readBuffer[2000], message[255];struct sockaddr_in serverAddress; //describes endpoint to a socketstruct hostent *server; //stores information about host name// The command string for a HTTP request to get / (often index.html)sprintf(message, "GET / HTTP/1.1 Host: %s Connection:close ", argv[1]);printf("Sending the message: %s", message);if (argc<=1){ // must pass the hostnameprintf("Incorrect usage, use: ./webBrowser hostname ");return 2;}// gethostbyname accepts a string name and returns host name structserver = gethostbyname(argv[1]);if (server == NULL) {perror("Socket Client: error - unable to resolve host name. ");return 1;}// Create the socket of IP address type, SOCK_STREAM is for TCPsocketfd = socket(AF_INET, SOCK_STREAM, 0);if (socketfd < 0){perror("Socket Client: error opening TCP IP-based socket. ");return 1;}// clear the data in the serverAddress sockaddr_in structbzero((char *) &serverAddress, sizeof(serverAddress));portNumber = 80;serverAddress.sin_family = AF_INET; //set the addr. family to be IPserverAddress.sin_port = htons(portNumber); //set port num to 80bcopy((char *)server->h_addr,(char *)&serverAddress.sin_addr.s_addr,server->h_length); //set the addr. to the resolved hostname addr.// try to connect to the serverif (connect(socketfd, (struct sockaddr *) &serverAddress,sizeof(serverAddress)) > 0){perror("Socket Client: error connecting to the server. ");return 1;}// send the HTTP request stringif (write(socketfd, message, sizeof(message)) < 0){perror("Socket Client: error writing to socket");return 1;}// read the HTTP response to a maximum of 2000 charactersif (read(socketfd, readBuffer, sizeof(readBuffer)) < 0){perror("Socket Client: error reading from socket");return 1;}printf("**START** %s **END** ", readBuffer); //display responseclose(socketfd); //close socketreturn 0;}
This code can be built and executed as follows. In this example, the simple web page from the local Beagle board Apache web server is requested, by using localhost, which essentially means “this device,” and it uses the Linux loopback virtual network interface (lo), which has the IP address 127.0.0.1:
debian@ebb:~/exploringbb/chp11/webbrowser$ gcc webbrowser.c -o webbrowserdebian@ebb:~/exploringbb/chp11/webbrowser$ ./webbrowser localhostSending the message: GET / HTTP/1.1Host: localhostConnection: close**START**HTTP/1.1 200 OKDate: Sat, 07 Jul 2018 16:17:34 GMTServer: Apache/2.4.25 (Debian)Last-Modified: Fri, 06 Jul 2018 23:27:01 GMTETag: "8a-5705d0030eb6b"Accept-Ranges: bytesContent-Length: 138Vary: Accept-EncodingConnection: closeContent-Type: text/html<HTML> <TITLE>Beagle Board First Web Page</TITLE><BODY> <H1>Beagle Board First Page</H1>The Beagle board's test web page.</BODY> </HTML>**END**
The example works correctly, returning the index.html file from the /var/www/ directory that is sent through the Apache server. It can also connect to other web servers (e.g., call ./webbrowser www.google.com).
Secure Communication Using OpenSSL
One of the limitations of the TCP socket application in the previous section is that all communications are sent “in the clear” across IP networks. This may not be of concern for home networks, but if your client and server are on different physical networks, then the data that is transferred can be easily viewed on intermediary networks. Sometimes it is necessary to communicate securely between a client and a server—for example, if you are sending a username and password to an online service. In addition, particular care should be taken in applications where the Beagle board can actuate motors or relays—a malicious attack could cause physical destruction. One way to implement secure communications is to use the OpenSSL toolkit.
OpenSSL (www.openssl.org) is a toolkit that implements Secure Sockets Layer (SSL), Transport Layer Security (TLS), and a cryptography library. This library can be installed using the following:
debian@ebb:~$ sudo apt install openssl libssl-dev OpenSSL is a complex and comprehensive toolkit that can be used to encrypt all types of communications. This section presents one example application to illustrate its use. For this example, the C/C++ web client code is modified to support SSL communications as shown in Listing 11-5. The code involved in this example is the same as in Listing 11-4, except for the following:
- The TCP socket connection is formed to the HTTP secure (i.e., HTTPS) port, which is port 443 by default.
- The SSL library is initialized using the
SSL_Library_init()function. - An SSL context object is used to establish the TLS/SSL connection. The security and certificate options can be set in this object.
- The network connection is assigned to an SSL object and a handshake is performed using the
SSL_connect()function. - The
SSL_read()andSSL_write()functions are used. - The
SSL_free()function is used to shut down the TLS/SSL connection, freeing the socket and SSL context objects.
Listing 11-5: /chp11/webbrowserSSL/webbrowserSSL.c (Segment)
/*** After the connection to the server is formed: ***/// Register the SSL/TLS ciphers and digestsSSL_library_init();// Create an SSL context object to establish TLS/SSL enabled connectionsSSL_CTX *ssl_ctx = SSL_CTX_new(SSLv23_client_method());// Attach an SSL Connection to the socketSSL *conn = SSL_new(ssl_ctx); // create an SSL structure for an SSL sessionSSL_set_fd(conn, socketfd); // Assign a socket to an SSL structureSSL_connect(conn); // Start an SSL session with a remote server// send data across a SSL sessionif (SSL_write(conn, message, sizeof(message)) < 0){ … }// read data scross a SSL sessionif (SSL_read(conn, readBuffer, sizeof(readBuffer)) < 0){ … }printf("**START** %s **END** ", readBuffer); //display the responseSSL_free(conn); //free the connectionclose(socketfd); //close the socketSSL_CTX_free(ssl_ctx); //free the SSL context
The full source code is in the /chp11/webbrowserSSL/ directory. It can be compiled and tested using the following commands:
…/chp11/webbrowserSSL$ gcc webbrowserSSL.c -o webbrowserSSL -lcrypto -lssl…/chp11/webbrowserSSL$ ls -l webbrowserSSL-rwxr-xr-x 1 debian debian 9188 Jul 7 17:33 webbrowserSSL…/chp11/webbrowserSSL$ ./webbrowserSSL www.google.com
The application can successfully communicate with the SSL port (443) on secured web servers (e.g., www.google.com). The current code does not verify the authenticity of the server owner, but it does encrypt communications.
A Beagle Board as a “Thing”
Earlier in this chapter a web server was configured on the Beagle board so that it can send temperature information to the internet. This mechanism is useful, as it provides a snapshot in time of sensor outputs. To provide trend data, it would be possible to store the data in flat files or to install a lightweight database on a Beagle board (e.g., MongoDB). PHP charting tools such as phpChart and pChart could be used to visually represent the data.
An alternative way of performing the collection and visualization of web sensor information is to connect a Beagle board to online data aggregation services, which enable you to push sensor data to the cloud, directly from the board. In this section, online services are utilized directly from within C/C++ programs that are executing on a board. This enables you to develop lightweight operations that can leverage internet services to intercommunicate between several different boards on different networks. It also enables the collection of sensor data from many “web sensors” at the same time on different physical networks.
ThingSpeak
ThingSpeak is an open-source IoT application and API that can be used to store data from web sensors (things). Using HTTP, the sensors can push numeric or alphanumeric data to the server, where it can be processed and visualized. The ThingSpeak application can be installed on a server that is running the Ruby on Rails web application framework and an SQL database.
In this example, the Beagle board pushes room temperature data to a hosted free service at www.thingspeak.com, where data can also be visualized as shown in Figure 11-9. Once you set up a free MathWorks account, you can then create a new channel on ThingSpeak, which provides you with read and write API keys for the channel.
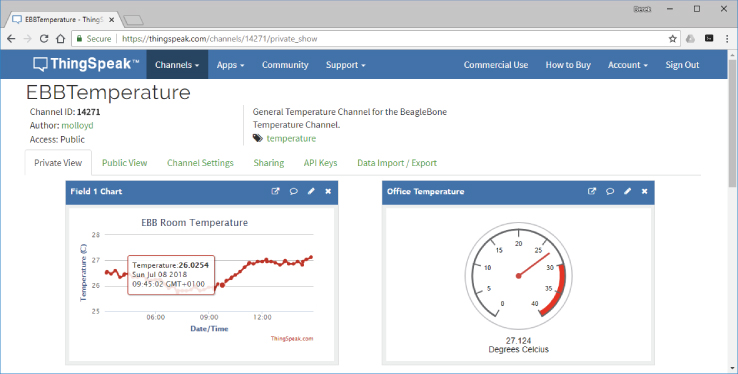
Figure 11-9: A ThingSpeak web sensor example using the TMP36 sensor circuit in Figure 11-2
A C++ SocketClient is available for this example. This class simply wraps the C code that is used for the C/C++ web browser application in Listing 11-4. Listing 11-6 provides the class interface definition.
Listing 11-6: /chp11/thingSpeak/network/SocketClient.h
class SocketClient {private:int socketfd;struct sockaddr_in serverAddress;struct hostent *server;std::string serverName;int portNumber;bool isConnected;public:SocketClient(std::string serverName, int portNumber);virtual int connectToServer();virtual int disconnectFromServer();virtual int send(std::string message);virtual std::string receive(int size);bool isClientConnected() { return this->isConnected; }virtual ~SocketClient();};
The code example in Listing 11-7 uses this SocketClient class. The example reads the temperature sensor and pushes it to the hosted ThingSpeak server using an HTTP POST request.
Listing 11-7: /chp11/thingSpeak/thingSpeak.cpp
#include <iostream>#include <sstream>#include <fstream>#include "network/SocketClient.h"#define ADC_PATH "/sys/bus/iio/devices/iio:device0/in_voltage"#define ADC 0using namespace std;using namespace exploringBB;float getTemperature(int adc_value) { // from the TMP36 datasheetfloat cur_voltage = adc_value * (1.80f/4096.0f); // Vcc = 1.8V, 12-bitfloat diff_degreesC = (cur_voltage-0.75f)/0.01f;return (25.0f + diff_degreesC);}int readAnalog(int number){stringstream ss;ss << ADC_PATH << number << "_raw";fstream fs;fs.open(ss.str().c_str(),fstream::in);fs >> number;fs.close();return number;}int main() {ostringstream head, data;cout << "Starting ThingSpeak Example" << endl;SocketClient sc("api.thingspeak.com",80);data << "field1=" << getTemperature(readAnalog(ADC)) << endl;cout << "Sending the temperature:" <<getTemperature(readAnalog(ADC)) << endl;sc.connectToServer();head << "POST /update HTTP/1.1 "<< "Host: api.thingspeak.com "<< "Connection: close "// This key is available from the API keys tab in Fig 11-9<< "X-THINGSPEAKAPIKEY: G6MTQ21IVBFGYEBB "<< "Content-Type: application/x-www-form-urlencoded "<< "Content-Length:" << string(data.str()).length() << " ";sc.send(string(head.str()));sc.send(string(data.str()));string rec = sc.receive(1024);cout << "[" << rec << "]" << endl;cout << "End of ThingSpeak Example" << endl;}
To send data to the server at regular time intervals, POSIX threads and sleep() calls can be added to the code in Listing 11-7. However, an easier alternative is to use the Linux cron time-based job scheduler. The code in Listing 11-7 can be built and executed as follows:
…/chp11/thingSpeak$ g++ thingSpeak.cpp network/SocketClient.cpp →-o thingSpeak…/chp11/thingSpeak$ ./thingSpeakStarting ThingSpeak ExampleSending the temperature: 27.168[HTTP/1.1 200 OKContent-Type: text/html; charset=utf-8Content-Length: 1 ….
The Linux Cron Scheduler
The Linux cron daemon (named after Chronos, the Greek god of time) is a highly configurable utility for scheduling tasks to be performed at specific times and dates. It is typically used for system administration tasks, such as backing up data, clearing temporary files, rotating log files, updating package repositories, or building software packages during off-peak times.
When sensors or actuators are interfaced to a Beagle board, cron can also be useful for applications such as logging data from these sensors at fixed intervals over long periods of time. On a Beagle board, you could use the scheduler for tasks such as collecting sensor data, building a stepper-motor clock, time-lapse photography, setting security alarms, and so on.
System crontab
Cron wakes once every minute and checks its configuration files, called crontabs, to see whether any commands are scheduled to be executed. It can be used to schedule tasks to run with a maximum frequency of once per minute down to a minimum frequency of once per year. Configuration files for cron can be found in the /etc/ directory.
debian@ebb:~$ cd /etc/cron.<Tab><Tab>cron.d/ cron.daily/ cron.hourly/ cron.monthly/ cron.weekly/
The crontab file contains scheduling instructions for the cron daemon, according to the crontab fields that are listed in Table 11-2. Each line of the crontab file specifies the time at which the command field should execute. A wildcard value (*) is available—for example, if it is placed in the hour field, then the command should execute at each and every hour of the day.
Table 11-2: Crontab Fields
| FIELD | RANGE | DESCRIPTION |
m
|
0–59 | The minute field |
h
|
0–23 | The hour field |
dom
|
1–31 | Day of the month field |
mon
|
1–12 or name | Month of the year (first three letters can be used) |
dow
|
0–7 or name | 0 or 7 is Sunday (first three letters can be used) |
user
|
Can specify the user that executes the command | |
command
|
The command to be executed at this point in time |
Ranges are permitted (e.g., 1-5 for Monday to Friday) and so are lists of times (e.g., 1, 3, 5). In addition, strings can be used in place of the first five fields: @reboot, @yearly, @annually, @monthly, @weekly, @daily, @midnight, and @hourly. The custom crontab file in Listing 11-8 provides some examples. There are comments in the file to explain the functionality of the entries.
Listing 11-8: /etc/crontab
# /etc/crontab: system-wide crontabSHELL=/bin/shPATH=/usr/local/sbin:/usr/local/bin:/sbin:/bin:/usr/sbin:/usr/bin# m h dom mon dow usercommand# Go to bed message, every night at 1am, sent to all users using wall0 1 * * * root echo Go to bed! | wall# Extra reminder, every work day night (i.e. 1:05am Monday-Friday)5 1 * * 1-5 root echo You have work in the morning! | wall# Perform a task each day (same as 0 0 * * *). Clear the /tmp directory@daily root rm -r /tmp/*# The following are present in the default Debian crontab file:17 * * * * root cd / && run-parts --report /etc/cron.hourly25 6 * * * root test -x /usr/sbin/anacron || ( cd / && run-parts--report /etc/cron.daily ) …
Examples are added to the crontab file to send messages and to clear the /tmp directory (see the listing comments). You can also specify that a command should be executed every 10 minutes by using */10 in the minutes field.
You may have also noticed other entries in the crontab file that refer to an anacron command. Anacron (anachronistic cron) is a specialized cron utility for devices, such as laptop computers and embedded systems that are not expected to be running 24/7. If regular cron were configured to back up files every week but the Beagle board happened to be powered off at that exact moment, then the backup would never be performed. However, with anacron the backup will be performed when the Beagle board next boots (i.e., jobs are queued). You can install anacron using the following:
debian@ebb:~$ sudo apt install anacron Now there will be a new /etc/anacrontab file that performs the same role as crontab does for cron. The configuration file for anacron can be found in /etc/init/anacron.conf.
One problem with having both cron and anacron installed on one system is that it is possible for cron to run a job that anacron has already run, or vice versa. That is the reason for the crontab entries at the end of Listing 11-8. These entries ensure that run-parts is executed only if anacron is not installed on the Beagle board. This is tested by the call to test -x /usr/sbin/anacron, which returns 0 if the anacron command is present, and 1 if it is not. Calling echo $? displays the output value.
An alternative to adding an entry directly to the crontab file is to add a script to one of the directories: cron.daily, cron.hourly, cron.monthly, or cron.weekly in the /etc/ directory. Any scripts in these directories are executed by cron. For example, you could create a script in the cron.hourly directory to update the temperature on ThingSpeak as follows:
…/chp11/thingSpeak$ sudo cp thingSpeak /usr/local/bin…/chp11/thingSpeak$ cd /etc/cron.hourly/debian@ebb:/etc/cron.hourly$ sudo nano thingSpeakTempdebian@ebb:/etc/cron.hourly$ more thingSpeakTemp#!/bin/bash/usr/local/bin/thingSpeakdebian@ebb:/etc/cron.hourly$ sudo chmod a+x thingSpeakTempdebian@ebb:/etc/cron.hourly$ ls -l-rwxr-xr-x 1 root root 38 Jul 8 00:16 thingSpeakTemp
An alternative to this is to execute the binary directly within the user account using user crontab, which is described in the next section.
User crontab
Each user account can have its own crontab. These files are placed in the /var/spool/cron/crontabs directory, but they should not be edited in this location. The following creates a crontab for the debian user:
debian@ebb:~$ crontab -eno crontab for debian - using an empty one
You can edit the user crontab file to upload the room temperature to ThingSpeak every 15 minutes by adding the following line:
# m h dom mon dow command*/15 * * * * /usr/local/bin/thingSpeak > /dev/null 2>&1
The end of this command redirects the standard output to /dev/null. The call 2>&1 redirects the standard error to the standard output and therefore also to /dev/null. If this were not present, then by default the output of the thingSpeak command would be e-mailed to the system administrator (if mail is configured on the board). You can back up your crontab file as follows:
debian@ebb:~$ crontab -l > crontab-backupdebian@ebb:~$ ls -l crontab-backup-rw-r--r-- 1 debian debian 954 Jul 8 00:26 crontab-backup
To reinstate this backup file with crontab, use the following:
debian@ebb:~ $ crontab crontab-backup The administrator account can control which users have access to cron by placing either a cron.allow or cron.deny file in the /etc/ directory. Under Debian all users can have their own crontab by default. Use the following to remove this capability:
debian@ebb:/etc$ more cron.denydebiandebian@ebb:~ $ crontab -eYou (debian) are not allowed to use this program (crontab)
With the previous crontab entry, the thingSpeak program uploads sensor temperature data to the ThingSpeak server every 15 minutes, as illustrated in the plot in Figure 11-9. ThingSpeak also supports MATLAB server-side code execution. For example, Figure 11-10 illustrates a short MATLAB program to convert the most recent temperature from degrees Celsius to degrees Fahrenheit. The example is structured to populate the converted result into another ThingSpeak data channel.
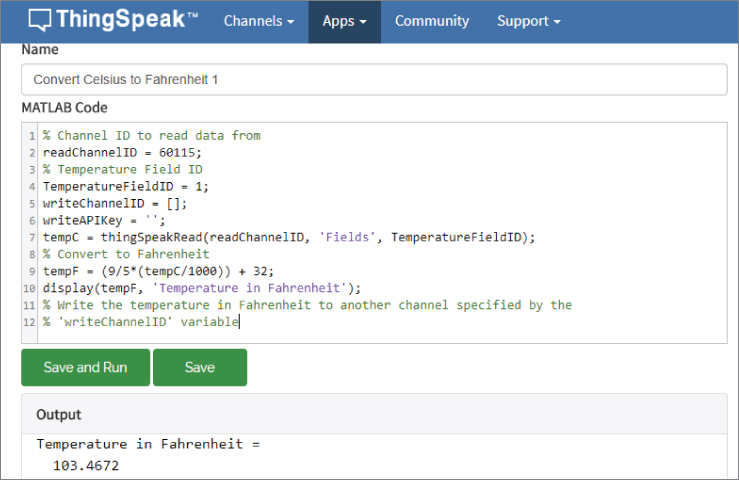
Figure 11-10: A ThingSpeak MATLAB example
Sending E-mail from the Beagle Board
It can be useful to send e-mail directly from a Beagle board so that detected system problems are relayed to a potentially remote administrator. In addition, it is useful for an e-mail to be sent when a sensor event occurs—for example, an e-mail could be sent if the room temperature exceeds 30°C. There are many mail client applications, but if you are using a secure Simple Mail Transfer Protocol (SMTP) server, like Gmail, then the ssmtp program works well. Install ssmtp using the following command:
debian@ebb:~$ sudo apt install ssmtp mailutils Configure the e-mail settings in the file /etc/ssmtp/ssmtp.conf. For example, to configure your board to send e-mail through a Gmail account, replace the account name and password fields in the following and change the hostname to localhost:
debian@ebb:/etc/ssmtp$ more ssmtp.conf# Config file for sSMTP sendmailroot=MyName@gmail.commailhub=smtp.gmail.com:587AuthUser=MyName@gmail.comAuthPass=MyPasswordAuthMethod=LOGINUseTLS=YESUseSTARTTLS=YESTLS_CA_File=/etc/ssl/certs/ca-certificates.crtrewriteDomain=gmail.comhostname=localhost
The settings can be tested by sending an e-mail from the terminal:
debian@ebb:~ $ ssmtp [email protected]To: [email protected]From: [email protected]Subject: Testing 123Hello World!^d
Typing Ctrl+D at the end of the message sends the e-mail. An alternative to this is to place the message text, which is the same as that just shown (including the To/From/Subject lines), in a file (e.g., ~/.message) and then send it using the following call:
debian@ebb:~ $ ssmtp [email protected] < ~/.message Or, you can use the mail tool directly (from the mailutils package):
debian@ebb:~ $ echo "Test Body" | mail -s "Test Subject" →[email protected]
All messages are sent using the user Gmail account. This command can be added to scripts or encapsulated within a C++ program that uses a system() call, as in Listing 11-9. C or C++ could be used for this example, but C++ strings make this task more straightforward.
Listing 11-9: /chp11/cppMail/cppMail.cpp
#include <iostream>#include <sstream>#include <stdlib.h>using namespace std;int main(){string to("[email protected]");string subject("Hello Derek");string body("Test Message body…");stringstream command;command << "echo ""<< body <<"" | mail -s ""<< subject <<"" "<< to;int result = system(command.str().c_str());cout << "Command: " << command.str() << endl;cout << "The return value was " << result << endl;return result;}
When executed, the program in Listing 11-9 outputs the following:
…/chp11/cppMail $ g++ cppMail.cpp -o cppMail…/chp11/cppMail $ ./cppMailCommand: echo "Test Message body…" | mail -s "Hello Derek" [email protected]The return value was 0
Here the value 0 indicates success. As well as sending notification messages, e-mail can be used to trigger other types of events using web services such as www.ifttt.com, which is discussed in the next section.
If This Then That
If This Then That (IFTTT) is a web service that enables you to create connections between online channels, such as Twitter, LinkedIn, Google Calendar, iPhone/Android Integration, YouTube, Adafruit IO, and many more. It works by connecting triggers and actions using the simple statement: “If this, then that,” where the trigger is the this, and the action is the that. For example, “If it is night time then mute my phone ringer,” or “If the weather forecast is for rain tomorrow then send me an Android or iOS notification.” These statements are called recipes, and they can be activated in an IFTTT account and even shared with other users.
IFTTT can be triggered using an e-mail message that is sent to [email protected] from a linked Gmail account. Hashtags (e.g., #EBB) can be used to differentiate events, and the subject and body of the e-mail message can be used as ingredients for the recipe. For example, the recipe in Figure 11-12(a) states, “If send [email protected] an email tagged #EBB from [email protected], then Send me an SMS at 00353xxx.” The body of the e-mail can be passed as an ingredient to the SMS message, which enables personalized messages to be sent from the Beagle board via SMS messaging (in many cases at no cost).
If send [email protected] an email tagged #EBB from [email protected],then send me an SMS at 00353xxxxxxxx
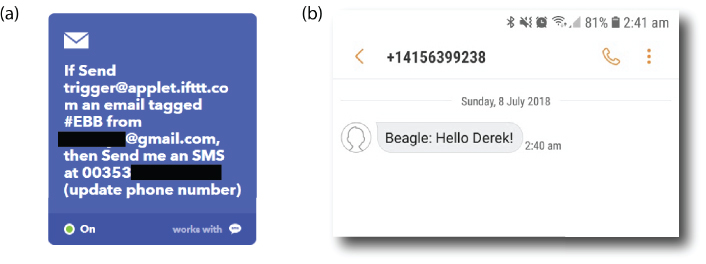
Figure 11-12: (a) Example IFTTT recipe, and (b) an SMS message received based on this recipe
The recipe should have the following body text:
Beagle: {{Body}} {{AttachmentUrl}} The recipe can then be triggered by sending an e-mail from the Beagle board.
debian@ebb:~ $ ssmtp [email protected]To: [email protected]From: [email protected]Subject: #EBBHello Derek!^d
This results in a text message being received that contains the recipe message and the e-mail body (i.e., “Beagle: Hello Derek!”), as in Figure 11-12(b).
IFTTT enables you to construct quite sophisticated interactions by simply sending e-mails from the Beagle board when certain events occur. For example, if a motion sensor is triggered, then you can message someone. Certain physical devices can also be triggered using IFTTT, such as Nest devices, smart phones, Automatic/Dash car OBD sensors, WeMo switches, Fitbit Flex healthcare devices, Lifx RGB smart lighting, SmartThings devices, Ubi voice control, and the Quirky+GE Aros smart air conditioner.
Some example recipes for the IoT include the following:
- Receive an emergency call if motion is detected.
- At sunrise, turn the security lights off.
- Remotely set your Nest thermostat to… .
- Delay watering your garden if it is going to rain tomorrow.
- Every day at … turn the lights on.
IFTTT supports Webhooks (ifttt.com/maker_webhooks) that allow a URL request to be made directly on a web server for DIY projects. For example, you could use Google Home Assistant to call a CGI script on a web server that is running on the Beagle board (similar to Listing 11-3). The only complication is that your Beagle board must be visible to the internet and addressable (e.g., via Dynamic DNS) outside of your home network.
IoT Frameworks
The ThinkSpeak solution that is presented in this chapter is a useful introduction to hosted platform as a service (PaaS) offerings, and it demonstrates some underlying communication technologies that are required to connect a Beagle board to the IoT. However, connecting single devices to the internet to log data does not solve all IoT challenges—in fact, it is only the starting point of the IoT. Figure 11-13 illustrates some of the large-scale interactions required to more fully realize an IoT platform.
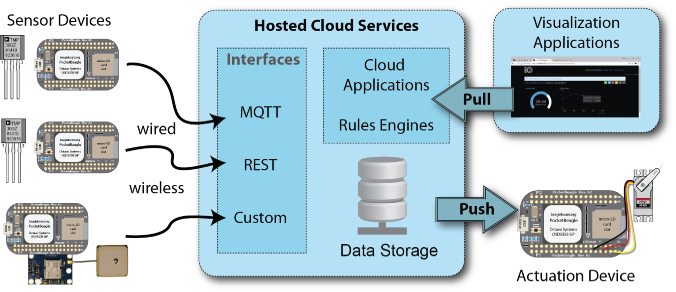
Figure 11-13: A typical IoT solution architecture
In the not too distant future, the IoT will involve tens of billions of devices interchanging trillions of messages, and this must be performed in a secure and scalable manner. The challenges involved are immense, and some of the world's largest cloud solutions providers are involved in the development of solutions. IBM released the Bluemix IoT service in August 2015, and in October 2015 Amazon launched the AWS IoT platform for building, managing, and analyzing the IoT. These are both enterprise-level solutions with price plans that scale according to usage. For example, Amazon charges ~$1 per billion messages that are interchanged by IoT devices, but it charges separately for device shadow and registry ($1 per million operations) and for rules engine calls ($1 per million rules triggered).
In this section, MQTT messaging APIs and servers are used to ensure vendor portability for your application.
MQ Telemetry Transport
Message Queueing Telemetry Transport (MQTT) is a lightweight connectivity protocol for machine-to-machine (M2M) communications. It was conceived in 1999 and has been used by industry since then; however, its applicability to the emerging IoT domain has placed it firmly in the spotlight, and in 2014 MQTT (version 3.1.1) became an OASIS standard. The lightweight nature of MQTT means that it can be used with low-level embedded devices and that it makes efficient use of network resources, while still providing reliable transactions. TCP/IP port 1883 is reserved for the MQTT protocol, and 8883 is reserved for the protocol over SSL. In addition to SSL, MQTT supports username/password transactions.
MQTT uses a publish/subscribe design model, where the publisher and subscriber are fully decoupled. A publisher client sends a message on a named topic (e.g., “ebb/temp”) to a broker, and the broker responds with an acknowledgment message and a status code. Any subscriber clients connected to the broker that are listening for messages on the named topic then receive the message from the broker. Figure 11-14 illustrates the architecture that is implemented in this section. The publisher does not know at the time of messaging how many subscribers there are (if any) on a particular topic. The topics are essentially message queues that the broker maintains, along with subscriptions to these queues as part of a session.
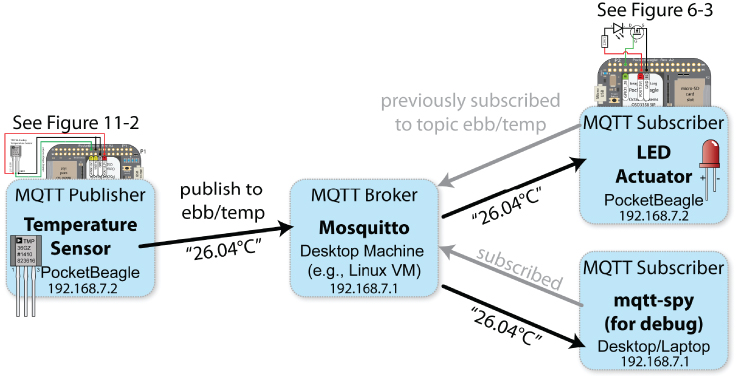
Figure 11-14: The MQTT messaging architecture used in this section
MQTT achieves efficient and reliable communication through the use of small message sizes (as little as two bytes) and different Quality of Service (QoS) configurations:
- QoS Level 0: There will be at most one delivery, and no acknowledgment is required (fire and forget).
- QoS level 1: Acknowledgment is required, so there will be at least one message delivery (but possibly more). Message IDs can be used to identify duplicates.
- QoS Level 2: Acknowledgment is required, and there will be exactly one message delivery.
MQTT uses TCP, which has built-in QoS functionality. However, it is important to remember that IoT implementations often involve wireless devices that are operating in unreliable networks, with frequent power outage, or signal range issues. Therefore, these application layer QoS configurations can greatly improve communication reliability. For example, if a message with QoS Level 1 is sent from the broker to a subscriber and no acknowledgment is received, then the broker will continue to re-issue the message (with a duplicate flag set and an identical message ID) until an acknowledgment (with the corresponding message ID) is received. Importantly, the broker employs back-off schemes to ensure that it does not flood the (possibly stressed) network with duplicate messages and thus exacerbate network problems.
MQTT supports retain messaging that allows a publisher to flag a message to be retained by a broker on a topic, which is sent to a subscriber when it first subscribes to that topic. This is particularly important if a publisher sends infrequent messages or sends messages only when there is a change in the sensor value (delta messaging); for example, a passively powered thermostat might only send a message every hour. Without retain messaging, if a heating system subscriber was to connect to the broker, it may have to wait for up to one hour before receiving a sensor reading. With retain messaging, a message with the last known temperature value would be sent immediately to the heating system.
The MQTT message may also contain a username, password, and a last will message. The last will message can be used to notify other clients should this client be abruptly disconnected. This is particularly important for sensing failure conditions—for example, a home alarm sensor might have stored a last will message with the broker to lock the doors in case of its disconnection from the network.
Figure 11-14 illustrates an MQTT messaging architecture that is implemented in this chapter. It uses the Mosquitto MQTT server running on a desktop machine to broker all messages. An MQTT publisher client running on a Beagle board can use the TMP36 circuit illustrated in Figure 11-2 to send messages on the arbitrary topic ebb/temp, which contain the current temperature. The broker then sends these messages to any MQTT subscriber that has previously subscribed to this topic. In this example, the LED Actuator PocketBeagle will light an LED if the temperature value exceeds a defined threshold. Separately, the mqtt-spy subscriber is used for debugging.
MQTT Server/Broker
You will need to install the Mosquitto server (also known as Mosquitto broker) on your desktop machine for this task. If you are running Windows, it is possible to install the Mosquitto server directly without Linux. However, I recommend you install VirtualBox and a Debian guest OS on your machine if you are running Windows or macOS, as it can be difficult to integrate software libraries at a later stage.
molloyd@desktop:~$ sudo apt updatemolloyd@desktop:~$ sudo apt install mosquitto…The following additional packages will be installed:libev4 libwebsockets8molloyd@desktop:~$ sudo apt install mosquitto-clients net-tools
The server will usually be executed automatically at this point. In this case, you should see that the MQTT server is bound to port 1883 on your Linux desktop machine.
molloyd@desktop:~$ netstat -atActive Internet connections (servers and established)Proto Recv-Q Send-Q Local Address Foreign Address Statetcp 0 0 0.0.0.0:1883 0.0.0.0:* LISTENtcp 0 0 desktop:34682 ftp-nyc.osuosl.org:http TIME_WAITtcp6 0 0 [::]:1883 [::]:* LISTEN
If it does not start automatically, you should be able to start it using sudo start mosquitto. The configuration files for the Mosquitto server are located as follows, should you need these:
molloyd@desktop:~$ cd /etc/mosquitto/molloyd@desktop:/etc/mosquitto$ ls -ldrwxr-xr-x 2 root root 4096 Jul 7 23:15 ca_certificatesdrwxr-xr-x 2 root root 4096 Jul 7 23:15 certsdrwxr-xr-x 2 root root 4096 Jul 7 23:15 conf.d-rw-r--r-- 1 root root 348 Dec 22 2017 mosquitto.conf
You can test that the broker is working correctly using the Mosquitto client applications on the desktop machine:
mosquitto_pub: A publisher client that sends messages (-m) to a broker host (defaults tolocalhost) on a topic (-t) of choice. It also supports QoS levels and authenticated messaging.mosquitto_sub: A subscriber client that listens to a broker (defaults to localhost) for messages on a defined topic (-t). It supports wildcard subscriptions (e.g., + and #)3
In the example displayed in Figure 11-15, the subscriber client on the right side is subscribed to the topic ebb/test. The publisher client on the left side publishes six different messages, but only those that are published on topic ebb/test are received by the subscriber. Importantly, the publisher and subscriber are not connected to each other directly but are connected via the Mosquitto broker.

Figure 11-15: The Mosquitto publisher client sending four messages on the topic ebb/test and the subscriber receiving only the relevant messages
MQTT Publisher/Subscriber on a Beagle Board
Before writing your own code on a Beagle board, you should first test that your board can see the MQTT broker on your network. Begin by installing the Mosquitto client applications on your board and testing that you can send and receive messages on a topic, where -x specifies the address of your desktop machine (see the feature on port forwarding):
debian@ebb:~$ sudo apt install mosquitto-clients nmapdebian@ebb:~$ nmap -T4 192.168.7.1Starting Nmap 7.40 ( https://nmap.org ) at 2018-07-08 17:57 ISTNmap scan report for 192.168.7.1Host is up (0.0073s latency).Not shown: 996 closed portsPORT STATE SERVICE22/tcp open ssh135/tcp open msrpc139/tcp open netbios-ssn445/tcp open microsoft-ds …
You can then subscribe to a topic (ebb/test) on the broker, identifying its address using the -h option. It is advisable to use the debug mode (-d) so that you can see all the MQTT messages to identify connection problems.
debian@ebb:~$ mosquitto_sub -v -t 'ebb/test' -h 192.168.7.1 -dClient mosqsub/25610-ebb sending CONNECTClient mosqsub/25610-ebb received CONNACKClient mosqsub/25610-ebb sending SUBSCRIBE(Mid:1,Topic:ebb/test,QoS:0)Client mosqsub/25610-ebb received SUBACKSubscribed (mid: 1): 0Client mosqsub/25610-ebb received PUBLISH(d0,q0,r0,m0,'ebb/test',32bytes)ebb/test Message from the desktop machineClient mosqsub/25610-ebb sending PINGREQClient mosqsub/25610-ebb received PINGRESP
The highlighted message was received as a result of the following call on the desktop machine:
molloyd@desktop:~$ mosquitto_pub -t 'ebb/test' -m 'Message from thedesktop machine'
Note that the PINGREQ and PINGRESP messages are used by the subscriber in the background to keep the TCP connection to the broker alive.
The mqtt-spy Debug Tool
There are many useful tools for debugging MQTT applications, but I recommend the cross-platform mqtt-spy application. You can download it from tiny.cc/beagle1104. It is a Java application, so you will need a JVM (e.g., Oracle JDK) on your machine. You should be able to double-click the .jar file to execute it. Once you open it, you can configure a connection to your MQTT broker that is running on your Linux (or VirtualBox Linux) host. In my case, the IP address of the broker is 192.168.7.1:1883, so the connection can be configured as in Figure 11-17. Please note that you must hit the Enter key when you change a value in any of the fields or the changes will not persist.
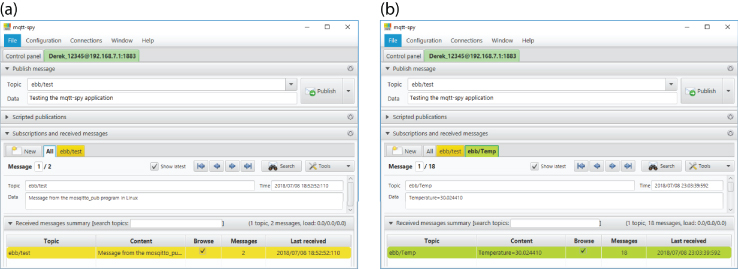
Figure 11-17: The mqtt-spy application running under Windows: (a) publishing and subscribing to the ebb/test topic; and (b) subscribing to the ebb/Temp topic
Writing MQTT Code
The Eclipse Paho project (www.eclipse.org/paho/) provides open-source implementations of MQTT in C/C++, Java, Python, JavaScript, and other languages that can be used to build small footprint, reliable MQTT client applications. In addition, the Eclipse IoT Working Group (iot.eclipse.org) provides strong support documentation and tools for developing open-source IoT solutions.
To download, build, and install the Paho libraries on a Beagle board, use the following steps:
debian@ebb:~$ sudo apt install libssl-dev gitdebian@ebb:~$ git clone http://github.com/eclipse/paho.mqtt.cCloning into 'paho.mqtt.c'…debian@ebb:~$ cd paho.mqtt.c/debian@ebb:~/paho.mqtt.c$ make
There may be warnings during the make process, but there should be no errors. You can test that the libraries are in the correct location using the following:
debian@ebb:~/paho.mqtt.c$ sudo make installdebian@ebb:~/paho.mqtt.c$ ls /usr/local/lib/libpaho*/usr/local/lib/libpaho-mqtt3a.so /usr/local/lib/libpaho-mqtt3c.so…
A Paho MQTT Publisher Example
Listing 11-10 is a Paho publisher example that sends temperature sensor messages to the broker in text format. It utilizes the circuit in Figure 11-2 to connect to the TMP36 sensor. This code is adapted from the examples that are distributed with the Paho libraries.
The listing begins by defining the fields that are required for connection to the broker, such as its address, the topic to publish against, the client ID, and authentication data if required. It is easy to configure the Mosquitto server to require authentication data, but it is unnecessary in a first example. Later code examples use authentication fields to connect to the Adafruit IO server.
Listing 11-10: /chp11/mqtt/publish.cpp
#include <iostream>#include <sstream>#include <fstream>#include <string.h>#include "MQTTClient.h"using namespace std;//Please replace the following address with the address of your server#define ADDRESS "tcp://192.168.7.1:1883"#define CLIENTID "Beagle1" // any ID is fine#define TOPIC "ebb/Temp" // this is the topic for messages#define QOS 1 // at least one message received#define TIMEOUT 10000L#define ADC_PATH "/sys/bus/iio/devices/iio:device0/in_voltage"#define ADC 0 // change to your ADCfloat getTemperature(int adc_value) { // from the TMP36 datasheetfloat cur_voltage = adc_value * (1.80f/4096.0f); // Vcc = 1.8V, 12-bitfloat diff_degreesC = (cur_voltage-0.75f)/0.01f;return (25.0f + diff_degreesC);}int readAnalog(int number){stringstream ss;ss << ADC_PATH << number << "_raw";fstream fs;fs.open(ss.str().c_str(), fstream::in);fs >> number;fs.close();return number;}int main(int argc, char* argv[]) {char str_payload[100]; // Set your max message size hereMQTTClient client;cout << "Starting Beagle board MQTT Publish Example" << endl;MQTTClient_connectOptions opts = MQTTClient_connectOptions_initializer;MQTTClient_message pubmsg = MQTTClient_message_initializer;MQTTClient_deliveryToken token;MQTTClient_create(&client, ADDRESS, CLIENTID,MQTTCLIENT_PERSISTENCE_NONE, NULL);opts.keepAliveInterval = 20;opts.cleansession = 1;int rc;if ((rc = MQTTClient_connect(client, &opts)) != MQTTCLIENT_SUCCESS) {cout << "Failed to connect, return code " << rc << endl;return -1;}sprintf(str_payload, "Temperature=%f", getTemperature(readAnalog(ADC)));pubmsg.payload = str_payload;pubmsg.payloadlen = strlen(str_payload);pubmsg.qos = QOS;pubmsg.retained = 0;MQTTClient_publishMessage(client, TOPIC, &pubmsg, &token);cout << "Waiting for up to " << (int)(TIMEOUT/1000) <<" seconds for publication of " << str_payload <<" on topic " << TOPIC << " for ClientID: " << CLIENTID << endl;rc = MQTTClient_waitForCompletion(client, token, TIMEOUT);cout << "Message with token " << (int)token << " delivered." << endl;MQTTClient_disconnect(client, 10000);MQTTClient_destroy(&client);return rc;}
This code can be built and executed as follows, where the “classic” Paho synchronous library is used (asynchronous libraries are also available):
…/chp11/mqtt$ g++ publish.cpp -o publish -lpaho-mqtt3c…/chp11/mqtt$ ./publishStarting Beagle board MQTT Publish ExampleWaiting for up to 10 seconds for publication of Temperature=28.354490on topic ebb/Temp for ClientID: Beagle1Message with token 1 delivered.…/chp11/mqtt$ ./publishStarting Beagle board MQTT Publish ExampleWaiting for up to 10 seconds for publication of Temperature=30.024410on topic ebb/Temp for ClientID: Beagle1Message with token 1 delivered.
Each time the program is executed, the current room temperature value is published to the ebb/Temp topic on the broker. Any clients that are subscribed to this topic will then receive the messages. For example, mqtt-spy is subscribed to this topic, and the output is visible in Figure 11-17(b).
A Paho MQTT Subscriber Example
Listing 11-11 is a client example that can be used to subscribe to a topic on the MQTT broker. In this example, my broker is running at 192.168.7.1 at port 1883, and the client is subscribing to the ebb/Temp topic.
In this example, an LED that is attached to GPIO 60 (see Figure 6-3 in Chapter 6) will light if the temperature exceeds 30°C—a value that can be exceeded by pinching the sensor with your fingers. It is important to remember that the publisher is sending messages to the broker and the subscriber is receiving messages from the broker, as in Figure 11-14—they are not communicating directly to each other.
Listing 11-11: /chp11/mqtt/subscribe.cpp
#include <iostream>#include <fstream>#include <stdio.h>#include <stdlib.h>#include <string.h>#include "MQTTClient.h"using namespace std;#define ADDRESS "tcp://192.168.7.1:1883"#define CLIENTID "Beagle2" // Could be a different board#define TOPIC "ebb/Temp" // The MQTT topic#define QOS 1#define TIMEOUT 10000L#define LED_GPIO "/sys/class/gpio/gpio60/"#define THRESHOLD 30 // LED triggered if Temp>30// Use this function to control the LEDvoid writeGPIO(string filename, string value){fstream fs;string path(LED_GPIO);fs.open((path + filename).c_str(), fstream::out);fs << value;fs.close();}volatile MQTTClient_deliveryToken deliveredtoken;void delivered(void *context, MQTTClient_deliveryToken dt) {printf("Message with token value %d delivery confirmed ", dt);deliveredtoken = dt;}// Called each time a message arrives for the stated topicint msgarrvd(void *context, char *topicName, int topicLen,MQTTClient_message *message) {int i;char* payloadptr;printf("Message arrived ");printf(" topic: %s ", topicName);printf(" message: ");payloadptr = (char*) message->payload;//Hack offset ptr by 12 -- the message is the form "temperature=x.xxxx"float temperature = atof(payloadptr+12); //float at 12th character inprintf("The temperature is %f ", temperature);temperature>THRESHOLD ? writeGPIO("value", "1"):writeGPIO("value", "0");MQTTClient_freeMessage(&message);MQTTClient_free(topicName);return 1;}void connlost(void *context, char *cause) {printf(" Connection lost ");printf(" cause: %s ", cause);}int main(int argc, char* argv[]) {MQTTClient client;MQTTClient_connectOptions opts = MQTTClient_connectOptions_initializer;int rc;int ch;writeGPIO("direction", "out");MQTTClient_create(&client, ADDRESS, CLIENTID,MQTTCLIENT_PERSISTENCE_NONE, NULL);opts.keepAliveInterval = 20;opts.cleansession = 1;MQTTClient_setCallbacks(client, NULL, connlost, msgarrvd, delivered);if ((rc = MQTTClient_connect(client, &opts)) != MQTTCLIENT_SUCCESS) {printf("Failed to connect, return code %d ", rc);exit(-1);}printf("Subscribing to topic %s for client %s using QoS%d ""Press Q<Enter> to quit ", TOPIC, CLIENTID, QOS);MQTTClient_subscribe(client, TOPIC, QOS);do {ch = getchar();} while(ch!='Q' && ch != 'q');MQTTClient_disconnect(client, 10000);MQTTClient_destroy(&client);return rc;}
This code can be built and executed as before, whereupon the subscriber client will listen to the broker forever until a message is published on the ebb/Temp topic. In fact, the subscriber client will send “hidden” messages to the broker in order to keep the TCP connection alive, as was illustrated previously using the debug mode (-d) of the mosquitto_sub tool.
debian@ebb:~/exploringbb/chp11/mqtt$ ./subscribeSubscribing to topic ebb/Temp for client Beagle2 using QoS1Press Q<Enter> to quitMessage arrivedtopic: ebb/Tempmessage: The temperature is 26.860350Message arrivedtopic: ebb/Tempmessage: The temperature is 26.728512Message arrivedtopic: ebb/Tempmessage: The temperature is 30.024410
Adafuit IO
Adafruit is well regarded in the Maker community for selling electronics hardware and for developing high-quality modules and associated software libraries. To support emerging connected embedded devices, Adafruit has developed online IoT data logging and communication services that are aimed in particular at the Maker community. This section examines the use of MQTT for communicating to the Adafruit IO platform.
At the time of writing, Adafruit IO has a free-tier platform that supports up to 30 messages per minute for 10 unique feeds, 5 visualization dashboards, with 30 days of storage. The Adafruit IO+ subscription service supports unlimited feeds, unlimited dashboards, higher data rates, and a longer data storage duration for $10 per month. Interestingly, you can connect your Adafruit IO account to your IFTTT account, whereby you can use an Adafruit IO feed as a trigger for and IFTTT event. This functionality would allow you to easily build a PocketBeagle burglar alarm that texted your phone when the alarm sensor is activated.
Figure 11-18 illustrates the outcome from the instruction in this section, in which the Adafruit IO account is configured to work with the MQTT publisher client code in the previous section to create a temperature sensor logging platform. A separate MQTT subscriber client on a Beagle board can then connect to the Adafruit IO service to retrieve sensor measurements.
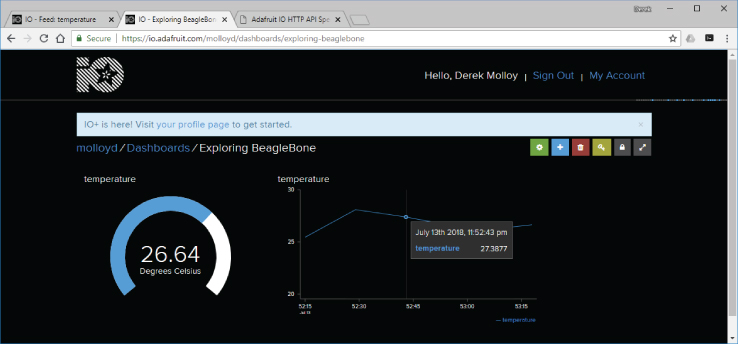
Figure 11-18: The Adafruit IO platform in operation
Configuring the Adafruit IO Account
The following steps must be performed to create this application:
- Create an Adafruit user account on the Adafruit IO platform at
io.adafruit.com. There is no requirement for payment. - Use the Feeds menu in Figure 11-19 to create a new feed. In this case, the feed is called
temperaturein theweathergroup. This feed is known asweather.temperatureon the Adafruit IO platform and in your program code. - Identify your AIO key and keep this value safe (e.g., do not share it in a book!). You can generate a new key if it is compromised, but you will have to update this value in any existing programs. This key is used in the program code examples in the next sections.
- Create a new dashboard to visualize your IoT data as in Figure 11-20. This dashboard contains blocks, which are visualization glyphs that can be used to represent the data that you pass to the Adafruit IO server. In Figure 11-18 I use a Gauge and a Line Chart block. These dashboards can be shared publicly as long as the feeds are also public.
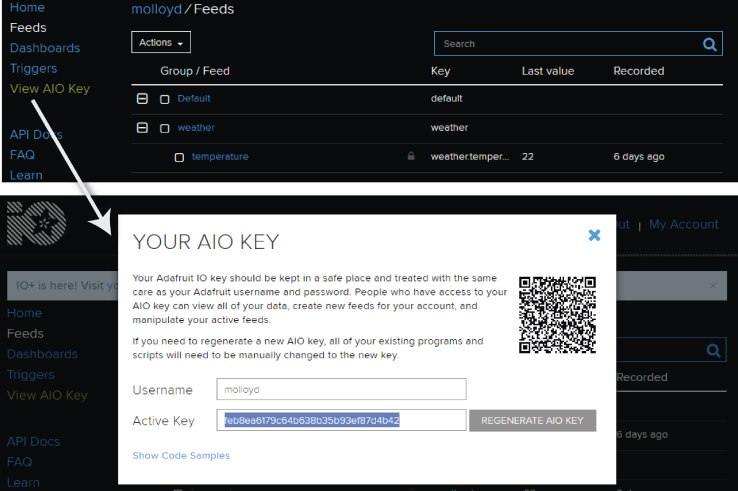
Figure 11-19: Creating an Adafruit IO feed and identifying the AIO key
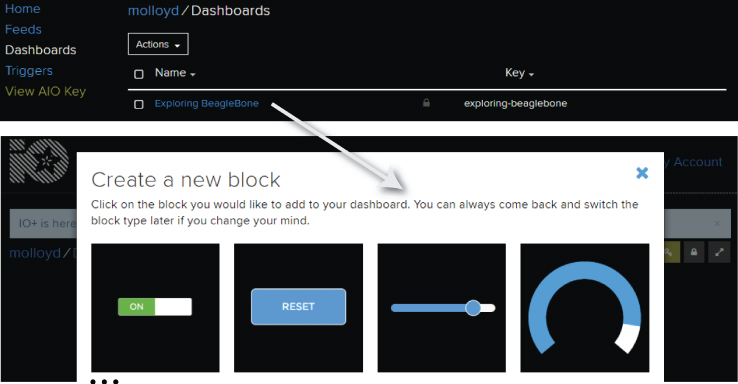
Figure 11-20: Creating an Adafruit IO dashboard and adding visualization blocks
Once these steps are complete, you can write program code that publishes and subscribes to the feeds on the Adafruit IO platform.
Connecting to Adafruit IO with MQTT
The code in the previous section can be adapted to connect to the Adafruit IO platform instead of a local MQTT broker. The code alterations are relatively straightforward and largely involve activating the authentication functionality of the Paho API. Listing 11-12 provides a segment of code, which captures the alterations required to Listing 11-11. The code identifies my username, my private authentication token (which is no longer valid!), and the topic name. The topic name must be prefixed by your username and the feeds identifier.
Listing 11-12: /chp11/adafruit/publish.cpp (Segment)
//Please replace the following address with the address of your server#define ADDRESS "tcp://io.adafruit.com"#define CLIENTID "Beagle1"//Please note that the username must precede the feed name and that// "feeds" must be present. Topic groupings are dot separated.#define TOPIC "molloyd/feeds/weather.temperature"#define AUTHMETHOD "molloyd"#define AUTHTOKEN "feb8ea6179c64b638b35b93ef87d4b42"…float getTemperature(int adc_value) { … }int readAnalog(int number){ … }int main(int argc, char* argv[]) {char str_payload[100]; // Set your max message size hereMQTTClient client;cout << "Starting Beagle board MQTT Adafruit publish Example" << endl;MQTTClient_connectOptions opts = MQTTClient_connectOptions_initializer;MQTTClient_message pubmsg = MQTTClient_message_initializer;MQTTClient_deliveryToken token;MQTTClient_create(&client, ADDRESS, CLIENTID,MQTTCLIENT_PERSISTENCE_NONE, NULL);opts.keepAliveInterval = 20;opts.cleansession = 1;opts.username = AUTHMETHOD;opts.password = AUTHTOKEN;int rc;if ((rc = MQTTClient_connect(client, &opts)) != MQTTCLIENT_SUCCESS) {cout << "Failed to connect, return code " << rc << endl;return -1;}sprintf(str_payload, "%f", getTemperature(readAnalog(ADC)));…if(rc == MQTTCLIENT_SUCCESS) {cout << "Message with token " << (int)token << " delivered." << endl;}else {cout << "Did not complete with error code: " << rc << endl;// MQTTCLIENT_SUCCESS 0 MQTTCLIENT_FAILURE -1// MQTTCLIENT_DISCONNECTED -3 MQTTCLIENT_MAX_MESSAGES_INFLIGHT -4// MQTTCLIENT_BAD_UTF8_STRING -5 MQTTCLIENT_NULL_PARAMETER -6// MQTTCLIENT_TOPICNAME_TRUNCATED -7 MQTTCLIENT_BAD_STRUCTURE -8// MQTTCLIENT_BAD_QOS -9 MQTTCLIENT_SSL_NOT_SUPPORTED -10}}
Listing 11-12 also provides a list of error codes and their meanings to aid you in debugging your connection to the Adafruit IO server. The code can be built and executed as follows:
debian@ebb:~/exploringbb/chp11/adafruit$ ./builddebian@ebb:~/exploringbb/chp11/adafruit$ ./publishStarting Beagle board MQTT Adafruit Publish ExampleWaiting for up to 10 seconds for publication of 25.366211on topic molloyd/feeds/weather.temperature for ClientID: Beagle1Message with token 1 delivered.debian@ebb:~/exploringbb/chp11/adafruit$ ./publishStarting Beagle board MQTT Adafruit Publish ExampleWaiting for up to 10 seconds for publication of 25.454098on topic molloyd/feeds/weather.temperature for ClientID: Beagle1Message with token 1 delivered.
The chp11/Adafruit/ folder also contains a subscriber.cpp example that is similar to Listing 11-11, but with the addition of authentication code. This code can be executed in a second Linux terminal window, whereupon it will connect to the Adafruit IO platform and subscribe to the desired feed, as follows:
debian@ebb:~/exploringbb/chp11/adafruit$ ./subscribeSubscribing to topic molloyd/feeds/weather.temperaturefor client Beagle2 using QoS1Press Q<Enter> to quitMessage arrivedtopic: molloyd/feeds/weather.temperaturemessage: The temperature is 25.366211Message arrivedtopic: molloyd/feeds/weather.temperaturemessage: The temperature is 25.454098
Similar to the program in Listing 11-11, the subscribe program is also configured to light the LED that is attached to GPIO 60, as illustrated in Chapter 6’s Figure 6-3, should the temperature exceed 30°C.
An MQTT Node.js Publish Example
The code in Listing 11-13 uses Node.js to read the temperature sensor in Figure 11-2 and send its value to the Adafruit IO platform using MQTT. The importance of this example is that it demonstrates how to connect a sensor on the Beagle board to the Adafruit IO platform using a different programming language but still using the same MQTT configuration.
Listing 11-13: /chp11/adafruitjs/adafruit.js
// This example uses mqtt.js to upload the TMP36 val to Adafruit IOvar mqtt = require('mqtt'); // required modulevar fs = require('fs')var DEVID = 'Beaglejs'; // the individual device idvar AUTHTOKEN = 'feb8ea6179c64b638b35b93ef87d4b42'; // auth tokenvar PORT = 1883; // reserved MQTT portvar BROKER = 'io.adafruit.com';var URL = 'mqtt://' + BROKER + ':' + PORT;var AUTHMETH = 'molloyd'; // using usernamevar client = mqtt.connect(URL, { clientId: DEVID,username: AUTHMETH, password: AUTHTOKEN });var TOPIC = 'molloyd/feeds/weather.temperature';var TEMP = '/sys/bus/iio/devices/iio:device0/in_voltage0_raw'console.log(URL);console.log('Starting the Beagle MQTT Adafruit IO Example');// Convert ADC value into a temperaturefunction getTemperature(adc_value) { // from TMP36 datasheetvar cur_voltage = (parseInt(adc_value) * 1.80) / 4096;var diff_degreesC = (cur_voltage-0.75)/0.01;return (25.0 + diff_degreesC);}client.on('connect', function() {setInterval(function(){var tempStr = 'invalid', temp;try {tempStr = fs.readFileSync(TEMP, 'utf8');temp = getTemperature(tempStr).toFixed(4);}catch (err){console.log('Failed to Read the temperature sensor.');}console.log('Sending Temp: ' + temp.toString() + '°C to Adafruit IO');client.publish(TOPIC, temp.toString());}, 10000); // publish data every ten seconds});
To use this code example, you must first install the Node.js MQTT module. The code can then be executed, whereupon it connects to the IoT platform using the MQTT settings. When the adafruit.js script is executed, the data points appear in the Adafruit dashboard visualization, as previously illustrated in Figure 11-18.
debian@ebb:~/exploringbb/chp11/adafruitjs$ npm install mqtt --save… + [email protected] …debian@ebb:~/exploringbb/chp11/adafruitjs$ node adafruit.jsmqtt://io.adafruit.com:1883Starting the Beagle MQTT Adafruit IO ExampleSending Temp: 24.9268°C to Adafruit IOSending Temp: 24.8828°C to Adafruit IOSending Temp: 29.0137°C to Adafruit IO…
The C++ Client/Server
The C/C++ client application described earlier in this chapter uses HTTP and HTTPS to connect to a web server and retrieve a web page. In this section, a TCP server is described, to which a TCP client can connect to exchange information, which does not have to be in HTTP form. The same SocketClient class that is used earlier in the chapter is reused in this section, and a new class called SocketServer is described. The importance of this example is that it allows for high-speed communications between the client and server, which is suitable for the transmission of video, audio, and real-time state data and is limited only by the speed of your network connection.
Figure 11-21 illustrates the steps that take place during communication in this client/server example:
- In step 1, a TCP server that is running on the Beagle board at IP address 192.168.7.2 begins listening to a user-defined TCP port (54321). It will listen to this port forever, awaiting contact from a client.
- In step 2, a TCP client application is executed. The client application must know the IP address and port number of the server to which it is to connect. The client application opens a client socket, using the next available Linux port allocation. The server, which can be running on a different Beagle board (or the same Beagle board in a different terminal window), accepts a connection request from the client. It then retrieves a reference to the client IP address and port number. A connection is formed, and the client writes a message to this connection, which is “Hello from the Client.”
- In step 3, the server reads the message from the connection and sends back a new message to the client, which is “The Server says thanks!” The client reads the response message and displays it to the terminal. Then the client and server both close the network sockets. The programs run asynchronously—in this case running to completion.
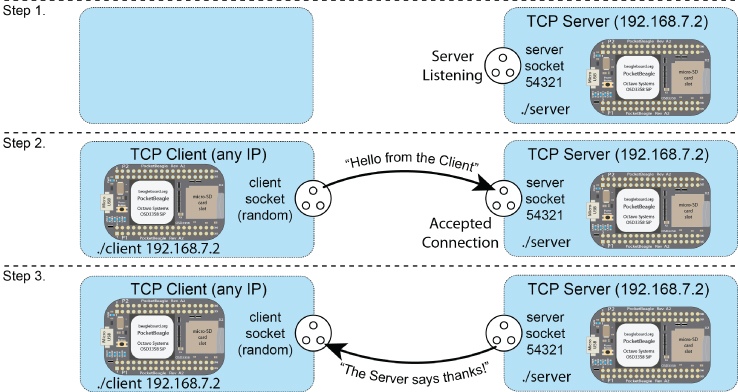
Figure 11-21: A client/server example
The full example is provided in the chp11/clientserver/ directory. The client.cpp program in Listing 11-14 uses the SocketClient class from the network subdirectory (see Listing 11-6).
Listing 11-14: /chp11/clientserver/client.cpp
#include <iostream>#include "network/SocketClient.h"using namespace std;using namespace exploringBB;int main(int argc, char *argv[]){if(argc!=2){cout << "Incorrect usage: " << endl;cout << " client server_name" << endl;return 2;}cout << "Starting Beagle Board Client Example" << endl;SocketClient sc(argv[1], 54321);sc.connectToServer();string message("Hello from the Client");cout << "Sending [" << message << "]" << endl;sc.send(message);string rec = sc.receive(1024);cout << "Received [" << rec << "]" << endl;cout << "End of Beagle Board Client Example" << endl;}
The SocketServer class in Listing 11-15 is new, and it behaves in a quite different manner than the SocketClient class. An object of the class is created by passing the port number to the constructor. When the listen() method is called, the program counter will not return from this method call until a connection has been accepted by the server.
Listing 11-15: /chp11/clientserver/network/SocketServer.h
class SocketServer {private:int portNumber;int socketfd, clientSocketfd;struct sockaddr_in serverAddress;struct sockaddr_in clientAddress;bool clientConnected;public:SocketServer(int portNumber);virtual int listen();virtual int send(std::string message);virtual std::string receive(int size);virtual ~SocketServer();};
The server.cpp code example in Listing 11-16 creates an object of the ServerSocket class and awaits a client connection.
Listing 11-16: /chp11/clientserver/server.cpp
#include <iostream>#include "network/SocketServer.h"using namespace std;using namespace exploringBB;int main(int argc, char *argv[]){cout << "Starting Beagle Board Server Example" << endl;SocketServer server(54321);cout << "Listening for a connection…" << endl;server.listen();string rec = server.receive(1024);cout << "Received from the client [" << rec << "]" << endl;string message("The Server says thanks!");cout << "Sending back [" << message << "]" << endl;server.send(message);cout << "End of Beagle Board Server Example" << endl;return 0;}
The code for this example can be built using the build script in the chp11/clientserver/ directory. The server can then be executed.
debian@ebb:~/exploringbb/chp11/clientserver$ ./serverStarting Beagle Board Server ExampleListening for a connection…
The server will wait at this point until a client request has been received. To execute the client application, a separate terminal session on the same Beagle board, another Beagle board, or a Linux desktop machine can be used.4 The client application can be executed by passing the IP address of the server. The port number (54321) is defined within the client program code.
debian@ebb:~/exploringbb/chp11/clientserver$ ./client localhostStarting Beagle Board Client ExampleSending [Hello from the Client]Received [The Server says thanks!]End of Beagle Board Client Example
When the client connects to the server, both the client and server execute simultaneously, resulting in the preceding and following output:
debian@ebb:~/exploringbb/chp11/clientserver$ ./serverStarting Beagle Board Server ExampleListening for a connection…Received from the client [Hello from the Client]Sending back [The Server says thanks!]End of Beagle Board Server Example
This code is further improved later in the book to add threading support and to enable it to communicate with a better structure than simple strings. However, it should be clear that this code enables you to intercommunicate between Linux client/servers that are located anywhere in the world. The client/server pair communicates by sending and receiving bytes; therefore, communication can take place at very high data rates and is limited only by the physical network infrastructure.
IoT Device Management
One of the difficulties with remote web sensors is that they may be in physically inaccessible and/or distant locations. In addition, a period of system downtime may lead to a considerable loss of sensing data. If the problem becomes apparent, you can SSH into the Beagle board and restart the application or perform a system reboot. In this section, two quite different management approaches are described—the first is manual web-based monitoring, and the second is automatic, through the use of Linux watchdog timers.
Remote Monitoring of a Beagle Board
One of the advantages of installing a web server in this chapter is that it supports a number of additional open-source services. One such example is a remote monitoring service called Linux-dash. For simplicity, the following steps use Node.js as the server:
debian@ebb:~$ sudo git clone https://github.com/afaqurk/linux-dash.gitdebian@ebb:~$ cd linux-dash/debian@ebb:~/linux-dash $ sudo npm install
Use an environment variable to configure Linux-dash to use a different number than port 80 (e.g., 81 in this case).
debian@ebb:~/linux-dash$ sudo -iroot@ebb:~# cd /home/debian/linux-dashroot@ebb:/home/debian/linux-dash# export LINUX_DASH_SERVER_PORT=81root@ebb:/home/debian/linux-dash# echo $LINUX_DASH_SERVER_PORT81root@ebb:/home/debian/linux-dash# bin/linux-dashLinux Dash Server Started on port 81!
These steps result in a service running on the Beagle board using the chosen port number; e.g., http://192.168.7.2:81/. You can then remotely connect to the Beagle board with a web browser to view system information, as shown in Figure 11-22. This approach can help you quickly identify system problems, such as unusual loads, network traffic, and so on, but it still requires that you manually check the web page.
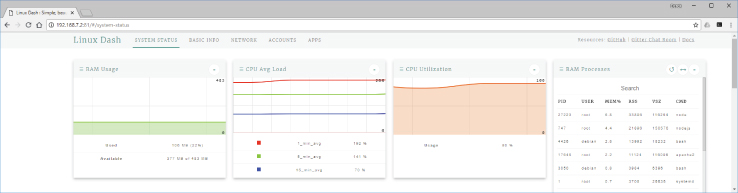
Figure 11-22: Beagle board remote monitoring using Linux Dash
Beagle Board Watchdog Timers
One solution to automatically determine whether there has been a significant problem with your application is to use a watchdog timer. The AM335x has full support for a hardware watchdog timer, which can be used to automatically reset a board should it lock up. Having a watchdog timer can be important in IoT applications if the board is inaccessible or performing an important role that should not be halted (e.g., a PocketBeagle-based intruder alarm). You can examine its functionality using the following steps:
debian@ebb:/dev$ ls -l watchdogcrw------- 1 root root 10, 130 Jul 1 17:21 watchdogdebian@ebb:/dev$ sudo -iroot@ebb:/dev# cat > watchdogTesting but quitting now ^C
The preceding steps should not cause the board to reboot. However, if you write anything to watchdog, do not close the file, and wait for 50 seconds after the last Return key is pressed, then the board will reboot!
root@ebb:/dev# cat > watchdogThis will reboot the BBB 50 seconds after I hit Return. Now!Even if I type really slowly on this line but don't hit Return
This is because the watchdog has been activated, held open, and not “fed” for 50 seconds, which is the default watchdog time on the Debian distribution.
Watchdog timers can be integrated directly into program code. For example, Listing 11-17 is a watchdog timer example that opens the watchdog device and writes to it every time you “feed the dog” by pressing f. If you do not write to the device for more than 30 seconds (the user-defined interval in the code listing), then the board will reboot.
Listing 11-17: /chp11/watchdog/watchdog.c
#include<stdio.h>#include<stdlib.h>#include<sys/fcntl.h>#include<sys/ioctl.h>#include<sys/stat.h>#include<unistd.h>#include<linux/watchdog.h>#define WATCHDOG "/dev/watchdog"int main(){int fd, interval=30, state;if ((fd = open(WATCHDOG, O_RDWR))<0){perror("Watchdog: Failed to open watchdog device ");return 1;} // set the timing interval to 30 secondsif (ioctl(fd, WDIOC_SETTIMEOUT, &interval)!=0){perror("Watchdog: Failed to set the watchdog interval ");return 1;}printf("Press f to feed the dog, h to say hello and q to quit: ");do{state = getchar();switch(state){case 'f':printf("[feed!]");ioctl(fd, WDIOC_KEEPALIVE, NULL);break;case 'h':printf("[hello]");break;}} while (state!='q');printf("Closing down the application ");close(fd);return 0;}
If you build the principles of this code into an application, then you should “feed the dog” each time an important block of code executes. For example, if a sensor value were read every 15 seconds in your code example, then you would also “feed the dog” each time you read the sensor value. That way, if the application locks up, then the board would reboot automatically. Having a watchdog timer can be important in IoT applications if the board is inaccessible or performing an important role that should not be halted.
debian@ebb:~/exploringbb/chp11/watchdog$ sudo ./watchdogPress f to feed the dog, h to say hello and q to quit:f[feed!] <board reboots 30 seconds later>
Static IP Addresses
The Beagle boards are configured by default to use the Dynamic Host Configuration Protocol (DHCP) for the allocation of its wired and wireless IP addresses. Network routers typically run a DHCP server that allocates a pool of addresses to devices attached to the network. While DHCP works well for most devices on a local network, it can cause difficulties if you want to make a Beagle board visible outside a home firewall via port forwarding. This is because DHCP devices may receive a different IP address each time they boot (depending on the router's lease time). Port forwarding (aka port mapping) means that a particular port on a Beagle board (e.g., port 80) can be mapped to a port that is visible outside your firewall, thus making a service on the board visible to the world. Many router/firewalls require the Beagle board to have a static IP address to set up a port forward to it.
To allocate a static IP address to a network adapter, you can alter the /etc/network/interfaces configuration file to manually specify the address (e.g., 192.168.1.33), the network mask, and the network gateway, with the following format:
debian@ebb:/etc/network $ more interfaces# The primary network interfaceauto eth0allow-hotplug eth0iface eth0 inet staticaddress 192.168.1.33netmask 255.255.255.0gateway 192.168.1.1
The Beagle board then has a static IP address after reboot. A similar procedure applies to other adapter entries, such as the wlan0 wireless Ethernet adapter except that it uses connman, as described in Chapter 12. Do not pick a static address that is within the DHCP pool or assigned to another device, or it could result in IP conflicts on the network.
Power over Ethernet
One common difficulty in using the Beagle board as a web sensor is related to the provision of power. It is possible to power the Beagle board using batteries, and there are many USB battery pack solutions available that can perform this role. For example, the IntoCircuit Portable Charger 26 .8Ah (~$44) is a popular choice that could in theory power the board for 30 to 50 hours at an average load (this duration will fall dramatically if Wi-Fi is used). For example, such a battery configuration could be used for a mobile robot platform.
When a fixed installation is required in a remote location (e.g., in a garden, gate/entrance) where power sockets are not readily available, then power over Ethernet (PoE) is a good option. Regular Ethernet cables (Cat 5e or Cat 6) contain four pairs of wires that are twisted together to cancel out electromagnetic interference from external power sources. Low-cost unshielded twisted pair (UTP) cables can therefore transmit data (and power) over long distances of up to 100 m/328 ft.
For standard Ethernet (100Base-T), only two of the twisted pair wires are actually used for data transfer; therefore, the other two pairs are available to carry power. However, it is also possible to inject a common-mode voltage onto the pair of wires that carry the data signals. This is possible because Ethernet over twisted pair (similar to CAN bus, USB, and HDMI) uses differential signaling, which means that the receiver reads the difference between the two signals, rather than their voltage level with respect to ground. External interference affects both of the paired wires in the same way, so its impact is effectively canceled out by the differential signaling. PoE can therefore use the network cable to deliver power to attached devices. This structure is commonly used by VoIP phones and IP cameras so that they do not need a separate mains power point.
The Beagle boards do not support PoE internally, so two main external options are available:
- Use a pseudo-PoE cabling structure: Adafruit sell a Passive PoE Injector Cable Set (~$6), illustrated in Figure 11-23, for which you can use a regular 5 V mains supply to inject power into the unused twisted pair wires and then draw that power at the other end of the cable. You can use the crimp tool that is described in Chapter 4 to terminate the DC power connector with a DuPont connector so that it can be attached to the Beagle board GPIO header. Do not connect such cables to a true PoE switch!
- Use a true PoE (IEEE 802.3af) switch: To send power over long distances, PoE switches provide a 48 V DC supply. Therefore, a PoE power extraction module is required to step down this voltage to a level that is acceptable by a Beagle board.
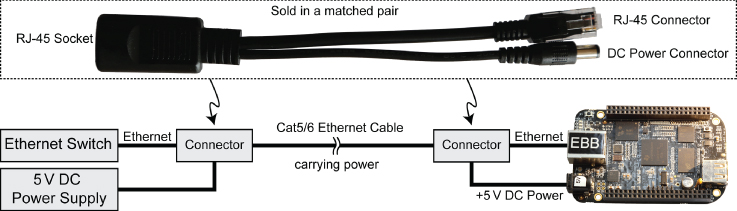
Figure 11-23: Adafruit pseudo-PoE cable
PoE Power Extraction Modules (Advanced Topic)
One problem with the arrangement in Figure 11-23 is that the 5 V supply voltage will drop as the cable length increases due to the impact of cable resistance. Recently, low-cost network switches have become available that offer PoE functionality. Power extraction modules (PEMs) can be purchased to step down the 48 V DC voltage that is supplied by these switches to lower, fixed DC levels (e.g., 3.3 V, 5 V, 12 V). The low-cost ($10–$15) PEM that is used in this section is the PEM1305 (tiny.cc/ebb1103), which can be used to supply 5 V to a Beagle board. PoE (802.3af) switches can provide up to 15.4 W of power per attached device. The IEEE 802.3af standard (IEEE Standards Association, 2012) requires that true-PoE devices support two types of PoE:
- Type-B PoE: Uses the spare pair of wires to carry power. The data pairs are untouched.
- Type-A PoE: Uses a 48 V common-mode DC voltage on the data wires to carry power. The spare pairs are unused.
Gigabit Ethernet uses all four pairs of wires to transmit data, so it is likely that Type-A PoE will be dominant in future PoE network switches.
Figure 11-24 illustrates a circuit that can be used to power the Beagle board using a PoE (IEEE 802.3af) supply. The PEM1305 can extract power from type-A and type-B PoE configurations. However, you must connect the module to DC isolation transformers to extract the power from the data wires. To do this, you can use a MagJack (a jack with integrated magnetics) with center-tapped outputs (e.g., the Belfuse 0826-1X1T-GJ-F). The MagJack contains the isolation transformers that are required to provide the 48 V supply to the PoE PEM and to deliver the data pair safely to the Beagle board Ethernet jack at Ethernet signal voltage levels.
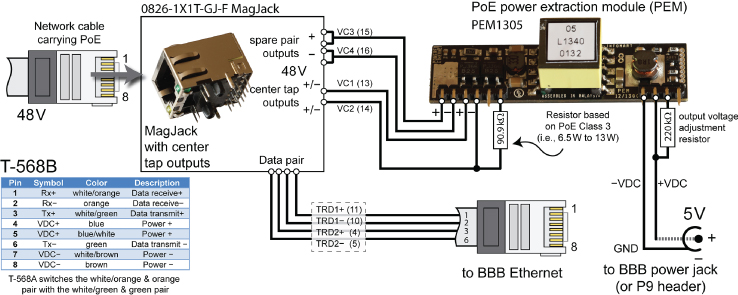
Figure 11-24: True PoE connection for the T-568B wiring scheme
The resistor that is placed on the input side of the PEM1305 is used to select the power output level of the PoE switch—accurately selecting the power output level results in a more power-efficient implementation. The output voltage adjustment resistor can further refine the PEM output voltage level. The PEM pin outputs can be connected directly to the BBB power jack or to the supply pins on the PocketBeagle headers.
Summary
After completing this chapter, you should be able to do the following:
- Install and configure a web server on a Beagle board and use it to display static HTML content
- Enhance the web server to send dynamic web content that uses CGI scripts and PHP scripts to interface to Beagle board sensors
- Write the code for a C/C++ client application that can communicate using either HTTP or HTTPS
- Build a full local MQTT architecture using Mosquitto and Paho
- Interface to platform as a service (PaaS) offerings, such as ThingSpeak and Adafruit IO, using HTTP and MQTT
- Use the Linux cron scheduler to structure workflow on the Beagle board
- Send e-mail messages directly from a Beagle board and utilize them as a trigger for web services such as IFTTT
- Build a C++ client/server application that can communicate at a high speed and a low overhead between any two TCP devices
- Manage remote Beagle board devices, using monitoring software and watchdog code, to ensure that deployed services are robust
- Configure a Beagle board to use static IP addresses, and wire it to utilize Power over Ethernet (PoE)