
CHAPTER 14
Images, Video, and Audio
In this chapter, USB peripherals are attached to the Beagle board so that it can be used for capturing image, video, and audio data using low-level Linux drivers and APIs. It describes Linux applications and tools that can be used to stream captured video and audio data to the internet. Open Source Computer Vision (OpenCV) image processing and computer vision approaches are investigated that enable the Beagle board to draw inferences from the information content of the captured image data. Capture and playback of audio streams are described, along with the use of Bluetooth audio. The chapter also covers some applications of audio on the Beagle board, including streaming audio, internet radio, and text-to-speech.
EQUIPMENT REQUIRED FOR THIS CHAPTER:
- A Beagle board (preferably one with HDMI and USB)
- Linux USB webcam (ideally the Logitech HD Pro C920)
- USB audio and/or Bluetooth adapter
Further resources for this chapter are available at www.exploringbeaglebone.com/chapter14/.
Capturing Images and Video
In this section, the Beagle board is used as a platform for capturing image and video data from USB webcams and saving the data on the board's file system. This is useful for Beagle board applications such as robotics, home security, home automation, and aeronautics, when networked image streaming is not an available option—for example, if the application is untethered and distant from a wireless network. With suitable peripherals, the board can be used to capture high-quality video streams, which can be viewed asynchronously. The durations of the video streams are limited only by the available storage on the board. (Chapter 3 describes an approach for mounting a high-capacity micro-SD card or USB memory device on the file system.) Alternatively, the video can be streamed to the network, which is discussed in the next section of this chapter.
USB Webcams
The main focus in this section is USB webcams, as they are widely available and can be reused as a general-purpose desktop peripheral. The Logitech HD C270 ($26), HD C310 ($30), and HD Pro C920 ($70), shown in Figure 14-1, are chosen, as they are commonly available HD cameras that are known to function under Linux. In fact, for the following tests the three cameras are connected simultaneously to the Beagle board using the USB hub displayed in Chapter 1. It is not a powered USB hub, but the board is connected to a 5 V 2 A supply in this case.
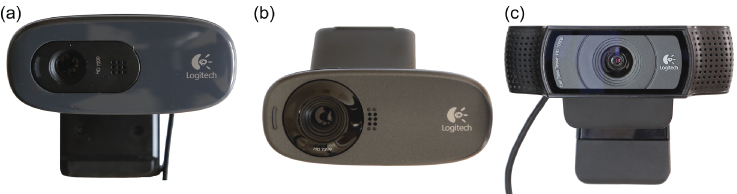
Figure 14-1: Logitech USB HD webcams (a) C270, (b) C310, and (c) C920
When the three USB cameras are connected to the board at the same time using a USB hub, the “list USB devices” utility provides the following output:
debian@ebb:~$ lsusbBus 001 Device 002: ID 1a40:0201 Terminus Technology Inc. FE 2.1 7-port HubBus 001 Device 001: ID 1d6b:0002 Linux Foundation 2.0 root hubBus 002 Device 001: ID 1d6b:0002 Linux Foundation 2.0 root hubBus 001 Device 003: ID 046d:082d Logitech, Inc. HD Pro Webcam C920Bus 001 Device 004: ID 046d:0825 Logitech, Inc. Webcam C270Bus 001 Device 005: ID 046d:081b Logitech, Inc. Webcam C310
The output lists the device IDs for the cameras, two USB sound adapters, and a Bluetooth adapter. The fact that “Logitech” is listed against the device IDs indicates that some level of Linux support is already present on the board for these devices. If this is not the case, then you will have to source proprietary Linux drivers from the webcam manufacturer. Typically, such drivers would be built and deployed on the board before the webcam could be used.
Full information about the modes that are available on the USB cameras can be displayed using the following:
debian@ebb:~$ lsusb -v | less This command results in detailed and verbose output. In addition, the loadable kernel modules (LKMs) that are currently loaded against these peripherals can be listed using the following command:
debian@ebb:~$ lsmodModule Size Used bysnd_usb_audio 184320 0uvcvideo 90112 0snd_hwdep 20480 1 snd_usb_audiovideobuf2_vmalloc 16384 1 uvcvideovideobuf2_memops 16384 1 videobuf2_vmallocsnd_rawmidi 32768 1 snd_usbmidi_libvideobuf2_v4l2 24576 1 uvcvideovideobuf2_core 45056 2 uvcvideo,videobuf2_v4l2 …
The uvcvideo LKM supports UVC (USB video class) compliant devices, such as the webcam that is attached. The videobuf2_vmalloc LKM is the memory allocator for the Video4Linux video buffer. If everything is working as expected, there should be new video and audio devices available, which can be listed using the following:
debian@ebb:~$ ls /dev/{vid,aud}*/dev/audio /dev/audio2 /dev/video0 /dev/audio1 /dev/video2/dev/audio3 /dev/video1
The device /dev/audio is mapped to the HDMI audio device, which will appear only if the HDMI virtual cape is enabled. The other audio devices are mapped to USB audio adapters and USB webcams.
Video4Linux2 (V4L2)
Video4Linux2 (V4L2) is a video capture driver framework that is tightly integrated with the Linux kernel and is supported by the uvcvideo LKM. It provides drivers for video devices, such as webcams, PCI video capture cards, and TV (DVB-T/S) tuner cards/peripherals. V4L2 primarily supports video (and audio) devices through the following types of interfaces:
- Video capture interface: Used to capture video from capture devices, such as webcams, TV tuners, or video capture devices
- Video output interface: For video output devices, e.g., video transmission devices or video streaming devices
- Video overlay interface: Enables the direct display of the video data without requiring the data to be processed by the CPU
- Video blanking interval (VBI) interface: Provides access to legacy data that is transmitted during the VBI of an analog video signal (e.g., teletext)
- Radio interface: Provides access to AM/FM tuner audio streams
V4L2 provides support for many types of devices, and simply put, it is complex! In addition to supporting video input/output, the V4L2 API also has stubs for codec and video effect devices, which enable manipulation of the video stream data. The focus in this section is on the capture of video data from webcam devices using V4L2 by performing the following steps (not necessarily in this order):
- Opening the V4L2 device
- Changing the device properties (e.g., camera brightness)
- Agreeing on a data format and input/output method
- Performing the transfer of data
- Closing the V4L2 device
The main source of documentation on V4L2 is available from www.kernel.org at tiny.cc/beagle1402, and the V4L2 API specification is available at tiny.cc/beagle1403.
Image Capture Utility
The first step is to install the V4L2 development libraries, abstraction layer, utilities, and a simple webcam application for V4L2-compatible devices. Always update the package lists to get information about the newest packages and their dependencies, before installing a system library:
debian@ebb:~$ sudo apt-get updatedebian@ebb:~$ apt-cache search v4l2libv4l-dev - Collection of video4linux support libraries..
Then, install the packages that are required for this section:
debian@ebb:~$ sudo apt-get install fswebcamgpicview libav-tools libv4l-dev The fswebcam application can then be used to test that the attached web camera is working correctly. It is a surprisingly powerful and easy-to-use application that is best used by writing a configuration file, as shown in Listing 14-1, which contains settings for choosing the device, capture resolution, output file type, and the addition of a title banner. It can even be used on a continuous loop by adding a loop entry that specifies the time in seconds between frame captures.
Listing 14-1: /exploringbb/chp14/fswebcam/fswebcam.conf
device /dev/video0input 0resolution 1280x720bottom-bannerfont /usr/share/fonts/truetype/ttf-dejavu/DejaVuSans.ttftitle "Exploring BeagleBone v2"timestamp "%H:%M:%S %d/%m/%Y (%Z)"png 0save exploringBB.png
The fswebcam application can be configured with these settings by passing it the configuration filename on execution:
…/chp14/fswebcam$ lsfswebcam.conf…/chp14/fswebcam$ sudo fswebcam -c fswebcam.conf--- Opening /dev/video0… Trying source module v4l2…/dev/video0 opened. --- Capturing frame… …
The image can then be viewed using gpicview, which requires that you have attached a display to the Beagle board, such as a VNC connection:
…/chp14/fswebcam$ gpicview exploringBB.png This will result in output like that in Figure 14-2(a). The image data has been modified to include a formatted bottom text banner, which contains a title and the date and time of image capture. Sample full-resolution capture images are available on the chapter web page.

Figure 14-2: (a) The fswebcam webcam capture (1280 × 720) displayed using gpicview via VNC; (b) the Cheese application displaying some available image filters
Interestingly, the fswebcam application could be executed on a loop and combined with the Apache web server (as described in Chapter 11) to create a simple web camera, which uses a web page that links to the captured image file present on the Beagle board file system.
Video4Linux2 Utilities
V4L2 provides a set of user-space utilities that can be used for obtaining information about connected V4L2-compatible devices. It is also possible to use the user-space utilities to change camera settings; however, it is possible that executed applications will be programmed to override such changes. The most important role of these tools is to verify that connected V4L2 devices are functioning correctly. You can list the available V4L2 devices using the following:
debian@ebb:~$ v4l2-ctl --list-devicesHD Pro Webcam C920 (usb-musb-hdrc.1-1): /dev/video0
The devices appear in the order in which they are attached to the USB hub. You can get information about a particular device by listing its modes (where -d 0 refers to the HD Pro C920 in this instance).
debian@ebb:~$ v4l2-ctl --all -d 0Driver Info (not using libv4l2):Driver name : uvcvideoCard type : HD Pro Webcam C920Bus info : usb-musb-hdrc.1-1Driver version: 4.14.54Capabilities : 0x84200001 Video Capture Streaming
Certain controls can be used to configure a camera, which can be accessed using the --list-ctrls option, as follows:
debian@ebb:~$ v4l2-ctl --list-ctrls -d 0brightness (int) : min=0 max=255 step=1 default=128 value=128contrast (int) : min=0 max=255 step=1 default=128 value=128saturation (int) : min=0 max=255 step=1 default=128 value=128white_balance_temperature_auto (bool) : default=1 value=1gain (int) : min=0 max=255 step=1 default=0 value=255 …
For the C920, other controls include white balance, color temperature, sharpness, backlight compensation, exposure (auto or absolute), focus, zoom, and support for pan/tilt. For example, to change the brightness on device 0 to 100 (currently 128 as shown in the preceding snippet), you can use the following:
debian@ebb:~$ v4l2-ctl --set-ctrl=brightness=100 -d 0debian@ebb:~$ v4l2-ctl --list-ctrls -d 0 | grep brightnessbrightness (int) : min=0 max=255 step=1 default=128 value=100
You can also list the modes of the cameras. In this case, there are three different video capture pixel formats, with fourcc color space video codes: YUYV (a common broadcast format with one luminance and two chrominance channels), H264 (a common modern interframe video compression format), and MJPG (a common, but older, intraframe-only motion JPEG video compression format). The listing is obtained using the following:
debian@ebb:~$ v4l2-ctl --list-formats -d 0ioctl: VIDIOC_ENUM_FMTIndex : 0 Type : Video CapturePixel Format: 'YUYV' Name : YUYV 4:2:2Index : 1 Type : Video CapturePixel Format: 'H264' (compressed) Name : H.264Index : 2 Type : Video CapturePixel Format: 'MJPG' (compressed) Name : Motion-JPEG
The C270 and C310 cameras do not have H.264 mode, but they both have YUYV and MJPG compressed pixel formats at indices 0 and 1, respectively. It is possible to explicitly set the resolution and pixel format of a camera as follows:
~$ v4l2-ctl --set-fmt-video=width=1920,height=1080,pixelformat=1 -d 0~$ v4l2-ctl --all -d 0Driver Info (not using libv4l2):Driver name : uvcvideoCard type : HD Pro Webcam C920Bus info : usb-musb-hdrc.1-1Driver version: 4.14.54 …Capabilities : 0x84000001 Video Capture StreamingFormat Video Capture:Width/Height : 1920/1080 Pixel Format : 'H264'Field : None Bytes per Line : 3840Size Image : 4147200 Colorspace : SRGBCrop Capability Video Capture:Bounds : Left 0, Top 0, Width 1920, Height 1080Default : Left 0, Top 0, Width 1920, Height 1080Pixel Aspect : 1/1Video input : 0 (Camera 1: ok)Streaming Parameters Video Capture:Capabilities : timeperframe Frames per second: 30.000 (30/1)Read buffers : 0 Priority: 2
This output provides useful state information, such as the resolution, video frame image size, frame rate, and so on.
Writing Video4Linux2 Programs
As with other devices in Linux (e.g., SPI in Chapter 8), it is possible to send data to and receive data from a video device by opening its /dev/videoX file system entry by using a call to file open(). Unfortunately, such an approach would not provide the level of control or performance that is required for video devices. Instead, low-level input/output control (ioctl()) calls are required to configure the settings of the device, and memory map (mmap()) calls are used to perform image frame memory copy, rather than using a byte-by-byte serial transfer.
The Git repository contains programs in the /chp14/v4l2/ directory that use V4L2 and its low-level ioctl() calls to perform video frame capture and video capture tasks.
grabber.c: Grabs raw image frame data from a webcam into memory using libv4l2. The images can be written to the file system.capture.c: Grabs raw video data to a stream or file. It does this quickly enough to be used for real-time video capture.
These code examples are almost entirely based on the samples that are provided by the V4L2 project team. The code is too long to display here, but you can view it in the Git repository. To build and execute the code examples, use the following steps:
~/exploringbb/chp14/v4l2$ sudo apt install libv4l-dev…/chp14/v4l2$ ls *.ccapture.c grabber.c…/chp14/v4l2$ gcc -O2 -Wall `pkg-config --cflags --libs libv4l2` →grabber.c -o grabber…/chp14/v4l2$ gcc -O2 -Wall `pkg-config --cflags --libs libv4l2` →capture.c -o capture…/chp14/v4l2$ ./grabber…/chp14/v4l2$ ls *.ppmgrabber000.ppm grabber005.ppm grabber010.ppm grabber015.ppm ……/chp14/v4l2$ gpicview grabber000.ppm
The .ppm file format describes an uncompressed color image format, which gpicview will display. You can use the “forward” button on gpicview to step through the 20 image frames. To capture data using the capture.c program, use a selection of the following options:
…/chp14/v4l2$ ./capture -hUsage: ./capture [options]Version 1.3 Options:-d | --device name Video device name [/dev/video0] …-f | --format Force format to 640x480 YUYV-F | --formatH264 Force format to 1920x1080 H264-c | --count Number of frames to grab [100] - use 0 for infiniteExample usage: capture -F -o -c 300 > output.rawCaptures 300 frames of H264 at 1920x1080. Use raw2mpg4 script to convert to mpg4
If you have the C920 camera, you can capture 100 frames of H.264 data using the first of the following commands. A second command then converts the .raw file to a .mp4 file format, which can be played on a desktop machine.
…/chp14/v4l2$ ./capture -d /dev/video0 -F -o -c 100 > output.rawForce Format 2…………………………………………………………….…/chp14/v4l2$ avconv -f h264 -i output.raw -vcodec copy output.mp4…/chp14/v4l2$ ls -l output*-rw-r--r-- 1 debian debian 1355695 Sep 3 22:23 output.mp4-rw-r--r-- 1 debian debian 1353801 Sep 3 22:23 output.raw
The file sizes are almost identical because the video data is actually captured in a raw H.264 format. The conversion is performed using the avconv (Libav) utility, which is a fork of the FFmpeg project that is well supported by the Debian Linux distribution. The -vcodec copy option enables the video to be copied without transcoding the video data format.
The capture.c program can also be used with cameras such as the C270 and C310, which do not have hardware H.264 functionality; however, the capabilities are more limited.
…$ v4l2-ctl --set-fmt-video=width=1280,height=720,pixelformat=1 -d 1…$ v4l2-ctl --all -d 1Format Video Capture: Width/Height:1280/720 Pixel Format:'MJPG'…/chp14/v4l2$ ./capture -d /dev/video1 -o -c 100 > output.rawForce Format 0 …………………………………………………/chp14/v4l2$ ls -l output.raw-rw-r--r-- 1 debian debian 4476448 Sep 3 01:58 output.raw…/chp14/v4l2$ avconv -f mjpeg -i output.raw output.mp4…/chp14/v4l2$ ls -l output.mp4-rw-r--r-- 1 debian debian 1456040 Sep 3 02:06 output.mp4
True video conversion using avconv can take quite some time on the Beagle board! In this example, you can see that the H.264 video file requires significantly less space than the MJPEG file, as it is a more efficient interframe video-encoding format.
Streaming Video
It is possible to use a Beagle board to capture and stream live video. The Logitech C920 is particularly useful for this purpose, as it has a built-in H.264 hardware encoder. The raw 1080p H.264 data can be passed directly from the camera stream to the network stream without transcoding, which means that the computational load on the Beagle board is reasonably low. Streaming scripts are available in the /chp14/v4l2/ repository directory. For example, Listing 14-2 provides a script for sending H.264 video data over UDP to a desktop PC at 192.168.7.1 using the C920 webcam.
Listing 14-2: /exploringbb/chp14/v4l2/streamVideo
#!/bin/bashecho "Video Streaming for the Beaglebone - Exploring BeagleBone v2"v4l2-ctl --set-fmt-video=width=1920,height=1080,pixelformat=1v4l2-ctl --set-parm=15./capture -F -o -c300000|avconv -i - -vcodec copy -f rtp rtp://192.168.7.1:8090/
This script pipes the raw video output from the capture program to the avconv application, which “copies” the raw data to the network stream using RTP. There is an additional script to multicast the video stream to multiple network points (streamVideoMulti) using the broadcast network address 226.0.0.1. A full video on my YouTube channel describes the steps involved in detail: tiny.cc/beagle1404.
You can execute this script directly, but you must also copy the text highlighted here from its output and paste it into a new text file (you can name this new file stream.sdp) and place it on your host machine.
debian@ebb:~/exploringbb/chp14/v4l2$ ./streamVideoFrame rate set to 15.000 fpsForce Format 2 …Output #0, rtp, to 'rtp://192.168.7.1:8090/':Metadata:encoder : Lavf57.56.101Stream #0:0: Video: h264 (Constrained Baseline), yuvj420p(pc, prog),1920x1080 [SAR 1:1 DAR 16:9], q=2-31, 30 fps, 30 tbr, 90k tbn, 30 tbcSDP:v=0o=- 0 0 IN IP4 127.0.0.1s=No Namec=IN IP4 192.168.7.1t=0 0a=tool:libavformat 57.56.101m=video 8090 RTP/AVP 96a=rtpmap:96 H264/90000a=fmtp:96 packetization-mode=1; sprop-parameter-sets=Z0JAKLtAPAES8uAokAAAAwAQAAADA8YEAALcbAAtx73vheEQjUA=,aM44gA==;profile-level-id=424028Stream mapping:Stream #0:0 -> #0:0 (copy)…frame= 1120 fps= 34 q=-1.0 Lsize=13901kB … bitrate=3052.5kbits/svideo:13756kB audio:0kB subtitle:0kB other streams:0kB …
You can then open this file stream.sdp using a media player such as VLC, whereupon you will see a live video stream from the Beagle board on which the streamVideo script is executed.
It is possible to build a custom Qt application that can receive the video stream on a desktop computer. This can be combined with the Qt client/server applications in Chapter 11 to provide network control and support for video streaming. Further details are available at tiny.cc/beagle1405.
A second Beagle board can be used to receive the network video stream; however, it does not have sufficient capability to render the HD video stream to a display in real time. Interestingly, it is possible to use a Raspberry Pi 2/3 to capture the UDP stream and display it using a video player that takes advantage of the Raspberry Pi's H.264 hardware decoder. For example, the OMXplayer supports hardware decoding, and it can be used to open the network broadcast stream using the following:
molloyd@raspberryPI$ omxplayer -o hdmi udp://226.0.0.1:123 The Raspberry Pi can decode the C920 video stream and display it live on a monitor, albeit with a varying degree of latency.
Image Processing and Computer Vision
Once a USB camera or camera cape is attached to the Beagle board, it is possible to capture images and process them using a comprehensive high-level library called Open Source Computer Vision (OpenCV). OpenCV (www.opencv.org) provides a cross-platform library of functions for computer vision, such as gesture recognition, motion understanding, motion tracking, augmented reality, and structure-from-motion. It also provides supporting libraries for applications such as artificial neural networks, support vector machines, classification, and decision tree learning. OpenCV is written in C/C++ and is optimized for real-time applications, including support for multicore programming. The OpenCV libraries can be installed using this:
debian@ebb ~ $ sudo apt install libopencv-dev Image Processing with OpenCV
OpenCV supports V4L2 and provides a high-level interface for capturing image data, which can be used instead of the grabber.c program. Listing 14-3 is an OpenCV application that captures data from a webcam and filters it using some simple image processing techniques. The steps that it performs are as follows:
- Capture of the image from the webcam.
- Conversion of the image into grayscale form.
- Blurring of the image to remove high-frequency noise.
- Detecting regions in the image where the image brightness changes sharply. This is achieved using an image processing operator known as an edge detector—the Canny edge detector in this example.
- Storage of the image files to the Beagle board file system.
OpenCV uses a file-naming convention whereby an .hpp file extension is used for header files that contain C++ code. This convention enables a C version of a header file (e.g., opencv.h) to coexist alongside a C++ header file (e.g., opencv.hpp). Because OpenCV mixes both C and C++ code, this is an appropriate way to distinguish one form from the other.
Listing 14-3: /exploringbb/chp14/openCV/boneCV.cpp
#include<iostream>#include<opencv2/opencv.hpp> // C++ OpenCV include fileusing namespace std;using namespace cv; // using the cv namespace tooint main(){VideoCapture capture(0); // capturing from /dev/video0cout << "Started Processing - Capturing Image" << endl;// set any properties in the VideoCapture objectcapture.set(CV_CAP_PROP_FRAME_WIDTH,1280); // width in pixelscapture.set(CV_CAP_PROP_FRAME_HEIGHT,720); // height in pixelscapture.set(CV_CAP_PROP_GAIN, 0); // enable auto gainif(!capture.isOpened()){ // connect to the cameracout << "Failed to connect to the camera." << endl;}Mat frame, gray, edges; // original, grayscale and edge imagecapture >> frame; // capture the image to the frameif(frame.empty()){ // did the capture succeed?cout << "Failed to capture an image" << endl;return -1;}cout << "Processing - Performing Image Processing" << endl;cvtColor(frame, gray, CV_BGR2GRAY); // convert to grayscaleblur(gray, edges, Size(3,3)); // blur image using a 3x3 kernel// use Canny edge detector that outputs to the same image// low threshold = 10, high threshold = 30, kernel size = 3Canny(edges, edges, 10, 30, 3); // run Canny edge detectorcout << "Finished Processing - Saving images" << endl;imwrite("capture.png", frame); // store the original imageimwrite("grayscale.png", gray); // store the grayscale imageimwrite("edges.png", edges); // store the processed edge imagereturn 0;}
This example can be built and executed as follows, which results in the output displayed in Figure 14-3:
…/chp14/openCV$ g++ -O2 `pkg-config --cflags --libs opencv` →boneCV.cpp -o boneCV…/chp14/openCV$ ./boneCVStarted Processing - Capturing ImageProcessing - Performing Image ProcessingFinished Processing - Saving images…/chp14/openCV$ ls *.pngcapture.png edges.png grayscale.png…/chp14/openCV$ gpicview capture.png…/chp14/openCV$ gpicview edges.png
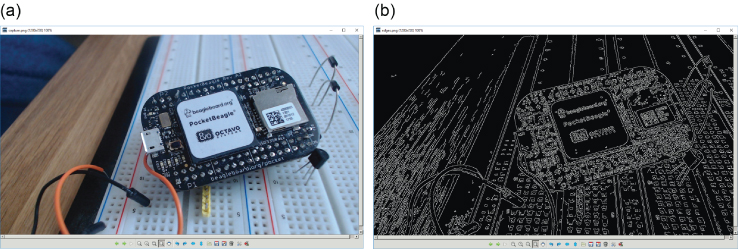
Figure 14-3: The OpenCV image processing example: (a) the webcam image; (b) the edge-processed image
A second example application in the same directory can be used to test the performance of using OpenCV for image processing. In each iteration, it performs an image capture at a 640 × 480 resolution, converts the image to grayscale form, and performs an edge detection operation. The program performs 100 iterations, after which the execution time is measured.
debian@ebb:~/exploringbb/chp14/openCV$ ./boneCVtimingIt took 12.3263 seconds to process 100 framesCapturing and processing 8.11274 frames per second
During this test the application uses 95 percent of CPU and 6 percent of memory capacity.
Computer Vision with OpenCV
Image processing involves manipulating images by filters (e.g., smoothing, contrast enhancement) or transformations (e.g., scaling, rotation, stretching) for purposes such as enhancing or even reducing the information content of digital images. Image processing is one tool that is used in computer vision, which often has the goal of “understanding” the information content within digital images.
Computer vision applications often try to replicate the capabilities of human vision by drawing inferences, making decisions, and taking actions based on visual data. For example, the OpenCV application described in this section uses the BeagleBone to process image data and apply computer vision techniques to determine whether a human face is present in a webcam image frame or an image file. Importantly, the approach is designed for face detection, not face recognition. Face detection can be used for applications such as security and photography; however, the processing required has a significant computational overhead and is not suitable for high frame rates on a Beagle board.
Listing 14-4 provides an example computer vision application that uses OpenCV for face detection. It uses a Harr feature-based cascade classifier, which uses a characterization of adjacent rectangular image regions to identify regions of interest—for example, in human faces the region near the eyes has a darker intensity than the region containing the cheeks. Human faces can be detected using such observations. Usefully, OpenCV provides some codified rules for detecting human faces, which have been used in this example.
Computer vision is an entire research domain, and it requires a significant time investment before you will be able to perform some of its more complex operations. The “Further Reading” section provides links to resources to get you started.
Listing 14-4: /exploringbb/chp14/openCV/face.cpp
#include <iostream>#include <opencv2/highgui/highgui.hpp>#include <opencv2/objdetect/objdetect.hpp>#include <opencv2/imgproc/imgproc.hpp>using namespace std;using namespace cv;int main(int argc, char *args[]){Mat frame;VideoCapture *capture; //capture needs full scope of main(), using ptrcout << "Starting face detection application" << endl;if(argc==2){ // loading image from a filecout << "Loading the image " << args[1] << endl;frame = imread(args[1], CV_LOAD_IMAGE_COLOR);}else {cout << "Capturing from the webcam" << endl;capture = new VideoCapture(0);// set any properties in the VideoCapture objectcapture->set(CV_CAP_PROP_FRAME_WIDTH,1280); // width pixelscapture->set(CV_CAP_PROP_FRAME_HEIGHT,720); // height pixelsif(!capture->isOpened()){ // connect to the cameracout << "Failed to connect to the camera." << endl;return 1;}*capture >> frame; // populate the frame with captured imagecout << "Successfully captured a frame." << endl;}if (!frame.data){cout << "Invalid image data… exiting!" << endl;return 1;}// loading the face classifier from a file (standard OpenCV example)CascadeClassifier faceCascade;faceCascade.load("haarcascade_frontalface.xml");// faces is a STL vector of faces - will store the detected facesstd::vector<Rect> faces;// detect objects in the scene using the classifier above (frame,// faces, scale factor, min neighbors, flags, min size, max size)faceCascade.detectMultiScale(frame, faces, 1.1, 3,0 | CV_HAAR_SCALE_IMAGE, Size(50,50));if(faces.size()==0){cout << "No faces detected!" << endl; // display the image}// draw oval around the detected faces in the faces vectorfor(int i=0; i<faces.size(); i++){// Using the center point and a rectangle to create an ellipsePoint cent(faces[i].x+faces[i].width*0.5,faces[i].y+faces[i].height*0.5);RotatedRect rect(cent, Size(faces[i].width,faces[i].width),0);// image, rectangle, color=green, thickness=3, linetype=8ellipse(frame, rect, Scalar(0,255,0), 3, 8);cout << "Face at: (" << faces[i].x << "," <<faces[i].y << ")" << endl;}imshow("EBB OpenCV face detection", frame); // display image resultsimwrite("faceOutput.png", frame); // save image toowaitKey(0); // dislay image until key pressreturn 0;}
The face detection example can be built and executed using the following commands:
…/chp14/openCV$ g++ -O2 `pkg-config --cflags --libs opencv` face.cpp -o face…/chp14/openCV$ ./faceStarting face detection applicationCapturing from the webcamSuccessfully captured a frame.Face at: (697,470) Face at: (470,152) Face at: (82,192) Face at: (966,296)…/chp14/openCV$ ./face Lena.pngStarting face detection applicationLoading the image Lena.pngFace at: (217,201)
When executed, it results in the display of the image in Figure 14-4(a) (if an X Window session is configured), with ellipses identifying any faces that are detected in the image.

Figure 14-4: (a) OpenCV face detection on with the Lena image file, and (b) OpenCV3 examples in operation
There is a myriad of OpenCV3 examples available in the source code repositories and at tiny.cc/beagle1408. The examples can be built and executed on the Beagle board as follows:
…/chp14/openCV3$ g++ -O2 `pkg-config --cflags --libs opencv` edge.cpp -o edge…/chp14/openCV3$ lsbuild edge edge.cpp fruits.jpg…/chp14/openCV3$ ./edge fruits.jpg
This directly results in the interactive threshold edge detection windows in Figure 14-4(b).
Boost
Similar to OpenCV, Boost (www.boost.org) provides a comprehensive free library of C++ source code that can be used for many applications on the Beagle board. There are libraries for multithreading, data structures, algorithms, regular expressions, memory management, mathematics, and more. The range of libraries available is too exhaustive to detail here, but a full listing is available at www.boost.org/doc/libs/. Boost can be installed on the board using the following:
debian@ebb:~$ sudo apt install libboost-dev… Unpacking libboost-dev:armhf (1.62.0.1) …
Listing 14-5 provides an example of usage of the Boost library for calculating the geometric distance between two 2-D points.
Listing 14-5: /exploringbb/chp14/boost/testBoost.cpp
#include <boost/geometry.hpp>#include <boost/geometry/geometries/point_xy.hpp>using namespace boost::geometry::model::d2;#include <iostream>int main(){point_xy<float> p1(1.0,2.0), p2(3.0,4.0);float d = boost::geometry::distance(p1,p2);std::cout << "The distance between points is: " << d << std::endl;return 0;}
Similarly to OpenCV, it utilizes an .hpp extension form. It also makes extensive use of C++ namespaces. The preceding code can be built and executed using the following:
debian@ebb:~/exploringbb/chp14/boost$ g++ testBoost.cpp -o testBoostdebian@ebb:~/exploringbb/chp14/boost$ ./testBoostDistance between points is: 2.82843
BeagleBone Audio
There are several approaches to utilizing audio inputs and outputs with Beagle boards, including the following:
- HDMI audio: This output is enabled by default on the BeagleBone boards and allows audio signals to be sent to a television via HDMI (not DVI).
- USB audio: Low-cost USB adapters can be attached to Beagle boards that have Linux driver support for the input/output of audio. In addition, USB webcams can be used as audio input devices.
- Bluetooth audio: A Linux-compatible Bluetooth adapter can be used to input from, or output to, external Bluetooth recorder/speaker devices.
- Multichannel audio serial port (McASP): Several Beagle boards have header pins for McASP that can be used to interface to McASP-capable audio codecs (e.g., the TI TLV320AIC series). This is a complex task that requires proprietary (typically SMT) components.
It is also possible to use the built-in ADC inputs to capture audio events at low sample rates. For example, the SparkFun electret microphone breakout board (BOB-09964) can be connected via an op-amp circuit to the Beagle board ADC (with a 10 kΩ potentiometer on the GND line) and used for tasks such as impact detection (e.g., a door knock). The sample rate of such a microphone circuit could be improved by using an external ADC that has an SPI interface, such as the low-cost ($3) MCP3008, which has eight 10-bit ADCs. In addition, the TI ADS8326 16-bit 250 kS/s SPI out could be interfaced to the PRU-ICSS, which is described in Chapter 15.
In this section, the most common approaches are examined, as is software that enables you to perform basic audio input/output tasks.
Core Audio Software Tools
The following tools are used in this section of the book:
- MPlayer: A movie player for Linux that has optimized built-in support for audio devices. It works well as an MP3 audio stream player on a Beagle board.
- ALSA utilities: Contains tools for configuring and using ALSA (advanced Linux sound architecture) devices. It includes the
aplay/arecordutilities for the playback and recording of audio streams, theamixertool for controlling volume levels, and thespeaker-testutility. - Libav: Contains libraries and programs for handling multimedia data. In particular,
avconvis a fast video and audio conversion tool that can also be used to capture audio data from devices or to stream data to the network (seelibav.org/avconv.html).
To install these tools, ensure that your package lists are up-to-date and install the tools as follows:
debian@ebb:~$ sudo apt-get updatedebian@ebb:~$ sudo apt-get install mplayer alsa-utils libav-tools
Audio Devices for the Beagle Boards
After you have the core software installed, the next step is to utilize an audio device that is connected to a Beagle board. In this section, an example is used in which several audio devices are attached simultaneously to the Beagle board—the HDMI audio interface, a webcam, and two USB audio adapters. Remember that the HDMI virtual cape must be enabled to utilize the HDMI audio output.
HDMI and USB Audio Playback Devices
Figure 14-5(a) illustrates the USB hub with three USB devices attached—the two USB audio adapters and the Bluetooth adapter. When the three webcams are also attached to the Velleman USB hub, then a call to lsusb results in the following:
Linux ebb 4.14.54-ti-rt-r63 #1 SMP PREEMPT RT …debian@ebb:~$ lsusbBus 001 Device 005: ID 0d8c:013c C-Media Elec CM108 Audio ControllerBus 001 Device 004: ID 041e:30d3 Creative Tech, Sound Blaster Play!Bus 001 Device 006: ID 0a5c:2198 Broadcom Corp. Bluetooth 3.0 DeviceBus 001 Device 003: ID 046d:082d Logitech, Inc. HD Pro Webcam C920Bus 001 Device 002: ID 1a40:0201 Terminus TechFE 2.1 7-port HubBus 001 Device 001: ID 1d6b:0002 Linux Foundation 2.0 root hub

Figure 14-5: (a) Seven-port USB hub with multiple adapters, (b) the Sound Blaster audio adapter; (c) the Dynamode USB audio adapter
The USB hub in Figure 14-5(a) is not a powered hub; however, the board is powered via the 5V connector using a 2 A power supply, which provides sufficient power to use all these devices simultaneously. The Sound Blaster ($20) and Dynamode ($5) USB adapters are illustrated in Figure 14-5(b) and (c), respectively. These adapters can be hot-plugged into the board, where their LKMs can be dynamically loaded and unloaded during Linux execution.
When the various adapters are connected to the Beagle board, you can obtain information about them as follows:
debian@ebb:~$ cat /proc/asound/pcm00-00: davinci-mcasp.0-i2s-hifi i2s-hifi-0 : : playback 101-00: USB Audio : USB Audio : capture 102-00: USB Audio : USB Audio : playback 1 : capture 103-00: USB Audio : USB Audio : playback 1 : capture 1
In this case, the HDMI adapter is capable of playback only, the two USB adapters are capable of playback and capture, and the USB webcam is capable only of capture. An alternative approach is to use the aplay utility to list the available playback devices.
debian@ebb:~$ aplay -l**** List of PLAYBACK Hardware Devices ****card 0: Black [TI BeagleBone Black], device 0: davinci-mcasp.0-i2s-hifi …Subdevices: 0/1Subdevice #0: subdevice #0card 2: U0x41e0x30d3 [USB Device 0x41e:0x30d3], device 0: USB Audio …Subdevices: 0/1Subdevice #0: subdevice #0card 3: Device [USB PnP Sound Device], device 0: USB Audio …Subdevices: 0/1Subdevice #0: subdevice #0
Once you have identified the devices, you can play back an audio file on the Dynamode and Creative Sound Blaster USB adapters, respectively, using the mplayer and aplay utilities, as follows:
…/chp14/audio$ mplayer -ao alsa:device=hw=2 320sample.mp3…/chp14/audio$ mplayer -ao alsa:device=hw=3 320sample.mp3…/chp14/audio$ aplay -D plughw:2,0 cheering.wav
The sound quality is audibly richer on the Sound Blaster adapter (card 2) than the Dynamode adapter (card 3). However, the quality of the Dynamode adapter is good for its price, and its manual volume control feature is useful.
The HDMI device adapter can also be used, either by connecting a Beagle board directly to an HDMI receiver or HDMI television (or a monitor with built-in speakers) or by using a VGA adapter to extract the HDMI audio channel to a 3.5 mm stereo audio jack. The quality of the audio that is extracted from the latter devices can be quite variable and can suffer from auto-gain line noise when no audio stream is being played back.
To test an output device, you can use the speaker-test utility (where -c2 indicates two channels are to be tested).
../chp14/audio$ speaker-test -D plughw:2,0 -c2 The ALSA utilities also provide you with detailed information about the capabilities of a USB device. For example, amixer can be used to get and set an adapter's available properties. Using amixer on the Sound Blaster device provides its current state information:
debian@ebb:~/exploringbb/chp14/audio$ amixer -c 2Simple mixer control 'Speaker',0Capabilities: pvolume pswitch pswitch-joinedPlayback channels: Front Left - Front RightLimits: Playback 0 - 151Mono: Front Left: Playback 44 [29%] [-20.13dB] [on]Front Right: Playback 44 [29%] [-20.13dB] [on]Simple mixer control 'Mic',0Capabilities: pvolume pvolume-joined cvolume cvolume-joined pswitchpswitch-joined cswitch cswitch-joinedPlayback channels: Mono Capture channels: MonoLimits: Playback 0 - 32 Capture 0 - 16Mono: Playback 23 [72%] [34.36dB] [off] Capture 0 [0%] [0.00dB] [on]Simple mixer control 'Auto Gain Control',0Capabilities: pswitch pswitch-joinedPlayback channels: Mono Mono: Playback [on]
To get its available control settings, use the following:
debian@ebb:~/exploringbb/chp14/audio$ amixer -c 2 controlsnumid=3,iface=MIXER,name='Mic Playback Switch'numid=4,iface=MIXER,name='Mic Playback Volume'numid=7,iface=MIXER,name='Mic Capture Switch'numid=8,iface=MIXER,name='Mic Capture Volume' …
Therefore, to control the Speaker Playback Volume setting, you can use this:
…$ amixer -c 2 cset iface=MIXER,name='Speaker Playback Volume' 10,10numid=6,iface=MIXER,name='Speaker Playback Volume'; type=INTEGER,access=rw---R--,values=2,min=0,max=151,step=0: values=10,10 | dBminmax-min=-28.37dB,max=-0.06dB
This adjusts the volume on the speaker output of the Sound Blaster USB card—the 10,10 values are the left and right volume percentage settings, so 0,30 would turn off the left channel and set the volume level at 30 percent for the right channel.
Internet Radio Playback
You can play internet radio channels using the same mplayer application. For example, by using www.internet-radio.com, you can search for a radio station of your preference to determine its IP address. You can then stream the audio to your USB adapter using the following:
…/chp14/audio$ mplayer -ao alsa:device=hw=2 http://178.18.137.246:80MPlayer 1.3.0 (Debian), built with gcc-6.2.1 (C) 2000-2016 MPlayer Teamdo_connect: could not connect to socketconnect: No such file or directoryFailed to open LIRC support. You will not be able to use your remote control.Playing http://178.18.137.246:80.Resolving 178.18.137.246 for AF_INET6…Couldn't resolve name for AF_INET6: 178.18.137.246Connecting to server 178.18.137.246[178.18.137.246]: 80…Name : Pinguin Radio Genre : AlternativeWebsite: http://www.pinguinradio.comPublic : yes Bitrate: 320kbit/sCache size set to 320 Kbytes Cache fill: 0.00% (0 bytes)ICY Info: StreamTitle='Placebo & David Bowie - Without You I'm Nothing';StreamUrl='http://www.pinguinradio.com'; …
This stream runs at 10 percent CPU and 5 percent memory usage on a BBB with good sound quality (regardless of what you might think of the music itself!). In fact, with multiple sound output devices, there is no difficulty in configuring a Beagle board to connect to multiple internet radio streams simultaneously and streaming audio to separate audio adapters.
Recording Audio
The USB adapters and the USB webcams can be used to capture audio directly to the Beagle board file system. You can use the arecord utility to provide a list of the available devices—for example, with one webcam and the two USB audio adapters connected:
debian@ebb:~$ arecord -l**** List of CAPTURE Hardware Devices ****card 1: C920 [HD Pro Webcam C920], device 0: USB Audio [USB Audio]Subdevices: 1/1 Subdevice #0: subdevice #0card 2: U0x41e0x30d3 [USB Device 0x41e:0x30d3], device 0: USB Audio …Subdevices: 1/1 Subdevice #0: subdevice #0card 3: Device [USB PnP Sound Device], device 0: USB Audio [USB Audio]Subdevices: 1/1 Subdevice #0: subdevice #0
These devices are also indexed at the following /proc location:
debian@ebb:~$ cat /proc/asound/cards0 [Black ]: TI_BeagleBone_B - TI BeagleBone Black1 [C920 ]: USB-Audio - HD Pro Webcam C9202 [U0x41e0x30d3 ]: USB-Audio - USB Device 0x41e:0x30d33 [Device ]: USB-Audio - USB PnP Sound Device
You can record audio from each of the audio capture devices using the arecord utility and the device's address. Interestingly, the LED does not light on the webcams described when they are recording only audio!
debian@ebb:~/tmp$ arecord -f cd -D plughw:2,0 -d 20 test.wavRecording WAVE 'test.wav' : Signed 16 bit Little Endian, Rate 44100 Hz
The waveform audio file format (WAV) stores uncompressed audio data, which will quickly consume your file storage free space. To avoid this, you can compress WAV files into the popular MP3 compressed format using the LAME MP3 encoder, as follows:
debian@ebb:~$ sudo apt install lamedebian@ebb:/tmp$ lame test.wav output.mp3LAME 3.99.5 32bits (http://lame.sf.net)Using polyphase lowpass filter, transition band: 16538 Hz - 17071 HzEncoding test.wav to output.mp3Encoding as 44.1 kHz j-stereo MPEG-1 Layer III (11x) 128 kbps qval=3Frame | CPU time/estim | REAL time/estim | play/CPU | ETA767/767(100%)| 0:09/ 0:09| 0:09/ 0:09| 2.1909x| 0:00
A recording test was performed on the BBB that uses each of the two USB adapters. A Zoom H1 Handy Recorder (www.zoom.co.jp) was used to capture my voice. The analog stereo line output of the Zoom H1 was connected to the analog stereo line in of each adapter, and the following steps were used to record the audio for each adapter:
…/audio/testMicrophone$ arecord -f cd -D plughw:2,0 -d 45 testX.wav…/chp14/audio/testMicrophone$ lame -b 128 testX.wav testX.mp3
A digital copy of the audio (i.e., digitally copied off the Zoom H1) is also provided in the Git repository for comparison. All three files are encoded at a sampling rate of 44.1 kS/sec with a bit rate of 128 Kb/sec. You can play these files directly on your desktop computer using the address tiny.cc/beagle1407.
…/chp14/audio/testMicrophone$ lsZoomH1DigitalSource.mp3 testCreative.mp3 testDynamode.mp3
Line noise is audible in both versions when compared to the original digital audio data, but there is not a significant difference in the quality of the audio recording from each USB audio adapter.
Audio Network Streaming
Earlier in this chapter, a description is provided of video streaming to the network using avconv. It is also possible to use the same application to stream audio as it is captured by an audio device, live to the network. For example, here is the command required to stream audio from a device attached to the address 2,0 using UDP to a desktop computer (at 192.168.7.1):
debian@ebb:/tmp$ avconv -ac 1 -f alsa -i hw:2,0 -acodec libmp3lame →-ab 32k -ac 1 -f mp3 udp://192.168.7.1:12345ffmpeg version 3.2.12-1~deb9u1 Copyright (c) 2000-2018 the FFmpeg developersbuilt with gcc 6.3.0 (Debian 6.3.0-18+deb9u1) 20170516 …Guessed Channel Layout for Input Stream #0.0 : monoInput #0, alsa, from 'hw:2,0':Duration: N/A, start: 1536103924.360745, bitrate: 768 kb/sStream #0:0: Audio: pcm_s16le, 48000 Hz, mono, s16, 768 kb/sOutput #0, mp3, to 'udp://192.168.7.1:12345':Metadata: TSSE : Lavf57.56.101Stream #0:0: Audio: mp3 (libmp3lame), 48000 Hz, mono, s16p, 32 kb/sMetadata: encoder : Lavc57.64.101 libmp3lameStream mapping: Stream #0:0 -> #0:0 (pcm_s16le (native) -> mp3 (libmp3lame))Press [q] to stop, [?] for helpsize= 73kB time=00:00:18.52 bitrate= 32.1kbits/s speed=0.993x
A desktop player such as VLC can be used to open the network UDP stream. For example, in VLC use Media → Open Network Stream and set the network URL to be: udp://@:12345.
Bluetooth A2DP Audio
The use of a Bluetooth adapter is first introduced in Chapter 12 for general-purpose serial communication. It is used again in Chapter 13 to attach peripherals to the BBB. Here again, Bluetooth can be used with a Beagle board—this time to communicate with audio devices.
One of the most common uses of the Bluetooth wireless communication system is for the connection of smartphones to in-car audio systems or to home entertainment centers. For this purpose, the Bluetooth Advanced Audio Distribution Profile (A2DP) can be used to stream high-quality stereo audio from a media source to a media sink. The source device (SRC) acts as the source of a digital audio stream (e.g., Bluetooth headset, smartphone media player), which is sent in a compressed format to a sink device (SNK) (e.g., Bluetooth headphones, stereo receiver, in-car receiver).
When connected to a USB Bluetooth adapter, the Beagle board can be configured to act as an A2DP SRC or SNK. In this example, the board is configured as the SRC that is connected to a Hi-Fi system and Windows PC SNK. There are many low-cost A2DP audio receivers available that provide audio output on a 3.5 mm stereo jack, which can be used to retrospectively add A2DP capability to Hi-Fi systems. However, the Sony Hi-Fi system that is used as the test platform has built-in A2DP support.
After a Bluetooth adapter is attached to the board, the first step is to install the necessary packages, configure it to support A2DP, and test that the Bluetooth audio SNKs are visible.
debian@ebb:~$ hcitool scanScanning … 40:E2:30:13:CA:09 HOMEOFFICE-PC00:1D:BA:2E:BC:36 CMT-HX90BTR00:21:04:F9:35:8E S68H
The board has detected the desktop PC, a Samsung device, and the Sony Hi-Fi system (CMT-HX90BTR).
An additional Linux service called PulseAudio, a background process that reroutes all audio streams, is required for recent A2DP services. It aims to support legacy devices, as well as to provide support for network audio (e.g., for VNC). PulseAudio is installed by default on the latest BeagleBoard.org Debian images. It provides useful user-interface tools, such as pavucontrol, which can be installed using the following:
debian@ebb:~$ sudo apt install pulseaudio pavucontrol →pulseaudio-module-bluetoothdebian@ebb:~$ pulseaudio --versionpulseaudio 10.0debian@ebb:~$ pulseaudio --dump-modules
PulseAudio can be configured as follows:
debian@ebb:/etc/pulse$ sudo nano default.pa The service can be started and stopped using the following (note: no sudo):
debian@ebb:~$ pulseaudio --killdebian@ebb:~$ pulseaudio --start
One of the best ways to debug problems with PulseAudio is to kill the service and start the service using pulseaudio -v to get a verbose output.
Once you have ensure that PulseAudio is working correctly, you can execute it in daemon mode and begin the process of pairing the board with the Bluetooth device.
debian@ebb:~$ pulseaudio -Ddebian@ebb:~$ sudo bluetoothctl[bluetooth]# scan onDiscovery started …[CHG] Device 00:1D:BA:2E:BC:36 Name: CMT-HX90BTR[CHG] Device 00:1D:BA:2E:BC:36 Alias: CMT-HX90BTR[CHG] Device 00:1D:BA:2E:BC:36 LegacyPairing: yes
You can then connect to the SNKs using the following commands (you will likely have to enter a code [e.g., 0000] on both devices to pair the devices in the first step):
[bluetooth]# pair 00:1D:BA:2E:BC:36Attempting to pair with 00:1D:BA:2E:BC:36[CHG] Device 00:1D:BA:2E:BC:36 Connected: yes[CHG] Device 00:1D:BA:2E:BC:36 Paired: yes[bluetooth]# trust 00:1D:BA:2E:BC:36[CHG] Device 00:1D:BA:2E:BC:36 Trusted: yesChanging 00:1D:BA:2E:BC:36 trust succeeded[bluetooth]# paired-devicesDevice 00:1D:BA:2E:BC:36 CMT-HX90BTR[bluetooth]# info 00:1D:BA:2E:BC:36Device 00:1D:BA:2E:BC:36Name: CMT-HX90BTR Alias: CMT-HX90BTRClass: 0x240428 Icon: audio-cardPaired: yes Trusted: yesBlocked: no Connected: noLegacyPairing: yes UUID: Audio Sink …[bluetooth]# connect 00:1D:BA:2E:BC:36Attempting to connect to 00:1D:BA:2E:BC:36[CHG] Device 00:1D:BA:2E:BC:36 Connected: yesConnection successful
Now if you use the PulseAudio sound configuration tool, pacmd, you can see that the Bluetooth device is now available as a sound sink.
debian@ebb:~$ pacmdWelcome to PulseAudio 10.0! Use "help" for usage information.>>> list-sinks3 sink(s) available …index: 2 name: <bluez_sink.00_1D_BA_2E_BC_36> …>>> set-default-sink 2
You can then play audio files to the Bluetooth device by using PulseAudio as the device.
debian@ebb:~/exploringbb/chp14/audio$ aplay -D pulse cheering.wavPlaying WAVE 'cheering.wav' : Unsigned 8 bit, Rate 11025 Hz, Mono
Text-to-Speech
Once you have a working playback adapter connected to your Beagle board, you can then utilize Linux tools and online services to perform some interesting audio applications. One such application is text-to-speech (TTS)—it is possible to generate audio from text using tools such as eSpeak, FestVox Festival, and pico2wave. Currently, pico2wave must be built from source, but eSpeak and Festival are available in binary form in the Debian distribution.
You can install and get eSpeak to output audio to the aplay application as follows:
debian@ebb:~$ sudo apt install espeakdebian@ebb:~$ espeak "Hello Pocket Beagle" --stdout | aplay -D plughw:2,0Playing WAVE 'stdin' : Signed 16 bit Little Endian, Rate 22050 Hz, Mono
You can install Festival and use it to output a text file to a WAV format file as follows:
debian@ebb:~$ sudo apt install festival festival-freebsoft-utilsdebian@ebb:~$ nano hello.txtdebian@ebb:~$ more hello.txtHello Pocket Beagledebian@ebb:~$ text2wave hello.txt -o hello.wavdebian@ebb:~$ ls -l *.wav-rw-r--r-- 1 debian debian 52528 Sep 5 02:05 hello.wavdebian@ebb:~$ aplay -D plughw:2,0 hello.wavPlaying WAVE 'hello.wav' : Signed 16 bit Little Endian, Rate 16000 Hz, Mono
Text can be piped to the text2wave application as follows:
debian@ebb:~$ echo 'Hello Beagle' | text2wave -o test.wavdebian@ebb:~$ aplay -D plughw:2,0 test.wavPlaying WAVE 'test.wav' : Signed 16 bit Little Endian, Rate 16000 Hz, Mono
TTS engines can be integrated into your own applications. For example, you can use the output from a binary application as follows for the date application to provide dynamic speech output:
debian@ebb:~$ echo $(date +"It is %M minutes past %l %p") | →text2wave -o test.wavdebian@ebb:~$ aplay -D plughw:2,0 test.wavPlaying WAVE 'test.wav' : Signed 16 bit Little Endian, Rate 16000 Hz, Monodebian@ebb:~$ lame test.wav test.mp3debian@ebb:~$ mplayer -ao alsa:device=hw=2 test.mp3debian@ebb:~$ ls -l test*-rw-r--r-- 1 debian debian 7992 Sep 5 02:09 test.mp3-rw-r--r-- 1 debian debian 0 Apr 5 01:46 test.txt-rw-r--r-- 1 debian debian 81966 Sep 5 02:08 test.wav
Finally, it is also possible to install the CMU Sphinx Speech Recognition Toolkit on the Beagle board. Open-source speech recognition tools are notoriously difficult to train when compared to commercial offerings such as Nuance's Dragon NaturallySpeaking. However, with some time investment, PocketSphinx can be trained to provide good results.
Summary
After completing this chapter, you should be able to do the following:
- Capture image and video data on the Beagle board using USB webcams combined with Linux Video4Linux2 drivers and APIs.
- Use Video4Linux2 utilities to get information from and adjust the properties of video capture devices.
- Stream video data to the internet using Linux applications and UDP, multicast, and RTP streams.
- Use OpenCV to perform basic image processing on an embedded Linux device.
- Use OpenCV to perform a computer vision face-detection task.
- Utilize the Boost C++ libraries on the Beagle board.
- Play audio data using HDMI audio and USB audio adapters. The audio data can be raw waveform data or compressed MP3 data from the board file system or from internet radio streams.
- Record audio data using USB audio adapters or webcams.
- Stream audio data to the internet using UDP.
- Play audio to Bluetooth A2DP audio devices, such as Hi-Fi systems.
- Use text-to-speech (TTS) approaches to verbalize the text output of commands that are executed on the Beagle board.
Further Reading
There are many links to websites and documents provided throughout this chapter. Additional links and further information on the topics are provided at www.exploringbeaglebone.com/chapter14/ and the following:
- Video4Linux2 core documentation:
tiny.cc/beagle1402 - V4L2 API Specification:
tiny.cc/beagle1403 - The Boost C++ Libraries, Boris Schäling:
theboostcpplibraries.com - Computer Vision Cascaded Classification:
tiny.cc/beagle1409 - CVonline: The Evolving, Distributed, Non-Proprietary, On-Line Compendium of Computer Vision, at
tiny.cc/beagle1410