
Chapter 11
Filling Facebook with Photos and Videos
IN THIS CHAPTER
![]() Looking at friends’ photos and videos
Looking at friends’ photos and videos
![]() Adding your own photos and videos to Facebook
Adding your own photos and videos to Facebook
![]() Adding photos and videos from your iPhone or other smartphone
Adding photos and videos from your iPhone or other smartphone
![]() Understanding privacy for photos and videos
Understanding privacy for photos and videos
Facebook Photos is the leading photo-sharing application on the web. This may sound surprising because entire sites are dedicated to storing, displaying, and sharing photos, whereas Photos is just one piece of the Facebook puzzle. But the fact that all your friends are likely on Facebook and using Photos makes it a one-stop shop for tracking all the photos of you, all the photos you’ve taken, and all the photos of your friends.
Additionally, Facebook Photos allows you to add and share videos. Though less common, videos are pretty similar to photos. If you let them languish on your hard drive or on your mobile phone, nobody gets to enjoy them. Nobody gets to tell you how cute the photos of your baby are. No one lets you know that she likes your wedding video. When you share photos and videos, they can become even more cherished, even more valuable as keepsakes.
Viewing Photos from Friends
Just by opening up Facebook and looking at News Feed, you’ll find yourself looking at lots of people’s photos. You’ll see photos a few different ways: in your News Feed, in the photo viewer, and in an album format.
Photos in News Feed
Figure 11-1 shows an example of how a single photo appears in News Feed. The photo takes up most of the screen. Running across the top is the name of the person who posted it and any description she wrote about it. There is also info about when the photo was added and possibly where it was added (for example: Indianapolis, Indiana). Underneath the photo are links to Like and Comment on the photo. You may sometimes see a link to Share the photo. Beneath those links is the count of how many likes and reactions the photo has already received, and any comments people have already made. You may even see a blank comment box, waiting for you to add your two cents.

FIGURE 11-1: Looking at a friend’s photo in News Feed.
Clicking the photo expands the photo viewer, which is covered in the following section.
Figure 11-2 shows an example of a photo album preview in News Feed. It’s similar to the single photo, but previews additional photos from the album. The name of the album appears at the top of the post and tells you how many photos are in the album. Clicking any of the photos expands the photo viewer, and clicking the album title brings you to an album view.

FIGURE 11-2: Looking at a friend’s album in News Feed.
Photo viewer
The photo viewer is an overlay on top of Facebook that allows you to quickly browse photos and leave likes and comments. Clicking a small version of a photo almost anywhere on Facebook expands the photo viewer and fades the rest of the screen to black, as shown in Figure 11-3. The left side of the viewer is where the photo appears, and the right side is where comments, likes, and info about the photo appear.

FIGURE 11-3: The Photo Viewer.
 When I mention liking something, I am referring to all of the reaction options Facebook provides. There are times when a like isn’t specific enough – perhaps you prefer to love your friend’s engagement photo or want to express astonishment at a photo of breathtaking views.
When you hover your mouse over the photo, more options show up in white on the photo. On either side is an arrow that allows you to navigate through a photo album. Clicking anywhere on the photo will also advance the album forward. The following information appears at the bottom of the viewer:
- <Album Name>: The album’s name is usually one your friend has created, like “Summer in February!” or a descriptive name generated by Facebook, such as “Mobile Uploads.” You may also see the album name at the top of the photo.
- Photo count: The number of the photo you’re on in the album (for example, 5 of 8) is also displayed.
- Tag Photo: Clicking this allows you to add tags or labels for those in the photo. I cover tags in the upcoming section, “Editing and Tagging Photos.”
- Options: Clicking this reveals a menu of options for things like downloading the photo to your computer, reporting the photo, or entering a full-screen view.
- Share: Clicking this lets you post the photo to your own Timeline. Privacy settings determine whether share is available on a photo.
- Send or Send In Messenger: Clicking this option lets you send a message to a friend with the photo attached. Keep in mind that sometimes you may be able to see photos your friend cannot see. Privacy settings apply to send as well – you may not see this option on every photo.
- Like: Same as with the Like link that appears on the right side of the viewer, selecting this option lets the person who added the photo know that you like the photo.
 You can also use the left and right arrow keys on your keyboard to scroll through an album.
The album view
The album view is the grid of thumbnail photos that you see when you click the name of an album. Most screens can fit about 8 to 12 photos in this view, and as you scroll down the page, more and more photos appear until you reach the end of the album. Sometimes if people add a really large album, you may want to skim the album view to identify the parts of the album that interest you. Clicking on any one photo brings up the photo viewer.
At the top of the album view is the name of the album and any general info your friend has added about the album. Beneath the last row of photos, you can see who has liked the album or commented on it. Figure 11-4 shows an example album view.

FIGURE 11-4: An album view of photos.
Commenting on an album is different than commenting on a single photo. Leave a comment on an album to comment on the collection: “Looks like a great trip!” “Can’t wait till we see the place ourselves.” Comment on a single photo when you have something to say about that photo in particular: “Did you use a fish-eye lens to get this shot?” or “OMG I was at this exact spot a year ago!”
Viewing photos on your mobile device
Chances are that if you have a smartphone or a tablet computer like an iPad, you’ll wind up looking at photos using the Facebook app. Looking at photos on these devices isn’t too different from looking at them on a computer screen. Tapping a photo in News Feed expands the photo and fades the rest of the screen to black. At the top of the screen are icons for closing the photo and returning to News Feed (X), tagging the photo (tag icon), and more options (… icon). At the bottom of the screen are buttons you can tap to like, comment on, or share the photo. Tapping the count of likes or comments expands a screen where you can scroll through the comments people have made on the photo.
When someone has added multiple photos in one post, you see a preview of those photos in your mobile News Feed. When you tap on any of the photos, you are taken to an album view, where you can scroll up and down to browse through all the photos that have been added. Tap on the back arrow in the upper left corner to return to News Feed. Tap on any photo to view it in the photo viewer, and then swipe left and right to navigate through the album. The two-finger method of zooming in and out also works on Facebook Photos.
Viewing tagged photos and videos of yourself
When I say photos and videos of yourself, I’m referring to photos and videos in which you're tagged. Tags are ways of marking who is in a photo — the online equivalent of writing the names of everyone appearing on the back of a photo print. Tags are part of what make Facebook Photos so useful. Even if you don’t add lots of photos, other people can add photos of you. Photos you’ve been tagged in might be scattered across your friends’ Timelines, so Facebook collects all these photos in the Photos section of your Timeline. You can get there by clicking the Photos tab underneath your cover photo.
The Photos section defaults to showing Photos of You. You can also view photos you’ve added (Your Photos) or albums you’ve added (Albums). The Photos of You section shows the most recently tagged photos at the top of the page. As you scroll down, you see older and older photos of yourself. This is a great place to take a trip down memory lane, and also to make sure that you’re aware of all the photos of you that are out there.
If you’ve been tagged in a photo and you don’t like that tag, you can always remove the tag by clicking Options from the photo viewer and choosing Remove Tag. Then that photo will no longer be linked to your Timeline, and it won’t appear in the Photos of You section of your Timeline either.
If there’s a photo or video you don’t want on Facebook at all, even after you’ve removed the tag, get in touch with your friend and ask him to remove it. If you think it’s offensive or abusive in any way, you can also report the photo and ask Facebook to remove it.
Adding Photos to Facebook
Facebook is a great place to keep your photos and videos because it’s the place where most of your friends will be able to see them. Whether that’s a single photo you snapped on your phone or a big album detailing the latest family vacation, photos are most fun when you can share them and talk about them with your friends.
Facebook distinguishes between uploading photos and creating a photo album. Albums are often created to document a particular event or period of time, whereas uploads happen on an ongoing basis. Because photo uploads tend to happen more frequently, I go over all the ways of uploading photos before going into Album creation.
Uploading photos
If you have a few photos you want to quickly share, follow these steps to get them out to your friends:
Click Photo/Video at the bottom of the Publisher on your Home page.
A window appears allowing you to browse your computer’s hard drive and select the photo you want (see Figure 11-5).
- Click the photo(s) you want to share.
Click Open or Choose (the wording may depend on your browser and operating system).
Clicking Open or Choose brings you back to Facebook. A thumbnail of that photo appears inside the Publisher (shown in Figure 11-6).
 Sometimes Facebook may be a little slow to add your photo. A progress bar or circle may appear instead of thumbnails. You won’t be able to post your photo until the photo has been added.
- Click in the Publisher (where you see Say Something About This Photo) and type any explanation you think is necessary.
(Optional) Add tags, location info, and change the privacy of those photos from the options at the bottom of the Publisher.
If you’ve never changed your Privacy settings, by default, everyone on Facebook can see your photos if they navigate to your Timeline. I usually like sharing my photos with Friends. Of course, you can always choose custom groups of people who can and cannot see the photo.
Click Post.
Clicking Post officially shares the photo to Facebook. People will be able to see the photos on your Timeline and in their News Feeds (provided they're allowed by your Privacy settings to see the photo). By default, this photo is added to an album called Timeline Photos, which is basically a collection of all the photos you’ve ever added individually.

FIGURE 11-5: Choose your favorite photos.

FIGURE 11-6: Share your photos with your friends.
Editing photos as you add them
Uploading photos is meant to be pretty easy. In essence you click on the photos you want to share and then you click post. Voilà, shared photos. However, Facebook offers a whole bunch of cool photo-editing options that you can choose to use as you add your photos. To get to these options, hover your mouse over any of the thumbnail previews of the photos you have chosen to add (do this before you click Post). When you hover over the thumbnail, three icons appear. Click the X icon to remove the selected photo from the post. Click the tag icon to tag people in that photo. Click the paintbrush icon to open a photo viewer with editing options (shown in Figure 11-7).

FIGURE 11-7: Photo editing options.
This is one of those places where what you see on-screen might be different than what’s pictured in the figures in this book. Don’t worry, the editing options are the same, just some of the locations (left versus right, top versus bottom) might be different.
FILTERS
Filters allow you to change the color balance of the photo you have chosen. Changing the color balance has a tendency to change the mood of the photo, so a silly photo can become more romantic if it is now black and white, or a photo might appear more retro if it has a vintage filter.
TAG
You can tag people in a photo by clicking on their face and then typing their name into the text box that opens. Facebook auto-completes as you type; hit Enter to select their name when you see it highlighted. Tagging friends will notify them that they have been tagged in a photo and may allow their friends to view that photo as well.
CROP
Cropping the photo involves changing the borders of the photo. After you click Crop, guidelines appear that you can move to crop the photo. Grayed-out areas don’t appear. You can also choose to keep the Original photo size or make it Square. Since many photos appear as thumbnails (such as in album previews), changing to square can make them fit more nicely into those square boxes.
When you crop a photo, you can also choose to rotate it. No need to make people tilt their heads at their computer screens in order to see your photo properly. Click Rotate to rotate the photo 90 degrees. Click it as many times as you need to get it to the proper orientation.
ADD TEXT
Unlike a caption, which tends to describe a photo, text on a photo is a way of editing the photo itself to say something. Text appears overlaid on top of the photo. Click on Add Text to open a text box, and then start typing to add your text.
You can change the color of the text using the color palette on the left side of the screen. Simply drag the circle over the color palette until the text changes to the color you want, then release it. Use the Left and Centered buttons to decide whether your text should be centered in the text box or left-justified. Use the Font drop-down menu to choose a font for your text.
Click and drag the text box to move it to where you want it to appear on the photo. Click on the blue two-way arrow to change the size and orientation of the text. Drag it out to make it bigger and in to make it smaller, and drag it up or down to spin the text on its axis. Click the X at the upper-left corner of the text box to delete the text entirely.
Once you’re happy with what the text says and how it appears on the photo, click on another portion of the photo to remove the text box, leaving just the text behind. Click on the text again to bring back the text box and the relevant editing options. You can add more than one text box to a photo.
ADD STICKER
Stickers are pretty much exactly what they sound like: digital drawings you can stick on top of your photos. Click on Add Sticker to browse through the sticker store for the sticker you want. When you click on the sticker you want, it appears in the center of your photo with a circle around it. Hover your mouse cursor over it until the cursor turns into a four-way arrow, and then click and drag it to your desired location on your photo. Click the blue two-way arrow to rotate the sticker and change its size (drag out to make it bigger, in to make it smaller). Click the X to delete the sticker. When your sticker is the proper size, orientation, and location, simply click another part of the photo to remove the circular frame from the sticker. Click the sticker again if you want to change something about it. You can add as many stickers as you want to a photo.
SHRINK OR ENLARGE
At the bottom of every photo-editing screen is a slider with an image of a small mountain on the left side and a larger version of the same image on the right side. Click and drag the blue circle in the middle of the slider to adjust the size of your photo. Dragging to the left shrinks the photo and dragging to the right enlarges it.
When you finish editing your photo, click the blue Save button. This brings you back to the Publisher, where your edited photo now appears as a thumbnail. You can repeat the editing process for each photo you are adding, but keep in mind that these advanced editing options are entirely optional. Well, if your photo is upside down I strongly recommend rotating it to the proper orientation, but everything else is totally up to you.
Adding photos from your iPhone
Lots of photos you see on Facebook are added when people are nowhere near a computer. Instead, they’re the photos of things that happen while you’re out and about. Things that are beautiful (spring blossoms!), or weird (how did this person lose only one high heel?), or just emblematic of your day (another cute photo of the dog).
If you add the Facebook app to most smartphones, you can send photos from your phone right to Facebook. We go over how to add a photo from the Publisher of the iPhone app in Chapter 7. You can also add a photo from your iPhone’s camera roll.
To add a photo from your iPhone’s camera roll, follow these steps:
From your photo gallery, tap the photo you want to share; then tap the Send icon at the bottom left of the photo.
A menu of options appears, including things like email or text messages. If you previously installed the Facebook app, you should see the Facebook icon among the other options.
Tap the Facebook icon.
A Facebook Publisher appears, as shown in Figure 11-8.
- (Optional) Click Say Something and use the keyboard to type any explanation the photo needs.
(Optional) Tap the Album icon to add the photo to an existing album on Facebook.
By default, Facebook adds your photo to a Mobile Uploads album.
- (Optional) Tap on any of the icons at the bottom of the photo to add tags, activity info, or location info, respectively.
(Optional) Tap the To: field at the top of the Publisher to edit who can see that photo.
Remember, by default, the audience you shared your last post with will be the people who can see this post.
Tap Post in the upper-right corner of the Facebook window.
The photo is added to your Timeline as part of the Mobile Uploads album, and it may appear in your friends’ News Feeds.

FIGURE 11-8: Don’t let your photos go unshared!
The mobile Facebook app allows you to create 360-degree photos. Click inside the Publisher and choose 360 Photo from the list of actions that appear. Follow the prompts to slowly move in a circle while continuously photographing your surroundings from your phone’s camera. When you’ve posted the image, your friends will see that it’s a 360 photo. If they click on it, they’ll be able to drag their mouse cursor left or right to see the static panorama as you captured it.
Creating an album
Whereas a single photo can share a moment, an album can truly tell a story and spark conversations with your friends. To create an album, follow these steps:
From the Publisher, click Photo/Video Album in the top menu.
This opens the same interface for exploring your hard drive that you used to upload a single photo.
Select multiple photos by pressing the Shift or Command button and clicking the files you want.
If you use a program like iPhoto to organize your photos, create an album there first; then navigate to it and select all those photos to add to Facebook. You’ll save yourself some time trying to figure out whether you want to use IMG0234 or IMG0235.When you’re done, click Open.
The Create Album window appears, shown in Figure 11-9. The progress bar fills with blue as your photos are uploaded. You can always add more photos by clicking the Add Photos/Videos button at the top of the Create Album window.
Edit the Album info and options.
The left side of the screen contains all the relevant album info:
- Album Name: Enter your album title here. Usually something descriptive does the trick: “Hawaii” or “Halloween.”
- Description: Click here to add context to your album. You might talk about why you took these photos, or anything else you think people might want to know about your album: “Snaps from Jill’s Birthday Party!”
- Location: Click here to add information about where these photos were taken. Location information may be added automatically, as Facebook pulls location info from your computer and from your photos. Any locations you enter get added as tags the album has.
- Tagged in This Album: As you add tags to your photos (more on that in Step 8), your friends’ names will appear here.
- Let Friends Add Photos: Often photo albums center on an event where many people took photos. You can create a shared album to allow multiple friends to add photos to the album. If you check this box, a text field appears where you can enter the names of people you want to share the album with. The name of anyone you tag will automatically appear here, but you can remove their tag by clicking the X next to their name.
- High Quality: High-resolution photos obviously look a bit better, but they also take longer to upload. Unless you’re a pro photographer or using a truly professional-level camera, standard quality is usually sufficient.
- Change Date: By default, your album will be dated from the date you upload it. If you want, you can use the date the photos were taken as the date of the album, or you can pick a date for the album.
Choose who can see the album by using the Privacy menu.
The Privacy menu reflects the privacy setting from the last time you posted something. If you last posted something publicly, for example, the Privacy menu displays the globe icon and says “Public.” As usual, the basic options are Public, Friends, Only Me, or a Custom set of people. If you are uploading a shared album, the options will be Public or Friends of Contributors.
(Optional) After your photos finish uploading, add descriptions to individual photos.
The thumbnail of each photo has a blank space beneath it. Click in that space to add a caption or description of that individual photo.
Hover the mouse cursor over any preview and click on the rotation icon that appears in the upper left corner to rotate the photo.- (Optional) Click and drag photos to reorder them in your album.
(Optional) Click friends’ faces to tag them. Type the name of the friend in the box that appears.
The tagging box is shown in Figure 11-10. You don’t have to tag friends in your album. However, tagging is highly recommended. It allows your friends to learn about your photos more quickly and share in discussing them with you.
Facebook’s facial recognition may automatically add tags of people it recognizes. This allows you to make sure your friend is tagged in many photos without having to enter his name a zillion times. You can remove any incorrect tags by clicking the X next to the person’s name underneath the photo in question. You can remove all tags for a particular friend by clicking the X next to his name in the Tagged in This Album section on the left side of the Create Album window.
Click Post.
Whew! That was a bit of a marathon. If you need a break or a drink of water, feel free to indulge. Then, when you’re ready, jump to the “Editing and Tagging Photos” section to find out how to edit your album and the photos in it.

FIGURE 11-9: Create your album here.

FIGURE 11-10: Who is it?
Editing and Tagging Photos
After uploading a photo, you can still make changes to the way it appears on Facebook. If you added a whole album, you may want to add more photos or rearrange the order of the pictures. For any photo you added from a phone or just quickly from your computer, you may want to add tags, date, or location information. Doing all of this is relatively easy using the following common editing “tasks.”
Editing albums
Editing an album usually consists of editing the album’s information or settings. You may also want to edit specific photos within an album. For those types of edits, hop on down to the “Editing a photo” section.
Editing album name, location, description, and privacy
First, let’s navigate to the album view by choosing Photos from the Explore section of the left-side menu on your Home page. Click the blue text that says Albums and then choose the album you want to edit. Look above the top row of photos for an Edit button and click it to bring up an Edit Album screen (see Figure 11-11). It should look familiar — it’s pretty much the same screen you saw when you created the album.

FIGURE 11-11: Editing your album’s info.
The fields at the top are the same as when you created the album: album name, description (Say Something), location (Where Were These Taken), contributors, and a Privacy menu. Remember to click Save when you finish editing this information.
Deleting an album
While you’re looking at the Edit Album screen, look for a button in the upper-right that says Delete Album. If you ever decide, in retrospect, that adding a particular album was a poor choice, you can click this button to remove the whole thing.
If you delete your photo album, all the photos in it will be gone forever, so make sure you want to get rid of it completely before you delete it.
Reordering photos in the album
Chances are that if you added your photos in bulk, they don’t appear exactly in the right order. And it’s awkward when the photos of the sunset appear first, and the photos of your awesome day of adventure come afterward. To reorder photos from the album view, follow these steps:
- Hover the mouse pointer over the photo you want to move.
- Click and hold the photo.
While holding the mouse button down, drag the photo thumbnail to its correct place in the album.
The other photos shift positions as you move your chosen photo (as shown in Figure 11-12).
- When the photo is in the spot you want, release the mouse button.
- Repeat with the next photo until your whole album is organized correctly.
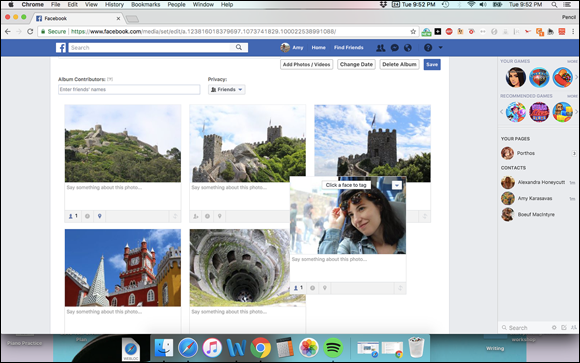
FIGURE 11-12: Making your album tell a story in the right order.
Facebook automatically saves the new order of your album, but it never hurts to click the Save button anyway.
Adding more photos
After you create a photo album, you can add more photos later. Sometimes, depending on how organized the photos on your hard drive are, you may want to add photos in batches anyhow. To add more photos, follow these steps:
From the Edit Album screen, click the Add Photos/Videos button.
This opens the interface for exploring your computer’s hard drive.
- Select the photos you want to add.
Click Open or Choose.
The upload process begins and you go to the Create Album window. You can tag your photos, add captions, and rotate them as needed.
- Click the Post button after the upload is complete.
Editing a photo
In addition to the actions you can take on an entire album, you can also take actions on individual photos within an album.
 For all of these possible photo edits, I assume you’re already looking at the photo you want to edit in the photo viewer.
Adding a tag to an individual photo
If you skipped adding tags earlier, you can always add your tags to individual photos.
Hover your mouse over a friend’s face.
The tagging box appears, as shown in Figure 11-13.
Enter the name of the person you want to tag in the text box.
Facebook tries to auto-complete your friend’s name as you type.
Repeat Steps 1 and 2 until everyone in the photo is tagged.
Or stop after you tag a few people. You can always come back to this later.

FIGURE 11-13: Tagging a friend in a photo.
Rotating a photo
Lots of times, photos wind up being sideways. It’s a result of turning your camera to take a vertical shot as opposed to a horizontal one. You don’t have to settle for this.
- Click Options in the bottom right corner of the photo.
- Choose Rotate Left or Rotate Right from the menu that appears.
- Keep clicking Rotate Left or Rotate Right until your photo is at the correct orientation.
Adding or changing a description or date for an individual photo
Just like you can add a description to the album as a whole, you can add descriptions or captions to individual photos:
- Click the Edit button on the right side of the photo viewer.
- Enter your description in the text box.
- (Optional) Add any tags to indicate who was with you when the photo was taken.
(Optional) Add location information about where this photo was taken.
Facebook tries to autocomplete your location information as you type.
- Use the date selector to change the date when the photo was taken.
- When you’re finished, click Done Editing.
Album covers
From the Edit Album view, Facebook lets you designate a photo to act as your album cover. The cover is the first photo people see when they click on your album. To choose an album cover:
- Hover your mouse over the top right corner of the photo until you see a gray arrow.
Click the arrow.
A menu of options appears.
- Choose Make Album Cover.
Moving photos
Sometimes you realize a photo you added to an album is better suited to a different album. There’s a quick and easy way to transfer that photo, also from the Edit Album view:
- Hover your mouse over the top right corner of the photo until you see a gray arrow.
Click the arrow.
A menu of options appears.
Choose Move to Other Album.
A pop-up window appears with a drop-down menu of all your photo albums.
- Choose the album you want to move the photo to.
- Click Move Photo.
Deleting a photo
Maybe you realized that all 20 group shots from the high school reunion don’t have to go in the album, or that one photo has a whole bunch of crossed eyes. From the Edit Album view, you can remove photos entirely from Facebook:
- Hover your mouse over the top right corner of the photo until you see a gray arrow.
Click the arrow.
A menu of options appears.
Choose Delete This Photo.
A pop-up window appears asking if you are sure.
Click OK.
You’re taken back to the album view, now with one less photo.
Automatic albums
Most of the time when you’re creating a photo album, you decide what to title it and which photos go into it. There are a few exceptions to this rule. Facebook assembles certain types of photos into albums on your behalf. Most importantly, every time you change your profile picture or cover photo, Facebook adds it to the Profile Pictures or Cover Photos albums, respectively. Facebook creates albums of all your profile pictures and cover photos automatically.
You can access this album by clicking your current profile picture or cover photo from your Timeline. This takes you to the photo viewer, where you can click through your historical record of profile pictures. Even though your current Profile and Cover photos are always Public, you can edit past photos to change the audience, add tags, location, a description, or delete a photo simply by clicking the Edit button to the right of the photo. Make sure to click Done Editing to save your changes.
You can turn any photo from this album back into your profile picture by navigating to the Options menu at the bottom of the photo and selecting Make Profile Picture.
Similarly, single photos that you add to your Timeline are collected into the Timeline Photos album. Photos that you add from your phone are added to a Mobile Uploads album. Videos are collected into a Videos album.
Working with Video
Too often, videos wither away on hard drives or cameras or on mobile phones. The files are big, and they can be difficult to share or email. Facebook seeks to make sharing videos easier. So film away and let everyone see what you’ve been up to.
Viewing videos
You’ll mostly encounter videos in your News Feed with a big fat Play button in the center (see Figure 11-14). If you pause in your scrolling to look at the video, it will begin playing, but without sound. If you aren’t interested in the video, keep scrolling. If you are, hover your mouse over the bottom of the video and click on the muted sound icon (it’s a megaphone with a white X next to it). This will turn the sound on for the video.

FIGURE 11-14: A video on Facebook.
Videos play inline in your News Feed. While the video is playing, you can hover your mouse over it to see the progress bar, change the volume, switch the video to HD, or expand it to full screen.
If you want to keep scrolling and watch a video at the same time — you can! Just click the Continue watching while you use Facebook button (looks like a square with the top left corner filled in) to move the video to the top left of your Home page and out of the News Feed. The video automatically follows as you scroll down.
If you like a lot of Pages, you may see more videos in your News Feed. For example, I follow a Page that posts nothing but videos of unlikely animal friends all day long. Some of these videos play for 15 or 30 seconds before being interrupted by a video advertisement. Just kick back and enjoy the brief ad. The video you’re watching will return right after the ad finishes.
Adding a video from your computer
Uploading a video to Facebook includes going out into the world, recording something, and then moving it from your camera onto your computer. I’m going to assume you’ve already done that part and are now back in front of your computer. Now, to upload a video to Facebook, follow these steps:
Choose Photo/Video in the Publisher at the top of your Home page or Timeline.
This expands a window that allows you to navigate your computer’s hard drive.
Select a video file from your computer.
This brings you back to Facebook, where your video is appended to your post.
- (Optional) Type any explanation or comment into the Say Something About This Video box.
(Optional) Select who can see this video using the Privacy menu.
As usual, your basic options are Public, Friends, Only Me, and Custom.
- (Optional) Use the icons at the bottom of the Publisher to add tags, activity or location information.
Click Post.
A blue progress bar appears at the bottom of the post. Uploading a video can sometimes take a while, so be patient. If you click to Post and are notified that your video is processing, it means you need to wait a little while until your video is ready. You can use Facebook in the meantime and wait for a notification that your video is uploaded.
Adding a video from the Facebook app
Much like photos, many of the videos you want to share most are ones you take when you’re out and about: someone attempting to park a car in a spot that’s too small, your dog chasing a tennis ball, the bride and groom cutting the cake. More and more often, you may find yourself using your phone to record these videos.
You could move the video from your phone to your computer and then add it to Facebook, or you could skip the middleman and share it directly from your phone using the Facebook app:
Tap the Photo option at the top of your mobile News Feed.
Your Photo and Video roll from your phone appears.
- Tap the video you want to add.
Tap Done in the upper-right corner.
A preview of your video appears in the mobile Publisher. You can play it here to make sure you want to share it.
- (Optional) Tap the Say Something space above the video to add a caption or description of the video.
- (Optional) Use the icons on the bottom of the Publisher to add tags, activity, or location info to your post.
Double-check your privacy by seeing who can see the video in the To: field at the top of the Publisher.
Remember, by default the video will be shared with the same group of people you last shared a post with.
Tap Post in the upper-right corner of the screen.
The video is then added to Facebook. Your friends will be able to see it on your Timeline and in their News Feeds (depending on your privacy settings, of course).
Live Video
There may be instances when something you’re witnessing should be shared with your friends in real-time. Maybe there’s a deer on your lawn or a particularly nasty storm you’re caught in. This is where Live Video comes into play. To create a live video, click the Live Video button at the top of your Publisher and follow the prompts to give Facebook access to the camera on your computer or mobile phone. Adjust privacy settings as necessary then start shooting by clicking the blue Go Live button. You know a video is live because of the red button and word Live in the upper-left corner of the video. If your friends miss the live version, they’ll be able to catch the video on your Timeline or in their News Feeds at a later point.
Discovering Privacy
While privacy is covered in detail in Chapter 6, it's worth going over a few settings again now that you understand what it is you're choosing to show or not show to people.
Photo and video privacy
Each time you create an album, post a photo, or add a video to Facebook, you can use the Privacy menu to select who can see it. These options are as follows:
- Public: This setting means that anyone can see the album. It doesn’t necessarily mean that everyone will see the album, though. Facebook doesn’t generally display your content to people who aren't your friends. But if, for example, someone you didn’t know searched for you and went to your Timeline, she would be able to see that album.
- Friends: Only confirmed friends can see the photos or videos when you have this setting.
- Only Me: Only you will be able to see that photo or video.
- Custom: Custom privacy settings can be as closed or as open as you want. You may decide that you want to share an album only with the people who were at a particular event, which you can do with a custom setting.
Another way to control who sees an album or video is to share it using Facebook Groups. So, for example, a video of your kids playing might be of interest only to people in your family. If you have a group for your family, you can share it from the Publisher within the group, and then only people in the group will be able to see it.
If you're brand new to Facebook and have never changed a single privacy setting, by default, all posts you add — including photos and videos — are visible publicly. If you aren't comfortable with this, remember to adjust your Privacy settings accordingly when you add new photos and video.
Privacy settings for photos and videos of yourself
The beauty of creating albums on Facebook is that it builds a giant cross-listed spreadsheet of information about your photos — who is in which photos, where those photos were taken, and so on. You’re cross-listed in photos that you own and in photos that you don’t own. However, you may want more control over these tags and who can see them. To control this, click Settings from the Account menu (down arrow) in the big blue bar. Click the Timeline and Tagging section on the left side of the page.
The following settings can help you further control who can see photos and videos of you:
Review posts friends tag you in before they appear on your Timeline? Turning this option from Off to On means you get to make sure you want to be tagged in photos (and other posts) before anyone can see that you’ve been tagged.
In other words, say that I tag my friend Carolyn in a photo.
- If this option is Off, as soon as I tag her, the photo is added to her Timeline and (usually) her friends will be able to see that she’s been tagged in their News Feeds.
- If this setting is On, she has to approve the tag before it appears on her Timeline and in her friends’ News Feeds. The photo itself still gets shared and is visible on my Timeline and in my friends’ News Feeds.
- Who can see posts you’ve been tagged in on your Timeline? Regardless of whether or not you choose to review tags before they appear on your Timeline, you can control who can see posts where you’ve been tagged. So, for example, if you set this to “Friends” and you get tagged in a photo, even though it has been added to your Timeline, a non-friend visiting your Timeline would not see it displayed there.
When you’re tagged in a post, whom do you want to add to the audience if they aren’t already in it? Another way to limit who can see that you’ve been tagged in a post is to change this setting from Friends to Only Me or Custom.
By default, if I tag Carolyn in a photo, her friend Stephanie, whom I'm not friends with, will be able to see the photo. If Carolyn changes this setting to Only Me, then when I tag Carolyn, Stephanie will not be able to see that photo.