
Chapter 14
Creating a Page for Promotion
IN THIS CHAPTER
![]() Understanding Community Pages and Official Pages
Understanding Community Pages and Official Pages
![]() Determining whether a Facebook Page is right for you
Determining whether a Facebook Page is right for you
![]() Creating and maintaining a Facebook Page
Creating and maintaining a Facebook Page
![]() Tracking how fans interact with your Page in real time
Tracking how fans interact with your Page in real time
Picture your town or city. There’s the park or school, the houses where people live, the offices where they go to work, and the stores they shop in. When you drive around town, you see all sorts of activities happening — whether people are walking their dogs, grabbing a cup of coffee, or working out. The world we live in is composed of people, the stuff they do, and the stuff that they need or want. People have real connections to all this stuff: the shops, the brands, the bands, the stars, the activities, the passions, and the restaurants and bars — things that are important. Facebook is about people and their real-world connections, including the connections that aren’t just friends. On Facebook, all of these non-friend entities are represented as Pages.
 “Page” is a pretty common word on the Internet, so I always capitalize the P in Pages when talking about Facebook Pages.
There are two main types of Pages: Community Pages, which are collectively updated and managed by its fans, and Official Pages, which are updated and managed by authorized representatives of any business entity. People who manage a Page are known as administrators, or admins.
This chapter is all about understanding the world of Facebook Pages. If you just want to know what these things are that you’ve been liking and that have been showing up in your News Feed, check out the next section, “Getting to Know Pages.” If you’re looking to represent your business, brand, band, or anything else on Facebook, continue to the “Creating a Facebook Page” section.
Getting to Know Pages
You can do many of the same things with Pages that you can do with friends — write on their Timelines, tag them in status updates, and so on. The main difference is that instead of friending Pages, you like them.
When you like a Page, your information and access to your Timeline isn’t shared with the Page and its admins, although any posts you make to a Page are public.
Anatomy of an Official Page
Official Pages are meant to be like Timelines, but they’re intended for organizations. So if you’ve already read Chapter 4, most of the following will sound familiar. Figure 14-1 shows a sample Facebook Page from For Dummies.

FIGURE 14-1: The For Dummies Facebook Page.
Here's the anatomy of an Official Page, across the top from left to right:
- Profile picture and cover photo: Just like you and your friends, Pages use one photo to represent them across the site. Usually, it's a logo or an official press photo. Pages also have a cover photo, often an image that more broadly represents the organization's brand. A blue check mark to the right of a Page name indicates that it is a verified Page, meaning that Facebook has confirmed this Page is indeed managed by the company it represents.
- Like button: The Like button is located under the Page's cover photo. To become a fan, click this button. (See the “Connecting and interacting with Pages” section for more on this topic). If you’ve already liked a Page, hover your mouse cursor over this button to open a menu where you can unlike the Page.
- Follow button: When you like a Page, you automatically follow it and receive its posts in your News Feed. Hover your mouse over this button and click Unfollow if you want to like the Page but skip seeing its posts in your News Feed. However, you may want to follow a Page without liking it when you’re interested in the content the Page produces, but don’t want to be associated with “liking” that content. Like implies approval and not everyone is comfortable giving that approval to every entity they interact with.
- Share button: Click this button to share the Page on your Timeline, in a group or event, or in a private message.
- Options (…): Clicking the … icon opens a drop-down menu from which you can save, report, invite friends to like the Page, or block the Page. You can also use this menu to suggest edits to the Page admins or like the Page as one of your Pages (more on that in the “Using Facebook as Your Page” section).
- About, Photos, Posts, More: On the left side of the Page, below the profile photo are tabs you can click to see specific content a Page has added, such as photos or events.
- Community: On the right side of the Page is information about how many people have liked the Page, as well as a link to Invite your friends to like this Page. There may also be additional information here about which of your friends already like the Page.
- About: Under the Community section is information about how long it usually takes the Page Admin to reply to messages, links to any external websites, and the type of Page it is (ex: Public Figure).
- Timeline (and Publisher): The Timeline is the heart of a Page — it's where the admins post updates and where fans can leave posts and comments. Pages may or may not have a Publisher here, although most choose to let their fans interact as though they were friends (the Publisher on Pages has fewer options than on your Timeline — usually just Status and Photo/Video). Scroll down to see posts the Page has added.
- Message button: Click the gray Message button to say something directly (and more privately) to the admins of the Page you’re looking at. Not all Pages have enabled the ability to get messages, so this button may be absent from some Pages.
Community Pages
Community Pages, or Pages that don’t officially represent something or someone, tend to cover a wider range of things, from basic activities to political statements. Often, the object represented by these pages is something that simply can't be owned by a corporation or individual — things like “Cheese” or “I Love Dogs.” Community Pages exist so that pretty much everything in the world has a way to be represented on Facebook. You can see the I Love Dogs Community Page in Figure 14-2.

FIGURE 14-2: Ode to man’s best friend.
Community Pages look exactly like Official Pages. The Like, Follow, Share, and Options buttons are all in the same place. The main difference is that you’ll see the word “Community” in a box on the right side, which helps you identify what type of Page it is.
Connecting and interacting with Pages
Wherever you go on Facebook, and in many places across the entire Internet, you’ll see links and buttons prompting you to like something. You can like photos, statuses, comments, articles, websites, videos … if it’s online, you can probably like it.
You can also like Pages. When you like a Page, it accomplishes a few things:
- Gives you a News Feed subscription. After you like a Page, you may start seeing its posts in your News Feed. If you don't like what you see, you can remove that Page from your News Feed. To do so, go to the Page and hover over the Following button. From the drop-down menu, click Unfollow the Page. You will no longer see stories from this Page in your News Feed, but you will continue to like the Page.
- Find other Pages you like. When you like a Page, Facebook may begin suggesting other Pages for you to like in a Pages You May Like box under a Page’s cover photo. This is a great way to find Pages with useful and interesting content. For example, after I liked the Page for a local coffee shop, I saw the Page for a local hairdresser and liked that Page as well.
- Displays the Page you liked on your own Timeline. Keep in mind that when you like a Page, it appears in the Likes section of your Timeline, and may appear as a News Feed story to your friends.
So what does this all mean for you? Basically, when you like something, you start a relationship with it that can be as interactive or as hands-off as you want. Frequently, people like a lot of Pages simply as a signifier or badge on their Timelines. However, just because you like This is Us doesn’t mean you want to read episode recaps or watch interviews with the cast. And that's fine. On the other hand, if you like seeing those sorts of things, or interacting with other fans on the show’s Page, you can do that as well. It’s a pretty flexible system.
Creating a Facebook Page
A Facebook Page isn’t equivalent to an account. Rather, it’s an entity on Facebook that can be managed by many people with their own distinct accounts. The rest of this chapter takes you through all the steps of Page creation, administration, and maintenance.
Do I need a Page?
So, you want to represent something on Facebook, but you aren’t sure of the best way to do so. The answer depends on what it is you want to represent and what you’re trying to accomplish on Facebook. Facebook Pages, at their most basic level, are for anything that’s not an individual person and can even be useful for individuals who are celebrities or who have a public presence beyond their friends and family. That includes small businesses, big businesses, bands, pets, charities, products, and much more.
Pages are best at promotion and distribution. If what you want is discussion and collaboration, groups might be a better fit for you. For example, if you are organizing a neighborhood fun run, you might create a Page to represent the event itself, post training schedules and weather updates there, and generally let people know what’s going on. At the same time, you and other organizers might choose to create a group where you can discuss logistics. The Page is a public presence for everyone and the group is for the people running the show.
So whether you have a small consulting business, are fundraising for a local organization, or are a member of a performance troupe, creating a Facebook Page can work for you. You do need to be an authorized representative of any larger entity (for example, you shouldn’t create a Page for a local congressperson unless you're working for her). But assuming that part is all squared away, you’re ready to find out how to create and manage a Page.
Creating your Page
Before you get started, I recommend you read the Facebook Pages Terms at www.facebook.com/terms_pages.php. The terms clarify some of the expectations for owning a Page and who can create a Page for a business. One thing to note: you must have a personal Facebook account to create a Page and act as its admin. Your personal account will not be public information, so unless you broadcast the fact, your fans won’t know which Facebook account is managing the Page.
There are also a few notes about who can see your content when you create a Page and age restrictions on your Page. I cover these topics throughout this chapter, but the terms provide a nice summary. If you violate these terms, your Page may be disabled, which could negatively impact your business. On the same note, if you use a personal Timeline to do the work of a Page (as I describe here), your Facebook account will almost certainly be disabled for violating the Statement of Rights and Responsibilities (which you can read at www.facebook.com/terms.php).
Pages can have multiple admins. If you plan to have other people managing the Page you’re creating, they can do so from their own accounts. There’s no reason to share the email address or password with anyone. So use your real email address and birth date; don’t create a fake persona just for the Page. Your information won’t be revealed to anyone else, and it makes your future interactions on Facebook much easier. To create your own Page, follow these steps:
- Log in to Facebook with your username and password.
Navigate to the Account menu (down arrow), located at the right corner of the blue bar, and choose Create Page from the drop-down menu.
The Create a Page page appears, as shown in Figure 14-3.
Click the category your Page falls under.
You can choose from the following:
- Local Business or Place
- Company, Organization, or Institution
- Brand or Product
- Artist, Band, or Public Figure
- Entertainment
- Cause or Community
When you choose your category, a registry field appears.
Choose your subcategory from the Choose a category menu.
Depending on the category you choose, there may not be sub-categories. For the purposes of these steps, I chose Artist, Band, or Public Figure.
Enter the name of your Page into the Name text box.
Use the exact name of your business, just as you need to use your real name on your Facebook account. For example, if you are creating a Page to represent Anthony’s Pizza, that should be the name of your Page, not Anthony’s Pizza Official Facebook Page.
Click Get Started.
Remember, when you click Get Started you are agreeing to the Facebook Page Terms.

FIGURE 14-3: What kind of Page do you need?
Getting started
In this section, I go over some of the things Facebook prompts you to do in order to set up your Page, as shown in Figure 14-4. Remember, this example is categorized as an Artist, Band, or Public Figure, so your own Page may look slightly different.

FIGURE 14-4: Begin setting up your Page.
Step 1: Add a cover photo
You want to make a good first impression with your Page, and one of the easiest ways to do that is to choose a striking cover photo. To add it, click the Add a Cover button (to the right of the profile picture on your Page). You can select to Choose from Photos/Videos or Upload Photo/Video. Keep in mind that “Choose from Photos/Videos” means choose from the Page’s photos or videos, so if you haven’t added this kind of content yet, you’ll want to upload something. When you’re sure the image is positioned properly, click the blue Save Changes button.
 A video may help you say more about your business than a photo. Cover photo videos are short videos meant to catch the eye of anyone looking at your Page. Videos must be 20-90 seconds long and a minimum of 820 x 312 pixels.
Step 2: Add a profile picture
The second step is to get your Page’s profile picture in place. You have two options for selecting an image:
- Click Take Photo to open your webcam and take a photo. When the webcam interface appears, get ready to pose and click the blue Take Photo button.
- Click Upload Photo to select an image from your computer’s hard drive. Click Open or Choose to select the photo and upload it.
When the photo is successfully uploaded, it replaces the default profile picture on the left side of the Page.
Profile pictures are 170 x 170 pixels, and anything larger will be cropped to fit in a square. You want your picture to be as close to square as possible to prevent it getting cropped oddly. Also keep in mind that your profile picture is cropped as a circle when displayed in ads or News Feed posts.
You can edit your profile picture with filters, stickers, and text the same way you do for the profile photo on your personal Timeline. See Chapter 11 for details.
Step 3: Tell everyone about yourself
Add a short description of yourself or your business, organization, band, or whatever your Page is about, and a link to any other websites that represent you. This can be anything from a Twitter feed to your personal website.
Step 4: Create a unique address
Click Create Page @Username under the profile picture to choose a unique moniker for your Page. This also gives your Page a vanity URL that’s easy to direct people to. If a local coffee shop decides to pick @seattlecoffeeshop as their username, their URL will be http://facebook.com/seattlecoffeeshop. See Figure 14-5 for the username interface.

FIGURE 14-5: Choose wisely.
 Your personal account must be verified before you can choose a username for your Page. If you aren’t yet verified, head to
 http://www.facebook.com/username. You will be prompted to verify your account by having Facebook send a text to your mobile phone. Enter the code you receive in the text and you’re good to go.
Step 5: Like yourself
Now that your Page is up and running, you can be the first person to like it! Just click the Like button to become your first fan.
Step 6: Invite your friends
One of the first steps in starting your Facebook account was to get some friends. This is even more important for Pages: Without likes, your updates and information won’t reach anyone. A good way to start getting likes is to suggest your Page to your own friends. Look for the Know Friends Who Might Like Your Page box on the right side of your Page. Enter the names of your friends in the text box and click the Invite button next to their name when it appears. Your friends receive a notification that you invited them to like this Page.
Step 7: Add a button
There are plenty of things you can still do to customize your Page at this point, but one I highly recommend is adding a large button under your cover photo with a call to action. The default button is Send Message and for many Pages this is the action you want visitors to take. However, for service-based or retail businesses, a Book Services or Make a Purchase button can really come in handy. Hover over the Send Messages button and choose Edit Button from the drop-down menu. Click the Other Options button and browse the available button choices. Remember to click Save Changes when you’ve finished.
Step 8: Pin to shortcuts
My final piece of advice is to make your life easier and place your Page in a prominent position on your Home page’s left-side menu where you can access it with one click. Go to the ellipsis […] icon under the cover photo and choose Pin to Shortcuts from the drop-down menu.
Sharing as a Page
After completing the previous steps, you’ll be looking at a fairly empty Page Timeline. You can add a bunch of content immediately, or, like your personal Timeline, choose to fill it up over time. Your Page will be visible on Facebook right away, so if you are going to create it, be ready to start using it on a regular basis so that it remains active and interesting to people.
The Publisher
If you have a personal Timeline, your Page’s Timeline will feel very familiar; it’s the virtual scrapbook of posts you’ve added to Facebook. Your Page also needs a virtual scrapbook.
If you’re a Page, the same things are true: People are going to want to hear from you and learn about you, and the place they go to do so is your Timeline. Any content you post to your Timeline also shows up in your fans’ News Feeds. In other words, it’s a very important place to represent yourself honestly and engagingly through continual updates.
When I talk about “you” in this context, I mean your Page. So if you’re a coffee shop, people want to know about your seasonal drinks. If you’re a band, people want to know about your shows. If you’re a dog, people want to know what sort of trouble you’ve gotten into recently.
As a Page admin, the most important part of the Timeline for you to understand is the Publisher. The Publisher, as shown in Figure 14-6, is where you and your fans create the posts that populate your Page.
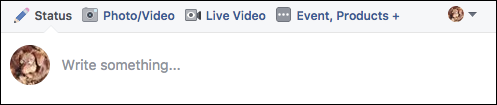
FIGURE 14-6: Use the Publisher to send posts out to fans.
The most basic post you can make is a status update, a short message letting people know what’s going on, what you're up to, thinking about, and so on. Just like status updates from your personal Timeline, updates from your Page can be done quickly and easily, or with more options.
The basic steps:
- Click in the Publisher (where it reads Write Something at the top of the Timeline).
- Type your update.
Click the blue Publish button.
The post now appears in your Timeline and will potentially appear in the News Feeds of people who have liked your Page.
ADD PHOTOS TO YOUR POST
Facebook offers some cool options to add albums or scrolling photo displays to your Page (covered in the later “Photos and videos” section). However, if you simply want to post a quick photo — for example, a company posting a photo from its holiday party, you can do so in Step 2 by clicking the camera icon at the bottom of the Publisher.
This opens an interface for exploring your computer’s hard drive. Click on the photo (or photos) you want to add and click Choose or Open. Once you do so, you return to the Publisher, and the photo you selected appears as a thumbnail at the bottom of the post.
The Publisher on a Page, though very similar to the Publisher on your Timeline, doesn’t have all the same photo-editing options that your personal Timeline does. Make any edits such as rotation or adding filters before you add the photo here.
Click the X in the upper right corner of the thumbnail to remove a photo from a post, or click Publish when you’re ready to share.
ADD FEELING OR ACTIVITY INFO TO YOUR POST
You can add information about what you (not you personally, but you the Page) are doing by clicking the smiley face icon at the bottom of the Publisher. Doing so opens a menu of various activities, and you can choose from any number of emotions your Page might be feeling or activities your Page might be doing. When you choose to add activity info, that info gets appended to the beginning of your post along with an emoji (or icon) representing that activity or feeling. You can see what this looks like in Figure 14-7.

FIGURE 14-7: A day in a dog’s life.
ADD LOCATION INFO TO YOUR POST
You can add information about where you are when you post something by clicking the location pin icon at the bottom of the Publisher. This opens a text box where you can type in where you are (or where you were). Facebook attempts to auto-complete as you type; when you see the place you’re looking for, click on it.
Location info gets appended to the beginning of your post. You can see an example of this in Figure 14-7.
The icons at the bottom of the Publisher change depending on what type of Page you have. For example, the Page of a public figure might include an option to encourage people to contact their government representatives.
SCHEDULE OR BACKDATE YOUR POST
Many Pages find it useful to coordinate their posts with events or real-world happenings. You might not want to promote your holiday sale until a certain time or date, or you might want a specific post to appear on Thanksgiving, but not want to be sitting at your computer at either of these times. You can schedule posts to appear in the future by clicking the tiny down arrow to the right of the Publish button in the Publisher. Doing so opens a drop-down menu with three options: Schedule, Backdate, and Save Draft.
When you select Schedule, a window opens that allows you to choose when your post will appear. You can also choose to Stop News Feed Distribution for your post by choosing a date for the post to end. An end date doesn’t mean your post will be deleted, but it does mean it will stop appearing in people’s News Feeds. This can be really useful if you are promoting a limited-time offer or if you just want to make sure that your Page doesn’t ever seem “stale” in News Feed.
When you select Backdate, a window opens that allows you to choose a date for your post. Posts that you backdate will appear further back on your Timeline, but could still appear in News Feed as a new post unless you check the Hide from News Feed box.
SAVE YOUR POST AS A DRAFT
You can save a post you are working on as a draft and return to it later. At any point while you are working on a post, click the down arrow next to the Publish button to open an options menu. Select Save Draft.
Drafts appear in a small box below the Publisher (only you and other admins can see this box). Click on the link to See Draft. This brings you to the Publishing Tools tab of your Page (more on that in the “Managing a Page” section). From there, you can click on the draft you want to work on, which opens the post in a new window. You can click on the Edit button to change the content of the post and save the new draft. When you decide it’s ready for publication, click the down arrow on the right side of the Edit button and choose Publish. You will be asked to confirm that you want to publish the post.
BOOST YOUR POST
Boosting your post is a form of paid promotion. In other words, it’s a Facebook specific form of advertising. Clicking on Boost Post opens an interface for selecting a target audience and setting an ad budget.
Photos and videos
In addition to adding photos or videos to your posts by clicking the camera icon in the Publisher, Facebook offers a few options for displaying photos. You can see these options by clicking Photo/Video at the top of the Publisher.
UPLOAD PHOTOS/VIDEO
Choosing to Upload Photos or Video basically functions the same as clicking the camera icon in the Publisher. This opens an interface for navigating your computer’s hard drive. Select the photos or video you want to post and click Choose or Open. That brings you back to the Publisher where you can preview your photos or videos and write a little something to go with the post.
CREATE PHOTO ALBUM
Creating a photo album is a way to organize lots of photos. So a band might create an album of photos from shows, or an album of photos of merchandise, or an album of photos of the band on the road. Or all three. Selecting Create Photo Album opens an interface for choosing photos from your computer. Choose as many photos as you want and then click Choose or Open. This brings you to the Create Album window, shown in Figure 14-8.

FIGURE 14-8: Create a photo album for your Page.
Creating photo albums is covered in detail in Chapter 11. So if this looks overwhelming to you, hop over there for a tutorial. As a brief refresher, from here you can:
- Create an Album Title and Description
- Add location info about where the photos were taken
- Decide whether the photos should appear in High Quality
- Decide if the Album should appear in News Feed or not
- Pick a date for the album (or use the date information from the photos)
- Tag people in the photos
- Add captions to photos
- Rotate individual photos
- Add more photos
After you edit your album to your heart’s content, click the blue Post button to post it to your Page.
CREATE A PHOTO CAROUSEL
Photo carousels are built using photos from an external website. So if you already have a band web page, you can reuse the photos that live there by simply entering your web address into the Destination URL box that appears when you click to Create a Photo Carousel. Doing so imports a selection of photos from your site. When you click Publish, the post appears as photos people can rotate through. Clicking on any photo takes them to your website.
CREATE SLIDESHOW
Slideshows allow you to choose 3–10 photos from your computer’s hard drive. After you select these photos (the same way you would choose photos for a post or an album), Facebook automatically generates a slide show that plays as a video from your Page’s Timeline. Add style to your slideshow by choosing a fade transition between each photo.
CREATE A CANVAS
Canvas is a special tool that allows you to combine photos and videos that load automatically in a full screen view from a post or mobile ad for your Page. The goal of a canvas post is to tell a complete story. A coffee shop might post a canvas following Arabica beans from harvest to cup.
Events
If you ever host an event for your business, you’ll get a ton of value from using Facebook Events. Stores create events for their big sales, comedians create events for their shows, and clubs create events for their theme nights. To create an event, click Event, Products + in the Publisher, then click Create an Event. The Create New Event window appears. Fill in the Event info and click Publish. Head over to the event’s page to invite your friends. Events you create for your Page are Public by default, meaning anyone can see and join the event.
If you haven’t used Facebook Events before, see Chapter 13 to learn about creating and managing your own events.
Milestones
Much like on your personal Timeline, adding milestones is something you can do for your Page to acknowledge big moments in your history. If you’re a charity you might want to create milestones for the date you were founded, or the day you reached a certain fundraising goal. You can add milestones on an ongoing basis as well as create as many past milestones as you want. Clicking on Event, Products + in the Publisher and then Add a milestone to your Page opens the Create Milestone window, shown in Figure 14-9.

FIGURE 14-9: Add an important event to your Page’s Timeline.
When you add milestones to your personal Timeline, Facebook asks you to choose the type of milestone so it can assign a particular icon to it and provide specific fields (for example, birth dates for the milestone of having a baby). On Pages, Facebook simply shows a generic milestone template and lets you edit it at will. You can create a title (for example: opened new offices downtown), then add photos, information about locations and dates, and provide an additional “story.” When you’re done, click the blue Save button and the milestone will be added to the proper place on your Page’s Timeline.
If you are creating a lot of milestones as you set up a Page, make sure to check the Hide from News Feed button, which prevents those items from appearing as News Feed stories for people who have liked your Page.
Notes
Notes is Facebook’s blogging feature. Notes look similar to the posts you might see on the blogging platform Medium.com — in other words, a big pretty photo on top and big centered text beneath. Previews of your notes appear as posts on your Page’s Timeline. To create a note, click the Event, Products + tab in the Publisher, and then Write a Note. This opens the Create Note window. Click on the top gray section to add a photo to the top of the Note. Click on the Title to add a title to the note, and click where it says Write Something… to author your note or blog post.
While you are writing, you can click on the gray plus sign icon on the left side of your writing to add a photo to the text. You can also choose to embed photos and videos from popular sites such as YouTube, Instagram, and Soundcloud. You can click on the formatting icon (a series of parallel lines) to add formatting such as headers or bullet points to your text. When you’re done, click the blue Publish button to publish your note. If you want to save and come back later to keep working on your note, click the gray Save button. You can access your draft from the Publishing Tools tab.
Using Facebook as Your Page
Part of using Facebook as a Page is being interactive. Pages aren’t just ways for you to distribute information to people who like your business or band or book. Pages are a way for you to engage in conversation and be human (or as human as a Page can be) with people. Part of that is liking and commenting on behalf of your Page.
Liking, commenting on, and sharing posts
As a Page admin, when you’re looking at posts on Facebook, you have the opportunity to like and comment on many of them as your Page. When you are looking at a public post from another Page, look in the top right corner of the post, where a tiny thumbnail of your (personal) profile picture appears next to a down arrow. Clicking that arrow opens a window for selecting who you want to comment as, shown in Figure 14-10.
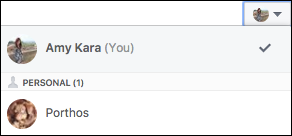
FIGURE 14-10: Like or comment as your Page.
Select the Page you would like to use to comment or like, and then click on any of the links at the bottom of the post to like, comment, or share that link on your Page.
When you like, comment, or share as a Page, changing who is commenting only works for that particular post. In other words, if there are ten articles you want to comment on as your Page, you will need to switch from your personal account to your Page, as described above, each of those ten times.
Liking other Pages
You can like other Pages as your Page. To do so, follow these steps. For clarity’s sake, I reference your Page as LocalCoffeehouse and the Page you want to like as MajorCoffeeBrand.
- Go to the Page you want to like (MajorCoffeeBrand).
Click the More […] button under the cover photo.
A menu of options opens.
Click Like As Your Page.
A confirmation window appears where you can choose the Page you want to use to like MajorCoffeeBrand.
- Use the drop-down menu to choose LocalCoffeehouse.
- Click Submit.
Liking other Pages can be a great way to be involved with the other entities your Page interacts with in real life, and also a way to get ideas for what to post about. For example, if you are a restaurant and you like the Pages of other restaurants nearby, you might learn about local events that you also want to promote. There are so many possibilities for using your Page over time; this chapter really just gives you the basics. Other Pages can teach you a lot.
Managing a Page
The basics of using a Page are fairly simple: Pages are Timelines for non-people (or famous people); use them to share and interact with your customers and fans. Up to this point, this chapter has focused on those basics.
Once you have the basics down, however, it’s worth noting that Pages is an incredibly powerful and diverse product. Pages can be created to represent the family dog or to represent the Smithsonian Museum. The needs for those two entities are pretty different, and yet Pages accommodates them both. In this section, I’m going to go over many of the settings and tools that Pages offers you beyond simple sharing. Some of these tools might seem superfluous to you. Some of the settings might not apply to you. I might miss certain settings that only apply to certain Page types (since my test Pages might be from different Page types). If you find yourself with a question I don’t answer here, Facebook itself provides a lot of material for Page owners to explore and learn from. A good place to start is www.facebook.com/business/products/pages/.
You may notice that when you look at your Page, there is an additional menu bar across the page, right below the blue bar on top. Pictured in Figure 14-11, these tabs are only visible to you as the Page’s admin. People who like the Page don’t see this.

FIGURE 14-11: Page management tabs.
The first tab, Page, simply brings you back to your Page’s Timeline. The other tabs are where you find options that help you get the most from your Page.
Inbox
Much like your personal Facebook account, Pages have an Inbox where you (and other admins) can respond to messages from people who encounter your Page. You will see a red box with a number indicating how many new messages you have. People don’t have to like your Page to message it, and the sorts of messages you receive may vary. Figure 14-12 shows a sample Inbox, with an open message.

FIGURE 14-12: A Page Inbox.
At first glance, this Inbox looks very similar to your personal message center, and it does have some similarities. Your message list is displayed on the left side of the page, with the newest messages appearing at the top of the list. Unread messages are in bold. The message you have open is displayed in the center of the page. You read a message thread from top to bottom (scroll up to see the oldest messages) and you can type your reply at the bottom of the thread.
Unlike your personal Inbox, the right side of the page displays any publicly available info about the person you are messaging with. This gives you a sense of whom you are talking to — where they are from, where they work, all the sorts of things that might be important to learn if someone is trying to contact you to make a professional connection.
Depending on what your Page represents, you might get a lot of “customer support” type questions in your messages as well. In those cases, it might be less important to know these biographical details about your customer, but it never hurts to put a name with a face when you are talking to your customers.
You can use the search box on the top left side of the page to search through your Page’s messages by keyword or name.
Message options
When you are looking at the list of messages down the left side of the page, you have a few options for keeping track of messages. Hover over any individual thread and click the gear icon that appears to access these options:
- Flag: Flagging a message thread ads a tiny orange label that says “flagged” to that thread in the Inbox. You can flag a message for any reason and it’s up to you and your fellow Page admins to decide what types of messages get flagged. You might choose to flag any message that requires a reply, or to flag messages that require urgent action. It’s up to you.
- Mark as Spam: If you receive messages that are spam, click this option to remove them from the Inbox. Messages you mark as spam get moved to your Spam folder, which you can access by clicking the down arrow next to the word Inbox at the upper left corner of the Inbox.
- Mark as Unread: You can choose to mark messages as read or unread, again, signifying whatever you and your fellow admins agree upon. I usually mark messages as unread when I intend to reread them later.
- Archive: Archiving a message moves it to the Archived folder, which you can access by clicking the down arrow next to the word Inbox at the upper left corner of the page. Archived messages reappear in the Inbox if either you or the other person adds another message to the thread.
Replying to messages
The basics for replying to messages as a Page are pretty much the same as any email, text, or instant message service. Type your response and click Send. Additionally, you can add attachments or stickers by clicking the paperclip or smiley icon, respectively.
Facebook also provides the ability to send what it calls saved replies. Saved replies are just what they sound like, common replies that you can save to more quickly send to people. Are people always writing in to ask what the delivery window is for your pizza shop? Create a saved reply explaining your policies. Then, anytime someone writes in asking that question, you can respond in just a few clicks; no typing necessary. Click the speech bubble icon to open the Saved Replies window, shown in Figure 14-13.

FIGURE 14-13: Create Saved replies here.
Saved replies are designated by titles (which the person you are messaging doesn’t see). If you have a lot of saved replies, you can search through the options using the search box at the top of the Saved Replies window. To select one of the saved replies, simply click on the reply you want to send. This fills the reply box with the text from the saved reply. Then click Send.
You can click the blue link to Create New Reply. This opens a window for entering the title and text of the saved reply. Click to personalize the saved reply with things like the name of the admin who is replying, or the name of the person who originally sent the message. You can also add images from your computer’s hard drive. Click Save Reply when you’re done creating the reply.
Notifications
Whenever anything happens to your Page such as someone liking it, liking a post your Page made, commenting on a post, sharing a post, and more, it creates a notification. All the notifications about your Page are collected on the Notifications tab, shown in Figure 14-14.

FIGURE 14-14: Notifications go here.
Notifications may or may not be something that winds up mattering to you as a Page owner. In general, evidence of people interacting with your Page and the content you post is considered to be a good sign of engagement, so if the amount of notifications suddenly change a lot or a little, that can be important to note. You can mark notifications as read or unread by selecting individual notifications (via the check box to each one’s left), and then clicking the Mark as Read or Mark as Unread buttons.
In addition to notifications of actions, the Notifications tab shows you a record of activity and information requests. Activity includes things like people mentioning (or tagging) your Page in a post. Information Requests show up when someone comes to your Page and wants to find out something that isn’t there. For example, if you didn’t add a website to your Page when you set it up, people can click a link to ask for your website. Those requests come to this portion of your Page’s Notifications tab.
You can control how you receive notifications from the Settings tab. I go over that later on in this chapter, in the section “Settings.”
Publishing Tools
The Publishing Tools tab gives you the ability to quickly review your posts — ones you have already made, ones you have drafted, and ones you have scheduled. As shown in Figure 14-15, the Publishing Tools tab shows a list of your posts, along with some data about those posts.

FIGURE 14-15: Review your posts and their impact.
The left side of the Publishing Tools tab categorizes your posts so you can quickly get to the type of post you want to review. For example, if you are logging in to see what posts other admins have scheduled for the upcoming week, you can click on Scheduled Posts to view only those posts. You can also use this menu to jump to your video library, to any forms you have created for Lead Ads, or any events you have planned.
When you are looking at Published Posts, you can see a thumbnail of whatever image accompanied the post and the title of it (if it had one). You can then view your reach for that post. Reach means the number of people who saw the post. Remember, News Feed (the main way your posts get distributed) works on an algorithm so that each person using Facebook sees what is most likely to be interesting to that person, so not all the people who have liked your Page will see your post. You can also see how many people liked or commented on your post. Finally, you can see when your post was published on the right side of the screen.
It’s worth noting here that as of time of publication of this book, Facebook has announced that going forward, News Feed will prioritize posts that are interactive and engaging to users. For the most part, this means posts from a user’s family and friends will be prioritized while posts from Pages may see less traction than they’re used to. The takeaway is that engagement is key — if your Page’s post is receiving a lot of comments and likes, it’s more likely to show up in your fans’ feeds.
Settings
As I mentioned previously, Pages is a powerful and in many ways flexible system that accommodates virtually every type of entity that isn’t a person. In order for a system to be that flexible, it needs to have a lot of options. And nowhere is the number of options available more apparent than on the Settings tab (see Figure 14-16). Here, I go through each setting. I try to include examples of how some of the more obscure settings might be used. Remember, depending on your Page and how you use it, many of these might not be relevant to you. Many settings will seem especially irrelevant if you’re just starting out with your Page and don’t have a lot of people who have liked it. If your Page has recently picked up in popularity and you are feeling overwhelmed by managing it, you may want to revisit some of the settings you had previously ignored.

FIGURE 14-16: Settings, so many settings.
General
General settings include a variety of settings about how your Page posts and interacts with other people and Pages on Facebook. To open the settings related to these categories, click Edit to the right of each setting. When you adjust a setting, remember to click Save Changes.
- Page Visibility: This controls whether or not your page is Published (publically visible) or not. If you want to make a lot of edits to your Page without people seeing those edits, you may want to opt to Unpublish the Page for a period of time while you make your changes.
- Visitor Posts: By default, people can post to your Page as they would post on a friend’s Timeline. You can disable this, or choose for people to be able to post text, but not photos and videos, or choose to review posts before they appear on your Page.
- Audience Optimization for Posts: If you want the ability to “target” your post to certain demographics (for example, a post about your band’s upcoming show in New York only being shown to people who live in New York), you can turn this setting on. Once it’s turned on, you’ll be able to access the Audience Selector by clicking the globe icon that appears in the Publisher.
- Messages: If you don’t want people to be able to message your Page, you can turn off that ability here. There are any number of reasons you might not want to use the message features — you don’t think you’ll have the time to respond to messages, or you would rather people contact you elsewhere, or you just don’t think it makes sense for you.
- Tagging Ability: You can choose to allow everyone to tag photos and videos you post, or you can choose to only let you and other admins tag photos and videos posted by your Page.
- Others Tagging this Page: You can check this box to prevent people from tagging your Page in their own Timeline posts.
- Page Location for Frame: This setting allows people to use your Page’s location as a setting for a Frame they build using the Camera Effects Platform. This setting is fairly intricate in that it only applies to a small subset of Facebook users who create these frames.
- Country Restrictions: By default, everyone the world over can find and view your Page. You can choose to hide it from certain countries, or only allow certain countries to see it.
- Age Restrictions: By default, anyone of any age (well, older than 13, which is the youngest age at which you can use Facebook) can see your Page. You can choose to restrict this so that people under 17, 18, 19, or 21 can’t see your Page. This is most relevant to you if you are creating a Page to represent a brand of alcohol or tobacco (and there is, in fact, an “Alcohol-related” setting that automatically adjusts the age restrictions for your Page).
- Page Moderation: You can create a list of words that, if they are detected in a post, blocks that post from being posted.
- Profanity Filter: You can choose to turn on Facebook’s profanity filter, which has two settings: Medium or Strong. If someone tries to enter a post with a profanity, that person will be unable to add it to your Page.
- Similar Page Suggestions: This controls whether or not your Page will appear in Facebook’s automatically generated “Page Suggestions.” By default your Page appears in Page suggestions.
- Page Updates: If you update your Page’s About section, achieve milestones, receive reviews, and so on, a post is automatically published on your behalf.
- Post in Multiple Languages: Allow other Page admins to post in multiple languages.
- Translate Automatically: People who use Facebook in another language will see your posts automatically translated into their language. Note that this feature isn’t available to every single user.
- Comment Ranking: If you are a very popular Page that gets lots of comments and replies to every post you make, you may want to turn on comment ranking. This setting tries to determine the most relevant comments (as determined by people liking and replying to that comment) at the top of the comments section. If you don’t turn this on, the most recent comments are displayed first.
- Content Distribution: Give users in some countries the option to download videos that you have added to your Page. Check this box to prohibit anyone from downloading your videos.
- Download Page: Click the Download Page link to receive a copy of your Page posts, videos, and Page Info. An email alerts you that the file is ready to download. This feature can be life-saving if content is accidentally deleted.
- Merge Pages: If you wind up with more than one Page for the same thing (it happens), you can merge the two so that it’s easier to reach everyone who has liked either Page.
- Remove Page: If you want to delete your Page entirely from Facebook, follow the prompts in this setting. You have 14 days to change your mind and reactivate your Page.
Messaging
The Messaging section of your Page is where you’ll go to communicate directly with customers and fans. Assuming you have kept your Page’s ability to receive messages, you can adjust settings here. I go over the three most important ones:
- Prompt Visitors to Send Messages: If you want to encourage visitors to engage with you one on one, you can turn this setting on and they may see prominent reminders and prompts to send a message your way.
- Response Time Display: If you typically respond to 75% of your messages within a day or less, Facebook automatically displays your average response time to people who visit your Page. If you don’t meet these two criteria, then no information is provided related to response time. You can choose to show either your average response time, or what you want people to expect as a response time (an hour, a few hours, a day).
- Instant Replies: Even if you don’t intend to respond to messages instantly, you can enable an Instant Reply, or auto-reply that gets sent to people whenever they write to you. Instant replies can include any information you think is relevant to messaging with your Page. Remember to click Save Reply when you’re done writing your instant reply.
Edit Page
The Edit Page section is all about your Page’s templates and tabs.
- Template: By default, your Page uses the standard template, but if you click the Edit button next to this setting, you can choose from other pre-fab templates, including templates for venues, restaurants and cafes, or video creators.
- Tabs: The rest of this page is devoted to the tabs on your Page. Click the Settings button next to each tab to get that tab’s unique URL. This is useful if you want to send your Page’s Photos to someone without asking them to wade through your Page to locate those photos. Some tabs also have additional settings. For example, the Review tab lets you choose whether fans are able to leave publicly visible reviews on your Page. The bottom of this page has a button to Add a Tab. Clicking this brings up a list of tabs you can choose to add to your Page, such as Offers or FAQ.
Post Attribution
Post Attribution settings dictate whether, by default, your posts to your Page will be attributed to you personally or to the persona of your Page. In other words, if I create a Page for my dog, Porthos, I can decide whether posts to Porthos’ Page come from me, Amy, or from Porthos.
Notifications
Notifications always appear in your Notifications tab for your Page, but you can also choose if they go into your Facebook notifications (where notifications for your personal account also appear), your email, or via text message on your phone.
If you want to see Notifications on Facebook but are feeling overwhelmed by the sheer amount, you can choose to receive a summary of notifications every 12–24 hours. You can also choose to turn off specific types of notifications (for example, you might want to be notified about new comments, so you can reply right away, but you might not want to be notified whenever someone likes a post).
You can also turn off notifications about messages your Page receives. This can be helpful if most of the time you are using Facebook as yourself, and not your Page. Your Page’s messages will always be available in the Messages tab.
Messenger Platform
This is an advanced group of settings that you’ll use if you build or use apps or bots in the Messenger section of your Page. You can learn more about your options for using these apps and bots at http://developers.facebook.com/docs/messenger-platform.
The setting on this Page that applies to most people is Discover Visibility. By default this is set to Show, which means that people will be able to see your Page in a new Messenger section called Discover, which highlights local places and businesses they can message. If you find you’re receiving too many irrelevant or spammy messages, toggle this setting to Hide.
Page Roles
Page Roles represent the different responsibilities that people who manage Pages may have. Often, you aren’t the only person who represents your Page. You might have a small business and you may want all your employees to be able to post photos and announcements on behalf of your Page. Or you might need moderators to respond to people’s comments and messages that you cannot respond to yourself. There are six different types of page roles, outlined below:
- Admin: If you created a Page, you are automatically its admin, and you can control all aspects of your Page. That includes: adding other people as admins or other roles, editing your Page’s settings, editing the Page, posting from the Page, sending messages as the Page, responding to and deleting comments and posts as the Page, removing and banning people from the Page, creating ads, viewing insights, and seeing who published as the Page.
- Editor: Editors have all the same abilities as admins, but they do not have the ability to edit all of the Page’s settings or assign Page roles to other people.
- Moderator: Moderators have many of the same abilities as admins and editors, but they can’t edit the Page or create posts as the Page.
- Advertiser: Advertisers only have the ability to create ads, view insights, and see who published as the Page. Lots of companies specialize in helping people manage their online advertising presence, which is why this is a unique position you can assign out.
- Analysts: Analysts can see your Page’s insights and see who published as the Page.
- Live Contributor: This role is for a person filming live video from a mobile device. They can post the content, but can’t comment as the Page, create ads, access Publishing Tools, or see Insights.
As the admin, you can add someone to any of these roles from the Page Roles section of the Settings tab. Type a name or email address into the text field under the Assign a New Page Role section, then decide what type of role you would like that person to have in managing your Page. Click Add when you’re done.
People and Other Pages
The People and Other Pages section of the Settings tab displays every person and Page who has liked your Page. Hover over any name and click on the gear icon that appears to take either of the following actions:
- Remove from Page Likes: Removing people from Page likes means that person will no longer be shown as someone who likes your Page. It’s basically a way to force someone to unlike your Page.
- Ban from Page: If someone is being abusive or inappropriate on your Page, you can ban that person from ever interacting with your Page again.
Preferred Page Audience
Facebook recently removed this section to simplify settings. You may see a notice explaining the change.
Partner Apps and Services
Apps are a way for companies that are not Facebook to build functionality that works on Facebook. Apps for Pages often add specific functionalities to your Page for things like booking an appointment or ordering food from a delivery service. Click the blue Add Service button to scroll through a list of apps you can add to your Page. One way to get ideas for apps that might be useful to your Page is to look at similar Pages and see what apps they use.
The Partner Apps and Services section shows you all the applications your Page is using. If you no longer use some of these applications, click the gear icon next to their name and choose Remove Service.
Branded Content
Branded content is content you create to promote another company or product (it often resembles a regular piece of your content) in exchange for some kind of value to your company. As an example, if the popular website Buzzfeed decides to publish an article titled “10 Ways You Can Use Aluminum Foil That Will Blow Your Mind” and you notice that near the top it says “sponsored by Reynold’s Wrap,” that article is likely branded content.
From this Page, you can allow other Pages to tag your Page in a branded content post (this setting’s default is off). You may want to toggle this setting to on if you think these tags can grow your Page’s presence and fan number in a positive way. If you’re a local coffee shop, you may appreciate the boost that comes from being tagged by a major coffee brand.
Once you turn this setting on, you can type the names of Approved Pages in the relevant field to ensure that only Pages you trust will be able to tag your Page.
From the Instagram section, you can link your business’ Instagram account to its Facebook Page. After you link these accounts, you can create ads on Facebook and show those same ads on Instagram as well as manage Instagram comments from the Pages Manager App.
Featured
The Featured section is where you can choose to feature certain Pages your Page has liked. A selection of Pages your Page has liked always appears on your Page, so choosing to feature some merely allows you to specify which ones you’d most want people to know you like.
Crossposting
Let’s continue using the example of the local coffee shop. Perhaps the local coffee shop has partnered with a local artist to display her work on the walls of the shop. In order to promote the partnership, the coffee shop films the canvasses being hung and posts the video to their Page. In this scenario, the local artist may want to feature the same video on her own Page.
Here is the place to list the URLs or names of Pages you want to crosspost on. You can add any Page you want, but that Page has to add you as well before the ability to crosspost on that Page is available. If the other Page accepts your request to crosspost, you’ll be able to see crosspost as an option when you choose Upload Photos/Videos from your Page’s Publisher. Note that the other Page will be able to see the insights for that post (they will not be able to see insights for any posts that aren’t crossposted).
Page Support Inbox
Page Support is a special Inbox for communicating with Facebook’s Help Team about your Page. If you ever wind up needing help from Facebook with your Page (for things like resetting your password or following up on reported material), those messages can be found in the Page Support section of your Page.
Payments
A new feature lets fans make purchases directly from your Page. If you want to sell items on your Page, come to this section to connect a payment method via Stripe or PayPal. Note that Facebook does not charge a fee for any purchases made via your Page. You may also notice that you’re unable to change the accepted currency – this is to help ensure that you are who you say you are in your personal account that manages the Page.
Calendar Settings
If you use Google Calendar to schedule your client appointments, this is a handy tool that syncs appointments made through your Page to your Google Calendar. Click Google Calendar and log in to your Google Account to add these appointments. Note that by logging in, you are giving Facebook permission to view your email address and manage your calendars – you will be prompted to click Allow to acknowledge this request before you finish logging in.
Activity Log
The Activity Log is a chronologically ordered list of every action your Page has taken (such as posting a photo) as well as every action involving your Page (such as being tagged in a status update).
Insights: Finding Out Who Is Using Your Page
After you create your Page, you might notice a tab at the top of your Page labeled Insights. The Insights tab contains all the data that Facebook can give you about who is looking at your Page, what they liked or didn’t like, how they’ve been interacting with your Page, and how engagement has changed over time. You can see a sample Insights Overview in Figure 14-17.

FIGURE 14-17: View your Page Insights here.
Similar to many of your Page’s management tabs, a menu down the left side of the page lets you dig into different statistics: Likes, Reach, Page Views, Posts, Videos, and Followers. By default, you land on the Overview section, which gives you, well, an overview of all those different stats.
At the top of the Overview section the date range of the data is noted. Under are nine boxes, each with some numbers and graphs. I cover the three data points you’ll be looking at the most.
- Page Likes: Likes are the most basic metric for measuring how your Page is doing. Likes aren’t everything; if you’re trying to draw attention to your Page, someone clicking Like and then never visiting your Page again or reading anything you post isn’t actually so useful. But your “Likes count” is a good baseline number to pay attention to. The Page Likes box shows you how many likes you have, and how much it’s changed in the last week. If you notice a sudden uptick or downtick in likes, you might want to think about anything your Page has done or posted in the last week that might have mattered to people.
- Reach: Reach shows you how many people have seen posts you’ve made in the last week.
- Post Engagements: Post Engagements keeps track of how many people have liked, commented, shared, or clicked on one of your posts in the last week.
Click on any of the boxes to see a larger view of the graph as well as settings that let you toggle between weekly, monthly, and quarterly views.
None of these numbers, alone, really matter. Together, they paint a picture of what your customers and fans are doing, and if you are truly interacting with them, or simply shouting into the void. The way these numbers trend over time helps you learn more about your customers and fans and how they want you to interact with them.
Below the nine boxes are insights about your five most recent posts. Each post gets a row with a link to the post if you want to view it. You can see what type of post it is (link, picture, video, and so on), how it was targeted (everyone or a specific demographic), the reach of that post, and the engagement with that post. Again, you’re not looking to achieve any one particular goal here, but you can learn a great deal. You might see that you have more engagement with photo posts, or greater reach when you target a post by demographic. Because managing a Page is an ongoing process, these types of insights let you make small adjustments to how you manage your Page and share with people who like your Page.