
Chapter 13. Scripting Basics
Calculation fields let you tell FileMaker how to automatically update and validate the data in your database. But working with the database is still a manual affair. If you often need to print a summarized report, you have to perform a find, sort the records, switch layouts, print, and then switch back to the original layout manually. Once you’ve done it 27 times, you start wishing you could click a button and have the report print itself. Well, you can: Just tell FileMaker the same series of steps you’ve been doing over and over again, and attach the list to a button (Section 6.6.5.3). That’s the essence of scripting.
A script is a series of steps bundled together. When you run the script (by clicking a button, say), FileMaker carries out all the steps on your behalf, one after the other. Scripts can be simple—just the five steps necessary to print the report—or they can be much more complicated. Advanced scripts can even incorporate calculations (Chapter 9) to do different things in different situations by making simple decisions based on the data in your database, the current time or date, and so on.
Note
If you’ve worked with other scripting environments—like Visual Basic for Applications, AppleScript, or JavaScript—FileMaker’s script-building tools are pleasantly familiar.
Your First Script
To get a feel for how scripting works, you’ll create a really simple script. Suppose you want to find all invoices with a balance due and view them in a sorted list. The following pages show how to go about preparing your database, planning, creating and polishing the script, and finishing off with a way to run it.
Preparing the Database
FileMaker is flexible enough to let you create fields and layouts on the fly, at the same time as you write a script, but it’s easier to focus on the script if you create all the supporting material you need before you even open ScriptMaker. In this example, you use a layout that shows a list of invoices, so create that first:
Switch to Layout mode in your database and choose Layout → New Layout/Report.
The New Layout/Report window appears.
From the “Show records from” pop-up menu, choose Invoices. In the Layout Name box, enter Invoice List.
Since you’ll tell the script which layout it needs to use, it helps to name the layout appropriately so that you can pick it from the list of layouts later.
In the “Select a layout type” list, select Columnar list/report, and then click Next. Leave the “Columnar list/report” radio button turned on, and then click Next again.
Now you get to pick which fields to include in the list.
Using the techniques described on Section 4.4.4.4, add the following fields to the “Layout fields” list: Invoice ID, Jobs::Name, Date, Date Due, and Total Due. When you’re finished, click Next.
FileMaker asks how you want the list sorted. Since this list isn’t a report, you can simply ignore this setting. Click Next again.
On the Themes screen, choose one that pleases you, and then click Next.
You now see the header and footer choices. You’re ignoring these too, so click Next yet again. FileMaker then asks if it should create a script for you.
Choose “Do not create a script” and click Next.
You’re going to do that yourself, of course. The final screen asks if you’d like to view the layout in Preview mode or Layout mode.
Select “View the report in Layout mode,” and then click Finish.
FileMaker creates your new layout and shows it to you. (Feel free to decorate the layout now if you want, using any of the features described in Chapter 4.)
Planning Your Script
Before you dive in and create the script, you should review what you think it’s supposed to do. Everything you can do yourself in FileMaker, you can have a script do instead—and this instance is no exception. A script is just a series of steps. When you’re planning a script, it often helps to actually do what you want the script to do, so you can see whether it works. So go through the steps necessary to find the balance due, and take notes. You probably end up with something like the following:
Switch to the Invoice List layout. This layout has the fields the script needs to create the invoice list. It’s also going to display the final list, so you want to make sure the script runs in this layout.
Choose View → Find Mode. The script needs to find all invoices with a balance due. Scripts can’t click a button or even choose a menu command, but you know that you need a script step that puts FileMaker into Find mode.
In the Total Due field, enter >0, then press Enter. This step tells FileMaker what to find and puts it into action. When the script runs this step, FileMaker performs the find and shows the correct records, just as if you’d performed the find yourself.
Choose Records → Sort and sort the records ascending by Date Due. You should now see your final list, properly sorted. Once you have the results that you want the script to produce, you know everything you need to know to build it.
Now that you know all the steps involved, you’re ready to get acquainted with ScriptMaker.
Creating Your Script
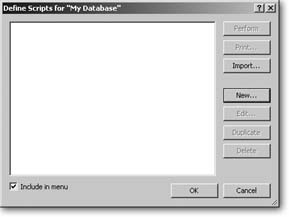
You create, edit, run, and delete scripts in FileMaker using ScriptMaker. It’s always available as the first item in the Scripts menu. When you choose this item, you see the window shown in Figure 13-1.
Now it’s time to build the script. FileMaker wants you to set up and name the script before adding the actual steps.
Choose Scripts → ScriptMaker. When the Define Scripts window appears, click New.
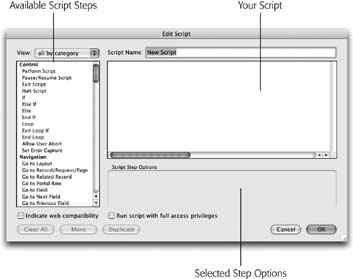
The Edit Script window pops up (Figure 13-2).
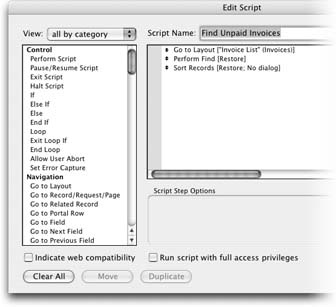
Figure 13-2. In the Edit Script window, you build your script by choosing steps from the Available Script Steps list and use the Move button to add them to your script. Once they’re there, you can configure them using buttons, checkboxes, and radio buttons that appear in the Script Step Options area (it’s empty now because you don’t have any script steps).In the Script Name box, enter Find Unpaid Invoices.
Your script’s name is important. It’s how you’ll identify it when you want to run it later.
From the View pop-up menu (top-left corner) choose, all by name.
The list of available script steps reorganizes to show you every step alphabetized by name.
You’re now ready to add steps to your script. You’ll be adding a script step for each of the actions you performed when you manually created the list of unpaid invoices back on Section 13.1.2.
Scroll through the script step list (Figure 13-2) to Go to Layout, and then click to select it. Click the Move button, which is now available.
FileMaker adds (and selects) a “Go to Layout step to the list of current steps. This script step makes FileMaker go to a layout when the script is run. Your job is to choose which layout it should visit.
Tip
You can double-click a step in the list to avoid the trip to the Move button. For less mousing, you can type the first part of a step’s name to scroll to it, and then press the Space bar to add it. You can also use the Tab key to move between the available step list, the current steps list, and the Script Name box.
From the Specify pop-up menu (in the Script Step Options area), choose Invoice List. Click Move.
Now your script has just one step, or line. If you were to run it as is, it would simply take you to the Invoice List layout. (If you were already on the Invoice List layout, it wouldn’t do anything.)
From the available script step list, select Enter Find Mode, and then click Move.
FileMaker adds a second line to your script. The Script Step Options area now has new options (those that make sense with the Enter Find Mode step). Notice that the Pause option at the left side of the Script Step Options area is turned on.
Turn off the Pause option.
Turning off this option tells the script not to wait for user input when it’s run. (You’ll learn more about pausing a script on Section 14.4.1.)
Add a Set Field script step to the script.
The procedure is similar to the previous two steps: Select Set Field in the available field list and click Move.
The Set Field step lets you put (set) something into that field. You can use Set Field in Browse or Find mode. In Browse mode, it enters data; in Find mode it specifies find requests. In this case, you’re specifying a find request for the invoices.
In the Script Step Options area, turn on “Specify target field.”
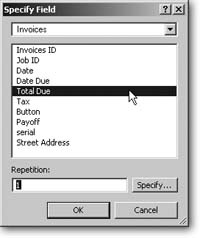
This tells FileMaker you want to indicate exactly which field to set. As soon as you turn this option on, FileMaker shows a slightly different Specify Field window (Figure 13-3).
In the field list, select Total Due, and then click OK.
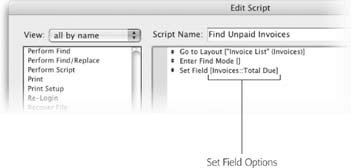
The Set Field step in your script (Figure 13-4) shows the option you’ve selected. In the Script Step Options area, click the bottom Specify button (the one beside “Calculated result.”)
Figure 13-3. This Specify Field dialog box looks almost exactly like the one you’ve seen in Layout mode. The only difference is the Repetition box at the bottom. If you select a repeating field (Section 3.3.4.2), you can use this box to tell FileMaker exactly which repetition to set.Figure 13-4. FileMaker shows all the steps in your script in the order they’re performed. If a step has any options, they’re displayed in brackets after the step name. In this example, you can clearly see that the Invoices::Total Due field is modified by the Set Field step.FileMaker shows you the Specify Calculation dialog box, the same one you used to build calculation fields in the previous few chapters. Here, though, you’re using a calculation to tell FileMaker what to put in the Total Due field. When this step runs, you’re in Find mode thanks to the second step in this script, so the next step tells FileMaker what to look for.
In the Calculation box, enter “>0" (including the quotes), and then click OK.
This bit of computerese sets the Total Due field to the appropriate value for finding unpaid invoices. FileMaker now shows the calculation beside the Set Field step as well. (Spoken out loud, this step reads, “Set the Invoices::Total Due field to greater than zero.”)
Add the Perform Find script step to your script.
This step carries out the find operation. It’s the equivalent of clicking Find or pressing Enter if you were doing it yourself.
Add the Sort Records script step to your script. Then, in the Script Step Options area (Figure 13-4), turn on “Perform without dialog.”
This tells FileMaker you want the script to go ahead and sort, instead of opening the Sort dialog box every time it runs. Instead, since the sort’s the same every time, you put it right here in the script.
Turn on the “Specify sort order” checkbox.
Assuming you just went through the sort as described on Section 13.1.3, the Sort dialog box is already configured properly. (When you add a Sort Records step to your script, FileMaker configures it to match the last sort you performed.)
Click OK in the Sort Records window. Then, in the Edit Script window, click OK again.
FileMaker shows you the Define Scripts window again. This time, though, your new script—Find Unpaid Invoices—is in the otherwise empty list. Time to check your work.
Click Perform.
FileMaker runs your script. You should immediately see the correct list of invoices, or—oops!—a message telling you no records were found. In the next section, you’ll refine your script to help deal with these message boxes if they pop up when someone runs the script. (See the box on Section 13.1.4.)
Improving Your Script
On the preceding pages, you created a script that mimics what you would do to get an unpaid invoice list, step by step. But ScriptMaker has a lot of options to make writing scripts fast and easy. Often, a script can get the results you want with fewer steps than it would take to do it yourself. For example, to see your unpaid invoice list, the steps boil down to the following:
Switch to the Invoice List layout.
Find the right invoices.
Sort the records.
This version has just three steps instead of five because it assumes you can “find the right invoices” in one step. Luckily, ScriptMaker’s Perform Find script step really can find what you want in one step. Here’s how to revise your script to use the simpler form:
Choose Scripts → ScriptMaker. In the Define Scripts window, select the Find Unpaid Invoices script, and then click Edit.
The script you created earlier in this chapter pops up in the Edit Script window again.
Select the second and third steps in your script (Enter Find Mode and Set Field).
You can select both by clicking Enter Find Mode in your script, then Shift-clicking Set Field.
Note
You should be selecting the steps in your script (in the window on the right), not the steps in the available script steps list (on the left side of the window).
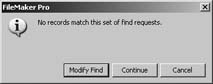
If your database has no unpaid invoices when you run the Find Unpaid Invoices script (Section 13.1.3), you see the message shown here. The message is the same as the one you see if you perform the find manually, with one exception: This time you get a Continue button.
Since FileMaker was running a script when the error occurred, it gives you the choice to cancel the script (in other words, stop in the middle and return control to the user) or continue the script (or keep going and pretend nothing went wrong). In this case, Cancel and Continue do the same thing since the error happened on the last step in the script.
If you don’t want the user to make this choice, you can tell FileMaker to capture the errors as they happen and let you deal with them inside the script. You’ll learn about this process on Section 15.4.
Click the Clear button.
FileMaker removes the two selected steps from the script. It now has two steps that look a lot like the simplified process above. Also notice that the Perform Find step is already selected, since FileMaker automatically selects the next step when you clear one or more steps from the script.
Turn on the “Specify find requests” checkbox in the Script Step Options area.
The Specify Find Requests dialog box (Figure 13-5) appears. Since the find request FileMaker created for you is exactly what you want, you don’t need to do anything in the Specify Find Requests window.
Click OK.
When you click OK, you see the Edit Script window again. Figure 13-6 shows how your script should look now. The script is now finished—and it’s just three lines.
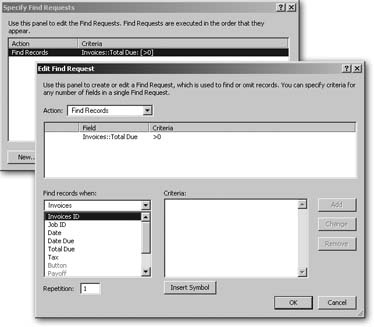
Figure 13-5. This window opens whenever you attach specific find requests to a Perform Find script step. From here you can add new find requests to your script. If you look in the list, you see that FileMaker’s already added a line for you. It has an Action of Find Records and Criteria that look like this: Invoices::Total Due: [>0]. Like the sort order, this is the last find you performed, and it’s also just what you want.Click OK again, and then click the Perform button.
You see your unpaid invoice list again.
![This window opens whenever you attach specific find requests to a Perform Find script step. From here you can add new find requests to your script. If you look in the list, you see that FileMaker’s already added a line for you. It has an Action of Find Records and Criteria that look like this: Invoices::Total Due: [>0]. Like the sort order, this is the last find you performed, and it’s also just what you want.](http://imgdetail.ebookreading.net/data/2/0596005792/0596005792__filemaker-pro-8__0596005792__httpatomoreillycomsourceoreillyimages141431.png.jpg)
This new, simpler script does everything the first script did. It’s simpler because you didn’t have to script all the steps involved in performing a find: Enter Find Mode; Set Field; Perform Find. Instead, you let FileMaker do all of that in one Perform Find step. You’ll find that you can reduce many of FileMaker’s common multi-step operations to a single step in ScriptMaker.
The Importance of the Layout
In a script, the active layout is very important, since it’s what determines the script’s context. Context is critical when you do things like delete records. If you write a script that simply deletes a record, it deletes the current record from whatever layout the user happens to be on—which may not be the right record at all. You could end up deleting a record from the Customer table instead of the single Invoice record you meant to delete!
Take the script you’ve created in this chapter, for example. Before it does anything else, your Find Unpaid Invoices script goes to the Invoice List layout—but what would happen if you left that step out? Figure 13-7 shows the options ScriptMaker gives you for the Perform Find script step. See if you can spot what’s missing.
Upon close examination of Figure 13-7, you can see that Perform Find—like every other script step—makes absolutely no mention of which table it should act upon. Just because you’re asking it to “Find records when Invoices::Invoice ID > 0” doesn’t mean you’re looking for invoice records. You could be looking for customers whose attached invoices have a balance due. Or you could be looking for any line items that are on an unpaid invoice. The only way FileMaker can tell what you’re looking for is by the context of the layout you’re on. That’s why the first step in the script goes to the Invoice List layout. That layout is attached to the Invoices table occurrence. This tells FileMaker which records to look through (those in the Invoices table) and from what perspective to resolve relationships (the Invoices table occurrence on the relationship graph).
When to Switch
Now that you’ve dutifully absorbed the lesson in the previous paragraphs, don’t get lured into the idea that you always have to switch to a layout for your script to work. The fact that a script can do something useful from more than one context can be a good thing. In general, you have three choices when you write a script, and here are some guidelines on when to use each:
Switch to a layout associated with the table you want to work with. The Go to Layout script step makes sense when you’re showing certain results (like the Find Unpaid Invoices script) or when your script always makes sense, but only from one particular context. If necessary, you can then switch back to the original layout at the end of the script (Go to Layout has an Original Layout option).
Don’t include a Go to Layout script step at all. Just let the script go about its business, whatever the context. If you use this approach, you have to make sure the script works and makes sense from any perspective. For instance, a script could switch to Preview mode, resize the window to show the whole page, and then ask the user if he’d like to print. This script can run on nearly any layout and still do something useful—print. (See the box on Section 13.4.1 for one example of context independent scripting.)
Prevent the script from running on the wrong layout. As you’ll see on Section 13.4.1, you can make it so a script won’t run at all if it’s not designed to work properly on the current layout. This alternative is your best bet when switching layouts within the script isn’t feasible. For example, suppose you have a Refund Invoice script that carries out the steps necessary to pay someone back. Using Go to Layout to switch to the Invoices layout would ensure the right layout, but not the right invoice. It’s best if this script runs only when the user is already open to the Invoices layout—presumably looking at the invoice she wants to refund.
Tip
Anytime a script can do damage to your database when run from the wrong layout, you may want to use that last option even if you’re the only person who uses your database. If your mouse hand slips when you’re insufficiently caffeinated, the script can show you an error message rather than running at the wrong time (Section 15.2.1).
Running Scripts
At this point you’re probably starting to see how scripts could be really useful in your database. The fact is, most large database systems are loaded with scripts that do all kinds of things. But the only way you’ve seen to run a script is pretty tedious: Chose Scripts → ScriptMaker, select the script, and then click Perform. That’s lots of clicks to run a script that’s supposed to save you time! Thankfully, there are a few other ways to run scripts that are more convenient, and you can set them up when you first create a script. Here are the possibilities:
The Scripts Menu
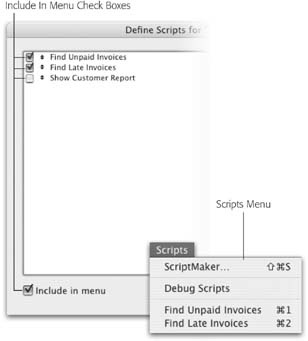
You can choose to show some or all of your scripts right in the Scripts menu. If you have a script or two that you want quick access to from anywhere, then it makes sense to put it in the Scripts menu. That way, anyone can run it by simply choosing it from the menu. There are even keyboard shortcuts for the first 10 scripts in the Scripts menu: Ctrl+1 (⌘-1) through Ctrl+9 (⌘-9) for the first nine, and Ctrl+0 (⌘-0) for number 10. Figure 13-8 shows how to assign a script to this menu in the Define Scripts dialog box (Section 13.1.3).
Buttons
Throwing lots of scripts into the Scripts menu is a good way to give your users access to them no matter what context they’re in. But what if you want to make a script available only on certain layouts? For scripts that apply only to the Invoices layout (like…oh…the Find Unpaid Invoices script), consider using buttons instead. When you add a button to the layout, FileMaker shows you the same Specify Button window you saw back on Section 6.6.5.3. Perform Script is the very first command available in the list (aside from Do Nothing). You can see the options associated with this button in Figure 13-9.

Using buttons, you can add one-click access to as many scripts as you want and you can place them where you want them. For example, you can put Invoice-related scripts on the Invoices layout and Payment-related scripts on the Payment layout. If you make sure your context-dependent scripts don’t show up in the Scripts menu, you’re adding another layer of assurance that FileMaker runs your scripts only from the right context.
Tip
If you want the ultimate in control over which of people get to see which scripts, and even which layout they can see them in, take a look at the Custom Menus section in Chapter 19. You need FileMaker Pro Advanced to create Custom Menus, but for many situations, this powerful feature alone is worth the price of admission.
Opening and Closing Scripts
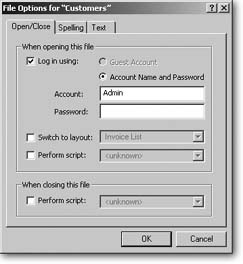
Finally, you can tell FileMaker to automatically run a script when someone opens or closes the file. The opening script runs when you first open the file. You might use this script if you want to be greeted with the list of unpaid invoices first thing every morning. The closing script runs when you close the last window for an open file. This option is a little less common, but it has its uses: If you want to make sure other related files close whenever the main file closes (even if they have open windows), then you could write a script to close them all whenever you close the main file.
To make the selection, you need to visit the File Options dialog box (File → File Options). In the File Options window, make sure the Open/Close tab is selected. In this window, you first turn on one of the “Perform script” checkboxes (there’s one under “When opening this file” and another under “When closing this file”). Then you can select one of your scripts from the associated pop-up menu. Figure 13-10 shows the result.
Branching and Looping in Scripts
Now that you have a basic foundation in what scripts do and how you can run them, it’s time to see some of ScriptMaker’s more powerful features. The script you created at the beginning of this chapter was the simplest kind: It goes through a series of steps from start to finish every time. Sometimes your script needs more smarts. You can add steps to the script that cause it to take different actions depending on the situation (called branching) or make it do the same thing over and over again (called looping).
Branching with If, Else If, Else, and End If
If you’re comfortable with the If and Case functions in calculations (Section 11.2.1.2), then you’ll feel right at home with this topic. You’ve noticed that you often look someone up in the Customers layout, copy his email address, and then go to your mail program to send him an email. You’d like to add a button to the Customers layout that creates the email directly, saving you all the trouble of copying, switching, and pasting.
You can use FileMaker’s Send Mail script step, which is just like the File → Send Mail command, to accomplish this task. First, create the script:
Choose Scripts → ScriptMaker. Then, in the Define Scripts dialog box, click New.
The Edit Script window pops up.
In the Script Name box, type Send Email to Customer.
When you want to run this script, you choose this name from the Scripts menu.
In the list of available script steps, select Send Mail, and then click Move.
FileMaker adds the script step to the script.
Note
The Send Mail script step is under Miscellaneous near the bottom of the list. If you don’t like looking through this long list, choose Miscellaneous from the View pop-up menu to see just the steps in this category. Whenever you’re not sure which category holds the step you want, choose “all by name” from the menu to see every step in alphabetical order.
In the Script Step Options area, turn on the “Perform without dialog” checkbox.
This tells FileMaker you don’t want a window that lets you enter or edit the Send Mail Options dialog box when the script runs. In this case, you just want it to do its work as you specify in the script step.
Click Specify. Then, when the Send Mail Options dialog box appears, click the pop-up menu to the right of the To field. Choose Specify Field Name.
You now see a Specify Field dialog box. Here, you tell FileMaker where to find your customer’s email address. Make sure “One email using data from the current record” is selected or you could get some dicey results, like sending an email about a Customer’s recent Invoice to all the Customers who happen to have records in your found set.
Switch to the Customers table, if necessary, and then choose the Email address field. Click OK.
FileMaker closes the Specify Field window and shows you the Send Mail Options window again. Now, though, it shows your Email Address field reference in the To field. You can also add field references or calculations for CC, BCC, Subject or even the body of your email message in those fields. This dialog box even lets you choose a file to attach to your email. But for now, just leave all these options blank.
Click OK again.
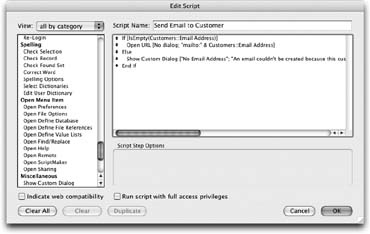
You now see your single line script in the Edit Script dialog box again, with the Send Mail options [No dialog; To Customers::Email Address] listed as reference.
At this point you have a working script. If you run it, it indeed creates a new email addressed to the current customer. But what happens if you don’t have an email address for this customer? If the Customers::Email Address field is empty, your script tries to send an email without a valid address to your email program, which complains mightily. Fortunately, you can head this problem off at the pass. If the Email Address field is empty, you’d rather have your script tell you about it and skip the Send Mail step entirely. This is a job for the If step, so add it as follows:
In the Edit Script dialog box (Section 13.1.3), add the If step to your script.
FileMaker adds this step after the Send Mail step. It also adds a third step: End If. You can’t have an If without an End If, so you get both automatically.
Using the little arrows to the left of the If step, drag the step up above the Send Mail step.
The process of moving a script step in a list is a familiar operation. It works just like moving fields, layouts, and so forth. By rearranging the steps in your script, you’re telling FileMaker what order they should run in. (A script won’t work if you’ve got a step above something that needs to happen first.)
Also, notice that the Send Mail script step is now indented. Everything between If and End If indents automatically to remind you that you’re inside an If condition.
Select the If step and, in the Script Step Options area, click Specify.
FileMaker shows you a standard Specify Calculation dialog box like the one shown on Section 9.2. You use a calculation to define the condition of this If step. If the calculation evaluates to True, FileMaker does the steps after the If. If the calculation evaluates to False, FileMaker skips to the End If and continues running the script from there.
In the calculation box, type Not IsEmpty(Customers::Email Address), and then click OK.
This calculation evaluates to True and sends your customer an email only if the Email Address field isn’t empty. See the box on Section 13.4.1 for details on how this calculation makes these decisions.
Your script now checks to see if the Email Address field has something in it before running off to create the email message. But what happens when you run the script and the Email Address field is empty? Right now, nothing at all. FileMaker evaluates the If condition, sees that it’s false, and skips to the End If. There’s nothing after the End If, so the script just stops and your user waits in suspense, until he finally realizes that the requested email message simply isn’t coming and investigates the problem on his own…or chucks his computer out the window.
In the interest of preventing property damage, it’s better for your script to tell the user why nothing’s happening. For example, you can have your script open a message box when the If condition is false, saying, “You can’t email this customer, since there’s no email address on file,” or whatever. You can get exactly what you want with the Else step:
Return to your script in the Edit Script dialog box (Section 13.1.3). Select the Send Mail script step in your script.
When you add a new step, FileMaker inserts it after the selected step. You want the Else step to go right after the Send Mail step, so you select that step first.
Add the Else step to the script.
FileMaker inserts an Else step between Send Mail and End If.
Right after the Else step, add the Show Custom Dialog script step to the script.
This step is also under Miscellaneous. Its job is to pop up a dialog box for the user. You get to decide what the box says, which buttons it includes, and which fields—if any—it should show.
Click the Specify button in the Script Step Options area.
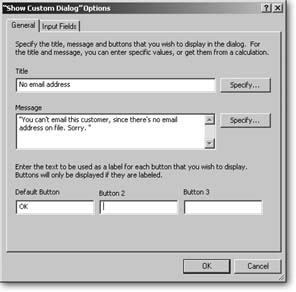
The Show Custom Dialog Options window (Figure 13-11) appears.
Figure 13-11. When you choose options for the Show Custom Dialog script step (step 3 on Section 13.4.1), you get a window like this. For example, you can give your dialog box a title, message, and up to three buttons. You can also add input fields to the dialog box by visiting the Input Fields tab. You’ll learn about these on Section 15.2.3.In the Title box, type No Email Address.
This controls what shows in the title bar along the top of your custom dialog box.
In the Message box, type You can’t email this customer, since there’s no email address on file.
This tells FileMaker what to put inside the dialog box.
From the Button 2 box, select and delete the word Cancel.
A custom dialog box can have up to three buttons. In this case, you want only one: an OK button. To keep the other buttons from showing up, just make sure there’s nothing in the Button 2 and Button 3 boxes.
Click OK.
Your script should now look like the one shown in Figure 13-12.
Just click OK twice to return to your database, and try your script out: Select a customer without an email address (enter Find mode, type “>0” in the Email address field, then click the Omit button), and choose Scripts → Send Email to Customer. If you look at a Customer record with an email address, the script creates a message in your mail program, ready for you to fill out. If the email address field is empty, you see an error message instead. You can create a button for this script and add it to the Customers layout for the ultimate in convenience (see Section 6.6.5.3 for more detail on creating buttons for your scripts).
Looping
Sometime you want to do the same thing over and over again, until you reach some kind of end point. For example, people often write a script that does something to every record in the found set, one after another. This kind of scripting is called looping. You make a script loop through records using the Loop script step.
Like the If step, the Loop step has a necessary partner called End Loop. When you put script steps between Loop and End Loop, FileMaker simply repeats them over and over, forever.
Since looping through the records in the found set is such a common operation, FileMaker lets you do it with a simplified set of script steps. For example, if you want to delete the Email Address field in every record in the found set (say you no longer want to email local customers, just out-of-state ones), you might think you’d have to approach the problem like this:
 Loop
      Set Field [ Email Address, "" ]
      Go to Record/Request/Page [ Next ]
      Exit Loop If [ Get ( FoundCount ) =
           Get (RecordNumber) ]
      End Loop
      Set Field [ Email Address, "" ]
This script first starts a loop. It then clears the Email Address field in the current record. Next, it moves to the next record (just like clicking the right-hand page in the Book icon). If the number of the record you’re now on equals the current found count, FileMaker exits the loop. But when this loop exits, you still haven’t cleared the last email address. The Exit Loop If step exits when you first reach the last record. You have to add the last step (a copy of the Set Field step in the loop) to clear the Email Address in this last record.
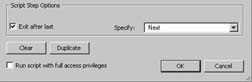
But the Go to Record/Request/Page script step has some special powers. When you choose the Next option (telling it to go to the next record), a new checkbox appears in the Script Step Options area (shown here).
This checkbox, called “Exit after last,” tells FileMaker you want it to automatically exit the loop after the last record. (In other words, it happens when the Go To Record/Request/Page step is run and you’re already on the last record.)
This kind of scripting is good for two reasons. First, you can save the Exit Loop If step in your script, since FileMaker exits the loop for you. Second, since the exit happens after the last record, there’s no need to add the last Set Field script step. The revised script looks like this:
Loop
    Set Field [ Email Address, "" ]
    Go To Record/Request/Page [ Next,
        Exit after last ]
    End Loop
In the real world, you probably wouldn’t clear an email address just to keep an email from being sent. You’d make a field with a checkbox, then mark the records that need to get an email. When you write your looping scripts, you’ll probably have more steps than the single Set Field shown here, and your scripts will grow accordingly.
So how does a script like this end? Simple: You tell FileMaker to exit the loop at the right time. To this end, FileMaker has a script step called Exit Loop If. Like the If step, Exit Loop If has an associated calculation. If the calculation evaluates to True, FileMaker immediately skips ahead to the End Loop step, and continues with the step that follows. As such, a loop usually looks like this:
Loop
    # Do some stuff
    Exit Loop If [ // some condition ]
End Loop
Using what you’ve learned in this chapter and about calculations in Part 4, you can easily build a script like this. For “some condition,” just use a calculation that describes the condition when the loop should stop repeating itself. In the box on Section 13.4.2 you can see an example of a looping script that stops when every record in a found set has been used up.