Premiere Pro brings media into a project in two ways: capturing and importing. Capturing refers to transferring video and/or audio to your hard drive from a video device, such as a camcorder, and making that file available to the project in the Project window. Importing is when a file already exists on your hard drive and you simply want to make it available to your project through a link in the Project window.
Opening the Capture Window
Press F5 or select Capture from the File pulldown menu. The Capture dialogue will open. In the upper right corner of the screen, you will see two tabs: one labeled Logging and one labeled Settings.
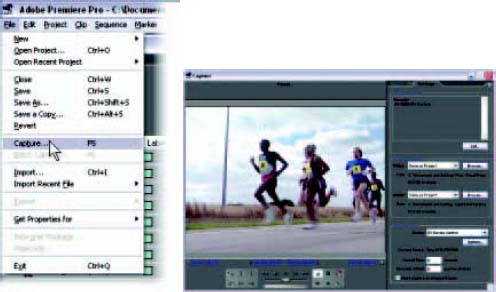
The Capture window. As you can see, the first thing I need to do is change the destination settings so I don’t put media on my C drive.
The first order of business is just where your video and audio data will go when you capture it. It is recommended you keep your video and audio media on a hard drive other than your C or system drive. To specify a destination for your media, select the Settings tab. On the right side of the window, you will notice an area labeled Capture Locations about halfway down the window. You can specify locations on your system’s hard drives for both the audio and the video. Again, be sure to target your media to drives other than your C drive. The remaining free space on your chosen hard drive will be displayed here. It can be helpful to have some idea of just how much space you may need. With DV, for instance, the rule of thumb is about 1 GB of hard drive space for every 5 minutes of video.
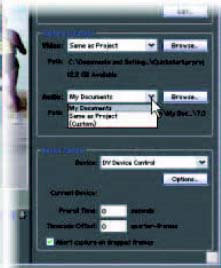
The Logging tab is where you log the in and out points of clips on your tape and create a batch list of predesignated clips for Premiere Pro to access and capture in a single step.
Capturing your video and audio with Premiere Pro can be done in one of three ways:
1 You can capture it on the fly by manually starting and stopping the capture process as your tape plays.
2 You can set an in point and an out point for a section you wish to capture.
3 You can set in and out points for a group of clips that you wish to capture as a batch.
Setting up Deck Control
Premiere Pro will control DV devices via the familiar video playback, or transport, controls in the Capture window, provided you have a FireWire card (IEEE-1394) installed in your computer. Premiere Pro will control other types of video devices with third-party controller software. If you have a third-party deck controller, please check your documentation for instructions.
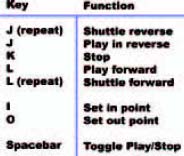
The device transport controls (Play, Stop, Fast Forward, Rewind, etc.) are below the video screen in the Capture window. However, most editors find it infinitely more efficient to use keyboard shortcuts during capture and most frequently performed editing tasks.
The keyboard shortcuts (shown in the figure for clarity) are used throughout Premiere Pro (and many other video-editing software packages), so they are worth learning.
To set up Adobe Premiere Pro for software DV deck control, follow these steps:
1 Open the Capture window, click on the tab in the upper right-hand corner of the window, labeled Settings.
2 In the text field labeled Device, be sure that DV Device Control, or the appropriate device control for your system, is selected. (The first time you launch, it may default to None.)
3 In the lower part of the tab, you will see an area labeled Device Control. Click the Options button.
4 A window will open, allowing you choose the video standard, as well as the brand and type (model) of your video deck or camcorder. Choose the appropriate settings.
5 Check the indication for device status, making sure it says Online.
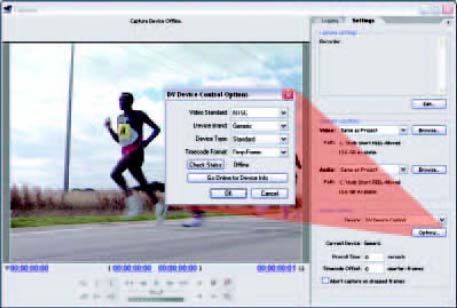
Once your device is connected, you can begin capturing footage. There are several different methods for capturing.
Manual Capture
To capture your video “on the fly,” you can press the Play button in the Capture window or press the spacebar or the L key to put your video deck or camcorder into play mode. If you don’t have a system with deck control, you can also operate your video device directly by pressing Play, Fast Forward, etc. Click the red Record button in the bottom of the window or press the G key to start capturing video. You can stop the capture by pressing Escape.

The Record button for manual capture in the bottom of the Capture window.
Capture In to Out Point
You can capture a clip beginning and ending at the points you set by doing the following:
1 Use the Play and Rewind/Fast Forward buttons or, on your keyboard, the J (reverse shuttle), K (stop), and L (play/shuttle forward) keys to position your tape at the point you wish to begin capturing. Press the button marked Set In to mark the point.
2 Go to the end of the section you wish to capture by playing or fast-forwarding to the point where you want the clip to end. When you reach the end point, mark it by selecting Set Out. You will notice that Premiere Pro displays the duration of your clip just below the in and out points.
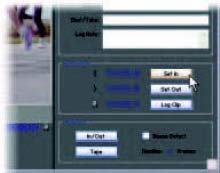
3 By clicking on the button marked In/Out, you will see Premiere back the tape up and capture the clip between the in and out points that you have set.
4 Name the clip or confirm the name you assigned it in the Capture window at the end of the capture.
Batch Capture
If you follow the first two steps in the Capture In to Out Point section and replace the third step with clicking on Log Clip, the clips will accumulate in the Project window but will remain offline, or uncaptured, until you elect to capture them all as a group. Batch capturing is a convenient way to capture many predesignated clips by timecode while you take a break or do something else.
Here’s how to capture the clips you have logged:
1 Select all the clips in the Project window you wish to capture by Control-clicking or Shift-clicking on the clips. They will darken to indicate they are selected.
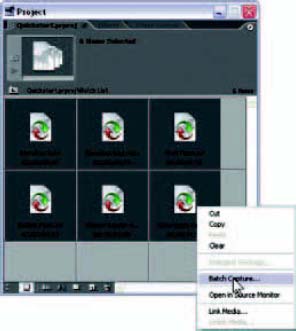
2 After you’ve selected the group of clips, right-click on any of the clips to bring up a context menu.
3 From the menu, choose Batch Capture.
4 Your video deck or camcorder may ask you to confirm that the proper reel or tape is in the deck. After you’ve confirmed that it is, the deck will begin to capture—and you can grab a cup of coffee.
Important note: Particularly in the case of some “prosumer” decks and camcorders, some timecode problems may present themselves if there is a break in the timecode. It’s important to have continuous timecode so that the batch capture can work correctly.
Many consumer and so-called prosumer cameras can create a timecode break if several recordings are made on a blank tape. Unfortunately, most DV cameras will default back to 00:00:00:00 timecode at those breaks, making continuous capture or batch capture impossible, because the timecode repeats itself.
The best way to avoid this is to “black” your tapes before using them. Put the new video cassette in your camcorder and record the entire tape with the lens cap on. This will create continuous timecode on your tape, even if the camcorder ends up recording with gaps.
Automatic Scene Detection
There are times when it can be an advantage to capture an entire tape at once, but very inconvenient to work with one file that large. Automatic scene detection can be used to capture a tape and break the shots apart at detected recording start and stop points. It does this primarily by detecting breaks in the time stamp on the source tape.
There is an important distinction to be made here between time stamp and timecode. The time stamp is strictly a clock signature your camera is recording with the video. When you pause the tape for a period of time, that time stamp is discontinuous at that point. In contrast, timecode is the numbering system for each frame on your tape.

The Scene Detect button is below the video picture in the Capture window and, alternately, there is a checkbox in the lower right. Remember to turn it off if you’re not using it. It works even if you are setting an in and an out yourself and there is a scene break in the middle. If it is left on, automatic scene detection will break your capture at each detected scene change, whether you want it to or not.
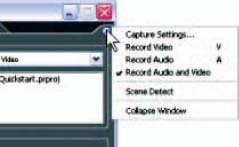
To choose to capture only audio or only video, use the wing menu in the Capture window and choose “record Video” or “Record Audio” as appropriate. Scene detection and capture settings are also available from the Capture window wing menu.
Importing Files
There will be times when you need to bring a file into Premiere Pro that already exists on your hard drive. Video clips, audio clips, and graphics can be imported into the Project window by using the pulldown File ![]() Import, or by using the keyboard command, which is Ctrl + I. Alternatively, you can right-click in a blank space in the Project window and select Import from the context menu.
Import, or by using the keyboard command, which is Ctrl + I. Alternatively, you can right-click in a blank space in the Project window and select Import from the context menu.
Toward the bottom of the Import dialogue, the File of type pop-up will display a list of compatible file types when you click on the down arrow. For easier sorting, you may want to select from the list the type of file you’re searching for. This will only show you that type of file and folder in the browser.
Premiere Pro can import many types of media, including the files output by many other Adobe applications. See Chapter 11 for further details on how Premiere Pro handles these files.

