As the process of video editing changes and new advances in computer hardware and software continue to make desktop computers more powerful, desktop computers are taking over many roles formerly dominated by expensive dedicated workstations and proprietary or extremely specialized software. Graphics, special effects, audio production, and post-production that used to be done on many different specialized systems—or even by specialized companies—all continue to migrate to inexpensive, off-the-shelf computer systems.
Because computers can accomplish various functions through the use of different software, a small production staff with a few computers can now do all of the jobs previously mentioned—and then some. The laptop computer on which I’m writing this book has software to do everything previously mentioned (now, if I only had all those skills). Although the laptop may not be as fast as my desktop systems, it is far more portable.
Adobe has several software packages that are designed to complement Premiere Pro in meeting the needs of those of us who must complete a variety of tasks, most of the time without leaving the computer we’re working on.
Working with Adobe Photoshop
Adobe Photoshop has long been the gold standard for photo and graphic manipulation software. Once used primarily by print layout artists and photographers to retouch or manipulate photographs, Photoshop’s value for image manipulation in video postproduction has become increasingly apparent in recent years.
We use Adobe Photoshop to create some sophisticated titling and masks, to work with client logos and graphic content, and, of course, to manipulate still images.
We’ll need a Photoshop file with several layers. In Photoshop 7.0, you can choose the proper document size from the New dialogue. Photoshop 7.0 says that 720 × 534 pixels is the frame size required for NTSC DV/DVD. Although this is the proper image aspect with square pixels, the actual picture size of NTSC DV is 720 × 480 pixels. This is because the pixels in DV are not square, but slightly taller than they are wide. For other NTSC formats or PAL, there are document presets, as well.
(Photoshop CS can create documents with nonsquare pixels.)
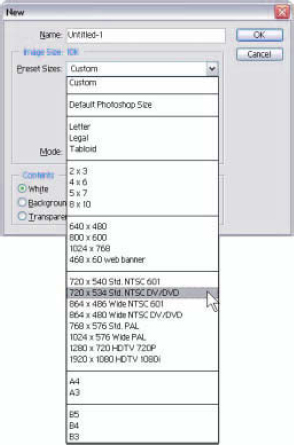
New document size presets in Adobe Photoshop 7.0.
What all this means is that the 534-pixel tall document will stretch off the top and bottom of the screen a bit. You may want to practice with Photoshop frame sizes and Premiere Pro, even if you’re an experienced Premiere user. Still documents are handled at their actual size in Premiere Pro, rather than attempting to force-scale the image into the video frame size.
1 Create a document in your desired size in Photoshop and create several layers with some content.
2 Save the document.
3 Launch Premiere Pro and go to File ![]() Import.
Import.
4 Find your Photoshop file and select it.
At this point, you will get a dialogue asking you to make some choices. The Import Layered File dialogue has a menu option to import your Photoshop file.
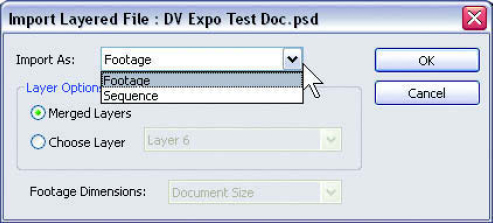
You can import Photoshop documents as footage (single layer) or as a sequence.
To load the file as footage will result in all layers being merged and acting like one still image. You won’t be able to manipulate any layers separately. If you import as footage, you have the option, toward the bottom of the dialogue, to load all the layers merged together or to load a particular layer. (This is one of those times when naming your Photoshop layers something descriptive really comes in handy.)
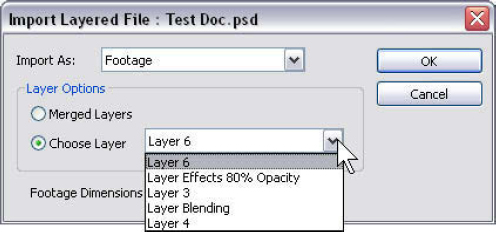
You can choose to load individual layers from a Photoshop file. Normally, I name my layers much more descriptively than this—with good reason.
If you choose to load one layer, you can choose between Document Size and Layer Size. Document Size refers to the size of your Photoshop document; the Layer Size option will look at only the area that the content on the layer occupies and will crop it tightly, eliminating empty document space. If you have carefully arranged the layers within the document in Photoshop, choose Document Size, because Layer Size will cause all the layer content to be centered by Premiere Pro, discarding any position information.
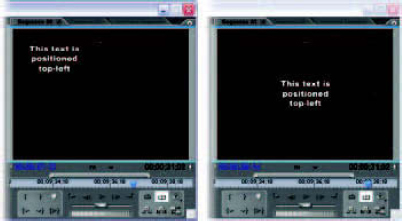
On the left is the layer loaded at document size; the text is in the top left corner of the Photoshop document. On the right is the same layer loaded at layer size; the text has been centered in the frame because the text is the only content on the layer.
If you choose to load the file as a sequence (as opposed to footage), all the layers will be loaded separately and assembled in their own sequence, layered on the timeline the way they were laid out in Photoshop. This can be a very productive way to work with Photoshop documents, because you can load the layers and manipulate them in their own sequence. By preproducing your Photoshop file’s motion or effects in this way, you can drag the Photoshop sequence from the Project window into your master sequence—with the entire Photoshop document and all the individually handled layers as one easy-to-handle clip.
An easy way to illustrate the benefits of working this way is to consider a multielement graphic that assembles itself through different components flying in and all landing exactly on their mark to form a finished logo. It’s easiest to construct a logo that has several elements in Photoshop, perfecting the relative size and placement of each individual element on each layer. When you import the Photoshop document as a sequence, all the elements are lined up precisely, allowing you to create your motion or effects with an ending home position, as opposed to attempting to line up the components by sight in Premiere Pro.
Export
To export material to Photoshop from Premiere Pro, you have several options. Photoshop will load any of the still document formats that Premiere Pro will export (BMP, TIFF, Targa, or GIF). Photoshop can also load a Filmstrip file, which is available when you export a clip (as opposed to a frame). I usually recommend that users export numbered images, as explained in Chapter 10. Filmstrip files can be awkward to handle, and I find it easier to work on a series of frames loaded into one document and stacked as layers in one Photoshop file. That way, I can see changes lined up between layers instead of scrolling through the frames all laid out on one large canvas.
Working with Adobe After Effects
Adobe After Effects 6.0 has become a favorite tool of many motion graphic artists. This software lets you do very sophisticated layering of multiple video and still images or graphics, create incredibly complex text animations, and basically just accomplish demanding video effects tasks that Premiere Pro really isn’t designed to do (or, in some cases, doesn’t do as well or as easily).
After Effects can create rendered video files to be imported into Premiere Pro in the conventional way that you might import any video clip.
Premiere Pro doesn’t load After Effects project files, but it can open the After Effects project file when you select Edit Original on the rendered clip that came from the project. In After Effects, go to Composition ![]() Make Movie to open the Render Queue dialogue. In the render settings for your composition, select the hot text next to Output Module to open the Output Module Settings dialogue. In this dialogue, for Embed select Project Link. Premiere Pro will automatically open the After Effects project where the video file was created.
Make Movie to open the Render Queue dialogue. In the render settings for your composition, select the hot text next to Output Module to open the Output Module Settings dialogue. In this dialogue, for Embed select Project Link. Premiere Pro will automatically open the After Effects project where the video file was created.
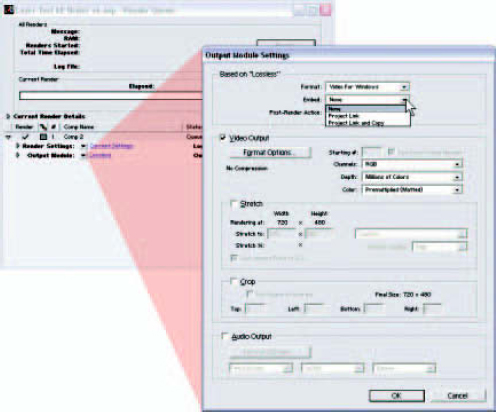
The Output Module Settings dialogue in After Effects 6.0.
After Effects will also open a Premiere Pro project should you want to work with advanced keying or effects within a Premiere Pro project. In After Effects, go to File ![]() Import and select a Premiere Pro project to import.
Import and select a Premiere Pro project to import.
Note: This feature is enabled by a plug-in that installs with Premiere Pro. If you have installed After Effects after installing Premiere Pro, you may have to install this plug-in manually or reinstall Premiere Pro to use this feature.
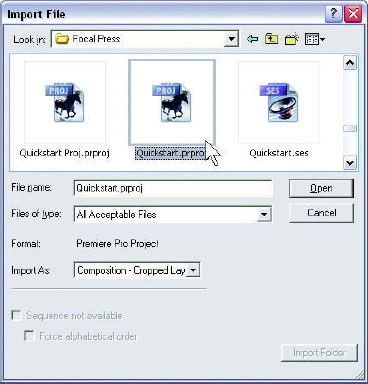
Selecting a Premiere Pro project file to import into After Effects.
The following are some important factors in how Premiere Pro project files in After Effects are handled:
• Clips remain in their folder arrangements. Subfolders will show up correctly, and sequences will convert to After Effects compositions within their proper folders, as well. Photoshop layers and sequences will transfer as if they had been loaded directly into After Effects.
• Cross dissolves will convert to clip opacity changes.
• Motion Fixed Effects properties will translate into After Effects.
• The Crop video filter will convert to an After Effects layer mask.
• Effects using After Effects filters in Premiere Pro will transfer directly, but other filters may not translate properly or work at all.
• You can render Premiere Pro sequences from After Effects to be used in Premiere Pro or as final output of your project.
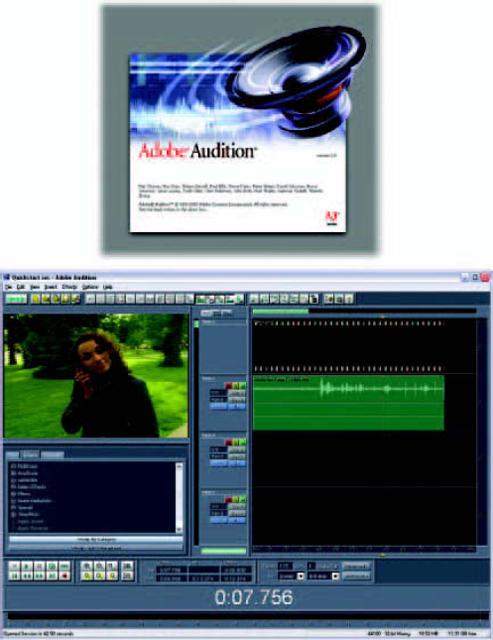
An example of creating audio to video in Adobe Audition.
Audio is often the ignored component in the world of video editing. Although Premiere Pro has some of the best audio tools available on any video editing software package, there will still be times when a dedicated, versatile audio editing and production software package will be needed to enhance or (unfortunately, in some cases) to fix your material.
Adobe Audition is really several tools in one. You can edit audio files and create multitrack audio mixes (up to 128 stereo tracks). You can also use Audition’s looping capabilities to create your own music beds, using any of the thousands of music loops included with the software or generally available.
There are different ways to work with Adobe Audition in your workflow. You can produce music and sounds in Audition to be imported into Premiere Pro, or you can take video clips with sound and work on the audio portion of the video clip itself.
When you output an Audition project, you can create your sound file so that the Audition session and mixdown files can be accessed via the Edit Original option in Premiere Pro. Select Options ![]() Settings and click on the Data tab. Select Embed Project Link data for Edit Original functionality.
Settings and click on the Data tab. Select Embed Project Link data for Edit Original functionality.
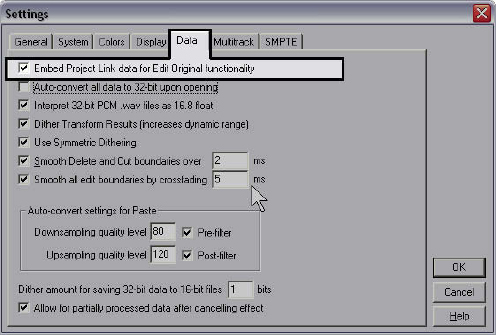
Embedding a project link in your Audition projects will enable Premiere Pro to link to the project from the sound file in your video project, using Edit Original.
DVDs are becoming a preferred method for distributing video content. And why not? The video quality is superior to most widely available consumer videotape titles, which are usually offered on VHS. The audio quality is superb, and with surround sound available on DVDs…well, let’s just say the DVD is most definitely here for a while.
When you distribute your content on DVD, there are a couple of ways to go about it. We described Adobe Premiere Pro’s direct Export to DVD earlier, but if you want a truly sophisticated title, you will need to author the DVD. Authoring will give you the ability to create menus and make your disc interactive, offering your viewers options.
Adobe Encore DVD is one of the newer kids on this particular block, but it definitely isn’t short on features.
Although Encore can be your tool for the authoring process, you will want programs like Adobe Photoshop and After Effects to create your graphics and motion menus, and you will need a program like Premiere Pro to create your finished movie.
A standard video DVD uses MPEG-2 video files. If you are creating a program in Premiere Pro that is intended for authoring in Adobe Encore DVD, you need to export a file from Premiere Pro that is the audio and video of your completed project (see Chapter 10: Exporting Media on page 170). You can either export a clip in the native format in which you are editing, such as DV, and let Encore change the file to MPEG-2 when you burn the disc, or you can output the MPEG-2 file directly from your Premiere Pro timeline (see Chapter 10: Adobe Media Encoder on page 168). I prefer to encode my MPEG-2 files from the timeline to avoid duplicate steps, not to mention that the MPEG-2 file is smaller than a full-resolution master program clip of DV or MPEG video.
Another reason to export MPEG-2 from the timeline in Premiere Pro is that you can create markers on your timeline, and those positions will remain attached to the file. This means you can create chapter points at those marker points almost effortlessly. If you were to export an AVI from Premiere Pro for MPEG-2 encoding in Encore DVD, there would be no way to retain this marker information.
By using the Embed Project option in Premiere Pro’s export dialogue, all these programs can link back to a project in Premiere Pro from the exported file using the Edit Original command.

