Anyone who has worked with video editing on a computer knows that audio is an often overlooked part of the video editing process. Although audio capabilities are being reinforced in many video editing packages, Adobe Premiere Pro has brought audio capabilities for video editing to a new level.
Premiere Pro creates audio previews called conformed audio files. The complicated explanation of these files is that they’re uncompressed 32-bit audio files created at the sampling rate defined in your project settings. The simple explanation is that they are very high-quality audio files, which allow Premiere Pro to preview audio effects very fast and efficiently at a high-quality level, but they can take up significant drive space.
Any audio that you bring into Premiere Pro—whether it’s the sound that is part of a video clip, or a music bed or sound effect—must be conformed. Conforming takes place in the background and may affect your ability to use the clip while it’s being done, and it may affect the speed of your system during the time conforming is happening. A short clip may conform without you realizing it’s going on, but a long clip, such as an hour of DV material captured as one clip, could take some time. How much time this process takes depends on your system specifications.
The conformed audio files are created in the location you specify in Edit ![]() Preferences
Preferences ![]() Scratch Disks
Scratch Disks ![]() Conformed Audio.
Conformed Audio.
And, as you will see in this chapter, conformed audio is just the beginning of the changes and improvements for audio control in Premiere Pro.
Track-Based vs. Clip-Based Effects
The first general concept to understand is that you can affect audio in Premiere Pro in two ways: You can place effects and volume changes onto a clip, and a new feature in Premiere Pro is the ability to apply volume changes and effects to a track.
Applying level adjustments and effects to a clip results in level adjustments and keyframes that move with the clip if you choose to change its position. Effects and level adjustments made to a track will stay where they are, even if a clip is moved. In other words, if you had a clip that was very loud and you made a level adjustment to the audio track with the Audio Mixer to lower its level, then you decided to exchange that clip for a different one that was not too loud, the adjustment would be linked to the track and stay in place, most likely requiring you to readjust for the new clip.
Most experienced Non-Linear Video Editors are familiar with the concept of applying effects to audio clips. The new features and capabilities contained in the all-new Audio Mixer may make even the most seasoned editor seriously consider rethinking his or her workflow, moving the majority of audio work from the timeline to the Audio Mixer.
The All-New Audio Mixer
Experienced Premiere Pro users will notice the new Audio Mixer, a huge step forward from the audio mixers of Premiere’s past versions. Users coming from another application may be surprised at the considerable power contained here. With features like automated mixing (deep down, what audio veteran doesn’t really like flying faders?), submixes, full 5.1 surround, and Virtual Studio Technology (VST) plug-in support, experienced audio editors will definitely find some satisfaction with the audio processing power of Premiere Pro.
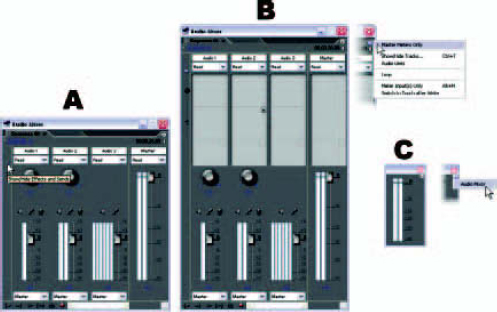
The three available Audio Mixer display modes. A. Open with the Effects/Sends hidden. B. Fully open. C. Master Meters only. Note the Audio Mixer menu choices to navigate between the views.
There are three choices for displaying the Audio Mixer. The Master Meters Only setting knocks the window down to a very small master levels display. With the Audio Mixer open, you have the option of showing or hiding the Effects/Sends area of the mixer.
Anyone new to video editing may find the Audio mixer a bit intimidating, but it is actually very efficient and logical. Even with the extensive capabilities in the mixer, the basic functions of the mixer are easy to understand.
The visual layout is familiar to audio pros who use mixing consoles. The familiar volume sliders work similarly to the volume sliders on a sound mixing board. In a way, changing the layout to vertical instead of horizontal makes the function of the sliders even easier to understand. Raising the slider increases the volume of that track in the mix, and lowering the slider decreases the volume of the track in the mix.
There are sliders for each mono, stereo, and surround channel in your timeline. There are also sliders for submixes and a slider for master volume. The master fader will always be on the far right side of the mixer. If you can’t see all the tracks in the mixer, they may be outside the window’s view. You can scroll left or right or increase the size of the window to bring missing tracks into view.
Beside each fader is the corresponding volume unit (VU) meter. The display in the VU meter gives a visual indication of the level of the sound on the track. The VU meters on the master and submix tracks show the level of the summed, or combined, audio tracks routed to them.
Audio levels can create an endless discussion with diverse opinions, particularly when it comes to analog vs. digital levels. Analog audio has always been referred to as having headroom (or ability to handle excess audio level) above 0 dB, but digital has no headroom at all.
When you’re working in Premiere Pro using DV or another digital video format, the basic idea is that 0 dB is as far as you can go. The numbers indicating the values are beside the volume fader. With digital audio, exceeding 0 dB will result in clipping, which simply cuts off any data exceeding 0 dB, causing potentially severe audio defects or artifacts. Keep in mind that although individual tracks may all be within acceptable limits, after they’ve been combined, the sound level from the summed tracks may be too high. Decrease the master volume fader or the individual track faders as necessary to make sure that your levels are within acceptable range.
Channel Panning
In sequences where the master out is stereo or mono, you will see a pan knob above the slider on mono and stereo tracks to pan the channel from stereo left to right. If the master output for the sequence is 5.1 surround, you will see the 5.1 Surround Pan/Balance tray on each mono and stereo channel. These controls are to slide the audio “presence” from channel to channel, giving the viewer the perception of spatial movement or presence. The power of surround sound is well known. We’ve all been in a theater and been affected by a savvy sound mixer. Our eyes tell us that the objects we see are in two dimensions—while our ears make a convincing argument for three.
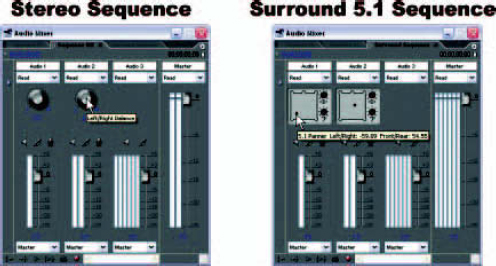
The Audio Mixer from a stereo sequence and from a 5.1 surround sequence. Note the Pan/Balance trays on the surround project.
There are three symbols above the faders. They are the Mute Track button, the Solo Track button, and the Enable Track for Recording button.
Mute Track: (Speaker icon). Use this to exclude a track from playback to focus on mixing other tracks or to compare different mixes.
Solo Track: (Trumpet icon). Use this when you need to concentrate on just one track. Another definition for Solo could be “Mute everything but this track.”
Enable Track for Recording: (Microphone icon). Use this control to enable recording directly to the timeline. Use this setting and a microphone plugged into your computer to do voiceovers directly to the timeline.
Automating Changes in the Audio Mixer
You can set the Audio Mixer to record your adjustments as you make them, when making audio-level adjustments using the faders or channel adjustments using the panpots or the Surround tray during playback.
To adjust the level or pan as the program plays back:
1 Position the CTI at the point on the timeline where you want to start your changes.
2 Select Write from the pop-up menu above the channel(s) you want to affect on the Audio Mixer.
3 Click the Play button in the Audio Mixer window.
4 Make changes on the control surface of the Audio Mixer for levels or panning.
5 After you’ve finished the changes, reset the pop-up(s) to Read.
6 Position the CTI to a point before your changes and click the Play button once more to play back your changes.
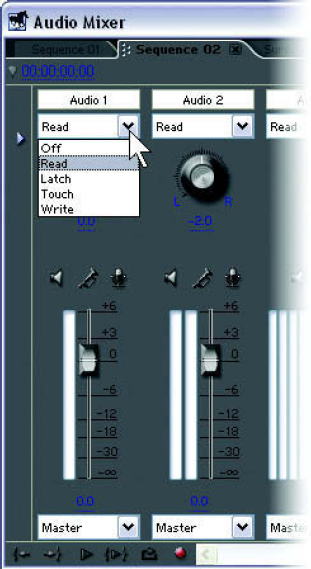
The automation choices are located in the pop-up just above the channel controls.
There are several different record and playback modes available on the Audio Mixer.
Off
This setting completely ignores your settings for the track during playback. Use this setting when you want to disable a previous mix and have manual control of the mixer.
Read
This mode tells the Audio Mixer to read all your stored settings during playback of the track. All your effects and level adjustments will be heard during playback. If you attempt to change a setting during playback on a track with Read selected, the control will simply snap back to its original location as soon as you let go of it, and no changes will be recorded.
Write
Unless you have a track control set to Safe During Write, this mode will record the adjustments you make. Each adjustment will create keyframes in the timeline as you play the program and operate the controls. Write mode creates keyframes as soon as you begin playback. Even if you only play back a track in Write mode and make no adjustments, you will have created keyframes.
Latch
Similar to Write mode. The difference is that you don’t actually create a keyframe until you make a change. The control stays in the position in which you left it after adjustment.
Touch
Similar to Latch mode. The difference is that after you make the adjustment and release the fader, the fader will return to the value it started with, as opposed to staying in the position in which you left it (for information about setting Automatch Time, see page 11).
Note: You can choose to make a track Safe During Write. You can select this option by right-clicking on an effect or on the panpot or fader for each channel. This will lock the chosen settings (chosen effect, pan, or level) for all tracks while you are using Write, Latch, or Touch mode to record other mixing commands. Use this in cases where, for example, you’ve set up your mix but now want to work with stereo or 5.1 channel panning only. Choosing Safe During Write for the volume faders will prevent you from accidentally moving one while you’re working with your panpots.
Applying an Effect to a Track
There may be times when you need to apply an effect to an entire track. For example, if you have footage from multiple shoot setups, and one location had a noise that needs to be filtered with an equalizer, you may want to dedicate one track to only those clips and set the proper effect once. That way the effect is consistent, and you don’t have to set the effect for each separate clip individually. An effect is set for a track from the Audio Mixer.
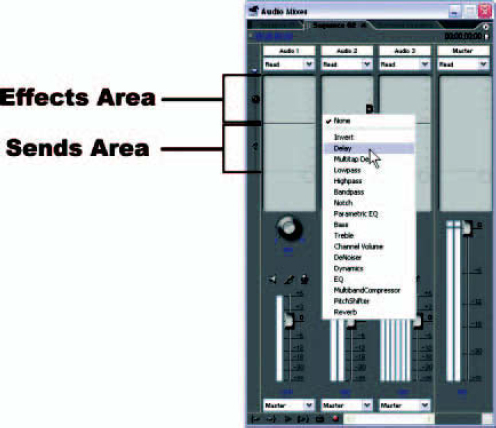
First of all, verify that you have the Audio Mixer fully open. There should be large blank areas above the panpots for each channel. These are the areas where we’ll set up our effects.
Click on one of the arrows along the right side of the Effects area to open the Effects menu.
You will notice that these areas seem to be broken into sections. The top section is for selecting effects. Each channel has the capacity for five separate effects. If you run your mouse down the top area, you will notice that each area highlights as you roll over it. On the right side of each effect slot is an arrow. Clicking this arrow will open a menu of the effects available to Premiere Pro. Select an effect from this menu, and you will see it take a position in your selected place on the Effects list for that channel or track.
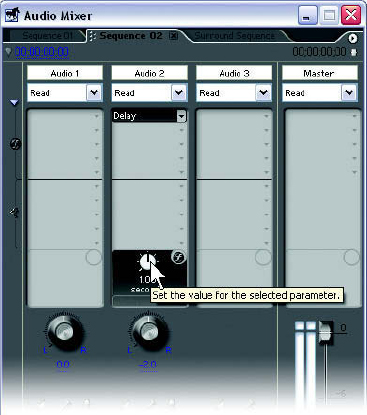
Some effects, such as a simple Delay, will have only a knob at the bottom of the Effects space to make simple adjustments. Other, more sophisticated effects, like the MultibandCompressor, will have their own control panels, which open when you double-click on their name in the Effects list.
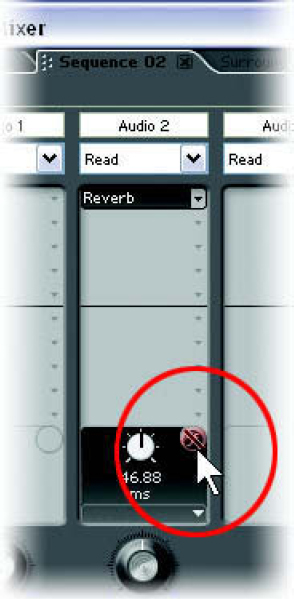
Here, a Delay effect has been added to channel 2 in the Audio Mixer. The knob at the bottom of the Effects/Sends area adjusts its value.
To apply an effect to a track, do the following:
1 Place an audio clip or group of audio clips on Audio 1 (a human voice would be very good to use for this demonstration).
2 On the Audio Mixer, go to the to Audio 1 and click on an arrow on the right side of Audio 1’s Effects area to open the Effects menu.
3 Select Reverb from the bottom of the menu.
4 Click and drag up on the knob at the bottom of the Effects area to increase the intensity of the effect (you should see the knob rotate and the setting change). Or you can right-click on the name of the effect and select Edit from the menu list to access the full controls for this effect.
5 Play your clip on the timeline.
The Effects Bypass button.
To temporarily disable an effect to listen to your audio without it, click on the small Bypass button (cleverly disguised as an ornate “f”) at the bottom of the Effects area
Along the bottom of the Audio Mixer window, you will notice transport controls. When you are working with the Audio Mixer, these controls control playback of the timeline, just as the Program View controls do. Use these controls to preview audio effects by applying the effect and using the transport controls to play the track.
If there is an area you know you’ll be working with in detail, place an in point and an out point on the timeline and use the Loop setting at the bottom of the Audio Mixer to loop that section continuously as you make adjustments.
To remove an effect from a track, return to the Effects menu for the effect you wish to remove and select None.
There are instances when the results from an effect can change significantly, depending on whether the effect was applied before or after the volume control was applied, particularly when a large volume adjustment was necessary. By right-clicking on the name of the effect, you can choose Pre-Fader to apply the effect before the volume adjustments or Post-Fader to apply the effect after the volume has been adjusted.
Submixes
In the days when all these audio effects could only be achieved through the use of expensive analog equipment in a large rack, unlimited channels of things like reverb, delay, and compression just weren’t possible because of the expense. There were times when one channel of a particular effect was all a studio had, even though that effect was needed on multiple channels. To achieve the effect without a separate recording pass to process each channel separately, the studio needed to do a submix. The submix would combine all the channels that had to go through the effects device so that the device would only have to process the audio once, but the channels would be mixed properly so that their relative volumes were correct going into the final mix.
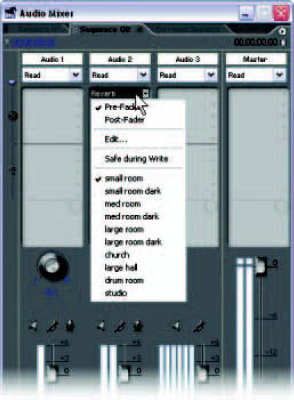
Right-click on an effect name to open a context menu that will give you Pre-Fader and Post-Fader options and (in this case for the Reverb effect) a selection of presets.
Why would you need to do a submix in Premiere Pro when you have all these channels available to you? The answer has less to do with your options than with your processing power. If you apply an effect to three channels separately, each with its own version of reverb, for example, Premiere Pro must apply that effect three different times, treating it as if it were actually three different effects. Use a submix to mix those three channels together before applying the reverb effect once to the submix, and you effectively use only a third of the resources to do it.
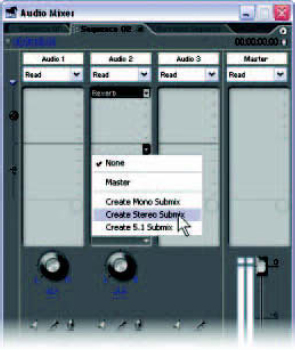
Click on a triangle along the right side of the Sends area to open the Submix menu.
There are also times when effects will simply interfere with each other if applied to different files. Three tracks of audio playing back with three different reverb applications just won’t sound the same as having the tracks mixed before the effect. A consistent effect across all three tracks creates a more realistic sound.
The area above the panpots, where we’ve focused for our effects work, is called the Effects/Sends area. We need to send a channel or track to a submix. The Sends area is below the Effects area. If you click on an arrow along the right side of the lower half of this area, you will notice that the menu that comes up has to do with creating submixes.
To create a submix, follow these steps:
1 Click on an arrow on the right side of the column to open the Send menu.
2 Select Create Stereo Submix (or Mono or 5.1, depending on your needs).
3 A new channel will appear in the Audio Mixer, and a new track will appear in the timeline, representing your submix.
4 The track from which you created the submix is already routed through that submix. To route another track to the submix, click on an arrow in the Sends area of another track, and select the submix from the menu.
5 Apply effects to the submix as you would to any other track in the Audio Mixer.
The relative volumes of the tracks in the submix are controlled by the volume slider on the individual tracks. It’s possible to send a track to a combination of submixes and the master track by selecting more than one send in the Sends area. A volume knob, indicating the volume level being sent to each destination, will appear at the bottom of the Effects/Sends area as each destination is selected.
You can route any track to any submix. Keep in mind that the type of audio that finally goes to tape will depend on the master settings for your sequence. You can have mono, stereo, or 5.1 channel surround sound tracks or submixes all included in the same sequence, but you can only output to stereo if that is your sequence’s master setting.
Track Display in the Timeline Window
As many controls as you have available in the Audio Mixer, there are even more available in the timeline itself. In the area where you find the name of the track on the far left side of the Timeline window, there are several controls that affect how we view the timeline.
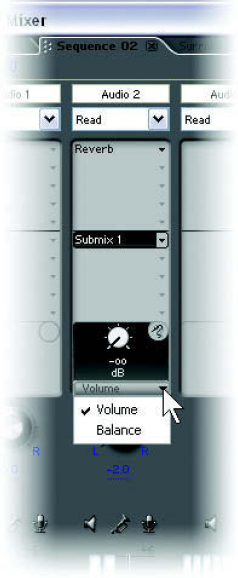
Use the adjustment knob at the bottom of the submix area to adjust the level or the channel balance going to the submix, depending on your selection in the pop-up menu just below the knob.
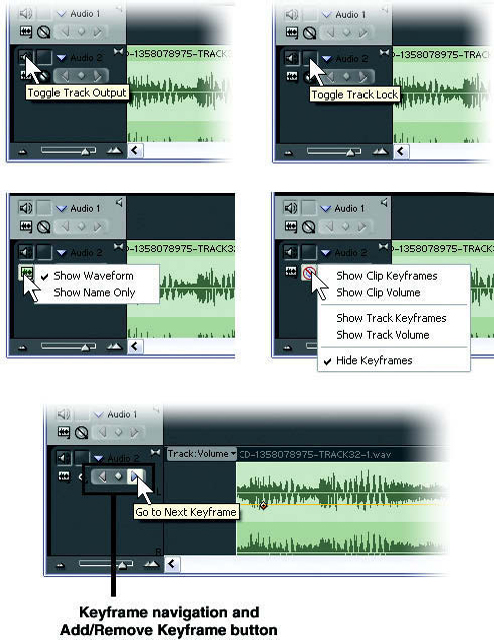
Each audio track in the timeline has several display options and keyframing controls.
This “speaker” button can turn the track on and off. There will be times when you are working with multiple audio tracks and you need to silence one or several of them to concentrate on the adjustment of another.
Toggle Track Lock
This button, to the right of the Toggle Track Output button, can protect a track from unintended changes. Click on this button to make the padlock appear, and the track’s attributes will be locked, including clip position, clip attributes, and track attributes. This will also lock out any unintended changes from happening on this track in the Audio Mixer.
Collapse/Expand Track
This triangle, just to the right of the Toggle Track Lock button, reveals the area where audio waveforms and the volume handles can be displayed. The track must be expanded for you to view the other buttons on this list. After the track has been expanded, you may want to adjust the track height by dragging the bottom edge of the track to make the working area larger.
Set Display Style
This button is only visible when the track is expanded and will produce a menu that gives you the option of showing the audio waveform or the name of the clip only. The audio waveform is very useful to view when you are editing audio, but it may slow the display down a bit on a slower system.
Show Keyframes
The Show Keyframes button is just to the right of the Display Style button and will open a menu with several options. Show Clip Keyframes will display any keyframes you might have associated with a clip-based audio effect. These keyframes would be the same ones created in, and visible in, the Effect Controls window. Show Clip Volume will turn on the volume handles, or rubberbands as some seasoned Premiere users may refer to them. Any keyframes you have created with the volume handles will also be visible. Show Track Keyframes and Show Track Volume work the same way as the Clip settings, but these will show you the volume and keyframe information that you have generated with the Audio Mixer. Hide Keyframes turns off all this information entirely.
Keyframe Navigation Tools
Directly under the track name (when the track is expanded) are the Keyframe Navigation tools. They work exactly like the Keyframe Navigation tools in the Effect Controls window. The arrows will move you forward or back to the next or previous keyframe, and the middle button is used to add or delete keyframes.
Adjusting Clip Audio Levels
There are times when a particular clip needs individual volume adjustment. The volume level of a clip can be adjusted in the Timeline window. Unlike the adjustments made in the Audio Mixer, the volume adjustments you make to the clip itself in the Timeline window will move with the clip when it is repositioned.
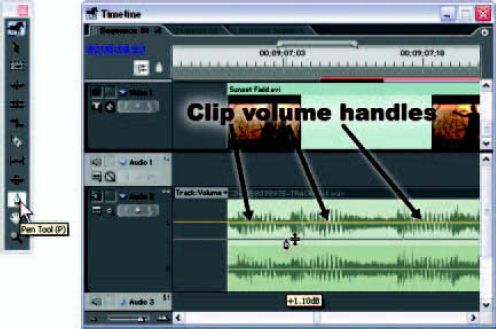
The clip volume handles can be adjusted using the Pen tool.
To adjust the audio levels of a clip, follow these steps:
1 Next to the name of the track on the left side of the Timeline window, click on the triangle for Expand/Collapse Tracks to expand the track if it isn’t currently expanded.
2 Select the button to the right of the Display Style button and choose Show Clip Volume from the menu.
3 Click on the Pen tool in the Tool palette.
4 Use the Pen tool to move the audio volume handle up and down across the entire length of the clip when the Pen tool changes to the Fade Adjustment tool.
5 You can create keyframes to vary the level along the clip by Control-clicking along the line segment to create clip volume keyframes.
6 Keyframes can be moved with the Pen tool or the Select tool once they are created.
Note: The Pen tool will automatically change state as you move over keyframe nodes and line segments, allowing you to adjust either without changing tools.
Note: Each keyframe’s interpolation can be set, just as it can inside the Effect Controls window, by right-clicking on a keyframe and selecting the interpolation setting(s).

The Pen tool moves (A) keyframe nodes or (B) line segments, based on where you position your cursor.
Applying audio effects to individual clips, as opposed to entire tracks, can be done on the timeline. Audio effects are categorized in the Audio Effects folder by the type of audio they are designed to handle. The Mono, Stereo, and 5.1 folders each contain the same list of effects, but make sure that you are choosing from the appropriate folder for the type of audio to which you are applying the effect.
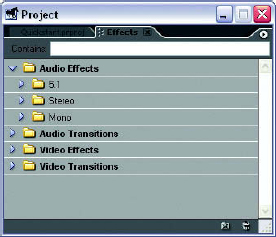
The Audio Effects folder has effects grouped by audio type.
Here’s how to apply an effect to an audio clip:
1 Place an audio clip on the timeline.
2 In the Effects window, open the Audio Effects folder.
3 Open the appropriate folder inside, based on the type of audio clip you’ve chosen.
4 Drag the effect to the timeline and release it over your chosen clip.
Each audio effect has a different amount of adjustment available through the Effect Controls window. Although each effect is structured differently, the access to the adjustments works the same. Let’s try one effect to demonstrate how this works.
1 Place a clip with audio on the timeline (a human voice would be a good clip to use for this effect).
2 Open the Audio Effects folder in the Effects window and open the appropriate folder: Mono, Stereo, or 5.1.
3 Select PitchShifter from the list and drag it onto your clip. Or, if the clip is selected and the Effect Controls window is open, you can drag the effect into the Effect Controls window.
4 In the Effect Controls window, you will see PitchShifter in the Audio Effects list. Use the triangle to the left of the name to open the settings, then click the triangle next to Custom Setup to see the adjustments for this effect.
5 By clicking and dragging over the knob on the left labeled Pitch, you will adjust the pitch of your audio.
6 Use the spacebar to play back your changes. By using the Bypass check box above the adjustment knobs to temporarily disable the effect, you can compare the sound with and without the effect.
As you can see, the PitchShifter has more adjustments than just this one control. Each effect’s custom controls will be different and appropriate to that effect’s operation. Readers who are familiar with audio processing will find the naming conventions to be fairly self-explanatory. For those who are just becoming familiar with audio effects, the online help has explanations of the functions of different effects; experimentation will help as well.
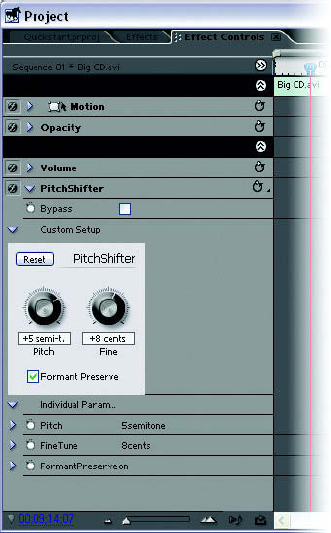
The PitchShifter effect adjustments in the Effect Controls window.
Fading and Crossfading
In many video editing software packages, the primary method of fading or crossfading audio is stacking the two audio clips on two different audio tracks with some overlap, then using the volume handles, or something similar, to simply ramp one in from silence as you ramp the other one out to silence, using the volume handles.
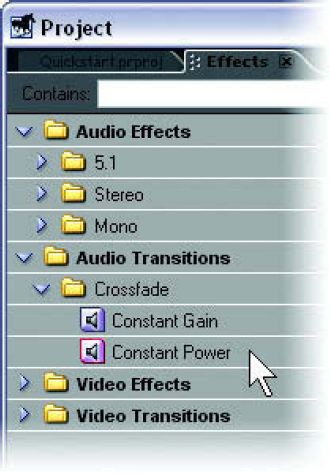
The Constant Gain and Constant Power audio transitions.
Premiere Pro has made this process far easier and faster by allowing the use of audio transitions, which are used exactly like video transitions. They can be used on cuts in line on a single track, or they can be used on the in or out point of a clip to fade it in or out, with no adjacent clip on the same track. The two options for audio crossfade are Constant Gain and Constant Power. Constant Power will produce a fade that sounds very linear or smooth to the ear, but may not actually be a flat ramp, mathematically speaking. Constant Gain will produce a smooth, technically flat ramp up or down, but it may not sound that way to the ear.
To apply an audio transition to fade audio, do the following:
1 Place an audio clip on the timeline.
2 In the Effects window, open the Audio Transitions folder.
3 Open the Crossfade folder and pick one of the crossfade transitions.
4 Drag the transition to the timeline, and release it on a cut or on the in point or out point of the clip.
5 Use the Select tool, which converts to the Trim tool along the edge of the transition, to adjust the length of your transition.
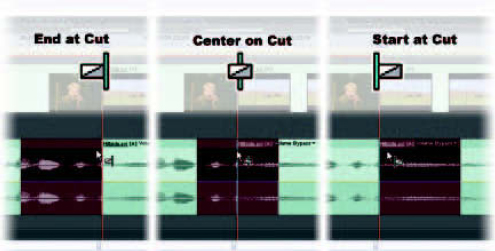
Apply an audio transition as you would a video transition.
To apply your default audio transition, position your CTI on a cut or the edge of a clip and press Ctrl + Shift + D.
The starting length of your transition when you apply it, called the default length, can be changed. Go to the pulldown menu Edit ![]() Preferences
Preferences ![]() General and alter the default length in seconds or fractions of a second.
General and alter the default length in seconds or fractions of a second.

