Video editing today is a much different process from what it was even seven to ten years ago. One area of video editing that has changed considerably is the options for outputting our programs. Even during the early to mid-1990s, when video editing was migrating from rooms full of video tape decks and other extremely expensive equipment to somewhat less costly desktop computers, the goal for output of the program was almost always the same videotape or film stock on which programs had been distributed for years.
Today the options for program distribution are expanding, due to a seemingly endless variety of compression options and distribution media. Users are editing programs for distribution on film, tape, CD-ROM, DVD, computer hard drives, flash RAM, video games, and the Internet. Premiere Pro has a very capable toolset for getting your program out of your machine and into the hands of your viewers.
Preparing a Program for Mastering
Depending on the ultimate destination for your program, you may want to prepare your program differently. For television commercials and programs that will be distributed on videotape, it is always best to put a test pattern (bars and tone) on the beginning of the tape. The test pattern, the universal language of all the equipment that will handle or process your video, helps broadcast or duplication technicians handle your program properly. Check with the television station or duplication facility for specific requirements for master tapes, such as test pattern length, audio tone level, black needed before program start, and whether or not a countdown or leader is required.
Common practice for a duplication master might be as follows:
• 60 seconds of bars and tone
• 10 seconds of black
• 10 seconds of slate (a simple title identifying what the program is and who you are, in case there are concerns or questions about the master)
• 10 seconds of black before program begins (Alternately, some television stations may still request a 10-second countdown.)
Some broadcast network submission requirements ask for program start to be at an exact timecode. Many editors will start bars and tone in the timeline at 00:58:00:00, so the program will always start two minutes later at exactly one hour (01:00:00:00). However, some consumer DV devices always start recording at 00:00:00:00 and don’t allow you to set a different value manually. Unless you’re supplying your DV footage to a television network, setting a specific timecode probably won’t present a problem.
Here’s how to create a Bars and Tone clip in your project:
1 From the File pulldown menu, select New ![]() Bars and Tone.
Bars and Tone.
2 The Bars and Tone clip will appear in the Project window.
3 Drag the clip into your timeline.
Note: If your program starts at the very beginning of your timeline, you may have to push your program material down the timeline to allow for the Bars and Tone clip and whatever else is required before program start. To accomplish this, you can use the Track Select tool with the Shift key to shift all tracks down the timeline, or you can perform insert edits at the beginning of the timeline.
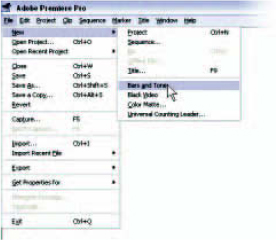
You can create a countdown leader by selecting File ![]() New
New ![]() Universal Counting Leader.
Universal Counting Leader.
If you are planning to output to an MPEG, QuickTime, or Windows Media file, or some other file format designed to be viewed on a computer screen, a test pattern will most likely be neither necessary nor desirable.
Export to Tape
The tape remains, for now, a likely destination for your program. If you are using a standard FireWire connection (also called iLink and IEEE-1394) and a DV camcorder or video deck, the connections are fairly straightforward. One FireWire cable will carry both audio and video to your camcorder or deck, just as it probably used the cable to bring in the footage and sound from that deck.
Note: If you are exporting your program to DV tape via FireWire, be sure to open your DV Playback Settings dialogue (from the Monitor window menu). Verify that Play Audio on DV Hardware is selected under the Export To Tape settings.
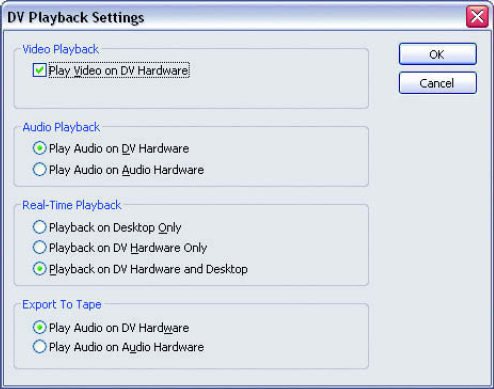
The DV Playback Settings dialogue.
If you have a video card that can record and/or capture analog video and audio, you might have to connect more than one cable. If you are making all or a part of your living with Premiere Pro, you may want to get an analog (usually RS-422) deck control plug-in so that Premiere Pro can connect to and control decks other than DV. Deck control allows you to place the program more precisely on the tape, particularly if you need to edit something and insert a section into an existing master tape.
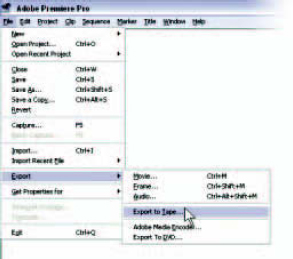
By selecting File ![]() Export
Export ![]() Export to Tape, you will open the Export to Tape dialogue.
Export to Tape, you will open the Export to Tape dialogue.
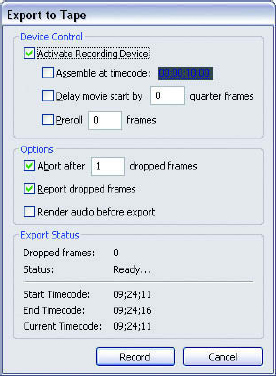
The Export to Tape dialogue.
Under Device Control, you will see several check boxes:
Activate Recording Device: Check this box to get remote control of your video deck. If you need to take an existing program and add it to the end of your tape at a particular point, you will need this box selected so that Premiere Pro can control the edit point.
Note: It is best to “black” any DV tapes by recording the entire length of the tape with your camcorder’s lens cap on before recording material on the tape from Premiere Pro. This will produce continuous timecode for the length of your tape, ensuring that Premiere Pro will always be able to navigate to the proper timecode location. If the program is destined for broadcast and your recorder allows you to set timecode, you may want to start with 00:58:00:00, as discussed earlier.
Assemble at timecode: Check this box and enter the timecode from your tape where you want to start recording new material.
Delay movie start by_____ quarter frames: Some DV video decks can experience a slight delay between detecting the proper position to edit “in” and actually beginning recording when the tape is playing back. You may want to experiment with your deck to determine how much, if any, delay is necessary to synchronize your deck with Premiere Pro.
Preroll: As in the ancient days of the early 1990s, when deck-to-deck video editing was state-of-the-art technology, video decks need to back up and use some preroll to get up to speed and to synchronize with the other devices involved with the edit. Many decks will be fine with 150 frames (5 seconds) of preroll.
Under Options, there are additional check boxes:
Abort after____ dropped frames: Check this box to stop the export if a certain number of dropped frames is detected. Type the number of dropped frames you want to have trigger an abort. I usually leave this on, because dropped frames usually aren’t acceptable under any circumstances for our projects. I would rather have the export stop, so that I can fix the problem and not waste time exporting the entire program just to repeat the process.
Report dropped frames: Check this box to have Premiere Pro track the frames that have been dropped during an export. I also always keep this one on, although when I ask it to stop on a dropped frame, it only counts to 1.
Render audio before export: Check this box to render audio effects and transitions before performing the export if you have a complex audio track that may prevent real-time export. Audio rendering is usually not nearly as time-consuming as video rendering, so I usually render the audio as a matter of practice before export.
The Export Status area displays any dropped frames that may have accumulated, the status of your record device, and the starting, ending, and current
timecodes.
Once your settings are complete, select the Record button to export or the Cancel button at the bottom of the dialogue to exit. (Note that if the Cancel button is selected, the settings will be lost.)
Manual Recording
If you are exporting your program to a video recorder through some other means than FireWire and you do not have direct control of the deck, you will have to operate both the computer and your deck manually.
To record your program to a video deck manually, follow these steps:
1 Open the project and sequence you want to export.
2 Play the sequence back and monitor the input of your deck to verify that the audio and video are coming through to your deck.
3 Position the tape at the point where you wish to start recording.
4 Position your CTI a second or two before the beginning of your program (or test pattern).
5 Start your deck recording, then click on the Play button in the Program Monitor or press the spacebar to start playback.
6 when the program is finished, click on the Stop button in the Monitor window or press the spacebar again before stopping the recorder.
A new feature with Premiere Pro is the Export to DVD option. With a compatible DVD burner connected to your system, this option will allow you to create an autoplay DVD. This type of DVD will automatically start to play when inserted in a DVD player. This option does not allow you to use menus, as you could by using a DVD-authoring program like Adobe Encore DVD, but you can use your timeline markers as chapter points to allow a DVD player to skip to various key points in the program.
Important note: Premiere Pro needs enough space to create your DVD on your hard drive before physically burning the DVD. Make sure there is sufficient space on your hard drive to create the scratch files for your export while still preserving scratch space for other tasks.
To export a sequence to DVD:
1 Have your project and sequence open. If you don’t want to export your entire sequence, you can create a work area to define a section of the sequence.
2 From the pulldown menu, select File ![]() Export
Export ![]() Export to DVD.
Export to DVD.
3 The Export to DVD dialogue will open.
4 Set up your settings as needed (specifics to follow).
5 Insert a compatible blank DVD in your DVD burner.
6 Click on Record to begin.
In Export to DVD, you will be specifying the following settings.
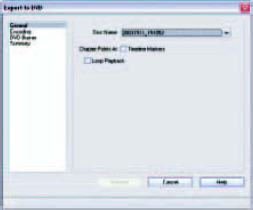
Under General panel:
• You can accept the default name that Premiere Pro picks based on the current date and time, or you can select Custom from the Disc Name pop-up menu and type in the disc name.
• Check the box for Loop Playback if you want the program to repeat automatically.
• Check the box for Chapter Points at Timeline Markers to create chapter points at each timeline marker in your sequence.
The General panel in the Export to DVD dialogue.
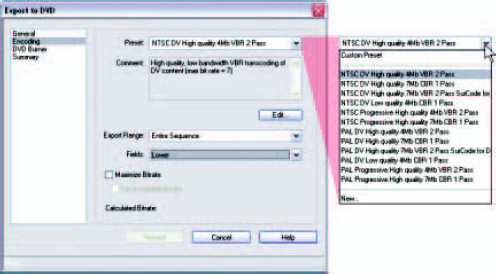
Under the Encoding panel:
• You can choose a preset from the Preset pop-up menu or a custom setting by selecting Custom Preset or New. (If you aren’t familiar with the technical aspects of DVD production, the preset settings are designed to be compliant with the widest variety of DVD players.)
• In the Export Range pop-up menu, you have the choice of exporting your entire sequence or restricting the export to the Work Area.
• The Fields pop-up menu allows you to choose the field dominance of your material. DV source material should be set to Lower; if your source material is progressive scan, choose None.
• Check the box next to Maximize Bitrate if you want Premiere Pro to override the preset settings and use the maximum bitrate that is allowed by the space available on your DVD. (This may result in a file that falls outside of DVD specifications.)
• If Maximize Bitrate is checked, you will notice that you have the option to force variable bitrate, based on the content.
The Encoding panel in the Export to DVD dialogue with encoding presets pop-up menu.
Bitrate is another one of those little items that could tack a chapter onto this book—or maybe a book onto this book.
Compression in general is a mysterious art. It’s not a question of what is best so much as what looks best. Because our eyes rarely tell us the whole truth anyway, video compression schemes can throw out huge amounts of one thing keeping something else to fool the eye into believing it sees a picture of a given quality level. For example, highly compressed video often does away with astounding amounts of color data, while keeping more luminance (brightness) information to distract the eye from the lack of color saturation by the fact that the picture appears sharp.
The amount of motion, contrast, and even straight edges in your footage can make a significant difference in optimal compression of your video. With MPEG, there are two general rules of thumb you can use. The first one is that, for the most part, more bits per second means better pictures. The second rule is that more bits per second means fewer seconds of video on the disc. As your video gets longer, you need to consider how much space is available on a DVD and reduce bitrate accordingly.
VBR stands for variable bitrate, and CBR stands for constant bitrate. CBR means that the bitrate of the file is constant and unchanging, but MPEG is not a video codec that has to be restricted to a single bitrate or file size over time. MPEG can expand and contract its data stream based on the needs of the footage, through the use of VBR and two passes over the footage. VBR is typically the way to produce the highest-quality results in the smallest file.
With VBR MPEG, high action (with a lot of motion covering a high percentage of the screen) occupies a lot of data. On the other hand, footage of a person walking on the beach 100 yards away from the camera, with the remaining 98% of the screen space occupied by the sky, will take very little data, because the sky is unchanging. In order to budget those bits, the MPEG encoder must get a peek at the footage before it attempts to compress it. That way, the encoder knows where the data needs will be high and where they will be low. The almost oversimplified explanation is that the encoder then creates a plan, if you will, on how best to compress the video, based on the maximum bitrate you specified, but also with attention to maximizing efficiency where it can. After this first pass to assess the material’s requirements, the second pass is the compression pass—hence the 2 Pass you see beside the VBR choices in the Encoding panel Preset.
So why in the world would you even want CBR, you ask? Well, there’s a trade-off for that extra quality you get with VBR: time. It takes much longer to do a VBR compression pass than a CBR, not only because it’s actually two passes, but also because it also takes some extra time for the encoder just to do the
compression pass alone. If you have a client breathing down your neck for a look at a rough edit of a project and you have to make the overnight courier, chances are that the quality you would gain by using VBR wouldn’t be worth missing the plane. However, if you are creating a disc that will be a master for duplication of that project, VBR may very well be worth the extra effort. In the end, you must examine the results and judge for yourself which trade-offs make sense.
Under DVD Burner panel:
1 In the DVD Burner pop-up menu, you will see the available DVD burners on your system.
2 Click on Rescan if the DVD burner does not appear. If it still does not appear, check to make sure you have compatible blank DVD media loaded. (If you connected or powered on a DVD burner after you launched Premiere Pro, it won’t be recognized unless you close and relaunch Premiere Pro.)
3 Select the number of copies you wish to burn.
4 The Burner Status will indicate whether or not there is a burner with media detected.
5 You can select whether you want to Record, Test Only, or Test and Record your DVD. (Test simulates recording the DVD to check the blank disc for errors; Test and Record runs a test first and records only after the disc has been verified as having no errors.)
You can select the Summary panel to verify your settings. When your settings are complete, click on the Record button to start the process.
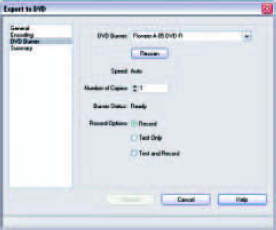
The DVD Burner panel in the Export to DVD dialogue.
The next question in your mind is sure to be, “How long should this take?” Unfortunately, the answer is, “It depends.” The speed of your processor, the amount of RAM in your system, the amount of free space on your hard drive, the length of your program, and the speed of your DVD burner will all play a role. If the program is long and you are compressing with VBR, you may have quite a wait. For a 5-minute corporate piece being compressed CBR for a proof copy, you may be able to complete the process fairly quickly. Test your system before you promise results, because the system on which all this is being done is still the biggest variable.
Adobe Media Encoder
If your project will be playing back from a file, whether it’s an MPEG-2 file for later authoring to DVD, or an MPEG-1, QuickTime, Windows Media, or Real Media CD-ROM, or Internet-based file, you will need to transcode the material to the proper compression format before you can deliver the project. The Adobe Media Encoder is included with Premiere Pro to accomplish that task.
From the pulldown menu, select File ![]() Export
Export ![]() Adobe Media Encoder. The Transcode Settings dialogue will open.
Adobe Media Encoder. The Transcode Settings dialogue will open.
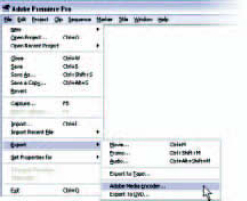
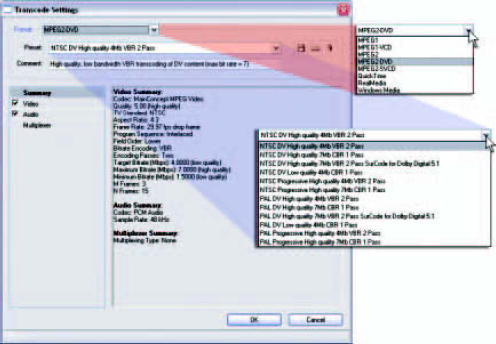
In the Format pop-up menu, choose between MPEG-1 and MPEG-2 presets for DVDs, SVCDs, and VCDs. Or you can choose customizable settings, as well as QuickTime, Windows Media, and Real Media settings.
In the case of MPEG compression for VCD, SVCD, or DVD, it is best to stick with the presets under the pop-up if you are unsure of the settings to use. If you spend some time examining all the options, you will see that the DVD standard requires certain settings to be compatible with the majority of consumer DVD players out there. The MPEG-2 standard is much broader than the DVD standard, and it is possible to create an MPEG-2 stream that won’t play back on a DVD player. The presets are a great way to ensure that your work will be properly formatted for the media you choose to distribute your project.
A VCD can be played on some DVD players and on most computers but uses MPEG-1 compression and is burned to a CD-R. I really don’t agree with calling anything that is a product of digital output “VHS quality,” because we’re comparing apples and oranges; however, that is typically how MPEG-1 is characterized. It is much lower in quality than DVD MPEG-2.
An SVCD is a more obscure format that burns a short amount of video onto a CD-R. SVCD uses an MPEG-2 compression scheme that is still a bit lower in quality than DVD video but better than MPEG-1. Some DVD players will play it, but support for it is still a bit spotty.
DVD, as we know, uses MPEG-2 with particular settings.
Each format option will have a number of presets available from the Presets pop-up menu underneath the Format pop-up menu. You can choose the appropriate preset or customize your own setting in the Video and Audio panels in the left-hand Summary column. If you want to save a customized preset, you can use the Save Preset button (which looks like a floppy disk) in the top right of the dialogue, to save the preset for later use. To load a custom preset, select the Load Preset button, which looks like a folder.
The Transcode Settings dialogue for the Adobe Media Encoder.
Exporting Media
There are times when you need to export material from Premiere Pro for processing or use in other programs. Premiere Pro can export a clip, a sequence, or a section of a clip or sequence as a motion clip in a variety of formats. You can also export audio and still frames.
One final note on compression: we are covering the basics of how Premiere Pro interacts with video compression in general. We won’t be covering the tiny, or even the many not-so-tiny, details of the implications of the various compression schemes available. There are entire books that struggle to be comprehensive and timely on that topic.
As I mentioned in the DVD section earlier, video compression can seem to be more sorcery than science. In many aspects, the significance is in the subtleties. The compression types available to each user will vary, and their uses will be different, depending on what type of workflow you have.
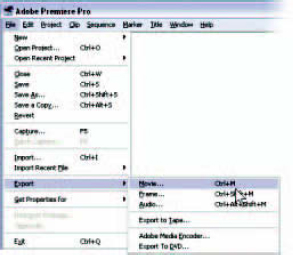
You can export part or all of a clip or a sequence as a motion clip by selecting File ![]() Export
Export ![]() Movie.
Movie.
In the Export Movie dialogue, you can browse to the destination for your exported file. To change the attributes of your exported material, click on the Settings button in the bottom right of the window. This will open another dialogue, where you can choose how to set up your file for export.
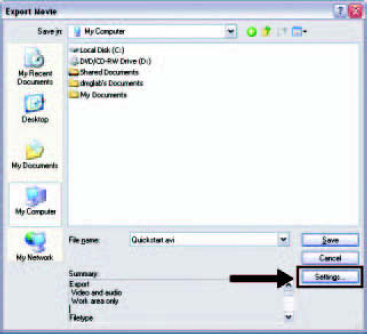
The Export Movie dialogue. Note the Settings button to access the specific settings panels.
1 Select the desired option from the File Type pop-up menu (you will be able to use the Compile Settings button to the right for GIF file selections).
2 Select the range. For a timeline export, you will choose between the complete sequence and the Work Area; for a clip export, you will choose between the complete clip or just the in and out points.
3 In the check boxes below, choose whether to export video, audio, or both. You can choose to have Premiere Pro automatically add your exported media to the Project window when you’re finished—not to mention whether or not you desire your computer to beep at you when it’s done.
4 Embedding Options enables other Adobe programs to associate back to this Premiere Pro project. Select Project when the file you are exporting will be used in another application that has an Edit Original option, such as After Effects and Adobe Encore DVD.
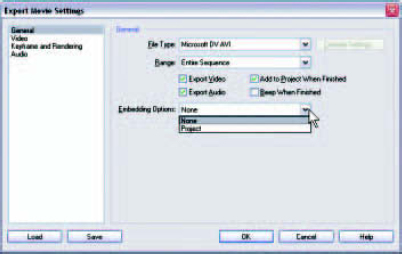
The General panel in the Export Movie Settings dialogue.
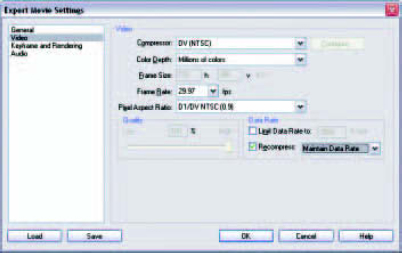
The Video panel has these settings:
• The Compressor pop-up indicates the codec Premiere Pro will use to export your file.
• Color Depth may or may not present you with options. This is an important setting when you are exporting for the Web and need to reduce your color depth considerably, or when you want to preserve the alpha channel on your exported clip and require a 32-bit color depth.
• Frame Size will be tied to whether or not your chosen export codec has support for multiple frame sizes. For example, DV will always be 720 × 480 pixels for NTSC and 720 × 576 pixels for PAL.
• Whether or not there are options under Frame Rate also depends on the compressor you’ve chosen for output.
• Pixel Aspect Ratio will usually be set properly when you set the compression type for your file. If you are unsure, try the default setting first. Changing this option can cause problems with the interpretation of your file by other applications—or even by Premiere Pro.
• The Quality setting, when available, can affect file size. You may want to try this at different levels with some codecs, because a very small adjustment can sometimes create a noticeable difference in quality.
• The Data Rate settings can be used, on compatible compression types, to limit the data rates of exported files. The Recompress check box and its popup can be used always to recompress the existing material, or only to compress when needed to fit within the specified data rate.
The Video panel in the Export Movie Settings dialogue.
The following settings are in the Keyframe and Rendering panel:
• Rendering Options adjustments include a field dominance choice, which is similar to where this option appears elsewhere in Premiere Pro. Choices include Upper, Lower, and No Fields (Progressive Scan).
• Click the Deinterlace Video Footage check box to create noninterlaced content from interlaced video material.
• The Optimize Stills check box indicates whether any still frames that are on screen during the clip should be imaged as one frame, held for a given period, or treated as actual video frames, creating 30 (or whatever the frame rate is) new frames every second. Check this box to hold the frame, creating a smaller exported file.
• Keyframe Options will only be available with certain compression types, which use compression over time.
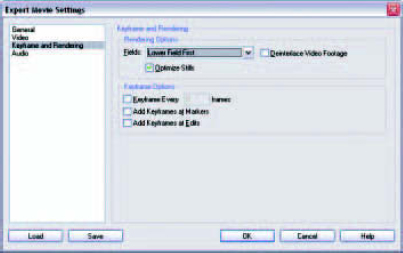
The Keyframe and Rendering panel in the Export Movie Settings dialogue.
Compression keyframes are the frames that are stored as complete pictures, whereas the frames between the keyframes (often called delta frames) are stored as amendments to the keyframe, stretching until the next keyframe is loaded as a complete picture, then starting the process again. More frequent compression keyframes can create a higher-quality file; less frequent compression keyframes create a smaller file at a lower quality. Finding the balance between file size and picture quality is the eternal challenge of image compression. Most likely, you will have to experiment to find the right balance.
The Audio panel offers the following settings:
• The Compressor choices available to you will depend on your compression choice in the video panel. Uncompressed audio is obviously the highest quality.
• The Sample Type setting is adjustable up to 32 bits, and the Channels setting specifies whether the file is mono or stereo.
• Interleave controls how much audio is loaded into RAM to be processed with the video. A setting of 1 means that one frame of audio is loaded with each frame of video. Adjust this setting if you are hearing pops or clicks in your audio (a larger number will result in more audio being loaded at once, requiring more RAM for proper playback). Most video cards work well with interleave settings of 1/2- or 1-second audio interleave.
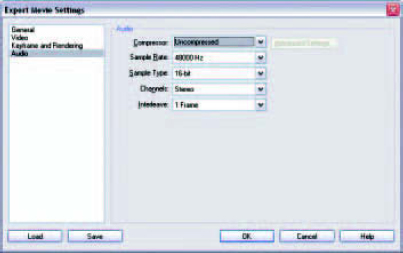
The Audio panel in the Export Movie Settings dialogue.
When your settings are complete, click on OK to accept them, close the Export Movie Settings dialogue, and go back to the Export Movie window. Once you’ve chosen a location, click Save.
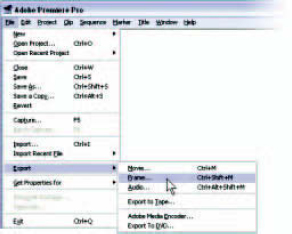
To export a still frame for use in another application, such as Adobe Photoshop, select File ![]() Export
Export ![]() Frame. A dialogue will open so that you can browse to the location where you want to save the file.
Frame. A dialogue will open so that you can browse to the location where you want to save the file.
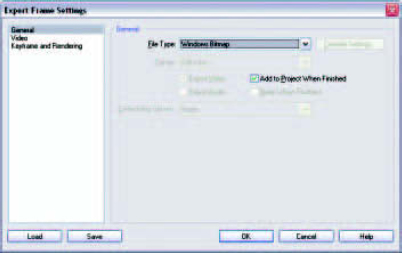
You will see the familiar Settings button for specifying file type and compression. The only part of this dialogue that wasn’t covered in the Export Movie section is the file types available to export in the General panel.
The available file types are as follows:
• Targa, or .tga file, which supports 16- 24- or 32-bit RGB images.
• TIFF, or .tif file, which can be RGB, CMYK, Lab, or Indexed-Color, is supported by almost all image-editing and paint programs.
• Windows Bitmap, or .bmp file, which supports multiple color depth RGB, Indexed-Color, and Bitmap Color images, is a standard file type for Windows and DOS computer platforms.
• CompuServe GIF, or .gif file, which creates a very small file but is of a lower quality than any of the others. These LZW-compressed images support Indexed-Color images and tend to be ideal as a file for the Internet or an image to be e-mailed to someone for reference purposes.
The Export Frame Settings dialogue.
Often a video or film clip needs some alteration. Perhaps the convenience store sign needs to be removed from the skyline of the gladiator movie, or the wires that are levitating the movie ghost have to be painted out, etc. This process of drawing directly on captured motion frames is called rotoscoping and is an essential tool in video, but even more so in feature film production. You can export motion clips as sequential still images for use in Photoshop or some other application:
1 First select File ![]() Export
Export ![]() Movie to open the Export Movie dialogue.
Movie to open the Export Movie dialogue.
2 Click on Settings.
3 For File Type, choose Windows Bitmap, TIFF, or Targa. (The animated GIF file format creates a motion clip, not individual frame files.)
4 Select whether you want to export the entire project or just the frames that are included under the work area bar from the Range menu.
5 Specify your export options in the Video and Keyframe and Rendering menus.
6 Close the Settings window and return to the Export Movie dialogue. Set the destination for your numbered files. (I recommend creating a new folder to keep all your associated frame files together and organized.)
7 Remove the wires and the convenience store sign…
Name your file with a number as the last part of the file name, indicating how many digits you want in the frame numbers. If your filename is LogoOpen, you might want to type in LogoOpen000. The frames will be numbered as LogoOpen 00001, LogoOpen00002, … LogoOpen00050, etc. All frames in the sequence must have the same number of numerals in the name to be reimported properly.
Note: After you’ve completed your work on the still images, you can reimport them and create a clip by choosing File ![]() Import and selecting the first sequential frame. Before importing, check the box labeled Numbered Stills at the bottom of the window. The stills will be compiled into a clip in Premiere Pro.
Import and selecting the first sequential frame. Before importing, check the box labeled Numbered Stills at the bottom of the window. The stills will be compiled into a clip in Premiere Pro.

Select the first numbered frame of a still sequence and check the Numbered Stills box at the bottom of the Import dialogue to compile the stills into a clip in Premiere Pro.
Exporting Audio
To export audio for use in another application, such as Adobe Audition, select File ![]() Export
Export ![]() Audio. A dialogue will open so that you can browse to the location where you want to save the file.
Audio. A dialogue will open so that you can browse to the location where you want to save the file.
The options available in the Settings dialogue are identical to the settings covered in the section on Exporting a Movie.

