CHAPTER 2
Intrusion Analysis and Incident Handling
In this chapter you will learn how to
• Prepare to handle an incident
• Identify, triage, and analyze suspicious behavior that may indicate an ongoing incident
• Contain and eradicate an attack
• Recover affected assets to BAU
Incident Handling Introduction
Various frameworks are often used for intrusion handling and incident response. A few of the most common ones are the kill chain and diamond models, but the one used most often is based on National Institute of Standards and Technology (NIST) SP 800-61 revision 2.
![]()
EXAM TIP Although you don’t necessarily need to be familiar with the kill chain and diamond models for the purposes of the exam, it is recommended that you review them to familiarize yourself with their operation. That will also give you a more comprehensive understanding of the NIST framework.
According to NIST, the incident response life cycle can be divided into four major phases, as depicted in Figure 2-1.

Figure 2-1 NIST’s incident response life cycle (Source: Cichonski et al., Computer Security Incident Handling Guide: Recommendations of the National Institute of Standards and Technology, Special Publication 800-61, Revision 2)
![]()
EXAM TIP For the purposes of the exam, the “detection and analysis” phase is referred to as “identification,” while the “post-incident activity” phase (which according to NIST consists of lessons learned, collected incident data, and evidence retention) is referred to as “lessons learned.” These conventions will be used throughout the book so the phases map to the exam.
Incident Handling Phases
A mapping of the NIST framework for the purposes of the exam can be seen in Figure 2-2.
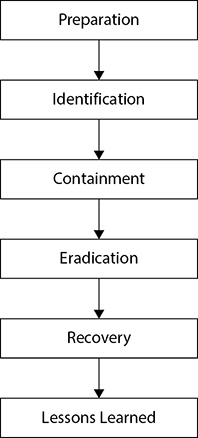
Figure 2-2 Incident handling phases
As you can see, the Containment, Eradication, & Recovery phase has been split into three separate phases. That can help your organization explicitly state what activities need to be performed during each phase.
Any incident you experience can be analyzed by following the phases that were mentioned in Figure 2-2. Note that preparation refers to all the activities you need to take prior to an attack. For example, if you anticipate SQL injection attacks against one of your web servers, you might decide to install a web application firewall (WAF) during the preparation phase to prevent such attacks. Identification occurs when you declare an incident, like when a security analyst identifies a data breach where information is being exfiltrated from your organization and is destined to an external IP address that the attacker controls. After the incident is identified, containment follows. A possible containment step in this example might be to block communication to that external IP address at your perimeter or isolate the originating device from your network so further data transfer doesn’t take place. Moving on to eradication might lead you to identify a rootkit that the attacker had installed on the compromised system, which you will need to remove. Following that, recovery might entail building up a fresh copy of the affected system from a previously taken backup. Finally, a lessons learned session can be conducted to report upon all the incident findings and identify gaps for future improvement.
![]()
CAUTION As a rule of thumb, it is recommended to fully complete a phase before moving on to subsequent ones. That will help ensure the incident has been handled fully, without missing or overlapping steps. However, you still need to allow for some degree of flexibility. For example, new evidence might be identified that will require you to go back to a previous phase and repeat certain actions.
Preparation
As the name implies, all of the activities discussed here are actions you need to perform well before an incident takes place. They are necessary for you to be able to effectively respond to any attack. Also, consider the possibility that an attacker is already present in your network without your knowledge. Performing the tasks discussed later may prove crucial to identifying an ongoing or recent attack and make the difference between successful identification and subsequent eradication of that threat versus not even being aware of it. Preparation includes the following:
• Building a team
• Getting information about the organizational network and its critical assets
• Creating processes
• Obtaining the required hardware and software
Building a Team
Building a team may arguably be classified as the hardest part of the preparation phase. It is also usually the most time consuming. Depending on the team’s target size, this process may take anything from a few weeks to several months, especially if you are trying to build a large-scale team spanning across different geographical locations. Other challenging considerations that need to be addressed are the team’s remit, working model, mission objectives, available budget, ideal size, requirements for outsourcing any elements to third parties, and a lot more.
Required Skills
Incident responders are considered the elite of the cyber world. They are the equivalent of special forces teams in the army. As such, they are required to possess a variety of skills to be effective in their roles and able to tackle any security incident that comes their way. The range of desired skills heavily depends on the needs of your company as well as the team’s objectives, but at a minimum, they need to possess the ability to perform the following tasks:
• Log review They need to be comfortable analyzing a variety of logs like IDS, IPS, firewall, antivirus (AV), proxy, Dynamic Host Configuration Protocol (DHCP), Active Directory (AD), DNS, endpoint, application, and system logs.
• Detection rule creation An ability to create detection rules is required so that any indicators of compromise (IOCs) that are extracted during an investigation can be used to create detection rules to identify that activity in the future.
• Network forensics This is a key element of incident handling because network traffic analysis can aid greatly in identifying what activity has taken place. Incident handlers need to be comfortable analyzing packet captures taken from a variety of devices (like endpoints and servers), extracting data of interest, and creating a timeline of activities that took place on the network.
• Endpoint forensics Performing endpoint forensics can be quite challenging due to the variety of operating systems and types of devices. As such, incident responders need to be comfortable performing endpoint forensics on desktops, laptops, servers, and phones. In addition, they need to be comfortable with all major operating systems like Windows, Linux/Unix, macOS, iOS, Android, Windows Mobile, and BlackBerry (including any older OS versions, since those may be encountered at any client environment).
• Malware analysis Whenever an investigation leads to a suspicious file or process, an incident handler needs to be able to analyse the item in question and ascertain if it’s malicious or not. If it is, then the investigator will use a series of techniques, like sandbox/static/dynamic analysis, to identify what specific actions the malware is trying to perform and will use that knowledge to build detection capability that will protect the organization.
• Scripting Being able to automate various activities using a scripting language is quite useful, as it drastically reduces response times when obtaining required information. It also allows the incident handler to perform other tasks while scripts are running in the background.
Operational Model
The selection of a suitable model depends heavily on the organizational requirements. Common considerations that drive decisions often relate to
• Mission objectives What are they key aspects of any incident the team is expected to address? Is it just identifying a potential intrusion, providing mitigation, and then handing over the incident to another team for further investigation? Is the team expected to reverse-engineer any malware samples, or is that going to be handed off to an AV vendor or other third party? Is forensics a part of the daily tasks? Is the team going to be dealing with external and insider threats?
• Need for extended hours availability and distributed teams Some companies, like banks or critical public-sector entities, require personnel to be present in an operations room at all times (also referred to as 24 × 7 or 24 × 7 × 365 support). Others choose to have personnel on-site during core hours (for example 9:00 A.M. until 5:00 P.M.) and then someone is on call to provide after-hours support. Some companies use geographically distributed teams that are located in different time zones over a follow-the-sun model (each team works 9:00 A.M. to 5:00 P.M. at their location and then hands over to another team, which also works the same core hours at another location, thus supporting the organization around the clock).
• Budget Cost can be a heavy limiting factor when building up an incident response team. When you want to hire the best of the best, it tends to cost a lot. As such, decisions need to be made regarding what key individuals to hire or what functions might need to be supported further down the line. If there’s any need for after-hours work, that will also come into play, as it tends to be quite expensive (for example, having the team working on call, overtime, or during night shifts).
Three main models are used, which heavily depend on the degree of outsourcing you intend to put in place:
• Full-time response team This type is often used in environments where a large volume of incidents is anticipated and a team is required to operate at all times to be able to support all investigative activities. In addition, very sensitive environments (like military or governmental departments) have their own teams so there’s no possibility for information leakage by a third party during an incident.
• Partially outsourced response team (also known as functional response team) Some of the organizational activities are being outsourced to a third party. For example, an external company might be hired to review device alerts and perform level 1 analysis. Once something interesting is identified, it can be escalated to the company’s internal team for further analysis. Other options include outsourcing specific tasks to an external party. Examples include the need for threat intelligence capability, after-hours monitoring, performing forensic investigations, and malware analysis. The advantage is that the organization can have a small in-house team with more limited technical skills and choose to outsource anything they desire to an external team. However, cost quickly becomes a consideration, as outsourcing tends to be quite expensive.
• Fully outsourced response team All incident response activities are performed by an external company. The organization may choose this option when it doesn’t have enough technically skilled employees to perform the type of required activities. In addition, it alleviates the responsibility and transfers all the risk to the external party, as they are solely responsible for all aspects of incident handling.
Interaction with Internal Teams
A good principle when building an incident response team is to be as inclusive as possible. Engaging people from different organizational teams can prove quite beneficial when an incident takes place. They can all bring their unique experience and skills to the table, which can often prove really valuable. If you need someone to provide insight about what type of machine resides at a specific IP address, what faster way for that to happen than having someone from IT on your team? If access to a critical network device is needed, the easiest way to get it would be to ask one of the network operations team members. If there’s a need to review a particular policy for suitability, someone from the legal team would be the best person to do it. If you are investigating an internal threat and would like to review the times and areas a person has accessed within a building, someone from the physical security team can easily get that information. Here is a sample list of internal teams to consider:
• Management
• Human resources
• Legal
• IT
• Network operations
• Business continuity planning
• Physical security
![]()
EXAM TIP Always remember that management support is the key to any successful incident response strategy. Maintain an open line of communication with your management team. Ensure you provide them with regular reports about the company’s risk profile and what is required to mitigate those risks. Provide them with an overview of past incidents, and don’t be afraid to ask for things you require to protect the business.
Collecting Organizational Information
Before you can start handling incidents effectively, you have to get an idea of what you are expected to protect. That means understanding
• Where the risk lies
• What are your most critical assets
• What are your “blind spots” (parts of the infrastructure that are not monitored at all or being partially monitored)
• If there are any up-to-date network diagrams
• If there is an asset management system you can use to get information about the various devices in the estate
• What types of attackers you anticipate targeting you
• What your company’s public footprint is
• If you regularly work with stored personally identifiable information (PII) and payment data
• If you label your documents according to their importance
• If an appropriate system redundancy plan is in place
• If any policies are in effect (for example, acceptable use, backup, disaster recovery, and remote access policies)
• If devices have warning banners to explicitly notify anyone attempting to connect to them that these devices are the property of your organization and if any unauthorized action takes place violators will be legally prosecuted
Answering some of these questions is not always straightforward. Identifying the appropriate individual or group that can provide guidance can take anywhere from several weeks to months. You might even end up opening a can of worms and asking for stuff that just isn’t there. Treat this as a good thing. It’s better to do it now than when an incident happens.
Responding to an Incident
The best way to respond to an incident is to ensure that you have procedures in place to deal with it, so there’s no mass panic, which may result in people running around without helping. Some key concerns are discussed next.
Ability to Have an Onsite Presence to Perform Response Tasks
If your organization is distributed in multiple locations around the world, how will you be able to provide onsite support in a remote location (for example, get a forensic image of an endpoint located at a remote branch)? Some companies have a team (even a small one) in each office so if something happens, there are always people onsite to deal with it. Others have external parties that they work with and dispatch if an incident takes place. Another solution may be to have a few people working onsite at major locations and in the event of an incident, dispatch those at the specific location to offer additional assistance. Ensure that you adopt whichever method works better for you and also determine how much time it will take to get a trained incident responder onsite to deal with an incident.
Escalation Plan
Define a list with all the necessary security contacts and distribute it company-wide. You can use the corporate intranet to store that information so people can access it at any given time. Ensure that you test all the incident response team members’ phone numbers and e-mail accounts to verify appropriate operation. Also make sure to have multiple redundancies in case a contact is unreachable. This should be the case during both business and out-of-business hours (including holidays and weekends).
![]()
TIP Small companies tend to use direct contacts (like the head of security or chief information security officer [CISO]) instead of using generic mailboxes or team phone numbers. However, this can lead to challenges when individuals are not available. A better method to ensure redundancy would be to use a team mailbox and phone number that redirects to whoever is working, based on an on-call rotation. This way you ensure robustness in your escalation plan and avoid unnecessary delays.
Using a dedicated telephone conference bridge in addition to a video conference (like WebEx or Zoom) will also help a lot in rapid information exchange and allow team members to work together more efficiently even when they are far away from each other.
Internal Team Communication and Need-to-Know Basis
Treat any information about the incident as confidential and only share on a need-to-know basis. This commonly includes people dealing directly with the incident (like the incident manager and response team), a point of contact from the leadership team, and the business owners of the affected assets. Any communication exchange should take place in a secure manner. If you use a teleconference to discuss the incident, verify the participants before that discussion starts to ensure only the people you expect are present. Don’t use a shared account to do this (for example, a WebEx account that various teams from your company share) because that would mean that the virtual teleconference room won’t always be available, since other teams may be using it when you need it. You may also run the risk of someone accidentally hijacking your session because they might need to use the same meeting dial-in details. Although it’s not advisable to have discussions about an incident in nonsecure areas, assign a code word that describes the incident so you can still refer to it if needed, without providing any actual detail about it. Establishing a so-called “war room” is ideal for such occasions. This would be a specific-purpose room that only the incident response team has access to. That room should have tinted windows (or drawn blinds at a minimum) and be adequately soundproofed to protect from eavesdropping. Remember to encrypt all your files, and instead of using e-mail for data exchange, use your company’s incident management tool to attach all the evidence. Remember that access to the tool (and subsequently to your team’s cases) should be strictly controlled. Only authorized individuals should be able to review organizational incidents. The last thing you want is to be performing an investigation about an administrator misusing your network and all the details of that being accessible by that administrator because they have access to the incident tracking tool. You can also choose to host that tool on a separate infrastructure (like a cloud server) to prevent any attacker that may have compromised your network from accessing it. Use encrypted Voice over Internet Protocol (VoIP) communications when possible, and if you need to use an instant messaging application, choose one that supports encryption.
![]()
TIP A few popular options for e-mail encryption are Pretty Good Privacy (PGP) and Secure/Multipurpose Internet Mail Extensions (S/MIME). With regard to messaging applications that support encryption, some of the commonly used ones are Wickr, Signal, Cyphr, and Dust.
External Communication
Apart from internal communications, you also need to think about what external parties you need to get in contact with. Examples include
• Attacking IP owner It’s very common for attackers to compromise machines and then use them to launch their attacks on a target victim, which may be your company. Getting in touch with the owners of those attacking machines (for example, a compromised web server’s administrator) is critical because its often the first time they have ever heard of their systems being used maliciously.
• Victim that you may be attacking involuntarily You may also find yourself in the unfortunate position of being compromised and having your machines launching an attack against an innocent third party. Once you are made aware of this fact, you should immediately reach out to the affected entity and appraise them of the situation.
• Media You should work closely with your media relations and legal teams and review how they plan to release information to the public in the event of an incident. They should always be vigilant not to divulge any sensitive information. In addition, the incident response team should direct any queries regarding specific incidents to the media relations team. Finally, consider the option of using a specialized company to handle any communications during an incident. If you do outsource this to such a company, make sure you have airtight nondisclosure agreements (NDAs) in place to protect your organization from any information leakage.
• External response teams A good example is a state- or country-wide computer security incident response team (CSIRT). Depending on your locality, you can select an appropriate team that may be able to assist and coordinate how to respond to a given incident. For example, a European Union (EU) incident will warrant assistance from an EU entity like the European Union Agency for Cybersecurity (ENISA) or European Police (EUROPOL). A full list of EU CSIRT teams by country can be found in ENISA’s interactive map (https://www.enisa.europa.eu/topics/csirts-in-europe/csirt-inventory/certs-by-country-interactive-map). Another great resource is the Forum of Incident Response and Security Teams (FIRST), which has a great list of CSIRT teams around the world that you can reach out to in the event of an incident (https://www.first.org/members/teams).
• Law enforcement Most companies want to handle things as privately as possible. That allows them the flexibility to handle incidents discreetly, controlling the flow of information as well as the reputational impact. It may also provide them the opportunity not to have their assets seized by law enforcement, which can often create tremendous business impact. The difference here is that law enforcement has different operating protocols and goals, which don’t necessarily align with the company’s concerns about doing business. However, there are situations where disclosing an incident to the authorities is not optional. For example, anything involving child pornography, terrorism, or an immediate threat to public safety must be disclosed to law enforcement. It is always prudent to check with your legal and compliance teams to ensure you are always compliant with the corresponding legislation. Some cases may require you reach out to the (United States Computer Emergency Readiness Team) US-CERT, Federal Bureau of Investigation (FBI), Secret Service, or Department of Homeland Security (DHS) to get assistance (depending on the nature and criticality of the incident). Others might require you to reach out to a regulating entity (like in the case of PII-related data, such as stolen passwords, Social Security numbers, date of birth, and more).
Access Requirements
When system access is required, there needs to be a method of obtaining that in a constructive and effective manner. The greatest challenge here is that business and data owners tend to be very protective of their devices and associated data. That can often lead to time-consuming requests, which require various levels of approval to get implemented. By the time access is granted, it may already be too late. You need to have an emergency or after-hours access procedure that allows you to get the job done without unnecessary delays. Sometimes this may mean having someone from the IT or network team assigned to your incident response team, which, as stated earlier, can work great. If that’s not possible (often due to resource constraints), you can request read-only access to the systems, which will allow you enough visibility into device configurations and log files. If there’s a need to make changes, you can formally submit a request to the business. The key thing to remember is to try and solve these issues collaboratively. After all, you are there to help the business, not hinder its operation. Always try to place yourself in other people’s shoes and understand where they are coming from when they say they can’t do something. Suggest alternatives or try to work around those restrictions.
Keeping Notes
Keeping high-quality notes when responding to an attack can be considered an art. This can help you retrace your steps and check what activities you performed. It can also allow you to verify if you missed any key tasks while other people are able to review your actions when an investigation is handed over to them for further analysis. A few items worth including in your notes are contact details, timestamp (date/time), endpoint details (IP and Media Access Control [MAC] address, hostname, OS version), investigation item (for example, audit logs), and reason for reviewing the item in question. Don’t dismiss taking notes when responding to an incident. Handlers often think they can remember everything they did, including the reasons for reviewing a particular file or process of interest at any given time, but that’s really hard to do. It’s your responsibility to store them securely, not disclose them to any unauthorized individuals and ensure they are detailed enough to account for all your decisions. Defining a suitable retention period is another thing to consider. Work with your internal teams and decide on a realistic retention time frame. After that has passed, all data should be safely destroyed. Also, remember to account for litigation cases. If you anticipate a case going to court, you may need to store your notes for longer, as court cases might drag on for years.
Hardware
Selecting the appropriate hardware depends heavily on your particular needs. For example, if you aim to host a virtual malware analysis lab on a single machine, then you would need to spend serious money on a central processing unit (CPU), RAM, and hard disk space. If you anticipate performing a lot of brute-force cracking on password files (to test password strength), then you would need to add a substantial graphics processing unit (GPU) on top of the prementioned items.
• Forensic/analysis workstation Incident responders require portability so they can carry machines in the field. That means getting some powerful laptops that can do the trick. As you can imagine, the more portable the devices, the bigger the cost.
• RAM and CPU Since you can never have enough RAM and CPU (especially when running forensic tools), it is highly recommended to aim for as much as possible. For RAM in particular, most tools need at least 32 to 64GB of RAM to perform optimally. With regard to CPU, choose a powerful machine with the latest-generation CPU and multiple cores so it can handle the workload.
• Hard disk Since you are going to store large files (especially when acquiring forensic images), it is advisable to include a high-capacity solid-state drive (SSD) in your machine. Anything from 2TB and above is usually a good option. Also, consider what type of redundancy you would like to have. A redundant array of inexpensive disks (RAID) cluster is always a great option, and depending on the type you choose, it will require a different number of hard drives.
![]()
CAUTION Remember that all stored data should remain encrypted at all times.
• Screen size The size of the screen is another thing to consider. You need as much working space as possible. A 17" screen should be fine, but some people tend to go for the 15" ones since the machine’s weight is still kept at a minimum.
• Case A pelican case would be ideal to ensure your equipment is protected against accidental drops, water, and dust. You really can’t be too careful, especially if you are in possession of forensic images being transferred for further investigation.
• Cables and adapters You should ensure you have all necessary cables and adapters to accommodate for most common scenarios. Examples include network/universal serial bus (USB)/ Serial Advanced Technology Attachment (SATA)/microSATA/integrated drive electronics (IDE)/Firewire cables, multicard readers, phone cables (like micro/nano/type C USB, lightning cables, and more), and power adapters (like EU, UK, and U.S.).
• External storage and media Additional storage can always come in handy. Make sure to have a few external hard drives, blank (Compact Disc) CDs/(Digital Versatile Disc) DVDs, and thumb drives. As stated earlier, any information stored on these devices should be encrypted to protect it from loss or theft.
• Network TAP You can attach a terminal access point (TAP) to any network of interest and mirror all the traffic to one of its ports. Attaching a laptop to that will allow you to get a copy of all the network traffic for further analysis. You can also use a switch for the same purpose, but it often requires additional configuration, which takes time that you may sometimes not have.
• Forensic image acquisition A forensic image, duplicator, or bridge will be required for you to be able to acquire a copy of a hard drive for later forensic analysis. Make sure that whichever product you choose supports write-blocking capability. If it doesn’t, you will need to purchase a separate write blocker, which allows you to take a forensically sound copy of the data (it only allows you to copy data from a source device to a destination of your choice without allowing the latter to tamper in any way with the original data).
• Evidence storage area You need to have a secure area in your facility (where only authorized personnel have access) to store all the evidence. Make sure you have enough space to hold objects of various sizes (for example, several laptops and desktops, mobile phones, hard drives, and more).
• Miscellaneous items Ensure you review your infrastructure and think about the hardware you need to support in your company. If there are additional items you require, add them to your kit. For example, if you anticipate encountering older machines that may use jumper pins, add some of them in your kit. A set of screwdrivers is also great to have. Copies of required forms (like evidence acquisition and incident detection forms) should also be present in your kit. If you need to preserve evidence for subsequent legal action, include a digital camera, batteries and tripod, an audio recorder, chain of custody forms, evidence bags/tags, and Faraday bags (for storing electronic equipment). It is also crucial to highlight the importance of having the remit to be able to acquire additional equipment while responding to an incident, without having to wait several days for hardware approval to take place. Imagine you need to get a forensic image of a large server and you need a new hard drive for that. The last thing you need is to wait several days to get a new hard drive purchased.
Software
A lot of useful applications can help you respond to any incidents. As with required hardware, software also depends heavily on what type of incidents you anticipate. But the good thing with software is that you won’t normally have huge delays for acquisition. Usually, you can get a free version of various products for testing them, and if you are happy with how they perform, you just need to purchase a license to fully use them. If you prefer using open-source tools, you can use those products immediately. You have to be careful of using open-source tools, however, because you won’t have any vendor support in case of issues. nor will they necessarily be acceptable by a wide audience (which is extremely important in litigation cases).
![]()
CAUTION When anticipating litigation, be extra careful of what tools are used. For example, if you use a proprietary script to investigate an incident, you will have a very difficult time convincing the court that this is a publicly acceptable method that ensured no evidence tampering took place while providing sound results. That can be challenged even more if other investigators use commercial tools to reach a different outcome.
In general, you will need the following types of tools:
• Disk imaging FTK Imager (by Access Data) and Encase (by Guidance Software) are two of the most popular tools for doing this. Another method is to simply use Linux’s dc3dd tool. That will allow you to acquire a raw image that you can then import to your forensic software of choice to perform an investigation.
• Host forensics software It is advisable to select a commercial suite that has been used by the wider community for some time and its use has been tested through several cases. Some popular options are
• X-Ways Forensics by X-Ways (one of the most cost-effective options)
• FTK by Access Data
• Encase by Guidance Software
• Axiom by Magnet Forensics
• Blacklight by BlackBag (especially good for acquiring and analyzing macOS images)
It is also advisable to obtain more than one tool, in case you encounter issues with your primary choice. You can also use the additional software to perform the investigation and verify that you can get the same results (something that law enforcement and governmental bodies perform on a regular basis).
If you are also eager to try some open-source solutions, there are quite a few tools to use. Some examples are
• Sleuth Kit/Autopsy
• CAINE
• SIFT
• Digital Forensics Framework
• The Coroner’s Toolkit
• Memory forensics software Acquiring and analyzing a machine’s memory can be done by using FTK Imager, Volatility (by Volatile Systems), Rekall (by Google), or Redline (by Mandiant). The best approach is to try these tools out and choose the one that you feel most comfortable using to perform an investigation.
• Network forensics software This type of software will allow you to capture and analyze network traffic. Examples include
• tcpdump
• Wireshark/tshark
• NetworkMiner
• Xplico
• Mobile forensics software If you intend to perform mobile acquisition and analysis, some tools of interest are
• Mobilyze by BlackBag
• UFED by Cellebrite
• iOS Forensic Toolkit by Elcomsoft (for iOS devices)
• Magnet Axiom Mobile by Magnet Forensics
Identification
An incident can be identified in various ways, but usually it’s either an alert from a security tool or an employee noticing some suspicious activity. Just because there’s an alert present, that doesn’t mean there’s also an ongoing incident. A few useful definitions that can help solidify some concepts are provided next:
• Event As per NIST’s (Special Publication) SP 800-61, an event is defined as any observable occurrence in a system or network. That means any type of activity can be considered an event. Examples include someone navigating to a news website or logging on to the corporate network.
• Security incident NIST defines a security incident as the violation or imminent threat of violation of various security policies (like the acceptable use policy [AUP] or other policies you may have in place).
• Alert An alert is a notification about a particular event of interest. For example, if you want to know when a guest account is used for accessing a particular device, an alert might be set to depict that activity. The term security alert is used to describe any type of alert reflecting security events of interest. In particular, there are four common security alert categories:
• True positive Depicts a condition where an alert was triggered and has positively identified an actual security incident.
• True negative Used to describe a condition where no alert was triggered and there was no security incident.
• False positive Describes a condition where an alert was triggered but there was no security incident present. Usually indicates an opportunity to fine-tune the alert (readjust the threshold or the conditions for triggering).
• False negative Used to describe a situation where a security incident is underway but there was no notification about it. This provides room for future improvement, as it means additional alerts need to be created in order to capture security incidents that currently go unnoticed.
One of the most challenging aspects of identifying an incident is performing the necessary triage of any alert or user report and trying to verify if this actually constitutes a real incident or not. Sometimes you just can’t be 100 percent sure. When that happens, it’s suggested you raise a security incident, as it’s better to be safe than sorry. If it turns out to be nothing, you can always go back to the drawing board and adjust your tools, alert thresholds, and underlying processes. But if there’s something suspicious going on that leads to a compromise, you certainly don’t want to miss it. A good idea to ensure you don’t miss any steps is to have custom-tailored checklists of actions to perform before raising a security incident. Some useful points for consideration are
• When and where the incident took place. Date, time (with accompanying time zone), physical location of device involved in the incident, and any particular data acquisition processes or restrictions that need to be considered.
• Contact information of the individual reporting the incident. If the incident was raised due to an alert, add information about the nature of the alert and associated systems. If an individual brought the issue to your attention, ensure you get all their contact details so you can reach out to them afterwards if additional information is required.
• Contact information of assigned incident handler(s).
• Contact information of the affected business owner or escalation point.
• Detail about the nature of the incident. Add as much detail as possible about the affected device (IP address, MAC address, OS, hostname), what happened, how it happened, what steps have you taken to investigate, and what the possible impact is. If the incident requires any special handling, clearly highlight that. For example, if there’s a critical server that seems to be under denial of service (DoS) attack and requires immediate attention, then mention that clearly. Likewise, if this seems relevant to an insider threat, take appropriate actions to ensure the information is on a need-to-know-basis, and handle the incident in a confidential manner, involving human resources and legal teams.
• Capture all related logs and system information before it becomes unavailable or overwritten. If you don’t have a central log management solution and you are basing your investigation solely on what logs exist on the affected asset, make sure to get a copy of all the critical logs you need to fully investigate the incident. The most common mistake people make is to reference a log or alert source that simply doesn’t hold available data anymore. For example, an analyst references alert data in a case by adding a link to a tool that is supposed to render the alert in question. When someone tries to access that link 40 days later, they are unable to review anything since the link isn’t rendering any data for more than 30 days (which is a common retention time frame for various tools).
• Check for any scheduled activity taking place around the time of the incident. If there’s a change management system, review it to check what type of administrative activity might have taken place around the time of the alert. For example, if someone was doing a firewall change and one minute later you have an alert about losing device connectivity, it certainly points to the fact that the change in question might have blocked access to those devices.
Remember all the useful preparation steps that were discussed earlier. Follow the organizational procedures for verifying, reporting, and escalating incidents accordingly. Usually, there’s a designated person tasked as an incident manager. If there’s no one, that commonly falls on the team leader. Ideally, another person will be required to aid and provide guidance when the primary person is unavailable. If the incident is large in scale, additional handlers will be used and the investigation will be broken down into different parts. Each person will be tasked with performing a specific set of activities that will aid the broader investigation. Also, keep in mind any considerations surrounding future litigation. Check with your legal team, and if there’s a need to pursue this case legally, ensure appropriate chain of custody has been maintained.
![]()
TIP NIST has a chain of custody template available for download at https://www.nist.gov/document/sample-chain-custody-formdocx, which is a great starting point. You can always adjust that according to your specific needs.
Incident Sources
Incidents can be identified in a variety of locations. That depends heavily on what type of security tools you are using and what locations in your network are being actively monitored. There’s nothing worse than being blind to an attack just because there was no monitoring of that particular network segment or attack vector that was used to breach your defense. A summary of common security tools and placement within the infrastructure can be found in Table 2-1.
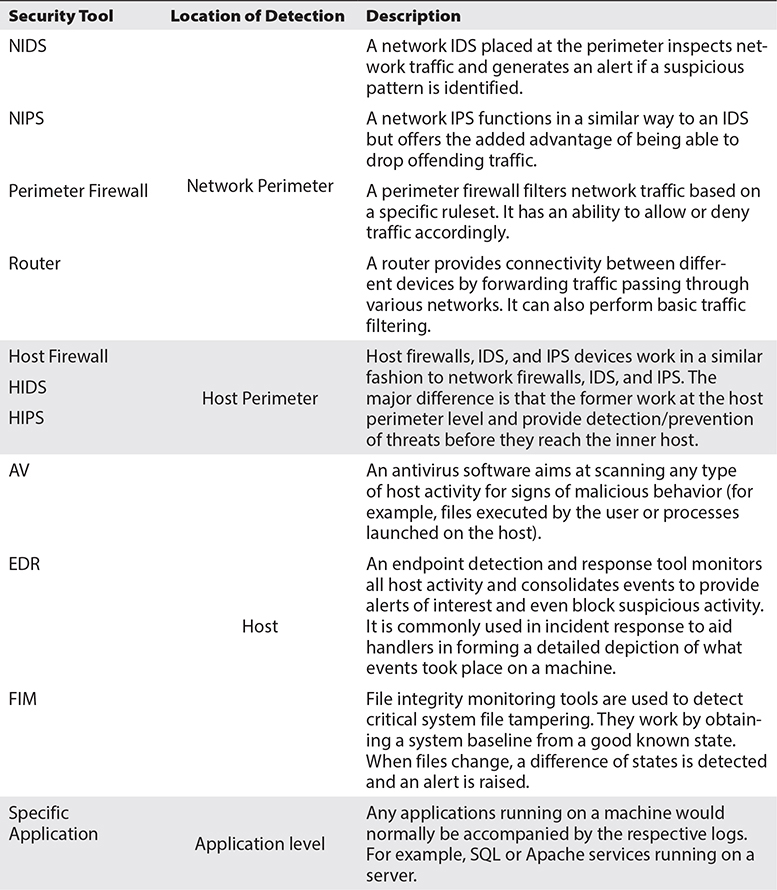
Table 2-1 Common Security Tools
An easier way of visualizing these detection locations is depicted in Figure 2-3.
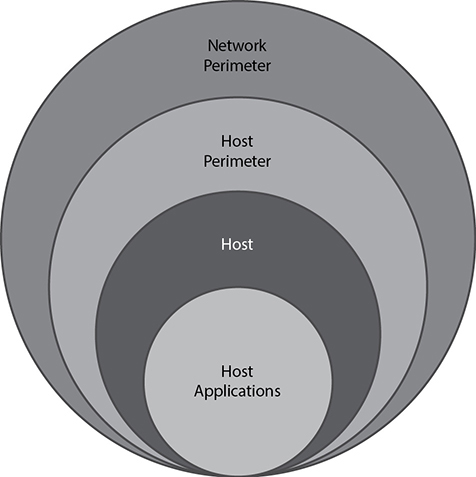
Figure 2-3 Detection locations
Detection of a security incident can take place at any of these points. It also helps highlight the need for “defense in depth,” which entails applying various security defenses in a layered approach. As such, if an attacker manages to compromise your network and host perimeters, detection/prevention might still be possible at a host level.
Data Collection for Incident Response
In order to identify suspicious activity, you need to obtain and review various types of data. A really good way of doing this is by running a set of commands that will give you an overview of the state of the machine in an effort to isolate anything interesting.
![]()
NOTE Whenever there’s a need to execute commands in an effort to extract information, incident handlers commonly use scripting to do this faster and more efficiently. If you are not well versed in scripting yet, it is highly recommended that you start learning the basics of any scripting language (like Python) so you can start automating execution and extraction of the information you require. You might think this is not necessary when handling a single system, but when an incident involves various systems, scripting can be the difference between a few minutes of effort versus hours (or even days) to get the same data.
A great method of obtaining preliminary information about an incident is to create sets of commands you need to run so you get specific results. You can separate these into collections for different platforms and operating systems. For example, you can have different sets of commands corresponding to Windows and Linux (the two predominant platforms in use today) and then further establish command sets for specific types of incidents. You can adopt playbooks and incorporate your command sets in them so the whole team can rapidly respond to any given incident. A few useful commands will be provided next, which will aid your investigation around Windows and Linux systems. Note that the list is not exhaustive and you should feel free to add and remove elements according to your particular needs.
![]()
TIP The best starting point for your incident response command lists is to use a combination of the ones mentioned in the next sections, along with the following books (which are also in the references table at the end of this chapter):
• Linux Phrasebook
• Blue Team Handbook: SOC, SIEM, and Threat Hunting (V1.02): A Condensed Guide for the Security Operations Team and Threat Hunter
• RTFM: Red Team Field Manual
• Blue Team Field Manual (BTFM)
• SANS Institute cheat sheets for intrusion discovery
Regardless of the specific device OS, you should focus on getting the following at a minimum:
• Generic system information (CPU, memory, hard drive capacity and status, date, time, OS version, and patching level)
• List of running processes, services, and applications scheduled to start during system startup
• List of local and AD user accounts and work groups
• Networking information (IP address, MAC address, Address Resolution Protocol [ARP] and routing tables, list of network connections and ports)
• Command history
• Log files
• Firewall state and ruleset configuration
Windows Investigations
If you want to use a tool to automate the extraction of information, you can consider a free one like Redline (https://www.fireeye.com/services/freeware/redline.html), Kansa (https://github.com/davehull/Kansa), Windows PowerShell, Velociraptor (https://github.com/Velocidex/velociraptor), or Google Rapid Response (GRR). If you prefer a commercial tool, Carbon Black Response offers a good starting point (https://www.carbonblack.com/products/cb-response). If you prefer following a more manual collection approach, you can either script your commands or execute them interactively using the command prompt. Some of the most useful commands are provided next, along with their outputs.
![]()
EXAM TIP The commands have multiple parameters that you can use, and several of them can be used to obtain information from remote computers that are part of a domain. The most common options are provided, but feel free to explore them in more depth using your VM.
A few commands may be lengthy to view over the command line. You can always redirect the output to a file and open that with Notepad or any other tool you like (such as Notepad++). For example, if you need to redirect the output of dir to a file named dir.txt, just type dir > dir.txt and output will be redirected to a file named dir.txt, which will be saved in your current directory. Some commands require an elevated command prompt to run. The easiest way to do that is to type command prompt in the Windows Start menu, but instead of left-clicking on the item and initializing it, right-click and select Run As Administrator, as shown in Figure 2-4.

Figure 2-4 Opening the Windows command prompt as administrator
![]()
TIP https://blogs.technet.microsoft.com and https://docs.microsoft.com contain a wealth of information regarding Windows commands and tools. You can also use the built-in help by typing /? at the end of any command to get information about its operation.
![]()
NOTE Commands outlined throughout the book are typeset in code font (for example, dir) so you can distinguish them from the rest of the text in addition to using them with their associated parameters (for example, dir /w). Also note that the command output presented is trimmed, as the actual output of most commands is very long. This allows you to focus on the most interesting parts. It’s always recommended to run these commands on your VM so you can familiarize yourself with the full output.
System Information
The following commands can be used to get system information, like hostname, logged-on user, existing hardware, and installed applications.
hostname hostname provides the machine’s hostname:
![]()
whoami whoami displays the domain in use, as well as the logged-on user:
![]()
As you can see in the earlier output, the domain is nick-pc and the user is nick.
systeminfo systeminfo displays configuration information about a host. It’s always recommended to start your investigation by capturing information about the host machine in question. If you want to obtain specific information, you can use the command’s parameters to limit the output.

As you can see, an abundance of host data is captured, including the hostname, machine owner, OS name/version, system boot time, native time zone, IP address and a lot more.
psinfo psinfo (part of the Sysinternals suite) can aid you in identifying installed applications (using the -s parameter), among other things.

![]()
TIP Sysinternals is a great collection of Windows utilities created by Mark Russinovich. If you are interested, you can find more information at https://docs.microsoft.com/en-us/sysinternals and download the full suite (or specific tools) from the downloads section at https://docs.microsoft.com/en-us/sysinternals/downloads.
Account Information
The following commands can be used to get details about the current users and local groups of a machine, as well as user command history.
net user net user displays the current machine users.

If you need more detailed information regarding a particular user, you can try net user <username>. For example, net user Niki would display information about user Niki:

![]()
TIP Using the command wmic useraccount list will also display the accounts configured on the machine, along with some additional detail about them, like account type, Security Identifier (SID), and SID type.
net localgroup net localgroup provides information about the local groups configured on the machine:

![]()
EXAM TIP It’s important to understand how the commands work and which ones can be used interchangeably. For example, the command wmic group list brief can also be used to display local groups, along with domain and SID information. It’s highly recommended to test these commands, with their various parameters, so you are familiar with how they can be used.
As before, if you need specific detail about a particular group, you can drill down to that. Let’s have a look to see what users exist in the Administrators and Guests groups.
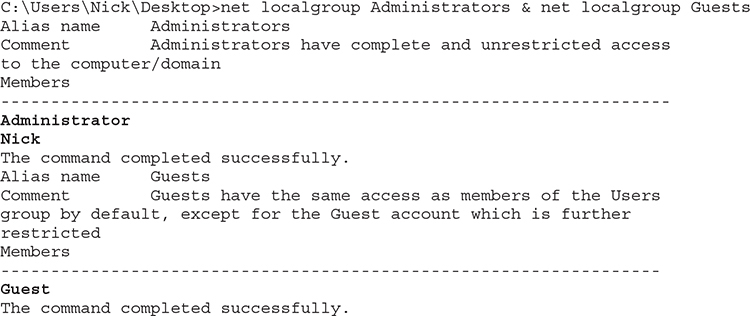
![]()
TIP If you need to run multiple commands in a single line, you can use the & character, as in the previous example.
As you can see, there are two administrator accounts in existence, one is Nick and the other one is Administrator (which is the default Windows administrator account). There’s also a single Guest account in the Guests local group.
![]()
CAUTION When you are performing system hardening, it is highly recommended to deactivate the default Administrator and Guest accounts. Furthermore, any user that requires administrator-level permissions should have a customized username in order to prevent brute-force attacks against standard usernames.
Another way to view the current users and groups is to use Windows Local Users and Groups. You can do that by pressing WINDOWS KEY-R (which opens the Run dialog box) and then typing lusrmgr.msc, as seen in Figure 2-5.

Figure 2-5 Access Local Users and Groups using lusrmgr.msc
Alternatively, you can also access Local Users and Groups by navigating to the Start menu and typing Computer Management. After opening that element, select Local Users and Groups, as seen in Figure 2-6.

Figure 2-6 Access Local Users and Groups using Computer Management
![]()
TIP If you are running a Home edition of Windows, you will not be able to start Local Users and Groups, as it’s not available in those versions.
doskey/h doskey/h (which is the same as doskey /history) can display all commands stored in memory. When the command prompt is terminated, the command history is cleared. For example, if you followed the earlier steps (without terminating your command prompt), your history should look like the following:

Network Information
The following commands can be used to get information regarding a system’s IP address, active connections and available ports, active SMB, and NetBIOS connections.
ipconfig /all This command was already used in Chapter 1 (without the /all option) to obtain information about your machine’s IP address. Adding the /all option provides full network configuration information about all the machine’s interfaces and is particularly useful if a device has multiple interfaces configured:

![]()
TIP If you need to obtain more information, commands like arp -a (to check ARP table entries), route print (to review the routing table), or ipconfig /displaydns (to display DNS cache entries) can be quite useful.
netstat netstat is one of most useful commands and comes with a variety of handy parameters. Examples include
• -n Displays addresses and port numbers with no resolution taking place.
• -a Displays all active Transmission Control Protocol (TCP) connections in addition to listening TCP and User Datagram Protocol (UDP) ports.
• -o Displays each connection’s process identifier (PID), which is extremely useful when trying to identify suspicious connections.
• -b Displays the binary application that is related to each connection. In order for this command to run, you will need to use a privileged command prompt.
• -p Connections are shown per protocol. Possible options include IP, Internet Control Message Protocol (ICMP), UDP, and TCP.
• -r Displays the routing table.
• -t Only displays TCP connections.
• -u Only displays UDP connections.
Try running netstat using the previously mentioned parameters. You can start by using them one at a time and then combining them to get the results you need with a single execution. For example, running netstat -naob provides an output like the following:
![]()
TIP The best way to view some really useful information is to switch your network adapter settings to NAT so you have external connectivity and simulate a real system. You can then try opening a few applications on your machine, which will generate network connections (like an Internet browser, which you can use to navigate to a few web pages of your choice). After you complete your tests, remember to switch your adapter back to Host-Only.

Notice how eligible the output is. From a quick look, you can see instances of Splunk (using TCP port 8000) and Python (using TCP port 8065) running on my machine. The Firefox browser is being used to browse to google.com (which is where IP address 216.58.192.136 resolves to), in addition to Internet Explorer being used to access Microsoft (which is where IP address 40.76.4.15 resolves to). When inspecting the output, it’s really useful to identify what external IP addresses are in use and understand if that’s expected or not.
![]()
TIP More detail about how to perform whois record and domain/IP lookups will be provided in Chapter 3, but for now you can feel free to use an online tool like https://centralops.net/co to perform a query for any IP address of interest. For example, if you use IP address 216.58.192.136 to perform a lookup, you will get the following organization registration details:

Using the -b parameter shows the associated executable for each connection, which allows you to easily identify if something suspicious is present. As already mentioned earlier, there’s an instance of Python running on the machine. If that is something you don’t expect, it should be investigated further. Note that if you didn’t use the -b parameter earlier, the line relating to Python would look like the following:
![]()
Sadly, that doesn’t provide enough information to identify anything suspicious. The only thing you can see is TCP port 8065 being used on the local host, without any information about what application is utilizing it. This is why you need to familiarize yourself with the native operating system commands. Obtaining information doesn’t always need to take place by using complicated tools. Sometimes, using native OS commands may be enough for you to get a starting point for an investigation.
net session net session allows you to check if there are any Server Message Block (SMB) and (Network Basic Input/Output System) NetBIOS connections established to the machine’s network shares. Note that the Windows 7 machine has a shared volume (C:), as depicted in the following output (using net view \localhost allows you to check the file share status on the local machine):

If there are no connections to this machine’s shared volume, then you should see the following:
![]()
However, if a session was already present, you would see the following (this is an example of a session established from my Kali Linux machine to the Windows 7 host):

If you want to drop any existing sessions, you can use net session /delete:

Confirming the operation via typing Y will result in dropping all connections to the Windows machine (or in this case, the single connection from my Kali Linux VM residing at 172.16.197.135).
net use On the other hand, if you want to check for sessions originating from your machine (like an attacker attempting to connect to a remote machine’s share without your knowledge), you can use the command net use. If there are no sessions originating from the Windows host, you should see this:

Tasks, Processes, and Services
The following commands can be used to get details about scheduled and current tasks, running processes, and service configuration.
schtasks Attackers often schedule specific activities to take place at regular intervals, like when they try to establish persistence on a system or exfiltrate data at regular intervals. Consider this example. You run schtasks and identify the following task:

As you can see, there seems to be a task named “diagnostics” that is scheduled to run each time the user logs on to the machine and execute the command telnet 172.16.197.135 1234. That allows a connection to be established from the Windows host to the Kali Linux machine (which could easily have been a remote attacker’s machine) over TCP port 1234. Later on, the netcat tool will be discussed, which allows file transfers (among other things) between remote machines. Telnet can be easily replaced by netcat, which is something that attackers commonly use to exfiltrate data.
![]()
TIP If you need more information on how to use schtasks to create, modify, and delete scheduled tasks, you can go over the full documentation at https://docs.microsoft.com/en-us/windows-server/administration/windows-commands/schtasks.
If you feel more comfortable using the graphical user interface (GUI) to work with Windows tasks, you can do that by accessing the Task Scheduler (navigate to the Start menu and type Task Scheduler), as seen in Figure 2-7.

Figure 2-7 Windows Task Scheduler
tasklist Most Windows users are accustomed to using Task Manager to get process information (accessed easily by right-clicking the Windows taskbar and selecting Start Task Manager or typing taskmgr in the Start menu). However, you can also use the tasklist command, which allows you to display a list of the processes currently running on a machine. In fact, its parameters allow you to get much more detail. Some of the most useful ones include
• /s Allows you to specify a hostname or IP address of a remote computer to display its running processes. If tasklist is used without this, results regarding the local machine will be displayed.
• /svc Lists full service information about each process.
• /v Displays task information in verbose mode.
For example, if I try running tasklist, tasklist /svc, and tasklist /v (while focusing the output on Splunk), I get the following output (note that some columns have been omitted for clarity):

As you can see, using tasklist with no parameters provides information about the process name, PID, session name, and ID, as well as how much memory it’s currently using. Using the /svc parameter, allows you to check what services are currently being used by the Splunk process, which at this moment seems to be using splunkd (the main Splunk daemon service). If you want to display all possible information, you can use the /v parameter, which in addition to the previous information will display the service status (showing Splunk to be running) and username being used for that service (it also provides the CPU time and window title, which have been omitted from this output for clarity). When you are performing investigations, running this command can allow you to identify any suspicious services that might be in use by a given process.
![]()
TIP You can apply powerful filters to use tasklist to search for a specific PID, only processes in the Running state, and a lot more. A great starting point is reviewing Microsoft’s documentation at https://docs.microsoft.com/en-us/windows-server/administration/windows-commands/tasklist.
wmic process wmic was used earlier to display user account and group information. But you can also use it to obtain process information (among other things). Using wmic process list brief provides information about process priority (CPU is allocated according to priority levels), PID, and the number of threads allocated to a process:


Using the Task Manager to change VMware’s vmtoolsd.exe priority to High results in the priority being elevated to 13 as per the following output:
![]()
As you can see, the priority has now changed to 13, indicating to the CPU this is a more critical task. Reviewing the output for anything suspicious, like a process you don’t recognize having a high priority or overutilizing the CPU by a high thread count, is a good starting point when trying to identify suspicious activity. If you need to obtain more process information, you can use wmic process list full, which would provide the following detail regarding vmtoolsd.exe:

You can also use wmic to specify what exact parameters will be displayed in the command’s output. For example, if you are only interested in getting a list of process names and PIDs, you can use wmic process get name,processid:

wmic startup list wmic startup list provides information about what processes have been configured to run when Windows boots. You can use wmic startup list brief for a summary:

Or you can use wmic startup list full, which will additionally provide the registry path of each item:

In the previous output, you can see that VMware has two processes configured to run at Windows startup. Alternatively, you can access msconfig.exe (via the Windows Start menu) and inspect the Startup tab, which will confirm the previous information, as seen in Figure 2-8.
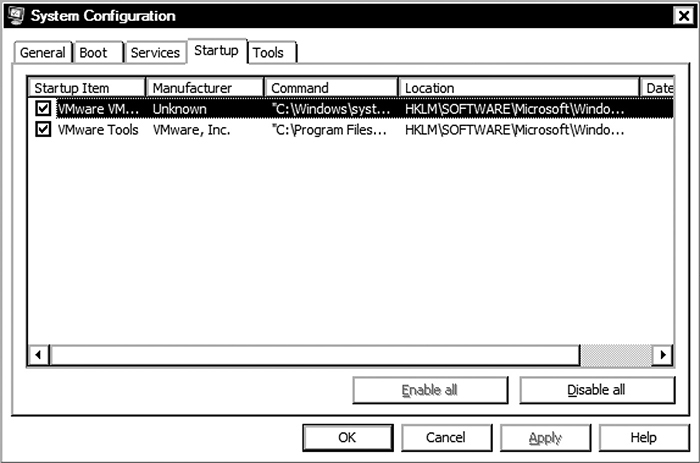
Figure 2-8 Inspecting startup items via msconfig.exe
net start, sc query, wmic service list config If you want to get a list of the services that have been started on your machine, you can use net start:

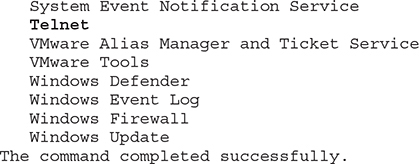
This command can prove quite useful because it can provide an early indication of something suspicious. For example, there is a Telnet service running on the machine. That can allow someone to connect to it remotely and is not something that you would normally expect to be enabled on a host. As such, you should investigate this further.
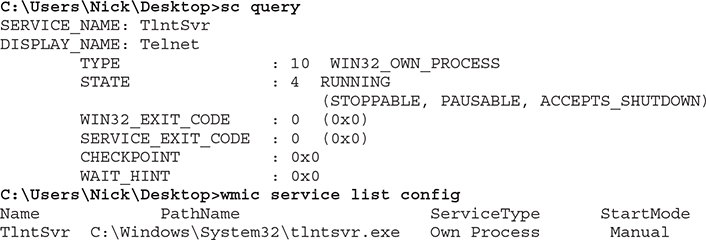
If you want to use the GUI, you can type services.msc in the Start menu, which will bring up the Windows Services Manager and allow you to manage your services (start, stop, enable, or disable them). If you need additional detail, you can use the sc query or wmic service list config command. Focusing the output on Telnet will provide the following:
Registry Information
The following command can be used to get details about various registry key hives that are of particular importance when responding to incidents.
regedit regedit (in the Start menu, type regedit.exe) invokes the Windows Registry Editor, where you can inspect and modify all registry key values. This is really important since malware can modify various registry keys to achieve persistence, disable Windows Firewall or AV, and a variety of other tasks. Depending on the type of investigation you are performing, you will need to review different registry keys. For example, if you are checking for persistence, you would commonly review the following:

If you want to check for startup folder persistence, you can check:
![]()

In order to be faster when reviewing the registry, you can use the command reg query to inspect registry keys of interest. For example, typing reg query HKEY_CURRENT_USERSoftwareMicrosoft will provide the following list of Microsoft-related application paths:

Some investigators prefer to use third-party software that allows them to extract the Windows registry and inspect items of interest. RegRipper (https://github.com/keydet89/RegRipper2.8) is a good example of open-source software used for that purpose.
Log Review
The most common method for reviewing logs is using the Windows Event Viewer, described next.
eventvwr.msc Using eventvwr.msc will allow you to inspect Windows logs for events of interest. Note that you need to have enabled monitoring of specific events you are interested in so the appropriate logs are present. You can adjust the monitoring in Local Security Policy (search for that item in the Start menu). An example of logon/logoff event auditing is shown in Figure 2-9.

Figure 2-9 Adjusting Windows Local Security Policy
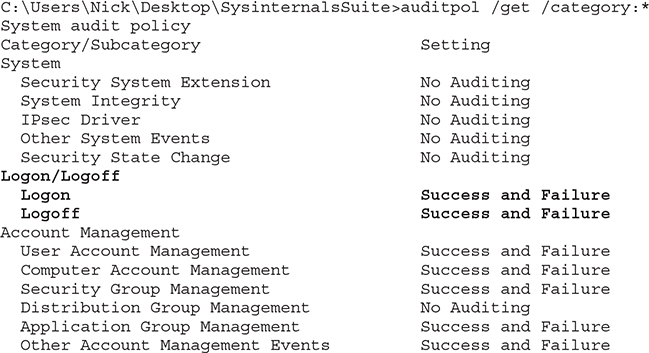
You can also use the command auditpol /get /category:* to check all current audit policies (the following output has been trimmed for clarity):
If you have chosen to log failed attempts, then typing eventvwr.msc will display a window like the one shown in Figure 2-10, where failed logon attempts can be identified (inspecting the security logs).

Figure 2-10 Windows Event Viewer
Although the log entries in Figure 2-10 have been generated deliberately by mistyping the account password, you have to be very careful when you identify a successful user logon after multiple failures on a real production system, as that may indicate an attempt to brute-force the account’s password.
![]()
EXAM TIP Windows 7 logs can be found in C:WindowsSystem32winevtLogs. There are several .evtx (Microsoft Event Viewer) files in that path, with the main ones being Application.evtx, System.evtx, and Security.evtx.
Firewall Settings
Although the Windows Firewall has been deliberately disabled for the purposes of the lab, when responding to a real incident, you would commonly expect that to be enabled on the host. If you want to check the firewall settings, use the command netsh advfirewall show allprofiles:

The command displays detailed information about the firewall, including its state, policy, and log location. As mentioned earlier, if it’s set to “off” you should check with the system administrator to understand if this is a deliberate action or not.
Linux Investigations
The easiest way to practice the commands described in this section is to run them using the Kali Linux VM (which is what will be demonstrated). Alternatively, any Linux machine will do, but note that some commands may differ, depending on which exact OS flavor and version you are running.
![]()
TIP If you need to get additional information about a command, use man [command] to display the built-in manual. For example, if you need more information about the command ls and how it works, use man ls. Similar to Windows, if you need output to be redirected to a file for later review, use man ls > file.txt.
System Information
The following commands can be used to get system information, like hostname, date/time, kernel details, memory usage, and system partition table state.
hostname As with Windows, hostname can be used to obtain the machine’s hostname:
![]()
date date provides the machine’s date and time (it’s always useful to run this command before extracting any data to remember when the information was obtained):
![]()
If you want to display the time in UTC format (which helps if your other logs are set in UTC) you can use date -u:
![]()
uptime uptime displays how long the machine has been running without being powered off or rebooted (for example, if you are investigating an incident on a server, it is common to see uptimes of several months to even years):
![]()
This output shows the current system time (08:37:52); how much time the machine has been up and running (up 1 day and 22 minutes); the number of logged-on users (currently one logged-on user); and the system load average for the past 1, 5, and 15 minutes (0.10, 0.10, 0.09).
uname -a uname can be used to get system information (like the kernel name and system architecture). Using the -a parameter will display all available information:

This output means that the kernel name is Linux, the machine’s hostname is kali, the kernel release is 5.2.0-kali2-amd64, an its version is #1 SMP Debian 5.2.9-2kali1 (2019-08-22), the machine’s instruction set is x86_64, and the operating system is GNU/Linux.
free free displays the amount of free/used physical and swap memory of the machine. You can choose to view the size in kilobytes, megabytes, gigabytes, terabytes, or petabytes using the --kilo, --mega, --giga, --tera, and --peta parameters.

Another useful option is the -h parameter, which displays the results in human-readable format. It scales the output fields automatically to the shortest three-digit unit (while also displaying the unit in the command output). The previous output would be displayed as follows:

df df displays the file system’s usage. Using -a provides all file system information, while using the -h parameter (as already mentioned) displays the results with accompanying size units:

fdisk -l fdisk can be used to display partition table information. Using the -l parameter provides the partition table and associated information:

cat /proc/partitions, cat /proc/cpuinfo An abundance of system information is contained in Linux’s proc directory, as shown in Figure 2-11.

Figure 2-11 Contents of /proc folder
Data regarding the machine’s memory, hardware configuration, file system statistics, and a lot more can be found in corresponding files.
A few useful examples include
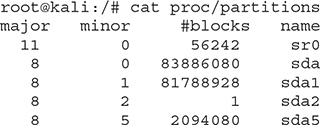
• cat proc/partitions (contains a list of the partitioned devices)
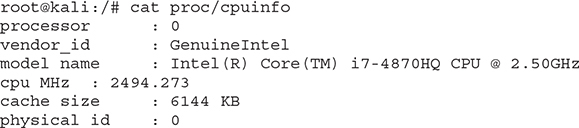
• cat proc/cpuinfo (contains statistics about the machine’s CPUs)
Account Information
The following commands can be used to get details about system users and groups, as well as command history.
w w displays details about the currently logged-on system users:

As you can see from this output, it starts by displaying the same information as uptime (which was already mentioned earlier). It then provides the login name (root), the terminal line used (1), the remote machine that was used (when responding to incidents, reviewing IP addresses of remote devices displayed here is crucial to ascertain the legitimacy of a connection), when the user logged in (user logged in earlier today at 07:55), the idle time (idle session time is 0.38 seconds), JCPU of 4 minutes and 18 seconds (the time used by all processes attached to tty), PCPU of 0.01s (time used by the current process designated in the WHAT field), and the command line of their current process (in the output gnome-session is listed, which indicates the initial root login on the Kali machine—when Gnome desktop was started and used to log on to the machine via the Gnome interface).
who Alternatively to w, you can use the who command to identify currently logged-on users:
![]()
who displays the username (root), terminal line used (1), system login date/time (2019-10-25 07:55), and remote hostname/IP.
cat /etc/shadow Additional information about the format and content of the shadow file will be provided later in the book. For now, keep in mind that all users are listed in the first column of the shadow file, which can be used to obtain a full user list. An example output of the shadow file (where four users are displayed) looks like the following:

If you want to make user extraction easier, you can run the following command to extract the first column of the shadow file:

cat /etc/group Information about user groups is stored in /etc/group. Similar to the shadow file, you can review its contents for a list of the groups, using cat /etc/group (output trimmed for clarity):

Or use cut -d: -f1 /etc/group to extract the file’s first column:

history The command history allows you to review the commands used previously. If you are reviewing the content from a non-root user account, you can only view the history for the particular user you are currently logged in as. Viewing the history as a root user will allow you to view past commands from all users. You can review or modify the history settings to increase or decrease the history size, make the machine remove all history upon logout, and a variety of other tasks. History parameters are set in ~/.bashrc. Reviewing the history size parameter in Kali Linux shows it’s currently set at 1,000. That means the file contains the last 1,000 commands executed:

Using history -c clears all your history. As you can see here, if you try using history after clearing the file, you will only see a single entry:
![]()
Network Information
The following commands can be used to get details about a machine’s interface configuration in addition to active connections and listening ports.
ifconfig ifconfig can be used to get status information about all network interfaces but also allows you to configure them. An example is provided here for eth0:

As you can see, various eth0 statistics are displayed regarding received and transmitted packets, as well as associated errors.
netstat netstat was already described in the previous section regarding Windows. In Linux, it works in a similar way and is able to provide network connection, routing table, and interface information. Some useful parameters are the following:
• -i Displays a list of all network interfaces
• -s Displays protocol statistics
• -a Shows listening and non-listening sockets
• -n Doesn’t perform host or port resolution
• -p Displays the PID and name of the program to which each socket (IP address and port in use) relates
• -l Shows listening sockets
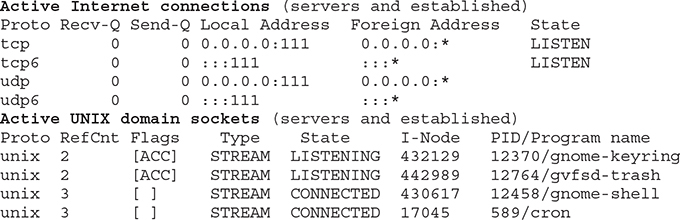
For example, using netstat -pan displays the following:
![]()
TIP If you want additional information, commands like arp -a (to check ARP table entries) or netstat -rn (to review the routing table) can be useful.
Tasks, Processes and Services
The following commands can be used to get details about task execution and scheduling, as well as running processes and services for the system.
crontab crontab can be used to review or schedule specific command or task execution in Linux. Using crontab -l will display the current user’s scheduled tasks (you can use -u to specify a different user). As you will see, there are no tasks currently scheduled for root. You can go ahead and create one though. In order to do that, crontab -e can be used (the first time you use it, a set of options will be displayed about which editor to use, where you can feel free to use whichever one you are comfortable with, like nano or vi). The format used for entering a task is as follows:
m h dom mon dow command
m: minute (0-59)
h: hour (0-23)
dom: day of month (1-31)
mon: month (1-12 or jan-dec)
dow: day of week (0-6 or sun-sat)
command: command for execution
Let’s add a script named backup.sh (located in the root folder) to be executed daily at 12:30 P.M. That means m = 30, h = 12, dom, and mon can be designated with an asterisk (*), which means all allowed values (every day of the month and every month); dow can be set to 0-6 (all the days of the week); and the command to be executed will be /root/backup.sh:
![]()
![]()
TIP Another method is to use an online tool (like the one located at https://crontab-generator.org) where you can input your desired parameters and the tool generates the related crontab command for you.
If you now use crontab -l, the newly created script should be visible. This is a valuable command when investigating incidents because you can uncover repetitive malicious activity (mainly used to persistently open a reverse shell to an attacker or perform data exfiltration at regular intervals). For example, the contents of backup.sh can contain a command that opens a remote shell to an attacker using netcat.
![]()
EXAM TIP If you want to review all cron jobs (system-wide), you can use ls -l /etc/cron.* which will provide detailed output about all scheduled system tasks broken down by category (hourly, daily, and monthly frequency).
ps ps displays information about system processes. ps -e displays a process list, while ps aux can be used to display in-depth detail about the process user, PID, CPU and memory consumption, timestamp information, and more, as seen here:

top top can be used to view additional information about the running processes:

The command displays the system time, uptime, and number of user sessions. It also provides statistics about system load, tasks, CPU, and memory. After that, there’s a list of current processes, with their associated PID, user, scheduling priority (PR), memory consumption (VIRT, RES, SHR, %MEM), CPU use (CPU), state (S), total CPU time used by each process (TIME+), and process name (COMMAND).
![]()
TIP Using man top will provide a wealth of information about top and all the associated parameters and fields. In general, it’s highly recommended to use the manual (man) for each command so you can get an in-depth understanding of what it does and what each parameter is used for.
service --status-all Using service --status-all provides the status of each service:
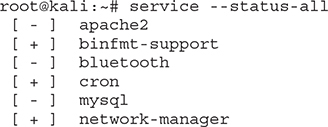
A + symbol indicates the service is running, a – indicates it’s not running, and a ? means the status can’t be determined. For example, you can see apache2 is not running. If you start the service (using service apache2 start) and run service --status-all again, you will notice the service now appears with a +:
![]()
systemctl The command systemctl can be used to display a list of system services along with their associated state. Using systemctl list-units --type=service displays a list of services, while systemctl list-units --type=service --state=running only shows the ones running:

Log Review
Linux logs are stored in /var/log. Depending on what type of events interest you at any given time, you can review the corresponding log file.
![]()
EXAM TIP When reviewing log files (or any type of large file), you can use grep to identify specific strings of interest. You can also use head -n X or tail -n X, where X represents the number of lines you want to review either from the beginning of the file (using head) or toward the end of the file (using tail).
For example, if you are interested in system activity logs, view /var/log/messages. If you need to check for authentication events, view /var/log/auth.log. Events relating to improper shutdown, reboot, and related failures would be in /var/log/boot.log. Information regarding installation or removal of packages can be found in /var/log/dpkg.log. Failed user login attempts can be found in /var/log/faillog (which you can view by using the faillog command). Using -a displays information about all users, but if you want to limit the output to a single user, you can use the -u parameter, like in the following example, where only information about root is displayed:

Firewall Settings
iptables -L -v allows you to check the iptables firewall status. An output like the following means the firewall is not enabled, as there are no rules currently configured:

Containment
After identifying an incident, the key goal is to ensure the attack is contained and the damage controlled. People often think that as soon as an attacker is identified, they need to kick them off so they can move to eradicating the threat. However, that may not always be the best approach. Sometimes, you may benefit from monitoring the attack and trying to understand what the attacker’s end goal is. After all, there is no guarantee that other avenues of access to your network haven’t been discovered by the attacker or additional accounts haven’t been compromised. As such, removing one type of access doesn’t mean they won’t just be back after a few minutes via another route. Consult with the business owner and wider teams and highlight the benefits of each method (immediately stopping the attack versus performing additional monitoring) and allow them to decide how they want to proceed. After all, it is their systems that are affected, so they need to be the ones deciding how they want to move forward.
Tracking and Communicating an Incident
The first thing you need to do after identifying an incident is to record the details in your incident tracking tool. Quite a few tools can be used for this purpose. Most organizations that have a security information and event management (SIEM) tool (like Arcsight, Alienvault USM, Splunk, or QRadar) tend to use that for incident tracking. Others just purchase tools like ServiceNow for this particular purpose. A few open-source tools that you can use are
• RTIR (https://bestpractical.com/rtir)
• FIR (https://github.com/certsocietegenerale/FIR)
• The Hive (https://github.com/TheHive-Project)
• Demisto (https://www.demisto.com/incident-management-and-response)
• CyberCPR (https://www.cybercpr.com)
• Cyphon (https://www.cyphon.io)
Regardless of what tool you choose, some key items you need to consider are what incident categories will you be using and what criticality levels best represent your organization (additional details regarding what data to capture regarding an incident have also been mentioned previously in discussing the preparation phase).
Some useful starting points for your incident categories can be found in ENISA’s threat taxonomy listing (https://www.enisa.europa.eu/topics/threat-risk-management/threats-and-trends/enisa-threat-landscape/threat-taxonomy/view) and threat landscape review (https://www.enisa.europa.eu/publications/enisa-threat-landscape-report-2018). In addition, the MITRE ATT&CK framework (https://attack.mitre.org) may be useful to ensure that all the attacks listed are reflected in your incident categories. Common examples include
• Physical attack
• Data loss/leak
• Hijacking/eavesdropping
• DoS/DDoS
• Malware
• Social engineering/identity theft
• Insider threat
• Cyber espionage
Incident criticality levels are usually represented in a matrix and heavily depend on what works best for your organization. Some use three levels (low, medium, high), while others use up to five. Table 2-2 contains a summary of the most commonly used criticality levels along with associated severity levels and definitions.

Table 2-2 Incident Criticality Levels
![]()
NOTE Sometimes you may see critical incidents described as severity 5 (instead of 1) if the organization is using a severity matrix of 1(informational) to 5 (critical) instead of the one mentioned in the Table 2-2. This often confuses both incident responders and analysts. In general, the convention presented here is the one most commonly used in practice.
Another thing you need to account for is what additional teams may need to be informed in the event of an incident and how much of the information needs to be restricted. For example, if the HR team has asked you to investigate a potential insider threat, they may request that information be kept confidential, meaning only the incident responder in charge of the investigation and the HR representative are kept in the loop, along with a senior stakeholder. In that case, you need to ensure your incident tracking tool allows that. If it doesn’t, you may need to identify other methods of communication that will ensure no one else can access those details. On the other hand, when you are working on a standard incident (which means that information doesn’t need to be restricted, like in the previous example of the insider threat) consider what teams need to be notified about it. For example, the affected system’s owner, the management team, legal team, law enforcement, or any teams you may require assistance from (like IT, infrastructure, network, and physical security). Always remember to update your incident tracking tool with as much detail as possible, including what actions have been taken and are to be taken next. Just make sure that this aligns with any sharing considerations that may exist, depending on the type and sensitivity of the incident.
Finally, remember not to interact with the attacker or try to retaliate against them. There are some very enthusiastic analysts who want to pay the attacker in kind. This may have serious legal implications. That’s because you can’t really be certain if the system you are attacking actually belongs to the attacker or not. Also, remember this action is illegal since you can’t target systems for offensive activity without prior permission. What if they have compromised someone else’s machine or network and you in turn attack them? Furthermore, what happens if your actions result in an innocent victim being greatly affected? If you just need to gain information about an IP or domain of interest, try to do so using open-source tools and intelligence and not interacting with the attacker’s systems directly, so you also don’t show you are on to them. More information on how to do this will be provided in Chapter 3.
Containment Strategies
The ultimate goal is full containment, also known as long-term containment, before moving on to the eradication phase. However, that may not always be feasible because it might result in business interruption and subsequent financial loss. In those cases, you can apply a short-term strategy (known as short-term or partial containment) and then ensure you acquire all necessary evidence to progress with your investigation and subsequently move to full containment. Examples of short-term containment methods include removing a machine’s network cable, blocking access from or to a specific set of IP addresses, or altering the network routes and physical configuration to stop the attack. Long-term containment can include system patching, OS upgrading, disabling a compromised account, installing a host firewall or host intrusion prevention system (HIPS), and various similar activities.
There are three main things you need to keep in mind:
• Each incident commonly has different containment strategies. This is where incident response playbooks come in handy. Work on those during the preparation phase and test them to ensure you are ready for an incident. Even if they work, try to increase the complexity and attack surface. For example, if you just tested a playbook relating to a ransomware attack infecting a single endpoint, would that work on a server? Or if it was a laptop that was infected while a user was connected to the corporate virtual private network (VPN) and then disconnected from the network? What happens if 200 machines are infected at the same time?
• Keep the business owner apprised at all times. Ensure the business is aware of the incident and provide regular status updates, depending on the criticality and type/number of affected devices. Advise the business owner of where you are and what steps are to be taken beyond that point, as well as what the associated impact is, so they can decide on how to proceed.
• Ensure you are able to obtain the evidence you require. This is not always easy to do, but when planning how to contain an incident, you have to be sure that the effort doesn’t destroy or alter any of your evidence. For example, if you decide to reboot a machine, you will lose any evidence residing in memory (among other things), so if that’s something you need for further investigation, it wouldn’t be the best approach. Similarly, if you decide to install software on the affected machine or otherwise interact with it, you are altering data, so if you need to maintain chain of custody for a court case, this might not be the best way to go about it.
It’s really crucial to be able to perform an in-depth investigation of the incident to identify the root cause for an effective remediation to take place. As such, after short-term containment is in effect, a full forensic image of the affected machine would commonly be obtained for further investigation. You may sometimes see the business trying to influence this approach by having you move from short-term containment to eradication. However, that doesn’t guarantee the attacker is not already present elsewhere in the network or that they aren’t able to use the same vulnerability to compromise another machine.
![]()
EXAM TIP It’s very crucial to remember that as you move into the containment phase, business owners (or other individuals) may start panicking because they think they are going to be blamed for what’s going on and might lose their jobs as a result of you doing yours. The key thing to remember is that you are there to help and this is definitely not the time to assign responsibility for the incident. In addition, you are still gathering evidence and performing an investigation, so until that is complete, you wouldn’t be in a position to provide concrete and accurate feedback.
Eradication
The eradication phase aims to remove any access the attacker has to the environment. After this phase is complete, the attacker should no longer have access to any system within the organization. Actions often include
• Malware removal
• Compromised account deletion
• Replacing compromised system files with clean ones
• Increasing/adjusting system auditing and logging
• Full hard drive erasure
• Changing system DNS name/hostname and IP address
• Black-holing traffic (also known as null routing or sink holing)
It’s very common to rebuild systems in an attempt to ensure that all attacker access has been removed and the system is safe to use again. However, as stated in the previous section, it’s equally crucial to identify the incident’s root cause to make sure the attacker doesn’t use the same method or exploit to regain access. Having said that, there will be times when fully rebuilding a system won’t be possible due to the business disruption it may involve.
When trying to create an eradication plan, consider that the attacker might be attempting to regain access while you’re executing your plan. That’s why in some cases where incidents are quite large in scale and multiple systems have been compromised, a decision might be taken to totally disconnect Internet connectivity for a short time when performing an eradication activity so the attacker can’t interfere with it. If full disconnection is infeasible, partial disconnection of affected parts of the network may be preferred instead.
Timing of the activity is also crucial. You need to work closely with the business and reach a decision as to when the best time is to execute the eradication plan, which can often be more challenging than initially anticipated.
Recovery
Recovery aims at returning the affected systems to a business as usual (BAU) state, which is commonly performed by restoring the system from a previously taken backup. The challenge is identifying if a backup is actually secure or not, which is again something that root cause analysis can help with. If you had a backup taken six months ago and root cause analysis indicates the attacker compromised that system a year ago, then clearly that backup can’t be considered safe to use for restoration.
In general, you should only restore from a backup when you are absolutely certain there’s no chance of it being compromised. If that’s not possible, then a system can be rebuilt from scratch by installing the OS, associated patches, and applications; performing testing; and gradually rolling it into production.
After that happens, it is vital to monitor the system for signs of new compromise. Ensure that it is carefully patched and the OS as well as installed applications are up to date. Performing periodic checks using the commands mentioned in the identification phase can also help you verify if any new compromise has taken place. Ensuring you have a robust vulnerability management program in place, which allows you to perform regular vulnerability scans of your systems, will also aid in keeping your infrastructure secure.
Lessons Learned
The lessons learned phase is the one that most organizations neglect to perform, thus not gaining the maximum value after handling an incident. Its main goal is to discuss the incident details, how the compromise took place, what worked properly and what didn’t work, and, most importantly, what can be done to improve the response capability to avoid future incidents.
It’s very important for this to happen in a timely fashion. If it takes too long, people usually forget the details and aren’t willing to allocate time to go over something that might have happened two months ago. The rule should be to do this as soon as possible following the recovery phase’s completion. Try to engage representatives from all relevant teams, so everyone has a chance to learn and take notes about what can be improved. In an ideal scenario, after the session is finished, everyone should walk out of the room with concrete actions that they need to perform, even if that entails them reviewing if specific systems or processes are working as expected.
Create a report that you can provide to the leadership team, and document in detail what is required to improve the company’s security posture. Sometimes it may be a technology investment, like a new firewall or intrusion prevention system (IPS) being able to filter offending traffic that got through this time. Other times it might mean going as far back as the preparation phase because you were missing an encrypted hard drive to securely store data, or your forensic software’s license had expired and you didn’t have a spare you could use. It’s also a great time to review current processes. If there are operating protocols that require changes or that didn’t work at all during the response to an incident, document that for future consideration.
Chapter Review
The six incident response phases were discussed in detail. As you saw, preparation requires a lot of steps to be performed and key decisions to be made before you have the capability to appropriately respond to an incident. These include building a team of skilled incident responders, deciding what the operating model will be, and determining how the incident response team will interact with other teams. It also means obtaining the necessary organizational information that will aid the response and ensuring all required hardware and software are available and have been tested for proper operation prior to any incident.
During the identification phase, a multitude of tools and commands can be used to verify an incident is present. The trickiest thing is to be as certain as possible that a security alert or a concerned employee’s report actually reflects a real security incident. Although no one likes false positives, there will be situations where you just can’t be certain, where treading carefully is usually the best approach. So, you might actually end up declaring an incident, and if it transpires that this wasn’t the case, you can always go back and readjust the trigger to avoid it in the future. The great thing about false positives is that they can become valuable lessons. For example, assume you try to call a business owner to get details about a critical server but you realize they don’t work for the company anymore and the related contact details haven’t been updated in the system. It’s better for that to happen when the incident turns out to be a false positive than finding yourself searching for that phone number in the middle of a real incident on a Saturday at 3:00 A.M. (yes, usually that’s when the fun starts).
During containment, it’s all about limiting the damage and applying solutions that will give you a chance to obtain the evidence you need for further investigation before enforcing more permanent containment strategies and moving to eradication.
Once you have reached the eradication phase, you are at the point of removing all the attacker’s access from anywhere in the network, which means you can then move to recovery.
As mentioned earlier, always perform a lessons learned session, as that can offer valuable information that shouldn’t be ignored. Always keep in mind that a great lessons learned session can save you from the next incident—or at least allow you to be better prepared to cope with it.
Questions
1. An attacker is trying to brute-force the admin password on a Windows server but you don’t get any alert for that activity. This is an example of a:
A. True positive
B. True negative
C. False positive
D. False negative
2. Which of the following commands would you use to display partition information, including the partition type and start and end sectors?
A. fdisk -l
B. df
C. free
D. cat /etc/partition
3. Which of the following tools would be used for securing the host perimeter?
A. NIPS
B. AV
C. HIPS
D. EDR
4. Which of the following commands can be used on a Windows machine to get details about user James?
A. net user James
B. net use James
C. net user
D. net session James
5. Which of the following is an open-source software solution used for host forensics?
A. Encase
B. FTK
C. Autopsy
D. Xplico
6. In which of the following phases would you most likely apply a patch to a compromised machine’s OS?
A. Preparation
B. Short-term containment
C. Long-term containment
D. Eradication
7. Which of the following tools would you use to get a copy of the network traffic?
A. TAP
B. Rekall
C. Volatility
D. CAINE
8. According to the following output, what’s the kernel release?
Linux kali 5.2.0-kali2-amd64 #1 SMP Debian5.2.9-2kali1 (2019-08-22) x86_64 GNU/Linux
A. kali
B. #1 SMP Debian 5.2.9-2kali1 (2019-08-22)
C. GNU/Linux
D. 5.2.0-kali2-amd64
9. In which of the following phases would you commonly use chain of custody forms?
A. Preparation
B. Containment
C. Eradication
D. Identification
10. Which of the following commands would you use to check for SMB connections originating from your machine?
A. net use
B. net session
C. tasklist
D. lusrmgr
11. Which of the following tools would you be least likely to use to analyze host forensic data regarding a case going to trial soon?
A. Encase
B. FTK
C. Autopsy
D. X-Ways Forensics
12. Using the command cut -d: -f1 /etc/shadow will achieve which of the following?
A. Provide a list of user groups
B. Provide a list of usernames
C. Remove the first column of the shadow file
D. Display the shadow file in an alphabetically sorted format
13. Which of the following activities would most likely be performed during the eradication phase?
A. Backup restoration
B. Removal of compromised system files
C. Addition of a firewall rule that blocks communication to a system owned by the attacker
D. Evaluation of the incident’s criticality
14. During which of the following phases would you most likely acquire a host forensic image?
A. Identification
B. Eradication
C. Preparation
D. Containment
15. Which command was most likely used to generate the following output?

A. netstat -naob
B. tasklist
C. schtasks
D. netstat -na
Answers
1. D. The definition of a false negative is “when a security incident is underway but there was no notification about it.” Since someone is really trying to brute-force the admin password on the server, this is classed as a real incident. However, the fact that there’s no alert for that activity makes this a false negative.
2. A. fdisk -l can be used to provide partition information, which will include the type and start and end sectors. An example is provided here:

The other commands won’t be able to display the same information. Also note the use of a distractor (option D), since this is not an existing file or directory.
3. C. Remember the four main detection locations: network perimeter, host perimeter, host, and applications. A HIPS would be placed at the host perimeter, similarly to a NIDS, which would be placed at the network perimeter. A HIPS is quite useful for protecting a host when an attack finds its way there after having circumvented other countermeasures, like when your NIDS or perimeter firewall is bypassed.
4. A. Using net user James will provide full detail about the specified user, in this case James. It’s worth noting that if you use it without specifying a user (net user), you will just get a list of the machine’s users but not some particular detail for any of them.
5. C. Autopsy is the only software on the list that is both open source and used for host forensics. Note that Xplico is the only other open-source software, but that is used for network forensics (not host forensics). This highlights the importance of reading questions carefully (sometimes more than once, if necessary) so you can identify the correct answer.
6. C. During long-term containment, you would commonly perform activities like OS patching/upgrading, disabling a compromised account, and installing a host firewall or HIPS.
7. A. A TAP can be used to mirror all network traffic to one of its ports. If you connect a laptop to that port, you will get a copy of the network traffic for further analysis.
8. D. The machine’s kernel release is 5.2.0-kali2-amd64. The other elements denote the hostname (kali), the kernel version (#1 SMP Debian 5.2.9-2kali1 (2019-08-22)), and the operating system in use (GNU/Linux).
9. B. During containment, you will commonly perform activities that initially allow you to stop the attack (thus performing partial containment) so you can acquire necessary evidence before applying more permanent containment methods (if applicable) or moving on to eradication. Chain of custody forms would be used when you are gathering evidence (for example, collecting hard drives, laptops, and mobile phones) to support later litigation proceedings.
10. A. Using net use will allow you to check if there are any SMB or NetBIOS connections originating from your machine. Note that net session allows you the opposite, meaning to view any SMB or NetBIOS connections to your machine.
11. C. When preparing for a litigation case, you need to make sure that any methods you used to analyze the forensic evidence are sound and the tools you used are commonly accepted by the industry. An open-source tool like Autopsy wouldn’t be the best option, as there’s no guarantee it has been rigorously tested since it is, after all, an open-source project. Commercial tools like FTK, Encase, and X-Ways Forensics are the best candidates.
12. B. Using cut allows you to display selected parts of lines from a file to standard output. The -d parameter allows you to set a delimiter (which in this case is the : character, separating the columns in the shadow file), and -f sets a specific field to be displayed. For example, setting -f1 allows you to display the first column, while -f6 displays the last one. Using cut -d: -f1 /etc/shadow can be used to provide a list of usernames, since the first column of the shadow file contains usernames.
13. B. Any malicious files that the attacker left behind (like backdoors, trojans, or altered system files) would be removed during eradication.
14. D. A forensic image would commonly be obtained as part of the containment phase. This will give you the time to fully investigate for indicators of compromise and perform root cause analysis while proceeding to the eradication phase.
15. A. Using netstat -naob will result in the provided output. Remember that using the -b parameter displays the binary application (splunkd.exe in this case) that relates to each connection.
References and Further Reading