CHAPTER 7
Network Attacks
In this chapter you will learn about
• IP address spoofing
• Network traffic sniffing
• ARP and DNS cache poisoning
• SSL/TLS and SSH attacks
• Session hijacking
• Using tools like hping3, Ettercap, Bettercap, and Arpspoof
Attackers love capturing network traffic because it often gives them all they need to access resources. If no encryption is applied, account credentials, credit card information, Social Security numbers, and other sensitive data can be captured and give the attacker a very easy win. Sometimes that happens passively (just by intercepting traffic) or often actively (entailing some type of interaction with the network). ARP, DNS, and SSL attacks are very common, along with session hijacking, where the attacker tries to use an already established session from a legitimate user to gain access to a resource.
IP Address Spoofing
IP address spoofing can be used to mask the true origin of an attack. An attacker can use a tool like hping3 to craft packets with various spoofed IP addresses and send them to the target. As the target receives those packets, the attacker may also blend in the traffic and perform reconnaissance or launch an exploit toward the target. Let’s see how that spoofed traffic looks like using hping3. Instead of sending traffic from Kali (172.16.197.135) to Windows (172.16.197.137), the source IP will be spoofed to resemble another machine on the network (for example, 172.16.197.34). That way, any logs or security devices present on the Windows host will identify offending traffic originating from 172.16.197.34. To reproduce this scenario, use the following steps:
1. Open a terminal in Kali and run tcpdump to capture traffic destined to Windows:
tcpdump -i eth0 dst 172.16.197.137
2. Open another terminal in Kali and use it to spoof traffic in hping3:
hping3 -S 172.16.197.137 -a 172.16.197.34 -c 2
Using -S will send SYN packets, -a will spoof the source IP address to 172.16.197.34, and -c 2 will send two packets (or you can omit it and terminate the command manually). Tcpdump’s output shows the spoofed traffic:

How about if you want to use random-source IP addresses? Replace the previous hping3 command with the following to send five randomly sourced SYN packets to the target:
![]()
The new Tcpdump output verifies the five different source IP addresses:

An attacker can do that with 50 or 100 different IP addresses. Various packets can be sent while running a stealth scan or launching an exploit. Anyone reviewing security logs on the target will have a difficult time identifying the true origin of the scan due to all of the spoofed traffic being present.
The great disadvantage of this method is although it’s really useful to confuse the defense, it doesn’t allow an attacker to establish an interactive session with a target. So, in the previous example, if the attacker needed to perform a scan or launch an exploit, that would need to be done originating from a real IP address so proper communication can be established. That can be achieved with source routing.
When source routing is used, the attacker can manipulate the path packets will take when traversing the network. As seen in Figure 7-1, Evil Dimi is connected to Router 3 while Jade is connected to Router 1. Router 6 has a filter applied that only allows traffic sourcing from Jade to reach it (destined for the server connected to Router 6). Evil Dimi can use source routing to pretend traffic is originating from Jade and he’s just another router in that traffic’s path. Any routers (like Router 5 and Router 6) will think traffic is taking a path starting with Jade, for example: Jade -> Router 1 -> Router 3 -> Router 5 -> Router 6 -> Server, and they will consider this traffic legitimate.

Figure 7-1 Source routing attack
Defending Against IP Spoofing
A first step to prevent spoofed packets being received would be to stop those at your network perimeter, like your border router, by implementing appropriate filtering.
Block ingress traffic sourcing from private IP addresses (RFC 1918) by using appropriate access lists. A sample entry from a Cisco device would be deny ip 10.0.0.0 0.255.255.255 to deny any 10.X.X.X addresses from sending traffic to your border router, since you wouldn’t expect that to be received at your network perimeter with an inbound direction. Such traffic would only be expected locally in your network. Similarly, you should also discard any multicast- or loopback-sourced traffic, which also wouldn’t be expected to originate from the outside network. Finally, don’t forget to create an entry for traffic sourcing from your own infrastructure, as that’s something that you also wouldn’t expect to reach your external border router’s interface with an ingress direction.
To avoid any source routing–related attacks, it’s also recommended to configure your devices (anything that performs routing, like your routers and firewalls) to block any source-routed traffic.
Network Traffic Sniffing
Packet capturing tools like Wireshark/tshark, Tcpdump, and WinDump were mentioned previously. Additional tools that can sniff network traffic are P0f (which was mentioned in Chapter 4 as a tool that can perform passive OS fingerprinting by inspecting surrounding traffic), Cain (discussed in Chapter 6), SteelCentral Packet Analyzer (https://www.riverbed.com/gb/products/steelcentral/steelcentral-packet-analyzer.html), OmniPeek Network Protocol Analyzer (https://www.liveaction.com/products/omnipeek-network-protocol-analyzer), Ettercap (https://www.ettercap-project.org), Bettercap (https://www.bettercap.org), and Dsniff (https://www.monkey.org/~dugsong/dsniff). An attacker can perform sniffing passively or actively.
Passive Traffic Sniffing
When performing passive traffic sniffing, the attacker just intercepts network traffic and analyzes available data without interacting with a target network. Figure 7-2 shows a user trying to connect from Kali to Metasploitable’s VNC server.

Figure 7-2 Using Kali’s Vncviewer to connect to Metasploitable’s VNC server
During that, an attacker is passively sniffing traffic using Cain on the Windows machine, as seen in Figure 7-3.

Figure 7-3 Cain sniffing the VNC password over the network
VNC uses encryption during the initial connection, so the password is not shown in plaintext. However, that can be sent to Cain’s cracker and an attempt to crack the password can be made. If the password was in plaintext, the attacker would have easily sniffed it, as seen in Figure 7-4 depicting an FTP password.

Figure 7-4 FTP password sniffed using Cain
So far, the attacker didn’t have to do anything else apart from passively sniffing network traffic. But the Windows machine is connected on the local network. In a real-life scenario, that would mean the attacker is attached on the local network segment and that a hub is being used (unless the network is wireless, of course), which allows the attacker to sniff all data sent from any machine. That is hardly ever the case anymore, as switches are widely used. The only option an attacker would then have is to connect to the switch’s Switched Port Analyzer (SPAN) port, since that mirrors all related traffic. If that’s not possible, additional actions need to be performed to be able to intercept traffic, which is when active sniffing is used.
Active Traffic Sniffing
To perform active sniffing, the attacker needs to interact with the network at some level. That means not only intercepting traffic (like in passive sniffing) but also altering packets so the attacker achieves his nefarious goals. Let’s first see how traffic normally flows in a switched network. Figure 7-5 shows a typical scenario.
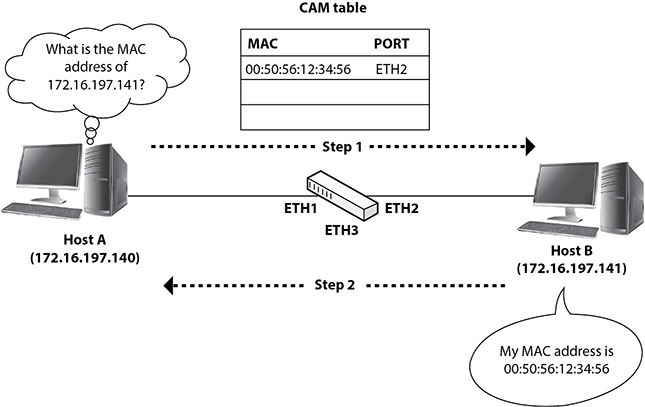
Figure 7-5 Traffic flow in a switched network
Host A needs to communicate with Host B. Remember in Chapter 4 when ARP was discussed and the communication between two local hosts was described?
Host A starts by checking its ARP cache for the presence of Host B’s MAC address. If that’s not there, it sends an ARP broadcast requesting that information. Once Host B replies to that, the switch adds an entry to its Content Addressable Memory (CAM) table correlating the MAC address with ETH2, and the information reaches Host A, which caches the mapping of IP address 172.16.197.141 to MAC address 00:50:56:12:34:56. There are two inherent issues with this model.
The first one relates to how switches process traffic when their CAM table is full. Some of them respond to that condition by forwarding any additional traffic they receive throughout all their ports, which can allow an attacker to intercept it.
The second issue is that ARP doesn’t provide any security, which means any information regarding a host’s MAC address will be considered genuine. That’s exactly what happens with gratuitous ARP messages, which are like a courtesy broadcast sent to the network nodes from a machine that wishes to provide them with its IP-to-MAC mapping.
MAC Flooding
When a CAM table is full and new frames reach the switch, it can behave in one of two ways:
• If there’s an existing entry for the destination MAC address in the CAM table, it can forward traffic to its destination.
• If there’s no entry for the destination MAC address in the CAM table, it can either replace an old entry with new information or fail back to working as a traditional hub and forward traffic to all other ports (apart from the one it originated from) in an effort to still allow the network to operate.
Attackers take advantage of the second scenario (when the switch is acting as a hub), since it allows them to sniff any network traffic that passes through the switch. Figure 7-6 shows how this is done.

Figure 7-6 MAC flooding
The attacker is connected on port ETH4 and starts sending fake MAC address updates (using a tool like Macof). Once the switch’s CAM table is full, it will start sending any new frames out of all its ports. Host A wants to communicate with Host C (connected on port ETH3, which doesn’t have a CAM table entry). The switch is now forced to flood ports ETH2, ETH3, ETH4, and ETH5 with Host A’s traffic, which allows the attacker to sniff it.
ARP Cache Poisoning
The goal of an ARP cache poisoning attack is to intercept traffic between two machines by manipulating their ARP cache entries without alerting any of them to this fact. Figure 7-7 shows an example where the attacker is trying to intercept traffic from a user on the Windows machine who is trying to connect to Metasploitable’s FTP server.
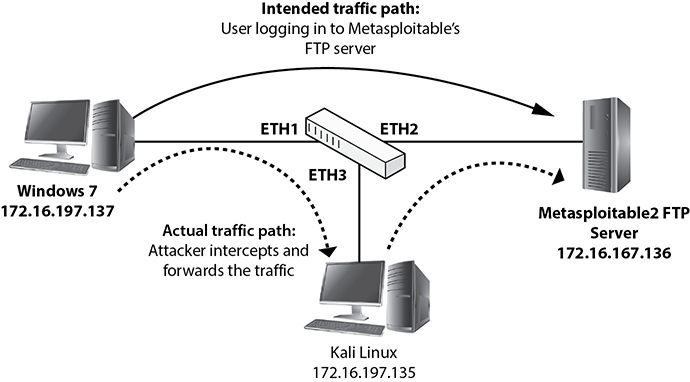
Figure 7-7 ARP cache poisoning example
For that to happen, the attacker will need to sniff the traffic from the Windows host but also ensure it gets forwarded to Metasploitable. Before starting to spoof traffic, check all your ARP cache entries (using arp in Kali Linux/Metasploitable and arp -a in Windows). My current values are as follows:


Arpspoof can be used to execute this attack by using the following steps:
1. Set IP forwarding in Kali Linux. That can be done by editing the /proc/sys/net/ipv4/ip_forward file and changing the value from 0 to 1:
![]()
2. Open a terminal and capture traffic in Kali for later analysis, using
![]()
3. Open Wireshark in Windows and capture all traffic for later analysis.
4. Open a terminal and use Arpspoof to send ARP replies to the Metasploitable host (using -t 172.16.197.136) while specifying to make the traffic look like it’s sourcing from Windows (172.16.197.137):
![]()
5. Open another terminal and use Arpspoof to send ARP replies to the Windows host (-t 172.16.197.137) while specifying to make the traffic look like it’s sourcing from Metasploitable (172.16.197.136):
![]()
6. Use the Windows command prompt to log in to Metasploitable’s FTP server:

7. Check the Windows and Metasploitable ARP cache entries.
8. Terminate all commands and restore the IP forward setting in Kali Linux.
If you managed to spoof traffic successfully, your Windows and Metasploitable cache entries should look like the following:
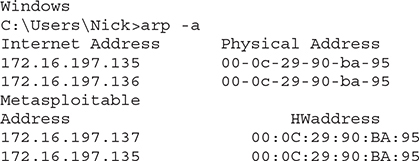
Windows now has a mapping of MAC address 00-0c-29-90-ba-95 for the Metasploitable machine, which in reality is Kali Linux’s MAC address. Similarly, Metasploitable has a mapping of MAC address 00-0c-29-90-ba-95 for the Windows machine, which, of course, is Kali Linux’s MAC address. So, it seems that the ARP cache entries have been spoofed as expected. Let’s have a look at the Windows capture, shown in Figure 7-8.

Figure 7-8 Windows packet capture during ARP cache poisoning
The capture shows the redirected packets from Kali Linux, and Wireshark is clever enough to identify the duplicate use of the IP address. However, there’s nothing noticeable from a user experience point of view. That means if you hadn’t taken a packet capture, you wouldn’t be aware of anything suspicious going on. Figure 7-9 shows what information the attacker gets (while following the TCP stream relating to FTP traffic).

Figure 7-9 Kali Linux packet capture during ARP cache poisoning
The FTP login credentials have been successfully intercepted and can now be used by the attacker.
![]()
EXAM TIP Attackers commonly set forwarding to the network’s default gateway so they can first intercept all traffic and then forward it to the default gateway for further routing, as would be the case with all legitimate traffic.
Switch Port Stealing
In a port stealing attack, the attacker uses the speed of forged ARP packets as the main weapon. As seen in Figure 7-10, Dana is connected on port ETH1, while the attacker is located on port ETH2 and is sending forged gratuitous ARP packets with a source of Dana’s MAC address and a destination of his own.

Figure 7-10 Port stealing
If the attacker is fast enough, he will be able to get the traffic destined to Dana by convincing the switch to send all packets destined to Dana to his actual MAC address. Notice that during this attack, the attacker only interacts with the switch and doesn’t perform any spoofing to Dana’s ARP cache or any other machine on the local network. However, the switch’s CAM table is manipulated, so an entry is added, redirecting Dana’s traffic to the attacker.
DNS Poisoning
Another attack similar to ARP cache poisoning is DNS poisoning, which is depicted in Figure 7-11.
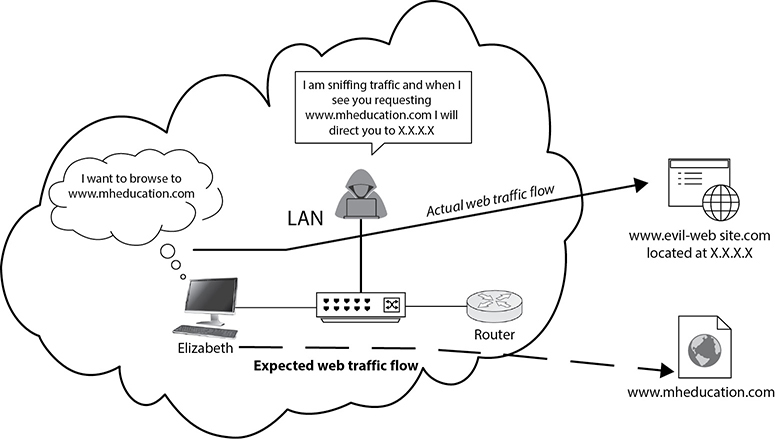
Figure 7-11 DNS poisoning
Elizabeth wants to browse to www.mheducation.com and sends a request to her local DNS server (which is the network router that also acts as a DNS server). The attacker is located on the local network and sniffs all traffic (using one of the earlier mentioned methods). Once a request for www.mheducation.com is identified, the attacker provides a DNS response stating “Hey, www.mheducation.com can be found at IP address X.X.X.X.” As such, Elizabeth navigates to X.X.X.X, which is controlled by the attacker.
![]()
EXAM TIP Figure 7-11 shows a representative example of DNS poisoning at a local network level. The same principle can be used even if the attacker is not located within the local network. He would need to be placed somewhere between the victim and the DNS server, so a response from the attacker comes before the legitimate DNS response. Similar to port stealing (which was mentioned earlier), the key is the speed of the DNS response. Even if a legitimate response arrives later, it will be ignored by the victim, since the fake response will have already been cached.
Another method to perform DNS poisoning includes manipulating the victim’s proxy settings and setting a fake proxy in the browser, which can allow the attacker to intercept traffic and again provide fake DNS responses. A tool like MiTMf or Bettercap can be used for that purpose.
Finally, another way is to change the DNS server records to point to a website that the attacker controls. That can be done by manipulating the entries in the DNS resolver cache so the attacker’s website is offered as a DNS response to a victim’s DNS requests.
SSL/TLS and SSH Attacks
You have noticed so many times by now that the primary method to protect against sniffing is using encryption. However, what happens when an attacker tries to manipulate the underlying certificate validation process to take advantage of it?
When using SSL or its successor, Transport Layer Security (TLS), the goals are to authenticate the destination server (so the client knows it’s communicating with an authorized entity) and to protect the subsequent communication with an encryption key. Figure 7-12 shows a TLS handshake taking place between Kali Linux (172.20.10.13) and https://www.mheducation.com (99.84.8.103).

Figure 7-12 TLS handshake between Kali Linux and https://www.mheducation.com
As you can see, the initial TCP three-way handshake takes place, and after that, the client sends a “Client Hello” message to the server to indicate its intention to connect over TLS. That contains parameters like SSL protocol version, session ID, and a list of cipher suites. The server then responds with a “Server Hello” message containing parameters like protocol version, session ID, selected cipher, and server certificate, and it can also optionally request the client to provide its own certificate (which is known as mutual authentication). The client proceeds with using the server certificate information to validate that against the certificate authority that generated it. It also sends a premaster secret key (encrypted with the server’s public key, which is contained in its certificate) that will be used to generate the session key to encrypt the communication.
An attacker can try a Man-in-The-Middle attack (MiTM or MITM) attack to intercept the communication. Basically, the attacker acts like a proxy, establishing one connection with the victim and a separate connection with the target server (which is a legitimate SSL connection, making the server think it’s established with the legitimate client). The key of this attack is that the attacker will send the victim a certificate that obviously won’t be the legitimate server’s certificate, but rather one that the attacker has generated. Since this certificate won’t be from a valid certificate authority, the client’s browser will display a certificate warning, as it will identify there’s something wrong. However, if the user chooses to dismiss the warning (which is something that a lot of unsuspecting people do), the attack can work just fine.
A tool like Ettercap/Bettercap can be used for that purpose. You can choose to perform a MiTM attack between two machines (like the Windows and Metasploitable hosts), or you can switch your machine to “Bridged Mode” and perform a MiTM attack toward the default gateway. You can use Ettercap’s GUI (using ettercap -G), as seen in Figure 7-13.
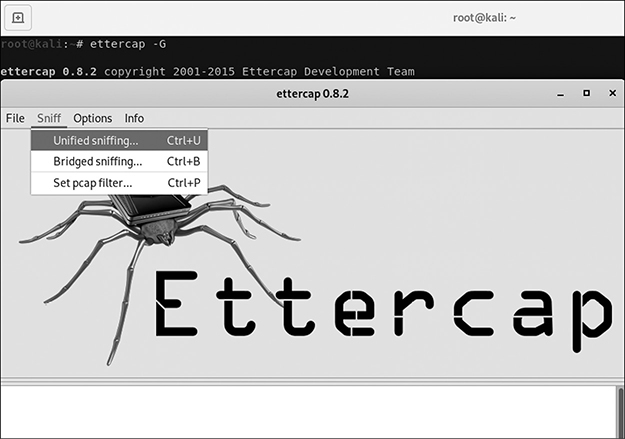
Figure 7-13 Ettercap GUI for MiTM attack
Start by sniffing traffic and then either use Hosts | Scan For Hosts and scan the network for active hosts or use Targets | Select Target(s) to define specific targets. If you prefer the command line, you can use -T to designate a text interface (instead of -G, used for GUI), -M to specify a MiTM attack, and then add the gateway (192.168.1.1) and target IP addresses (192.168.1.112).
![]()
All the attacker has to do is wait for the victim (192.168.1.112) to send an SSL-related request, like try to browse to https://www.mheducation.com. The victim thinks that an actual SSL connection has been established with https://www.mheducation.com and the communication is fully secure. That would be true if the server’s certificate was a legitimate one, like the one depicted in Figure 7-14.
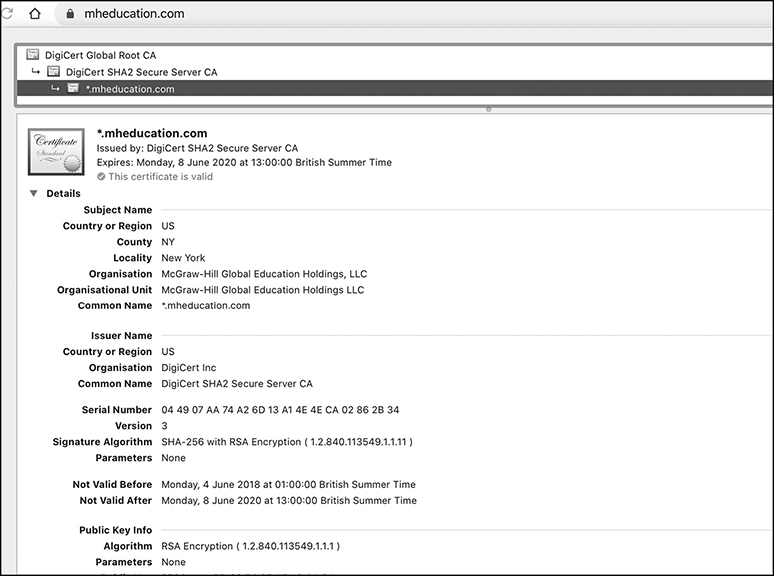
Figure 7-14 Valid SSL certificate for https://www.mheducation.com
In reality, if the victim chooses to ignore the related certificate warning displayed from the browser, a connection is established between the victim and the Kali Linux machine (running Ettercap) and a separate connection is established from Kali Linux to https://www.mheducation.com, as shown in Figure 7-15.

Figure 7-15 MiTM attack using Ettercap to intercept SSL/TLS traffic
The only notable disadvantage of this attack is that the user needs to manually disregard the browser warning to allow it to succeed.
Attacks against Secure Shell (SSH) (version 1) work in a similar way. A common tool used for these is SSH MITM (the latest version is 2.2) (https://github.com/jtesta/ssh-mitm). The tool intercepts traffic between a client and an SSH server. As with SSL, the client will get a warning message. In the case of SSH, it will state that the server’s key is different, but individuals may choose to ignore this.
![]()
EXAM TIP Some valid tasks will cause that message to be generated, like a legitimate key change on the server.
Additional MiTM tools you can consider are mitmproxy (https://mitmproxy.org), MiTMf (https://github.com/byt3bl33d3r/MITMf), Tornado (https://github.com/reb311ion/tornado), and Subterfuge (https://github.com/Subterfuge-Framework/Subterfuge).
![]()
TIP A full list of MiTM tools can be found at https://github.com/Chan9390/Awesome-MitM and https://github.com/topics/mitm.
Also, remember BeEF in Chapter 5? It can allow the attacker to “own” the victim’s browser and use that to deliver malicious files, fake updates, credential-harvesting web pages, and more. When an attacker has successfully performed a MiTM attack, he can sniff traffic, obtain sensitive information, deliver malicious files to the victim, and carry out various other activities. In fact, a simple packet capture often includes all the necessary information, and after an attacker sniffs all traffic with Wireshark, a tool like Network Miner or Xplico can be used to load the packet capture and allow it to identify all the important elements quite easily. Figure 7-16 shows an example of importing a packet capture in Network Miner, which has loaded all the interesting elements.

Figure 7-16 Network Miner packet capture analysis
It identified 13 different hosts, four sets of credentials, four files copied via SMB, and a variety of other parameters. All of that is available to the attacker, who wouldn’t have to do anything else, apart from capturing th enetwork traffic and importing the associated file to Network Miner, which will perform all the analysis.
Upgraded SSL Attack: SSL Stripping
If an attacker wants to get rid of the browser’s warning message, SSL stripping can be used via a tool like sslstrip (https://moxie.org/software/sslstrip). Figure 7-17 shows how traffic flows in that case.

Figure 7-17 SSL stripping attack
This time, the victim tries to browse to https://www.google.com. However, the attacker is using sslstrip and is able to redirect HTTPS to HTTP traffic (in the segment between the victim and attacker). Any traffic between the attacker and actual target will use HTTPS and won’t alert the target that anything out of the ordinary is taking place. In order for this attack to happen, the following steps can be used:
1. Arpspoof can be used to intercept traffic between the victim and the local gateway (victim = 192.168.156.112, gateway = 192.168.156.1):
arpspoof -i eth0 -t 192.168.156.112 192.168.156.1
2. Ensure port forwarding is enabled (as you did before when using Arpspoof):
cat /proc/sys/net/ipv4/ip_forward1
3. Set an IPTABLES rule to forward traffic from port 80 to port 7629 (or any other of your choice):
![]()
4. Run sslstrip to redirect web traffic (7629 was used earlier):
sslstrip -l 7629
If you managed to follow these steps properly, any SSL traffic originating from the victim machine (Windows: 192.168.156.112) will be rewritten to HTTP. Figure 7-18 shows an attempt by the victim to browse to https://www.google.com.

Figure 7-18 Victim attempt to browse to https://www.google.com
Figure 7-19 shows the actual web page displayed in plain HTTP, instead of HTTPS. Note that there was no need to dismiss any browser warnings, since Sslstrip just redirects the related traffic.

Figure 7-19 Google web page in HTTP (instead of HTTPS)
There are other ways that SSL browser warnings can be avoided. Think of the path that is followed to validate a certificate. It all starts with a browser (having various certificate authorities installed) and goes all the way to the certificate authority itself. If any of these components is compromised, the underlying certificate is also compromised. Starting from the browser, if an attacker manages to compromise a victim’s browser, a malicious certificate can be installed on it, resulting in no SSL browser warnings. Another option is to exploit any existing vulnerabilities that allow one to identify encryption keys from a host’s memory. Finally, an attacker can try to attack the mechanism that browsers use to validate certificates or the certificate authority itself (thus allowing an attacker to issue certificates that will be considered legitimate ones, since, as far as anyone can tell, those are signed by a legitimate certificate authority).
Defending Against Traffic Sniffing
Ensure all communications are vigilantly encrypted and all insecure protocols are replaced with their secure alternatives. As mentioned in previous chapters, examples of that include replacing FTP with SFTP, Telnet with SSHv2 (to avoid SSHv1 MiTM attacks), encrypting e-mails, and ensuring that VPNs are used.
Ensure that no hubs are in use (which, in all fairness, are rarely found today), and if they are present, replace them with switches. That will ensure an attacker has a harder time sniffing network traffic even if he does manage to connect to the local network. To that end, review your physical security protocols and enhance them so an attacker can’t physically connect to a switch.
Switches have various mechanisms to protect them from layer 2 attacks. For example, Cisco switches use dynamic ARP inspection to validate ARP packets within a given network. If a MAC-to-IP address binding is invalid, the associated packet can be discarded. They can also use port security, which allows a specific number of MAC addresses to be associated with a given switch port, and any violation can result in the port being disabled until an administrator re-enables it. Some tools that can identify ARP spoofing attacks are XArp (http://www.xarp.net), shARP (https://github.com/europa502/shARP), and Arpstraw (https://github.com/he2ss/arpstraw). Some administrators prefer manually administering system ARP tables, without allowing any dynamic entries. That can work for small networks, but on medium to large ones it can be a real challenge. Still, you can consider doing it for some very critical systems.
In order to protect against DNS poisoning, consider using Domain Name System Security Extensions (DNSSEC), which will allow clients to authenticate DNS responses (since DNS data is digitally signed by the DNS zone owner’s private key) and not accept rogue DNS replies from a potential attacker.
![]()
TIP Remember that DNSSEC doesn’t provide data confidentiality. Responses are authenticated due to using digital certificates, but they are not encrypted.
Configure your clients to query local DNS servers and not to send those requests externally. That can also be enhanced by your firewall blocking (or at least logging) any DNS requests that are destined externally.
Audit network traffic frequently. Tools like Wireshark are very good at detecting duplicate ARP packets or attempts to spoof MAC addresses and ARP entries. An IDS or any network behavioral analysis tool can also help, as it can detect changes in MAC addresses of critical devices. They can also identify any traffic of interest that maps to services that might not be serving any actual purpose that you should consider disabling, like Web Proxy Auto-Discovery (WPAD) or Link-Local Multicast Name Resolution (LLMNR) or even SMB used across network boundaries.
Check if machines on the network seem to be in promiscuous mode, which allows them to intercept and sniff all local network traffic. Tools like Microsoft’s PromqryUI (http://www.microsoft.com/en-gb/download/details.aspx?id=16883) and nmap’s sniffer-detect NSE script can be used for that purpose.
Session Hijacking
If an attacker manages to obtain critical information regarding an established user session, he may be able to combine it with the victim’s IP addresses to gain access to a target resource. Figure 7-20 shows an example of such a session hijacking attack scenario.

Figure 7-20 Session hijacking attack
Ade establishes a session with an FTP server. Evil Dimi is located in the path of the traffic (somewhere between Ade and the server) and is sniffing data using a tool like Ettercap or Morpheus (https://github.com/r00t-3xp10it/morpheus), which can be used to automate a TCP/IP hijacking attack. That allows him to obtain the session’s TCP sequence numbers, which the tool will use in combination with Ade’s IP address to steal the active session and log in to the server, posing as Ade.
Firesheep (https://codebutler.github.io/firesheep) can be used for HTTP session hijacking. Other techniques involve session ID prediction (to attempt guessing/brute forcing the ID of a valid session) or session ID theft (stealing the ID of an already established session from the victim). Session hijacking may be possible if unencrypted protocols are used, the session ID algorithm is not strong and can be easily brute forced to yield legitimate session IDs, or sessions are being insecurely handled by the destination server (for example, not logging off users properly or not having suitable session timers enforced).
An attacker can also perform a hijacking attack using a tool like Responder (https://github.com/SpiderLabs/Responder). It can simulate a variety of services (like HTTP, HTTPS, WPAD, SMB, SQL, FTP, IMAP, POP3, SMTP, DNS, LDAP and RDP) and provide poisoned answers (like LLMNR or NBT-NS) to trick the victim into authenticating and steal his account credentials. Look at the following example.
As you may remember, there’s no FTP server running in Kali Linux:

However, once Responder is started, all the services mentioned earlier start to be simulated, and therefore a victim may be tricked into using them. Start the tool using
![]()
Attempt to use any of its services from the Windows host (like log in to the FTP server):

After successfully logging in, when I tried issuing a PWD command, the connection was terminated. However, this is what Responder recorded:

It managed to get a username of “Nick” and a password of “password1.” The same can take place for any of the other services it simulates to attract victims.
![]()
EXAM TIP Attackers can also try to get session information after successfully compromising a host machine, a technique that is known as host session hijacking.
Defending Against Session Hijacking
Most of the defenses mentioned earlier against traffic sniffing are also valid for defending against session hijacking. In addition, you should consider
• Using HTTPS for cookie transmission.
• Enforcing session terminations by appropriate logout mechanisms.
• Ensuring no session ID reuse takes place by forcing applications to generate different IDs after a user logs out of the application.
• Using strong session ID generation algorithms to prevent ID prediction.
• Using host IDS/IPS, firewalls, and AVs to prevent an attacker from compromising a machine and perform a host session hijacking attack.
• Encouraging employees to report any issues to the security team. For example, getting a warning message for a key change when trying to use SSH to connect to a server (as it may indicate an SSH MiTM attack) or experiencing frequent session disconnects to a target server (may indicate a desynchronization attack).
Chapter Review
Attackers can use IP address spoofing so they don’t alert a target about the true IP address of an attack. Source routing can be used to manipulate the path packets take in a network so source IP address filtering is defeated.
Traffic sniffing can result in a wealth of information being intercepted by the attacker. That can happen passively (without the attacker interacting with the target network) or actively. During an active sniffing attack, the attacker can use
• MAC flooding The goal is to connect to a hub and sniff traffic. If a switch is in place, the attacker can try to overwhelm its CAM table in the hope that it starts broadcasting incoming traffic throughout all its ports, thus acting like a hub.
• ARP cache poisoning The attacker tries to manipulate machine ARP cache entries to allow for traffic interception and inspection while it subsequently gets forwarded to the real recipient so no detection of an attack happens.
• Port stealing Forged gratuitous ARP responses are sent by the attacker, who wants to make the switch overwrite a legitimate user’s MAC address and port association with that of the attacker’s.
• DNS poisoning Illegitimate DNS responses are sent to a victim in an effort to have it browse to a malicious destination, which the attacker controls.
• SSL/TLS/SSH attacks The attacker is located between a victim and the legitimate target and proxies the connections so that an unencrypted communication takes place between him and the victim. That allows him to sniff the traffic and get sensitive information (while an encrypted communication still takes place between the attacker and the actual destination).
Network session hijacking can be used to leverage a victim’s already established session and allow the attacker to connect to the destination resource, making it think a legitimate client is connecting. Furthermore, if the attacker manages to compromise the victim’s machine, host session hijacking can take place.
Questions
1. What will the following hping3 command do?
hping3 -S 172.16.197.137 -a 172.16.197.34 -c 2
A. Perform a port scan on 172.16.197.34
B. Send two ICMP request packets
C. Send SYN packets sourcing from 172.16.197.137
D. Send SYN packets sourcing from 172.16.197.34
2. Which of the following is used to encrypt the client’s premaster key during a TLS handshake?
A. Server’s private key
B. Server’s public key
C. Client’s private key
D. Client’s public key
3. The attacker sends ARP packets to the switch, and they all have the victim’s MAC address set as a source and a destination MAC address of the attacker. What type of attack does this depict?
A. ARP cache poisoning
B. DNS poisoning
C. SSL stripping
D. Port stealing
4. Which of the following tools would you use to identify an ARP spoofing attack?
A. XArp
B. PromqryUI
C. ArpFinder5
D. Responder
5. Which of the following most accurately depicts how an attacker can passively sniff traffic on a switch with no port mirroring support?
A. MAC flooding
B. ARP cache poisoning
C. He can’t perform that
D. MiTM attack
6. Which of the following can help you check if a machine on the network is set in promiscuous mode?
A. nmap
B. DNSSEC
C. Ettercap
D. Tcpdump
7. What can be a disadvantage of using Ettercap for an SSL MiTM attack?
A. Speed
B. Browser warning
C. Requires a valid client certificate
D. Requires access to the victim’s machine
8. A packet with a source IP address of 172.30.123.145 reaches your border router with an inbound direction. Which of the following would be the best course of action?
A. Allow the packet.
B. Monitor the traffic.
C. No action is required.
D. Discard the packet.
9. Which of the following tools would an attacker use to simulate an LDAP server running on his machine, with a goal of luring victims to provide valid account credentials?
A. Bettercap
B. Sslstrip
C. Responder
D. Firesheep
10. An analyst is looking for a tool to allow her to quickly export files contained in a packet capture. Which of the following would be the most suitable option?
A. Network Minder
B. Tcpdump
C. Xplico
D. Hping3
Answers
1. D. The command will result in sending two (-c 2) SYN packets (-S) to the target machine 172.16.197.137, sourced from a spoofed IP address (-a) of 172.16.197.34.
2. B. The client uses the server’s public key (contained in the digital certificate, which the server sends to the client when the “Server Hello” message is sent). That way, only the server can decrypt the client’s premaster key.
3. D. During a port stealing attack, the attacker sends forged gratuitous ARP packets with a source of the victim’s MAC address and a destination of his own.
4. A. From the provided tools, only XArp is used for ARP spoofing identification.
5. C. Passive sniffing means the attacker doesn’t interact with the target. As such, the only viable way to do this when a switch is being used is by having some type of port mirroring in place (like being connected on a SPAN port), allowing him to sniff traffic. If that’s not supported, active sniffing would be required.
6. A. nmap’s sniffer-detect NSE script can help identify machines set in promiscuous mode.
7. B. When using Ettercap to perform an SSL MiTM attack, a warning message will be displayed by the victim’s browser, stating that the certificate being used is not valid. In order for the attack to work, the victim needs to dismiss that warning.
8. D. IP address 172.30.123.145 belongs to the private IP address range of 172.16.0.0 to 172.31.255.255 (according to RFC 1918). Any traffic sourcing from a private IP address and destined for your border router (with an inbound direction) should be discarded, since that wouldn’t be legitimate traffic. Private IP addresses are only used internally in an organization.
9. C. Responder can simulate a variety of services (like HTTP, HTTPS, WPAD, SMB, SQL, FTP, IMAP, POP3, SMTP, DNS, LDAP and RDP). As such, it would be the best option for an attacker who wants to simulate an LDAP server running on his machine.
10. C. Xplico is a network forensic tool that can be used for this purpose. Note that another tool mentioned in this chapter is Network Miner; however option A mentions Network Minder and is provided as a distractor.
References and Further Reading