CHAPTER 4
Scanning, Enumeration, and Vulnerability Identification
In this chapter you will learn how to
• Map networks
• Use basic network protocol functionality to perform reconnaissance
• Perform host discovery, port scanning, version identification, and OS fingerprinting
• Perform vulnerability scanning
• Use tools like hping3, arp-scan, nmap, Zenmap, rpcclient, enum4linux, and Nessus
After using OSINT techniques for information gathering (as described in Chapter 3), now it’s time to gain even more specific information about the target environment. At this point, an attacker would start interacting with your network (something that you may sometimes see happening or often enough may go unnoticed, depending on the specific techniques that are used). The goals are the following:
1. Map the network architecture and identify live hosts.
2. Perform port scanning to find available services (listening ports on target hosts).
3. Perform vulnerability scans to see what type of attacks those hosts might be vulnerable to.
Introduction to ARP, ICMP, IP, TCP, and UDP
Scanning tools don’t perform magic (although we sometimes think they do) to identify which hosts are active on a network or what services are available on particular devices. They use various network protocols to send packets to targets and elicit responses. Then, responses are analyzed to determine if a host is up or a port is open based on expected protocol behavior. The following section aims to provide a brief protocol overview to make it easier for you to understand how those protocols are used by the various security tools. If you need more in-depth information about network protocols, feel free to revert to a resource like Walter Goralski’s The Illustrated Network: How TCP/IP Works in a Modern Network, Second Edition. It’s an amazing book with in-depth detail on all network protocols and their functions.
ARP
ARP is used each time a device needs to communicate with another device. In order for the communication to start, the source host needs the destination’s MAC address. Although the destination’s IP address may be available, a method is required to determine the MAC address that maps to that IP address. ARP is used to provide that information. Let’s assume that Host A needs to communicate with Host B over a local network. However, Host A needs to identify the MAC address of the destination host (it’s assumed that it doesn’t already exist in its cache). To gain that information, it will perform the following steps:
1. Host A sends an ARP broadcast message, trying to obtain the MAC address of Host B.
2. That message is received by the various local network devices but answered only by Host B, which replies with its MAC address. Other devices ignore it since it doesn’t relate to them.
3. Host A receives the response from Host B and adds the new MAC address to its cache for future use.
In terms of the lab you have set up, remember that your Kali machine needs to communicate with your Windows host (with an IP address of 172.16.197.137). It’s like it’s asking, “What’s the physical address of 172.16.197.137?” Your Windows host replies to that by saying, “Hey, my physical address is XX:XX:XX:XX:XX:XX.”
![]()
TIP To be able to have an abundance of hosts for port scanning and trying the various tools in this chapter, I am going to be using my VMs in bridged mode. That allows me to be able to scan anything in my home network.
An example of the Kali machine’s ARP cache is provided here, where the only machine existing in the cache is my home router, as all my VMs are currently powered off:
![]()
If an attacker is connected to the local network segment, ARP can be used to perform host discovery, as will be demonstrated in the next section.
ICMP
Hopefully, you already remember using ping in Chapter 1 to confirm connectivity between machines. An example of checking connectivity between Kali and Windows is shown here:

Do you recognize the protocol being used? It’s ICMP.
ICMP is mainly a diagnostic protocol that tools like ping and traceroute use to identify if there’s proper communication between two hosts or if there’s any connectivity issue that needs to be addressed.
![]()
EXAM TIP The Windows version of traceroute (tracert) uses the ICMP protocol. However, the Linux/Unix version uses UDP by default, although it can be configured to use ICMP if required.
The previous example showed proper communication between the two devices. If that wasn’t the case, the following would be displayed instead:

The attacker can gain information by analyzing the type of ICMP responses being received. Even if this attempt doesn’t yield a listening device, useful conclusions can be drawn about the network and its security posture (for example, understand if a firewall is in place or if route filtering is enabled).
![]()
NOTE Various ICMP message types can be used. Two of the most common ones are ICMP request (type 8) and ICMP reply (type 0). For example, when ping is being used, it generates ICMP request packets and sends them to a target, which will reply with ICMP reply packets, assuming proper communication is in place.
IP
As you may know, there are two main IP protocol versions in existence: IPv4 and its successor, IPv6. Their headers are depicted in Tables 4-1 and 4-2.

Table 4-1 IPv4 Header

Table 4-2 IPv6 Header
An example of a common IP field manipulation technique is IP address spoofing. The attacker attempts to spoof the source IP address of the packets in an effort to defeat security tools (for example, when source IP address filtering is implemented).
TCP
Table 4-3 shows the TCP protocol’s header and its main fields.
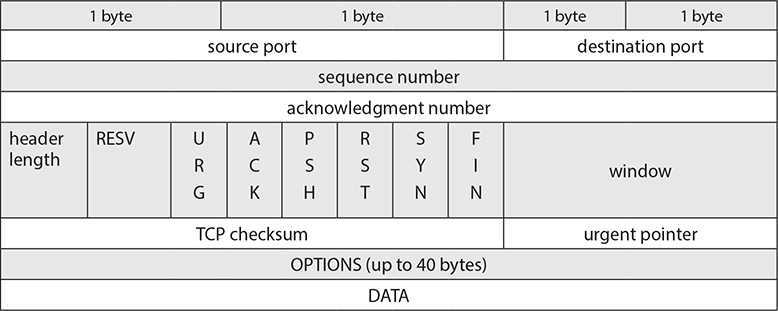
Table 4-3 TCP Header
Some of the more important fields are
• Ports The source and destination port fields are 16 bits (2 bytes) each. That gives you a total of 2^16 = 65536 available ports (note the actual range is 0 to 65535).
• Flags Possible flags are
• SYN Used when a new connection request is made
• ACK Used to acknowledge successful packet reception
• FIN Used to request a connection termination
• RST Used to terminate a connection
• PSH Used to instruct the destination not to buffer data but pass it directly to the application layer
• URG Raises the priority of a data segment
![]()
EXAM TIP Well-known ports range from 0 to 1023 (reserved for common applications), registered ports range from 1024 to 49151 (assigned by IANA for particular uses), and dynamic ports (also known as ephemeral) range from 49152 to 65535.
When a host needs to initiate communication, a SYN packet (containing a specific sequence number) is sent to the destination. If the destination is ready to accept the connection, it will reply with a SYN/ACK packet, also bearing its own sequence number. Finally, the originator of the connection will reply with an ACK packet, confirming the connection establishment. This will conclude what is known as a three-way handshake, which takes place each time a new TCP connection is formed. When a connection is to be terminated, a FIN packet replaces the SYN in the sequence.
Attackers often manipulate these fields when performing scans in an effort to elicit different responses from destination machines and determine their type or to bypass security devices. It’s also worth noting that a TCP header can be between 20 bytes (with no options field used) and 60 bytes (if the full option field is used, so all 40 bytes).
Some of the advantages of using TCP include connection reliability, flow control, and error correction. All these features come in handy and allow packets to be retransmitted if the destination never receives them or to adjust the transmission data volume if the destination is congested with traffic from other sources. However, in order for all these features to work, related information needs to be added in packet headers, making the communications slower, and depending on the destination’s conditions, transmission may even temporarily stop. TCP also tends to be more resource intensive and allows additional fields to be manipulated by an attacker (like the sequence and acknowledgment numbers and TCP flags).
UDP
The major differences between UDP and TCP are that UDP is stateless and has no reliability, meaning it can’t guarantee packet delivery. That’s why its header is quite smaller in comparison to TCP. However, the lack of complexity and additional checks make UDP a very fast protocol. So, if you are interested in speed and not so much in reliability or ensuring a message is received by the other end at all costs, then UDP is a great option. Table 4-4 shows the structure of the UDP header.
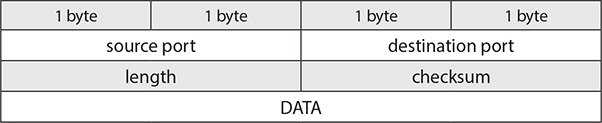
Table 4-4 UDP Header
So, now that you have a basic idea of commonly used network protocols, let’s see how an attacker can try to map your network by using those.
Network Mapping
As also mentioned at the beginning of the chapter, the first step is to create a map of the network, usually starting from the external perimeter and moving to the internal resources. A variety of tools can be used for host identification and subsequent network mapping. The ones used here are
• arp-scan (uses ARP for host discovery)
• ping
• traceroute
• Zenmap (nmap’s GUI)
Arp-scan
If an attacker is connected to the local network, a tool like arp-scan (https://github.com/royhills/arp-scan) can be used to perform host discovery. If used to scan the 192.168.1.0/24 subnet, the following output is provided:

As you can see, three hosts were identified as VMware devices. Each of them has a MAC address beginning with 00:0C:29, which is VMware’s identifier. Note that the first 3 bytes denote the manufacturer. You can use various online tools to look that up, like DNS Checker (https://dnschecker.org/mac-lookup.php). The IP addresses of each machine can also be seen.
Ping
As you know by now, ping can be used to send ICMP requests to a target and check if a host is alive or not. If you intend to scan a whole subnet of hosts (like in the earlier example with arp-scan), you don’t want to manually type ping 256 times. A simple bash script can be used instead, which has a for loop that can provide an easy solution:
![]()
This states that you are going to use a for loop with a variable named k for a range of values from 1 to 254 (since .0 is the network address and .255 is the broadcast address of that subnet). The command to execute is ping -c 1 -W 10 192.168.1.$k (sending one packet each time and waiting 10 milliseconds for an ICMP response before moving on to the next IP address), and the k variable will take all possible values from 1 to 254, meaning all those IP addresses will be pinged one after the other. This can also be done with various tools (like nmap) presented later in this section.
Traceroute
Traceroute can be used to map the path to a given destination. Traceroute works by manipulating the TTL field.
![]()
NOTE IPv4 uses the term TTL (depicted in Table 4-1), whereas IPv6 uses the term hop limit, mentioned in Table 4-2.
Each time a packet reaches an intermediary device (a router), the TTL value is decremented by 1 before being sent out to traverse the rest of the network. When a value of 0 is reached, the packet is discarded and an “ICMP time exceeded” message is sent back to the source. This works really nicely so packets don’t traverse networks indefinitely. Traceroute takes advantage of this feature by performing the following sequence of steps:
1. The TTL value is initially set to 1.
2. When the first router is encountered, the packet’s TTL is reduced to 0 and the first “ICMP time exceeded” message is sent to the source (containing the discarding router’s IP address and packet round-trip times).
3. The TTL value is increased by 1 (so now TTL = 2), and the packet is again sent out from the original source.
4. The first router again reduces the TTL by 1 (so now TTL = 1) and sends it to the next router.
5. Once the second router receives the message, it decreases the TTL by 1 (so now TTL = 0) and the packet is discarded, and a new “ICMP time exceeded message” is sent to the source (this time containing the second router’s IP address and packet round-trip times).
This process keeps repeating until the packet successfully reaches its destination. In a local network where all devices are directly connected (for example, via a router), a single hop is encountered, which is why if I use traceroute from Kali to my Windows machine, I have the following output:

However, if you try to use traceroute via large networks (traversing various routers), you see what those devices and their IP addresses are. For example, If I use traceroute from my host machine to Google’s public DNS server (8.8.8.8), I get eight hops until I reach the destination and a full list of each one of the hostnames and IP addresses of all of those devices.
![]()
EXAM TIP When you see a hop appearing with * * * it means the particular device is configured not to respond to these types of requests. A common configurational mistake is to only deny ICMP responses, thinking that this will be enough to block traceroute. But (as also highlighted earlier), Linux’s traceroute uses UDP. As such, an attempt to use traceroute from a Linux host would work just fine in those scenarios. Similarly, any scanning tool supporting the use of traceroute with UDP will also succeed.
Zenmap
nmap will be discussed in detail in the next section regarding port scanning. However, when performing network mapping, a really useful tool is Zenmap (https://nmap.org/zenmap), which is a GUI to nmap. It has the advantage of being able to graphically represent network resources and at the same time shows you the nmap commands being executed in a GUI box, which can help beginners build their nmap skills. Running a ping scan with Zenmap on 192.168.1.0/24, will provide the following output:

![]()
NOTE Zenmap displays the related nmap command being executed, which in this case is nmap -sn 192.168.1.0/24 (directing nmap to only perform a host ping scan). Each time you select a different profile, the command box dynamically changes. You can also specify a particular command you want to execute in that box and select Scan to run it.
The first device on the list (192.168.1.1) is my home router, followed by my MacBook host (192.168.1.103), Windows 7 machine (192.168.1.112), and Metasploitable (192.168.1.111). Try to do the same to your network and check what other devices Zenmap finds. Examples include smart TVs, tablets, and phones. Oh, and it’s always fun finding a device that you don’t recognize. That can make for an interesting day ahead.
Defending Against Network Mapping
All the tools mentioned earlier use the underlying OS protocols (mainly ICMP) to identify live hosts in a network and allow an attacker to map its structure. If you want to limit the information being disclosed, you have to restrict what type of responses are provided. But remember that ICMP is frequently used for identifying network issues. So, if you don’t allow that type of traffic, it might limit your capability to detect and fix these. For example, if you block ICMP echo request packets at your border router, that will stop an attacker from checking if a host is alive. However, that will also stop legitimate external users from checking if a resource is up (like a web server) and, if not, reporting that to your organization. Along the same lines, you can block ICMP time exceeded packets (which will prevent traceroute from working). A good approach would be to limit these types of traffic externally but allow them within your internal network so your internal teams can still troubleshoot issues.
Modern security devices (firewalls, NIDS/NIPS) are quite good at detecting these types of traffic (especially with some light threshold fine-tuning), and their rules can be configured to silently drop or alert upon offending traffic. It’s always good to keep an eye on what sources are trying to map your network, as this usually indicates the first stage of a later attack.
Port Scanning
The next step for the attacker is to perform port scanning on the hosts identified during the network mapping phase. The following tasks are part of this phase:
• Identify open ports (for later service exploitation)
• Version identification (figure out what specific versions of services are available on the target)
• OS fingerprinting (identify the target OS)
• Proxy utilization (mask scanning efforts by hiding traffic behind a proxy)
• IDS/IPS evasion (try to bypass any security devices that might be blocking scans)
Nmap
Although various tools are used for port scanning, nmap is by far the most commonly used tool. It’s open source, really well maintained, and performs quite nicely. It can do all sorts of things, including host discovery (also known as host sweeping), version identification, port scanning, and even firewall evasion.
![]()
TIP If you want to check how nmap works while scanning an external machine, you can freely scan scanme.nmap.org, which has been set up for that very purpose by the tool’s creator. Just try not to overutilize it so you don’t affect the functionality for others.
nmap can perform host discovery scans using the -sn option. So, using nmap -sn 192.168.1.0/24 would scan the whole subnet for live hosts. Or you can use it to scan scanme.nmap.org. But what packets does it send exactly? Is it just ICMP or something else?
![]()
EXAM TIP If you try to perform an nmap scan on a target attached on the local network, it will only send ARP packets to check if it’s alive.
A Wireshark pcap is shown in Figure 4-1. The scan was run against scanme.nmap.org (45.33.32.156). A filter has been applied to only show the traffic sourcing from Kali.

Figure 4-1 Wireshark pcap of nmap scan (focusing on packets originating from Kali)
As you can see, four packets are sent by nmap:
• ICMP request (which is what ping would use)
• ICMP timestamp request (queries a target system for the current time, and it should respond with the number of milliseconds since midnight)
• SYN packet to TCP port 443
• ACK packet to TCP port 80
By default, each time you try to perform a port scan with nmap, a host sweep will be done first. If a response is received to any of these requests, it will be assumed that there’s an active machine on the network.
![]()
EXAM TIP If nmap is run on Kali (or any Linux machine) without root permissions, it will replace the previously mentioned ACK packet with a SYN packet to the destination’s TCP port 80. That’s because it lacks the necessary permissions to craft the ACK packet.
When nmap is used for port scanning without explicitly defining which ports to scan, it will perform a scan against the 1,000 most common ports defined in its services file (located at usr/share/nmap/nmap-services). Experienced penetration testers use customized services files that may reflect what they have found to work better in their engagements or adapt according to the specific target. Table 4-5 summarizes some commonly used ports that are useful in most port scans.

Table 4-5 List of Common Ports
Nmap supports multiple scan types that serve different purposes. For example, sometimes a scan needs to be speedy, while other times it’s more important to be stealthy. Often enough, reliability can be the main target. Table 4-6 contains a list of the most commonly used nmap scan types, along with their switches and descriptions.

Table 4-6 nmap Scan Types
It’s worth providing some more information regarding service/version detection and OS fingerprinting before putting everything to the test.
• Service/version detection When this option is used, nmap will provide more information than that provided with a standard port scan, which would just state that a given port is open. It uses its probe database (which contains a variety of signatures) to query the services and match them to a specific fingerprint. As such, it will try to provide a specific protocol, version number, and device type, if possible.
• Active OS fingerprinting nmap uses a variety of techniques to perform active OS fingerprinting and accurately identify a target OS.
![]()
EXAM TIP nmap only performs active OS fingerprinting. Other tools can perform passive OS or TCP/IP stack fingerprinting (try to identify the target OS or review TCP/IP stack features without sending any packets, but instead by sniffing associated traffic). Examples include P0f, SinFP, and Siphon.
As mentioned on the site https://nmap.org/book/osdetect-methods.html, nmap may send various TCP, UDP, and ICMP packets to the target to elicit responses and check how those may deviate from protocol RFCs. These mechanisms include a variety of flags being set, sequence-generation techniques, ICMP echo requests, congestion notifications, response tests, fragmentation bits, and TCP window size review. If it’s unable to identify a reliable match, a message will be displayed stating that the target’s OS wasn’t able to be guessed.
![]()
TIP If you need in-depth information about nmap, the best resource is the online manual, which contains every piece of data about how nmap works: https://nmap.org
Some examples of nmap scans originating from Kali and targeted against Metasploitable follow. Note that I am still using my bridged configuration, so Metasploitable is located at 192.168.1.111. The best way to practice with nmap scans and gain the maximum value is by performing the following steps:
1. Ensure your target VM is running.
2. Go to Kali and open two terminal windows (one will be used to run nmap commands and the other to capture packets using tcpdump).
3. In the terminal used for tcpdump, run the following filter (or any filter of your choice) to capture scanning traffic: tcpdump -i eth0 host 192.168.1.111 -vvv -w scan (ensure that your Kali Linux’s interface is also eth0 and adjust accordingly if it isn’t). This filter will store traffic to a file called scan, which you can open with Wireshark.
4. Run your nmap scan (start with a full connect scan, like the one in Example 1).
5. Once the scan finishes, go to the terminal where tcpdump is running and press CTRL-C to write the data to the file.
6. When you are ready to start a new capture, run the filter again, and if you want to save all captures in multiple files, change the destination names (so, scan1, scan2, scan3, and so on).
![]()
TIP If you don’t want nmap to perform a ping scan each time you run it (so you have a clearer output), use the -Pn option, which just assumes the target is up and won’t send any probe requests. If you need additional details about tcpdump or Wireshark, go to Chapter 5.
Example 1
This command will perform a full TCP connect scan targeting port 80:
nmap -sT -Pn -p 80 192.168.1.111
The following illustration shows how the result of the tcpdump capture looks in Wireshark.

A full TCP scan will include a full three-way handshake. That’s exactly what’s depicted here. A three-way handshake is initiated by 192.168.1.108 (my Kali host) targeting 192.168.1.111 (TCP port 80), and after that is established, an RST packet is sent to terminate the connection. If there were more ports, additional such handshakes would be present for each of them.
Example 2
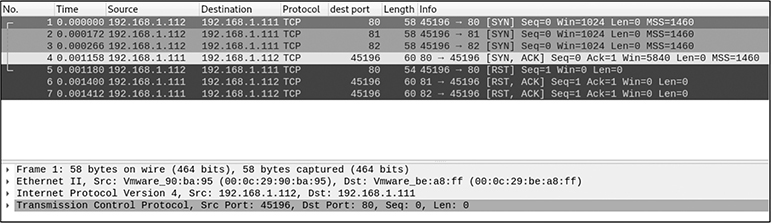
nmap -sT -Pn -p 81 192.168.1.111
This next image illustrates what would happen if you attempted to perform a TCP connect scan and the port is closed (like in the case of port 81). An RST/ACK packet would be expected from the Metasploitable host.

Indeed, the packet capture shows a SYN packet being sent from Kali and an RST/ACK being received in response. That indicates TCP port 81 is closed.
Example 3
This option will perform a XMAS scan:
nmap -sX -p 11 192.168.1.111
According to Table 4-6, since the port is closed, an RST/ACK is expected. The next illustration verifies that fact. Notice how the various flags (FIN, PSH, URG) are set in the packet sent from Kali, thus indicating the XMAS scan.

Example 4
nmap -sV 192.168.1.111
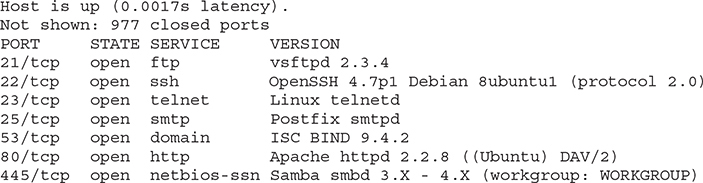
This time, a version scan is performed that will hopefully provide in-depth detail about the various services running on the target. A sample of the output follows:

As you can see, specific versions of services have been identified by nmap. The next step for an attacker would be to research those and identify vulnerabilities that can be exploited. A quick online search for “vsftpd 2.3.4” returned a Rapid7 article detailing a vulnerability and related exploit: https://www.rapid7.com/db/modules/exploit/unix/ftp/vsftpd_234_backdoor. Things are not looking good for the defense on this one.
Following a similar approach with all other scan types will help you solidify these concepts in your mind. The greater the variety of target systems and scans you perform, the more detailed your tests will be. Don’t be afraid to experiment. Also consider using various timing options and check how long it takes to do a scan (which is also a great evasion tactic). For example, -T0 and -T1 are very slow scans designed to evade IDS systems. You can easily install Snort (https://www.snort.org), which is a great open-source IDS/IPS, and check if using these timing options for your scans raises any alerts.
Take captures and verify the results. Is there anything different from what you anticipated? Did any of your target systems crash? If you are testing against an IDS, did the scan complete without causing any alerts to be raised? This is valuable knowledge that can prepare you for real-life incidents.
Hping3
hping3 (http://www.hping.org) is a tool used for packet crafting, port scanning firewall testing, remote OS fingerprinting, and network testing. It works in ICMP, TCP, UDP, and raw modes. For example, if you want to perform an ICMP scan you can use mode 1 (-1):

In this example, two packets were sent before I terminated hping3 manually, and the results state that replies were received for both of them, indicating the target machine is alive.
If you want to perform a scan for TCP ports 20, 21, 22 and 80 you can use the following command, indicating to hping3 that you are using it in scan mode (--SCAN) and setting SYN packets to be sent:

As you can see, the scan identified three open ports (note that TCP port 20 is closed and doesn’t appear at all in the table).
Additional Scanning Tools
nmap and hping3 are not the only port scanning tools. There are various other ones you can use, depending on your needs. Some examples include
• Unicornscan (https://tools.kali.org/information-gathering/unicornscan) Among other things, it supports active and passive OS fingerprinting, TCP banner grabbing, and asynchronous TCP scanning.
• Masscan (https://github.com/robertdavidgraham/masscan) Masscan is an extremely fast scanning program and is very convenient if you need to conduct scans against large IP ranges. Its major feature is that it uses asynchronous transmission. As such, there are separate threads of the program handling transmission and reception of packets, resulting in greater speeds.
• Amap (https://github.com/vanhauser-thc/THC-Archive/tree/master/Tools) This tool attempts to identify services running on nonstandard ports. It’s extremely useful, as it tries to send packets and review the responses to search for distinctive service strings, regardless of what port is being used.
• EyeWitness (https://github.com/FortyNorthSecurity/EyeWitness) This tool’s greatest feature is the ability to take screenshots of various websites (which includes Remote Desktop Protocol (RDP) and VNC servers). It’s also able to identify default credentials and provide header information.
Proxy Utilization
Using proxies can help attackers stay anonymous when launching their attacks. Well, maybe not totally anonymous, but it certainly makes the lives of security analysts much more difficult. Hiding behind a proxy means that any activity performed toward a specific target network will appear as originating from that proxy. The attacker establishes a connection with the proxy, and the proxy establishes a separate connection with the target machine. As such, as far as the target is concerned, traffic is originating from that proxy, since it can’t tell who the attacker really is (not unless there was an ability to review the proxy’s logs and identify the true IP address of the attacker, which can prove really hard, if not impossible, to do in real life).
nmap supports proxying requests via the --proxies parameter. Using the following command would allow you to perform a stealth scan to scanme.nmap.org using a list of specified proxies:
nmap -sS --proxies < list of proxies> scanme.nmap.org
There are three main ways this can be done:
• Using online tools
• Using open proxies (freely available machines over the Internet)
• Purchasing a private proxy/VPN software
Using Online Tools
This is perhaps the easiest approach, as you are using a publicly available tool to perform a scan without doing any configuration or having to locate a free working proxy. However, it also doesn’t give you full control over the scan. First of all, you are limited to the online tool’s options for scanning. Second, you don’t know where scans are being logged or what results are being stored (which sometimes might be less anonymous than you think). Some examples of online tools are
• IPVoid (https://www.ipvoid.com/port-scan)
• HideMyName (https://hidemy.name/en/ports)
• MX Toolbox (https://mxtoolbox.com/TCPLookup.aspx)
• Pentest Tools (https://pentest-tools.com/network-vulnerability-scanning/tcp-port-scanner-online-nmap)
Using Open Proxies
The challenge when using open proxies is that you have to constantly search for working proxies, as they change quite frequently. Also, you really have no idea what type of tracking takes place when using someone else’s proxy. Still, attackers don’t usually care about the fine print and would be eager to use them. There are various lists online, like the following:
• Proxy Nova (https://www.proxynova.com/proxy-server-list)
• Spys (http://spys.one/en)
• Public Proxy Blog (http://public-proxy.blogspot.com)
It’s also worth noting that some attackers prefer to perform scans using the TOR network, which can also provide a great level of anonymity (https://www.torproject.org).
Another option is using openly available tools to perform this activity:
• http-padawan (https://github.com/kost/http-padawan) This is a tool written in Perl that provides HTTP proxy capability supporting port scans.
• ScanSSH (https://github.com/ofalk/scanssh/wiki) Works slightly differently, as this tool allows you to search the Internet for available proxies.
• Remux (https://github.com/banianhost/docker-remux) Python tool that identifies available proxies that can be used to perform scans.
Purchasing a Private Proxy/VPN Software
Getting a private VPN/proxy solution has become quite cheap, and there’s a huge list of applications out there that you can use. Legitimate users would commonly purchase these to protect their systems when connecting via insecure networks (like hotels and airports) or to access applications when they are traveling outside of the usual area of coverage. A few examples of private VPN and proxy solutions include
• Express VPN (https://www.expressvpn.com)
• Nord VPN (https://nordvpn.com)
• Private VPN (https://privatevpn.com)
Regardless of the option, the principle is the same. The true IP address and location of the attacker are masked. For example, using one of these solutions to connect via Germany assigned me an IP address of 89.249.64.174, as seen in Figure 4-2.

Figure 4-2 Using a private VPN proxy
However, I am actually located in the UK. But any traffic I generate (including scans via nmap or any other activity) will appear as coming from the previously mentioned IP address. Cool, right? You can now appreciate how difficult it is to properly trace this back to an attacker.
IDS/IPS Evasion
Attackers commonly try to exploit vulnerabilities in how IDS/IPS systems work so they can fly under the radar. One example is encrypted traffic. Since it can’t be inspected by these systems, it might be passed directly to the target machine.
![]()
NOTE How an IDS/IPS system handles encrypted traffic is up to the administrator. In strict environments, such devices might be configured to drop encrypted traffic based on the fact that it can’t be inspected. However, that’s rare, as in most production systems, encrypted traffic is usually allowed in an effort to serve legitimate clients.
IP address spoofing can be employed to mask the true origin of an attacker (hping3 and nmap both support this). The key thing to remember is that when a tool is used to spoof the source IP address of a machine, any return traffic will reach the true machine. That won’t be really useful for an attacker trying to perform a scan or any other meaningful activity on a target, but can easily be used to confuse the target’s security teams. For example, imagine your IDS receives scanning traffic from 100 different IP addresses. Even if only one of those actually belongs to the attacker, it would be really difficult to distinguish it.
Packet fragmentation is another well-known technique. The goal is to separate the information from a single packet to many smaller ones, which can be quite handy if the IDS is unable to support packet reassembly. In such a case, offending traffic would pass through the IDS and reach the target, where reassembly would take place.
String manipulation can also help in evading an IDS. Encoding all or part of the string the attacker sends can help in defeating IDS signatures.
Timing is a factor in these scenarios. If you set your port scanner to perform the scan in enough time (for example, using a T1 nmap option), it will make things harder for an IDS, since it will have a threshold of traffic volume for a given period. If you slow your scans down considerably, it is very likely that your traffic will go right through, since you won’t go above that time threshold.
Blending attacks is another interesting method. In essence, the attacker will try to match the existing network traffic as much as possible so they avoid any behavioral IDS detection. That’s one reason why attackers use preexisting tools they find on compromised machines, especially for data exfiltration. For example, if you commonly use Dropbox or Google Drive for collaboration in your company, an attacker would also use those applications if they wanted to exfiltrate data, since you have already preconfigured your defenses to allow them.
Fragroute (https://tools.kali.org/information-gathering/fragroute) is an example of a tool that can perform IDS evasion. You can install it using apt-get install fragroute. It works by rewriting egress traffic to a specific target. It supports packet delay, duplication, fragmentation, overlap, and a lot more features that IDS evasion techniques use (as described earlier). Using fragroute 192.168.1.111 will send fragmented traffic to the machine residing at the IP address 192.168.1.111. Opening a new terminal and sending a single ICMP request will result in the packet being fragmented into additional IP packets. Try it out and see what you get. Instead of sending one ICMP echo request packet, you will find that broken into four or five packets. I recommend using Wireshark to analyze the captured traffic, as it’s really good at identifying fragmented packets.
Also, note that nmap supports IDS evasion through a variety of features described in detail at https://nmap.org/book/man-bypass-firewalls-ids.html. Remember that this is not an exact science and various techniques may sometimes work or fail, depending on the target’s security device type and associated configuration.
![]()
TIP Additional information on IDS evasion techniques (including the use of invalid TCP checksums, fragmentation overlap, or overwrite) can be found at https://www.symantec.com/connect/articles/ids-evasion-techniques-and-tactics, https://www.sans.org/reading-room/whitepapers/detection/intrusion-detection-evasion-techniques-case-studies-37527, and https://www.blackhat.com/presentations/bh-usa-00/Ron-Gula/ron_gula.ppt.
Defending Against Port Scanning and IDS Evasion
The most fundamental defense against port scanning is to close those ports. Of course, you can’t disable all services, but closing nonessential ports would fall under host hardening. You should regularly review your systems and check what ports are open and what services are in use. Whatever is not absolutely required should be disabled. Also, don’t be afraid to challenge your teams. Sometimes IT teams cut corners. They often install a service to test something and then leave it working. I remember doing an audit on a firewall policy and finding Telnet being allowed from the external network to a server placed in the demilitarized zone (DMZ). When I asked the network team, they replied this was added as a test. To make matters worse, although everyone understood this should now be removed, they required me to fill in a change request and wait until the next change advisory board session to have it reviewed and approved. If only attackers were so polite as to hold off and not brute-force the password to that server, waiting for the company to get the change approved first, right?
Ensure you use next-generation devices (firewalls, NIDS/NIPS) at your network perimeter that can detect port scanning, and be diligent in applying updates and patches to them. Even open-source tools like Snort and Zeek (https://www.zeek.org) are really good at detecting port scans. But feel free to test them out and adjust thresholds and rules accordingly. If there are critical systems in need of protection, consider installing HIDS/HIPS to ensure adequate protection is provided.
It’s time to break out those cheat sheets you created when you went over Chapter 2. Use the related commands to check for open ports and enabled services in both Windows and Linux (and any other OS you have in your organization) and review the outputs. As a reminder, using netstat -naob on my Windows host provided the following interesting service:

Challenge what you don’t expect. Would you expect Python on your systems? If no, dig deeper and see what that service is doing there. In Chapter 2, the Windows Sysinternals suite was also mentioned when discussing psinfo. Another great Sysinternals tool is TCPView. It allows you to graphically view processes, PIDs, protocols, and local and remote ports, as well as their state (can easily display which ones are listening) and get some useful statistics about how much data has been sent and received.
Use netstat on your Linux host and identify interesting ports. You can even use nmap to scan your local machine and review the output. Review the rest of the commands for identifying services and processes of interest, or use the Windows GUI tools (task and service manager) or Linux command prompt to do that (for example, use kill to stop a suspicious process).
In Unix, inetd.conf (/etc/inetd.conf) and xinetd.conf (/etc/xinetd.d) can be edited to disable specific services.
This is where continuously reviewing and optimizing your cheat sheets come in handy, as this will save you valuable time.
![]()
EXAM TIP Having great cheat sheets also helps a lot during the exam because you will undoubtedly need to search for commands, no matter how good your memory is. If you get easily confused with some of the commands and their different outputs (especially using the various parameters), a nice idea is to print some sample command outputs so you have them as a quick reference. It can really help speed things up.
Vulnerability Identification
Vulnerability identification is another key element in an attacker’s arsenal. For the defenders, it’s the closest thing to a penetration test without a penetration testing team present. Organizations use vulnerability scanning tools (for example, Nessus, OpenVAS, Qualys, and InsightVM) to identify known vulnerabilities and patch or upgrade the OS and various services to protect themselves and remain compliant. The scanners can be configured to validate if known vulnerabilities exist within your network and, if so, how critical they are and how you can address them.
However, these tools can be easily used by an attacker, as they contain an abundance of information. OpenVAS is a great open-source tool and has come a long way over the years. Early versions were really difficult to install and configure, but now the interface is quite nicer. Nessus is another interesting choice, as Tenable is currently offering it for free use to scan up to 16 IP addresses. That gives you a great practice option, as you can use it for your home lab/network.
Nessus
Nessus has a very simple architectural setup. You handle everything via a GUI, which you reach via a browser on your local machine. That in turn communicates with the Nessus server, which actually performs the scans and collects the results. Once a scan is finished, you can choose to generate a report from a variety of supported report formats (PDF, HTML, and CSV). In order to simplify this setup, the client and server can both be installed on the same machine, which is exactly what will be used and demonstrated next.
You will need to download and install Nessus (https://www.tenable.com/products/nessus), as it’s not included in Kali Linux. Follow these steps:
1. Browse to https://www.tenable.com/products/nessus and select Download (note that you will need to register for a free account).
2. After registering, a list of available versions will be displayed. Download the Debian one (it also mentions it supports Kali Linux in the description). Make sure to download the one corresponding to your version of Kali Linux (32-/64-bit), and if you don’t remember your version, check it using uname -r.
3. After downloading the package, use the command prompt to navigate to its folder and use dkpmg -i Nessus-8.8.0-debian6_amd64.deb to install Nessus.
4. Use /etc/init.d/nessusd start to start the Nessus server.
![]()
5. Browse to https://kali:8834 to access the GUI and configure your scans.
![]()
NOTE You will need to confirm the security exception that will be displayed regarding the certificate.
6. Select Nessus Essentials.
7. You should have received an activation code via e-mail. If that’s the case select Skip. If you haven’t received an e-mail, register at this step.
8. Add an account (username and password) to manage the tool.
If you complete these steps successfully, Nessus will start downloading and compiling the necessary plugins (which will take quite a bit of time). You can then select to scan a whole subnet or a specific machine (like your Windows or Metasploitable host). Following are the steps you need to complete to scan one of your VMs:
1. Select New Scan.
2. Choose Basic Network Scan.
3. Fill in the name, description, and IP address of the target and click the arrow next to Save to allow the Launch option to be displayed, as shown in Figure 4-3.
4. Select Launch.

Figure 4-3 Nessus scan settings for Metasploitable scan
This will run a scan against Metasploitable with the default settings. If you want, you can configure additional options by navigating through the various tabs, like Discovery and Assessment. If you select the Metasploitable host in Nessus, you can view a summary of the different vulnerability levels and associated numbers, as seen in Figure 4-4.
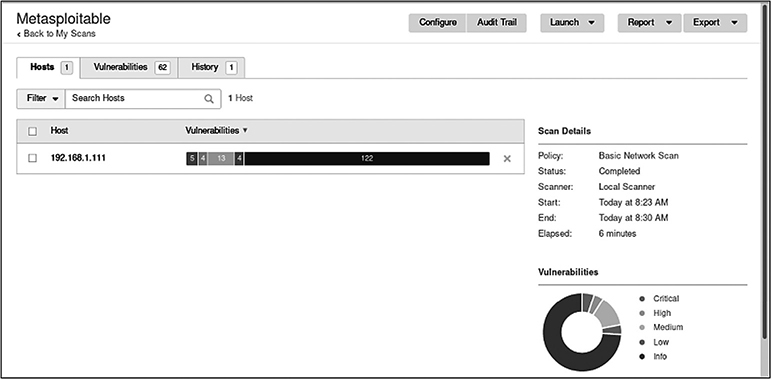
Figure 4-4 Nessus scan summary for Metasploitable
As you can see, there are multiple vulnerabilities present (which makes absolute sense, since Metasploitable is a deliberately built vulnerable machine). But imagine you saw this report for one of your company assets. Figure 4-5 shows a breakdown of the VNC vulnerability.

Figure 4-5 Nessus details about Metasploitable’s VNC vulnerability
As you can see, the description states that the VNC server running on the machine has been configured with a weak password. Nessus has even managed to identify the password used, which in this case is “password.” Review the other vulnerabilities and try to familiarize yourself with the different scanning options. You can also create specific scan policies, which depict custom settings you want to have in place whenever a scan is conducted. You can also choose to scan for specific vulnerabilities, like when a new vulnerability is out and you want to check which of your systems are affected. In general, vulnerability scanners are really valuable tools but can also do a lot of damage in the hands of an attacker. That’s why it’s crucial to secure your devices. Attackers can also use these tools to gain insight to where your vulnerabilities are so they can exploit them and breach your network.
![]()
CAUTION One thing to keep in mind when using Nessus and creating scanning policies is to allow or exclude “dangerous scripts.” Nessus has categorized scripts that might create an impact to a target machine, so if you want to exclude them from being used, make sure you choose the Safe Checks option when configuring your scans.
Defending Against Vulnerability Identification
Defending against vulnerability identification is similar to defending against port scanning. If you want to address any vulnerabilities, you have to ensure the system is adequately patched and updated. Create a patching cycle and stick to it. Perform regular vulnerability scans, and ensure you check your systems against a variety of vulnerabilities.
If you want to minimize impact to production systems, you can have a preproduction environment where you replicate the exact configuration of the production network. There, you can safely run more exhaustive scans (including the dangerous ones) and see how your systems cope with the challenge. If there’s no preproduction system, define specific vulnerability scanning schedules that can run outside of business hours. Most scanners will be able to pause and start scans according to your schedule until the whole process is completed and a report is ready for your review.
As with port scanning, ensure that deprecated services and systems are removed from your network as soon as possible, and mitigate any high-risk vulnerabilities you identify before an attacker has an opportunity to exploit them. An upside is that most IDS/IPS devices are actually quite good at identifying scanning traffic. As long as you keep them up-to-date they will do a fairly good job of notifying you when a scan is taking place so you can take appropriate action.
Commonly Exploited Protocols: A Few Useful Examples
Attackers look for the lowest-hanging fruit when trying to compromise networks. If there are any services or protocols that are inherently insecure, those would be the ones that are targeted. For example, if you are running FTP and SSH, FTP would be the one an attacker predominantly targets, due its lack of encryption. Remember that during the scanning phase, services and their versions can be identified, so if some of those have known weaknesses, an attacker would turn to them first. A few examples of commonly exploited protocols have been provided for your awareness, with an emphasis on SMB, which has been one of the most heavily targeted protocols due to the fact that it’s usually allowed within the majority of organizations.
FTP
As soon as attackers see an FTP port open on a target machine, the first thing they will do is try to connect to it. Note that if some type of version scanning has been performed, this doesn’t mean they will only try to connect to the default FTP port (TCP port 21). If an FTP server has been identified running on another port, that will also be used. Sometimes administrators think that just because they moved a vulnerable service to a nonstandard port, this provides adequate protection. It actually doesn’t. A simple version scan on Metasploitable shows two FTP-related ports and associated services:

FTP servers often support anonymous logins (commonly utilizing the usernames “anonymous” and “ftp”). The first step for any attacker would be to try and log in using anonymous or ftp as usernames and any password. If the FTP server has been configured to support anonymous logins, this would be an easy win.

As you can see, the login was successful. You can verify anonymous logins are allowed in Metasploitable by navigating to the configuration file and reviewing the related section:

This demonstrates the need for configuration review and service hardening. Imagine how damaging this could be if an externally facing server of yours was supporting anonymous logins.
![]()
CAUTION Whenever you encounter an insecure protocol (like Telnet or FTP) existing in your infrastructure, you should always highlight it to the business and suggest they replace it with a secure solution. For example, suggest replacing FTP with SFTP and Telnet with SSH.
Telnet
As also mentioned in the previous section, Telnet is another example of an insecure protocol that should be avoided, since attackers can sniff credentials passed in plaintext. Figure 4-6 shows an example of a Wireshark capture from an attempt to use Telnet to log in to Metasploitable.
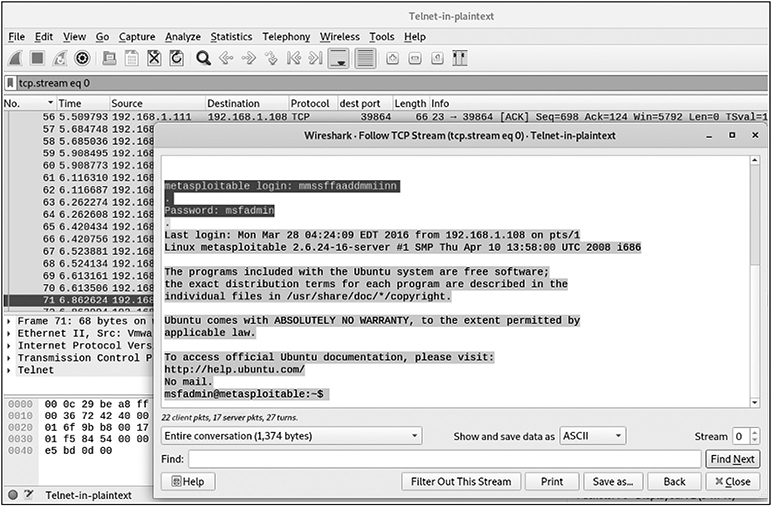
Figure 4-6 Wireshark capture of Telnet login to Metasploitable
The username and password used for that connection are present in the capture. An attacker can easily use them to log in to the target.
It’s also worth mentioning that Telnet can be used to get banner information from a target device (also known as banner grabbing) and understand what exactly that machine is or what purpose it serves. If I try to use Telnet to access an old lab router of mine (using TCP port 80), I get the following response:

I didn’t have to log in to the device, but this attempt identified a ZTE router’s banner, which is great information for an attacker, as they can now start searching for vulnerabilities and exploits for that particular device. This happens constantly across various exposed devices, and it’s an easy way to identify vulnerable services that can be exploited to gain access.
SMB
SMB is used within the majority of companies worldwide, since it’s the easiest way to share resources in Windows environments. Anything from network shares to printing services can be shared via SMB, and it can also be used for remote device administration. The most common port for SMB is TCP port 445, but you may also sometimes see it using the Remote Procedure Call (RPC) (TCP port 135) and NetBIOS ports (TCP/UDP 137 to 139) in older systems.
SMB Using Windows
You may remember SMB in Chapter 2 and learning how to use the net command and its parameters to view network shares. As a refresher, using net view \localhost allows you to check the file share status on the Windows machine, which shows volume C is being shared across the network:

If you connect to a remote machine using the machine’s name (or IP address) instead of the local host, you can display its shared elements. You can also use net view/domain to get a list of the available domains:

And you can then use net view /domain:<domain_name> to list all the devices in the domain. An example of two available devices is shown here. Within my domain (WORKGROUP), my Windows machine and a printer are present:

![]()
TIP Additional tools worth considering are the Windows nbtstat command (which can be used to display a remote system’s name table, which may include logged-on users if the target is running an old Windows version) and nbtscan (a free program that can be used to scan a whole local/remote network for NetBIOS information).
If you want to open a new connection to a Windows machine residing at 192.168.1.14, you can use net use \192.168.1.14. And now you might be thinking, “Wow, does that mean I can access anything that has SMB enabled, just like that?” Not quite. You still need working credentials to connect to the resource, but that’s where password cracking (covered in Chapter 6) comes in handy. Also, good old misconfiguration sometimes may allow access to shares you wouldn’t normally expect to view. If no credentials are provided with net use, it will use your current credentials used to log in to Windows to connect to the target share.
Null SMB sessions are another great feature that can be exploited. You can think of this as the equivalent of an anonymous FTP login. Using
net use \192.168.1.14IPC$ "" /u:""
will allow an attacker to connect to the share named IPC, although no username or password was provided (as long as the target allows null SMB sessions). As a comparison, if this share was accessed using a username of admin and a password of password, the command would be changed to include those credentials:
net use \192.168.1.14IPC$ password /u:admin
If you identify open connections to your machine and need to remove them, use the following command:
![]()

In this example, a single session was established to the Windows machine, which was removed. If you need to remove a session originating from your machine, use command net use \192.168.1.108 /del.
Enum (https://packetstormsecurity.com/advisories/bindview) is a free tool used to gain more information via SMB sessions. It can help you get a list of machines, users, shares, and even information about the password policy in use. Although it primarily works by using null sessions, you can also use specific credentials. For example, if you want to specify a user of admin and a password of pass to connect via SMB to 192.168.1.155, you can use the following command:
enum -u admin -p pass -G 192.168.1.155
Some additional tools of interest are
• dumpsec (https://sectools.org/tool/dumpsec) Tries to establish a null SMB session with the target to get information.
• epdump (http://www.security-solutions.net/download/index.html) Uses the RPC service to get information.
• winfo (https://packetstormsecurity.com/files/16272/winfo.exe.html) Uses SMB null sessions to query a target for information.
• PowerShell-based tools and scripts can also help in getting SMB information. Two examples are SMB Share Scanner (https://github.com/SecureNetworkManagement/Powershell-SMBShareScanner) and SMB Scanner (https://github.com/vletoux/SmbScanner).
SMB Using Linux
Enum4linux (https://labs.portcullis.co.uk/tools/enum4linux) is a great tool and is the Linux equivalent of the previously mentioned enum tool for Windows. You can install it using apt-get install enum4linux. It allows you to find information about usernames, shares, remote OSs, the target’s workgroup, and more. The results depend on the target’s configuration. An example is shown here, where -a is used to perform a variety of basic enumeration tasks (combines the -U, -S, -G, -P, -r, -o, -n, and -I parameters):

Sadly, not a lot of information was retrieved. That’s because using a null session sometimes may not yield a lot. However, if you had valid credentials (which is something that attackers could get via social engineering or compromising another network machine), a wealth of information can be provided. An example is shown here, where a list of users is extracted:

Another really amazing tool is rpcclient. This one has a great variety of options that can allow you to get valuable information from any target. You can connect to the Windows machine and display the help option for a full command list using rpcclient -U <user>%<pass> <target_IP>:
![]()
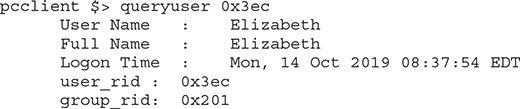
Using help displays more than 250 lines of parameters. It includes the ability to review information or even modify the existing user database by creating or deleting users. If you want to get a list of the current users, use

If you need to drill down on a particular user, use queryuser followed by the user rid (displayed earlier). A look at Elizabeth displays the following:
A list of the domains can be retrieved using
![]()
![]()
TIP Additional tools worth using include smbclient (https://pkgs.org/download/smbclient) and smbmap (https://github.com/ShawnDEvans/smbmap).
Defending Against SMB Sessions
As you may have noticed, most of the tools use null SMB sessions to connect to the target and extract information. As such, the first thing you can do to protect your network is not allow any null SMB sessions. You can do that in the Windows registry, under
HKLMSystemCurrentControlSetControlLSA
You also have to think about where you would like SMB to be allowed within your environment. Obviously, you don’t expect anyone from the outside world to connect to your network via SMB, so you should block any such connectivity. Even in your internal network, you might not want to allow SMB across different subnets. If that’s the case, use appropriate filtering within firewalls, routers, and switches to restrict that type of communication. Also perform an architectural review of your network and ensure that SMB is only allowed in the parts where it is required.
Chapter Review
A basic understanding of network protocols (mainly ARP, ICMP, IP, TCP, and UDP) is required to be able to efficiently use their features to map networks, perform port scanning, identify vulnerabilities, and ultimately find a way to gain access to a network. The more you learn about them, the easier using the tools will become.
Attackers follow different phases to properly map networks before launching an effective attack. During the network mapping phase, native OS commands can be used (like ping and traceroute) to find active hosts on a network. Using additional tools (like nmap and Zenmap) will make this process quite faster. The goal is to find as many live machines as possible. Ensuring you block ICMP requests at the perimeter and do not allow ICMP time exceeded messages to leave your network as responses are great starting points for limiting network mapping attempts.
As soon as targets are identified, a port scan will follow so you can understand what ports are open. At this point, further identification of particular software running on those ports, along with its version and target OS, can prove highly valuable to understand what the best avenue of gaining access to a network is. Proxies can be used to mask the true origin of scans to make it more difficult for the target to identify the true attacker. Even if security devices are in place, evasion can be attempted to bypass them and have the traffic reach the target system.
Using a vulnerability scanner is another method of identifying ways to breach the target network. The number of existing signatures for various vulnerabilities, as well as the in-depth information found in the scanner’s database on how to exploit them, can prove to be a treasure trove of information for any attacker. That’s why it’s important to harden your hosts and disable any services that are not explicitly required. Also, use firewalls, IDS, and IPS devices but make sure you configure them properly and patch them regularly so they are always up-to-date with the latest attack trends.
Attacking common services, like vulnerable FTP/Telnet servers or using the SMB protocol, is a common method used to connect to target machines and extract information. Ensure you disable any insecure protocols that are in use within your network. Review the configuration of the ones you do end up using to disable any insecure features (like SMB null sessions). Also, review your network architecture to identify what type of information attackers can get, even if they manage to breach some part of your internal infrastructure. Appropriate network segregation and security devices placed in the network boundaries can greatly aid in stopping any leaks.
Questions
1. Review the following Wireshark tracert/traceroute packet capture:
Which of the these systems was most likely used to run this command, assuming default options were used when it ran?
A. Windows XP
B. Windows 7
C. Windows 10
D. Ubuntu
2. Which of the following nmap scan types would you use if you need to bypass the target’s firewall?
A. TCP
B. SYN
C. ACK
D. RPC
3. Which of the following activities is the attacker trying to perform when using the command nmap -sn 192.168.1.0/24?
A. Ping scan
B. Port scan on 192.168.1.0/24
C. Network connectivity check
D. Identify target MAC addresses
4. Review the following packet capture taken during a Wireshark port scan:
Which of these statements is correct (assuming default ports are being used)?
A. Target’s TCP port 45196 is open.
B. Target’s FTP port is open.
C. TCP port 81 is open.
D. HTTP port is open at the target.
5. An attacker is performing an nmap host discovery scan from a non-root account. Which of the following is not a packet that would be sent during that?
A. ICMP request
B. TCP ACK packet to TCP port 80
C. ICMP timestamp request
D. TCP SYN packet to TCP port 443
6. Which of the following tools would you use during the network mapping phase if the goal is to quickly create a diagram of the target network’s topology?
A. nmap
B. Masscan
C. Zenmap
D. Amap
7. Which of the following would help defend against network mapping?
A. Block ICMP echo requests originating from the internal network
B. Block ICMP echo requests originating from the external network
C. Disable nonessential ports
D. Patch systems
8. If you want to conduct a port scan over a large IP address space, which of the following tools would be the best choice for this purpose?
A. Masscan
B. Amap
C. Zenmap
D. EyeWitness
9. Review the following output:
What type of scan does it represent?
A. Host discovery
B. OS fingerprinting
C. Version scan
D. FIN scan
10. Which of the following would be performed using nmap -O 192.168.1.105?
A. Version detection
B. UDP scan
C. Passive OS fingerprinting
D. Active OS fingerprinting
11. Review the following output, taken from a Windows machine:

Which of the following statements is correct?
A. An SMB connection is currently originating from this machine.
B. An SMB connection is currently established to this machine.
C. An attacker has managed to gain access to the machine.
D. A Telnet session is currently in progress.
12. What is the command net use \192.168.1.157IPC$ "" /u:"" used for?
A. Scan 192.168.1.157 for open NETBIOS ports
B. Bypass the admin’s password
C. Establish a null SMB session
D. Display a list of network shares
Answers
1. D. If you look closely at the packet capture, you can see that the protocol used to traceroute to 8.8.8.8 is UDP. By default, Windows tracert uses ICMP packets (not UDP), so this indicates the command was run from a non-Windows machine. As such, Ubuntu is the only correct option.
2. C. An ACK scan is often used to bypass stateless firewalls, since they have no concept of sessions. The attacker tries to benefit from that by sending ACK packets to mimic return traffic, which packet-filtering firewalls may allow (they usually have rules allowing packets with an ACK flag set, as they normally are a part of an established session).
3. A. A sample output of the command is

Using the -sn parameter tells nmap to only run a ping scan, also known as a host discovery scan (disabling port scanning). Although this scan also displays MAC addresses, that’s not the attacker’s primary goal when using the -sn option. Also, note that MAC addresses are only displayed here because there’s a scan of the local network. If this was a remote network, that wouldn’t be possible.
4. D. Looking closely at the packet capture, you can see that the scan is originating from 192.168.1.112. You see three successive SYN packets destined to 192.168.1.111 over three different ports: TCP 80, 81, and 82. You can also see a SYN/ACK packet being sent from 192.168.1.111 with a source port of TCP port 80, indicating that this port is open. The other two ports seem to be closed, as indicated by the RST/ACK packets sent by 192.168.1.111 with source ports of TCP port 81 and 82.
5. B. nmap uses four types of packets during a host discovery scan: ICMP request, ICMP timestamp request, SYN packet to TCP port 443, and ACK packet to TCP port 80. However, when it’s run in non-root mode, it replaces the ACK packet with a SYN packet to the destination’s TCP port 80.
6. C. Zenmap has a Topology tab that provides a diagram of the network devices. Although you can use other tools (like nmap) to scan the network and manually create a diagram, using Zenmap is the fastest and easiest option.
7. B. Blocking ICMP requests originating from external networks will limit network mapping attempts. Attackers won’t be able to perform efficient ping scans (using ICMP echo request packets) and identify live hosts within your infrastructure. There are still other ways, but this is a great step in the right direction.
8. A. Masscan is an ideal option for scanning large IP address spaces because it’s fast due to its asynchronous scanning feature.
9. C. The scan results provide information about the various versions of software running on particular ports, leading to the conclusion that a version scan was run to try and identify those.
10. D. Using nmap’s -O parameter will perform active OS fingerprinting. Remember that nmap only performs active OS detection, as no passive method is supported.
11. B. Using net session displays NetBIOS/SMB connections currently established to the Windows machine. The table shows one connection from IP address 192.168.1.112. Note that there’s no evidence showing this is an attacker’s connection. The command just shows an established SMB session, which could be absolutely legitimate.
12. C. The command net use \192.168.1.157IPC$ "" /u:"" can be used to connect to 192.168.1.157 via SMB while using a null session (with no username or password being specified). If the target machine allows null SMB sessions, a successful connection will be established.
References and Further Reading