
CHAPTER 3
Information Gathering
In this chapter you will learn how to
• Use OSINT techniques to collect information
• Perform whois lookups and DNS queries
• Perform war dialing and war driving
• Use various tools like nslookup, dig, host, DNSRecon, Maltego, FOCA, Recon-NG, Metagoofil, Exiftool, theHarvester, and Kismet
It’s really important to highlight the need for obtaining permission before performing any type of activity that might affect the confidentiality, integrity, or availability of any target system. You shouldn’t perform any testing without explicit permission to do so.
Using information-gathering techniques to obtain insight into any target can be quite valuable, and if you are using passive methods, you have the added advantage of not interacting with the target at all. A lot of the commonly used techniques are going to be covered in this chapter. However, if you really want to become an open-source intelligence (OSINT) expert, you can download Buscador (https://inteltechniques.com/buscador), which is a Linux VM that has been prebuilt for investigators (courtesy of David Westcott and Michael Bazzell). In addition to that, Michael has written an amazing book on how to leverage OSINT techniques (https://inteltechniques.com/book1.html), which I highly recommend.
![]()
TIP In order for you to work with the tools described in this chapter, it is recommended that you switch your Kali Linux VM’s network adapter to NAT or Bridged so you have Internet connectivity. That will allow you to perform domain/ IP lookups and use all the tools. After you finish practicing, ensure you switch it back to Host-Only.
Public Website Searching
As we all know, there’s a wealth of information on the Internet about anything we can think of. Some of that is placed there intentionally and some of it is just accidental exposure. Attackers rely on the latter so they can find valuable information about any entity they want to target. A great place to start is visiting the target’s website and checking what information is available. For example,
• Documents (can contain a lot of sensitive data or features that can indicate vulnerabilities)
• E-mail addresses (may prove valuable for social engineering attacks)
• Open job postings (which often contain important details about the company’s security infrastructure)
• Third-party vendors and clients (attackers will often compromise a third-party vendor or company client, which can work as an entry point to the target organization)
Figure 3-1 shows a job posting on an organization’s website (identifying information has been omitted for privacy reasons).

Figure 3-1 Job posting example
Every technology that the company is currently using (along with associated category and version) is listed in that job ad. The attacker can focus on exploiting vulnerabilities in any of these technologies to gain access to the target. This is just too much information being exposed. Another example is shown in Figure 3-2 where a Portable Document File (PDF) file marked “For Internal Use Only” is exposed on the company’s website (the full uniform resource locator [URL] and content of the file have been redacted for privacy reasons, not really leaving a lot, but you get the idea).

Figure 3-2 Confidential file exposed on company website
Netcraft
A useful tool for obtaining a lot of in-depth detail about various websites is Netcraft (https://www.netcraft.com). You can start just by adding a website in the field labeled “What’s that site running?” An example for mheducation.com is shown in Figure 3-3, where details about underlying technologies, the hosting provider, Secure Sockets Layer (SSL) certificates, and a lot more can be seen.

Figure 3-3 Netcraft output for mheducation.com
![]()
NOTE I am using McGraw-Hill’s website for most of my examples to keep them consistent. You can use any website you want, but please note that you shouldn’t be taking any offensive activity or performing tasks that might result in any type of impact on the website in question. Also note that proper permission is required to perform any type of tests against any organization.
theHarvester
A very common tool that attackers use to scrape open-source information from various websites is theharvester (https://github.com/laramies/theHarvester). It can use multiple data sources like Google, Bing, Baidu, LinkedIn, Twitter, and more. An example is given here where mheducation.com is selected, with a limit of five results and a data source of LinkedIn (note that the employee names have been replaced with Employees 1–5 for privacy reasons):

After identifying potential victims, an attacker would typically try to get their e-mail addresses and craft a social engineering e-mail in an effort to launch a phishing attack. You would be surprised as to how many attackers use some form of phishing to lure their victims. Symantec’s 2019 Internet security threat report mentions that 65 percent of known advanced threat groups used targeted phishing (spear phishing) to compromise their targets (https://www.symantec.com/content/dam/symantec/docs/reports/istr-24-2019-en.pdf).
Wget
Wget can be used to download content from a website and is something that attackers often use when they want to copy a website’s content locally for later review (also known as website mirroring). Using wget mheducation.com will download a copy of the website’s index.html page to my machine:
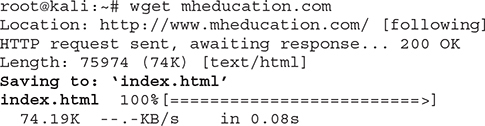
That can now be used locally to identify anything of interest, such as URLs, e-mails, names, and phone numbers, which can all be used by the attacker. Third-party tools can also be used to mirror websites for later review. HTTrack (http://www.httrack.com/page/2/en/index.html) and Fresh WebSuction (https://fresh-websuction.en.uptodown.com/windows) are examples of such tools.
Social Media Searching
Social media websites are another great source of information. This usually works better for actual people, but most companies have social media profiles for clients and partners to connect and stay informed about what the company is up to. You can use a social media tool’s internal capability for searching, or use third-party tools that allow you to monitor multiple social media platforms simultaneously (which commonly leverage application programming [API] keys to obtain massive amounts of data). Common examples include Facebook, Twitter, LinkedIn, YouTube, Instagram, Tumblr, Reddit, Snapchat, Pinterest, and Flickr.
A lot of people use these applications through their mobile phones, so it’s very easy to harvest uploaded photos for geolocation data and track where someone has been uploading photos from. You can also use them to get information on specific users or monitor an area of interest for particular notifications. If you have a Twitter account and go to the search bar, you can use a query with global positioning system (GPS) coordinates and get related tweets about that location. For example, if you want to see tweets about Central Park and the surrounding location (say, over a 2-kilometer radius) use geocode:40.769463,-73.971798,2km.
If you are interested in displaying or monitoring Twitter data in a robust way, TweetDeck (https://tweetdeck.twitter.com) is a great starting point. It’s owned by Twitter and has a lot of features allowing you to monitor for specific user tweets, particular notifications, mentions, and a lot more. Other tools of interest are Onemilliontweetmap (https://onemilliontweetmap.com) and Tweetmap (https://www.omnisci.com/demos/tweetmap), while some third-party tools allow you to aggregate data across various social media platforms. Examples of those include Hootsuite (https://hootsuite.com), Brandwatch (https://www.brandwatch.com), Pushpin (https://github.com/DakotaNelson/pushpin-web), and Social Mapper (https://github.com/Greenwolf/social_mapper).
If you want to do a quick search across various social media platforms to see if someone has a specific account, you can use Checkusernames (https://checkusernames.com). If I search using my name, I get the results in Figure 3-4 (“Not Available” means there’s already a user account in existence).
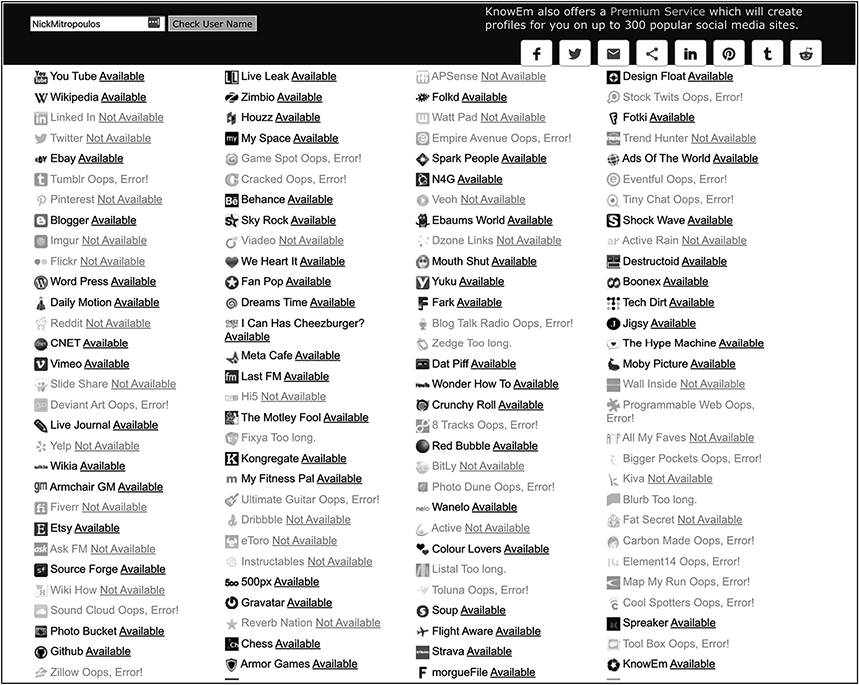
Figure 3-4 Checkusernames results for NickMitropoulos
Defending Against Public Website and Social Media Searching
The best way to defend against public website and social media searches is to limit the information you provide via those platforms. Make sure your company website doesn’t divulge anything sensitive. That may be a job ad that has too much information (like the example in Figure 3-1), a document that shouldn’t be accessible externally (like the example in Figure 3-2), contact details of key individuals that shouldn’t be available for everyone, or anything else that can give attackers the upper hand. Also, consider customizing any error messages that might be returned from your web server to make it more difficult for attackers to gain information.
Using Search Engines for Information Gathering
Search engines are commonly used to search for information, but that functionality can be manipulated so you get in-depth data about organizations and individuals. Also, it’s worth noting that at this point an attacker is not interacting with a target at all or actually doing anything illegal. For example, if your company website or your social media account divulges information that is indexable by a search engine, you can’t blame anyone for viewing that. That’s why it’s so important to limit the information you provide publicly.
![]()
CAUTION After information becomes available publicly, it’s really difficult (if not impossible) to contain the damage. Search engines index content constantly, not to mention individuals may copy that and host it on their website. As such, limiting the information you make available over the public domain is the best way to prevent any unwarranted disclosure, which may have severe consequences for your organization.
Some of the most common search engines are
• Bing
• DuckDuckGo
• Yandex
• Baidu
• Yahoo!
The key thing about a successful search is the terms it’s compiled from. Depending on how your search query is formed, it may take you 5 seconds or 5 hours to find something. In order to aid your searches, various operators can be used to make them more efficient. These usually work across all search engines, although they might require some minor adaptions. I will focus on using Google in my examples, but you can feel free to test across different search engines. In reality, since they index data differently, it’s always recommended to search in more than one engine to find what you are looking for.
The most frequently used operators are summarized in Table 3-1.
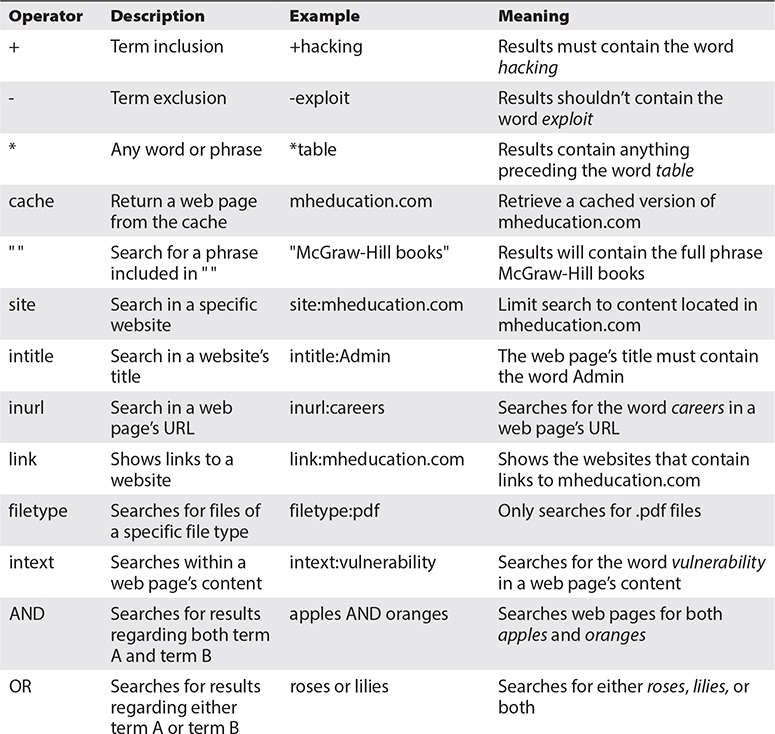
Table 3-1 Search Engine Operators
The best resource for search operators is Exploit-DB’s Google Hacking database (GHDB), located at https://www.exploit-db.com/google-hacking-database. Various search queries (also known as “dorks”) have been indexed there for easy access. You can browse the database and copy the queries you like and then paste them to your search engine of choice.
![]()
CAUTION Be very careful when using these search queries, as they can uncover sensitive information like usernames, passwords, confidential documents, and a lot more. Examples follow that are placed here strictly for educational purposes. Note that you shouldn’t be using results from these queries to target organizations (even for testing) without their explicit permission.
Search Engine Query Examples
Now that you have seen what the operators are, here are some representative examples from the GHDB showing how dangerous searches can be.
Query 1
inurl:admin/changepassword*
Result Performs a search for web pages that contain admin login portals. Most likely, it will bring back pages that allow the admin password to be changed. An example is provided in Figure 3-5, where the admin password can be updated with a new value, without having to enter the current password.

Figure 3-5 Web page allowing admin password change (without prior authentication)
Query 2
inurl:/admin/ intitle:index.of
Result Performs a search for indexed admin pages. If such pages are found and access is allowed without authorization, the attacker could be able to manipulate the website’s content by adding and removing items at will.
Query 3
index.of.password
Result Performs a search for directory listings of files named “password,” which would commonly contain some sensitive passwords.
Query 4
intext:"Please log on to use the mikrotik hotspot service" inurl:login
Result Identifies Mikrotik hotspots by searching for the distinctive default banners in the web page content and the word “login” in the URLs, as seen in Figure 3-6.
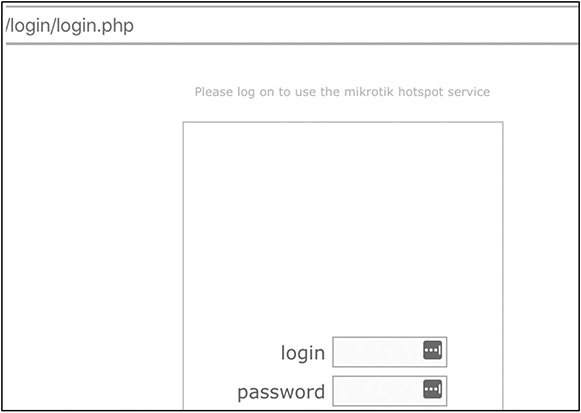
Figure 3-6 Mikrotik hotspot login page
This highlights the problem of using default banners on externally facing web pages. It’s a trivial matter for any attacker to discover those and, if there’s no appropriate authentication mechanism in place (like multifactor authentication), try to brute-force the default account’s password to gain entry.
Query 5
intext:"internal use only" filetype:pdf
Result This query will identify any PDF files that contain the phrase “internal use only,” which clearly shouldn’t be available online. A Google search returns about 642,000 results for that query. Even if some of them are false positives, you can surely appreciate how serious this can be.
Viewing Deleted Content Through the Wayback Machine
The Wayback Machine (https://archive.org/web) contains website snapshots over time and can prove particularly useful when you want to view how a website has been changing throughout the years, as it can provide insightful patterns. In addition, it gives you the opportunity to view any information that was removed in later versions of the website. As stated earlier, it’s very difficult to have something removed after it has become publicly available, and the Wayback Machine is a really good example of that. Figure 3-7 shows search results for mheducation.com.
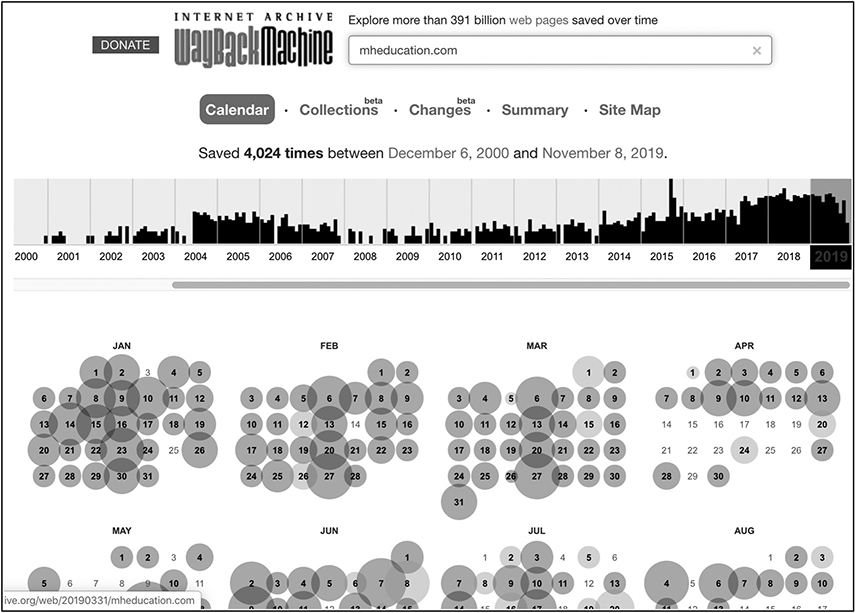
Figure 3-7 Wayback Machine results for mheducation.com
As you can see, multiple results exist dating back more than two decades. There are even tools available to get notifications when a website’s content has been updated. An example is Distill Web Monitor (https://chrome.google.com/webstore/detail/distill-web-monitor/inlikjemeeknofckkjolnjbpehgadgge?hl=en), which is a Chrome extension that monitors a website or feed for content changes and even has the ability to send an e-mail or text when that happens.
Using Tools for Search Engine Information Gathering Automation
Using each one of the prementioned test queries can take a lot of time, especially if you are running them through a variety of search engines. That’s why attackers use tools to run these queries, so they get more information in less time.
![]()
CAUTION Search engines will usually identify and block bulk search queries. For example, you may have noticed that when you persistently execute searches in Google every second for four to five times in a row, you are presented with an “I’m not a robot” message. You should always read the terms and conditions of each provider before using any scripts or automated tools for data extraction.
Recon-NG
Recon-NG (https://github.com/lanmaster53/recon-ng) is a great tool and has multiple reconnaissance modules that you can use. The full list of those can be reviewed by starting the tool (just type recon-ng at the terminal) and then typing marketplace search. About 100 available modules can be used for a variety of tasks like performing host and DNS enumeration, port scanning, DNS cache snooping, search engine information gathering, whois lookups, and much more. Note that quite a few of these require a functioning API key to operate properly. The tool’s interface is created to resemble Metasploit’s look and feel. As such, if you haven’t used Metasploit before, it might be a good idea to review Chapter 5 where exploitation is discussed and Metasploit is presented.
Metagoofil
Metagoofil (https://tools.kali.org/information-gathering/metagoofil) can be used to get information about document metadata that is found on websites. Installing it is quite simple. Just open Kali’s terminal and type apt-get install metagoofil. After the tool has been installed, check the available parameters by typing metagoofil:

For example, the following command will extract up to three PDF files from mheducation.com:

metagoofil -d mheducation.com -l 1 -t doc will download a single .doc file:

A copy of all those files is now saved locally, as you can see next:

An attacker would try to closely examine these files to obtain information about the underlying system. That can be easily done with a tool like exiftool.
Exiftool
Exiftool is a great application for reviewing file metadata (use command apt-get install exiftool to download it). Look at the following example, showing metadata for MOM_of_eCommerce.doc. Note that I have trimmed the following output and replaced all sensitive data with the sequence “XXXXXXXXX” that would normally be visible to an attacker.

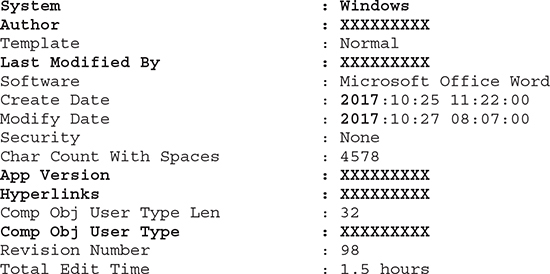
This document was written in Microsoft Word. Some of the redacted data provides the exact version, the author’s name, who modified it last, the creation and modification timestamps (created and modified in 2017), exact application version, the content of all the hyperlinks, and even the total time spent to edit the document. Great stuff, right? Now an attacker can custom-tailor their attack to a specific vulnerable application or try and social-engineer an employee and so on.
FOCA (Fingerprinting Organizations with Collected Archives)
FOCA (https://github.com/ElevenPaths/FOCA) is another great tool for document and metadata extraction. This one only runs on Windows, so feel free to download it and use it in your Windows VM. Also note the requirements for this to work in your VM:
• Microsoft Windows (64-bit) versions 7, 8, 8.1, and 10
• Microsoft .NET Framework 4.7.1
• Microsoft Visual C++ 2010 x64 or greater
• An instance of SQL Server 2014 or greater
After FOCA has been started successfully, you will be asked to designate a target website (mheducation.com was chosen in this example). You can then
1. Select Documents.
2. Navigate to the upper-right section.
3. Select a search engine (Google was used).
4. Select the type of files to search for (docx was selected).
5. Select Search All.
This search will use Google to identify .docx files within the chosen website. After those are found, the results list will start populating, as seen in Figure 3-8.

Figure 3-8 FOCA .docx search on mheducation.com
You can right-click on a document of interest and select Download or Extract Metadata to view the metadata (similarly to what you did earlier when you used the ExifTool). As you may notice, all categories on the left side (Network, Domains, and Metadata) will constantly be populated with any data that is discovered through this process. Also notice that the Metadata Summary contains items like Users, Software, E-mails, and Passwords, which can all prove quite valuable.
SearchDiggity
SearchDiggity (https://resources.bishopfox.com/resources/tools/google-hacking-diggity/attack-tools) is a great suite of tools containing the ability to perform search engine information gathering (using Google, Bing, and SHODAN), malware scanning of third-party links, passive port scanning using Google, and searching of third-party websites for personal information. Figure 3-9 shows an example of using Bing to search for the existence of “IIS web server error messages” at the website mheducation.com.

Figure 3-9 Using SearchDiggity to identify IIS error messages in mheducation.com
Feel free to review the detailed manual (located in C:Program FilesBishop FoxSearchDiggitySearchDiggity 3.1 - Help.chm) and experiment with the tool to see how it can help you achieve different things.
Defending Against Search Engine Information Gathering
As already mentioned, numerous tools can utilize the power of search engines to get valuable data about any target. Sometimes the effort is manual, but more often it tends to be automated (using a script or tool).
The first thing you can do to protect your data is identify what your exposure is. Using the prementioned tools, search for your critical data. If you find anything, advise the business on the best approach to have that information removed. The good thing is that search engine providers are on your side. So, if they detect an entity misusing their capabilities, they will commonly prompt for a CAPTCHA or implement a temporary IP address block to stop a bot from running. Review Google’s webmaster support web page (https://www.google.com/intl/en_uk/webmasters/support) on topics like
• Removing content from Google search results
• Blocking search indexing with “noindex” meta tag
• Removeing URLs
• Preventing images on your page from appearing in search results
• Introduction to robots.txt
• Robots.txt specifications
• Testing your robots.txt with the robots.txt tester
In general, you need to remember that a well-structured robots.txt file is a great starting point to control the content being accessed by search engine crawlers. As such, this is a common target for any attacker because they want to know what the juicy parts of your website are. Since you have told search engines not to go there, it probably means some valuable information is present. Let’s take the following robots.txt example:

As you can see, the first line indicates the following rules will apply to all user agents. The web administrator has selected to exclude everyone (*) from crawling http://www.example.com/temp/docs and anything under /admin. If you want to exclude all of your website from being crawled, you can have a robots.txt file with these lines:
![]()
When there are multiple user-agent directives, each of them would only be enforced to the crawler specified in the particular part.
For example, if you have the following entries:

it means that Bspider is only not allowed to crawl /test/examples but can go anywhere else, while BlackWidow can go to anywhere but /var/data. Although an asterisk (*) is present, not allowing any crawler to crawl the website, BSpider and BlackWidow will ignore that and direct themselves to the part of robots.txt that specifies what action they need to take. Any other crawler will follow the * directive.
Remember that in order for search engines to be able to find your robots.txt file, it needs to be placed at the top-level directory of your domain. If that’s not the case, it won’t be discoverable by them. As such, if your domain is www.example.com, then a robots.txt file would be commonly found in www.example.com/robots.txt.
A few useful Hypertext Markup Language (HTML) tags can help protect your website against involuntarily exposing information to crawlers. For example, adding a tag to the head section of your website that states the content shouldn’t be indexed or any links followed would look like this:
![]()
If you use this, that particular web page to which you have applied the previously mentioned tag won’t be indexed by search engines. Additional tags (like none, nosnippet, and noarchive) and related information can be found at https://developers.google.com/search/reference/robots_meta_tag.
Whois Lookups
Every time you register a new domain, there’s some basic information that you are required to provide, like the registrant’s organization, name, address, phone numbers, and name servers. The Internet Corporation for Assigned Names and Numbers (ICANN), the nonprofit organization tasked with the Internet’s operation, has a function called the Internet Assigned Numbers Authority (IANA), which is the one that oversees global IP address and autonomous system number allocations. IANA is the authoritative registry for all top-level domains (TLDs). However, regional registries exist and are responsible for different geographical areas. A list of the five regional registries (along with their URLs and areas of responsibility) can be found in Table 3-2.

Table 3-2 Regional Internet Registries
Performing Whois Lookups Using IANA and Regional Registries
When you want to perform a lookup for any domain, you would commonly start by querying IANA (https://www.iana.org/whois). After getting the authoritative registry for that domain from IANA, you can revert to it for additional information. For example, a whois lookup at IANA for mheducation.com provides the following registry details:
![]()
That means that in order to get the actual whois information, Verisign’s website has to be used. If you do that, a search for mheducation.com provides the following:

In addition to this, you can query the provided whois server (whois.corporatedomains.com) for more information:

An attacker can use the e-mail and phone numbers in this output to perform a social engineering attack or get the name server information and perform DNS zone transfers or associated reconnaissance, which will be described in the next section.
![]()
NOTE According to General Data Protection Regulation (GDPR) legislation, which went into effect in May 2018, registrant names and addresses don’t need to appear in whois records anymore. They will only be there if there is explicit consent by the registrar.
Various anonymous registration authorities offer anonymization services for a small fee, and this is a very common add-on when buying a new domain from a hosting provider. It ensures your details remain private and away from public databases. When privacy is enabled, the response to a whois query would be similar to this:
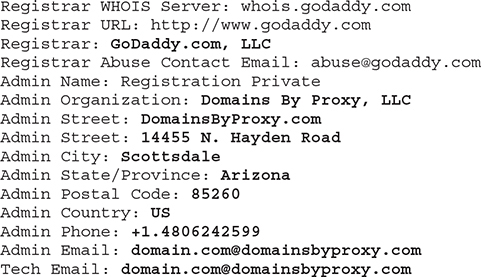
The only thing you can see is that GoDaddy was used, but other than that, all tangible information like phone, address, and e-mail belong to Domains By Proxy, LLC, which is a company offering the ability to anonymously register a domain. They are one of GoDaddy’s partners. In short, this means that when someone purchased this domain from GoDaddy, they selected their privacy package, as shown in in Figure 3-10.

Figure 3-10 Purchasing a domain using GoDaddy’s full domain and privacy protection feature
Performing Whois Lookups Using Online Tools
Several online tools can be used for whois lookups, which can help expedite the previously mentioned process (when using them, you don’t need to go to IANA’s website and then to the related registry, as these tools do all of that for you). Examples include
• Whoisology (https://whoisology.com)
• Centralops (https://centralops.net)
• Domain Tools (http://whois.domaintools.com)
• SpyOnWeb (http://spyonweb.com)
It’s always recommended to use more than one tool, as some may contain additional information. Another benefit relates to the usual restrictions that some of them have regarding how many queries you can perform per day. If you are a security analyst, you might be surprised as to how often you reach those limits, especially during a busy day.
Performing Whois Lookups Using the Command Line
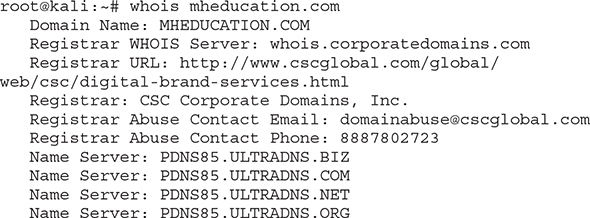
Another way to perform a whois lookup is using Linux’s whois command. If you try to run whois mheducation.com on your Kali Linux VM, you should get the same results as using any of the methods mentioned earlier. A summary of that can be seen here:
Defending Against Whois Lookups
It’s important to note that you can’t really stop someone from looking up your whois information, since it’s publicly available. The only thing you can do is limit what appears there. However, the downside of using a privacy protection service (like the one mentioned earlier from GoDaddy) is that if your organization is identified as performing any malicious activity and someone looks up your publicly available whois records to find your contact details, they might not be able to reach you. So, weigh this in your decision and identify the best solution for you.
DNS Lookups
A DNS lookup allows you to get information about an organization’s DNS records, including DNS server IP address/hostnames, aliases in use, and what the mail servers are. The most common DNS record types are the following:
• A Maps names to IPv4 addresses
• AAAA Maps names to IPv6 addresses
• SOA Indicates an authoritative DNS server for the zone (containing administrator contact details, serial number, zone refresh timers, and retry and expiration timers)
• NS Provides the authoritative DNS server for the zone
• CNAME Maps an alias to a canonical name
• MX Provides a mail server for the domain
• PTR Allows a reverse lookup to take place (which means that if an IP address is provided, a hostname can be returned)
• TXT Used to provide generic information
There are three main ways to perform DNS lookups to get these types of information:
• Use online lookup tools
• Use operating system (OS) tools (like nslookup, dig, and host)
• Use Kali Linux’s tools (or other publicly available tools and scripts) for reconnaissance and DNS interrogation
You might wonder at this point what you could possibly use this information for. From an attacker’s point of view, it’s all about gaining as much information about a target as they possibly can before launching an effective attack. Most commonly, the ultimate goal of DNS reconnaissance is a successful zone transfer. A zone transfer is incredibly useful since a copy of the primary name server’s database is replicated to a secondary server. This is the equivalent to having a map for the whole domain. In theory, this works nicely if something happens to the primary server. Your organization will still have redundancy and DNS will work without any impact. However, a zone transfer should only happen between your organization’s primary and secondary DNS servers. No such information should ever be replicated externally, as an attacker would be in a position to gain insight into your internal network’s architecture. Let’s put all this to the test and see how you get along with obtaining some valuable DNS information.
Performing DNS Lookups Using Online Tools
Several online tools can perform DNS lookups. Examples include
• Centralops (https://centralops.net)
• MXToolbox (https://mxtoolbox.com/DNSLookup.aspx)
• DNS Checker (https://dnschecker.org)
Feel free to experiment with them and review the results they provide.
Nslookup
Nslookup allows you to perform DNS queries and is commonly used in Windows, so use your Windows machine for testing. It also works in a few Linux flavors but it’s considered deprecated. Dig and host (both discussed later) are more commonly used there.
nslookup provides the following information for mheducation.com:

This output means that the DNS server residing at 192.168.156.2 responded to this request. The response states that mheducation.com can be found at IP address 204.74.99.100. If you prefer to run nslookup to search only for mail servers, follow these three steps:
1. Type nslookup and press ENTER.
2. Type set type=mx (which states you only want mail server information).
3. Type mheducation.com (to designate your target domain).

The response states that the domain’s mail server is mheducation-com.mail.protection.outlook.com.
Before proceeding to an example of a zone transfer, it should be noted that I don’t recommend you do this on a random DNS server you don’t own. You can configure a DNS server on your Windows machine and test this from Kali if you like, or use zonetransfer.me as a target (which is far easier and is built for educational purposes). As of this writing, Robin Wood (also known as DigiNinja) has mentioned in his blog (https://digi.ninja/projects/zonetransferme.php) that he has graciously set up a DNS server that allows zone transfers. He prompts everyone to use it for training purposes. To perform a zone transfer with nslookup on zonetransfer.me, do the following:
1. Start nslookup.
2. Type server nsztm1.digi.ninja to designate a DNS server of nsztm1.digi.ninja (which is the domain’s primary server).
3. Type set type=any to set the record type to any, so you get all possible records returned.
4. Type ls -d zonetransfer.me to specify you want to perform a zone transfer (ls -d) on domain zonetransfer.me.

As you will see, information about various MX, NS, and many other records will be provided. That is really valuable to an attacker, as they can now gain a lot more insight about the target and craft their attack accordingly.
Dig
In Linux, dig is commonly used to perform DNS lookups. It works in a similar fashion as nslookup. For example, if you want to perform a zone transfer, you would get this:

The syntax is pretty similar to nslookup. You need to specify the DNS server that will be used (@nsztm1.digi.ninja), the target domain (zonetransfer.me), and denote you want to perform a zone transfer using -t AXFR.
Host
Using host is another way of performing DNS queries in Linux. A zone transfer using host can be performed by using host -l zonetransfer.me nsztm1.digi.ninja:

As you can see, -l was used to denote a zone transfer (in comparison to dig’s -t AXFR parameter) for domain zonetransfer.me using name server nsztm1.digi.ninja.
DNSRecon
DNSRecon is a great DNS interrogation tool that can perform subdomain brute forcing, DNS record cache checking, record enumeration, and much more.
![]()
NOTE For in-depth information on DNSRecon, feel free to review https://tools.kali.org/information-gathering/dnsrecon and https://github.com/darkoperator/dnsrecon.
Using it to perform a zone transfer on zonetransfer.me would look like this:
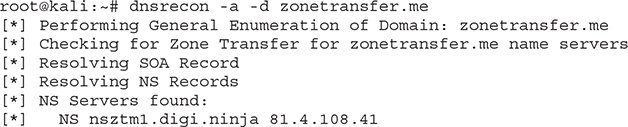
Using the -a parameter designates a zone transfer will take place, while -d can be used to specify the target domain (zonetransfer.me). It’s worth mentioning that DNSRecon will try to perform zone transfers by querying all name servers within the domain. From an attacker’s point of view, that has two major advantages:
• Saves a lot of time.
• Performs zone transfers on any name servers that allow them. This can work really well even if a single one has zone transfers enabled. It can sometimes happen in large companies, since a potential misconfiguration might exist on one of their DNS servers, but not all of them.
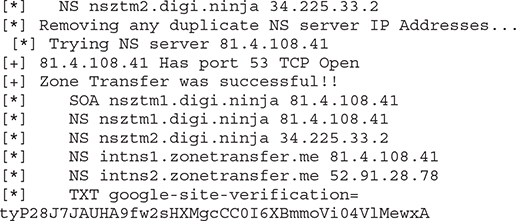
Defending Against DNS Lookups
As already mentioned earlier, DNS zone transfers should only be taking place between your primary and secondary DNS servers. More specifically, as also depicted in Figure 3-11, secondary servers can request a zone transfer from the primary server, which in turn will respond with the zone’s information.
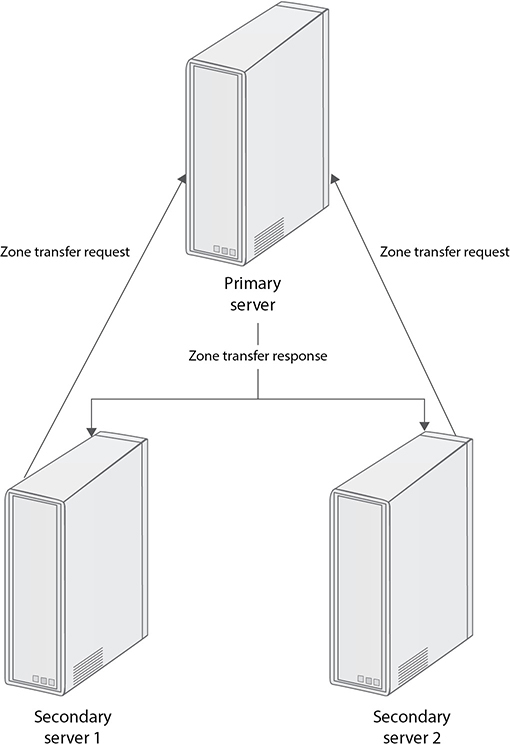
Figure 3-11 Zone transfers between primary and secondary DNS servers
No other zone transfer request should be allowed. This is something that can be checked in your DNS server logs. In fact, it is recommended that alerts are set up for any type of DNS requests and responses that violate this model. Identifying those in DNS logs is fairly straightforward, as TCP port 53 is used for zone transfers. As such, you can implement alerts for any DNS response (over TCP port 53) originating from you primary DNS server but not directed to one of your secondary ones.
Another method to protect against unauthorized zone transfers is using a split DNS configuration (also known as split-horizon or split-view DNS). When this is in place, a level of abstraction exists between the internal network and the external world, as two different types of DNS servers are in use: an external and an internal one. When a request is made regarding an internal network resource, the internal server responds (for example, if someone requests access to an internally hosted intranet web page). However, if a request for an external resource is made (for example, someone wants to reach www.mheducation.com), the external DNS server responds.
War Dialing
Have you ever seen the amazing movie War Games starring Matthew Broderick? It’s one of the most epic hacking films of all time, although it was released in 1983. In the movie, David Lightman tries to identify and dial into other computers using his analog modem. That’s what war dialing essentially is—using the phone line to dial all numbers within a given range to identify working machines to connect to. Today we actually use Voice over Internet Protocol (VoIP), so there’s no requirement to have a modem on your machine. This is where harvesting phone numbers using all the prementioned methods comes in handy. You would be shocked if you knew how many organizations use default credentials (or none at all) for out-of-bound modem access or what the device connected at the other end might be (for example, a fax, IDS/IPS, firewall, switch, router, load balancer, or any other device that supports remote management via an out-of-bound connection). The attacker’s goal is twofold:
• Identify phone numbers that respond to machines (this is commonly achieved by the software used to perform war dialing, as most of them have databases of digital signatures that can be matched against a human or various devices)
• Attempt to brute-force accounts to gain access to the machines identified in the previous step
The challenge nowadays is that not so many tools are used for war dialing. In addition, some of the tools widely available are really old (like late 1990s to early 2000 type of tools). That means they mostly run in DOS or outdated Windows versions. Table 3-3 contains a summary of the most commonly used war dialing tools, including their license requirements, OS versions, and basic advantages/disadvantages.

Table 3-3 War Dialing Software Comparison
A key concern is usually cost and tool functionality (especially if it only runs on obsolete operating systems). Then again, getting an open-source tool might be free, but lack of support and tool updates can cause great challenges at times. Feel free to download and test some of these tools to see how they measure up to the challenge.
Defending Against War Dialing
The first thing to do to protect from war dialing is know your phone lines. To that end, you should perform the following:
• Create a full inventory of all landlines, faxes, and out-of-bound modems. Every line should be in that inventory. If you identify existing lines that are not in use, ask to have them decommissioned.
• Train your staff on phone number distribution, and make it harder for social engineers to be successful in getting that information.
• Avoid adding various phone numbers to whois records when registering a domain. If you want to add a working phone number, you can always add one that can be used across all registrations. You can also consider adding a virtual number that is redirected to a company phone, so you enhance privacy.
• Place appropriate device banners so attackers are aware that if they proceed with any offensive activity, they will be legally prosecuted.
• Ensure all out-of-bound access is protected adequately, using a strong password/ Personal Identification Number (PIN), and that no default credentials (or blank password configurations) are present. Enhance this by enforcing multifactor authentication wherever possible.
• The final step should always be to test things yourselves. Get a war dialer, appropriate permission from the business, and start war dialing. Document your findings, revisit this list, make the necessary infrastructural adjustments, and go back at it again.
War Driving
The term war driving is used to describe the act of driving around an area in an effort to identify wireless networks (with the subsequent goal of connecting to them after they have been identified).
Wireless Network Introduction
Everything you need to know about wireless networks can be found in the Institute of Electrical and Electronics Engineers’ (IEEE’s) 802.11 family of standards (for example, 802.11a, 802.11b, 802.11g, and 802.11n). Among other things, they contain detailed information regarding operating frequencies, bandwidth, modulation algorithms, and network ranges. Table 3-4 lists the main standards.
Table 3-4 Main IEEE Wireless Standards
It’s also worth noting that each of these frequencies contains specifically defined operating channels. The 2.4 GHz range has up to 14 available channels (but in most countries, like the United States and UK, only 11 are in use). Have you noticed that sometimes your wireless signal quality is really poor? Using a tool like Kismet (described in detail later in this section) can display which channels are currently being used in your area and what their load looks like. If you realize you’re in a congested channel, it would then just be a matter of changing to a different one and, voila, problem solved. Unfortunately, attackers can also use this to deliberately jam your signal. For example, imagine what would happen if you have a few wireless closed-circuit television (CCTV) cameras working in a particular channel that an attacker can easily identify, and jam, using various tools.
Wireless Security Standards
Two main standards are in use for wireless network security:
• WEP When using Wired Equivalent Privacy (WEP), there’s a common network key (commonly referred to as a passphrase) that each client needs to provide to connect to the access point (AP). That same passphrase is used to encrypt the information using the RC4 algorithm. Sadly, this protocol suffers from a major weakness in initialization vector (IV) generation, making IVs predictable by an attacker. In short, any WEP key can be cracked in minutes after enough traffic has been captured (for example, with a tool like aircrack-ng, described later).
• WPA/WPA2 Some of the challenges posed by WEP were solved with Wi-Fi Protected Access (WPA). It uses Advanced Encryption Standard (AES) as its encryption algorithm (which is much harder to defeat than RC4) in addition to the use of an authentication server when implementing Enterprise mode. Cracking the WPA2 password is still feasible, although much more difficult. An attacker would have to capture the network’s traffic and try to brute-force the password (usually by employing an offline password cracking tool and a password dictionary). In addition, tools like Reaver can be used to attack devices that have Wifi Protected Setup (WPS) enabled.
![]()
NOTE WPA3 (announced by the Wi-Fi Alliance in 2018) has emerged as WPA2’s replacement. Its main features include protection against brute-force password attacks (courtesy of Simultaneous Authentication of Equals [SAE], which is a new key exchange protocol), as well as mitigation of the WPS issues. However, as of this writing, broad implementation of WPA3 is expected no earlier than the end of 2019.
Authentication Types
Two main authentication types are in use for each standard—two for WEP and two for WPA:
• WEP Open System Authentication This means there’s no actual authentication in place and the network is open for use to everyone. Clearly, this provides no security at all.
• WEP Shared Key Authentication A WEP key is used by the client to encrypt a response to a clear-text challenge sent by the AP. The AP will then decrypt the response and check if the message matches the challenge text that was originally sent to authenticate the client.
• Wi-Fi Protected Access Pre-Shared Key (WPA-PSK) uses a preshared key that is required to create encryption keys, which protect the session. This authentication type is commonly used by home and small office networks due to its low administrative overhead.
• WPA Enterprise It’s more robust and commonly found in large enterprise networks. It requires an authentication server to be set up (a remote authentication dial-in user service [RADIUS] server), and each time a new client authenticates successfully with the access point (using the RADIUS server for validation), a different key is used to encrypt that session. So, if you have 10 clients connecting to an access point, there would be 10 sessions encrypted with 10 different keys. This, of course, is substantially different from using a single passphrase (like when WPA-PSK is in use).
Sniffing Capability
A good sniffing tool can go a long way to help analyze all the captures that are going to be obtained by the tools used to perform war driving. Wireshark is by far the most common tool used for this purpose. If you are interested in learning about Wireshark, Laura Chappell has some amazing courses available at https://www.chappell-university.com, in addition to various books. Other tools that you can consider are
• tcpdump (http://www.tcpdump.org)
• OmniPeek (https://www.liveaction.com/products/omnipeek-network-protocol-analyzer)
• Network Miner (https://www.netresec.com/index.ashx?page=NetworkMiner)
Before you dive into war driving tools, let me point out that Kali Linux’s tool directory (https://tools.kali.org/tools-listing) has more than 50 tools available for wireless attacks.
![]()
TIP Some of the tools aren’t installed in the current Kali Linux distribution. When one of those is being used in the book, I will highlight it to you and mention how to install it. Manual installation is fairly trivial and is usually performed using apt-get install <TOOL>. If that doesn’t work, searching online for the tool’s repository usually provides instructions on how to install and use it.
One of the disadvantages of using a VM is you can’t avoid getting some actual hardware from time to time. In this case, if you try to use the tools described later in the section, they may “complain” because they can’t detect a wireless card. The easiest way to solve this is to just get a wireless USB adapter and use the “bridged” network adapter setting to allow your VM to properly use that. They are fairly cheap and can also work as a nice backup option if your primary wireless card ever experiences issues. Note that in order to be able to properly perform war driving, your wireless card needs to be able to support monitor mode, which will allow it to listen for and capture data from surrounding networks. Airmon-ng has an in-depth guide available at https://www.aircrack-ng.org/doku.php?id=airmon-ng about what wireless cards support monitor mode and how to identify your card’s features.
![]()
TIP Another method is to use a bootable USB drive and load Kali Linux onto your host machine’s memory. If you prefer this way, there are detailed instructions at https://www.kali.org/docs/usb/kali-linux-live-usb-install/ on how to perform this.
After having a working wireless adapter in Kali Linux, you should check what your wireless interface is (mine is wlan1). Use ifconfig -a (output trimmed only to wlan1):
![]()
As also mentioned earlier, before using any tool for wireless network identification, your wireless card needs to be switched to monitoring mode, so it’s able to capture the wireless network frames from your surrounding networks. Airmon-ng is a great tool for that.
Airmon-ng
Airmon-ng (https://tools.kali.org/wireless-attacks/airmon-ng) can switch your wireless card to monitor mode by using the following:

As you can see from this output, airmon-ng has successfully placed my USB wireless adapter in monitor mode and the associated name of the wireless adapter has now been changed to wlan1mon (you can verify the details by using ifconfig wlan1mon).
After this step has been successfully performed, you can use any tool you prefer for wireless network discovery.
Kismet
Kismet (https://www.kismetwireless.net/#kismet) is a really good tool for wireless network and device detection. It allows you to monitor your infrastructure for any rogue access points or clients you don’t expect connecting to your company’s APs. It can also discover any wireless channels that are being overutilized or that shouldn’t be in use at all and provide a holistic picture of your network, including
• Type of surrounding wireless devices (client, access points, bridges)
• Encryption in use (none, WEP, or WPA mode)
• When the device was last seen
• Packet statistics
• Basic Service Set Identifier (BSSID) details
Another great advantage of the tool is that it runs passively, just sniffing traffic across networks and extracting all the required information. Basically, the tool just intercepts traffic from any wireless network in range and inspects the packets for Service Set Identifier (SSID) details. Even if the AP is configured with SSID cloaking (not to broadcast its SSID), that is still found in the frames that clients send when connecting to it. Also, the fact that the attacker doesn’t have to send any traffic makes this a very stealthy technique.
Running Kismet will provide an output similar to the following (note that all MAC addresses have been replaced with XX:XX:XX:XX:XX:XX for privacy):

Forty-one devices (including clients and APs) were identified in the full list provided by Kismet, as seen in Figure 3-12, where the GUI is accessed by navigating to http://localhost:2501 with Firefox.

Figure 3-12 Kismet’s list of identified wireless networks
Searching for “open” displays three networks in range that currently have no encryption enabled (Figure 3-13).
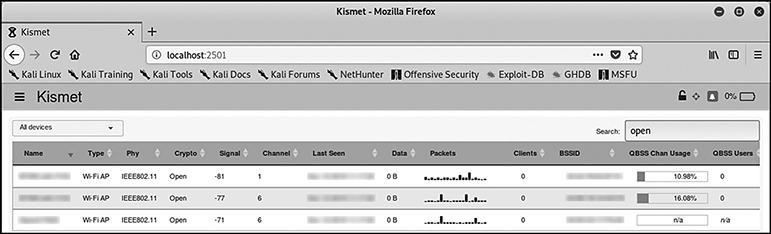
Figure 3-13 Open wireless networks identified by Kismet
Oh yes, these are still out there. Although commonly used by cafes, retailers, and other entities that need a wireless network to be available to a lot of people, you would be surprised as to what those networks actually do. For example, some of them might be used by point-of-sale (POS) machines or other sensitive resources, which the attacker might be able to compromise if given access to such a network.
If you want to check for any unauthorized clients connecting to an AP, you could select the AP of interest and under DEVICE DETAILS select the Wi-Fi (802.11) tab, where a list of clients that have connected to the AP can be identified, as shown in Figure 3-14 (MAC addresses have been redacted for privacy).

Figure 3-14 Kismet’s list of clients that have connected to an AP
InSSIDer
If you are more of a Windows fan, InSSIDer (https://www.metageek.com/products/inssider) may be the tool for you. It’s very easy to install and provides basic information, as displayed in Figure 3-15.

Figure 3-15 InSSIDer’s list of identified wireless networks
It can help identify wireless networks in your infrastructure and review their properties (SSID, utilization, signal strength, operating channels, security, and operating modes) to check if any rogue access points are set up or signs of anomalies (like congested channels or inadequate signal strength) are present.
![]()
EXAM TIP InSSIDer uses active scanning methods to identify wireless networks (it constantly sends probe requests to APs and waits for responses that contain the network’s BSSID). If APs don’t respond to those probes, it won’t be able to get the SSID information.
It’s always worth comparing different tools and identifying what they find and what’s missing. For example, Figure 3-13 shows a total of three open wireless networks identified by Kismet, while Figure 3-15 shows InSSIDer only managed to identify two.
Other Tools Worth Checking
Some other tools you might find useful are
• Aircrack-ng (https://tools.kali.org/wireless-attacks/aircrack-ng) It’s the most common tool for cracking WEP and WPA-PSK keys, and it’s actually a suite of different tools, including airmon-ng (mentioned earlier) and airodump-ng (used for capturing raw packets).
• Netstumbler (https://www.netstumbler.com/downloads) Windows tool that performs active scanning. Although an older tool, it’s sometimes still used even today because it’s very light and easy to use.
• Reaver (https://tools.kali.org/wireless-attacks/reaver) A great tool for attacking the WPS feature in a lot of wireless devices with the goal of recovering the WPA/WPA2 key.
• Asleap (https://tools.kali.org/wireless-attacks/asleap) Can be used to attack Cisco’s Lightweight Extensible Authentication Protocol (LEAP) networks.
• Ghost Phisher (https://tools.kali.org/information-gathering/ghost-phisher), Karmetasploit (https://www.offensive-security.com/metasploit-unleashed/karmetasploit) and Easy-Creds (https://github.com/brav0hax/easy-creds)
These try to deceive clients and make them connect to fake APs/servers. They support fake APs, DNS/DHCP/ Post Office Protocol (POP3)/HTTP servers, and various other types of services.
• Bluesnarfer (https://tools.kali.org/wireless-attacks/bluesnarfer) Performs bluesnarfing attacks on Bluetooth-enabled devices.
• CoWPAtty (https://tools.kali.org/wireless-attacks/cowpatty) Performs dictionary attacks on WPA/WPA2-PSK networks.
• Pyrit (https://tools.kali.org/wireless-attacks/pyrit) GPU-supported key cracking on WPA/WPA2-PSK.
Defending Against War Driving
Network administrators have followed numerous approaches to protect wireless networks over the years. A summary of the most common ones can be found here:
• SSID cloaking (also known as network cloaking or masking) Conceals the existence of a wireless network since the SSID isn’t broadcasted by the AP. However, that doesn’t stop connected clients from sending that information across, which can be inspected by a tool like Kismet, to determine the network’s SSID.
• MAC address filtering When using MAC address filtering, only specific devices will be able to connect to the wireless network, since you administer a list of allowed MAC addresses. The challenge here is twofold: Administration can be very difficult, especially in a large environment. Also, an attacker can easily spoof their MAC address to connect to the network.
• Network architecture When designing a wireless network, try to limit the signal to only reach the area you aim to cover. Using directional (instead of omnidirectional) antennas, setting up wireless channels appropriately, segregating subnets, and configuring the equipment gain can all help you achieve this.
• Use appropriate protocols and keys Don’t leave your networks open to the world. Always apply strong security protocols and associated keys to protect networks. That means not using WEP. It also means using WPA enterprise whenever possible. If you need to use WPA2-PSK, specify a suitable passphrase.
• Use VPNs when connecting on wireless networks Using end-to-end VPN software will help encrypt your session’s data and stop anyone from sniffing information. Most companies offer preconfigured VPN software, used to connect via any noncorporate network. Some of them even enforce an “always on VPN” configuration, which means that whenever you are away from the office, a VPN connection needs to be established to connect your machine to the Internet via any local network.
• Perform wireless router/AP hardening Apply the latest patches and change the default username/password and administration IP addresses.
• Disable AP/router external access If you need to administer devices remotely, ensure they’re only reachable through the corporate VPN or via a jump server that you control. That resources should also be protected via multifactor authentication.
• Use WIDS/WIPS Using wireless IDS/IPS (WIDS/WIPS) can help you detect rogue wireless devices and mitigate associated attacks.
• Perform regular network surveys Performing regular network surveys to identify any rogue APs or clients or unencrypted segments in the network is crucial for its overall security.
General-Purpose Information Gathering Tools
There are hundreds of tools you can use, ranging from publicly available websites to vendor tools and scripts. I will mention a few more that you might find useful, and as in most things in life, the sky is the limit.
Maltego
Open a terminal and type maltego to start the tool. Once it prompts you to select a version to use, choose Maltego CE, which is a free version. You will need to register for a free account, which you will then use with the tool. Choose Open a Blank Graph at the final step and acknowledge the privacy policy. In addition, follow the steps presented here to create a map of a domain of your choice and extract e-mail addresses listed on that.
1. On the left-hand side (at the “palette”), select Domain and drag that object in the map. The domain mheducation.com has been selected for this example.
2. Right-click on that object and select All Transforms.
3. Select To Website (Quick Lookup).
4. Right-click on the resulting object (www.mheducation.com) and select Mirror: Email Addresses Found.
Figure 3-16 shows the result of the preceding steps (with the prefix of the e-mail addresses redacted for privacy).

Figure 3-16 Maltego diagram showing e-mail addresses contained in mheducation.com
Maltego contains numerous transformations that you can use. Some of them require an API account or your social media login details, depending on what the transform is looking for. However, you can create great maps about organizations, infrastructure, people, documents, and everything else you can imagine. You can even build your own Maltego server and create proprietary transforms if you like.
Shodan
Shodan (https://www.shodan.io) is a really good online resource for identifying information about any imaginable type of device. It can index web cameras, Supervisory Control and Data Acquisition (SCADA) devices, medical sensors, printers, and smart TVs. For example, using McGraw-Hill product:"Apache httpd" will provide a list of McGraw-Hill’s Apache web servers. Searching with port:"23" will display devices with Telnet enabled. A query of port:5900 authentication disabled will provide devices that have the Virtual Network Computing (VNC) protocol enabled but configured with no authentication required for login. Using os:"Windows XP" will provide a list of devices running Windows XP. Yes, those are still out there, since this search returns about 112,000 machines!
![]()
NOTE You will need to register for a free account to apply filters in your searches. You can instead choose to purchase an account. A lifetime Shodan account costs $49 at the time of this writing and allows you more in-depth results, access to Shodan Maps and Images, and a free copy of The Complete Guide to Shodan: Collect. Analyze. Visualize. Make Internet Intelligence Work For You.
You can apply similar search queries when you want to search for any vulnerable protocols, services, or obsolete operating systems that might have vulnerabilities. Jake Jarvis has published a great list of Shodan queries at https://github.com/jakejarvis/awesome-shodan-queries that can provide a great starting point for your searches.
Maps
Various online tools can be used by attackers interested in launching physical attacks on target organizations. Examples include
• Google Maps (https://maps.google.com)
• Bing Maps (https://www.bing.com/maps)
• Citymapper (https://citymapper.com)
• Maps (https://maps.me)
• MapQuest (https://www.mapquest.com)
Features include pictures from target locations, distance measurement, street view, traffic indicators based on hours of the day, and a lot more. It’s always useful to search for pictures relating to a given location, because some of them might be depicting building interiors and provide a lot of detail regarding the infrastructure.
There are even mapping websites like Wigle (https://www.wigle.net), which contains a map of wireless networks and access points and allows you to filter for locations, SSIDs, and a lot more. You can even upload output from war driving tools like Kismet to enrich Wigle’s database. Figure 3-17 shows the tool’s main page. Look at how many devices appear. It’s fascinating, isn’t it?

Figure 3-17 Wigle map of wireless networks and APs
Give it a try and search for your location. Hopefully, you don’t see your own home router advertised.
Spokeo
Spokeo (https://www.spokeo.com) can be used to get physical address and ownership information. You can add a street name, ZIP code, or anything else you have regarding a subject, and it will search for any records matching your query. A search for Allen Center Street in Sonoma, California, generates 72 matches. For less than $1 you can get a report that includes occupants, phone numbers, e-mail addresses, and court records, as seen in Figure 3-18.
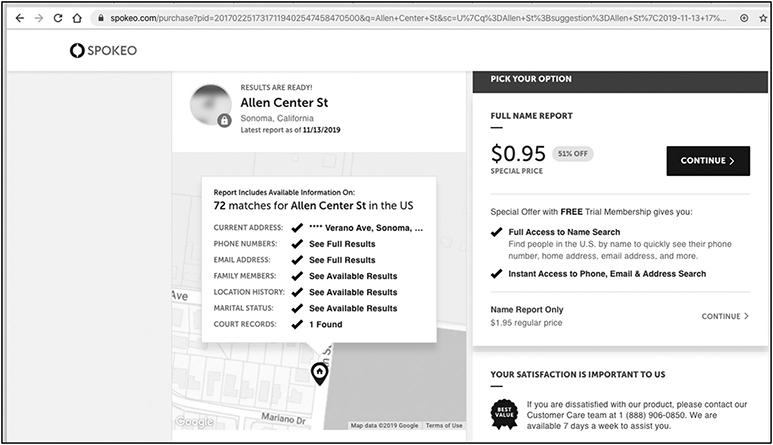
Figure 3-18 Spokeo results for Allen Center Street, Sonoma, California
Grayhat Warfare
Grayhat Warfare (https://buckets.grayhatwarfare.com) is a tool that can help you search for data exposed over Amazon S3 buckets. This means that the information in those cloud instances is publicly available, sometimes on purpose, while others are a result of misconfiguration. The benefits of this tool are that it indexes millions of results for each bucket, and you can apply search engine–like logic when searching. Figure 3-19 shows a search for McGraw-Hill returning almost 170 results.

Figure 3-19 Grayhat Warfare results for McGraw-Hill
Chapter Review
Wow! This chapter was a true blast. Most students in classes I teach love hacking and breaking stuff. They just wait for the opportunity to start Metasploit and hack away at targets. I personally love this chapter right here. I believe that there’s an endless wealth of information residing in the public domain. Searching in organizational websites has proven quite valuable, as lots of information can be uncovered, including documents, e-mail addresses, phone numbers, cooperating third parties, and job postings. Remember that companies and individuals also have social media pages that can be harvested for valuable information.
Search engine querying can also prove very fruitful. Just by using the right phrases, you can get sensitive information or an eager administrator posting a network configuration in a blog that is later indexed by a search engine. The more creative you are with your searches, the more data you can get. Use operators wisely, and also remember to review terms and conditions closely to ensure you are not violating any of them when executing your searches.
Archived content may also contain a lot of useful stuff. Prior website versions found archived online may contain anything from past vulnerabilities to sensitive information. Always remember to carefully review any type of information available online and assess what type of insight it may provide to an attacker. Note that some information (like whois and DNS records) can’t really be removed. In those cases, carefully review and keep track of what data has been provided so you can identify how it’s being used.
War dialing is something that most organizations tend to ignore. Ask yourself: Do you encrypt your phone/VoIP traffic? Do you have a list of your phone lines, and do you know if some of them aren’t used at all? What about which types of devices are connected to these via out-of-bound modems? Are your employees allowed to use modems at will?
War driving is another attack vector that goes fairly unvetted. Open or WEP-enabled wireless networks are still found today, which may cause serious issues to a company, especially if its network is suffering from poor segregation.
Finally, a key takeaway from this chapter is to always survey your infrastructure and use tools that attackers use to infiltrate networks. You can then go back and redesign your defenses accordingly to make it harder for them. In the words of a CISO I used to work with: “I know we are owned by someone. I just want you to show me where they are and what I can do about it.”
Questions
1. Which of the following tools would you use to perform a zone transfer?
A. Kismet
B. Aircrack-ng
C. Dig
D. Shodan
2. Consider the following output:

What command/tool was most likely used?
A. nslookup
B. host
C. who
D. whois
3. Using the search query inurl:mheducation.com filetype:pdf confidential will return which of the following results?
A. Confidential McGraw-Hill PDF files
B. PDF files from mheducation.com containing the word confidential
C. Files from mheducation.com that are either confidential or PDFs
D. Confidential files from all McGraw-Hill websites
4. Which of the following record types is used to map a domain name to an IPv6 address?
A. A
B. MX
C. PTR
D. AAAA
5. What’s a method to defend against zone transfers?
A. Use robots.txt.
B. Use split tunneling.
C. There is none.
D. Use split DNS.
6. Which of the following is not a war dialing software?
A. iWar
B. WarVox
C. Kismet
D. THC-Scan
7. Review the following output:

What is the attacker most likely trying to do?
A. Upload a file to a target website
B. Mirror a website
C. Perform a DNS lookup
D. Remove a website’s index page
8. What is an attacker trying to achieve with the following search engine query?
“Powered by: vBulletin Version 1.1.5”
A. Identify admin pages
B. Find blogs
C. Identify a vulnerable server
D. Search for web servers
9. Review the following robots.txt file configuration:

Which of the following statements is wrong?
A. Googlebot can’t crawl the temp directory.
B. BlackWidow can’t crawl the market directory.
C. Cassandra can’t crawl the market/products directory.
D. BSpider can crawl the docs directory.
10. Review the following command output:
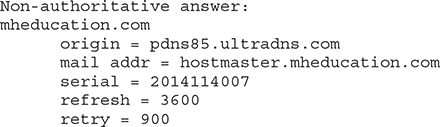
What type of record was used as a parameter for this query?
A. A
B. AAAA
C. MX
D. SOA
11. Which of the following robots.txt locations would not be found by crawlers?
A. http://mheducation.com/var/robots.txt
B. www.mheducation.com/robots.txt
C. http://mheducation.com/robots.txt
D. http://mheducation.com:80/robots.txt
12. Which of the following is required before performing war driving?
A. Have airmon-ng running
B. Install Kismet
C. Have a wireless card that supports monitor mode
D. Install Wireshark
Answers
1. C. The only tool in the list that can be used to perform zone transfers is dig. Remember that the most commonly used OS tools are nslookup, dig, and host.
2. D. Whois will provide domain registration information, like contact details about the domain’s registrar and registrant.
3. B. The selected search keyword is confidential. The inurl operator is used to limit that search to a specific domain (mheducation.com), and the filetype operator is used to allow only PDF files to be returned. Just because the word confidential is contained in a PDF file, that doesn’t necessarily make it contain confidential information (which is what is implied by option A).
4. D. An AAAA record is used to obtain an IPv6 address for a given domain name. It’s similar to an A record, which maps a domain name to an IPv4 address.
5. D. Using a split DNS configuration means that a level of abstraction is instituted between the internal network and the external world, since you now have an external and an internal DNS server. That can aid in preventing zone transfer requests from external entities.
6. C. Kismet is a wireless network tool used for identifying wireless devices/networks and sniffing their traffic. It’s not used to perform war dialing but can be used to perform war driving. Notice the similarity in terms between war driving and war dialing. Although they are used to denote two totally different attacks, this often confuses most people.
7. B. The attacker is using wget to get a copy of the website (also known as mirroring). That can be viewed locally to identify useful content like phones and e-mail addresses or source code that denotes possible security issues.
8. C. Using the query “Powered by: vBulletin Version 1.1.5” will display results relating to vBulletin, which is a software used for Internet forums. It doesn’t matter if you don’t recognize the particular software. If you inspect the query closely, you can see the phrase “Powered By” being used. That’s commonly in place to denote specific technologies. Similar examples include WordPress (Powered By WordPress), MediaWiki (Powered by MediaWiki), PHP (Powered-By: PHP), and various others. If you combine this information with the fact that the query mentions a specific version (1.1.5), it most likely means that the attacker is aware of an exploit regarding the specific software version and is probably scouring the Internet for vulnerable devices.
9. C. When there’s a specific directive for a crawler in robots.txt, it will only apply the rules mentioned in that specific directive. As such, the only directive for Cassandra states that it isn’t able to crawl the new directory but wouldn’t have any problem crawling market/products.
10. D. SOA records contain zone administrative information, including the contact details of the person responsible for the zone (mail addr = hostmaster.mheducation.com), serial (2014114007), zone refresh timer (3600), and how much time should pass after a failed refresh (900). If you want additional information about the SOA structure, you can review RFC 1035 (https://tools.ietf.org/html/rfc1035) for full details.
11. A. In order for crawlers to be able to find your robots.txt file, it needs to be placed at the top-level directory of your domain, which is where they expect to find it. Using http://mheducation.com/var/robots.txt places the file in a subdirectory, where it wouldn’t be discoverable by crawlers.
12. C. The first thing to do before starting war driving is to ensure you have a wireless card that supports monitor mode. If that’s not the case, then having tools like airmon-ng, Kismet, or Wireshark won’t really help, since you won’t be able to capture the necessary wireless network traffic and analyze it for the required information.
References and Further Reading


