
This chapter is a continuation of the previous chapter, adding more features to our sprite capabilities. Here we'll take a look at compressed and compiled sprites, which will speed up sprite blitting on some systems (particularly those without modern video cards). You'll also learn about the crucial subject of collision detection, which truly makes a game a game, for without the ability to test for collisions all you have is a screen filled with pretty objects moving around. You already learned a great deal about sprites in the last chapter, and you have at your disposal a good tool set for loading and blitting sprites. We'll also explore a new way to move and rotate a sprite using angular motion, which does away with having fixed degrees of rotation. Finally, all of the things you've learned about sprites will be wrapped up into a reusable sprite class. Here are the major topics:
Creating a sprite class
Allegro provides a custom type of sprite that is compressed to save memory. By “compressed,” I don't mean that the image is changed in any way, only that the sprite's image is compressed to save memory and (in some cases) draw faster. Allegro uses a popular compression algorithm called run-length encoding (RLE for short) to compress sprite images. The resulting “RLE sprites” can have significantly smaller memory footprints than standard sprites, which are based on regular bitmaps. In addition, there is some overhead in the header for each bitmap that also consumes memory that a compressed sprite eliminates. If you have an image that is not modified but only copied from (for instance, a sprite sheet), then it is a good candidate for compression.
There are several drawbacks to using compressed sprites, so some flexibility is sacrificed to save memory (and perhaps increase speed at the same time). Compressed sprites can't be flipped, rotated, stretched, or copied into. All you can do is copy a compressed sprite to a destination bitmap using one of the custom compressed sprite functions. The run-length encoding algorithm considers repeating pixels on a line, and then replaces all of those pixels with just two bytes—the color and the count. This is called a “solid run.” The second drawback is related to the complexity of a sprite image. RLE compression only works well when there are a lot of solid runs in an image. So, if a sprite is very detailed and does not have very many duplicate pixels, it may actually render more slowly than a regular sprite. This is obviously something that requires some design and planning on your part.
Compressed sprites are usually much smaller then normal bitmaps not only due to the run-length compression, but also due to eliminating most of the overhead of the standard bitmap structure (which must support flipping, scaling, and so on). Compressed sprites are drawn faster than normal bitmaps because, rather than having to compare every single pixel with zero to determine whether it should be drawn, you can skip over a whole series of transparent pixels with a single instruction.
You can convert a normal memory bitmap (loaded with load_bitmap or created at runtime) into an RLE sprite using the get_rle_sprite function.
RLE_SPRITE *get_rle_sprite(BITMAP *bitmap);
When you are using compressed sprites, you must be sure to destroy the sprites just as you destroy regular bitmaps. To destroy an RLE sprite, you will use a custom function created just for this purpose, called destroy_rle_sprite.
void destroy_rle_sprite(RLE_SPRITE *sprite);
Drawing a compressed sprite is very similar to drawing a normal sprite, and the parameters are similar in draw_rle_sprite.
void draw_rle_sprite(BITMAP *bmp, const RLE_SPRITE *sprite, int x, int y);
Note that the only difference between draw_rle_sprite and draw_sprite is the second parameter, which refers directly to an RLE_SPRITE instead of a BITMAP. Otherwise, it is quite easy to convert an existing game to support RLE sprites.
Allegro provides two additional blitting functions for RLE sprites. The first one, draw_trans_rle_sprite, draws a sprite using translucent alpha-channel information and is comparable to draw_trans_sprite (only for RLE sprites, of course). This involves the use of blenders, as described in the previous chapter.
void draw_trans_rle_sprite(BITMAP *bmp, const RLE_SPRITE *sprite,
   int x, int y);
Another variation of the RLE sprite blitter is draw_lit_rle_sprite, which uses lighting information to adjust a sprite's brightness when it is blitted to a destination bitmap. These functions are next to useless for any real game, so I am not planning to cover them here in any more detail. However, you can adapt the TransSprite program from the previous chapter to use draw_trans_rle_sprite with a little effort.
void draw_lit_rle_sprite(BITMAP *bmp, const RLE_SPRITE *sprite,
   int x, y, color);
To assist with loading an image file into an RLE sprite, I have modified the grabframes function to return an RLE_SPRITE directly so conversion from a normal BITMAP is not necessary. As you can see from the short listing for this function, it creates a temporary BITMAP as a scratch buffer for the sprite frame, which is then converted to an RLE sprite, after which the scratch bitmap is destroyed and the RLE_SPRITE is returned by the function.
RLE_SPRITE *rle_grabframe(BITMAP *source,
                  int width, int height,
                  int startx, int starty,
                  int columns, int frame)
{
   RLE_SPRITE *sprite;
   BITMAP *temp = create_bitmap(width,height);

   int x = startx + (frame % columns) * width;
   int y = starty + (frame / columns) * height;

   blit(source,temp,x,y,0,0,width,height);
   sprite = get_rle_sprite(temp);
   destroy_bitmap(temp);

   return sprite;
}
The RLESprites program is unique in that it is the first program to really start using background tiling—something that is covered in Part III. As you can see in Figure 10.1, a grass and stone tile is used to fill the bottom portion of the screen, while the dragon sprite flies over the ground. This is a little more realistic and interesting than the sprite being drawn to an otherwise barren, black background (although background scenery and a sky would help a lot).
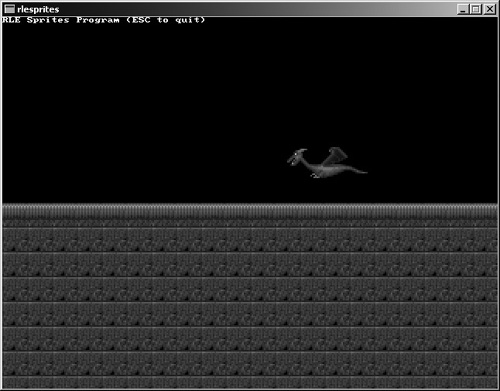
Figure 10.1. The RLESprites program demonstrates how to use run-length encoded sprites to save memory and speed up sprite blitting.
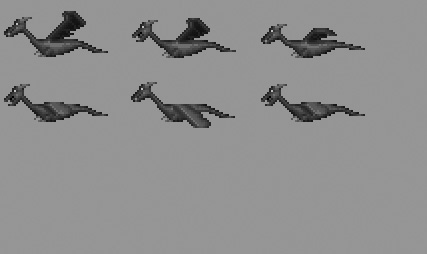
The actual dragon sprite is comprised of six frames of animation, as shown in Figure 10.2. This sprite was created by Ari Feldman, as were the ground tiles.
Using the previous SpriteGrabber program as a basis, you should be able to adapt the code for the RLESprites demo. I will highlight the differences in bold.
#include <stdlib.h>
#include <stdio.h>
#include "allegro.h"

#define BLACK makecol(0,0,0)
#define WHITE makecol(255,255,255)
//define the sprite structure
typedef struct SPRITE
{
    int x,y;
    int width,height;
    int xspeed,yspeed;
    int xdelay,ydelay;
    int xcount,ycount;
    int curframe,maxframe,animdir;
    int framecount,framedelay;
}SPRITE;

//sprite variables
RLE_SPRITE *dragonimg[6];
SPRITE thedragon;
SPRITE *dragon = &thedragon;

void erasesprite(BITMAP *dest, SPRITE *spr)
{
    //erase the sprite using BLACK color fill
    rectfill(dest, spr->x, spr->y, spr->x + spr->width,
       spr->y + spr->height, BLACK);
}

void updatesprite(SPRITE *spr)
{
    //update x position
    if (++spr->xcount > spr->xdelay)
    {
        spr->xcount = 0;
        spr->x += spr->xspeed;
    }

    //update y position
    if (++spr->ycount > spr->ydelay)
    {
        spr->ycount = 0;
        spr->y += spr->yspeed;
    }

    //update frame based on animdir
    if (++spr->framecount > spr->framedelay)
    {
        spr->framecount = 0;
        if (spr->animdir == -1)
        {
           if (--spr->curframe < 0)
               spr->curframe = spr->maxframe;
       }
       else if (spr->animdir == 1)
       {
        if (++spr->curframe > spr->maxframe)
            spr->curframe = 0;
       }
    }
}

void warpsprite(SPRITE *spr)
{
    //simple screen warping behavior
    if (spr->x < 0)
    {
       spr->x = SCREEN_W - spr->width;
    }

    else if (spr->x > SCREEN_W - spr->width)
    {
       spr->x = 0;
    }

    if (spr->y < 40)
    {
       spr->y = SCREEN_H - spr->height;
    }

    else if (spr->y > SCREEN_H - spr->height)
    {
       spr->y = 40;
    }

}

RLE_SPRITE *rle_grabframe(BITMAP *source,
                  int width, int height,
                  int startx, int starty,
                  int columns, int frame)
{
    RLE_SPRITE *sprite;
    BITMAP *temp = create_bitmap(width,height);

    int x = startx + (frame % columns) * width;
    int y = starty + (frame / columns) * height;
    blit(source,temp,x,y,0,0,width,height);
    sprite = get_rle_sprite(temp);
    destroy_bitmap(temp);

    return sprite;
}

int main(void)
{
    BITMAP *temp;
    int n, x, y;

    //initialize
    allegro_init();
    set_color_depth(16);
    set_gfx_mode(GFX_AUTODETECT_WINDOWED, 640, 480, 0, 0);
    install_keyboard();
    install_timer();
    srand(time(NULL));
    textout_ex(screen, font, "RLE Sprites Program (ESC to quit)",
        0, 0, WHITE, 0);

    //load and draw the blocks
    temp = load_bitmap("block1.bmp", NULL);
    for (y=0; y < SCREEN_H/2/temp->h+temp->h; y++)
      for (x=0; x < SCREEN_W/temp->w; x++)
        draw_sprite(screen, temp, x*temp->w, SCREEN_H/2+y*temp->h);
    destroy_bitmap(temp);

    temp = load_bitmap("block2.bmp", NULL);
    for (x=0; x < SCREEN_W/temp->w; x++)
        draw_sprite(screen, temp, x*temp->w, SCREEN_H/2);
    destroy_bitmap(temp);

    //load rle sprite
    temp = load_bitmap("dragon.bmp", NULL);
    for (n=0; n<6; n++)
         dragonimg[n] = rle_grabframe(temp,128,64,0,0,3,n);
    destroy_bitmap(temp);

    //initialize the sprite
    dragon->x = 500;
    dragon->y = 150;
    dragon->width = dragonimg[0]->w;
    dragon->height = dragonimg[0]->h;
    dragon->xdelay = 1;
    dragon->ydelay = 0;
    dragon->xcount = 0;
    dragon->ycount = 0;
    dragon->xspeed = -4;
    dragon->yspeed = 0;
    dragon->curframe = 0;
    dragon->maxframe = 5;
    dragon->framecount = 0;
    dragon->framedelay = 10;
    dragon->animdir = 1;

    //game loop
    while (!keypressed())
    {
      //erase the dragon
      erasesprite(screen, dragon);

      //move/animate the dragon
      updatesprite(dragon);
      warpsprite(dragon);

      //draw the dragon
      acquire_screen();
      draw_rle_sprite(screen, dragonimg[dragon->curframe],
         dragon->x, dragon->y);
      release_screen();

      rest(10);
      }

      for (n=0; n<6; n++)
          destroy_rle_sprite(dragonimg[n]);

      allegro_exit();
      return 0;
}
END_OF_MAIN()
Compressed sprites are interesting because they are rendered with a custom function called draw_rle_sprite that actually decompresses the bitmap as it is being drawn to the back buffer or screen. To truly speed up the blitting of these sprites, they would need to contain many repeated pixels. Therefore, a complex sprite with many colors and different pixels will not benefit at all from run-length encoding—don't always assume that just because a compressed sprite sounds cool, it is necessarily better than a regular sprite. Sometimes the good old-fashioned brute force method works best.
But isn't there yet another method that would draw them even faster? Given that you will choose the method to use for certain sprites while writing the code, it is up to you to decide whether a sprite contains long runs of pixels (good for packed blitting) or a diversity of pixels (good for brute-force blitting). Why not take compressed sprites to the next step and actually pre-compile the sprite itself? After all, a blitter is nothing more than a function that copies a source bitmap to a destination bitmap one line at a time (often using fast assembly language instructions). How about coding those assembly language instructions directly into the sprites instead of storing solid runs of pixels?
Intriguing idea? But what about performance? I'll leave that up to you to decide. Each game is different and each sprite is different, so it's largely up to you. Will standard, compressed, or compiled sprites work best with certain images but not with others? Suppose you are developing a role-playing game. These games typically have beautiful game worlds filled with plants, animals, houses, rivers, forests, and so on. A compressed or compiled sprite would just slow down this type of game compared to a standard sprite. But take a game like Breakout or Tetris that uses solid blocks for game pieces . . . now these blocks are absolutely perfect candidates for compressed or compiled sprites! Another good example of a game that would benefit is a side-scrolling game like R-Type or Mario, where there are a lot of solid runs in the various background layers and scenery.
Which brings up another important thing to consider. There is absolutely no reason why you can't combine the three different types of sprites in a single game. You do not need to choose one and stick with it! If you have some images that are very detailed, use a standard sprite. But if you have large layers or scenery, maybe it would benefit from compression. Use your judgment in each case, and then time your game (we'll get into timing in Chapter 11). By putting timing code around key functions, you can see how fast they execute. This will be a good way to benchmark the sprite methods if you want to make a decision based on real performance data.
What's the scoop with compiled sprites? They store the actual machine code instructions that draw a specific image onto a bitmap, using assembly language copy instructions with the colors of each pixel directly plugged into these instructions. Depending on the source image, a compiled sprite can render up to five times faster than a regular sprite using draw_sprite!
However, one of the drawbacks is that compiled sprites take up much more memory than either standard or RLE sprites, so you might not be able to use them for all the sprites in a game without causing the game to use up a lot of memory. By their very nature, compiled sprites are also quite constricted. Obviously, if you're talking about assembly instructions, a compiled sprite isn't really a bitmap any longer, but a miniature program that knows how to draw the image. Knowing this, one point is fairly evident, but I will enunciate it anyway: If you draw a compiled sprite outside the boundary of a bitmap (or the screen), bad things will happen because parts of program memory will be overwritten! The memory could contain anything—instructions, images, even the Allegro library itself. You must be very careful to keep track of compiled sprites so they are never drawn outside the edge of a bitmap or the screen, or the program will probably crash.
Now, how about another positive point? You can convert regular bitmaps into compiled sprites at runtime, just like you could with RLE sprites. There is no need to convert your game artwork to any special format before use—you can do that when the program starts.
From this point, compiled sprites are functionally similar to RLE sprites. The first function you might recognize from the previous section—get_compiled_sprite. That's right, this function is almost exactly the same as get_rle_sprite, but it returns a pointer to a COMPILED_SPRITE.
COMPILED_SPRITE *get_compiled_sprite(BITMAP *bitmap, int planar);
The bitmap in the first parameter must be a memory bitmap (not a video bitmap or the screen). The second parameter is obsolete and should always be set to FALSE, specifying that the bitmap is a memory bitmap and not a multi-plane video mode (a holdover from a time when mode-x was popular with MS-DOS games).
In similar fashion, Allegro provides a custom function for destroying a compiled sprite in the destroy_compiled_sprite function.
void destroy_compiled_sprite(COMPILED_SPRITE *sprite);
What remains to be seen? Ah yes, the blitter. There is a single function for drawing a compiled sprite, and that concludes the discussion. (See, I told you compiled sprites were limited, if powerful.)
void draw_compiled_sprite(BITMAP *bmp, const COMPILED_SPRITE *sprite,
   int x, int y);
The first parameter is the destination bitmap, then comes the actual COMPILED_SPRITE to be blitted, followed by the x and y location for the sprite. Remember that draw_compiled_sprite does not do any clipping at the edges of the screen, so you could hose your program (and perhaps the entire operating system) if you aren't careful!
What if you are used to allowing sprites to go just beyond the boundaries of the screen so that they will warp to the other side more realistically? It certainly looks better than simply popping them to the other side when they near the edge (something that the SpriteHandler program did). There is a trick you can try if this will be a problem in your games. Create a memory bitmap (such as the second buffer) that is slightly larger than the actual screen, taking care to adjust the blitter when you are drawing it to the screen. Then you have some room with which to work when you are drawing sprites, so you won't have to be afraid that they will blow up your program.
To save some paper I've simply modified the RLESprites program for this section on compiled sprites; I will point out the differences between the programs. You can open the RLESprites program and make the few changes needed to test compiled sprites. Also, on the CD-ROM there is a complete CompiledSprites program that is already finished; you can load it up if you want. I liked the dragon so much that I've used it again in this program (giving credit again where it is due—thanks to Ari Feldman for the sprites).
Note
In the last chapter you saw how to draw a frame from a sprite sheet directly to the back buffer or screen without going through the “middleman” array. That is perfectly legitimate for the example programs here as well, but for the sake of learning I feel that using an array for a sprite animation is easier to understand.
Up near the top of the program where the variables are declared, there is a single line that changed from RLE_SPRITE to COMPILED_SPRITE.
//sprite variables
COMPILED_SPRITE *dragonimg[6];
Then skip down past erasesprite,updatesprite, and warpsprite, and you'll see the rle_grabframe function. I have converted it to compiled_grabframe, and it looks like the following.
COMPILED_SPRITE *compiled_grabframe(BITMAP *source,
                  int width, int height,
                  int startx, int starty,
                  int columns, int frame)
{
    COMPILED_SPRITE *sprite;
    BITMAP *temp = create_bitmap(width,height);

    int x = startx + (frame % columns) * width;
    int y = starty + (frame / columns) * height;

    blit(source,temp,x,y,0,0,width,height);

    //remember FALSE is always used in second parameter
    sprite = get_compiled_sprite(temp, FALSE);

    destroy_bitmap(temp);
    return sprite;
}
Moving along to the main function, you change the title.
textout(screen, font, "CompiledSprites Program (ESC to quit)",
    0, 0, WHITE);
Cruising further into the main function, make a change to the code that loads the dragon sprite images.
//load compiled sprite of dragon
temp = load_bitmap("dragon.bmp", NULL);
for (n=0; n<6; n++)
    dragonimg[n] = compiled_grabframe(temp,128,64,0,0,3,n);
destroy_bitmap(temp);
Down in the game loop where the dragon sprite is drawn to the screen, you need to change the code to use draw_compiled_sprite.
//draw the dragon
acquire_screen();
draw_compiled_sprite(screen, dragonimg[dragon->curframe],
    dragon->x, dragon->y);
release_screen();
There is one last change where the compiled sprite images are destroyed.
for (n=0; n<6; n++)
    destroy_compiled_sprite(dragonimg[n]);
That's it! Now try out the program and gain some experience with compiled sprites. You might not notice any speed improvement; then again, you might notice a huge improvement. It really depends on the source image, so experiment a little and make use of this new type of sprite whenever the need arises.
Collision detection is the process of detecting when one sprite intersects (or collides with) another sprite. Although this is treated as a one-to-one interaction, the truth is that any one sprite can collide with many other sprites on the screen while a game is running. Collision detection is much easier once you have a basic sprite handler (which I have already gone over) because it is necessary to abstract the animation and movement so that any sprite can be accommodated (whether it's a spaceship or an asteroid or an enemy ship—in other words, controlled versus behavioral sprites).
The easiest (and most efficient) way to detect when two sprites have collided is to compare their bounding rectangles. Figure 10.3 shows the bounding rectangles for two sprites, a jet airplane and a missile. As you can see in the figure, the missile will strike the plane when it contacts the wings, but it has not collided with the plane yet. However, a simple bounding-rectangle collision detection routine would mark this as a true collision because the bounding rectangle of the missile intersects with the bounding rectangle of the plane.
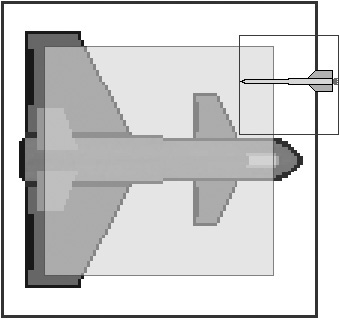
One way to increase the accuracy of bounding-rectangle collision detection is to make the source rectangle closely follow the boundaries of the actual sprite so there is less empty space around the sprite. For instance, suppose you were using a 64 × 64 image containing a bullet sprite that only uses 8 × 8 pixels in the center of the image—that's 56 pixels of empty space in each direction around the sprite that will foul up collision detection. There's no reason why you can't use different sizes for each sprite—make each one as small as possible to contain the image. The load_bitmap function certainly doesn't care how big the sprite is, and the blitting and collision routines don't care either. But you will speed up the game and make collision detection far more accurate by eliminating any unneeded empty space around a sprite. Keep them lean!
Another way to increase collision detection accuracy is by reducing the virtual bounding rectangle used to determine collisions; that is, not by reducing the size of the image, but just the rectangular area used for collision detection. By reducing the bounding rectangle by some value, you can make the collisions behave in a manner that is more believable for the player. In the case of Figure 10.3 again, do you see the shaded rectangle inside the plane image? That represents a virtual bounding rectangle that is slightly smaller than the actual image. It might fail in some cases (look at the rear wings, which are outside the virtual rectangle), but in general this will improve the game. When sprites are quickly moving around the screen, small errors are not noticeable anyway.
Take a look at Figure 10.4, which shows three missiles (A, B, and C) intersecting with the jet airplane sprite. Right away you might notice a problem—the missiles have a lot of empty space. It would improve matters if the missile images were reduced to a smaller image containing only the missile's pixels, without all the blank space above and below the missile. Why? Missile A is clearly missing the plane sprite, but a “dumb” collision routine would see this is a collision using simple intersection. A smarter collision routine using a virtual rectangle would improve the situation, but the bounding rectangles for these missiles are so large that clear misses are likely to be treated as collisions more often than not.
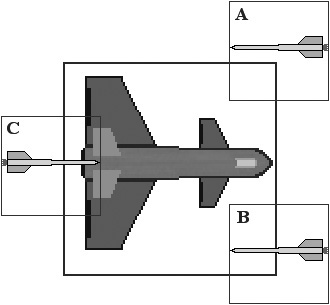
Figure 10.4. Sprite collision is more accurate using a virtual bounding rectangle with very little blank space.
Now take a look at Missile B in Figure 10.4. In this situation, the missile is clearly intersecting the plane sprite's bounding rectangle, resulting in a true collision in most cases, but you can clearly see that it is not a collision. However, a virtual bounding rectangle would have compensated for the position of Missile B and recognized this as a miss. Missile C is clearly intersecting the plane's bounding rectangle, and the actual pixels in each image are intersecting so this is a definite collision. Any collision routine would have no problem with C, but it might have a problem with B, and it would definitely have a problem with A. So you should design your collision routine to accommodate each situation and make sure your game's art resources are efficient and use the least amount of blank space necessary. Following is a generic collision routine. This function accepts two SPRITE pointers as parameters, comparing their bounding rectangles for an intersection. A more useful collision routine might have included parameters for the virtual bounding rectangle compensators, but this function uses a hard-coded value of five pixels (bx and by), which you can modify as needed.
I have included the first glob of code only to simplify the collision code because so many variables are in use. This function works by comparing the four corners of the first sprite with the bounding rectangle of the second sprite, using a virtual rectangle that is five pixels smaller than the actual size of each sprite (which really should be passed as a parameter or calculated as a percentage of the size for the best results).
The workhorse of the collision routine I'm going to show you is a function called inside. This function checks to see if a point falls within the boundary of a rectangle. This function needs to be as efficient as possible because it is called many times by the collided function.
int inside(int x,int y,int left,int top,int right,int bottom)
{
    if (x > left && x < right && y > top && y < bottom)
       return 1;
    else
       return 0;
}
The collided function accepts two parameters for the two sprites that it is to compare. This is where the code gets a bit messy looking, because collided compares all four corners of the first sprite to see if any of those points fall within the bounding box of the second sprite (by calling the inside function).
int collided(SPRITE *first, SPRITE *second)
{
  //get width/height of both sprites
  int width1 = first->x + first->width;
  int height1 = first->y + first->height;
  int width2 = second->x + second->width;
  int height2 = second->y + second->height;

  //see if corners of first are inside second boundary
  if (inside(first->x, first->y, second->x, second->y, width2, height2)
      return 1;
  if inside(first->x, height1, second->x, second->y, width2, height2)
     return 1;
  if inside(width1, first->y, second->x, second->y, width2, height2)
     return 1;
  if inside(width1, height1, second->x, second->y, width2, height2))
     return 1;

  //no collisions?
  return 0;
}
Now do you remember the discussion earlier of how bounding rectangle collision testing often generates false positives because the bounding box has a lot of empty space within it where the image's pixels are not actually located? Well, there are a couple of ways to get around that problem. One is to just use the center point of the first sprite and compare that with the second sprite's bounding rectangle by simply using the inside function. This is very effective when you want to compare a tiny sprite with a larger sprite (for example, to see if a bullet hits a sprite). It's also much faster than a full bounding rectangle collision, which calls the inside function four times. The second way to improve collision testing is to reduce the size of the bounding rectangle by a certain amount.
int collided(SPRITE *first, SPRITE *second, int border)
{
  //get width/height of both sprites
  int width1 = first->x + first->width;
  int height1 = first->y + first->height;
  int width2 = second->x + second->width;
  int height2 = second->y + second->height;

  //see if corners of first are inside second boundary
  if (inside(first->x, first->y, second->x + border,
        second->y + border, width2 - border, height2 - border)
      return 1;
  if inside(first->x, height1, second->x + border,
        second->y + border, width2 - border, height2 - border)
      return 1;
  if inside(width1, first->y, second->x + border,
        second->y + border, width2 - border, height2 - border)
      return 1;
  if inside(width1, height1, second->x + border,
       second->y +; border, width2 - border, height2 - border))
     return 1;

  //no collisions?
  return 0;
}
The second part of the function uses the shortcut variables to perform the collision detection based on the four corners of the first sprite. If any one of the points at each corner is inside the virtual bounding rectangle of the second sprite, then a collision has occurred and the result is returned to the calling routine.
I've made some changes to the SpriteGrabber program to demonstrate collision detection (rather than writing an entirely new program from scratch). Figure 10.5 shows the CollisionTest program in action. By changing a few lines and adding the collision routines, you can adapt SpriteGrabber and turn it into the CollisionTest program.
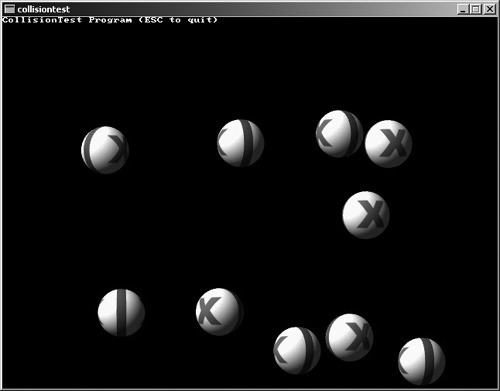
Figure 10.5. The CollisionTest program demonstrates how sprites can interact. Sprite image courtesy of Edgar Ibarra.
The first thing you need to add are some defines for the graphics mode and a define to specify the number of sprites used in the program.
#include <stdlib.h>
#include <stdio.h>
#include "allegro.h"

#define BLACK makecol(0,0,0)
#define WHITE makecol(255,255,255)

#define NUM 10
#define WIDTH 640
#define HEIGHT 480
#define MODE GFX_AUTODETECT_FULLSCREEN
The next section of code declares the sprite variables below the SPRITE struct. All you need to do here is make these variables plural because this program uses many sprites instead of just the one sprite in the original SpriteGrabber program. The array of pointers will point to the struct array inside main because it is not possible to set the pointers in the declaration. (Each element of the array must be set individually.)
//sprite variables
BITMAP *ballimg[32];
SPRITE theballs[NUM];
SPRITE *balls[NUM];
After these minor changes, skip down a couple pages in the source code listing (ignoring the functions erasesprite, updatesprite, bouncesprite, and grabframe) and add the following functions after grabframe:
int inside(int x,int y,int left,int top,int right,int bottom)
{
   if (x > left && x < right && y > top && y < bottom)
       return 1;
   else
       return 0;
}

int collided(SPRITE *first, SPRITE *second, int border)
{
  //get width/height of both sprites
  int width1 = first->x + first->width;
  int height1 = first->y + first->height;
  int width2 = second->x + second->width;
  int height2 = second->y + second->height;

  //see if corners of first are inside second boundary
  if (inside(first->x, first->y, second->x + border,
        second->y + border, width2 - border, height2 - border))
      return 1;
  if (inside(first->x, height1, second->x + border,
        second->y + border, width2 - border, height2 - border))
      return 1;
  if (inside(width1, first->y, second->x + border,
        second->y + border, width2 - border, height2 - border))
      return 1;
  if (inside(width1, height1, second->x + border,
        second->y + border, width2 - border, height2 - border))
      return 1;

  //no collisions?
  return 0;
}

void checkcollisions(int num)
{
   int n,cx1,cy1,cx2,cy2;

   for (n=0; n<NUM; n++)
   {
       if (n != num && collided(balls[n], balls[num], 5))
       {
          //calculate center of primary sprite
          cx1 = balls[n]->x + balls[n]->width / 2;
          cy1 = balls[n]->y + balls[n]->height / 2;

         //calculate center of secondary sprite
         cx2 = balls[num]->x + balls[num]->width / 2;
         cy2 = balls[num]->y + balls[num]->height / 2;

         //figure out which way the sprites collided
         if (cx1 <= cx2)
         {
            balls[n]->xspeed = -1 * rand() % 6 + 1;
            balls[num]->xspeed = rand() % 6 + 1;
            if (cy1 <= cy2)
           {
            balls[n]->yspeed = -1 * rand() % 6 + 1;
            balls[num]->yspeed = rand() % 6 + 1;
           }
           else
           {
            balls[n]->yspeed = rand() % 6 +; 1;
            balls[num]->yspeed = -1 * rand() % 6 + 1;
           }
         }
         else
         {
           //cx1 is > cx2
           balls[n]->xspeed = rand() % 6 + 1;
           balls[num]->xspeed = -1 * rand() % 6 +; 1;
           if (cy1 <= cy2)
           {
              balls[n]->yspeed = rand() % 6 + 1;
              balls[num]->yspeed = -1 * rand() % 6 + 1;
           }
           else
           {
              balls[n]->yspeed = -1 * rand() % 6 + 1;
              balls[num]->yspeed = rand() % 6 + 1;
           }
         }
       }
     }
}
The main function has been modified extensively from the original version in SpriteGrabber to accommodate multiple sprites and calls to the collision functions, so I'll provide the complete main function here. This is similar to the previous version but now includes for loops to handle the multiple sprites on the screen, in addition to calling the collision routine.
int main(void)
{
  BITMAP *temp;
  BITMAP *buffer;
  int n;
  //initialize
  allegro_init();
  set_color_depth(16);
  set_gfx_mode(MODE, WIDTH, HEIGHT, 0, 0);
  install_keyboard();
  install_timer();
  srand(time(NULL));

  //create second buffer
  buffer = create_bitmap(SCREEN_W, SCREEN_H);

  textout_ex(buffer, font, "CollisionTest Program (ESC to quit)",
      0, 0, WHITE, -1);

  //load sprite images
  temp = load_bitmap("sphere.bmp", NULL);
  for (n=0; n<32; n++)
      ballimg[n] = grabframe(temp,64,64,0,0,8,n);
  destroy_bitmap(temp);

  //initialize the sprite
  for (n=0; n<NUM; n++)
  {
      balls[n] = &theballs[n];
      balls[n]->x = rand() % (SCREEN_W - ballimg[0]->w);
      balls[n]->y = rand() % (SCREEN_H - ballimg[0]->h);
      balls[n]->width = ballimg[0]->w;
      balls[n]->height = ballimg[0]->h;
      balls[n]->xdelay = 0;
      balls[n]->ydelay = 0;
      balls[n]->xcount = 0;
      balls[n]->ycount = 0;
      balls[n]->xspeed = rand() % 5 + 1;
      balls[n]->yspeed = rand() % 5 + 1;
      balls[n]->curframe = rand() % 32;
      balls[n]->maxframe = 31;
      balls[n]->framecount = 0;
      balls[n]->framedelay = 0;
      balls[n]->animdir = 1;
  }

  //game loop
  while (!key[KEY_ESC])
  {
    //erase the sprites
    for (n=0; n<NUM; n++)
        erasesprite(buffer, balls[n]);

    //update the sprites
    for (n=0; n<NUM; n++)
    {
        updatesprite(balls[n]);
        bouncesprite(balls[n]);
        checkcollisions(n);
    }

    //draw the sprites
    for (n=0; n<NUM; n++)
        draw_sprite(buffer, ballimg[balls[n]->curframe],
            balls[n]->x, balls[n]->y);

    //update the screen
    acquire_screen();
    blit(buffer,screen,0,0,0,0,buffer->w,buffer->h);
    release_screen();

    rest(10);
  }

  for (n=0; n<32; n++)
      destroy_bitmap(ballimg[n]);

  allegro_exit();
  return 0;
}
END_OF_MAIN()
You have now learned about as much as I can teach you about sprites! You have learned about sprite sheets, sprite animation, compressed sprites, compiled sprites, and many other things along the way. One of the problems with all of this code is that it's all over the place and hard to reuse without copying and pasting large portions of code from one project to another. You might have done some of that while creating the projects in this chapter. A far easier solution is to package all of this sprite code into a C++ class. By encapsulating all of the sprite code inside a class, we can “wrap up” all of that code, reign it in, and make it more useful in a single location. At the same time, a sprite class opens up the possibility to create a new sprite handler too.
Let's jump into some code to see how a sprite class looks. I'll go over the first sprite class first, and then explain the sprite handler class next. We'll demonstrate it with an example program afterward. First up is the header file for the sprite class. Every C++ class should be defined inside a header file. Now, if you are an experienced C++ programmer, the first thing you're going to do is scream at my use of public properties (such as x and y) in the sprite class. I'm fully aware of the “problem.” I've been writing C++ code for many years, and did this intentionally. The first step to wrapping something in a class is to get it working, especially when you're wrapping existing code. I want to convert one of the previous examples to use the sprite class with a minimum of fuss. After the class has been fully tested and demonstrated, then we'll write the accessor/mutator functions and hide away those public properties.
First up is the header file, which is called sprite.h. This header just defines the structure of the class by describing the properties (variables) and methods (functions).
#ifndef _SPRITE_H
#define _SPRITE_H 1

#include <allegro.h>

class sprite {
private:
public:
    int alive;
    int state;
    int objecttype;
    int direction;
    double x,y;
    int width,height;
    double velx, vely;
    int xdelay,ydelay;
    int xcount,ycount;
    int curframe,totalframes,animdir;
    int framecount,framedelay;
    int animcolumns;
    int animstartx, animstarty;
    int faceAngle, moveAngle;
    BITMAP *image;

public:
    sprite();
    ~sprite();
    int load(char *filename);
    void draw(BITMAP *dest);
    void drawframe(BITMAP *dest);
    void updatePosition();
    void updateAnimation();
    int pointInside(int px,int py);
    int collided(sprite *other, int shrink);
};
#endif
Now we'll look at the implementation file, sprite.cpp, containing the sprite class methods.
#include <allegro.h>
#include "sprite.h"

sprite::sprite() {
    image = NULL;
    alive = 1;
    direction = 0;
    animcolumns = 0;
    animstartx = 0;
    animstarty = 0;
    x = 0.0f;
    y = 0.0f;
    width = 0;
    height = 0;
    xdelay = 0;
    ydelay = 0;
    xcount = 0;
    ycount = 0;
    velx = 0.0;
    vely = 0.0;
    speed = 0.0;
    curframe = 0;
    totalframes = 1;
    framecount = 0;
    framedelay = 10;
    animdir = 1;
    faceAngle = 0;
    moveAngle = 0;
}

sprite::~sprite() {
    //remove bitmap from memory
    if (image != NULL)
       destroy_bitmap(image);
}

int sprite::load(char *filename) {
      image = load_bitmap(filename, NULL);
      if (image == NULL) return 0;
      width = image->w;
      height = image->h;
      return 1;
}

void sprite::draw(BITMAP *dest)
{
      draw_sprite(dest, image, (int)x, (int)y);
}

void sprite::drawframe(BITMAP *dest)
{
    int fx = animstartx + (curframe % animcolumns) * width;
    int fy = animstarty + (curframe / animcolumns) * height;
    masked_blit(image,dest,fx,fy,(int)x,(int)y,width,height);
}

void sprite::updatePosition()
{
    //update x position
    if (++xcount > xdelay)
    {
       xcount = 0;
       x += velx;
    }

    //update y position
    if (++ycount > ydelay)
    {
       ycount = 0;
       y += vely;
    }
}

void sprite::updateAnimation()
{
    //update frame based on animdir
    if (++framecount > framedelay)
    {
       framecount = 0;
           curframe += animdir;

           if (curframe < 0) {
           curframe = totalframes-1;
           }
           if (curframe > totalframes-1) {
           curframe = 0;
     }
   }
}

int sprite::inside(int x,int y,int left,int top,int right,int bottom)
{
    if (x > left && x < right && y > top && y < bottom)
       return 1;
    else
       return 0;
}

int sprite::pointInside(int px,int py)
{
    return inside(px, py, (int)x, (int)y, (int)x+width,
      (int)y+height);
}
int sprite::collided(sprite *other, int shrink)
{
    int wa = (int)x + width;
    int ha = (int)y + height;
    int wb = (int)other->x + other->width;
    int hb = (int)other->y + other->height;

    if (inside((int)x, (int)y, (int)other->x+shrink,
     (int)other->y+shrink, wb-shrink, hb-shrink) ||
     inside((int)x, ha, (int)other->x+shrink,
       (int)other->y+shrink, wb-shrink, hb-shrink) ||
     inside(wa, (int)y, (int)other->x+shrink,
       (int)other->y+shrink, wb-shrink, hb-shrink) ||
     inside(wa, ha, (int)other->x+shrink,
       (int)other->y+shrink, wb-shrink, hb-shrink))
       return 1;
    else
       return 0;
}
Okay, great! Now let's look at the sprite handler class. The sprite handler is a convenience, really. It helps to clean up the source code of a game by moving most of the sprites into a central repository, a sort of storage bin where the sprites are stored together. This early version of the sprite handler will just use a large array to hold the sprites. In the future, this array can be replaced with a more advanced construct, like a linked list. A linked list is a chain of objects, with the capability of inserting and deleting chains at any point, and accessing any link in the chain. But a simple array will do just fine for now. Type this code into a new file called spritehandler.h.
#pragma once
#include "sprite.h"

class spritehandler
{
private:
       int count;
       sprite *sprites[100];
public:
       spritehandler(void);
       ~spritehandler(void);
       void add(sprite *spr);
       void create();
       sprite *get(int index);
       int size() { return count; }
};
Are you curious about the functions in the sprite handler class definition? The add method will add a sprite to the handler. When you do this, you can delete the sprite because you don't need to keep a separate copy of a sprite after you've added it to the handler. The create function will construct a new sprite internally within the handler directly, without the need to add an external sprite. The get function returns a sprite object as a pointer, so you can access the properties and methods of the sprite inside the handler, or you can copy the sprite out of the handler (to a local pointer) and use it if you want. The size property returns the number of sprites that have been added. Note that there is no way to replace or delete a sprite from the handler. We can add that code if needed in the future, but for now this will suffice. Type this code into a file called spritehandler.cpp.
#include "spritehandler.h"

spritehandler::spritehandler(void)
{
   count = 0;
}

spritehandler::~spritehandler(void)
{
   //delete the sprites
   for (int n = 0; n < count; n++)
       delete sprites[n];
}

void spritehandler::add(sprite *spr)
{
   if (spr != NULL) {
       sprites[count] = spr;
       count++;
   }
}

void spritehandler::create()
{
   sprites[count] = new sprite();
   count++;
}

sprite *spritehandler::get(int index)
{
   return sprites[index];
}
The SpriteClass program demonstrates how to use the sprite and spritehandler classes. This program was adapted directly from the MultipleSprites program from the previous chapter, so you may review that program and compare it to this listing to see the difference the sprite classes have made. For a simpler example with just one sprite, the code would have been very small. As you'll recall from the last chapter, the MultipleSprites program had a very complex collision function that would cause the balls to bounce off each other somewhat realistically. That code accounts for the bulk of the lines in the listing that follows (and it has been adapted to use the sprite classes). After all the stuff we've done with sprites, this new code is awe-inspiring! At least, I think it is. I'll highlight the key portions of code that have been impacted by the sprite classes.
#include <stdio.h>
#include "allegro.h"
#include "sprite.h"
#include "spritehandler.h"

#define BLACK makecol(0,0,0)
#define WHITE makecol(255,255,255)

#define NUM 20
#define WIDTH 800
#define HEIGHT 600
#define MODE GFX_AUTODETECT_WINDOWED
//define the sprite handler object
spritehandler *balls;

void bouncesprite(sprite *spr)
{
    //simple screen bouncing behavior
    if (spr->x < 0) {
        spr->x = 0;
        spr->xspeed = rand() % 2 + 4;
        spr->animdir *= -1;
    }
    else if (spr->x > SCREEN_W - spr->width)
    {
        spr->x = SCREEN_W - spr->width;
        spr->xspeed = rand() % 2 - 6;
        spr->animdir *= -1;
    }
      if (spr->y < 20) {
       spr->y = 20;
       spr->yspeed = rand() % 2 + 4;
       spr->animdir *= -1;
     }
     else if (spr->y > SCREEN_H - spr->height) {
       spr->y = SCREEN_H - spr->height;
       spr->yspeed = rand() % 2 - 6;
       spr->animdir *= -1;
     }
}

void checkcollisions(int num)
{
  int cx1,cy1,cx2,cy2;
  for (int n=0; n<NUM; n++) {
    if (n != num && balls->get(n)->collided(balls->get(num)))
    {
      //calculate center of primary sprite
      cx1 = balls->get(n)->x + balls->get(n)->width / 2;
      cy1 = balls->get(n)->y + balls->get(n)->height / 2;

      //calculate center of secondary sprite
      cx2 = balls->get(num)->x + balls->get(num)->width / 2;
      cy2 = balls->get(num)->y + balls->get(num)->height / 2;
      //figure out which way the sprites collided
      if (cx1 <= cx2) {
       balls->get(n)->xspeed = -1 * rand() % 6 + 1;
       balls->get(num)->xspeed = rand() % 6 + 1;
       if (cy1 <= cy2) {
           balls->get(n)->yspeed = -1 * rand() % 6 + 1;
           balls->get(num)->yspeed = rand() % 6 + 1;
       }
       else {
          balls->get(n)->yspeed = rand() % 6 + 1;
          balls->get(num)->yspeed = -1 * rand() % 6 + 1;
      }
     }
     else {
       //cx1 is > cx2
       balls->get(n)->xspeed = rand() % 6 + 1;
       balls->get(num)->xspeed = -1 * rand() % 6 + 1;
       if (cy1 <= cy2) {
           balls->get(n)->yspeed = rand() % 6 + 1;
           balls->get(num)->yspeed = -1 * rand() % 6 + 1;
     }
     else {
        balls->get(n)->yspeed = -1 * rand() % 6 + 1;
        balls->get(num)->yspeed = rand() % 6 + 1;
     }
    }
   }
  }
}

int main(void)
{
    sprite *ball;
    BITMAP *bg;
    BITMAP *buffer;
    int n;

    //initialization
    allegro_init();
    set_color_depth(16);
    set_gfx_mode(MODE, WIDTH, HEIGHT, 0, 0);
install_keyboard();
install_timer();
srand(time(NULL));

//create back buffer
buffer = create_bitmap(SCREEN_W, SCREEN_H);

//load background
bg = load_bitmap("bluespace.bmp", NULL);
if (!bg) {
    allegro_message("Error loading background");
    return 1;
}

//create the sprite handler
balls = new spritehandler();

//create the ball sprites
for (n=0; n<NUM; n++) {
    //create new ball sprite
    ball = new sprite();

    //load the ball image
    if (!ball->load("sphere.bmp")) {
       allegro_message("Error loading ball image");
       return 1;
    }

    //set sprite properties
    ball->x = rand() % (SCREEN_W - 64);
    ball->y = rand() % (SCREEN_H - 64);
    ball->width = 64;
    ball->height = 64;
    ball->xspeed = rand() % 5 + 1;
    ball->yspeed = rand() % 5 + 1;
    ball->animcolumns = 8;
    ball->curframe = rand() % 32;
    ball->totalframes = 31;
    ball->animdir = 1;

    //add this sprite to the handler
    balls->add(ball);
}
     //game loop
     while (!key[KEY_ESC]) {
         //draw the background
         blit(bg, buffer, 0, 0, 0, 0, WIDTH, HEIGHT);

         //print the program title
         textout_ex(buffer, font, "SpriteClass Program (ESC to quit)",
             0, 0, WHITE, -1);

         //update positions and animations
         for (n=0; n<NUM; n++) {
             balls->get(n)->updatePosition();
             balls->get(n)->updateAnimation();
             bouncesprite(balls->get(n));
             checkcollisions(n);
        }

        //draw the sprites
        for (n=0; n<NUM; n++)
            balls->get(n)->drawframe(buffer);

        //update the screen
        acquire_screen();
        blit(buffer,screen,0,0,0,0,WIDTH,HEIGHT);
        release_screen();
        rest(10);
    }

    //shutdown
    destroy_bitmap(buffer);
    destroy_bitmap(bg);
    delete balls;
    allegro_exit();
    return 0;
}
END_OF_MAIN()
The classical way to move a game object (namely, a sprite) on the screen in a typical 2D game is with the use of a velocity variable for X and Y:
int x, y;
int velx, vely;
This works well in a classic 2D game, such as an arcade-style vertical shooter, a single-screen game, a horizontal platform game, and the like. But using a velx and vely variable for movement results in unnatural jerkiness for game objects.
For instance, somewhere in your while loop . . .
x += velx;
y += vely;
The velx and vely variables are set to specific values such as 1, 2, or more. These represent the number of pixels that the sprite will move by in a single iteration of the game loop.
One solution is to add a delay value for both X and Y, so that a game sprite will move more realistically:
if (++CounterX > DelayX) {
    CounterX = 0;
    x += velx;
}
The trick, then, is to fine-tune DelayX and velx to values appropriate for the object you are trying to animate in the game.
What's another glaringly obvious problem with integer-based sprite motion? When you write a side-view game, you typically have objects animated in the left and right orientation. But in a top-down game, you must account for 360-degrees of movement. This movement is usually simplified to just eight directions of motion: N, NE, E, SE, S, SW, W, and NW (see Figure 10.6).
This range of movement is grossly inefficient and does not even properly model the physical world that the game is simulating. Adding more angles of motion to 16 or 32 directions does improve the appearance of a game, but requires a huge amount of complex code to account for each direction.
A far better solution is to calculate the velocity values as floating-point numbers instead of setting them manually as integers. What if velx and vely are floating-point instead of integer based? By switching to a float or double, you can use values such as:
velx = 2.3455;
vely = 0.0023;
These values might be small, even fractional, but keep in mind . . . a game runs upwards of 60 frames per second. When iterated through a loop many times in a second, a sprite with these types of values will move!
The problem is figuring out which fractional values to assign to the velocity variables to account for many directions of travel. You could do that manually by playtesting to figure out which velocity values result in proper motion at a given angle, but this is tedious and imprecise.
A better method is to calculate these values!
Let me introduce you to two lovely functions that can help . . .
#include <math.h>
#define PI 3.1415926535

double calcAngleMoveX(double angle) {
    return (double) cos(angle * PI / 180);
}

double calcAngleMoveY(double angle) {
    return (double) sin(angle * PI / 180);
}
What you want to do is choose a direction angle (as a double or float) and then call calcAngleMoveX and calcAngleMoveY, pass the angle to these functions, and then you are given a velocity value for X and Y that is a floating-point value. The end result is a velocity for X and Y that is fractional, and you have the ability to move a sprite along any angle!
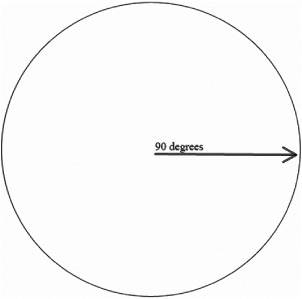
The following code listing demonstrates how to use these angular motion functions to move a sprite on the screen in any direction. Don't confuse the angular degrees with Allegro's 0–255 rotation degrees. We're working with the full 360 here—although it's necessary to convert from 360-degree numbers to 256-degree values (just for the rotate_sprite command). Figure 10.7 shows what the program looks like. Take note of the values printed in the upper-left corner of the screen in this figure. The ship is facing toward an angle of 51 degrees, which is somewhat close to the upper-right diagonal. The velocity values are 2.99 and –2.42 (for x and y, respectively), which is about what you'd expect for this direction, since the X position will be increasing, while the Y position will be decreasing at an equivalent negative value.
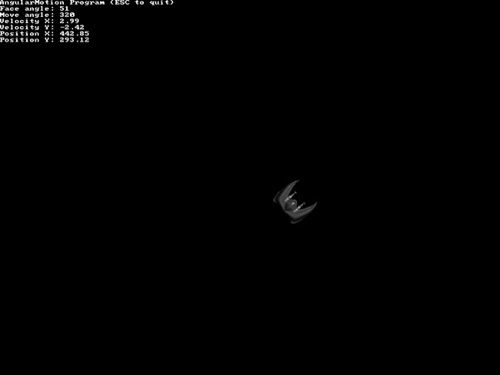
Figure 10.7. The AngularMotion program demonstrates how to calculate velocity on the fly based on the angle a sprite is facing.
#include <stdio.h>
#include "allegro.h"
#include "sprite.h"
#include "spritehandler.h"
#define BLACK makecol(0,0,0)
#define WHITE makecol(255,255,255)

#define NUM 20
#define WIDTH 800
#define HEIGHT 600
#define MODE GFX_AUTODETECT_WINDOWED

//define the sprite handler object
spritehandler *balls;

void bouncesprite(sprite *spr)
{
   //simple screen bouncing behavior
   if (spr->x < 0)
   {
      spr->x = 0;
      spr->velx = rand() % 2 + 4;
      spr->animdir *= -1;
   }

   else if (spr->x > SCREEN_W - spr->width)
   {
      spr->x = SCREEN_W - spr->width;
      spr->velx = rand() % 2 - 6;
      spr->animdir *= -1;
   }

   if (spr->y < 20)
   {
      spr->y = 20;
      spr->vely = rand() % 2 + 4;
      spr->animdir *= -1;
   }

   else if (spr->y > SCREEN_H - spr->height)
   {
      spr->y = SCREEN_H - spr->height;
      spr->vely = rand() % 2 - 6;
      spr->animdir *= -1;
   }
}
void checkcollisions(int num)
{
    int cx1,cy1,cx2,cy2;

    for (int n=0; n<NUM; n++)
    {
        if (n != num && balls->get(n)->collided(balls->get(num)))
        {
           //calculate center of primary sprite
           cx1 = (int)balls->get(n)->x + balls->get(n)->width / 2;
           cy1 = (int)balls->get(n)->y + balls->get(n)->height / 2;

           //calculate center of secondary sprite
           cx2 = (int)balls->get(num)->x + balls->get(num)->width / 2;
           cy2 = (int)balls->get(num)->y + balls->get(num)->height / 2;

           //figure out which way the sprites collided
           if (cx1 <= cx2)
           {
              balls->get(n)->velx = -1 * rand() % 6 + 1;
              balls->get(num)->velx = rand() % 6 + 1;
              if (cy1 <= cy2)
              {
                 balls->get(n)->vely = -1 * rand() % 6 + 1;
                 balls->get(num)->vely = rand() % 6 + 1;
              }
              else
              {
                 balls->get(n)->vely = rand() % 6 + 1;
                 balls->get(num)->vely = -1 * rand() % 6 + 1;
              }
        }
        else
        {
              //cx1 is > cx2
              balls->get(n)->velx = rand() % 6 + 1;
              balls->get(num)->velx = -1 * rand() % 6 + 1;
              if (cy1 <= cy2)
              {
                balls->get(n)->vely = rand() % 6 + 1;
                balls->get(num)->vely = -1 * rand() % 6 + 1;
              }
           else
           {
              balls->get(n)->vely = -1 * rand() % 6 + 1;
              balls->get(num)->vely = rand() % 6 + 1;
           }
        }
      }
    }
  }


int main(void)
{
    sprite *ball;
    BITMAP *bg;
    BITMAP *buffer;
    int n;

    //initialization
    allegro_init();
    set_color_depth(16);
    set_gfx_mode(MODE, WIDTH, HEIGHT, 0, 0);
    install_keyboard();
    install_timer();
    srand(time(NULL));

    //create back buffer
    buffer = create_bitmap(SCREEN_W, SCREEN_H);

    //load background
    bg = load_bitmap("bluespace.bmp", NULL);
    if (!bg) {
       allegro_message("Error loading background");
       return 1;
    }

    //create the sprite handler
    balls = new spritehandler();

    //create the ball sprites
    for (n=0; n<NUM; n++)
    {
     //create new ball sprite
     ball = new sprite();

     //load the ball image
     if (!ball->load("sphere.bmp")) {
         allegro_message("Error loading ball image");
         return 1;
     }

     //set sprite properties
     ball->x = rand() % (SCREEN_W - 64);
     ball->y = rand() % (SCREEN_H - 64);
     ball->width = 64;
     ball->height = 64;
     ball->velx = rand() % 5 + 1;
     ball->vely = rand() % 5 + 1;
     ball->animcolumns = 8;
     ball->curframe = rand() % 32;
     ball->totalframes = 31;
     ball->animdir = 1;

     //add this sprite to the handler
     balls->add(ball);
}

//game loop
while (!key[KEY_ESC])
{
    //draw the background
    blit(bg, buffer, 0, 0, 0, 0, WIDTH, HEIGHT);

    //print the program title
    textout_ex(buffer, font, "SpriteClass Program (ESC to quit)",
        0, 0, WHITE, -1);

    //update positions and animations
    for (n=0; n<NUM; n++)
    {
        balls->get(n)->updatePosition();
        balls->get(n)->updateAnimation();
        bouncesprite(balls->get(n));
        checkcollisions(n);
    }
       //draw the sprites
       for (n=0; n<NUM; n++)
           balls->get(n)->drawframe(buffer);

       //update the screen
       acquire_screen();
       blit(buffer,screen,0,0,0,0,WIDTH,HEIGHT);
       release_screen();
       rest(10);
     }

     //shutdown
     destroy_bitmap(buffer);
     destroy_bitmap(bg);
     delete balls;
     allegro_exit();
     return 0;
}
END_OF_MAIN()
This chapter was absolutely packed with advanced sprite code! You learned about a couple subjects that are seldom discussed in game programming books—compiled and compressed sprite images. Using run-length encoded sprites, your game will use less memory, and by using compiled sprites, your game will run much faster. But possibly the most important subject in this chapter is the discussion of collision detection and the mysterious but cool angular motion for moving sprites realistically (especially in a space environment). So, what comes next? The next chapter delves into ways to improve the game loop with timers and interrupt handling.
You can find the answers to this chapter quiz in Appendix A, “Chapter Quiz Answers.”