Before Opening RAW Files
And the flying saucer men, that’s the Ministry of Justice?
Before opening the door to RAW nirvana, it’s nice to have some idea of what’s on the other side. When processing RAW image files, you’re gonna have to deal with a few technical decisions regarding such subjects as bit depth and color space. If you’re not already familiar with these terms, this chapter provides some background to help you make decisions about what’s best for your photographs.
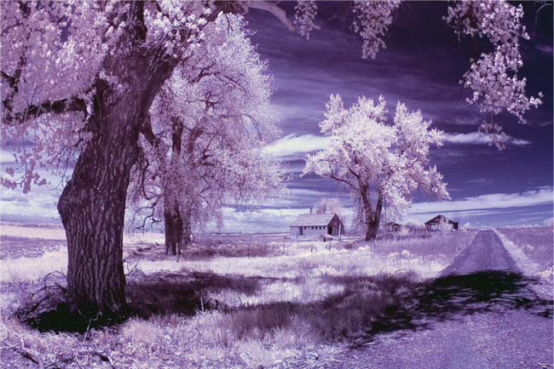
One way to extract the maximum image quality from cameras that don’t have lots of megapixels is to use RAW capture. The Canon EOS D30 that I had converted to capture images in digital infrared has a three-megapixel maximum resolution. By using RAW capture, I managed to extract the maximum image quality from those three megapixels. The completed IR image was later colored in Adobe Photoshop CS2 to create the tonalities you see here. © 2005 Joe Farace.
Note: The most important thing to keep in mind when reading this section is that I’ve tried to provide enough information about the choices you can make while working with RAW image files so that you can make up your own mind about how to produce the best looking images from your photographs. This is no “my way or the highway” approach here. Every reader’s image files and needs are different and out of necessity your choices and decisions will be different from mine. From time to time I may tell you how I prefer to do something, but that in no way represents the only way to accomplish anything; it’s just my preference. You may develop your own. My advice is to use all of the information that’s contained in this section to explore the capabilities of RAW image files to create your own unique vision.
Getting Started with Raw
I’ve been shooting with digital SLRs and digicams with RAW capture capability for some time, but only occasionally used that format when making photographs. Why? At the time, most of the software provided or sold to you by the camera manufacturers for the explicit purpose of working with RAW files were simply not that good, and were more often than not difficult and non-intuitive to use. Fortunately, this is finally starting to change.
This photograph was captured as a CRW (Canon Raw Format) file. It is an 8-bit file or 16 bits? Can you tell the difference? Image was made with Canon EOS D60 at 1/180 second and f/9.5 in Program mode at ISO 100. Lens was EF 22–55 f/3.5-mm zoom lens at 22mm. (Pssssst: it’s an 8-bit file.) © 2004 Joe Farace.
The process of converting from RAW to whatever format became more intuitive with the availability of Adobe Camera RAW. All of a sudden the Adobe software provided a logical progression from RAW capture to a working image onscreen. Once the jump into Camera RAW was accomplished, the next question became how many bits are enough?
I’ll be Back with You in a Byte
Computers are digital devices because they represent all data (including photographs) by using digits or numbers. These digits are measured as bits or binary digits. Binary is a mathematical system based on working only with the numbers one and zero. This is an ideal method for computers because electrical signals can be represented by current being either positive or negative, or off or on. Each electronic signal therefore becomes one bit, but to represent more complex numbers or images, computers combine these signals into 8-bit groups called bytes.
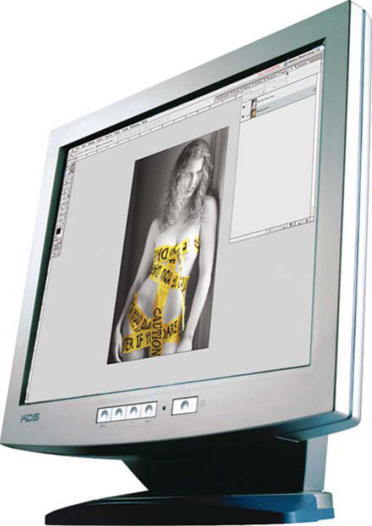
Monitors such as this KDS LCD (liquid crystal display) monitor have the capability to display millions of colors, but if you put your nose up to the screen you might see the digital equivalent of grain—pixels, or picture elements. © 2004 Joe Farace.
If you look closely enough at any traditional photographic print, you’ll see silver grain. Isn’t that what Antonioni’s classic film “Blow-Up” is about? When the hero enlarges a photograph to mural-sized proportions he’s unable to tell if the object he is looking at is a gun or several clumps of grain. If you get close enough at a photograph on a computer screen, you might see the digital equivalent of grain called pixels or picture elements. A computer screen is made up of thousands of pixels arranged in clusters or triads. Each triad is a combination of three colored dots placed close to one another. On the screen, combinations of these pixels produce all of the colors you see.
As we covered in another chapter, in a typical CRT (cathode ray tube) glass monitor three electronic “guns” fire three separate signals (one for each color) at the screen. If all three guns hit a single pixel’s location at equal intensity, it will appear white on the screen. If none of the guns hit a target pixel, it will be black. Similarly, the number of bits of data associated with each pixel determines the visual quality of a photograph and is measured as bit depth, not dynamic range, as it’s often mistakenly called. Bit depth refers to the number of bits assigned to each pixel, and thus how many varying colors can be applied to each pixel.
Should I Work with 16- or 8-Bit Files?
The simplest answer to that question is that the more bits you have, the higher quality you’ll get. Think of the decision as another version of the one facing film photographers. If a landscape photograph made with 35-mm film looks great, it will look even better on 4 × 5 sheet film, and even better than when shot with an 8 × 10 view camera. Capturing these larger film images isn’t easy. You can hardly pack an 8 × 10 view camera in the same case as a Canon EOS 1v, and as the physical demands increase so does the cost of processing these large film images, and storage becomes an issue too. Get the picture?
Large digital capture files create more issues too. The secret in making it all work is to find a balance between image size and quality that fits your workflow and expectations. Just as it did in computer selection, cost comes into account too. Much as an 8 × 10 Sinar view camera costs more than a Canon EOS 35-mm SLR, the digital tools needed to work on large image files are going to cost more too.
Eight or Sixteen?
The upside of working with 16-bit images is better image quality. I should say theoretically better, because it’s still up to you to capture a properly exposed and sharp image. The oft-heard quip, “just shoot it; I’ll fix it later in Photoshop” doesn’t work if you’re striving for maximum image quality. Since you start with a larger image file, there is less image degradation that can be created by the inevitable rounding errors that occur when a file is processed in an image-editing program. Image manipulation using 16-bit techniques take advantage of Photoshop’s floating-point operations (that’s the math stuff that happens inside the program) that produce smoother histograms and tonal transitions.
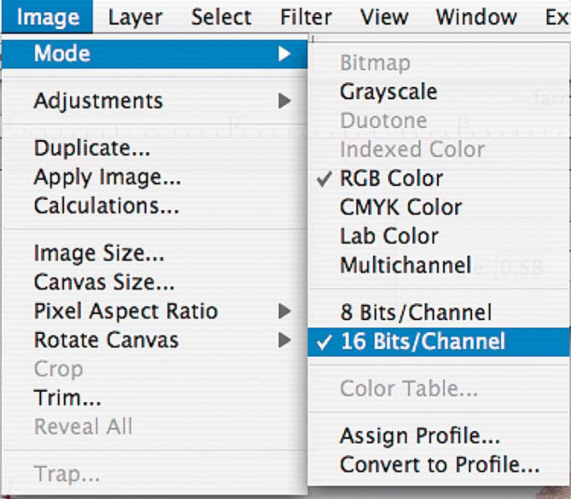
An 8-bit image offers 8 bits of data for each pixel and provides you with a palette of 256 colors. A 16-bit image provides more than 32,000 different colors for each pixel. In Adobe Photoshop, converting back and forth between 16- and 8-bit file formats is just a menu pull away (Image > Mode > 16 bits/Channel).
The downside of working in 16-bit mode is that fewer tools, especially third-party (see Chapter 9) Photoshop-compatible plug-ins, or “power tools,” will work in that mode. Then there is the “Incredible Hulk” factor. Bigger files take more space and demand more computing resources. That bargain computer you bought at Crazy Charlie’s Flea market ain’t gonna work that fast with 16-bit files, so you’re gonna need a state-of-the-art microprocessor in that computer, BIG hard drives, and recordable DVD drives to store all of those image files. At some point you will need to do something you may not be able to accomplish at 16 bits. When that happens you should save a copy and convert it into 8-bit mode, retaining your original 16-bit file in the project folder.
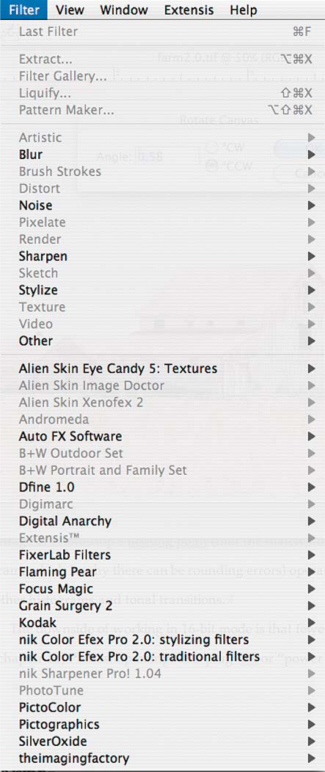
Here’s what the Filter menu looked like in Adobe Photoshop when a 16-bit file was opened. As you can see, many of Adobe’s, as well as most third-part compatible plug-ins, are not available and are “grayed out.”
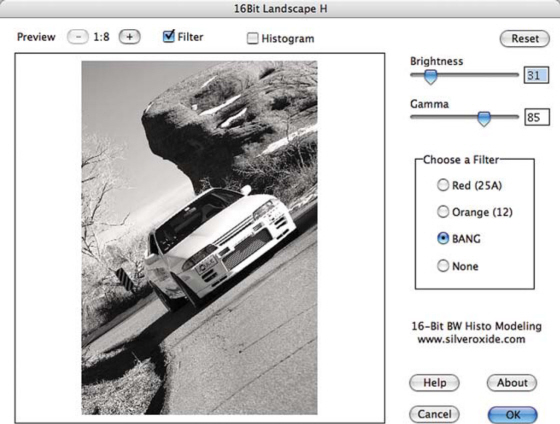
SilverOxide (www.silveroxide.com) offers a family of Photoshop-compatible plug-ins allowing digital images to emulate the tonalities of “real” analog film, such as Kodak’s classic Tri-X, or my favorite Panatomic X. Their 16-bit Landscape filter includes typical filter options, such as red, orange, and the ubiquitous none, but a new purely digital filter called BANG (Blue Algorithm Neutral Gray) acts like a polarizer. © 2004 Joe Farace.
Space: not Necessarily the Final Frontier
Computer monitors are RGB, meaning they build images out of red, green, and blue dots. This is known as additive color. Most popular desktop printers use CMYK inks to build images on paper. CMYK stands for cyan, magenta, yellow, and black, and is typically referred to as subtractive color. The software that drives the printer uses an RGB model to interpret the colors to CMYK, so you’re gonna need some help.
Standard RGB (sRGB) was developed to match a typical computer monitor’s color space, and is the default for Microsoft Windows XP and other software on the Windows platform. It is also the color space tucked inside most digital cameras.
The Adobe RGB color space is designed for printing using CMYK inks and includes a wider range of colors (gamut) than sRGB. Some digital cameras, especially SLRs, give you a choice of sRGB or Adobe RGB. Take time to look up how to change color space in your camera’s Users Guide.
ColorMatch RGB was originally based on the Gamma of the Radius PressView Monitor and is a color space that is smaller and less uniform than Adobe RGB (1998). Those photographers with archives of old scanned images will find this color space useful.
ProPhoto RGB has a larger gamut than Adobe RGB, which itself cannot represent some of the colors that can be captured by the newest digital SLRs. ProPhoto RGB has a large gamut that’s especially useful if your devices can display saturated colors.
All of these color spaces, except ProPhoto RGB, show some clipping, especially in the red channel, which means if you choose one of the other color spaces you will lose some data. Yet, most labs want sRGB files because their digital printers can output any pixel data as long as it fits inside their standard gamut space. Out-ofgamut colors will not be printed, and simply disappear. Try to avoid bouncing back and forth between color spaces because every time you convert a file you lose some data. If you want to use a color space that’s not listed in the Space menu, choose ProPhoto RGB, and then convert to the working space of your choice after the file opens in Photoshop.
Some photographers, especially those working under repeatable studio conditions, find that having camera profiles created for their specific camera is the best solution, and Camera RAW 3.0 is the first version that will let you do that before opening the image in Photoshop. You can read more about that in a later section of this chapter.
Other Voices, Other Options
With the introduction of 8GB CompactFlash cards (even if they aren’t all that cheap) and the availability of lots of different RAW format processing tools, it might seem that most serious photographers will only shoot RAW files. So why should we even care about other options such as the JPEG 2000 format mentioned in a previous chapter? It’s like this Bunky, out here in the real world sometimes size does matter. Files have to be distributed, e-mailed, and archived, and even with Terabyte-sized hard drives, some kind of compression strategy is going to be required.
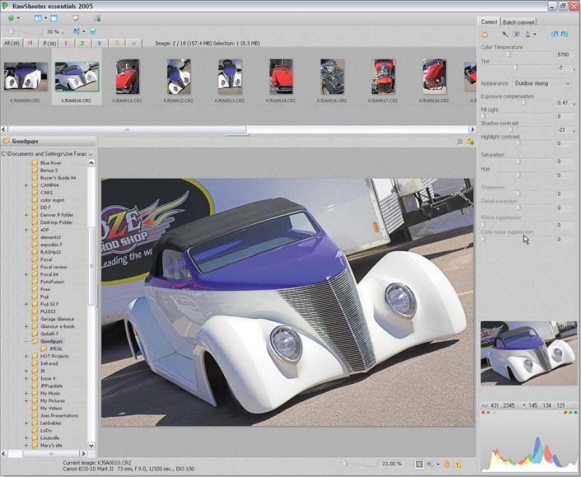
Pixmantec (www.pixmantec.com) RawShooter essentials 2006 and RawShooter premium 2006 1.02 offers many new features and is compatible with the most digital SLRs including the Nikon D200, Canon EOS 5D, 1Ds Mark II, and 1D Mark II N, Sony R1 and other brands and models. RawShooter essentials 2006 is a free download. RawShooter Premium 2006 includes the ability to make sideby-side comparisons of similar images taken seconds apart. It has an Integrated Downloader that quickly transfers RAW files from a card reader or other source to a target directory for instant viewing and color correction. Other features and functions include Interpolation, Noise Suppression software, Batch Renaming, Vibrance, and Color Balance Correction tools. A FastProof feature quickly (1 second per file) produces low-res proofs for approval. FastProofHQ creates high-resolution TIFF and JPEG RAW conversions as fast as one file every 2 seconds.
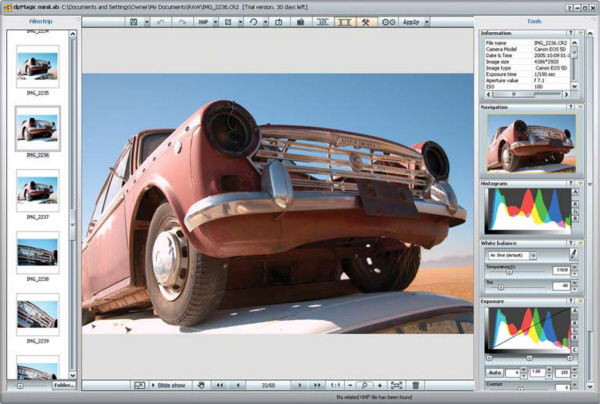
dpMagic miniLab (www.dpmagic.com) is a free product that allows adjusting, correcting, and converting RAW images and is based on industry standards like XMP. miniLab provides a non-destructive RAW workflow and lets you preview, adjust/correct, and save changes into XMP file without touching RAW originals. With dpMagic Plus ($9.95) you can preview RAW images as thumbnails or in fullscreen viewer, execute a slideshow, and view a histogram. Immediately after installing dpMagic, your system becomes aware of new file types. You can switch views in your folder to Thumbnail view and see thumbnails. Start a slideshow and you can flow through RAW files as if they were JPEGs. dpMagic CE provides basic Windows Shell extensions such as thumbnail support for RAW files.
RawShooter Essentials enables photographers to view, prioritize, and process large batches of RAW images in more than 50 different RAW formats. During conversion, you can apply image adjustments, including color and exposure corrections, sharpening, and noise suppression. The result is a set of TIFF or JPEG files that can be opened in anybody’s digital photography software where more advanced image enhancements can be made.
Adobe’s Lightroom consists of four modules. When you launch Lightroom it opens in Library mode for photo management. There’s even a digital loupe to check sharpness and a comparison feature that lets you select the best shot and assign a rating to your faves. Lightroom supports more than 100 camera RAW file formats, DNG, TIFF and JPEG, and after importing your photos, they’re placed into a “Shoot” and displayed on the left panel. The Library module includes a Quick Develop palette that lets you make minor corrections on color balance, brightness, and contrast along with a Convert Photograph to Grayscale tool that’s a lot better than what’s built into Photoshop. A Slideshow module enables you to create slideshows for onscreen viewing and exporting, and includes an interface with controls that let you create slick presentations as good as PowerPoint, only easier to assemble. The Print module provides many ways to set up your output, offering a set of templates as well as control palettes that exceed Photoshop’s built-in capabilities.
A subscription to the Windows-based dpMagic CE that supports RAW images produced by many digital cameras and costs $19.95 a year.
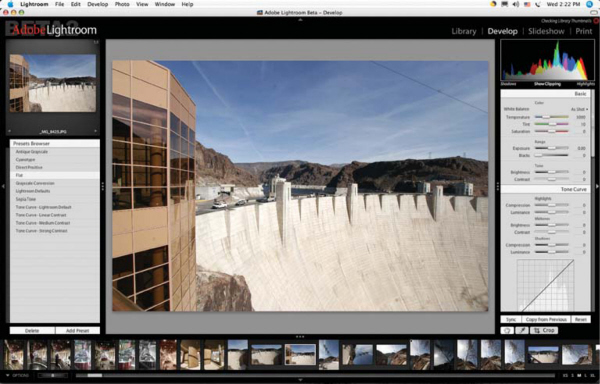
If you want to add effects or tweak the image file in Adobe Lightroom, just click into the Develop module where you can perform image adjustments, which unlike Photoshop, includes some built-in image tweaks. © 2006 Joe Farace.
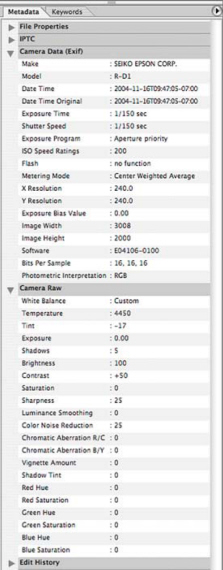
Exchangeable Image File (EXIF) format is an international standard that lets your digital SLR encode capture information, such as shutter speed, aperture, and the date and time the image was captured, into a JPEG file. Most, if not all digital cameras store images using EXIF-compressed files that use the JPEG DCT (discrete cosine transform) format which means the image data can be read by any application supporting JPEG, including Web browsers, image editors, desktop presentation programs, and document creation software.
JPEG algorithms, especially when used to compress sRGB files and used with a consumer-level image enhancement software, deliver much less color information than was originally captured by your camera’s sensor. EXIF 2.2 is designed to preserve the color range (gamut) that is normally reduced when using sRGB. In order to take advantage of these enhanced capabilities, your image-editing software must be able to open, edit, and print files captures using EXIF 2.2. Printers and software that support the Print Image Matching (www.printimagematching.com) standard take advantage of EXIF 2.2, which has been widely adopted.

This black and white photograph of Ashley Rae was made near the railroad track, but near an in-town crossing where the train is going slowly. A long lens was used to add compression so she is standing on a public street, not anywhere unsafely near the railroad tracks. © 2004 Joe Farace.
You can read EXIF data in Adobe Photoshop in Photoshop CS2’s Bridge image browser. When selecting any image file, its metadata will be displayed on the left-hand side of the screen. Here you can see the image data for the black and white photograph of Ashley Rae with complete technical details of how it was captured using an Epson RD-1 digital rangefinder camera.
|
sRGB Color Space: You Pays Your Money and Takes Yer Cherce |
|
|
Many digital SLRs give you a choice of capture in sRGB or Adobe RGB (a.k.a. Adobe RGB 1998). What’s the diff? sRGB was created in 1999 with a goal of producing color consistency between hardware devices. It defines a gamut of colors that represents each color well and can be used by CRT monitors, liquid crystal display (LCD) screens, scanners, printers, and digital cameras. sRGB has been incorporated into many Web browsers to make sure the colors on Web pages match the color scheme of the operating system. Because of the color consistency it creates, most hardware devices that work with images now use it as the default setting. All of which sounds very inviting, doesn’t it? |
Adobe RGB is designed for photographers whose work will appear in print and offers a broader range of colors than sRGB. If you want to get down and funky with the deals, download the full Adobe RGB specifications at www.color.org/adobergb.pdf. If you want to really make yourself crazy, you can Google “sRGB vs. Adobe RGB” and read opinions about it from a wide range of viewpoints. Being a pragmatist, I suggest you do the same thing with this color space argument as you do with the 8-bit vs. 16-bit controversy. Shoot some tests, make some prints, and then decide. This is the way we worked back in the film days and the methodology is still valid today, even if the tools are a little different. |
Eugene Delacroix once said “Artists who seek perfection in everything are those who cannot attain it in anything.” Opinions are far from unanimous on every aspect of digital image capture, with some dissenters on 16-bit capture arguing that there is no discernable difference between it and 8-bit images. Here’s my take on the whole deal: for many applications, an 8-bit image file may be all you need and, perhaps, the best of both worlds is to capture in 16 bits but work in 8. All of these decisions regarding color space and bit depth need to be part of your decision before you begin to think about opening a RAW file. If you want to see one way to open RAW files, turn the page. . .
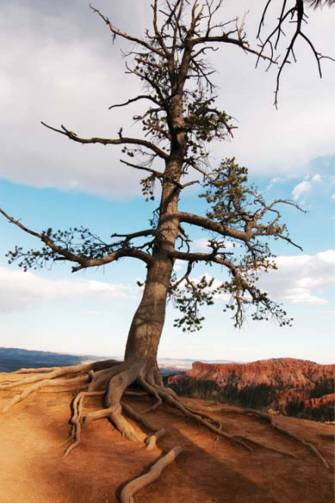
This photograph was made near dusk at Bryce Canyon Utah using a Pentax K100D and was shot as a PEF (Pentax RAW) file. Exposure was 1/500 second at f/8.0 and ISO 400. The Pentax 12–24-mm zoom lens was set at 19mm. © 2006 Joe Farace.