
3
Programming Using MicroPython
Now that you’ve had a very basic introduction to both the micro:bit’s hardware and how to write a program to it, let’s begin talking about how to actually write a program.
As of this writing, you can use at least six different coding environments to program your board: MicroPython, Microsoft PXT, Microsoft Block Editor, the Code Kingdoms JavaScript editor, Microsoft Touch Develop, and the mbed yotta integrated development environment (IDE). All of these languages have a JavaScript-based web environment you can use to create your programs, and for basic scripts that’s probably all you’ll need.
However, at some point you’re probably going to want to dig deeper into the micro:bit’s capabilities, and learning a more robust code is the best way to make that a bit easier.
I’m going to use this chapter to introduce you to MicroPython, my language of choice when it comes to programming the micro:bit. You may know from my previous books that I’m already a big fan of Python as a coding language, so discovering that there was a native Python-esque way to interact with the board made it a no-brainer, in my opinion, as to what language to use and teach. If you’ve never used Python before, MicroPython is a great introduction to the language. It’s a bit less feature-rich than full-fledged Python, but it’s exactly the same, syntax-wise, which means that lessons learned in this environment will carry over well should you decide to learn regular Python as well.
We’ll start with learning the web-based side of things, and then we’ll explore how to program MicroPython for the micro:bit directly on your computer.
The MicroPython Web Editor
To start with programming via the web, point your browser to http://microbit.org/code/. Choose the Python editor and click the “Let’s code” button. You’ll be taken to a web-based editing page that looks like Figure 3-1.
As you can see, there’s a (fully functional) example script already loaded for you. If you’d like to try it out, click the Download button. You’ll be prompted to save the resulting hex file to your computer.
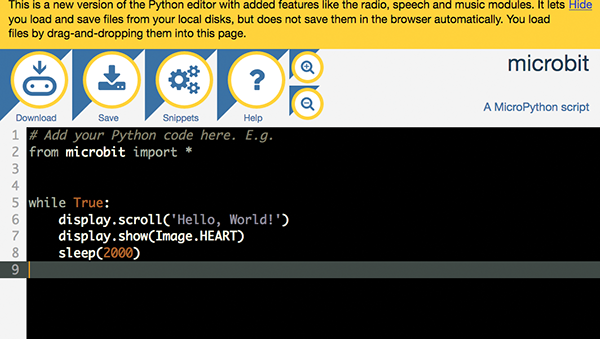
Figure 3-1: The MicroPython scripting page
Once it’s downloaded, connect your micro:bit if you haven’t already. It should show up as an external disc drive. Simply drag the downloaded hex file (unearthly-script.hex in this case) onto your micro:bit’s drive icon. The board will flash, and then you should be greeted with “Hello, World!” scrolling across the display, followed by a heart symbol.
A few icons are spaced across the top, so let’s take a look at them. The first one, My Scripts, takes you to a page where you can see the scripts you’ve been working with since you visited the page. If you’ve signed in with a micro:bit account, this is where all your saved scripts will go. You don’t need to create an account to use the editor, so creating one is up to you. The interface will save all your scripts until you close your browser, unless you’ve set your browser to save cookies; in that case, your scripts should remain saved indefinitely, which is nice. In any case, your scripts will save with names like extraordinary script, unearthly script, and so on. Unfortunately, there doesn’t seem to be a way to rename your scripts unless you download them.
To the right of the Download icon is the Snippets button. This is less helpful than you’d think; I was hoping for some functional examples, such as accessing the buttons or onboard sensors for the board. Instead, the Snippets button shows you some common Python functions you can use in your code, like while, with, class, if/then, and so on. If you’re new to the Python language, this can be useful, but if you’re looking for more information about the micro:bit-specific functions, you’ll want to skip ahead to the non-web-interface bit in the next section, where I discuss the mu programming environment. These snippets make the web interface act something like a regular IDE. Typing the first few letters of a Python keyword like import or if and then pressing the Tab key fills in the code for you. The interface also adds a helpful comment reminding you to fill it in (Figure 3-2).

Figure 3-2: Typing if and pressing Tab fills in the code for you.
Next to the Snippets button is the Help button, which takes you to (as you’d expect) an introductory web page—in another tab, luckily, so your current script is saved. This page walks you through the web-based interface, just like I’m doing now, and gives a few examples of some simple programs. In that sense, it provides more information than clicking the Snippets button.
Finally, there are two small icons on the right—the Zoom buttons. These let you enlarge or shrink the code, which is useful if you’re displaying your screen with a projector for a group, for example.
It’s important to remember that this is a fully functional programming interface, if a bit light in the documentation department. Once you’re familiar with what you can do with your micro:bit and the commands and functions needed to program it, the web interface can be a handy way of throwing a quick script together wherever you may happen to be and quickly flashing your board. I think this interface would be most useful for teaching in a group setting, where students can follow along with a teacher’s script and flash their boards without having to deal with installing a full IDE on their individual computers.
The mu Programming Environment
As I’ve already mentioned, the Python web interface is fine for some basic board programming, but there are some very good reasons for installing an IDE on your computer to do your programming. For one thing, you’ll be able to save your work to your local machine, making it easier to work in stages. For another, code completion can be extremely helpful when you’re just not sure what function you need or exactly what arguments are necessary when you’re calling a function. Most good IDEs have a code-completion feature, where you can enter the first few letters of a word and the IDE will suggest common functions and already-created variables that will fit. In a situation like this one, where you’re not sure what functions are available, code completion can come in very handy. The web interface has this functionality, but it’s extremely limited in its vocabulary. For instance, in the web interface, typing wh and pressing the Tab key will fill in the block:
while True:
       # TODO: write code...
This is nice, but chances are that if you type wh, you already know you’re planning to type while and the Tab completion is just a timesaver. However, if you type
display.show(Image.in the web interface environment, nothing happens, while in the mu programming environment we’re about to explore, the interface will clearly illustrate the possibilities that can follow Image. with a drop-down list.
As it turns out, there is a full IDE for MicroPython, and it’s called mu. It’s the basic development editor suggested by the micro:bit foundation for working with the board. It’s an easy download and installation process, and it works for Windows, Mac, and Linux. Point your browser to http://codewith.mu and scroll to the bottom of the page, where you can choose your operating system flavor. Download and install the correct version; Windows uses an .exe file, Mac has a .zip file, and Linux uses a .bin.
If you’re using a version of Windows earlier than Windows 10, after you run the EXE file, you’ll need to install an additional driver in order to make a serial port available with which to communicate with your micro:bit. Click the link on the Download page, and follow the instructions included. According to the mu website, if you’re using Windows 10 this step won’t be necessary. However, when I tried to access the micro:bit using my own Windows 10 installation, I had to install that driver in order for things to work, so bear that in mind.
If you’re using a Mac, download the .zip file to your local directory. When it’s finished, right-click it and choose Open. This will result in a mu application (Figure 3-3) appearing in the same directory as the downloaded .zip file, which you can then copy to your Applications folder. Depending on your security settings, the first time you run it you may get an error because it’s from an unsigned developer; if that’s the case, just open the Security & Privacy settings in your System Preferences and let your computer know that it’s all right to open the program.

Figure 3-3: The mu application
If you’re using a Linux box for your development, download the .bin file and save it to your local directory. Open a terminal, navigate to the directory you saved to, and type
chmod +x mu-0.9.13.linux.bin (or whichever version you have downloaded) in order to make it executable. Then just type
./mu-0.9.13.linux.bin to start the program.
Once you’ve installed mu, open it up, and you should see the window shown in Figure 3-4.
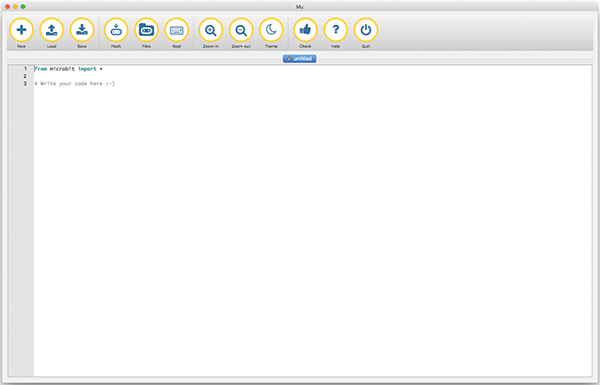
Figure 3-4: The mu editor
Now that you’ve got mu installed and open, let’s take a look at the interface. It’s designed to be very user-friendly and most of the icons are pretty self-explanatory. They also display a helpful dialog box if you hover your mouse over them. As you can see, some of them duplicate the web interface icons, since the web interface was designed to mirror the mu application.
On the left, the first group of three icons—New, Load, and Save—let you create, open, and save your script to your computer. Skipping the second group of three (we’ll get to those in a moment), Zoom-in, Zoom-out, and Theme in the next trio let you enlarge or shrink the text size, and switch back and forth between a light or a dark environment. In the final group, Check lets you check your code for mistakes before you flash it to the micro:bit, Help opens the page https://codewith.mu/help/0.9.13/ with your default browser, and Quit quits the mu application completely.
Now let’s return to that second group of icons: Flash, Files, and REPL. Flash is obvious—it loads the current working script onto the micro:bit board. Once you’ve got a working script in your window, just clicking the Flash button will load it onto your device. You should be aware of two things about this procedure, however. First, the code will be loaded onto your micro:bit whether or not you save it to your computer first. In other words, saving is not necessary to flash your board. Second, the code is uploaded without a prior check for errors. I say this because those among my readers who are familiar with using an Arduino may remember that the Upload button in the Arduino IDE first checks and compiles the code before uploading it to the Arduino. The mu interface, however, just uploads, errors or not. Because of this, it’s a good idea to get in the habit of using the Check button before uploading a script. If (when) you do upload faulty code, the micro:bit tries to helpfully tell you what’s wrong by scrolling messages across the board’s LED display. However, you can imagine how difficult it is to read Line 4 Name Error: Name 'shrubbery' is not defined when it shows one hard-to-read character at a time, slowly scrolling past:
...L...
...i...
...n...
...e...
...4...
...N...
...a...
...m...
...e...
...E...
...r...
...r...
...o...
...r...
…and so on. Please, get in the habit of checking your code.
Files and REPL are a bit more involved than the Flash button. Files allows you to view files that are currently on the micro:bit. Clicking this icon brings up two additional panes at the bottom of your window (Figure 3-5).

Figure 3-5: The Files interface
The left pane shows files available on your micro:bit, and the right pane shows files that are available in your local directory. If you’ve just opened mu for the first time and haven’t saved any files, you won’t see any files listed here. Try saving the open file as test.py and then close and reopen the Files window, and you should see test.py listed on the left.
REPL (Read-Eval-Print Loop) is perhaps the niftiest part of the mu IDE—it allows you to “live-program” your board, similar to an interactive Python session on your computer. To try it out, click the REPL button. (The Files interface and the REPL interface cannot be open at the same time; if you get an error message from the IDE, click the Files icon again to close the interface and then click REPL again.)
Your working window should split into two panes—an upper and a lower—where the lower pane is your interactive session. If you type help(), the display will scroll with a short introductory text, which gives you an idea of what you can do (Figure 3-6).

Figure 3-6: The REPL help() command
Try typing
display.scroll('Hello, World!') at the prompt. Your micro:bit should immediately scroll “Hello, World!” across the LEDs on the front. Typing
display.show(Image.HAPPY)should show a happy face. To wait two seconds, type
sleep(2000)And finally, to clear the display of the happy face, just type
display.clear()in the interactive window.
Feel free to play around with some different Python commands, but there’s an important (in my opinion) aspect of this programming environment, aside from being able to immediately test commands: the help() interactive command. Similar to Linux’s man pages, Python’s help() function can be a lifesaver, especially in a situation like this one where you’re not confident about how to use available functions. To illustrate, type help(Image) at the command prompt. The prompt immediately responds with a message about how to easily access each of the device’s LEDs in a grid pattern with a command like
Image (
   '09090:'
   '99999:'
   '99999:'
   '09990:'
   '00900: ')
which will display a heart. Even more useful is the information it gives that you can control the brightness of each individual LED by using numbers from 0 (off) to 9 (brightest). To test this, try entering the following at the prompt:
>>> x = Image('02468:02468:02468:02468:02468:')
>>> display.show(x)
You should be rewarded with each row of your display showing LEDs of increased brightness as they go to the left. In fact, let’s play with this newfound information. Close your REPL window by clicking the icon again, and then type the following code into your main window:
from microbit import *
a = Image('86420:86420:86420:86420:86420:')
b = Image('68642:68642:68642:68642:68642:')
c = Image('46864:46864:46864:46864:46864:')
d = Image('24686:24686:24686:24686:24686:')
e = Image('02468:02468:02468:02468:02468:')
while True:
    display.show(a)
    sleep(200)
    display.show(b)
    sleep(200)
    display.show(c)
    sleep(200)
    display.show(d)
    sleep(200)
    display.show(e)
    sleep(200)
    display.show(d)
    sleep(200)
    display.show(c)
    sleep(200)
    display.show(b)
    sleep(200)
Flash this to your micro:bit, and you should be rewarded with a line of dots moving back and forth across the display. (You can download this code from the GitHub repo here: https://github.com/wdonat/microbit-code/blob/master/chapter3/line.py.) You can also add this Python code directly to the online Python editor if you’d like to use it outside of the mu programming environment. Download the file from GitHub and then visit http://python.microbit.org/editor.html in your browser. Drag and drop the downloaded line.py file into the editor, press the Download button, save the line.hex file to your machine, and then flash it to your micro:bit board.
The code here is pretty simple. Variables a through d simply show a bright line at varying points on the display surrounded by progressively darker lines, and the while loop scrolls through each frame of the animation. There are two important lessons I should point out here, however. First of all, you may notice that you don’t need to import time as you would in a normal Python script. The microbit module has a built-in method, sleep, that you call instead of time.sleep. It takes milliseconds as an argument, so sleep(200) tells the board to wait for 200 milliseconds before continuing. Second, there is a weird syntax requirement you may notice as you attempt to upload or check your script. After the final line of code, you’ll need to press Enter/Return to create a newline, but then you can’t have any whitespace in that newline. The compiler requires a newline/carriage return at the end of the last line of the script, but nothing after that. Since your last line is in the middle of a while loop, after your last carriage return you’ll need to press Delete until your cursor is at the very beginning of the last line. It’s an idiosyncrasy that you’ll need to remember as you go along. You can flash code to your board with whitespace in the last line, but if you use mu’s Check icon, it’ll complain unless the whitespace is removed.
So there you have it: an introduction to writing Python code for (and directly to) your micro:bit. If you’d rather use a different coding language, I’ll go through a few of the other possibilities in Appendix 2. Now that you’re familiar with the programming environment, in the next chapter we’ll discuss a few basic projects, like writing text to the display and accessing the onboard sensors.