
B
Other Programming Environments
Perhaps you’re not a fan of Python (gasp!) or you’re not ready to take the leap into learning a full programming language and just want to play around with your micro:bit board using some easy-to-learn IDEs.
If that’s the case, you’re in luck. The Micro:bit Foundation currently has three other coding environments available for the micro:bit, aside from Python: the Blocks Editor (based on Microsoft’s Blocks environment), Code Kingdoms’ JavaScript, and Microsoft’s Touch Develop. All of these are fairly user-friendly, and in this appendix I’ll walk you through setting up and using each of them.
The Blocks Editor
The JavaScript-based Blocks Editor uses a user interface that’s not unlike puzzle pieces. In fact, if you’ve ever used the Scratch programming interface (it comes preinstalled on many Raspberry Pi distributions, for instance), you’ll probably recognize it right away. In the case of the micro:bit, programming puzzle pieces vary from basic (show number 0) to more intricate control of the LED array (plot x 0 y 0) to yet more advanced functionality like reading and writing data over a serial connection or controlling and reading from the GPIO pins. It’s designed the way it is to appeal to younger users, but honestly it’s a pretty attractive interface for adults, too. At first glance it appears to be rather simplistic, but the interface belies its actual capabilities.
To get started with Blocks, point your browser to https://makecode.microbit.org/. You’ll be greeted by the screen you see in Figure B-1.
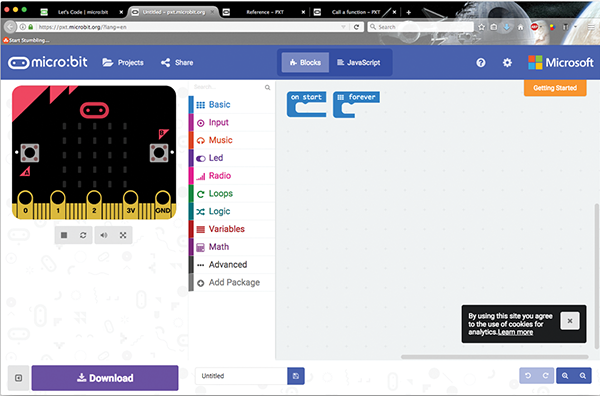
Figure B-1: The Blocks Editor screen
To create a script, you choose from the various categories in the middle, ranging from Basic to Input to Radio and Logic (see Table B-1 for a rundown of each category). Clicking on a category brings up a new screen with all of the puzzle pieces available to you (Figure B-2).
Table B-1: Categories and functions
| Category | Example functions |
| Basic | show leds, show icon, show string |
| Input | on button press, on shake, get temp |
| Music | play tone, start melody, change tempo |
| Led | plot (x,y), unplot (x,y), plot bar graph |
| Radio | send number, send string, receive value |
| Loops | repeat, while |
| Logic | if/then, if/then/else, and, or, not |
| Variables | create/set variables |
| Math | +, -, *, /, random numbers |
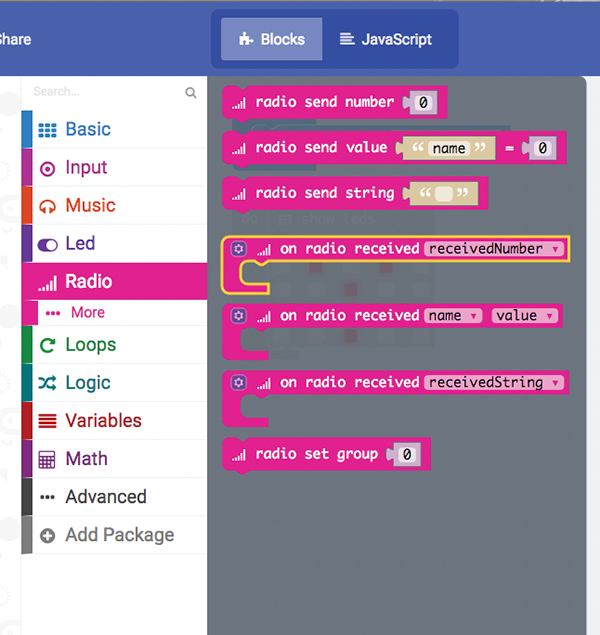
Figure B-2: The Radio pieces
You then drag and drop the blocks onto the right portion of the screen, where they fit together as you place them. Loops and conditionals, like while() and if(), are shaped with a “hole” in them (Figure B-3). Declarative statements, meanwhile, are shaped to fit inside those holes and are processed as part of the loop that encases them (Figure B-4). The outer loop piece will resize itself to fit around the inner portion if necessary (the show leds piece, for instance, is a pretty hefty piece).

Figure B-3: while() loop
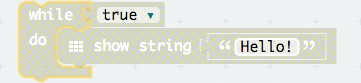
Figure B-4: Statement inside a while() loop
Make your selection from the list on the left, and drag it into the workspace on the right. Notice that if you hover over a piece after you place it, an information dialog pops up telling you not only what the piece does, but also how it would look if you were coding it in JavaScript (which is, after all, what the end result of this interface is—a JavaScript program).
Perhaps the best way to illustrate how this works is just to jump right in. Start by clearing out any blocks currently on the workspace by right-clicking them and selecting Delete Block. If you right-click on a loop piece that encases several other pieces, you’ll have the option of deleting the entire group, rather than having to do it one by one.
Once your workspace is clear, click the Basic category and drag the on start piece and the show leds piece. Drag the show leds piece into the on start piece until it clicks into position and the on start piece resizes to fit. (This can take some fiddling; I found that if you click on and drag the small indent at the top of the piece and drag it to the matching indent on the outer piece, it’ll click right into place.)
When your two pieces are interconnected, click on some of the squares in the show leds array—they’ll turn red as you click, meaning they’ll be lit when you start the program. When you’re satisfied with the design, leave those pieces and drag another one—let’s say the on button A pressed from the Input category—onto the workspace. Finally, go back to the Basic category and drag the show string "Hello" piece onto the board. Click on "Hello" and fill in whatever string you’d like to display. Then drag that piece into the slot on the on button pressed piece. When you’re done, your workspace should look like Figure B-5.
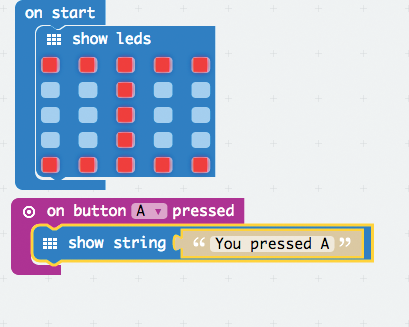
Figure B-5: Your first Blocks program
Now, before you download and flash your script, notice the picture of the micro:bit board on the left of your browser window. It most likely is currently displaying the design that you placed in your show leds puzzle piece. (If it’s not, click the replay icon to the left of the square below the micro:bit picture.) That’s because this image actually gives you a chance to preview the script you’ve written. If you now click the A button on the image with your mouse, the board will display the message you typed. If you’re satisfied with how everything looks, give the script a new name in the text box next to the Download button. Then click Download and save the hex file to your hard drive. Drag the file onto your micro:bit, and voilà! It should work exactly as the preview image did.
Keep experimenting with all of the pieces; as you can see, you can program some pretty complex behaviors with these simple puzzle pieces.
Code Kingdoms
Upon first inspection, out of all the programming environments Code Kingdoms seems to be the most kid-oriented (when you first bring it up, it shows a Minecraft-style loading screen). However, as with Code Blocks, the simplicity of the interface belies the complexity underneath, and it has more than a few hidden gems that are not immediately apparent. To get started, point your browser to https://www.microbit.co.uk/app/#create:tomwku (or bring up https://microbit.org/code/ and click the Code Kingdoms JavaScript icon at the bottom of the screen; see Figure B-6).

Figure B-6: Code Kingdoms icon
The interface is a bit more cluttered than Code Blocks (Figure B-7).
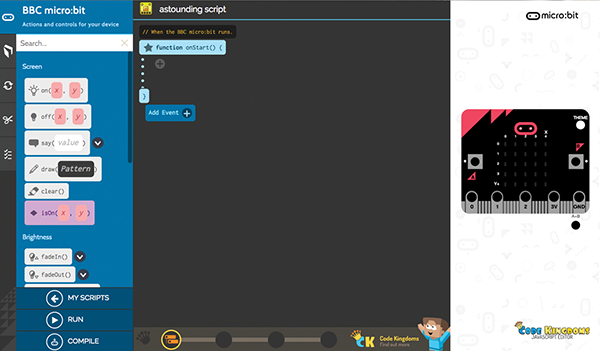
Figure B-7: Code Kingdoms workspace
The pieces and snippets you will use to code are on the left side of the screen. The workspace where you will work is in the middle, and the micro:bit preview application is on the right. On the far left of the screen are some additional icons; the top micro:bit logo icon is the default and shows the various actions and controls available for your script. The next icon down looks like a book and gives you access to some additional libraries: Math, Random, and Globals. Below that, the circling arrows logo gives access to control flow portions of script, such as threads, conditionals, and loops. The scissors icon below the book is where you can store snippets of code for later use, and finally the last icon in the column is a library of tutorials, ranging from a simple roll-the-dice game to a more complicated maze runner script.
Perhaps the neatest part of this interface is the slider you see across the bottom of the workspace. If you have some code loaded in the workspace, moving the slider changes the “complexity” (for lack of a better term) of the code shown. Moving the slider all the way to the left shows some simple icons relating to the code, and moving the slider all the way to the right shows the code only. Figure B-8 shows the same batch of code in all four slider positions.
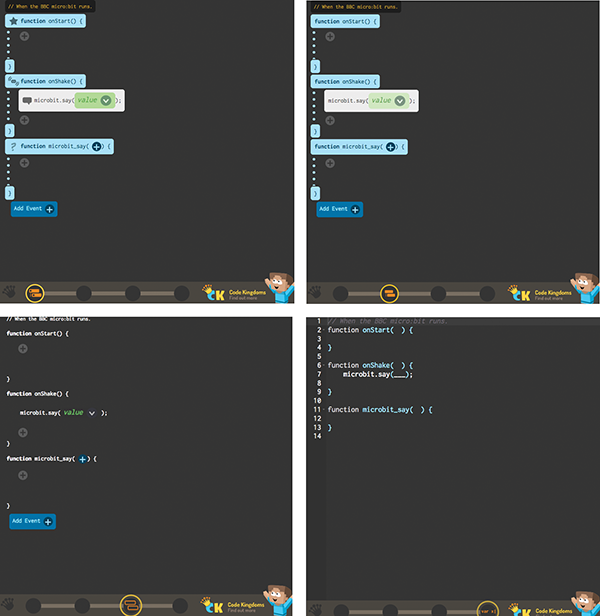
Figure B-8: Code in four slider positions
The idea here, obviously, is that you can become acquainted with the code behind the icons, and as you get more comfortable with coding, you can leave the graphic interface behind completely.
In the meantime, however, you can experiment with the interface with the slider set in the graphic mode. It’s a bit less intuitive, in my opinion, than the Code Blocks interface, but still very easy to use. When you first bring up the web page, you’ll see that the function onStart() is preloaded. This function encapsulates everything that you program so that it’ll run when the micro:bit powers on. You can create functions outside of this main function, of course, but just keep in mind that onStart() contains your main program, similar to the while True() statements we’ve used before. The Add Event button below it is where you’ll enter other functions, like roll_dice() from our craps game, for example.
To begin, click the micro:bit logo at the top left to make sure you’re in the Basic category, then click on the Draw (Pattern) icon and drag it into the workspace between the beginning and ending brackets ({ }) of the onStart() function. Then click on the word Pattern in parentheses and choose one of the many images available (Figure B-9). When you’ve chosen your image, click the green check mark to close the pop-up box.
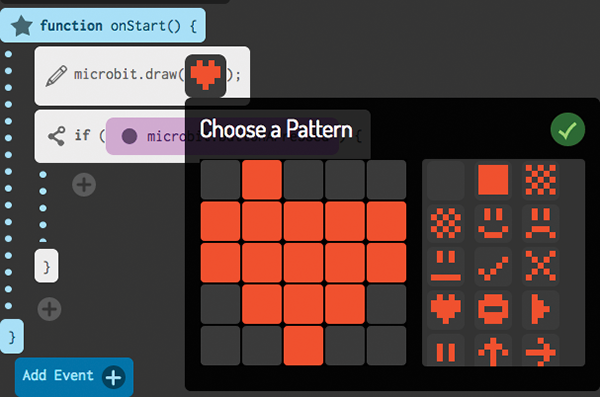
Figure B-9: Choosing an image to draw
Now let’s clear the screen after a few seconds. In the Control Flow section (the circling arrows at the extreme left of the screen), click the wait(milliseconds) piece and drag it into the onStart() function, underneath the microbit.draw() line. Click the word milliseconds and enter 2000. Then go back to the Basic category and drag the clear() button into the workspace.
You’re ready for the main program script. Back in the Control Flow section, find the while (test) { } button and drag it into your workspace underneath the existing code but still within the onStart() function brackets. Click on the small arrow by the word test and select true from the pop-up window (Figure B-10).
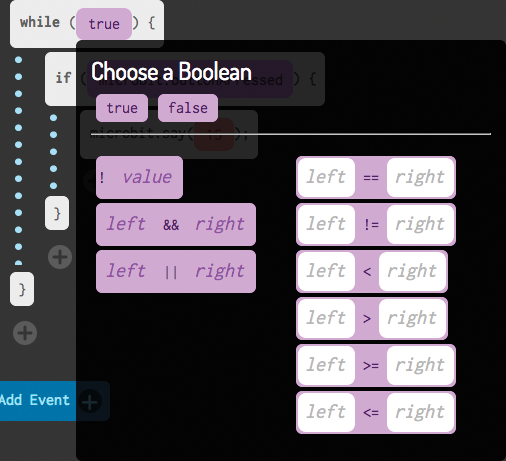
Figure B-10: Filling in the while() loop
Now click the circling arrows on the left to access the control flow blocks and find the if (test) { } conditional block. Drag it into the while(True) loop. Now go back to the Basic category on the left, scroll down to the System subcategory, and drag the buttonAPressed block onto the word test in purple on the if() conditional block. This is now akin to
if button_a.is_pressed():in Python. Select another simple task to perform when the A button is pressed, such as say(value). Then click on the value prompt and enter a string, such as "You pressed A!".
If at any point you make a mistake and need to delete a block, simply click on it and drag it away from the main code. A ghostly trash can will appear at the bottom right of the workspace, and you can drop the block into the can to delete it. You can also re-input any text or conditionals you’ve added just by clicking on them again inside the block; the pop-up you saw in Figure B-10 will reappear and allow you to choose a different value.
That’s it for a very simple program! If you’re curious to see what the actual code looks like, move the slider at the bottom all the way to the right, and you should see this:
function onStart() {
    microbit.draw(Pattern("01010.1111.1111.01110.00100"));
    wait(2000);
    microbit.clear();
    while (true) {
        if (microbit.buttonAPressed) {
            microbit.say("You pressed A!");
        }
    }
}
As you can see, it’s very similar to Python in commands, but you’re looking at pure JavaScript here. If you’re comfortable using JavaScript, you should definitely experiment more with the window in this configuration—there’s a lot you can do that isn’t necessarily available via the basic kid-friendly icons.
Finally, of course, you’ll want to preview the program and then load it onto your board. To preview it, click the Run button at the bottom right of the page. The interface will compile the script and—assuming everything compiles correctly—will then load it onto the simulated micro:bit on the right. You can’t test things like shake or compass headings, but you can make sure that button presses and displays work right.
If you’re satisfied, and if the code loaded without errors onto the simulated board, click the Compile button at the bottom to create an actual hex file. After a moment a pop-up window will let you know your script is ready to download, and you can save it and flash it onto your device.
That is a short introduction to the Code Kingdoms web-based coder. As I said, it’s a complex interface. Although it definitely presents a kid-friendly appearance, my experience has been that it really isn’t very intuitive, and it could definitely use some more fleshed-out tutorials. Still, you may like it, and I do like that it allows you to jump directly into coding in JavaScript.
Finally, let’s take a look at Microsoft’s Touch Develop.
Microsoft Touch Develop
To get started with the Touch Develop interface, point your browser to https://www.microbit.co.uk/app/#create:hrvbin. You’ll be greeted by the screen you see in Figure B-11.
Like the advanced side of the Code Kingdoms page, Touch Develop seems to be aimed at introducing you to the JavaScript foundations behind the scripts you will be writing. The workspace, complete with a starter script, takes up the majority of the page. At the bottom is where you’ll find the snippets, functions, and variables that you can put into your script, and on the right is the simulated micro:bit board where you can test your code before uploading it to your actual device.

Figure B-11: The Microsoft Touch Develop interface
There are two main ways to interact with your code: you can choose snippets from the bottom, which populates the script bit by bit, or you can actually click in the body of the script and type your code. When you start typing, however, you’re not left out in the cold; as soon as you type a letter, the interface gives you up to ten different suggestions as to what you might want to put there (Figure B-12 illustrates what happens when you type t, for example).
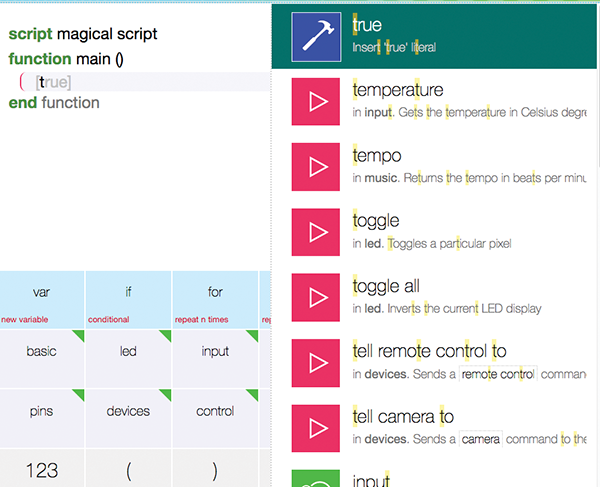
Figure B-12: Helpful suggestions from Touch Develop
If you just want to play with the available functions, using the buttons on the bottom is a good way to become acquainted with this interface. Starting from the welcome screen, make sure your cursor is blinking on the line directly below the function main() line. Click the led button at the bottom. The code will show the word led, along with the helpful prompt "we have a led here; did you want to do something with it?".
Ignoring the smart-aleck interface for a moment, if you look back at the bottom of the screen, you’ll see that it’s now populated with things you can do with that LED: plot, unplot, point, brightness, toggle, and so on. Clicking on plot, for example, continues to fill in the line of code with led → plot(0, 0), with the cursor blinking at the first 0. A horizontal bar at the bottom of the workspace now describes the function you’ve chosen, how to call it (its parameters), and what it does.
If you change your mind about a line of code, you can click on the line you don’t like and three icons will pop up, letting you paste, copy, or cut the code. Cut removes the line and lets you start over.
Some of the buttons at the bottom are self-explanatory, like declaring a variable or adding a for loop. Others, however, can take you deeper down the rabbit hole than you may care to go, at least until you’re more comfortable with the board and the interface. For example, try clicking the Game button.
Once again the interface asks if you’re going to do anything with that nice game object, but now the bottom of the page is filled with functions like create sprite and add score. Clicking the create sprite button adds the line game → create sprite(2, 2) to your code, which creates a new LED sprite pointing to the right. start countdown, on the other hand, adds the line game → start countdown(10000), allowing you to start a game countdown timer. Obviously you can use the Touch Develop interface to program an entire game from scratch, using the predeveloped libraries that Microsoft has made available to you.
If you click the magnifying glass icon located toward the top of the screen labeled “all APIs,” you’ll see a list of the various categories of events and functions that you can play with (Figure B-13) and a short description of what each one does. There’s a little bit of everything here, from basic functions like displaying strings, to controlling paired devices, to performing bitwise arithmetic on 32-bit integers. Clicking on any one of them brings up its associated variables and functions at the bottom of the screen.
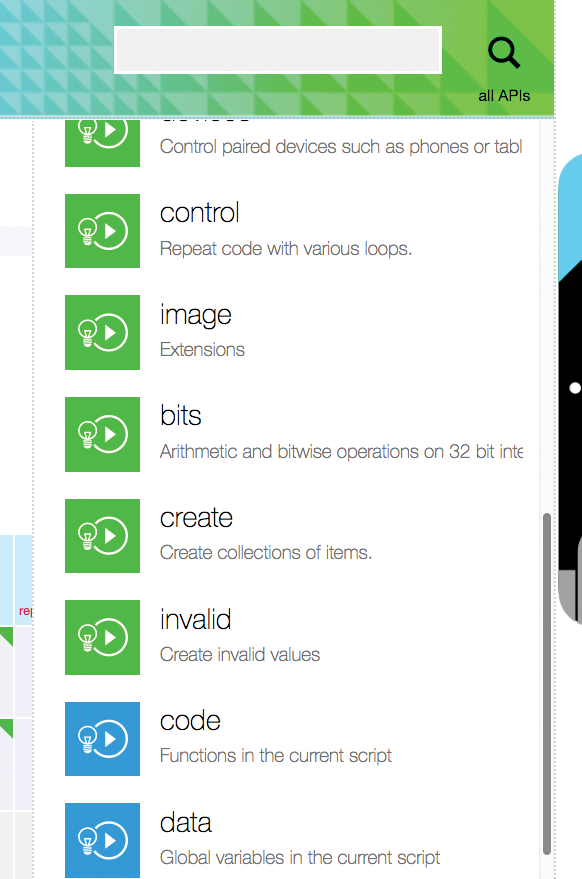
Figure B-13: Additional libraries of functions
Let’s create a basic script and upload it to our device. From the starting page, click on the empty line below function main() to bring up the row of functions at the bottom. Click the while button, which will automatically fill in the loop with the following:
while true do
    (add code here
    (basic → pause(20)
end while
Clicking on the add code here line will bring up the list of available functions again; choose the basic button and then show string. Type Hello, world! in the text box, and the line will autocomplete with basic → show string("Hello, world!", 150), which, according to the informational block, means that it will display the text, one character at a time, shifting by one column each 150 milliseconds.
That’s a good basic, introductory script. Click the Dismiss arrow at the top left of the screen, and you’ll see some new icons: My Scripts, Run Main, Compile, and Undo. The My Scripts button takes you to a page of scripts that you’ve worked on, Run Main runs your program on the simulated micro:bit board, Compile compiles the script so you can flash your board, and Undo reverses anything you may have done. Don’t worry about running this particular script on the simulator—it’s a very basic script, after all. Rather, click the Compile button and save the hex file when you see the message that it’s ready to download. Drag that downloaded file onto your micro:bit, and voilà! You’ve just used the interface! Your board should slowly scroll the text “Hello, world!”
There’s a ton more material here to go through, but this isn’t a book about these interfaces. All three listed here have some very good tutorials available; if you’re interested in learning more about them I highly recommend working through the online lessons. Personally, I prefer the Python and C++ environments (via mu and mbed), but these environments are just as effective.