
4
Some Basic Projects
Now that you’ve had an introduction to programming the micro:bit in Python, it’s time to start tackling some basic projects and getting used to interacting with the board and all of its inputs and outputs.
The LEDs
Probably the most visually interesting part of the micro:bit, obviously, is the 5×5 grid of bright red LEDs that take up the majority of the real estate on the front of the device. With these LEDs, you can print images, scroll text, and even play games. They are also important because we use them to display information (accelerometer data, instructions, and so forth) if the board is connected to an external device such as a smartphone.
You got a short introduction to using the LEDs in the previous chapter, but let’s see what else we can do with them.
To start, make sure you have mu installed on your system. Plug in your micro:bit and open up mu.
Text
Since the built-in functions take care of turning individual LEDs on and off for you, probably the easiest thing to display on the board is text. There are several different ways to display text, but all of them use the display() method. In a blank script, try entering the following:
from microbit import *
while True:
    display.show('Hello, world!')
    sleep(200)
    display.show('Hello, world!', 200)
    sleep(200)
    display.scroll('Hello, world!')
    sleep(200)
    display.scroll('Hello, world!', 200)
    sleep(200)
Press the Check button to check for errors in your code (I know, it’s a simple script, but it’s good to get in the habit of checking—remember, mu doesn’t check before uploading) and then flash the script to your board.
You’ll notice that these lines of code—display.show() and display.scroll()—are just different ways of showing a line of text. The first three implementations of the show() function show the letters in the string, one after another, on the LED matrix. The show() function takes five parameters, only one of which (the actual text string) is required. The function’s full parameters are
display.show(x, delay=400, wait=True, loop=False, clear=False)x is the string (or image, or character, or whatever) you want to display. delay (with a default value of 400) is the length of time in milliseconds between characters. wait (with a default value of True) determines whether or not the animation occurs in the background while other parts of the script continue (if wait is set to True, the rest of the script pauses while the animation takes place). loop’s default value of False means the text will only display once, and clear’s default value of False means the display will not empty after the last character displays.
The last few lines illustrate the scroll() method of displaying text, which—obviously—scrolls the letters across the matrix, marquee-style. Like show(), scroll() takes five parameters, only one of which is required. The function’s full parameter list is
display.scroll(string, delay=150, wait=True, loop=False, monospace=False)string is obviously the string you want to display (scroll() does not work with images the way show() does). delay is the length of time it takes each letter to show (smaller numbers mean a faster scroll). Again, wait determines whether or not the animation occurs in the background. loop’s default value of False again means that the animation will not repeat. Setting monospace to True means that each letter will always take no more than five pixel-columns as it scrolls.
Images
If you want to show images on the micro:bit’s LED matrix, the display.show() method is the one you’ll be using. Recall that the first parameter of show(), x, can be a string, an image, a character, or even a list. This means that you can declare a list:
x = ['1', 'a', '2', 'spam', 'eggs', str(5 + 6)]and then show each list member, one after another, with display.show(x). A caveat here is that show() can only display either strings or what MicroPython recognizes as Images; display.show(9) will throw an error (TypeError: not an image), as will display.show(Image.CLOVER) (Attribute Error: type object 'MicroBitImage' has no attribute 'CLOVER').
That being said, however, quite a few built-in images are available for you to play with, and you can always create your own the way we did at the end of the last chapter. More images are sometimes added by MicroPython developers, but the ones currently available on the micro:bit run the gamut from clock displays 12:00 through 11:00 (Figure 4-1) to arrows pointing in all directions, to happy and angry faces, to check marks and houses and rabbits and snakes and even Pac-Man (Figure 4-2).
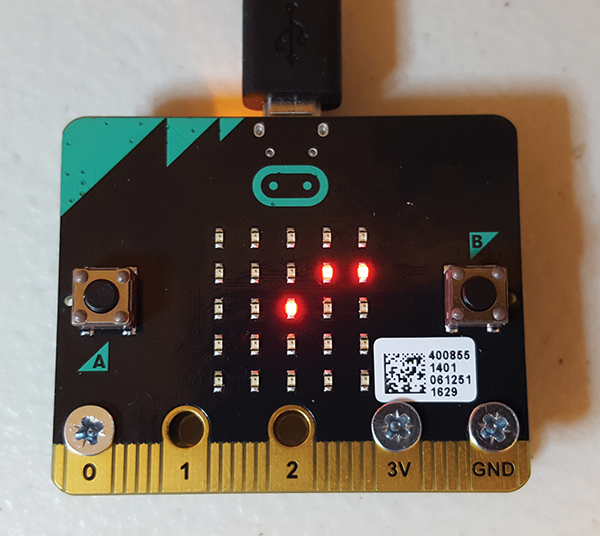
Figure 4-1: Image.CLOCK2 (two o’clock)
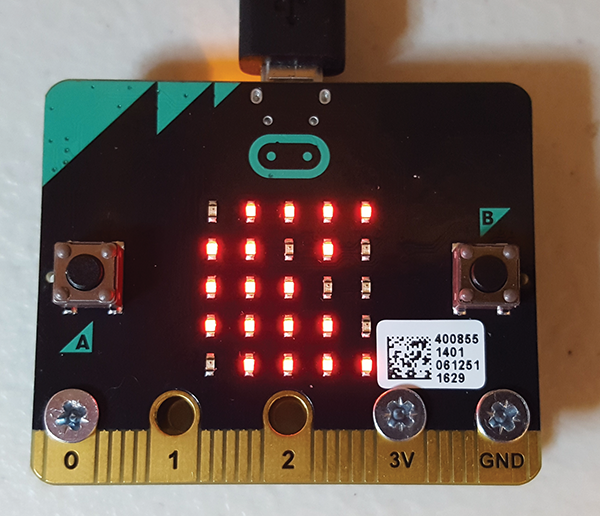
Figure 4-2: Image.PACMAN
The best way to display a list of what’s available is simply to start typing a line in mu and look at the code auto-fill suggestions. In your editor window, type
display.show(Image.and take a look at the pulldown menu that becomes available (Figure 4-3) as soon as you type the period after Image.
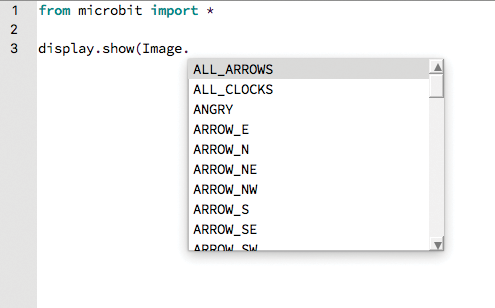
Figure 4-3: Available premade images
If you want to create an image that doesn’t appear in that list of ready-made pictures, creating one is not difficult. Probably the easiest is to use a matrix, the way we did at the end of Chapter 3, “Programming Using MicroPython.” You’re creating a MicroBit.Image object, which takes as a parameter a colon-separated list of pixel values, row by row. Those values can range from 0 (the faintest) to 9 (the brightest). In other words, you can create a square with an embedded X with the following commands in your REPL window:
>>> a = Image('99999:99099:90909:99099:99999:')
>>> display.show(a)
Figure 4-4 shows the result. In fact, if you’re interested, you can see exactly how each of the ready-made pictures are constructed by simply typing the name of the image in your command prompt and looking at the response. For example, typing Image.PACMAN returns
Image('09999:99090:99900:99990:09999:')It’s not terribly high-resolution, but by fiddling with the brightness of each individual pixel, you’d be surprised at just how much control you can have when it comes to creating images and animations.

Figure 4-4: Square with embedded X
For instance, creating an image with a bright pixel in the center, surrounded by gradually dimming pixels, and then “moving” that bright pixel around, can create a soothing effect. To see what I mean, download https://github.com/wdonat/microbit-code/blob/master/chapter4/animation.py, paste it into your mu window, and flash it onto your board. You can see a single frame of it in Figure 4-5.
You’ll see by looking at the code that you can create a list of images, and then use show() to animate that list with a specific delay. Setting loop equal to True ensures that it goes on forever.
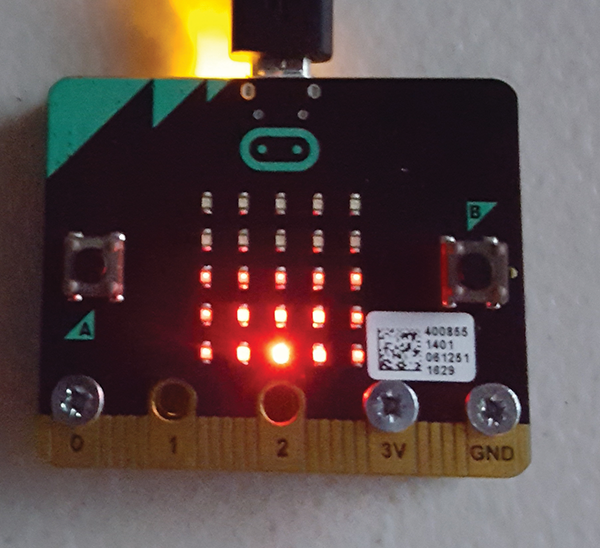
Figure 4-5: A single frame of pixel animation
You can also access the values of individual pixels using display.get_pixel(x, y). This function takes as a parameter the pixel location (column = x, row = y) and returns an integer from 0 to 9, 0 being off and 9 being the brightest.
That was a good introduction to creating text and images on your micro:bit. Now let’s move on to using the buttons.
The Buttons
The buttons labeled A and B on the front of the micro:bit board are momentary pushbuttons that can be used as inputs for various reasons: gameplay, responding to prompts, or various other possibilities. They’re accessed with MicroPython objects button_a and button_b, appropriately enough, and those objects have a few functions associated with them: get_presses(), is_pressed(), and was_pressed().
To get a feel for how they work, start a new mu script and enter the following:
from microbit import *
while True:
    if button_a.is_pressed():
        display.show(Image.HAPPY)
        sleep(500)
        display.clear()
    if button_b.is_pressed():
        display.show(Image.ANGRY)
        sleep(500)
        display.clear()
Save this and flash it to your micro:bit. As you’ve probably guessed, it simply responds to your button press with either a happy or an angry face, depending on which button you’ve pressed.
You can also keep track of things such as button presses using the get_presses() method. Again, in your mu window, try the following:
from microbit import *
while True:
    display.scroll("Press the A button a few times.")
    sleep(5000)
    display.scroll(str(button_a.get_presses()))
This is a remarkably simple script—while the board sleeps for five seconds, it counts how many times you press the A button, and then displays the count. Accessing the buttons on the micro:bit is pretty easy—there are only three functions to call, after all. Now let’s take a look at the sensors on board.
The Accelerometer
The micro:bit’s onboard accelerometer is one of the more nifty things about the board, because you can do a lot with it. It measures in three axes, which means it can sense movement about the X-axis (horizontal left and right), the Y-axis (horizontal forward and backward), and the Z-axis (up and down). You can read individual X-, Y-, and Z-values, or you can recognize gestures. The micro:bit recognizes eleven different gestures, all as strings: up, down, left, right, face up, face down, freefall, 3g, 6g, 8g, and shake. Most of these are self-explanatory, but 3g, 6g, and 8g are not. Basically, these gestures are registered when the board experiences those levels of G-force.
The G-force gestures may be difficult to experiment with (unless you feel like throwing your micro:bit against the wall), but we can use the seven built-in accelerometer methods to look at the other values that the device can send. These methods are get_x(), get_y(), get_z(), get_values(), current_gesture(), is_gesture(), was_gesture(), and get_gestures().
Let’s look at a few of those. With mu open and your board connected, click the REPL icon and connect to your board. At the prompt, type
>>> accelerometer.get_values()You should be rewarded with a Python tuple (a comma-separated list of values in parentheses) of three values—an X-component, a Y-component, and a Z-component, similar to this:
(272, 224, -960)Moving the board around and repeating the command should show you the differing values as you move it. These values are in milli-g’s—thousandths of a G.
At another prompt, type
>>> accelerometer.current_gesture() == "face up"This should return either True or False, depending on your board’s current orientation. However, you may get False, no matter how you maneuver the board. This may be a bug in the interactive Python interface; if this happens to you, don’t despair. Just try the script in the next paragraph to make sure your accelerometer is working the way it should.
This command, by the way, is an example of a Boolean conditional in Python. You could use this command in an if statement in a Python script, and it will return either True or False. You could then instruct your micro:bit to act accordingly. For instance, close your REPL window by clicking the icon, and enter the following code into your IDE window:
from microbit import *
while True:
    gesture = accelerometer.current_gesture()
    if gesture == "face up":
        display.show(Image.HAPPY)
    else:
        display.show(Image.ANGRY)
Flash this short program to your board. This script comes straight from the micro:bit MicroPython documentation on GitHub, and it simply tells your micro:bit to smile if it’s face up and frown if it’s not (Figure 4-6).
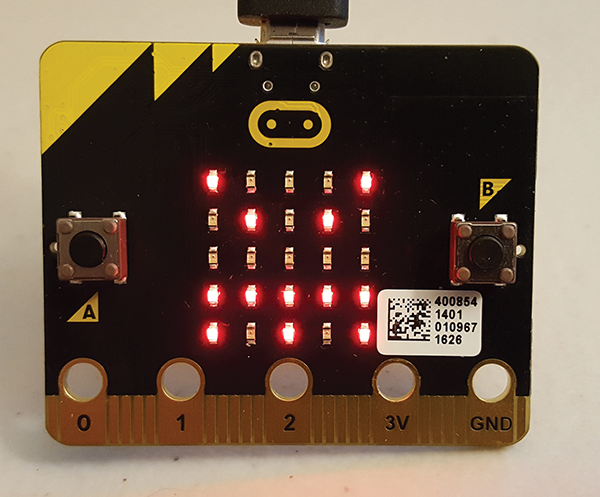
Figure 4-6: micro:bit unhappy at not being face up
Another useful function is was_gesture(), which lets you know if a certain gesture has been performed. To try this out, type the following into your mu window and flash it to your board:
from microbit import *
while True:
    display.show(Image.DIAMOND)
    if accelerometer.was_gesture("shake"):
        display.clear()
        sleep(1000)
        display.show(Image.YES)
        sleep(1000)
This script will make the micro:bit display a diamond shape until you shake it; at that point the screen will clear for a second and then display a check mark. Fair warning: It may be easier to test this script if you use the external battery pack or have your micro:bit hooked up to the mi:power board, because it’s rather difficult to shake the device while it’s connected to your computer via USB cable.
If you’d like to experiment further with the accelerometer and its readings, you can also use the REPL window. For instance, entering
>>> display.show(str(acccelerometer.get_x()))will show the current X-value on the LED display. (Note that you have to cast the accelerometer.get_x() reading to a str, since the display.show() function only takes strings, and the get_x() function returns an integer.) You can also play with the 3g and other -g functions, but as I said, be careful about breaking your board!
The Compass
The last sensor on the micro:bit board we want to play around with is the compass/magnetometer. It works by detecting magnetic fields and determining their direction. Before you use it, you’ll need to calibrate it using a built-in function called—appropriately—calibrate(). You can call this function interactively at the REPL prompt, and you can also call it in a script; if it’s called in a normal script, the script will pause while the calibration takes place. The calibration itself consists of a little game in which you have to draw a circle by tilting the board, using a single LED on the display (Figure 4-7).
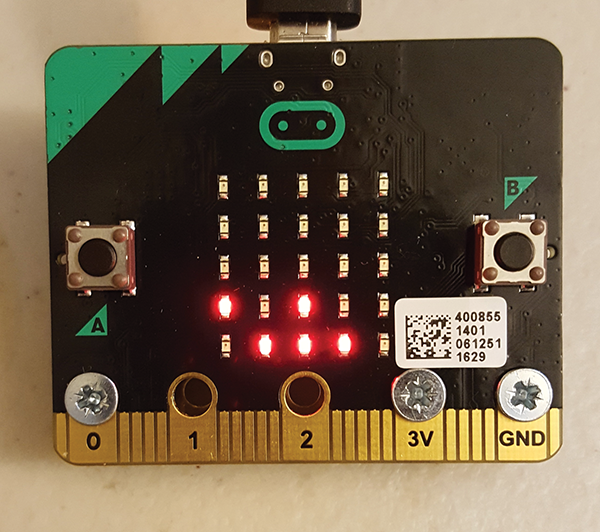
Figure 4-7: Calibrating the compass
Once the circle is drawn and you’ve calibrated the compass, you’re greeted by a smiley face (Image.HAPPY). Try it out:
>>> compass.calibrate()Once you play the game, you’re done. The device should stay accurate as long as it’s powered on, but a power cycle may destroy the accuracy. That’s why it’s a good idea to add the compass.calibrate() line to any script that requires the compass—doing so will ensure everything is accurate before progressing further in the program.
The board has a total of eight compass-related functions: calibrate(), clear_calibration(), get_field_strength(), get_x(), get_y(), get_z(), heading(), and is_calibrated() (Figure 4-8).
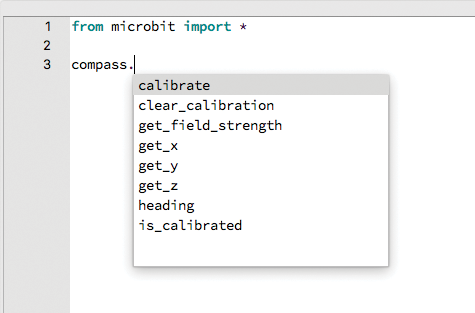
Figure 4-8: Compass functions shown in mu
Of these, compass.heading() is one of the easiest to understand. Point the top of the compass (where the USB plug is) toward North and type compass.heading() in your REPL prompt, and you should be rewarded with a heading in degrees (from 1 through 359). Since you’re pointed toward North, you should get a reading that hovers around 0 or 360 (depending on how you’re pointing it exactly). If you get something completely different, recalibrate and try again. If you still get a value that’s totally off base, check to see if you’re holding your micro:bit over a big magnet (Figure 4-9). Since the compass is nothing more than a Hall effect magnetometer, the presence of a strong magnetic field will adversely affect your directional readings. It is also affected by the presence of ferromagnetic materials around the device, so moving to a different location may solve the problem. Luckily, magnetometers are not affected much by electromagnetic (EM) waves, so you shouldn’t have to worry about your television or microwave screwing up your results.
You may also need to play with your board’s orientation. One of my boards was accurate when the LED display was facing up. The other, however, was only accurate when the display was facing down. Your results may vary.
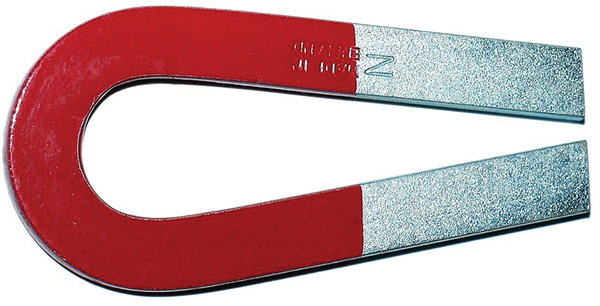
Figure 4-9: This will throw your compass readings way off.
get_x(), get_y(), and get_z() give the magnitude of the magnetic field in each axis, respectively, with the positive or negative depending on the direction of the field, and get_field_strength() returns the total magnitude around the device. All of these readings are returned in nanoteslas. Earth’s magnetic field at ground level varies from about 25 to 65 microteslas, so the return of compass.get_field_strength() should be between 25,000 and 65,000 (microteslas converted to nanoteslas), assuming you’re not holding your board over a horseshoe magnet.
The Local Persistent Filesystem
The last not-so-basic feature of the micro:bit I’d like to introduce you to is its filesystem. Yes, you can actually store files on the board—both text files and even binary files such as images. There are two caveats to this, however:
- There is only approximately 30 KB of memory on the board. To put that into perspective, the image in Figure 4-10 is 400×300 pixels, and is 31 KB in size. Now, it’s true that you can get a lot of text into 30 KB, but my point is that you shouldn’t plan on being able to store War and Peace on your micro:bit.

Figure 4-10: A 31 KB JPEG image
- Files on the board will remain only as long as you don’t flash the board with a new program. Flashing the board necessarily wipes all onboard memory, so any files you have stored will be wiped out. You can safely turn it off and on again and the files will be safe, but once you flash it, they’re gone forever.
That being said, you can imagine that the ability to store files on the board can come in handy. You can write to a text file for reading during a game, for example, or store the current configuration of LEDs as a text array or even an image file that you’ve converted. There is no directory structure; files are simply stored as a list. In order to work with the files, you perform an import os in your script and use the included functions (open(), listdir(), and so on) to operate on them.
As an example, open your REPL window in the mu editor and try the following:
>>> import os
>>> os.listdir()
[]
You should get an empty pair of brackets ([]) as evidence that nothing is stored on the device. To continue with experimentation:
>>> with open('test.txt', 'w') as f:
...    f.write("Hello, world")
>>> os.listdir()
['test.txt']
If you’re still a Python newbie, I should probably mention here that after you type the first line starting with with, the mu interpreter will continue to indent the following lines until you tell it to stop. To do that, hit the Backspace or Delete key, and then Enter.
And finally, to read what you’ve written:
>>> with open('test.txt', 'r') as f:
...    print (f.read())
Hello, world
(Again, use the Backspace key to break out of the loop.) If you’re familiar with Python, you should recognize the open(), write(), and read() functions, as well as the with() method. When you call the open() function, the second parameter determines whether you’ll be reading from ('r') or writing to ('w') the file, as well as whether it will be stored as text or binary. The default is text, or 't'; if you want to store binary as bytes, the syntax uses 'b'. If you want to read bytes from a binary file, for example, you would use 'rb' as your second parameter to the open() function.
Obviously you don’t always have to use the os.listdir() function to see what’s on the device. You may remember that the Files icon at the top of the mu editor lists the files as well. However, be aware that this can still be a little buggy; nine times out of ten when I clicked the Files icon on my computer (a Mac running the Sierra OS) the interface would freeze and I would have to force-quit the program. os.listdir(), however, has never crashed for me.
Putting It All Together
Now that you’ve had a chance to play with all the various parts of the board, it’s time to experiment with putting things together in some projects. The easiest way to play with all the buttons and doodads on the board seems to be, appropriately enough, with games. Let’s start with craps.
You’re probably familiar with the game of dice from either playing it yourself or watching it in movies. At its core it’s incredibly simple: roll the dice and bet on the outcome. All players bet on the same roll—the only thing that matters is the total of the dice, and each player rolls until he or she rolls a seven, which is called “sevening-out.”
Now, we don’t have to go over the betting; I’ll leave that to you. What we can do, however, is simulate the dice rolls, and—just to make it interesting—enable a way for us to cheat, using the board’s two buttons.
The basic structure of the script will be as follows:
- Shake the micro:bit.
- This will result in two numbers being chosen at random, which we’ll display after the roll.
- Cheat #1: Holding down the A button while you shake will result in a roll of 7, enabling you to pass the dice if you don’t want to roll anymore.
- Cheat #2: Holding down the B button while you shake will result in a roll of 8 (or whatever you choose), ensuring that you can bet on a known outcome.
I would like to emphasize here that this is for instructional purposes only, and is probably not a good way to study statistics and probability. It is all for fun, after all.
So let’s write this simple program. Open up mu on your computer and enter the following:
from microbit import *
import random
random.seed()
These lines import the microbit libraries and the random number generator. The random.seed() line is necessary, because it “seeds” the random number generator. This ensures that the numbers chosen will indeed be random (or at least as random as is possible without invoking quantum computations). Let’s continue:
def roll_dice():
    a = random.randint(1, 6)
    b = random.randint(1, 6)
    numbers = [str(a), str(b)]
    return numbers
def roll_seven():
    a = 4
    b = 3
    numbers = [str(a), str(b)]
    return numbers
def roll_eight():
    a = 5
    b = 3
    numbers = [str(a), str(b)]
    return numbers
def show_roll(dice):
    for i in range(0, len(dice)):
        display.clear()
        display.show(dice[i])
        sleep(1000)
    display.show(Image.YES)
These are just three functions that simulate dice rolls and one that shows what was rolled. Which dice roll gets called will depend on whether a button is being held down during the shake. Each function selects a value for each die, and then returns a list of those two numbers, converted to strings for easy displaying. Finally, the show_roll() function takes a list, dice, as its parameter. It simply shows each member of the list in order, twice, to make sure you can see the roll.
Now comes the main portion of the program:
display.show(Image.YES)
while True:
    if not accelerometer.was_gesture("shake"):
        continue
    if button_a.is_pressed():
        roll = roll_seven()
        show_roll(roll)
        continue
    if button_b.is_pressed():
        roll = roll_eight()
        show_roll(roll)
        continue
    roll = roll_dice()
    show_roll(roll)
As you can see, this is a very simple program. (You can download it at https://github.com/wdonat/microbit-code/blob/master/chapter4/craps.py.) The default image shown on the LED screen is the YES symbol (a check mark). As soon as a shake is detected, the device checks to see if a button was held down as well, and then calls the appropriate function, which clears the screen and displays the die values. Then it waits for a second and returns to the default image.
Lastly, let’s just write a short script that walks through the available functions on the device, just to make sure we know how to access them and that our device is working properly. Again, this should be a simple program:
from microbit import *
compass.calibrate()
Now you’re ready for the function that will go through all of the functionality of the board:
def iterate_thru():
    display.show(Image.ALL_ARROWS)
    display.clear()
    display.scroll("Press A")
    while not button_a.is_pressed(): # see text
        continue
    display.show(Image.ARROW_W) # see text
    sleep(1000)
    display.scroll("Press B")
    while not button_b.is_pressed(): # see text
        continue
    display.show(Image.ARROW_E) # see text
    sleep(1000)
    display.clear()
    x = str(accelerometer.get_x())
    y = str(accelerometer.get_y())
    z = str(accelerometer.get_z())
    a = x + " " + y + " " + z # see text
    display.show(a)
    sleep(1000)
    display.clear()
    display.scroll(str(compass.heading()))
    sleep(1000)
    if accelerometer.is_gesture("face up"):
        display.show(Image.HAPPY)
    return
And finally, the main loop of the program itself:
while True:
    display.clear()
    if button_a.is_pressed():
        iterate_thru()
You can download this program at https://github.com/wdonat/microbit-code/blob/master/chapter4/functions.py.
While simple, there are a few things worth mentioning in this program, delineated by the see text comments:
- The
while notloops make the board wait until button A (or B) is pressed by entering a loop; as long as the button is not pressed, the loop continues indefinitely. The button press breaks it out of the loop and allows the program to continue. Image.ARROW_WandImage.ARROW_Eare probably self-explanatory, but in case you weren’t sure: they point to the left and the right, respectively, as if you were looking at a map. Remember, the board thinks that the USB port is on the North side, so it is prudent to continue that framework with an East and a West arrow. Since there is noARROW_RIGHTorARROW_LEFT, these are what you would use instead.- Finally, the assignment of the
x,y, andzstrings to theastring is due to the unique requirements ofdisplay.scroll()anddisplay.show(). Both require strings, or images, or lists of images. A list of strings won’t work. For that reason, we’ve combined thex,y, andzstrings into one string, which can then be scrolled through.
That concludes our basic introduction to programming the integral parts of the micro:bit with Python. In the next chapter, we’ll dive into interfacing with the board using C++ and the native tools that are available for that.