
7
Using Bluetooth
Now that you’re familiar with connecting to the micro:bit using hardware and wires, it’s time to take a look at connecting to the board using the Bluetooth stack. After all, one of the big selling points of the micro:bit is its BLE (Bluetooth Low-Energy) connectivity, which is used in many different IoT applications and devices.
What Is Bluetooth?
Before we get started, I feel I should warn you that Bluetooth connections in general can be somewhat finicky, and communicating with the micro:bit is no different. Things don’t always work the first time, and the micro:bit is still relatively new and the software and firmware are still being updated. Just don’t get too frustrated if things seem a little wonky, and I’ll try to walk you through it as gently and completely as possible.
So what exactly is Bluetooth? You’ve most likely used it with your smartphone to connect to external devices like speakers and headphones, or your car radio, or even to send files to another smartphone. Or you may have used it on your computer or laptop—perhaps to use a wireless mouse or keyboard. It’s been around longer than you may think (since 1994, as a matter of fact) and version 5.0 is now available, which, according to the Bluetooth Special Interest Group, quadruples range, doubles speed, and increases data broadcasting capacity by up to 800 percent. If you have a moment, I recommend visiting www.bluetooth.com/about-us/our-history, as it’s quite an enlightening read.
Bluetooth is a wireless technology standard originally designed to be a wireless substitute for RS-232 (serial) communication, developed by Ericsson Telecommunications. Ericsson was mainly interested in two things: developing wireless headsets, and allowing mobile phones to communicate with computers. Devices using Bluetooth communicate at frequencies between 2400 and 2483.5 MHz. Within that spectrum there are seventy-nine designated channels over which standard devices can communicate; BLE devices like the micro:bit have only forty channels to choose from.
Bluetooth differs from WiFi in two main ways: power and connectivity. WiFi was designed to replace Ethernet and coaxial cables comprising a network, and is much more powerful in terms of broadcast strength. WiFi is also normally set up in a client-server mode, where most networked devices communicate with each other via a central node, such as a router or a switch. Bluetooth, on the other hand, tends to be a symmetrical setup, where devices communicate directly with each other.
Bluetooth LE, the specification used by the micro:bit and many other IoT devices, was released as Bluetooth 4.0 in 2010. It’s intended to require considerably less power and cost less than classic Bluetooth but to be similar in terms of communication range. IoT devices that use BLE can go for extended periods of time—often months or even a year or more—on the same small battery.
Programming Bluetooth on the micro:bit
When it comes to using Bluetooth on your micro:bit, you’ll most likely end up using C++ and your mbed developer account, because as you’ll remember from Chapter 5, “The mbed Operating System,” many of the other online programming environments don’t get you close enough to the hardware to program the Bluetooth stack directly. MicroPython doesn’t offer Bluetooth connectivity at all, and some of the others offer only a limited range of options and functionality. C++ and mbed are currently the best ways to experiment with Bluetooth (though I expect that may change as the development environment matures).
Another thing you’ll probably need in order to conduct pairing experiments is an app for your smartphone that can read and write to the micro:bit. Unfortunately, as it stands right now, there is a serious lack of iPhone apps that are designed for Bluetooth development work with the micro:bit. I’ve done my best to research apps for both platforms, but it seems that Android is the way to go if you’re looking to do any serious work with Bluetooth on your board. The best cross-platform app I’ve found so far is called nRF Connect for Mobile. It is free and is available for both Android and iPhones—just search for it in your respective app store and download it to your device. It’s not particularly user-friendly and is quite technical, but it is handy for showing that you’re connected to your board, it gives you some basic functionality, and it works on both types of smartphones. If you have an Android phone, however, I highly recommend picking up Martin Woolley’s micro:bit Blue app, also available for free at the Google Play Store. It allows you to read and write to the micro:bit device over Bluetooth in a graphic environment, as I’ll show you in a moment.
When we go on to Chapter 8, I’ll discuss serial communication over Bluetooth, which can be done either with an iPhone or an Android, or even a computer with a Bluetooth adapter installed. I also highly recommend the official micro:bit app (Figure 7-1), available for both the iPhone and Android devices for free at their respective app stores (just search for micro:bit). The official app is generally pretty helpful and is designed for the novice user. It can get finicky at times as well, but it will allow you to pair your micro:bit, write code directly on your phone, and then flash that code to your board over Bluetooth.

Figure 7-1: The official micro:bit app
To get started, however, let’s start with mbed. On your computer, log into your mbed account and bring up the compiler workspace. First, let’s make sure you’re connected and have the correct libraries available. Click New at the top left of your IDE menu bar. In the pop-up menu, make sure that “An example of how to use the micro:bit DAL’s abstraction” is selected (Figure 7-2). In this context, DAL stands for Device Abstraction Layer, and is an abstraction of the hardware on the micro:bit that has been written by the good folks at Lancaster University. It creates the MicroBit class and allows you to access various parts and functions of the device by using methods and variables that have been written into the class.
Name the program whatever you like (microbit-test is a good name) and click OK.
Now, you’ll compile it. Make sure that microbit-test is selected in your list of programs, then click Compile in the menu bar. It may take a few minutes to compile, but then you’ll get a download prompt for a hex file. Download the file and flash it to your micro:bit, and you should be rewarded with “HELLO WORLD! :)” scrolling across your display.
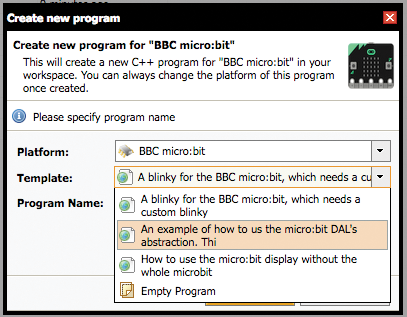
Figure 7-2: Starting a new micro:bit program
Great! Now you know that your compiler is set correctly and you can flash the resulting files to your board. In order to work with Bluetooth, you should import an already-working program into your compiler that you can play around with and change. In a new tab, point your browser to https://developer.mbed.org/teams/BBC/code/microbit-samples/, where you’ll find a sampling of some of the possibilities for your board. Click the Import Into Compiler button on the right, and import the program into your compiler workspace.
Once the program is imported, expand it in the Program Workspace on the left, and then expand the source folder. Right-click on the HelloWorld.cpp file and choose Clone (Figure 7-3). Call it BLE.cpp.

Figure 7-3: Cloning HelloWorld.cpp
Now open the MicroBitSamples.h file. Line 41 or so should read as follows:
#define MICROBIT_SAMPLE_HELLO_WORLD Change that line to read
#define MICROBIT_BLE_SERVICESThen, in your BLE.cpp file, change line 29 to read
#ifdef MICROBIT_BLE_SERVICESNow scroll down a bit (to line 41 or so) and add the following lines to your main() function:
// Gives Bluetooth access to the various micro:bit
// functions
new MicroBitLEDService (*uBit.ble, uBit.display);
new MicroBitTemperatureService(*uBit.ble, uBit.thermometer);
new MicroBitAccelerometerService(*uBit.ble, uBit.accelerometer);
new MicroBitMagnetometerService(*uBit.ble, uBit.compass);
new MicroBitButtonService(*uBit.ble);
new MicroBitIOPinService(*uBit.ble, uBit.io);
These lines are initializing the Bluetooth on your micro:bit and making the various services (display, thermometer, etc.) available to the Bluetooth stack, which makes them visible to other devices.
Now, you’d hope that would be all you’d need to do and you could go happily pair your micro:bit to your phone. Unfortunately, there’s another problem: Bluetooth services use a lot of memory. Since your board doesn’t have much to begin with, it turns out that this program, as written, will take up all the memory on your board and the pairing will fail. So you need to change a few things so your program isn’t such a memory hog.
Back in your compiler window, expand the microbit/microbit-dal/inc/core folder and click on the MicroBitConfig.h file (Figure 7-4).
Scroll down to line 236, and change the 1 at the end of the line to a 0. Likewise, on line 243, change that 1 to a 0. Here you’re turning off the device firmware update and event services, since you don’t need them in this application (you’re just testing the Bluetooth, after all). When you’re done, line 236 should read
#define MICROBIT_BLE_DFU_SERVICE 0and line 243 should read
#define MICROBIT_BLE_EVENT_SERVICE 0Next, in the same file, scroll up to line 103, and edit it to read
#define MICROBIT_SD_GATT_TABLE_SIZE 0x700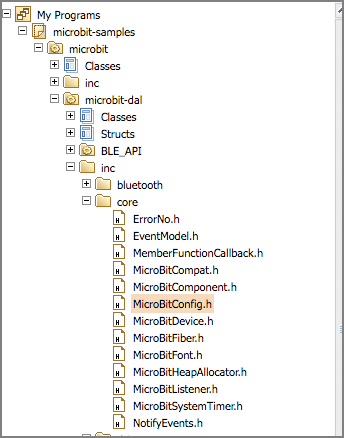
Figure 7-4: The MicroBitConfig.h file in the source tree
This GATT_TABLE is where the micro:bit keeps track of Bluetooth services. By changing the value to 0x700, we’ve maximized the size of that table.
Finally, scroll up a bit further, and change the value at the end of line 89 to 0.50 rather than its current 0.75, so that it reads
#define MICROBIT_NESTED_HEAP_SIZE 0.50This slightly decreases the amount of memory on the heap available and gives you a bit more for your program.
When you’ve finished, click the small arrow inside the Compile button and click Compile All (Figure 7-5). After a bit you’ll be rewarded with a hex file that you can download and flash onto your micro:bit.

Figure 7-5: Compiling the program
When it’s flashed, the first thing you’ll see is the “Draw a circle” message. That’s because you included the compass service in your Bluetooth tests, and the compass needs to be calibrated every time you flash the device. Draw the circle to calibrate the compass, and then turn on your phone’s Bluetooth and open the Bluetooth settings.
Now you’ll pair the micro:bit to your phone. To do this, on your micro:bit press and hold the A and B buttons, then press the reset button on the other side of the board. Hold down the reset button for a second or two, and then release it. Then release the A and B buttons. It all sounds a bit more complicated than it is; in short, you just press and hold A and B, press and release reset, and then release A and B. You’ll see “PAIRING MODE!” scroll by on the display, and then a pattern will appear on the LED matrix (Figure 7-6).
When you see this pattern, use your phone to try to connect to the micro:bit. The board should immediately display an arrow pointing to the A button, and your phone should ask for a six-digit code. This is a code randomly generated by the micro:bit that needs to be entered into the phone to complete the pairing process. Press the A button on the board, and six digits will flash, one after the other. Enter these numbers into your phone, and you should be greeted by a check mark on the device.

Figure 7-6: The “pairing” pattern
If you’re using the official micro:bit app, the app will ask you to duplicate the pattern first, and then will go through the six-digit pairing process. The end result is the same.
Now that you’re connected, open up the nRF Connect app. On the Scanner tab, find your micro:bit in the list of available devices and click Connect. After the phone connects to your board, you should see a long list of client attributes and services that are being read off your board. The services you enabled in your BLE.cpp file are listed here as Unknown Services. Once you’re connected, you are able to read and write, where applicable, to these services, using your phone. Perhaps the easiest way to see this is to expand the top Generic Access service and read the device name from your board by clicking the down-facing arrow. You should see something like Figure 7-7, with the device name filled in.
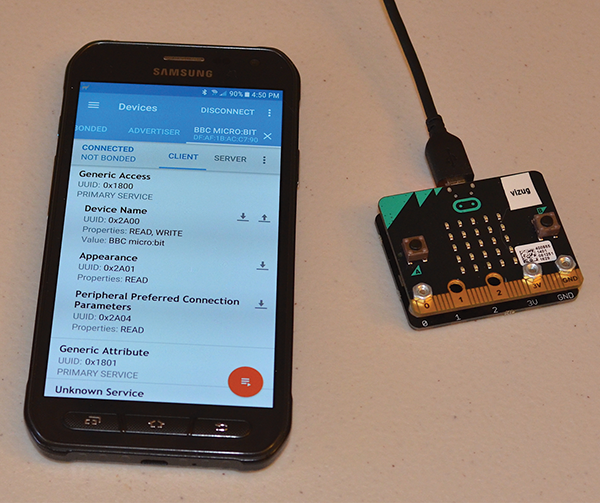
Figure 7-7: Reading the micro:bit’s name via Bluetooth
You can also click the up-facing arrow (which is shorthand for write) and write a new name to the board. It won’t last through a reboot, but it’s a simple way of making sure everything is working.
Now, if you happen to have an Android phone and have downloaded the micro:bit Blue app from Martin Wooley I mentioned earlier, you can see a bit more information. Start the app and select your micro:bit from the list of paired devices. You may need to click “Find paired BBC micro-bits” at the bottom. Once you’ve connected to your board, you’ll see a list of available services, as shown in Figure 7-8.
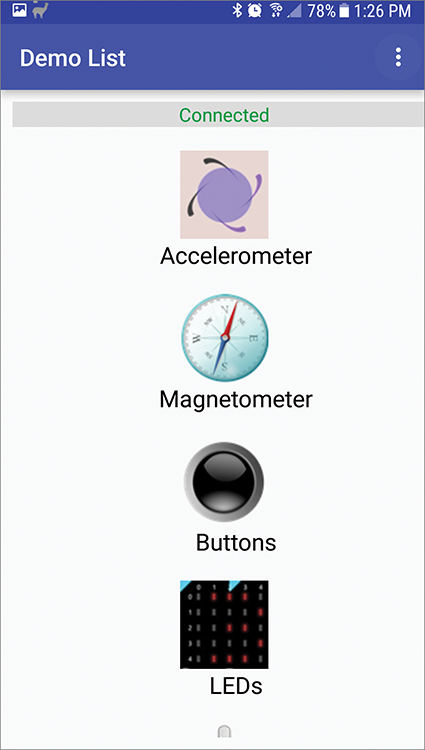
Figure 7-8: Available Bluetooth services
Play around with the services we enabled, like the accelerometer, the buttons (Figure 7-9), the thermometer (Figure 7-10), and—perhaps the most fun—the display LEDs (Figure 7-11).
Unfortunately, there is no similar app available yet for the iPhone, so for now you’ll have to be satisfied with checking that the Bluetooth services exist with the nRF app. In the next chapter, however, we’ll discuss using serial communication over Bluetooth to send messages back and forth, and that communication can happen no matter what platform you happen to be using.
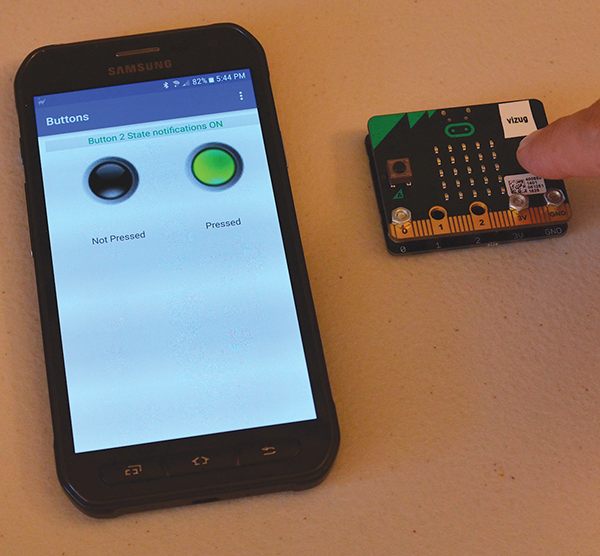
Figure 7-9: Detecting button presses

Figure 7-10: Reading from the thermometer
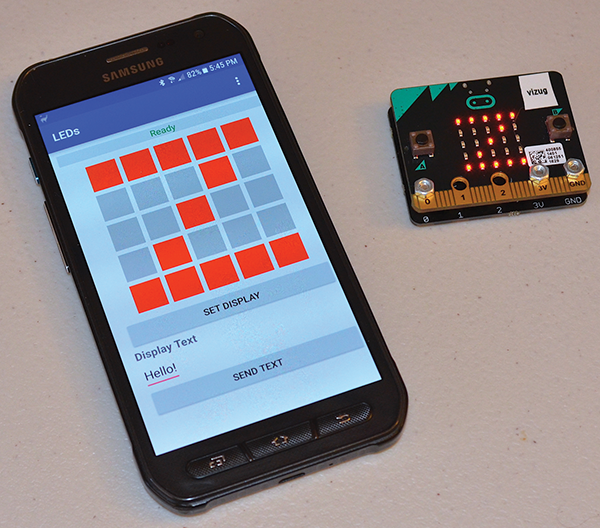
Figure 7-11: Writing to the display
Third-Party Apps
All of this may seem a bit complicated, and as I mentioned earlier it’s because some sort of program needs to be running on your smartphone in order to truly communicate with the micro:bit. You can program your board to send and receive Bluetooth messages, but you still need a device to handle the other side of the communication, and programming an external device like a smartphone to handle the other end of the messages in a GUI like an app is obviously outside of the scope of this book.
Luckily, thanks to the rise in popularity of smartphone apps , there are other options when it comes to building one for your phone. There are some simple plug-n-play apps available that can work with the micro:bit, and I’m sure that more will arise as the micro:bit’s popularity increases. Probably the most successful so far is the Evothings environment. Evothings uses a somewhat unique model: there are actually three programs working simultaneously. The first, obviously, is your micro:bit code. A second code runs on your phone and allows you to program a GUI using drag-and-drop technology. It also allows you to interact with an external device like a micro:bit. Finally, a third program, Evothings Studio, runs on your desktop or laptop computer (Figure 7-12) and communicates with your phone via Evothings’ cloud servers. These cloud servers act as a middleman between your computer and your phone. It sounds complicated, but it seems to work pretty well. If you’re interested in playing with Evothings, you’ll need the mobile app for your OS, and the Evothings Studio program for your computer, available at https://evothings.com.
Kivy is another cross-platform Python development tool, designed to make coding apps as painless as possible, but unfortunately Kivy’s Bluetooth support is almost nonexistent, so it won’t work for our purposes. Other apps exist as well, but it’s hit and miss when it comes to their success with working with the micro:bit.
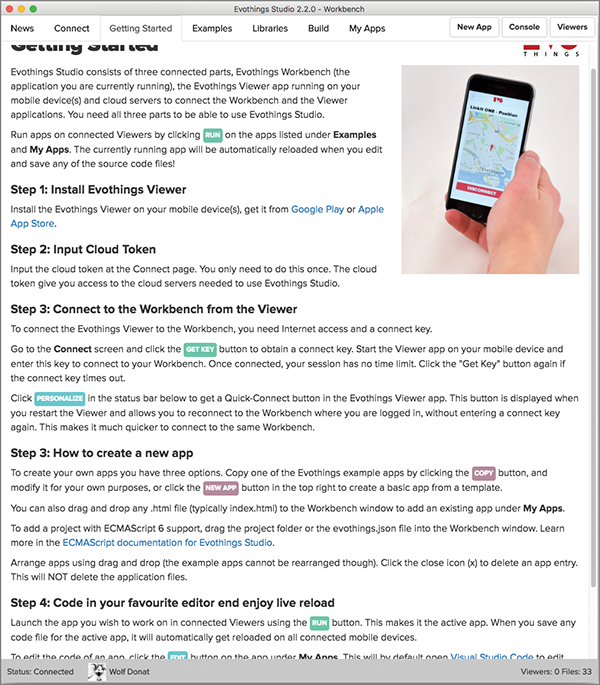
Figure 7-12: Evothings Studio
As I said earlier, in the next chapter we’ll break things down further and make them even simpler, and communicate with the micro:bit via serial communication over Bluetooth. This approach is not particularly elegant, but it will allow us to communicate with and control a small mobile robot, and Bluetooth serial communication applications are available for both platforms.