
Chapter 4
Setting Up a GitHub Website Repo
IN THIS CHAPTER
![]() Getting acquainted with GitHub Pages
Getting acquainted with GitHub Pages
![]() Creating a project website
Creating a project website
![]() Preparing a website repo
Preparing a website repo
![]() Preparing your local computer
Preparing your local computer
![]() Discovering resources for building your website on GitHub.com
Discovering resources for building your website on GitHub.com
One technology that truly pushed the boundaries of society and software development was the Internet. As the Internet became more embedded in everyday life, it brought new meaning, career opportunities, and ways to connect for millions of people. A more recent phenomenon enabled by the Internet is a set of sites categorized as social media. Social media profiles provide a way for people to express who they are, what their interests are, and how to connect with them. But social media creates new challenges.
Personally, I have accounts on Twitter, Instagram, Snapchat, Facebook, and LinkedIn. I don’t feel comfortable sharing personal accomplishments (like having a baby) on my LinkedIn, but also rarely share minor professional accomplishments (like starting a new project) on my Instagram. For me, having a website gives me a place to point people to all of me, not just the version of me that fits the community of the particular platform I’m using. That way, if folks want to learn more about the new project I’m working on, they will head to my website where they may also stumble upon the fact that my daughter is now walking and reach out to me to suggest a walker that worked well for their child. This interaction improves my bonds and connections with people from all aspects of my life.
Others may use a custom website to still focus on a particular part of who they are, but they like having the control over what they share and how they do it. This chapter, along with Chapter 5, guides you through turning any project repo that you own into a website and creating your own website on GitHub.com. In a matter of minutes, you can have a website up and running without having to pay for additional services.
Introducing GitHub Pages
GitHub Pages is a fast and easy way to make a website that is hosted on GitHub.com. The code in your repo will be the code running the website. Even better is that it’s much easier to style your websites with Jekyll, a free, open-source site generator that takes Markdown files and creates websites with support for themes.
 You can discover more about Jekyll at
 https://jekyllrb.com or even check out what it’s up to on its GitHub repo (https://github.com/jekyll/jekyll).
With GitHub Pages, you can create a website using Markdown or HTML/JavaScript/CSS.
 If you need help remembering what you can do with Markdown, visit the Markdown GitHub Guide at
 https://guides.github.com/features/mastering-markdown.
Turning a Project Repo into a Website
GitHub Pages is a great tool that is integrated into GitHub.com. GitHub Pages will look for a README.md file on your master branch and use it as the landing page for your website, meaning you don’t have to do much to get it up and running! Just follow a couple short steps:
Open a repository on GitHub.com.
For this example, I use my
HelloWorldrepo that I create in Chapter 3.On the home page for the repo, click the Settings tab on the top right to open the Settings page.
The Options Settings page, shown in Figure 4-1, appears.
From the Select source drop-down menu, change the source for GitHub Pages from
nonetomaster branchand then click Save.The web page refreshes. If you scroll back to the GitHub Pages section, you see
master branchunder Source.Choose a theme for your website.
A new web page loads, as shown in Figure 4-2. Browse through the themes and choose one. For my example website for this book, I use the Time Machine theme.
After you choose a theme for your website, click Select theme.
You return to the Settings page.
Visit your project website.
Scroll back down to the GitHub Pages section on the Settings page for your repository, and you see a notification in green that your site has been published with a clickable URL.
If you don't see that your site has been published, try refreshing the web page. Sometimes browsers will cache, and these changes won’t appear immediately.- Click the URL and view the website you just made.
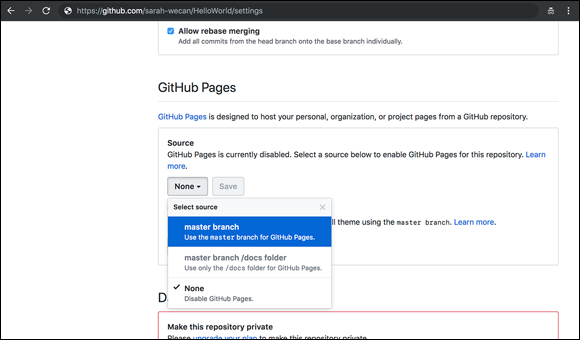
FIGURE 4-1: The GitHub Pages section under repository settings.
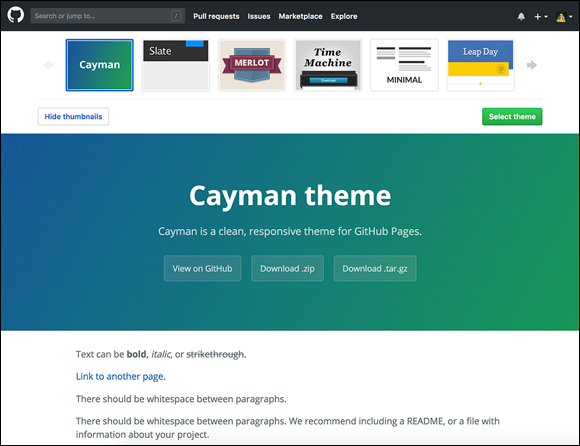
FIGURE 4-2: The GitHub Pages website theme chooser.
Setting Up a Personal Website Repo
To create a new repo that houses your own personal website, you need to set up your repo:
Create a new repository and name it
username.github.io, where username is replaced with your actual GitHub username.For example, the name of Sarah's repository is
sarah-wecan.github.io. If you’re unsure how to create a new repository, see Chapter 3.Make the repository public, initialize it with a README, choose a license, if you want, and then click Create Repository.
If you’re unsure whether you want a license, see Chapter 3, which describes the benefits of choosing a license.
The page refreshes to the home page of your new repository.
Create a project with the Automated kanban template.
If you don’t know how to create a project, see Chapter 3 for guidance.
At the top of your repo again, click the Settings tab and scroll down until you see the GitHub Pages section.
Notice that it says your site is already ready to be published at a certain URL (mine is
https://sarah-wecan.github.io/). If you go to this URL, you should see a simple barebones web page with the contents of your README.md file. If you get a 404, just wait a moment and refresh the page. It can take a few seconds for GitHub Pages to build your site.In the GitHub Pages section, click Choose a theme and then click Select theme.
If you’ve already chosen a theme and want to change it, this button is labeled Change theme. After you choose a theme, you’re taken to one of two pages, depending on which theme you chose. Either you’re taken back to the Settings page, from which you can navigate back to your code and you see a
_config.ymlfile with your theme information. In this case, you can skip Step 6. Alternatively, you're taken to the README.md file in editing mode, where the theme information has been added to the README. In this case, you should follow Step 6. In either case, the commit of the_config.ymlfile happens automatically, and that commit triggers GitHub Pages to rebuild your site with the theme applied.Commit your README.md file.
Your README.md file has now been modified to include information about your Jekyll template. Scroll to the bottom, add a title to the commit message, and choose Create a new branch for this commit and start a pull request. Then click Propose file change. The page refreshes with a new pull request ready to be created. You can merge your pull request. Then you can navigate back to your code, and you see the
_config.ymlfile as described in Step 5.Create a pull request with a more inclusive title.
For instructions on creating a pull request, see Chapter 3.
Change the title of the pull request to describe everything you want to do for this iteration of your website and add a description. For example, I added the following list:
To create a basic website:- [ ] Add a theme- [ ] Add an index.md file with "Hello World" on itLink this pull request to the project and create the pull request.
To ensure your project board automatically tracks the progress of your website, choose the project created in Step 3 on the right side of the pull request from the Projects section. Then click Create pull request.
Update the pull request when appropriate.
The description of a pull request is not static. When you first create a pull request, you may have a list of things you want to do before merging the code into the master branch. You may also end up making changes throughout. Make sure to always revisit the description and make sure it is accurate. For example, if you're following these steps exactly, you have already chosen a theme, so you can check the first box.Verify the project board automation.
Go back to the project board by clicking on the Projects tab at the top of your repo and notice that a new card is in the In progress column. This card has a checklist on it, just like the description of the pull request does, and you can see that one of two tasks has already been completed.
Switch to the pull request branch.
Go back to the Code tab of your repo and switch to the branch that is associated with your pull request. Mine is
sarah-wecan-patch-1. If you don’t know how to switch to a different branch on GitHub.com, see Chapter 3.Create an
index.mdfile.On the top right of your code file list, click Create new file. Name the file
index.mdand add a header that says “Hello World!”:# Hello World!Commit that file to the same branch you've been working on, with a title and commit message.
Update and merge the pull request.
Go back to the pull request and check off the second check box. Because everything that you wanted to do for this pull request has been completed, the pull request can be merged. Click Merge pull request, Confirm merge, and then Delete branch.
Verify the project board automation.
The pull request shows in the conversation that it has been moved from the In progress column to the Done column. You can also go back to the project board. Notice that the card has moved to the Done column, and both checklist items have been completed.
Verify the website was published.
Go back to your URL (mine was
https://sarah-wecan.github.io). You have a working website with the theme you chose.
If you don’t see the theme that you chose, try refreshing your web page. You now have a website that you can continue building and customizing as you do more and have more to share with the world.
Creating Issues for Your Website
After you have a GitHub.com website repository (see preceding section), you can think through the sections you want to have on your website. Creating issues for everything you want to add or change about your website can help you plan and remember all the little things you want to change.
Say that someone gives you a great suggestion. You don’t want to pull out your computer and make the change right then and there, but you can quickly jump on GitHub.com and create an issue to remind you to add it later. Creating an issue can also be useful if you are working on your website, and you’ve found something that is bothering you that you want to change. Instead of derailing what you’re already working on with a new task, you can just make a quick issue and get to it later.
To get started with this planning phase, go to the Issues tab on your repo and click New issue. Create an issue for all the things you want to add to your website.
In this book, I create four issues to use in my example:
- Change the title and tagline. The title and tagline of your website is currently something auto-generated. You probably want to change it to your name and some tagline that represents you. Create an issue, assigning yourself to it and linking it to your project board:
Issue Title: Change the title and taglineIssue Description: Make the title and tagline something unique to you. - Add sections to the website. Without even having to leave an issue you created, you can click New issue and create another issue to add in sections to your website, assign yourself to the issue, and link it to your project board. In my example, I’ve chosen to add three sections:
Issue Title: Add a couple of sections to the websiteIssue Description: Add three sections to the website:- [ ] About Me- [ ] Contact Information- [ ] Blog - Write a blog post. Because one of the sections is to add a blog to the website, you may also want to actually publish your first blog post. Make a new issue to remind yourself, assign yourself to the issue, and link it to your project board:
Issue Title: Write a blog post about GitHubIssue Description: With a blog section ready to go, add a blog post that talks about your interactions with GitHub so far. - Link your project repo. You can turn your project repo into a website, as described earlier in this chapter. Why not link that website from your personal website? Create an issue, assign yourself to the issue, and link it to your project board. Later, you can link to other projects that you contribute to or find interesting:
Issue Title: Link to the Project RepoIssue Description: I've turned http://github.com/sarah-wecan/HelloWorld into a website and I want to link that website from this one.
Four issues now appear under the Issues tab of my website repo, as shown in Figure 4-3. They also appear on my project board in the To do column (see Figure 4-4).

FIGURE 4-3: The issue list for the website repository.
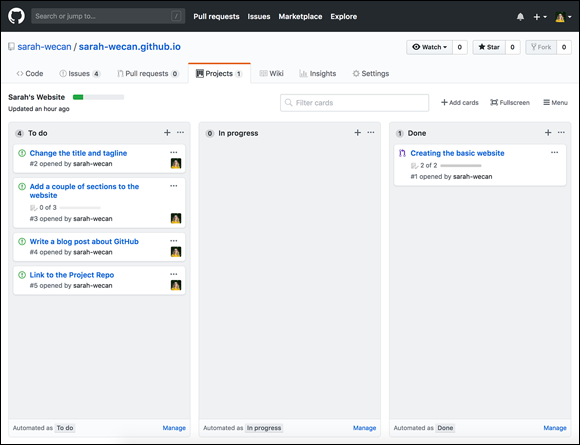
FIGURE 4-4: The project board for the website repository.
Setting Up Your Local Environment
This section assumes you already set up GitHub Desktop and Atom. If you haven’t, Chapter 2 can help guide you through this process.
In this section, you get your website working so that you can modify files on your local computer instead of on GitHub.com.
Modifying files on your local computer can be useful if you need to work on a project when you won’t have Internet access or if you need to browse a lot of files while editing files.
Cloning a repo in GitHub Desktop
The first step in modifying files on your local computer is to get your website repo onto your computer:
Open GitHub Desktop and choose File ⇒ Clone a Repository on the menu bar.
You see a dialog box with three tabs; GitHub.com, Enterprise, and URL.
A nice alternative approach to cloning a repository when you have GitHub Desktop is to click the Clone or Download button on the home page of every repository. When you click the button, you see a flyout that includes an Open in Desktop button. Click that button to launch GitHub Desktop (if it’s not already running) and clone the repository to your local machine.On the GitHub.com tab of the Clone dialog box, your repositories auto-fill for you from GitHub.com.
 If your GitHub.com repositories don’t auto-fill in the Clone dialog box, it probably means you’re no longer signed in to GitHub.com in GitHub Desktop. You can log in by choosing GitHub Desktop ⇒ Preferences from the top menu bar. Click the Accounts tab and sign in. If it appears you’re logged in but your repos are still not showing up, try signing out and signing back in.
Choose your personal website repository and choose where you want it to be stored on your local machine.
I chose the default path as the place to store the repository on my local machine.
Click Clone.
GitHub Desktop refreshes with your repo information included.
Touring GitHub Desktop
GitHub Desktop offers a variety of features to help you with your development and interactions with GitHub.com. You can check out the GitHub Desktop User Guides at https://help.github.com/desktop if you need additional support beyond this book. Figure 4-5 highlights the top six features:
- Repository list: As you clone more repositories to your local computer, clicking the Current Repository drop-down list reveals all the repositories that you have on your local computer, enables you to quickly switch between them, and gives you a quick button to add a new one.
- Branch list: The branch list gives you a quick overview of all the branches that you have checked out on your local computer, as well as a button to quickly create a new branch.
- Pull request list: One the same drop-down list as the branch list, you see a second tab that lists all the pull requests that are open on this repo.
Sync project button: As you start to make changes and/or changes are made on the repo outside of what you’re doing on your local machine, you will need to sync. Because Desktop hasn’t detected any changes made on GitHub.com or your local computer, the option presents itself as a
fetchto start. If you start to make changes on your local machine, you can choose to push your local changes to GitHub.com. If you start to make changes on GitHub.com, you can choose topullthose changes to your local machine. If you create a repository on your local machine and it isn't on GitHub.com yet, you can choose topublishyour project to GitHub.com. If you do not push your changes to GitHub.com, they won’t be available for other people and if your computer were to crash, you would lose all your work. We highly recommended that you pushyour code often.Changes list: As you start to make changes to your code, the files that you've added, deleted, or modified show up in this changes list. You can click each file to see the diff to the right. When you’re ready to commit to those changes, you can add a Summary and Description and click the Commit to master button. At that point, you can push your changes to the branch that you’re on using the Sync project button.
You should always double check which branch you’re on before you commit and push your changes. You can undo commits and pushes, but avoiding it is best because the process can get hairy really quickly.- History list: Next to the changes you find the history of this repo. The history includes activity from your local machine that has been synced with GitHub.com and activity from GitHub.com that you may have never done on your local machine. When you click one of the events, you see a list of activity that happened.

FIGURE 4-5: An overview of GitHub Desktop.
Opening your repo in Atom
To edit your files on your local computer, you can use a number of applications, including Atom, Visual Studio Code, or even TextEdit. In this book, we use Atom.
To open your repo in Atom:
Open Atom.
You see a blank window.
Choose File ⇒ Add Project Folder from the top menu bar.
A file finder dialog box appears.
From the file chooser, open the folder for your repo and click Open.
Your project is now open in Atom.
Touring Atom
Atom is primarily a code editor, but it also has features that make coding on GitHub repos much easier. If this section doesn’t offer enough detail for everything you can do with Atom, make sure that you check out the docs. In particular, the Atom Flight Manual is always updated to reflect the newest features (https://atom.io/docs). Figure 4-6 shows the top six features:
- File list: On the left side of Atom is a list of all the files that you have in your repo. If you click a file, it opens in the center code editing area.
- Code editor: To the right of the file list is the code editor where you can write or modify code.
- Branch list: At the bottom right corner of Atom is a branch chooser. Right now, you are on the master branch of your repo. If you click the branch, a menu pops up, allowing you to choose between branches or create a new one.
- Sync project button: Atom supports syncing your project with what is on GitHub.com.
- GitHub panel toggle button: If you click the GitHub button, the GitHub panel appears in your Atom window. This panel specifically lists and supports pull request actions.
- Git panel toggle button: If you click the Git button, the Git panel appears in your Atom window as a second tab next to the GitHub panel. This panel specifically supports staging and committing changes, as well as viewing the history of changes on this repo.

FIGURE 4-6: An overview of Atom.
Finding Resources for GitHub Pages
Some amazing folks over at GitHub have dedicated all their time to supporting GitHub users in discovering and learning about all the features that GitHub offers. Beyond the static documentation, the GitHub Training Team offers Learning Labs.
Learning Labs are a self-guided, automated tutorial that actually has you doing the actions on GitHub.com and not just watching a video or reading a tutorial. You can find great ones for GitHub Pages, all GitHub fundamentals, Markdown, HTML, and even running your own Open Source Community. Head over to https://lab.github.com, authenticate with your GitHub credentials, to try some of these outlearning Labs.