
Chapter 7
Writing and Committing Code
IN THIS CHAPTER
![]() Committing code in a terminal
Committing code in a terminal
![]() Creating a good commit
Creating a good commit
![]() Writing a commit message
Writing a commit message
![]() Committing other tools
Committing other tools
In this chapter, you write and commit code. The first part, writing code, is a very broad topic — too broad to be covered in this (or any single) book. The code we write in this chapter sets the stage for covering how to create good commits. Most of this chapter focuses on committing code. No matter what kind of code you write, the act of committing that code remains the same.
The code example we use throughout this chapter may seem contrived and overly simplistic. That’s because it is contrived and simple. Don’t let the simplicity, though, distract you because the information in this chapter also applies to large code bases.
Creating a Repository
A commit is the smallest unit of work with Git. It represents a small logical group of related changes to the repository. A commit additionally represents a snapshot in time — the state of the entire repository can be represented by referencing a single commit.
Before writing code, you need to create a local repository to store the code. In the following examples, we create a repository in a directory named best-example. Feel free to change best-example to a directory of your choice. Fortunately, this process is quick and painless:
Open the terminal on your computer.
If you don't know how to do so, see Chapter 1 for guidance.
- Go to the directory where you want your project folder to be stored and type the following commands:
$ git init best-example$ cd best-exampleThe first command creates an empty Git repository in the specified directory,
best-example. Because thebest-exampledirectory doesn't already exist, Git creates it. The second command changes the current directory to this new directory.
 Nearly every Git tutorial I’ve seen that covers initializing a Git repository does it in the current directory by calling
 git init with no parameters or git init . where the . represents the current directory. People can be forgiven for not realizing you can both create the repository directory and initialize it in one step by passing in the path to the new repository like we do here. In fact, you can combine both of these commands into a single command: git init best-example && cd best-example. This tip can help you gain the admiration and adulation of your less efficient peers!
Writing Code
After you're in a Git repository directory, you can start adding files. (If you aren’t in a directory, see the previous section, “Creating a Repository” where we created the best-example directory.)
For this example, you create three files by typing the following code:
$ touch README.md
$ touch index.html
$ mkdir js
$ touch js/script.js
Note that one of the files you create is a README.md file. To find out why every repository should have a README.md file, see Chapter 10.
After running these commands, you have three files:
README.mdindex.htmlscript.js
script.js is in a subdirectory named js. You guessed it. — you're making a simple website!
You can flesh out the README.md file first. In this example, we use Atom to open and edit the files in the current directory. (If you need any guidance setting up Atom, see Chapter 2.)
If you prefer, you can easily use another editor, such as Visual Studio Code, to edit the file by replacing atom with code in the following example:
$ atom .
You can add some simple Markdown text to the README.md document. Markdown is language that offers a simple way to format and style your text. You can check out a guide on Markdown on the GitHub guides https://guides.github.com/features/mastering-markdown.
Open theREADME.md in the editor by clicking in in the file tree in Atom. Then add some Markdown relevant to your project. In this example, add the following text:
# The Best Example Ever
Which will be a part of the best commit ever.
Then add the following code to index.html.
<!doctype html>
<html lang="en">
<head>
<meta charset="utf-8">
<title>It is the cod3z</title>
<script src="js/script.js"></script>
</head>
<body>
<h1>The Best Cod3z!</h1>
</body>
</html>
This HTML file references scripts.js. Open script.js in Atom and add the following code.
document.addEventListener(
"DOMContentLoaded",
function(event) {
alert('The page is loaded and the script ran!')
}
);
 Make sure to save your changes to each file. Now test the code by opening
 index.html in your browser from the terminal.
$ open index.html
The page loads in your default browser, and the alert message, shown in Figure 7-1, appears.

FIGURE 7-1: An alert message from our running code.
Creating a Commit
This section assumes you have code that you've changed on your local computer and that the code is in a working state. If you need an example of working code, see the previous section in this chapter to get to this state.
After you have running code, you can commit it to the repository. To create a commit is a two-step process:
- Stage the changes you want to commit.
- Create the commit with a commit message.
Staging changes
Staging changes can be confusing to the Git beginner. In concept, it’s similar to a staging environment for a website. Staging changes is an intermediate place where you can see the changes you’re about to commit before you commit them.
Why would you want to stage changes before committing them? In Git, a commit should contain a group of related changes. In fact, Git encourages this setup.
Suppose that you’ve been working for a few hours and now have a large set of unrelated changes that aren’t committed to the Git repository.
You may be tempted to just commit everything with some generic commit message like “A bunch of changes.” In fact, an XKCD commit makes light of this phenomena at https://xkcd.com/1296.
Committing a bunch of unrelated changes is generally a bad idea. The commit history of a repository tells the story of how a project changes over time. Each commit should represent a distinct cohesive set of changes. This approach to commits isn’t just about being fastidious and organized. Having a clean Git history has concrete benefits.
One benefit of a clean Git history is that a command like git bisect is way more useful when each commit is a logical unit of work. The git bisect command is an advanced command, and full coverage of what it does is beyond the scope of this book. In short, though, git bisect provides a way to conduct a binary search through your Git history in order to find the specific commit that introduces a particular behavior, such as a bug. If every commit contains a large group of unrelated changes, finding the specific commit that introduces a bug isn't as useful as it would be if every commit contains a single logical unit of change.
In the example for this chapter, we can probably stand to create two commits:
- One that just contains the
README.mdfile. - Another that contains the
index.htmlandscript.jsfiles.
Because the index.html file references the script.js file, checking in one without the other doesn't make sense at this point.
Start by staging the README.md file:
$ git add README.md
The README.md file is added to the Git index. The Git index is the staging area for creating commits to the repository. You can check the status of the repository to see that the file has been added to the index:
$ git status
On branch master
No commits yet
Changes to be committed:
(use "git rm --cached <file>…" to unstage)
new file: README.md
Untracked files:
(use "git add <file>…" to include in what will be committed)
index.html
js/
As you can see, the README.md file is staged for commit. Meanwhile, the index.html and js/ directory aren't yet tracked by this repository.
Why isn’t script.js listed in the untracked files section? Git is taking a shortcut here. It notices that no files within the js directory are tracked, so it can simply list the directory rather than list every file in the directory. In a larger code base, you'll be glad Git isn’t listing every file in every subdirectory.
Committing a file
After you stage changes (see preceding section), you can create a commit. In this example, we use the -m flag with the git commit command to specify a short commit message. The following commands demonstrate how to create a commit and specify the commit message in one step:
$ git commit -m "Add a descriptive README file"
[master (root-commit) 8436866] Add a descriptive README file
1 file changed, 3 insertions(+), 0 deletions(-)
create mode 100644 README.md
The file is committed. If you run the git status command again, you see that you still have untracked files. The git commit command commits only the changes that are staged.
Committing multiple file:
After you commit the first file, you're ready to stage the rest of the files for a commit.
$ git add -A
$ git status
On branch master
Changes to be committed:
(use "git reset HEAD <file>…" to unstage)
new file: index.html
new file: js/scripts.js
The -A flag indicates that you want to add all changes in the working directory to the Git index. When you run the git status command, you can see that you've staged two files.
When the js directory is untracked, git status lists only the js directory and none of the files in the directory. Now that you're trying to stage the js directory, Git lists the file in the js directory. Why the discrepancy? Git doesn't actually track directories. It tracks only files. Therefore, when you add a directory to a Git repository, it needs to add each file to the index.
Sometimes you need to write a more detailed commit message. In this example, we don’t specify a commit message when we run the commit command because we plan to write a more detailed commit message:
$ git commit
If you don’t specify a commit message using the -m flag, Git launches an editor to create a commit message. If you haven’t configured an editor with Git, it uses the system default editor, typically VI or VIM.
There are legions of jokes about how difficult it is to exit VIM, so we won’t rehash them all here. We’ll simply take a moment of silence in remembrance for our friends still stuck in the VIM editor.
For the record, to exit VIM, press the ESC key to exit the edit mode and type :wq to exit and save or :q! to exit without saving.
To change the default editor to something like Atom, run the following command in the terminal:
git config --global core.editor "atom --wait"
The editor opens a temporary file named COMMIT_EDITMSG, which contains some instructions that are commented out:
# Please enter the commit message for your changes. Lines starting
# with '#' will be ignored, and an empty message aborts the commit.
#
# On branch master
#
# Initial commit
#
# Changes to be committed:
# new file: README.md
#
# Untracked files:
# index.html
# js/
#
You will enter your commit message in the file that gets opened. You can write your message before all the comments or simply replace everything in the file with your own commit message.
In this case, we replace everything in that file with
Add index.html and script.js
This adds index.html to the project. This file is the
default page when visiting the website.
This file references js/script.js, which is also added
in this commit.
After you save the commit message and close the file or editor, Git creates a commit with the message you wrote.
Writing a Good Commit Message
What should you write in a commit message? What makes a good commit message?
A Git commit should contain a logical and cohesive change or set of changes. The message should describe that change in clear terms so that anyone who reads the message later understands what changed in the commit.
The audience for the commit message are current and future collaborators on the project. Those collaborators may include yourself in the future. Someday you may be tracking down a bug and want to understand why you made some change. You'll thank past-you for writing a well-written commit message that answers that question. So write clear commit messages and be nice to future-you.
If you find that you have trouble describing a commit, it may be that the commit contains too many changes. In writing code, we often note that well written functions do one thing and do it well. Similarly, a commit should represent one change to the system. The commit message describes the change and why it’s being made.
A good commit message should also follow a specific structure. In general, a commit message has two parts:
- The summary should be short (50 characters or less) and in the imperative present tense. For example, instead of writing “I added a method to Frobnicate widgets,” write “Add method that Frobnicates widgets.”
- The description provides detailed explanatory text, if needed. Not every change requires explanatory text. For example, if you rename a function, a commit message with just a summary of “Rename Frobnicate to Bublecate” may suffice. You should wrap the description text at 72 characters. This ensures it looks good when displayed in the terminal as part of the output from the
git logcommand.
By convention, a new line character separates the summary from the description.
Here’s an example commit message written by one of the authors in an open source project https://git.io/fhZ5a:
Avoid potential race condition
In theory, if "ClearFormCache" is called after we
check `contains` but before we execute the `return`
line, we could get an exception here.
If we're concerned about performance here, we could
consider switching to the ConcurrentDictionary.
There’re a few conventions you can use within a Git commit message that Git will ignore, but GitHub will recognize. For example, you can specify that a commit resolves a specific issue with something like “fixes #123” where 123 is the issue number. When a commit with this pattern is pushed to GitHub, the issue number is linked to the issue. And when the branch that contains that commit is merged into the default branch of the repository (typically master), GitHub closes the referenced issue. That's pretty handy!
You can also use emojis in a commit message. For example, one pattern some teams use is to indicate that a commit contains only cosmetic changes by prefacing it with :art:. When that commit is rendered on GitHub.com, GitHub renders the emoji. You can see this in action in Figure 7-2 which shows a list of commits from the GitHub for Visual Studio open source project https://git.io/fhnDu.

FIGURE 7-2: A list of commit messages, some with emojis in the summary.
Committing Code with GitHub Desktop
Even though committing from the terminal is pretty straightforward, many people prefer to use a GUI application to commit code. Using a GU has a few benefits:
- A GUI can provide guidance on conventions with commit messages, such as keeping the summary to 50 characters and separating it from the description by new lines. A GUI can simply present two fields: summary and description.
- A GUI can provide support for GitHub specific conventions, such as the one where you can specify that a commit resolves an issue.
GitHub Desktop (which we refer to as Desktop for short) is a GUI created by GitHub that is great for committing code.
Tracking a repository in Desktop
Choose a repository that you have never opened in Desktop, but that you have locally on your computer. (See Chapter 2 if you haven’t worked with Desktop yet.) If you need an example, use the best-example repository that you can create in the section “Creating a Repository,” earlier in this chapter. When you launch Desktop, the best-example repository isn't listed in the list of repositories. Desktop doesn’t scan your computer for Git repositories to manage. Instead, you have to tell Desktop about each repository you want to manage.
As expected, if you use Desktop to clone or create the repository, it’s already tracking it. But sometimes you have a repository that you cloned or created outside of Desktop — for example, we created best-example using the terminal. Now you need to tell Desktop to track the repository you have chosen. Fortunately, this task is easy from the terminal.
The Desktop command line tool allows you to launch Desktop from your terminal, which allows you to easily integrate Desktop as much or as little as you want into your existing terminal-based Git workflow.
On Windows, you don’t need to install the command line tool; it’s done automatically. On the Mac, you have to take a separate step.
To install the command line tool on a Mac:
- Make sure Desktop is the active application and then, in the application menu bar, choose GitHub Desktop ⇒ Install Command Line Tool.
From the terminal, make sure that you’re in the repository you want Desktop to track.
For this example, we are in the
best-example.- Run the following command:
$ github .The
.in the command represents the current directory. It could, instead, be a fully qualified path to a directory.GitHub Desktop launches (if it's not already running) and opens the specified directory. Because the current directory is already a Git repository, Desktop adds it to the list of repositories that it tracks. It then sets this repository as the current repository so that you can browse the repository’s history, switch branches, and create commits, as shown in Figure 7-3.
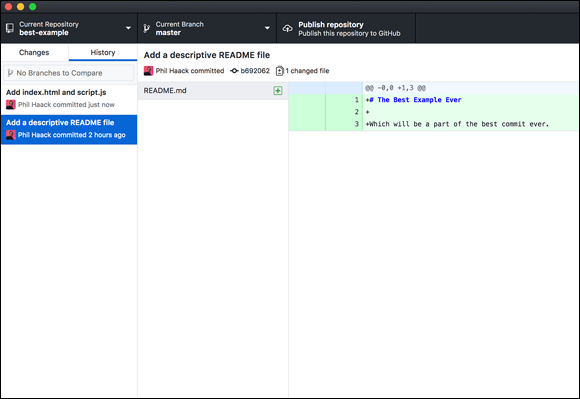
FIGURE 7-3: GitHub Desktop opened to the best-example repository.
If the current directory wasn’t a repository, Desktop prompts you to create a Git repository in that directory. How convenient!
Publishing a repository in Desktop
To experience the full power of Desktop’s integration with GitHub, you need to publish this repository to GitHub:
Clicking the Publish repository button.
A dialog box to publish the repository appears (see Figure 7-4).
Fill in the details and click the Publish Repository button.
The repository is created on your GitHub.com account.
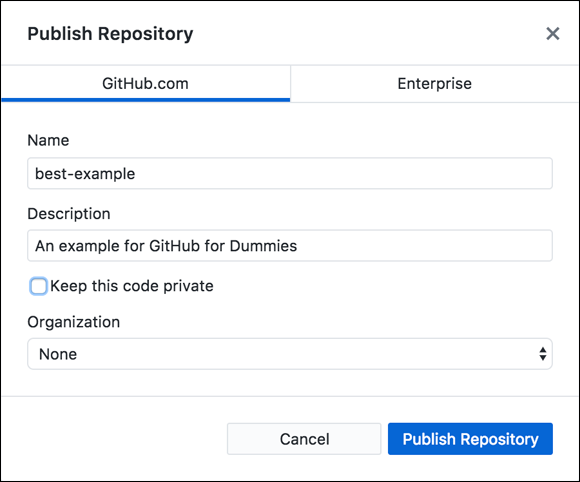
FIGURE 7-4: The Publish dialog box used to publish a repository to GitHub.com.
Desktop provides a keyboard shortcut to open the browser to the repository: ⌘ + Shift + G (Ctrl+Shift+G on Windows).
If you want, you can create a few issues in the repository. (see Chapter 3 to find out how to create issues.) For this example, we create five issues:
- Provide more details on the README.
- Mention in the README that this is a collaborative efforts.
- Add a contribution section to README.
- Do not use an alert message.
- Set up website alerts.
You can also see these issues on our repo at https://github.com/FakeHaacked/best-example/issues.
Committing in Desktop
Desktop is used only for Git operations. To edit the files in the repository, you still need to use your editor of choice.
Make some changes so you have something to commit. In the example for this chapter, you can make some changes to index.html shown in bold.
<!doctype html>
<html lang="en">
<head>
<meta charset="utf-8">
<title>The Best Example</title>
<script src="js/script.js"></script>
</head>
<body>
<h1>The Best Cod3z!</h1>
<div id="message"></div>
</body>
</html>
Update script.js to populate the new DIV element, like civilized people would, rather than pop up an alert message. Changes are in bold:
document.addEventListener(
"DOMContentLoaded",
function(event) {
var message = document.getElementById('message')
message.innerText = 'The script ran!'
}
);
Switch back to Desktop and click the Changes tab, shown in Figure 7-5.
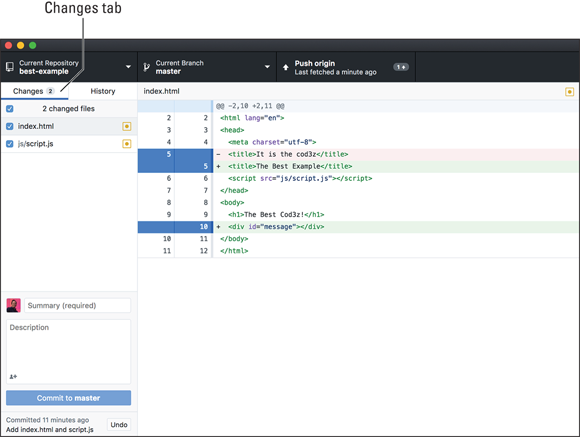
FIGURE 7-5: The Changes View showing the uncommitted changes.
The left pane lists the set of changed files. If you select a file, you can see the specific changes to that file in the right pane, which is called the diff view.
You can commit all the changes as a single commit, but sometimes you will have unrelated changes. In this example, we have two unrelated changes:
- The change to the title in
index.html - The message changes to both
index.htmlandscript.js
Each of these changes should be in their own commit. How do we do that when index.html contains two unrelated changes? Fortunately, Desktop provides a nice way to commit a portion of the changes in a file. This process is known as a partial commit:
Deselect all changes.
In the left pane, uncheck the check box next to the label
2 changed filesto deselect all changes.Select
index.htmlin the left pane.Click the filename in the left pane to display the changes for
index.html.Select the title changes.
In the diff view, click the line numbers in the gutter to select the changes you want to keep. To select a whole code block, click the thin line just to the right of the line number. Select the code block next to line 5 by clicking on the thin line next to line 5. After you select the code block, both lines labeled line 5 should be selected (selected lines show up as blue), as shown in Figure 7-6.
 You may be confused about why two lines are labeled 5 in the diff view. The numbers on the left represent what the file was originally named before you made the changes. The lines on the right represent the lines of the changed lines. Because we changed line 5, it's listed twice. Line 10 is a new line that didn’t exist before, so it is listed only on the right.
With those lines selected, enter a commit message and then click the Commit to master button.
As you can see in the bottom left portion of Figure 7-6, Desktop provides two fields for commit messages. Go ahead and enter “Change the title” into the summary and click the Commit to master button.
Notice that the diff view updates to have the change only on line 10 (see Figure 7-7). That’s because we committed the change on line 5.
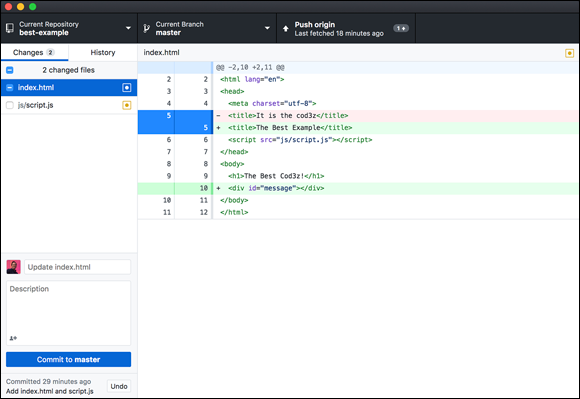
FIGURE 7-6: The diff view with one change selected.

FIGURE 7-7: The Changes tab after a partial commit.
If you’re following the example in this chapter, make sure all the remaining changes are selected by clicking the check box next to the label 2 changed files until the check box is selected.
Using GitHub Conventions in Commit Messages
You can enhance your commit messages with GitHub-specific features, such as emojis, issue references, and coauthor credits.
Emojis
Emojis are little images or icons that convey an emotion or concept. Widely used on GitHub.com, emojis can bring a bit of levity and whimsy to an otherwise serious occupation.
In the commit summary box, you can initiate the emoji picker by typing the : character. If you keep typing, you can list all emojis that start with the letters you type. For example, Figure 7-8 lists all emojis that start with ar as the result of typing :ar.
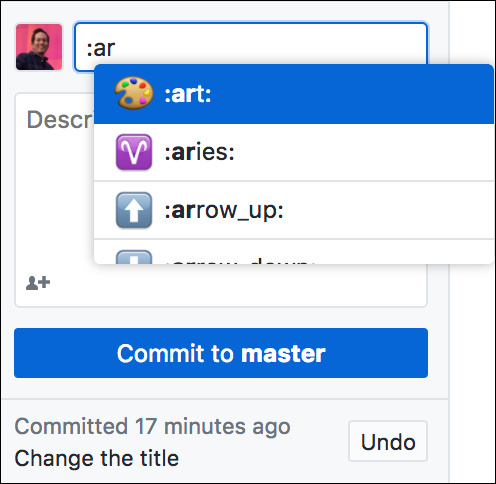
FIGURE 7-8: The emoji picker listing emojis.
You can select the one you want with the arrow keys and then press Tab to complete it. Desktop then fills in the full text of the emoji, which in this case is :art:.
Issue references
GitHub also lets you reference an issue in a commit message with the format #123 where 123 is the issue number. Desktop has support for looking up an issue when writing a commit message. To try this out, create an issue ahead of time so that you can reference the issue in a commit message. As an example, we created an issue that describes the need to replace the alert message with a better approach. We reference that issue in this commit message.
To reference an issue in a commit message:
In the commit description field, type Fixes #.
A few recent issues appear. If you don't see the issue you want to reference and you don’t remember the issue number, You can start typing a word that’s in the issue that you remember. For example, when we type #alert a couple of issues pop up (see Figure 7-9).Select the issue you want to reference and press Tab.
In this example, we select issue 4. Desktop replaces
#alertwith#4.
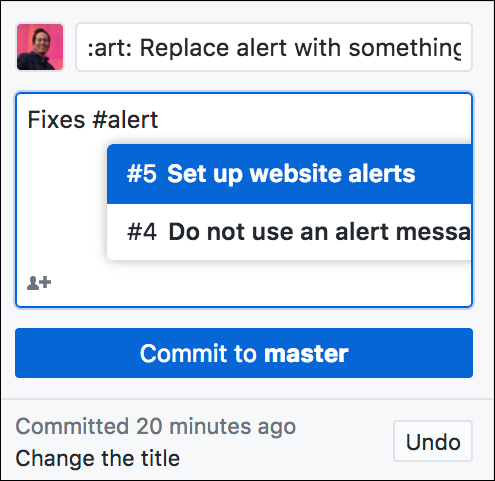
FIGURE 7-9: A list of issues with the word “alert” in them.
Giving credit to coauthors
Git doesn't support multiple authors directly. However, the Git community created a convention for specifying multiple coauthors in a commit that is now supported by GitHub.
To give credit to coauthors:
With the Desktop open, in the commit box with the Description label, click the little icon with a person and a plus sign in the bottom left corner.
Desktop adds a textbox to enter a coauthor’s GitHub username.
Click the @ symbol to see a list of potential users, as shown in Figure 7-10.
GitHub lists only users who have access to the repository — for example, collaborators and org members (if the repository belongs to an organization).
Just like the issue selector, you can also search by first name, last name, or username by appending a bit after the @. For example, if I only remember y coauthor’s last name, I could type @guth to find my coauthor. Press Tab,and Desktop replaces whatever you typed so far with the selected user’s full username.- To create the commit, click the Commit to master button.
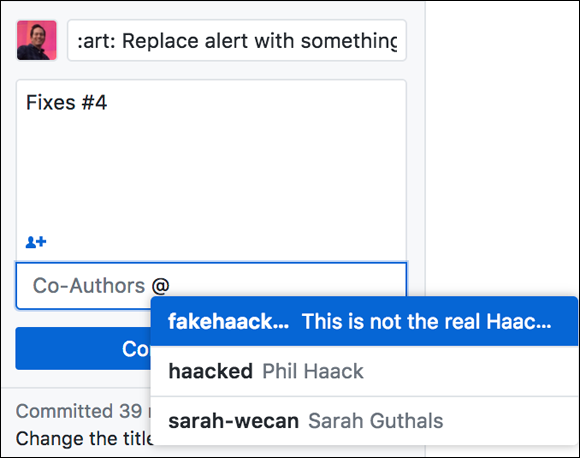
FIGURE 7-10: A list of potential coauthors.
To see your commit, click the History tab and click the you just created (see Figure 7-11).

FIGURE 7-11: The newly created commit.
You can see in the commit message in the right pane that Sarah’s username was replaced by the line
Co-Authored-By: Sarah Guthals <[email protected]>
That’s the actual convention for specifying coauthors in Git commit messages. By using Desktop, you don’t have to remember the exact format. You can just specify a username and let Desktop handle the rest.
Committing Code from Your Editor
Many editors have built-in support for committing code. Built-in support allows you commit code without having to switch to another application. The downside is that different editors have different levels of support for the various conventions you can use in a commit message.
But for quick and dirty commits, built-in support is very useful. Covering how every editor supports Git commits is out of the scope of this book, but you can see this in action with Atom in Chapter 5. For other editors, refer to their specific documentation.