
Chapter 12
Collaborating Outside of GitHub
IN THIS CHAPTER
![]() Setting up GitHub integration in Slack
Setting up GitHub integration in Slack
![]() Setting up GitHub integrations in Trello
Setting up GitHub integrations in Trello
![]() Installing Octobox to manage notifications
Installing Octobox to manage notifications
While GitHub may be the hub of a software development project (it hosts the key deliverable, the source code), it is not the only place where collaboration occurs. Software development teams use a variety of tools to communicate and coordinate their software efforts. Many people who are not developers also work on a software project and will want to keep apprised of the progress of a project in the tools they use.
For example, a lot of day-to-day collaboration occurs in chat rooms, such as Slack. Others may use a Trello board to manage tasks for a team. Still others may use Octobox to keep on top of their GitHub notifications.
In this chapter, we explore the various integrations that bring GitHub information into other collaboration tools. This chapter is in contrast to Chapter 13 where we cover integrations that bring information from other tools into GitHub to improve the software development workflow.
Chatting It Up
For many teams, especially distributed teams, chat is a powerful way for members of the team to collaborate and coordinate their efforts. Chat in this context does not refer to sipping tea on a porch talking about how their day went. Chat refers to text-based tools, such as Slack, used by teams to communicate both synchronously and asynchronously.
Many teams find it helpful to have GitHub post important notifications into a chat room so teams are kept apprised of what’s going on with a repository. In this section, we set up a GitHub integration with one popular chat software, Slack.
Before you install the integration, you need to be the admin of a Slack workspace. You can create a free Slack workspace at https://slack.com.
After you set up your Slack workspace, installing the GitHub for Slack integration requires two key steps:
- Install the GitHub app for Slack in the Slack workspace.
- Add the Slack App for GitHub to your GitHub account.
The following sections cover these steps in detail.
Installing the GitHub app for Slack
To install the GitHub app for Slack:
Go to
https://slack.github.comand click the Add to Slack button in the center of the browser window.If you’re not logged into your Slack workspace in the browser, clicking the Add to Slack button prompts you to sign into your slack workspace. Likewise, if you’re not logged into GitHub, the site prompts you to log into GitHub. When you’re authenticated to both, you see a Slack confirmation screen with information on what permissions the GitHub app will have to your Slack workspace. Figure 12-1 shows the confirmation screen with every section expanded (they’re collapsed by default), so you can see everything the integration can do.
 Be sure you’re adding the GitHub app to the correct Slack workspace. If the wrong workspace is shown, you can change it by clicking the workspace drop-down list on the top right of this screen. Here, you can choose to change which Slack workplace you want to install the integration into. If the workspace isn’t listed there, you can click Sign in to another workspace.
Click Continue to go to the GitHub app configuration screen.
As shown in Figure 12-2, this screen prompts you to pick which channels this app should be available to.
Choose All Public Channels.
Any public channel in your Slack workspace can choose to make use of this app and subscribe to GitHub repository notifications.
Click the Install button to complete the installation on the Slack side.
You’re redirected back to Slack.

FIGURE 12-1: Confirmation page for the GitHub app.

FIGURE 12-2: Choose which channels the GitHub app is enabled in.
 If you have the Slack desktop application, clicking the Install button attempts to launch the application and take you to the workspace where you installed the app. If you haven’t yet added the workspace to the desktop application, you’ll just be in the last workspace you used. This can be a bit confusing as it may seem like the installation didn’t work. Don’t worry, it probably did work. Just add the workspace to your desktop application and continue.
Subscribing to a repository in a Slack channel
After you install the GitHub app for Slack, you can subscribe to notifications for a GitHub repository from within a Slack channel:
- Type the following command:
/github subscribe owner/repositoryFor example, to subscribe to the repository we created for the readers of this book,
https://github.com/thewecanzone/GitHubForDummiesReaders, you would type the following in a Slack channel:/github subscribe TheWecanZone/GitHubForDummiesReadersThe first time you run this command, Slack prompts you to connect your Slack account to your GitHub account. as shown in Figure 12-3. This Slackbot message is visible only to you.
Click the Connect GitHub Account button to start the process of connecting your account.
If you’ve already authenticated and authorized Slack on GitHub.com by either doing these steps previously or by following the steps in the section “Installing the GitHub app for Slack,” earlier in this chapter, your browser will open and automatically authenticate and redirect you to Slack.
If you’re not authenticated on GitHub.com, GitHub prompts you to authenticate first and complete the rest of the steps in this section.
After authenticating, GitHub prompts you to authorize the Slack app, as shown in Figure 12-4. You won’t need to do this again when installing GitHub into other Slack workspaces.
Click Authorize Slack by GitHub to continue.
After you authorize the app, GitHub prompts you to choose an org to install the app into or to choose your account.
Click the account name corresponding to the repository you want to subscribe to.
In this example, we are installing to a repository in TheWeCanZone org, so we would click that option. Clicking the account takes you to next step where you specify which repositories the app may access, as shown in Figure 12-5.
- Choose All repositories to enable the app for all current and future repositories or click Only select repositories and pick the specific repositories that may use the app.
After you select the set of repositories, click the Install button to complete the installation on GitHub.
Slack is now listed in the Applications page of your account or organization settings. You can go there to change the settings for the app or to uninstall it.

FIGURE 12-3: Slack message with a prompt to connect your GitHub account.

FIGURE 12-4: Authorize the Slack app for GitHub.

FIGURE 12-5: Configuring the Slack app on GitHub.
Trying out the GitHub Slack integration
With the installation complete, you can now subscribe to GitHub repositories in your Slack channels. To see the full list of Slack commands, type the following:
/github help
The output of this command is shown in Figure 12-6.
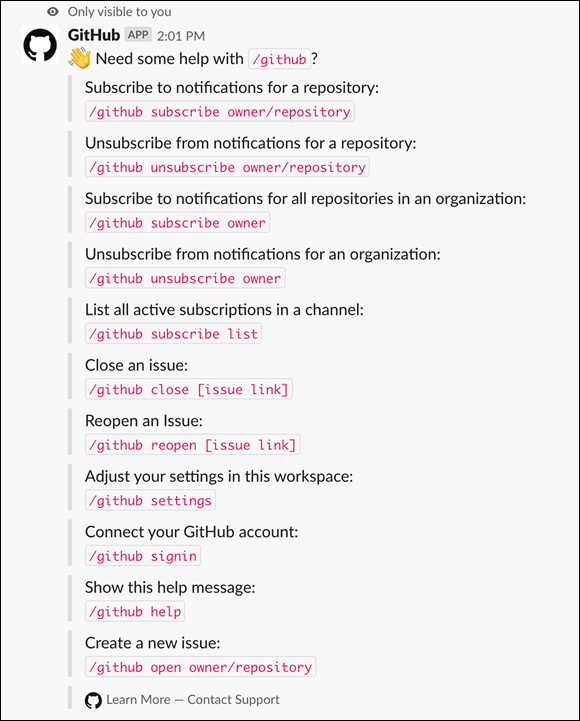
FIGURE 12-6: Summary of available GitHub commands on Slack.
To test the GitHub app and open a new issue:
- Run the following command.
/github open TheWeCanZone/GitHubForDummiesReadersA Slack dialog box appears. You can use this dialog box to create a new issue, as shown in Figure 12-7.
Fill in the dialog box and click the Open button.
Clicking the Open button creates the issue on GitHub. And because we’re subscribed to that repository, we get a Slack message in the channel that the issue was created as shown in Figure 12-8.

FIGURE 12-7: Slack dialog to create an issue on GitHub.
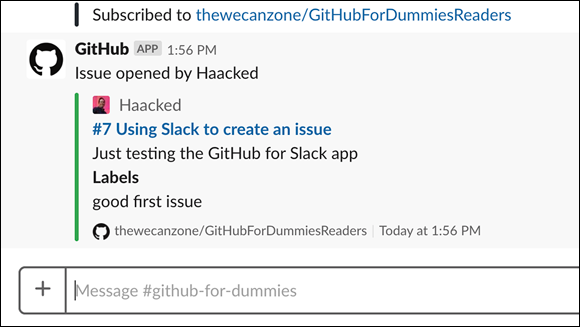
FIGURE 12-8: Slack message with information about a newly created GitHub issue.
If you find a bug with the GitHub integration or have an idea for a way it could be better, good news! It’s open source on, of course, GitHub! You can log issues or even contribute at https://github.com/integrations/slack.
The /github subscribe command by default subscribes a channel to notifications for the following features of a repository:
issues: Opened or closed issuespulls: New or merged pull requestsstatuses: Statuses on pull requests- commits: New commits on the default branch (usually master)
deployments: Updated status on deploymentspublic: A repository switching from private to publicreleases: Published releases
To subscribe to only a single feature, use the /github subscribe owner/repo [feature] command.
/github subscribe TheWeCanZone/GitHubForDummiesReaders reviews
You can remove a single feature by using the /github unsubscribe owner/repo [feature] command. For example, to remove commit notifications on the default branch, run the following command.
/github unsubscribe TheWeCanZone/GitHubForDummiesReaders commits
Additional features are disabled by default:
reviews: Pull request reviewscomments: New comments on issues and pull requestsbranches: Created or deleted branchescommits:all: All commits pushed to any branch
Getting Trello and GitHub Integrated
Trello is a collaboration tool used to organize projects into boards, lists, and cards. It's inspired by the Kanban scheduling system popularized by Toyota. Kanban is Japanese for signboard. The idea is to have a board that provides a view of a project’s status and progress at a glance.
Often, a tool like Trello is combined with GitHub to manage a project. A project team may use Trello to manage the entire project, but use GitHub to host the code and assign specific code issues to developers. A card in Trello might correspond to multiple GitHub issues.
GitHub Project Boards are essentially Trello with GitHub already integrated into it. However, Project Boards within GitHub aren’t always the right fit for your team. Some teams have nondeveloper folks who don’t want to have to learn GitHub and may already be using Trello. Typically, it’s best to have all your project management in one place, so if that should be outside of GitHub, in Trello for example, you can still make it a part of your developer workflow with this integration.
A GitHub integration (what Trello calls a power-up) for Trello connects cards to GitHub issues, pull requests, and branches. In the next section, we walk through setting up the GitHub power-up.
Installing the GitHub power-up
The following installation instructions assume that you’ve already signed up for https://trello.com and created a project board:
If you’ve never used Trello, you can visit its guides at https://trello.com/en-US/guide. It is similar to GitHub Project Boards (see Chapter 3). For specific help on creating a board and cards, visit https://trello.com/guide/create-a-board.html.
With a board open, make sure the menu is open.
If not, click in the top right to show the menu.
Click the Power-Ups section of the menu, as shown in Figure 12-9.
Clicking the Power-Ups button brings up a search dialog box for power-ups.
- Search for GitHub to find GitHub related power-ups.
Click the Add button for the GitHub power-up to enable it.
Just like for any application, Trello may have GitHub power-ups (extensions/integrations) that are built by GitHub and some that are built by other folks. Since GitHub’s API is public, folks can often create power-ups/extensions of their own. Be sure you’re always aware of the author of the power-up/extension when you’re installing it. You may very well want to install from a third-party developer instead of GitHub itself because the features might be different. Regardless, you should make sure you’re aware of that choice. Don’t assume anything with “GitHub” in the title is made by GitHub the company.After you enable the power-up, click the gear icon in the corner to configure it.
You see a menu with the option to disable the power-up, or authorize it.
Click Authorize Account.
An option to link your GitHub account appears.
Click Link Your GitHub Account.
GitHub.com launches in your browser and prompts you to Authorize Trello, as shown in Figure 12-10.
Before clicking the Authorize trello button, make sure to click the Grant button next to any organizations that you want to connect with Trello. In my case, I’ll grant Trello access to the thewecanzone organization and then click the Authorize trello button to make the power-up active.
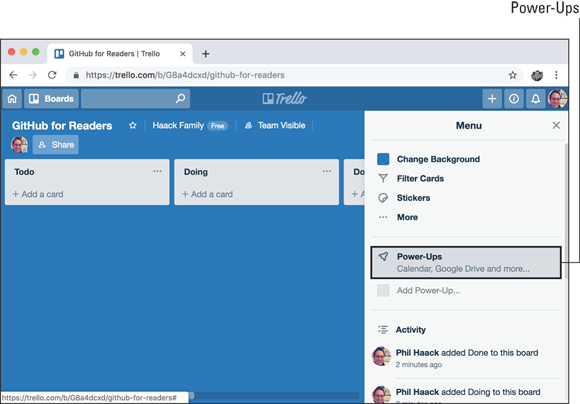
FIGURE 12-9: Power-Ups section of the menu.

FIGURE 12-10: Authorize Trello on GitHub.
Using the GitHub power-up
The GitHub power-up is accessed via the power-up button on the back of any Trello card. If you haven’t already, go ahead and create a couple of cards.
To use the GitHub power-up on your Trello board, follow these steps:
Click the card to access the back of the card.
Figure 12-11 shows a card that we created. The GitHub power-up shows up in the bottom right corner.
Click the GitHub Power-Up button.
Four menu options appear:
- Attach Branch
- Attach Commit
- Attach Issue
- Attach Pull Request
- Click Attach Issue to bring up a repository search dialog box.
Find the repository that contains the issue you want to attach to the card.
After you select the repository, you see a list of issues, as shown in Figure 12-12. You can also search for issues.
Clicking the issue from the drop-down list attaches it to the Trello card. After you attach the issue, the issue is displayed on the back of the Trello card.

FIGURE 12-11: Trello card with a GitHub power-up.
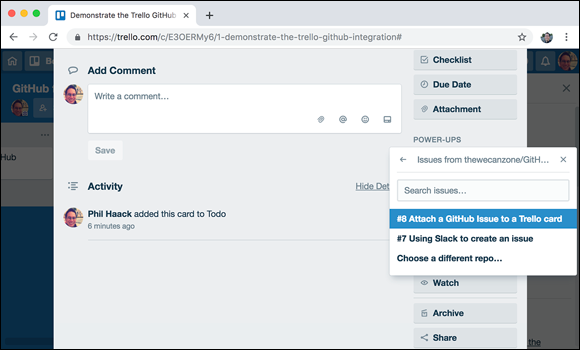
FIGURE 12-12: Selecting the issue to attach.
A Trello card may be attached to multiple GitHub items. For example, repeat the previous steps, but choose Attach Pull Request instead of Attach Issue to attach a pull request to an issue. When you are done, you see both an issue and a pull request attached to the Trello card, as shown in Figure 12-13.
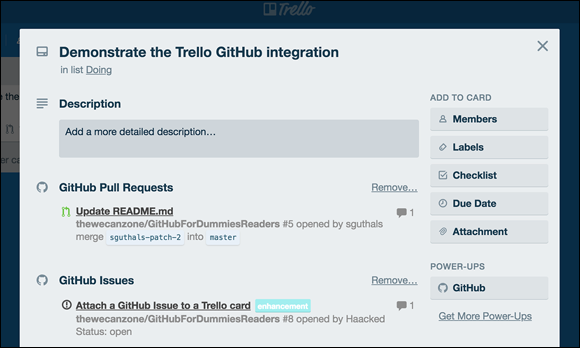
FIGURE 12-13: Trello card with an issue and pull request attached.
The front of the card shows a couple icons that indicate that this card is attached to GitHub. It shows an Octocat icon with a count of GitHub items attached to the card. It also shows pull request icon with a count to indicate the number of pull requests attached, as shown in Figure 12-14.
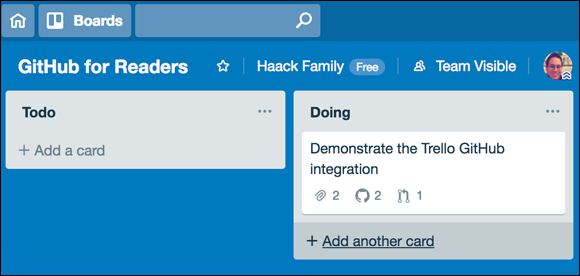
FIGURE 12-14: Front of a card with an issue and pull request attached.
When you visit the issue or pull request on GitHub.com, you can see that the attachment is bidirectional. The GitHub issue now has a link to the trello card, as shown in Figure 12-15.

FIGURE 12-15: GitHub issue with a link to the Trello board.
Managing Notifications with Octobox
Earlier in this chapter, we cover a couple of integrations that bring GitHub information into other collaboration tools. GitHub integrations help teams work together.
In this section, we cover a GitHub app that’s a little different. It’s a tool to help individuals manage the flow of GitHub notifications. As you participate in more and more GitHub repositories, the number of notifications can start to get overwhelming. Octobox provides an email client style view of your notifications.
Installing Octobox is pretty straightforward:
Go to
https://octobox.ioand scroll down to the button labeled Install the GitHub App.Some pricing options appear, as shown in Figure 12-16. Octobox is free for open source projects.
- Click Install it for free to continue with the installation process.
- Authorize the application the same way you authorized Slack and Trello, earlier in this chapter.
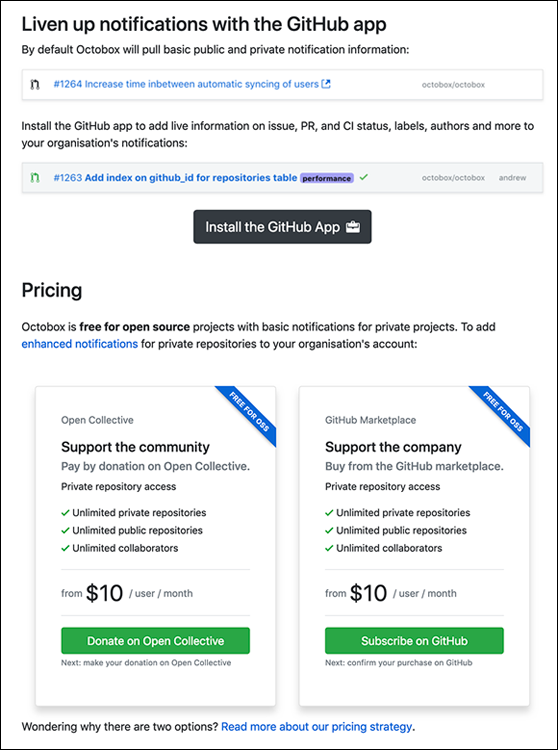
FIGURE 12-16: GitHub app download button and Pricing options for Octobox.
After the installation and authorization steps are complete, you’re taken to your Octobox inbox. The first time it runs, it takes a moment to synchronize your notifications. When it’s done, you should see something like Figure 12-17.
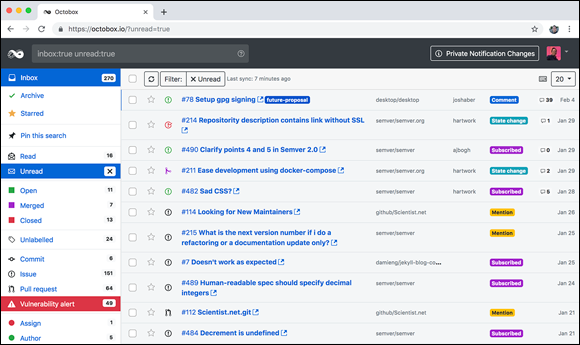
FIGURE 12-17: Octobox inbox for the author.
After Octobox is installed and synchronized, you can use it to manage your notifications. It allows you to search and filter your notifications by repository, organization, type, action, status, and so on. You can set Octobox to automatically synchronize on an interval in its Settings page. As the status for issues and pull requests change on GitHub, synchronizing Octobox displays those changes in Octobox. Octobox also provides archiving and muting for notifications, which is a nice way of staying on top of notifications, especially if you work on multiple active projects on GitHub.
In this chapter, we note that people collaborate on a project in many places other than GitHub. For example, people may use Slack to chat about a project and Trello to manage tasks for a project. The GitHub apps for these two products pull information from GitHub into these spaces. This is useful for those who are not on GitHub as the apps may provide important context. It also helps reduce context switching as folks may not need to constantly switch back and forth from their app and GitHub.
The last app, Octobox, serves a different purpose. It is a tool that fills in a gap in the GitHub product and makes GitHub notifications more manageable. These are just three examples of the many apps that make it possible to collaborate on GitHub in contexts outside of GitHub.