
Chapter 13
GitHub Workflow Integrations
IN THIS CHAPTER
![]() Exploring GitHub Integrations
Exploring GitHub Integrations
![]() Using GitHub Integrations
Using GitHub Integrations
![]() Keeping informed about GitHub Integrations
Keeping informed about GitHub Integrations
In Chapter 12, we show you some ways that you can get information about GitHub repos in other applications. Using applications like Slack and Trello, integrated with GitHub, can especially help you with project management. In this chapter, we show you some ways you can integrate GitHub into your existing development workflow.
A lot of the integrations that we show you in this chapter are open source, which means you can track the development of new features, easily report bugs through GitHub, or even contribute to the project. It also means that each is rapidly changing, so some details may be outdated by the time you read it. What is important is that you know how to find updates and navigate each integration.
Using GitHub for Atom
Atom is a lightweight, open source editor, so you can track the progress and report issues directly on the GitHub repo where it’s being developed. Atom has both a GitHub and Git integration that can help improve your development workflow when collaborating with others.
To get started, make sure you’ve downloaded Atom from https://atom.io. Then, open the GitHub tab in one of the following ways:
- Choose Packages ⇒ GitHub and then select the Toggle GitHub tab
- Click the GitHub button at the bottom right of the Atom window
- Use the keyboard shortcut Ctrl+Shift+8.
Viewing, checking out, and creating pull requests
When you first open the GitHub tab, what you see depends on the state of the repository that you have open in Atom. Figure 13-1 shows what happens if you don’t have a repository open in Atom at all. The blank screen isn’t an error; there is just no project, so the GitHub tab has no actionable items or feedback for you.

FIGURE 13-1: The GitHub tab when no project is open in Atom.
If you have a project open in Atom that isn’t associated with a GitHub repository, then you see the same blank tab that is shown in Figure 13-1. If the project is only a local project (for example, you created the repository using git init or it's just a folder on your computer, but you don’t have it backed up to any hosting platform like GitHub), you also have a notification at the bottom of the Atom window that indicates that no remote repository exists for this project. If the project is hosted somewhere other than GitHub, such as GitLab, you still see a blank tab like in Figure 13-1, but the bottom of the Atom window has the button for fetching, pushing, and pulling your code. This button is a feature of the Git integration and isn’t specific to GitHub.
Figure 13-2 shows the login button that you see if you have a GitHub repo open in Atom. When you click the Login button, you’re asked to go to http://github.atom.io/login to generate an authentication token to paste into the Atom window.

FIGURE 13-2: The GitHub tab when a GitHub project is open in Atom, but you have not yet authenticated with GitHub.
After you give permission to the GitHub package for Atom to access your account, you’re given a long authorization token. After you paste that token into Atom, you see a list of all the open pull requests on that repository and information about which branch you’re on (see Figure 13-3).
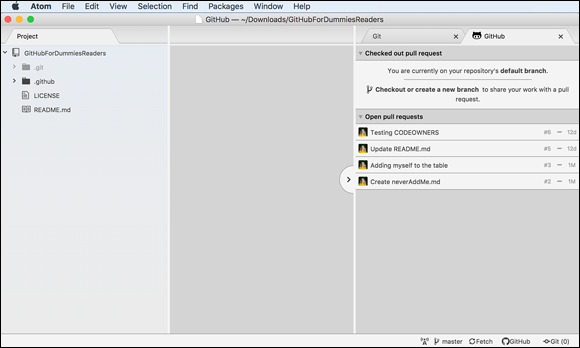
FIGURE 13-3: The GitHub tab showing all open pull requests on that repository.
You can check out a branch associated with a pull request by clicking the pull request and then clicking the blue Checkout button, as shown in Figure 13-4.

FIGURE 13-4: The detailed view of a pull request with the Checkout button.
Notice that in Figure 13-4, multiple tabs at the top of the detailed pull request view allow you to check the build status, view the list of commits on this branch, and view the diff of the files that were changed compared to the target branch for this pull request.
When you’re on a branch associated with a pull request, that pull request will be brought to the top of the GitHub tab, as shown in Figure 13-5.
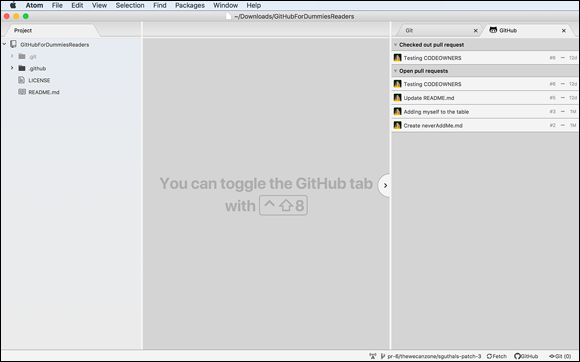
FIGURE 13-5: The GitHub tab showing the current pull request at the top.
If you create or check out a branch that isn’t yet associated with a pull request, the GitHub tab adds a Publish button to the top section, above the list of open pull requests. Clicking this button publishes your branch and then takes you to the GitHub.com web page where you can create a pull request for that branch. This button replaces the Testing CODEOWNERS pull request in the Checked out pull requests section in Figure 13-5.
Viewing issues
You can also view issues in Atom using a nifty Command Palette command. First, open the command palette by choosing Packages ⇒ Command Palette or by pressing ⌘ +Shift+P. From there, start typing GitHub: Open, and you should find the GitHub: Open Issue or Pull Request option, as shown in Figure 13-6. Choose that option.

FIGURE 13-6: The GitHub tab showing the current pull request at the top.
Paste in the URL to any issue (this work for pull requests also) and click the Open Issue or Pull Request button, and the issue details open in Atom with all the comments, just like on GitHub.com (see Figure 13-7).

FIGURE 13-7: GitHub issue details opened in Atom.
You can’t interact with issues other than reading them, but viewing issues in Atom can still be useful if you need to reference an issue while you’re working on some code. With the open issue feature, you don’t have to have a browser window also open and continuously toggle between the browser and Atom.
Following the GitHub package for Atom
The GitHub package for Atom has extensive documentation, which you can find in the Atom Flight Manual at https://flight-manual.atom.io/using-atom/sections/github-package. Here you find a list of all the Git and GitHub features with screenshots and in-depth descriptions.
You can also track the progress of new or future features on the GitHub repo itself at https://github.com/atom/github. The GitHub package for Atom team often uses project boards, issues, pull requests, and RFCs (request for comments) to plan, design, and implement new features. For example, you can find the RFC for the pull request review features at https://github.com/atom/github/blob/master/docs/feature-requests/003-pull-request-review.md.
Using GitHub for Visual Studio Code
One of the fastest growing editors is Visual Studio Code (VS Code for short). With more than 2.6 million active users in the first 12 months in 2017, you have probably either used it or at least heard about it. Like Atom, VS Code is open source, which means you can see the development of new editor features at https://github.com/microsoft/vscode. In 2018, Microsoft and GitHub teamed up to build an open source GitHub editor extension that provides an in-editor pull request experience.
After you install VS Code, you can install this extension by going to the extension marketplace, searching for GitHub, and clicking the green install button for the GitHub Pull Requests extension, as shown in Figure 13-8.
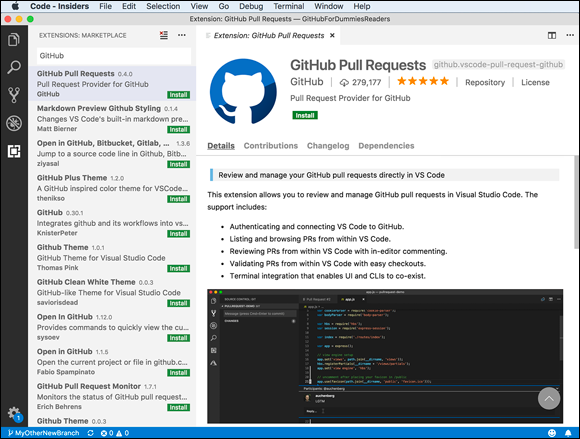
FIGURE 13-8: GitHub extension for VS Code in the extension marketplace.
 You have to reload the VS Code window after you install the extension. Reloading should take only a couple of seconds, and if you have any projects already open, it shouldn’t be a problem.
After you install the extension, you can sign in to GitHub. You can sign in to GitHub in three ways (see Figure 13-9):
- Click the Octocat button at the bottom left of the VS Code window.
- Click the notification at the bottom right of the VS Code window.
- Use the Command Palette, which you can open by pressing ⌘ +Shift+p and searching for the sign in by typing GitHub.
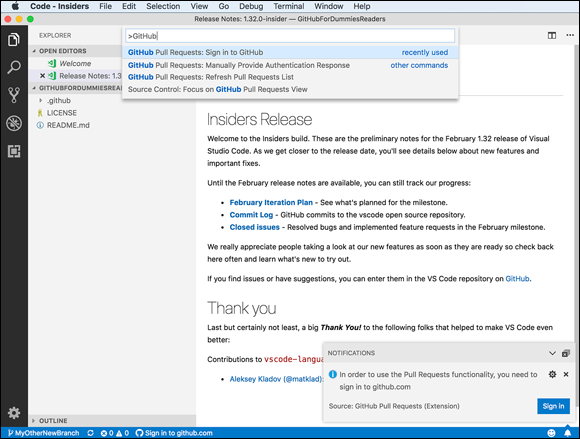
FIGURE 13-9: Three ways to start the GitHub sign-in process.
The sign-in process opens a web browser where you can authorize VS Code to access your GitHub repositories. Click through the prompts, and it redirects you back to VS Code. After you’re back in VS Code, you get a pop-up notification asking whether you trust the URL; click Yes.
Interacting with pull requests in VS Code
After you’re signed in, when you go to the Source Control tab on the left side of VS Code, you should see all the pull requests associated with this repo. Pull requests are grouped into five different sections:
- Ones that you currently have checked out
- Ones where you are marked as a reviewer
- Ones that you’re assigned to
- Ones that you created
- A list of all pull requests
When you unroll a specific pull request, you see the description of the pull request, along with all the modified files.
Clicking the description of the pull request displays the description as you would see it on GitHub, as shown in Figure 13-10. From this page, you can check out the pull request, leave a comment, merge or update the pull request, or complete a review. You have the entire pull request experience right inside of VS Code!

FIGURE 13-10: Interacting with pull requests in VS Code.
Another feature of this extension is the ability to add inline comments to the diff. Clicking a specific modified file shows you the side-by-side diff, just as it would look on GitHub.com. From here, you can add a comment to any of the modified lines, as shown in Figure 13-11. All these actions are reflected on GitHub.com.
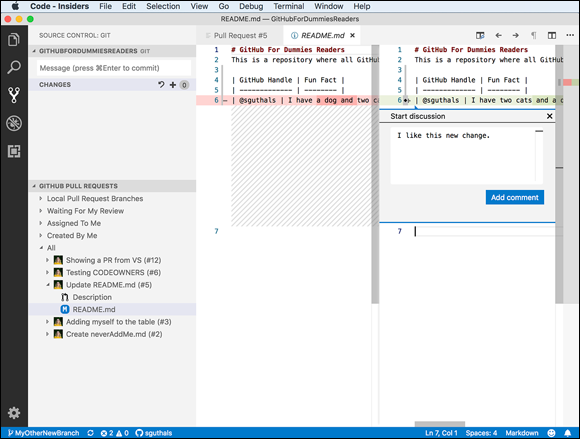
FIGURE 13-11: Adding an inline comment in VS Code.
Following the GitHub for VS Code pull requests extension
Because this extension is also open source, you can follow the development, report issues, or even contribute to it on GitHub.com. Go to https://github.com/Microsoft/vscode-pull-request-github to find the latest features and documentation for how to use this extension to improve your development workflow.
The VS Code and GitHub teams working on this extension often use a tracking issue to track what they’re working on. You can find the most recent iteration plan for this project by going to the Issues tab on the GitHub repo and filtering the issues by the label iteration-plan.
Using GitHub for Unity
Unity is a cross-platform game engine that game developers use to build scenes and attach code scripts to games. You can write the code in any editor you want, or you can use MonoDevelop, the editor that is shipped with Unity.
 Integrated development environments (IDE), such as Visual Studio, have integrations that make writing code for your Unity game a better experience. With the full-featured experience of an IDE coupled with a clean connection back to Unity, you can be an even more effective game developer! After you create a new project in Unity, you can add the GitHub extension to your project. Unity is different from other editors. In Unity, every extension is represented as an Asset and is a part of your game, not a part of the development environment. So, when you add the GitHub extension to your Unity project, the files for that extension are a part of your game. Don’t worry; they won’t appear in your finished game, but they will help while you’re collaboratively building it!
First, open the Asset Store in Unity by choosing Window ⇒ Asset Store. Search GitHub, and you will find the GitHub for Unity asset, as shown in Figure 13-12. It is free.

FIGURE 13-12: GitHub for Unity in the Asset Store.
Click the GitHub for Unity asset, scroll down, and click the big pink Import button. A pop-up window with all the files that will be added to your project appears, as shown in Figure 13-13. Click Import.

FIGURE 13-13: Installing the GitHub for Unity extension.
Using GitHub for Unity in Unity
After you install the extension, you see a new menu item in the Window menu called GitHub. If you choose GitHub, a new tab opens in Unity (see in the background of Figure 13-14). Click the Initialize a git repository for this project button in the center of the new tab, and the GitHub tab updates with additional tabs related to git actions. At the top right of the GitHub tab, you can click the Sign in button to sign in to your GitHub account, shown in Figure 13-14. If you have two-factor authentication setup, you are asked for your 2fa code.
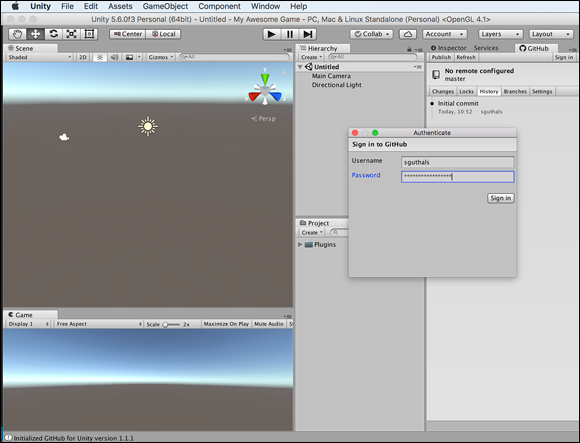
FIGURE 13-14: Signing in to GitHub inside of Unity.
When you’re ready, you can publish your project to GitHub by clicking the Publish button at the top left of the GitHub tab. In the Publish dialog box, shown in Figure 13-15, choose which GitHub organization should own this project, put in a repository name, add a description, and choose to make it public or private.
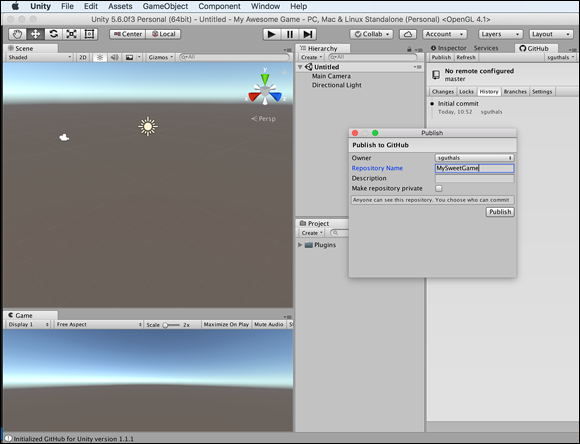
FIGURE 13-15: Publishing your project to GitHub.com.
After the project is published, you can continue to work on your project just like you would any other coding project. Items that you may find useful include
- Changes where all the recent changes are listed. You can add changes to a commit and then commit them to the branch that you’re on.
- Locks where you can lock certain files and assets so that only you can modify them. This lock becomes extremely important if you’re making changes to a game scene and you don’t want someone else to also make changes to that scene and overwrite your work.
- History is a history of all the commits for this project.
- Branches where you can see all the branches on this repo, create a new branch, and switch branches.
- Settings where you can change the remote path of your repository, change the path to git that this extension is using, and even update your git username or email. It’s recommended that you don’t modify these settings unless you know what you are doing. The extension will set these up properly for you.
- Fetch/Pull/Push/Refresh is at the top of the GitHub tab and contains four buttons that sync your GitHub repo with your local project.
- GitHub Username is at the top right of the GitHub tab where you see your username and go to your GitHub.com profile or sign out of GitHub inside of Unity.
Following the GitHub for Unity extension
The GitHub for Unity extension is open source, so you can track development, report issues, or even contribute to it via the GitHub repo at https://github.com/github-for-unity/Unity. It’s also important to always keep the extension up to date. A pop-up window appears in Unity whenever a new version is released, but you can also check on the Unity Asset store or directly download the latest version all from https://unity.github.com.
The team working on this extension is fairly small, so if you’re interested in contributing to the project, we’d highly encourage you to give it a go! You can always check out the issues on the repo on GitHub.com for ones labeled Help Wanted or Good First Issue.
Using GitHub for Visual Studio
Visual Studio is different from Visual Studio Code. Visual Studio is an IDE and is a full-featured application to support developers in writing code. Both VS Code and Atom are editors that have an extensive list of extensions that a developer can add to the editor to create the experience they need. Visual Studio has a version for Mac and a version for Windows. This section talks only about the version for Windows because it’s the original and more full-featured version and the one that has the GitHub integration.
After you install Visual Studio, choose Tools ⇒ Extensions and Updates. A pop-up window appears with all the extensions you currently have installed, plus the marketplace of additional extensions. If you click Online, the top choice is the GitHub Extension for Visual Studio extension, as shown in Figure 13-16.
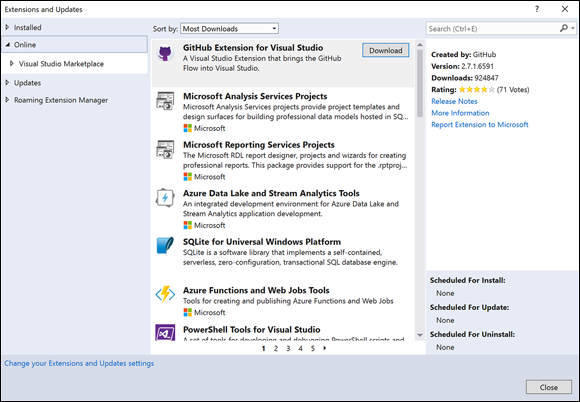
FIGURE 13-16: The GitHub for Visual Studio extension in the Visual Studio Marketplace.
Click the Download button and close Visual Studio. When Visual Studio closes, the VSIX Installer starts and ask whether it can modify Visual Studio. When you click yes, then modify, the extension begins to install. After it installs, click the Connect link in the Team Explorer tab and connect to your GitHub account, as shown in Figure 13-17. When you click the Connect link, a pop-up window asks you to sign in to GitHub. If you have two-factor authentication set up, you’re also asked for your 2fa code.

FIGURE 13-17: The Team Explorer pane with the GitHub Connect section.
Once connected, you can clone a repo, create a new repo, or sign out from GitHub, all from the Connect page on the Team Explorer pane.
Viewing, creating, and reviewing pull requests in Visual Studio
When you have the project open in Visual Studio that is connected to a GitHub repo, you see additional project options on the home page of the Team Explorer pane, as shown in Figure 13-18.

FIGURE 13-18: The Team Explorer pane with additional GitHub project options.
Clicking Pull Requests opens the GitHub pane where all the pull requests on this repo are listed, as shown in Figure 13-19. At the top of the list, you can choose to see all the open pull requests, closed pull requests, or just all pull requests. You can also sort by author.

FIGURE 13-19: A list of pull requests on the GitHub pane.
If you double-click one of the pull requests, the details open. From here, you can see the description, the target and base branch, the current state, the list of reviews, and the list of files changed. You can also click the View on GitHub link to open a browser window to this pull request on github.com. Click the Checkout <branch-name> button to check out the branch associated with this pull request. Click the Add your review link to add your own review with inline and overall comments. When you add a review, you can mark it as comment only, approve it, or request changes. If you double-click one of the changed files, the diff opens in the editor area. If you hover over one of the changed lines, you can add an inline comment, very similar to how it is done in VS Code (refer to Figure 13-11). You can see all of this in Figure 13-20.

FIGURE 13-20: Interacting with a pull request in Visual Studio.
Following the GitHub for Visual Studio extension
The GitHub for Visual Studio extension is open source. You can follow the development, report issues, or even contribute to it on GitHub.com. Go to https://github.com/github/visualstudio to find the latest features and documentation for how to use the GitHub for Visual Studio extension to improve your development workflow.
The GitHub team working on the extension often use a tracking issue to track what it’s working on. You can find the most recent tracking issue for this project by going to the Issues tab on the GitHub repo and filtering the issues by the Next Release label.
Using GitHub for XCode
Apple has developed an integration for GitHub in XCode. After you install XCode, you can sign in with GitHub by choosing XCode ⇒ Preferences to open the Accounts tab. Click the plus sign in the bottom left corner, choose GitHub, and click Continue, as shown in Figure 13-21. Follow the prompts to sign in to your GitHub account. If you have two-factor authentication set up, you are asked for your 2fa code.

FIGURE 13-21: Signing in to GitHub inside of XCode.
Now when you choose Source Control ⇒ Clone, your GitHub repos load below the box where you can insert a URL to clone. When you click one, you get information, such as the primary language used, the number of forks and starts for this repo, and a quick link to the README, as shown in Figure 13-22.

FIGURE 13-22: List of GitHub repositories you have access to clone from inside XCode.
If you have a file open in XCode, the Source Control menu displays additional actions you can perform, such as Commit, Push, Pull, and Fetch and Refresh Status.
This extension isn’t open source, so it’s best to keep up with the latest Apple developer news to know what new features may be available. You can read about all the source control integrations that Apple releases at https://developer.apple.com/library/archive/documentation/ToolsLanguages/Conceptual/Xcode_Overview/UsingSourceCodeControl.html.
Using GitHub for IntelliJ
The IntelliJ IDE from JetBrains has GitHub pull request support for any GitHub repo you have open. After you install IntelliJ, you can choose to clone a git project from the Start menu, as shown in Figure 13-23.

FIGURE 13-23: Clone from a git project to get started integrating GitHub into IntelliJ.
A pop-up window asks for a URL. At the bottom of this window, click the Sign in to GitHub button. You’re asked for your GitHub credentials. If you have two-factor authentication set up, you are also asked for your 2fa code. After you have successfully logged in, all the GitHub repositories that you have access to appear in the drop-down list, as shown in Figure 13-24.
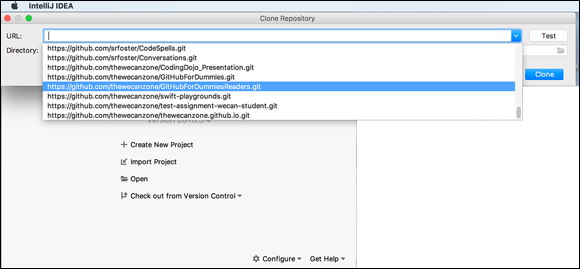
FIGURE 13-24: List of GitHub repositories you have access to clone from inside IntelliJ.
After you choose a repository and click Clone, a series of pop-up windows prompt you to create the IntelliJ project. When the project is open in IntelliJ, you can open the GitHub pull request preview by choosing VCS ⇒ Git ⇒ View Pull Requests. A new section opens in the IntelliJ window with a list of the open pull requests. If you click one, the description and list of changed files opens. If you double-click one of the changed files, a diff of that file opens in a new window (see Figure 13-25).
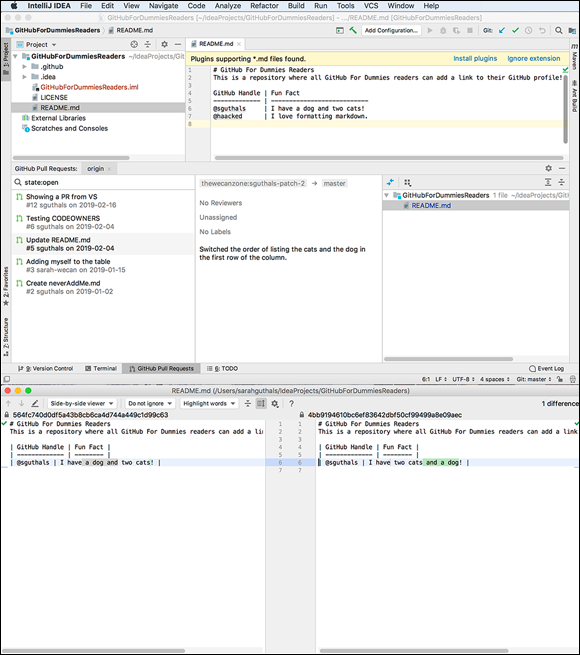
FIGURE 13-25: Viewing a pull request from inside of IntelliJ.
Lastly, you can create a pull request from inside of IntelliJ as well. If you’re on a new branch and have already made some changes and committed them to your branch, you can choose VSC ⇒ Git ⇒ Create Pull Request. In the pop-up window, shown in Figure 13-26, specify the base and target branch, title, and description of your pull request.

FIGURE 13-26: Creating a pull request from inside of IntelliJ.
This GitHub pull request feature is embedded in the IntelliJ IDE, so it’s best to follow the IntelliJ blog and documentation for up-to-date information on the development of this feature.