
Chapter 1
Understanding the Git in GitHub
IN THIS CHAPTER
![]() Getting familiar with GitHub
Getting familiar with GitHub
![]() Discovering Git
Discovering Git
![]() Signing up with GitHub.com
Signing up with GitHub.com
![]() Exploring helpful resources
Exploring helpful resources
Whether you’re an experienced coder or a newbie starting out, learning how to work with others on code is critical to succeeding in the software industry. Millions of people around the world work together to build software, and GitHub is one of the largest tools to support a collaborative workflow. This chapter introduces you to the core tools you need to write code with other people.
Introducing GitHub
GitHub creates an environment that allows you to store your code on a remote server, gives you the ability to share your code with other people, and makes it easy for more than one person to add, modify, or delete code to the same file and project, while keeping one source of truth for that file (phew!). So what does that all actually mean? One of my favorite ways of explaining GitHub.com to folks who are new to the tool is to compare it to Google Docs — a place online where you can write code with other people and not have to email different versions back and forth.
What makes GitHub work behind the scenes is Git.
Understanding Version Control
Version control systems (also known as source control management, or SCM) are software that keep track of each version of each file in a coding project, a timestamp for when that version was created, and the author of those changes.
 Writing code is an iterative process. For example, when you’re building a website, you first may want to get some basic structure up before adding all your content. The best thing to do is to create a version of your website each time you have something that works. That way, as you experiment with the next piece, if something breaks, you can just go back to your previous version and start over.
SCMs enable coders to make mistakes without worrying that they’ll have to completely start over. Think of it like being able to click Undo, but instead of undoing each key press, you can undo an entire piece of the project if you decide you don’t like it or it doesn’t work.
The basic workflow of coding with version control system support is as follows:
- Create a project, typically in a folder on your computer.
- Tell your version control system of choice to track the changes of your project/folder.
- Each time your project is in a working state, or you’re going to walk away from it, tell your version control system of choice to save it as the next version.
- If you ever need to go back to a previous version, you can ask your version control system to revert to whichever previous version you need.
You can use a version control system if you’re working alone on your own computer, but it gets even more interesting when you begin working with other people. (For more on working with other people, see the section “Git version control,” later in this chapter).
For more information about version control, visit https://git-scm.com/book/en/v2/Getting-Started-About-Version-Control.
Git Version Control
GitHub, as the same would suggest, is built on Git. Git is a type of version control system, and it is free and open source, which means that anyone can use it, build on top of it, and even add to it.
GitHub products make using Git easy, but if you’re curious, you can also use Git to track your solo projects on your computer. You can find a brief introduction to local Git commands for solo projects in the section “Try simple Git on the terminal”.
Try simple Git on the terminal
With the help of Git for Windows, using the terminal on Mac, Windows, or Linux computers is exactly the same. A terminal is an application that enables you to interact with your computer in a text-based way — in other words, instead of double-clicking and dragging, you type commands to navigate your computer.
If you’re on Mac or Linux, a terminal is already installed on your computer. If you’re using a Windows computer, install Git for Windows, which is what this section assumes you’ve installed. Just go to https://gitforwindows.org and click Download to gain access to Git Bash, an emulator that allows you to interact with Git just like you would on a Linux or Mac terminal. You also get Git GUI, which gives you a user interface for almost all Git commands you might type into Git Bash, and shell integration so that you can quickly open Git Bash or Git GUI from any folder.
Many developers on Windows prefer to use PowerShell as their terminal environment. You can use Git within PowerShell, but setting that up properly is outside the scope of this book. However, Phil, one of the authors, has a handy guide to setting this up at https://haacked.com/archive/2011/12/13/better-git-with-powershell.aspx.
First, find the Terminal application:
- On Mac, you can click the magnifying glass at the top right of your desktop, type Terminal, select the terminal from the list of applications, and press Enter or click it.
- On Linux, press Ctrl-Alt-T all at the same time, and the terminal window opens.
- On Windows, click the Windows menu in the bottom right of your desktop, search Git Bash, select the Git Bash application from the list of search results, and press Enter or click it.
When the application opens, type git --version in the terminal. If you have Git installed, you should see a version number, as shown in the following code (the $ should already be on the line, so you do not need to type it). Otherwise, you can follow the instructions on https://git-scm.com/book/en/v2/Getting-Started-Installing-Git.
 When using the command line, you have to be very careful about exactly what you're typing. In the following code, the first instruction is for you to type
 git --version. You should note that a space appears between git and the rest of the instruction but no other spaces. You should also note the two dashes before the word version. They can be easy to miss, so be careful!
For Mac or Linux, you should see something like this:
$ git --version
git version 2.16.3
$
For Windows, you should see something like this:
$ git --version
git version 2.20.1.windows.1
$
Next, using the terminal, go to your desktop and create a new folder called git practice. To do this, you should type the following commands:
$ cd ~/Desktop
$ mkdir git-practice
$ cd git-practice
$
If you type pwd, you should see that you are now in the folder git-practice, which is on your desktop. It might look something like this:
$ pwd
$ /Users/sguthals/Desktop/git-practice
$
Now, you can tell git to track this folder using the init command.
$ git init
Initialized empty Git repository in /Users/sguthals/Desktop/git-practice
$
Then make sure that you have a clean folder. You can check with the status command:
$ git status
On branch master
No commits yet
nothing to commit (create/copy files and use "git add" to track)
$
Then, you can create a file to have Git start tracking and confirm the file is in the folder:
$ echo "practicing git" > file.txt
$ ls
file.txt
$
On Mac, you can open this folder in a Finder with the open <path> command:
$ open .
$
On Linux, you can open this folder with the nautilus <path> command:
$ nautilus .
$
On Windows, you can open this folder with the explorer <path> command:
$ explorer .
$
In this example, we put . as the <path> for each command. . tells the terminal to open the current folder. You could also use a different path with these commands to open other folders.
After the folder is open, double-click the file called file.txt, and the file opens with TextEdit on Mac, gedit on Linux, and Notepad on Windows. You can see that the words “practicing git” are actually there.
Close the file. Now, you can tell Git that you want to save this as a particular version. Back in the terminal:
$ git add file.txt
$ git commit -m "Adding my file to this version"
[master (root-commit) 8d28a21] Adding my file to this version
1 file changed, 1 insertion(+)
Create mode 100644 file.txt
$ git status
On branch master
nothing to commit, working tree clean
$
You can make a change to your file in the text file. Open the file again, change the text to say “Hi! I'm practicing git today!” and then click File ⇒ Save and close the text application.
When you go back to the Terminal to check the status of your project again, you should see that Git has noticed that the file has changed:
$ git status
On branch master
Changed not staged for commit:
(use "git add <file…" to update what will be committed)
{use "git checkout -- <file>…" to discard changed in working directory)
modified: file.txt
no changed added to commit (use "git add" and/or "git commit -a")
$
Commit this version of your file again and notice that Git recognizes that everything has been saved to a new version:
$ git add file.txt
$ git commit -m "I changed the text"
[master 6d80a2a] I changed the text
1 file changed, 1 insertion(+), 1 deletion(-)
$ git status
On branch master
nothing to commit, working tree clean
$
If your terminal starts to get too cluttered, you can type clear to clear some space and make it more visually appealing. Don't worry; you can always scroll up and see everything you typed earlier!
Say that you actually want to go see the original change; when you added “practicing git”. First, get the log of all the commits you have made:
$ git log
commit 6d80a2ab7382c4d308de74c25669f16d1407372d (HEAD -> master)
Author: sguthals <[email protected]>
Date: Sun Dec 9 08:54:11 2018 -0800
I changed the text
commit 8d28a21f71ec5657a2f5421e03faad307d9eec6f
Author: sguthals <[email protected]>
Date: Sun Dec 9 08:48:01 2018 -0800
Adding my file to this version
$
Then ask Git to show you the first commit you made (the bottom most one). Make sure that you're typing your unique commit hash. In this book, the hash starts with 8d28a2. Make sure you type the entire hash that appears in your Git log:
Instead of typing the entire hash (and possibly having a typo), you can highlight the hash with your mouse, right-click and choose copy, and then after git checkout, you can right-click and choose Paste. Using the keyboard shortcuts Ctrl+C or ⌘ -C doesn't work
$ git show 8d28a21f71ec5657a2f5421e03faad307d9eec6f
commit 8d28a21f71ec6567a2f5421e03faad307d9eec6f
Author: sguthals <[email protected]>
Date: Sun Dec 9 08:48:01 2018 -0800
Adding my file to this version
diff --git a/file.txt b/file.txt
new file mode 100644
index 0000000..849a4c7
--- /dev/null
+++ b/file.txt
@@ -0,0 +1 @@
+practicing git
$
You can see that practicing git was added to the file in that original commit.
For more information on how to use git on the command line, check out the following resources:
- The GitHub Git Cheat Sheet at
https://services.github.com/on-demand/downloads/github-git-cheat-sheet.pdf - The Visual Git Cheat Sheet at
http://ndpsoftware.com/git-cheatsheet.html - The Git Docs page at
https://git-scm.com/doc
Another couple resources for learning and understanding Git is https://learngitbranching.js.org and http://git-school.github.io/visualizing-git, which enable users on Windows to experience a similar workflow because they’re visualizations hosted on a website. The first link, learninggitbranching.js.org, is a good self-guided set of exercises, while the second link, git-school, is best used for folks who have a decent understanding of Git and want to explore what will happen in different scenarios, or for folks who have a more expert Git user guiding them.
Git branching by collaborator
Git is different from other version control systems because it has fast branching, shown in Figure 1-1. Branching is a Git function that essentially copies code (each branch is a copy of the code), allows you to make changes on a specific copy, and then merges your changes back into the main (master) branch.
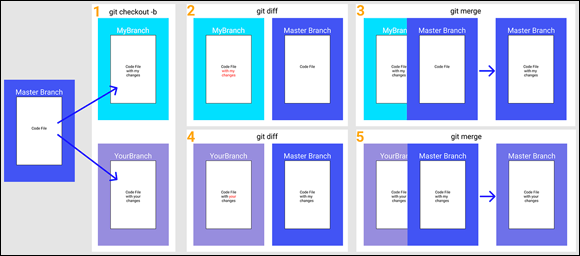
FIGURE 1-1: Example workflow for Git branches.
When you're writing code, you will add files and commit changes to your master branch. Figure 1-1 outlines a specific workflow where two people are collaborating on the same file. Person 1 creates a new branch called MyBranch and makes some changes to the file. Person 2 also creates a new branch called YourBranch and makes some changes to the same file. You can see this change in box #1.
You can see the difference (called diff) between the master branch and MyBranch in Figure 1-1 in box #2.
Then, Person 1 merges their changes with the master branch, as you can see in box #3.
Person 2 has made their own changes, but before merging, they will make sure they have the most updated version of the master branch, which now has the changes from Person 1. The diff can be seen in box #4. Notice what text is in both files.
Finally, Person 2 acknowledges that their changes will overwrite Person 1's changes and merges their changes with master, making the final version have the changes from Person 2. Box #5 shows this final merge, with the master branch having the final changes.
 Figure 1-1 shows just one workflow that can exist when more than one person is working on code and is meant to describe branching. You can get a more in-depth overview on Git and branching at
 https://git-scm.com.
Git branching by feature
Another common way to use branching is to have each feature that you develop be on a different branch, regardless of the collaborator who is building the feature.
You can extend the idea of branching by feature to also have one branch that is your production branch. This branch is what your users will see. Then you can have a development branch, which is one that you can merge features into without changing what your users see.
This type of branching allows you to build a lot of different features, merge them each into the development branch, make sure they all work the way you want, and then merge the development branch into the production branch when you know it's ready for your users.
Git branching for experimentation
You can also create branches to test to see whether something works and then completely throw the branch away.
This type of branching can be useful if you want to try a completely new layout of a website, for example. You can create three different branches, each with a different layout. After you decide which layout you like best, you can simply delete the other two branches and merge the branch with your favorite layout into master.
Git's Place on GitHub
GitHub is a host for Git repositories. At some point, it is helpful to place your Git repository in a shared location as both a backup and a place where others can collaborate with you on your code. As a Git host, Git provides all the features of Git in addition to a few extra useful services.
On GitHub.com, projects, or repositories, are stored on remote GitHub servers. If you save all your code on GitHub.com and your computer crashes, you can still access it.
Here is a list of some core Git features that GitHub supports:
- Repository: Each repository contains all the files and folders related to your project and gives you control of permissions and collaborators’ interaction with your code.
- Clone: When you want to make changes to your code, you will often want to create a copy, or
clone, of the project on your local computer. The cloned project is still tightly connected with the version on GitHub.com; it’s just your local copy. - Fork: Forking a project is when you create your own copy of the entire project. When you
forka project, GitHub.com creates a new repository with your copy of all the files. You can still suggest changes back to the original copy, but you can also take your version and go in a new direction. - Branches: GitHub.com supports branching and even provides a useful tool — pull requests — to compare the diff between branches and
mergebranches. - Commits: GitHub.com tracks all the
commitsthat you push to its servers and gives you an easy interface for browsing the code at different branches and different commits.
Signing Up for GitHub.com
GitHub.com offers unlimited free public and private repositories for individuals. Free private accounts are limited to three collaborators. You can sign up for a paid account to have unlimited collaborators and some Pro features.
Public means that anyone can see your code, clone your code, and therefore use your code. GitHub is a huge supporter of open source software (OSS) and therefore encourages public, shared code. Open source software is more than just public, shared code (see Part 5). Because every line of code can be traced to an author, you still get credit for what you've written, but the goal is to keep the code available for anyone to use, extend, and explore.
The following steps guide you through signing up for a free, individual GitHub.com account:
- Go to GitHub.com and fill out the Sign Up form.
Choose the plan you want.
For the purpose of this book, you can use the Free plan. You can always upgrade to a paid plan later if you decide you want to have more than three collaborators for your private repository and other pro GitHub features.
Complete the brief survey.
This survey helps GitHub understand who is using the software and helps them support workflows specific to their users.
You’re now at the home page, shown in Figure 1-2.
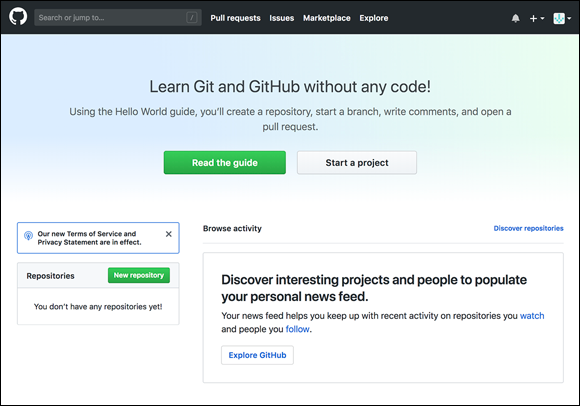
FIGURE 1-2: The GitHub.com home page when you’re logged in.
Personalizing Your GitHub.com Account
As you become a more experienced coder, you may want to reference your GitHub.com profile on your resume and job applications. More and more companies care more about your portfolio than a list of degrees or awards. For example, GitHub doesn’t require you to provide information on your education as part of the hiring process and instead asks for a link to your GitHub.com profile and/or portfolio.
To complete your GitHub.com profile:
- Click the avatar icon in the top right corner and choose Your Profile.
- Click Edit Profile on the page that appears.
- Fill out the form on the Personal Settings page, shown in Figure 1-3.
- Click Update profile when you’re finished.
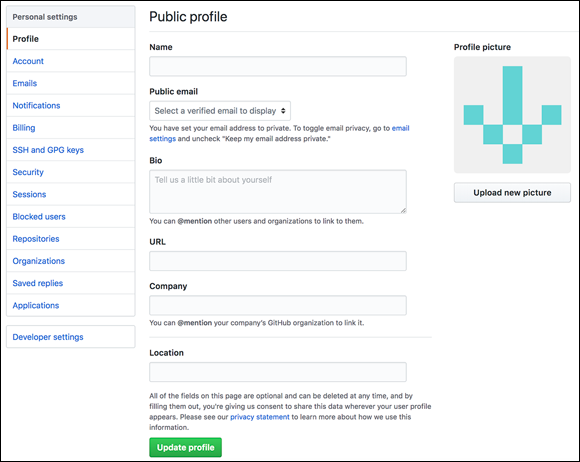
FIGURE 1-3: The Personal Settings page.
On the Personal Settings page, you can also adjust a number of different settings to continue personalizing your account.
Account
In Account settings, you can change your password, change your username, or delete your account (see Figure 1-4).

FIGURE 1-4: Account settings.
Changing your username may cause unintended side effects, so it typically isn’t recommended. Just make sure that after you change your username that anything that you need to continue working still does. Follow links, test code, and run your applications again.
Emails
GitHub allows you to link multiple email addresses to your account. Notice that you can add email addresses, keep your email address private, and even block Git commands that may expose your email address (see Figure 1-5).

FIGURE 1-5: The Email settings.
Notifications
Notifications can get really overwhelming. Though you can choose your level of granularity for receiving notifications per repository, this page creates your default preferences for notifications (see Figure 1-6).
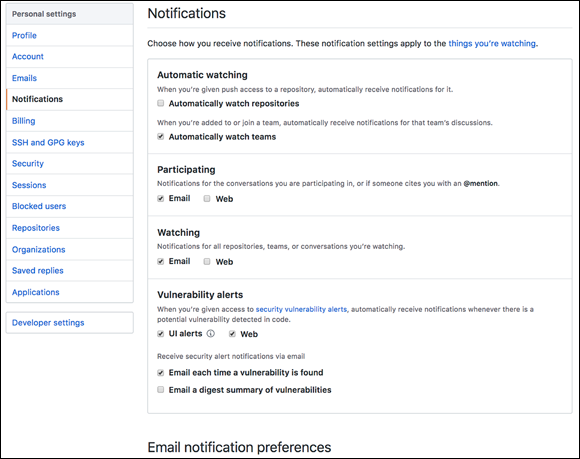
FIGURE 1-6: The Notifications settings.
We recommend not automatically watching repositories because any kind of activity that happens on any repository that you interact with will start to show up in your inbox, which turns out to not be helpful as you begin collaborating more.
Click the Things you’re watching link at the top of the notifications settings page to check to see what you’re watching and therefore what notifications you may get from them.
Billing
You can upgrade your plan at any time to include Pro features, such as unlimited collaborators and advanced code review tools. You can make this upgrade happen on the Billing settings page, shown in Figure 1-7. In addition to upgrading your plan, you can also purchase Git LFS data and other Marketplace Apps. You can even put in coupons from your company, school, or affiliated organization.

FIGURE 1-7: The Billing settings.
Git LFS stands for Git Large File Storage. Some software development requires large files, such as game scenes in video game development, to be stored. Without Git LFS, you can upload files as large as 100MB. Anything larger requires Git LFS, which supports files up to a couple GB.
SSH and GPG keys
At some point, you may want to create an SSH or GPG key to encrypt your communication with GitHub and ensure a secure environment. You can do this in your settings, shown in Figure 1-8.
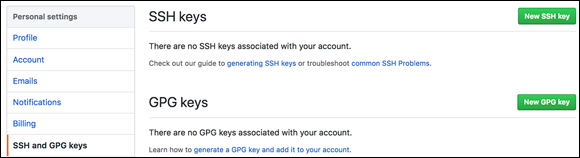
FIGURE 1-8: The place to create SSH and GPG keys.
SSH keys enable you to connect to GitHub from your local machine without having to put in your username and password each time. GPG keys mark tags and commits that you make as verified, meaning that other people know that it was actually you who push the changes.
Another way to tell Git to remember your credentials is to use a credential helper. GitHub tends to recommend this over using SSH, especially for Windows users. For more information on how to set up this feature, visit https://help.github.com/articles/caching-your-github-password-in-git.
Security
Not only should your password be complex, but you should also consider enabling two-factor authentication. Two-factor authentication means that when you type the correct password, you’re asked to further verify that it is you who is attempting to log in through an app or SMS.
Sessions
Sessions allows you to see every computer address, city, and country where you’re logged in or connecting to GitHub.com.
Blocked users
In the Blocked users settings, you can block users from all your repositories.
Repositories
The Repositories section lists all the repositories that you have created or been invited to as a collaborator. You also can leave repositories from this page.
Organizations
Organizations enable you to put GitHub users and repositories under similar settings. For example, you can grant admin rights to all repositories in an organization to the entire organization, instead of having to individually add each person to each repository. Although Organizations is out of the scope of this book, you can read about them on the GitHub Help page at https://help.github.com/articles/about-organizations.
Saved replies
Saved replies, shown in Figure 1-9, can be extremely useful for popular OSS. For example, if you’re building an extension to an application, a lot of folks may report problems with the application, not with your extension. You can write a saved reply to point folks to where they can provide feedback on the application when they find an error.

FIGURE 1-9: The Saved replies settings.
Applications
You can connect three kinds of applications with your GitHub.com account:
- Installed GitHub apps: GitHub applications that you are using with your account. One example is GitHub Learning Labs.
- Authorized GitHub apps: Applications that you have authorized to access your account. One example is Slack.
- Authorized OAuth apps: Applications that you have authenticated with using GitHub credentials. One example is GitHub Desktop.
Developer settings
The last section on the Settings page is Developer settings, which you use only if you’re building an application that accesses the GitHub API, which means the application needs to access GitHub data in some way.
Three settings appear in this section:
- OAuth apps: Applications you have registered to use the GitHub API.
- GitHub apps: Applications that integrate with and extend GitHub.
- Personal access tokens: Similar to SSH keys, tokens that allow you to access the GitHub API without requiring authentication.
Discovering Helpful Resources
The GitHub.com help page (https://help.github.com) has an extensive list of documents for every feature on GitHub.com. From the top-right avatar menu, you can click the Help link. From there, clicking Contact a Human takes you to the GitHub contact page (https://github.com/contact) where you can find the following resources:
- A FAQ
- Links to the help documentation
- Links to developer documentation for help on the GitHub API (
https://developer.github.com) - The GitHub Learning Lab for guided GitHub exercises (
https://lab.github.com) - The GitHub Community Forum, where you can ask questions and get answers from folks who work at GitHub and other community members (
https://github.community) - A slew of other resources about your experiences on GitHub.com
If none of those resources are helpful, you can visit https://github.com/contact and fill out a quick form to ask a specific question.