
Chapter 3
Introducing GitHub Repositories
IN THIS CHAPTER
![]() Touring a repository?
Touring a repository?
![]() Creating a Hello World repository
Creating a Hello World repository
![]() Exploring repository issues, pull requests, and project boards
Exploring repository issues, pull requests, and project boards
Almost everything on GitHub.com revolves around a repository.
In this chapter, you find out how you can set up a repository, interact with it, and create project boards and issues.
Setting Up a Repository
A GitHub repository is a folder with all the files needed for your project, including the files that track all the versions of your project so that you can revert back if you make a mistake. A repository on GitHub also tracks who can collaborate and how.
To get a better understanding of what a repository is and how it is structured, you need to create your first GitHub repo:
Go to the home page of GitHub.com by clicking the Octocat.
A list of your repositories appears on the bottom left side of the screen.
Click the green New Repository button.
The Create a New Repository dialog page, shown in Figure 3-1, opens.
Type the name of your repository in the Repository name text box.
I named my repository
HelloWorld.- Type a short description in the Description text box.
- Select the Public radio button.
Click the Initialize this repository with a README check box.
You do not need to add a
.gitignore.Choose a license from the Add a license drop-down list.
 If you're interested in finding out more information about licenses, see the nearby “Software licenses” sidebar.
Click Create Repository.
The home page of your repository appears. It should look similar to the one I created, which is shown in Figure 3-2. Notice that a markdown file — README.md — is already in the repository. Markdown is a lightweight markup language used to style the words that you write with a plain text syntax. You can make words bold, turn them into headers, and even create a table for data.
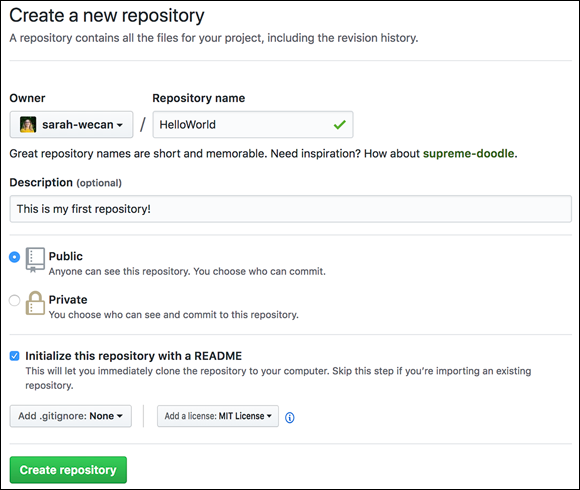
FIGURE 3-1: The page to create a new repository.
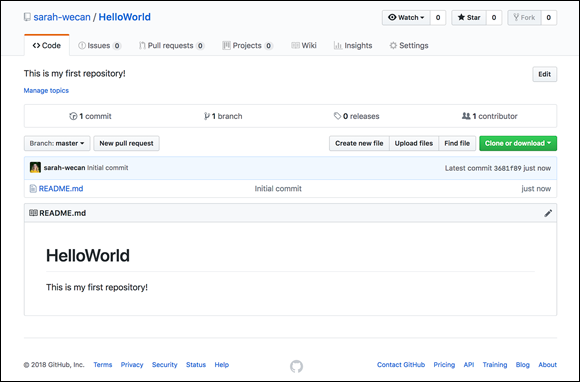
FIGURE 3-2: The home page of my HelloWorld repository.
In Chapters 4 and 5, you can create a website for yourself. This website can link back to your repository.
Exploring Your Repository
A repository has a lot going on, even when it’s as simple as the HelloWorld one that I created in the preceding section. The following sections walk you through an overview of everything on the repository.
Top information
At the top of the repository is the username of the author and title of the repository. When you fork a repository, you see the original author underneath for a quick link. To fork a repository is to make a copy of it, where the changes you make to your copy can be suggested to the original author. See Chapter 6 for a deep dive into forking a repository.
To the right of your username are three buttons:
- Watch: You can choose what kind of notifications you want to receive based on the type of activity happening on this repo.
- Star: Starring can help you quickly navigate to certain repositories, as well as give GitHub insight into things you’re interested in so that recommendations will be more accurate for you. To access your starred repositories, just click your avatar on the top right of GitHub.com and choose Your Stars.
- Fork: If you are not the author of the repository, then you have the option to fork it. Chapter 6 goes into more detail on forks.
 We highly recommend choosing either Not watching or Releases only for the majority of repositories so that you only get notifications when you’re specifically mentioned or actively participating in a discussion on an issue or a pull request. Otherwise, your inbox will be filled with emails about every single action taken on the repository, which will get out of hand very quickly. If you notice this happening, go to
 https://github.com/watching and unwatch all or some of the repositories you’re watching with a quick click.
Tabs
Seven tabs appear across the top of your repo. Each tab provides different features for the repo:
- Code: The Code tab is where you can find all your code and browse folders and files. You can click a file to view its contents or click the pencil icon to modify the file, right in your Internet browser. (See the upcoming “Code tab” section for more details.)
- Issues: Issues are a really neat feature for repos. Issues can help you track things you want to still make, problems you’re having, or suggestions for other people. You discover how to create issues in the upcoming section “Using Issues and Project Boards.”
- Pull requests: Pull requests, also referred to as PRs, are similar to issues in that they have a title and a description, but they also have code changes that you’re requesting to be pulled into the main branch. The safest way to contribute code is to create a new branch, make your code changes on that branch, and then request for that branch to be merged with the master branch. A PR gives you an interface for merging the two branches, showing you the diff between the files you modified and the ones that are on the master branch and giving you a place to have a conversation with collaborators on whether the code should be merged or changes should be made first. For more information on branching, see Chapter 1.
- Projects: You may already be familiar with project boards like Trello or Kanboard. GitHub has project boards linked directly with your repo. The best part is that the cards on a GitHub project board can be directly related to issues or PRs and can automatically move when something happens. For more on project boards, see the section “Using Issues and Project Boards,” later in this chapter.
- Wiki: Wikis are a great place to store documentation, project status, and roadmaps for your project. It’s a great go-to place for collaborators to see what is going on and where they can jump in to help!
- Insights: The Insights tab, shown in Figure 3-3, gives you an overview of all collaborators and actions happening on the repo. It’s really neat to see this tab on popular open source projects. For example, TensorFlow has had 158 contributors in the last month!
- Settings: The Settings tab is visible only if you have the right permissions on the repository. In this tab, you can decide who has access to what and how collaborators should collaborate. You can also integrate apps that tell you how much of your code is covered with tests.
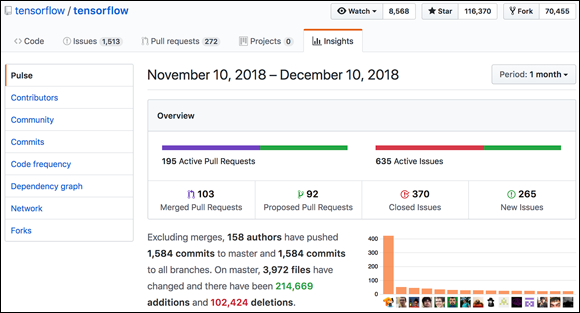
FIGURE 3-3: The Insights tab.
Code tab
The Code tab, shown in Figure 3-4, has a lot of additional important metadata about your repo that will come in useful in future development:
- Description and topics: At the top of the Code tab is a description and a place where you can put in topics to make your repository more discoverable. Adding topics is particularly important if you want to attract other coders to help you build your software.
- Metadata: This bar contains information and links to the number of commits, branches, releases, and contributors for the repo.
- Action buttons: On the left side of the repo is a drop-down menu where you can change which branch you’re looking at or browse the files for a particular branch. The New pull request button allows you to quickly create a pull request. The best way to create a pull request is to switch to another branch, make some changes, and then click New pull request. On the right side are three buttons related to files: Create new file, Upload files, and Find file. Finally, you can click on the green Clone or download drop-down list to clone or download the code to your local machine (see Chapter 4).
- Code: At the bottom of the Code tab is a list of all the code in this repo. If a
README.mdfile appears in this list, then the file shows up below the list. For any file, you can click the filename to go to a page where you can see the file and edit it if you want.
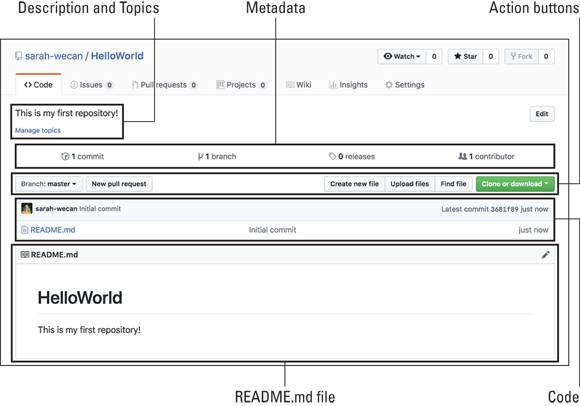
FIGURE 3-4: The Code tab.
Modifying README.md
I highly recommend that every project, whether public or private, have a README.md file at the top level. This file is often the starting point for anyone who wants to contribute to the code.
The README.md file will often have the following sections:
- Project title and description
- Prerequisites for getting the project running on your local machine
- Instructions on installing the project (and any dependencies)
- Instructions on running tests to make sure that you haven't broken anything
- Instructions on deploying the project
- An overview of dependencies
- A link to the guide on how to contribute to the project, including a code of conduct
- The main authors or maintainers of the project
- A link to the license
- Any additional acknowledgements
PurpleBooth on GitHub has created a great template for a README.md at https://gist.github.com/PurpleBooth/109311bb0361f32d87a2.
 GitHub promotes a culture of sharing and open software development. In the sharing, it is important that each person acknowledge where they drew inspiration and what pieces went into helping them create what they have created. Software development rarely happens alone and, at this point, is always built on someone else’s work. Though you don’t have to specifically acknowledge the work that Grace Hopper, a well-known computer scientist who created the first compiler and English programming language, did to promote high-level programming languages so that you’re not all writing in assembly anymore, you should always recognize that it’s a large, timeless community working toward building, creating, and pushing the boundaries of what you think is possible today.
For simpler projects, a README.md file can also be the front page to your project. In this case, the project is a description of you, and the README.md file is essentially the entire project because it will contain the information about you!
Follow these steps to modify your README with a headshot and a short description about things you love:
Go to the Code tab of your repository and click the Upload files button.
Steps 2 through 6 guide you through the page shown in Figure 3-5.
Find a headshot of yourself (or any picture that you want to be on your README) and upload it using the drag box.
Alternatively, you can click the Choose your files link and browse your files to find your photo.
Type a title in the text box Commit changes.
In this example, I added the title “Adding a Headshot.”
- Select Create a new branch for this commit and start a pull request.
Type a name for the branch, or you can leave the default name for the branch.
I left my default name, which is
sarah-wecan-patch-1.Then click the Propose changes button.
The Open a pull request page appears with your one commit to add a new headshot to your repo (see Figure 3-6).
Add a short description to explain the change and then click the Create pull request button.
The Pull request tab displays your pull request with a title, number, status, description, list of commits, and a check to see whether it can be merged with master, shown in Figure 3-7.
- Click the Code tab to go back to the code in your repo.
Click the branch drop-down list and switch to the branch you created in Step 5.
This step allows you to see your project as it looks in that branch. The changes you make added to that branch as you make them and therefore the pull request that you created in Step 6. That way, you can add your headshot and make all the changes to the README at once.
You see the new branch you created. Next to the branch is a link to the pull request you created. This branch is associated with that pull request, so you can kind of think of them as the same things. You also see the picture that you uploaded in your list of files.
Because your README file is still showing, click the little pencil so that you can change what the README says.
If it exists, a README file always appears below the list of files.
Using Markdown, write a little about yourself, including your career passions and some hobbies you enjoy.
Figure 3-8 shows you an example of the type of information you may want to include.
Click the Preview changes tab above the text.
A red line appears to the left of the first two lines to indicate they will be deleted (see Figure 3-9). Everything you wrote after that has a green line to the left of it to indicate that the text will be added to your description.
When you're satisfied with your description, scroll to the bottom of the file editor, add a title to the commit, and commit to the same branch you just created.
You see your README.md file in its final state.
- Click the
HelloWorldlink at the top where it saysHelloWorld/README.mdto return to your code home page. - Add your headshot by clicking on the pencil above the README.md file and adding the following line:
Make sure that you put the name of your picture in place of
sarah_pic.jpeg. Preview the changes.
Your headshot now appears. You can see mine in Figure 3-10.
- Scroll to the bottom and commit your changes.
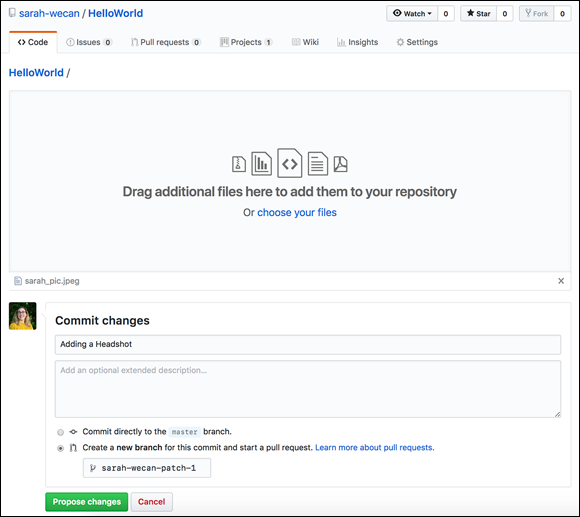
FIGURE 3-5: The page to add a file to the HelloWorld repository.

FIGURE 3-6: The Open a pull request page.
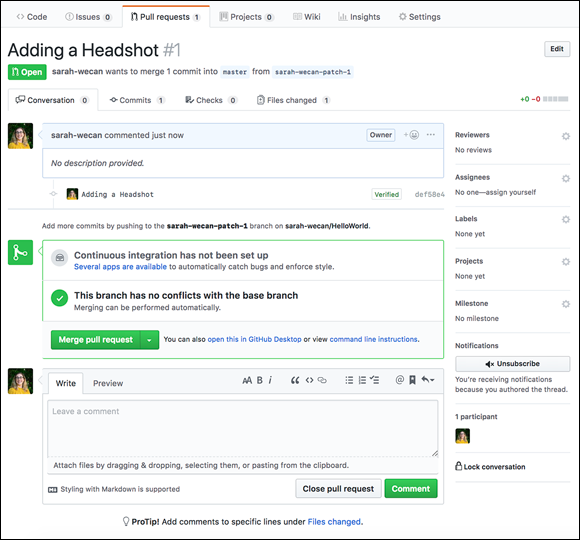
FIGURE 3-7: The pull request description page for an open pull request.

FIGURE 3-8: The README.md file in edit mode.

FIGURE 3-9: The README.md file in diff mode.

FIGURE 3-10: The README.md file in diff mode with the headshot added.
You have now made changes to your project. The only problem is these changes are still on their own branch, and not on the master branch. To find out how get your changes merged into the master branch, refer to the next section.
Merging a Pull Request
After you have all your changes in a pull request (see the preceding section), you can merge those changes into the master branch by following these steps:
On the main Code tab, click the View #1 button to get to your pull request.
My pull request page, shown in Figure 3-11, has three different commits. The original one is when I added my headshot to my repo. The next one is when I added the new text to my README.md file, and the third is when I added my headshot to my README.md file. (If you haven't added these items and would like to, see the section “Modifying README.md”, earlier in this chapter.)
Click the Files changed tab to see all the changes made to this repo.
Files that appear in red will be deleted, while the lines in green will be added.
(Optional) To change the way you see the diff, click the Diff Settings drop-down list and then click Split then Apply and reload.
If you split the view, your screen changes (see Figure 3-12).
In the Conversation tab, scroll to the bottom of the pull request and click the big green Merge pull request button.
The Confirm merge dialog box replaces the section with the Merge button from Figure 3-12, as shown in Figure 3-13.
Click Confirm merge.
You see a message that your pull request merge was successful, with an option to delete the branch (see Figure 3-14).
Click Delete branch.
Your pull request is merged, and the branch is deleted. Don’t worry, if you need that branch back for some reason you can restore it. It’s nice to keep things tidy within the repository.
Click the Code tab to go to your code.
You see the master branch with your picture and the changed README.md file.

FIGURE 3-11: My pull request page.
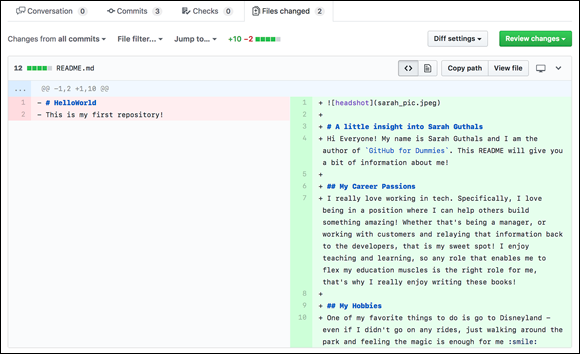
FIGURE 3-12: The diff in split view.
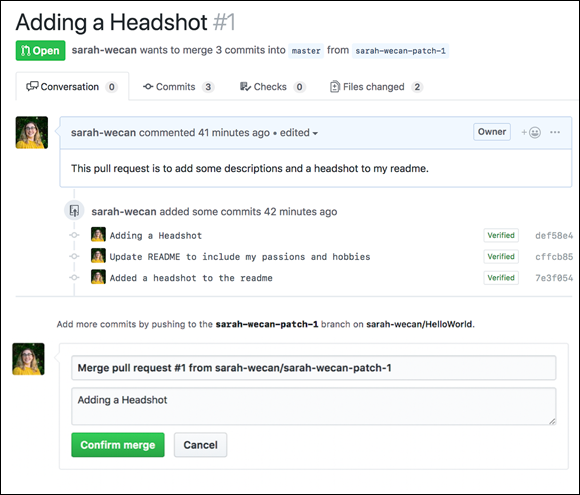
FIGURE 3-13: The dialog box to confirm the merge of the pull request.

FIGURE 3-14: The merge confirmation for a pull request.
Using Issues and Project Boards
Issues on a GitHub repo are a great way to track the things you need to fix, add, or change. When you combine issues with project boards, you get insights into your project that would otherwise be hard to track. In this section, you create issues and project boards and change your README.md.
Creating a project board and an issue
To get started on issues and project boards, go to your repo on the Code tab and then follow these steps:
Click the Projects tab and then click the Create a project button.
The Create a new project dialog box appears, as shown in Figure 3-15.
- Add a project name and description.
From the preloaded Template drop-down list, select a project template and click the Create project button.
In this example, I chose Automated kanban as my project template.
A project board appears with some To do cards to show you how things work (see Figure 3-16).
Click the Manage button at the bottom of the To do column to open the dialog box to choose what automation should happen.
Figure 3-17 shows the automation settings for the To do column. Every time an issue gets created, it is automatically added to your To do column. You create an issue in Step 8 of this section.
Click the Manage button at the bottom of the In progress column.
A similar automation settings dialog box appears (see Figure 3-17). Every time an issue is re-opened after you close it, or a pull request is created or reopened, it appears in the In progress column. You see this card in the To do column if you revisit the project after Step 11 of this section.
Click the Manager button at the bottom of the Done column.
Similar to Figure 3-17, automation settings appear. Every time an issue or pull request is closed or a pull request is merged, the cards move from the previous columns to this column. You see this in Step 14 of the section “Closing an issue”.
You can change the automation settings for these columns or add other columns. Check out https://help.github.com/articles/configuring-automation-for-project-boardsfor more information on project board automation.Delete the cards that were automatically added to the To do column by clicking the three dots on the top right of each column and choosing Delete note from the drop-down menu that appears.
The card disappears. You can then click on the three dots of the next card that was automatically added to delete it.
On the Issues tab, click New issue.
If you haven’t previously dismissed the dialog box, Figure 3-18 shows the dialog box that appears above the Issues tab. Issues and pull requests can have labels, which are useful when you’re trying to sort through things that still need to be done. If you’re going to contribute to an open source project, looking for help wanted or good first issuelabels is a great way to get started in the community. (see Part 5 for more information on open source software).- Add a title and description to the new issue and then, on the right side, assign yourself to it.
Link this issue with a project by clicking Projects and choosing Tracking Changes to HelloWorld.
After you choose it, you see it in blue under Projects, as shown in Figure 3-19.
Click the Submit new issue button.
Just like with the pull request, the issue has a title, number, status, description, and some metadata on the right side (see Figure 3-20). One interesting bit of information is that the number is
#2for this issue, even though it's the first issue you’ve created on this repo. That is because issues and pull requests follow the same numbering, so the pull request was #1, this issue is #2, and any pull request or issue you open next will continue with #3.After you create an issue, the card relating to it appears on your project board.

FIGURE 3-15: The page to create a new project.
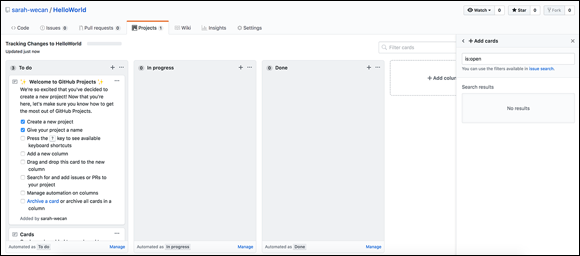
FIGURE 3-16: A blank kanban project board template.

FIGURE 3-17: The automation settings for the To do column on a kanban project.

FIGURE 3-18: The page that shows all issues for the HelloWorld repository.
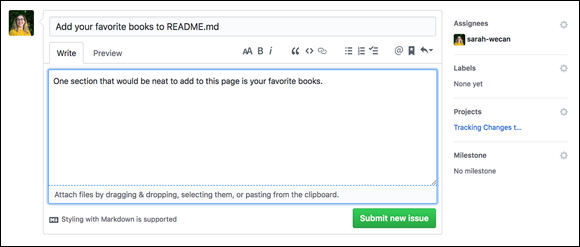
FIGURE 3-19: A new issue linked to the project Tracking Changes to HelloWorld.

FIGURE 3-20: The description page of an open issue.
To see the new card in the To do column, click on the project board link under Projects.
Closing an issue
The best way to close an issue is to create a pull request with changes to address what was written in the issue. Understanding the relationship between issues and pull requests can help you on your own projects and open source projects.
To close out the issue, follow these steps:
- From the Code tab on your repo, click the pencil icon for the
README.mdfile to edit the file. - Add a section at the bottom of the
README.mdfile with your favorite books. - Scroll to the bottom of the page and add a title to the commit.
- Choose Create a new branch for this commit and start a pull request.
- Click Commit changes.
Add a description to the pull request.
Specifically, make sure that you write
closes #2on its own line. When you type#, GitHub suggests any issue or pull request that you have in this repo to auto-fill.Link the project to this pull request.
You link the project to the pull request the same way that you link a project to an issue. (See step 10 in the section “Creating a project and an issue”, earlier in this chapter.)
- Click Create pull request.
Return to your project board.
You see the card for the pull request in the In progress column, as shown in Figure 3-21.
Click the pull request card title to preview the pull request.
Click Go to pull request for full details to return to the pull request.
Click the Files changed tab and then click View file.
You see the
README.mdfile with your last section added (see Figure 3-22).- Click the Back button on your browser.
If you're happy with the changes, click the Conversation tab, click Merge pull request button, click Confirm merge button, and then click the Delete branch button.
You can revisit the section “Merging a pull request,” earlier in this chapter, for more details on how to complete this step if you get stuck.
Click the Projects tab and choose the project that you created.
Both of the cards have moved from the To do and In progress columns to the Done column.

FIGURE 3-21: The project board with an open issue and an open pull request.
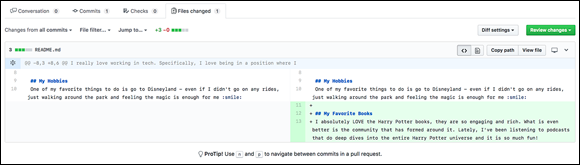
FIGURE 3-22: The diff of README.md showing the added text.