
Chapter 11. Passing the First Test
In which we write test infrastructure to drive our non-existent application, so that we can make the first test fail. We repeatedly fail the test and fix symptoms, until we have a minimal working application that passes the first test. We step through this very slowly to show how the process works.
Building the Test Rig
At the start of every test run, our test script starts up the Openfire server, creates accounts for the Sniper and the auction, and then runs the tests. Each test will start instances of the application and the fake auction, and then test their communication through the server. At first, we’ll run everything on the same host. Later, as the infrastructure stabilizes, we can consider running different components on different machines, which will be a better match to the real deployment.
This leaves us with two components to write for the test infrastructure: ApplicationRunner and FakeAuctionServer.
The Application Runner
An ApplicationRunner is an object that wraps up all management and communicating with the Swing application we’re building. It runs the application as if from the command line, obtaining and holding a reference to its main window for querying the state of the GUI and for shutting down the application at the end of the test.
We don’t have to do much here, because we can rely on WindowLicker to do the hard work: find and control Swing GUI components, synchronize with Swing’s threads and event queue, and wrap that all up behind a simple API.1 WindowLicker has the concept of a ComponentDriver: an object that can manipulate a feature in a Swing user interface. If a ComponentDriver can’t find the Swing component it refers to, it will time out with an error. For this test, we’re looking for a label component that shows a given string; if our application doesn’t produce this label, we’ll get an exception. Here’s the implementation (with the constants left out for clarity) and some explanation:
1. We’re assuming that you know how Swing works; there are many other books that do a good job of describing it. The essential point here is that it’s an event-driven framework that creates its own internal threads to dispatch events, so we can’t be precise about when things will happen.
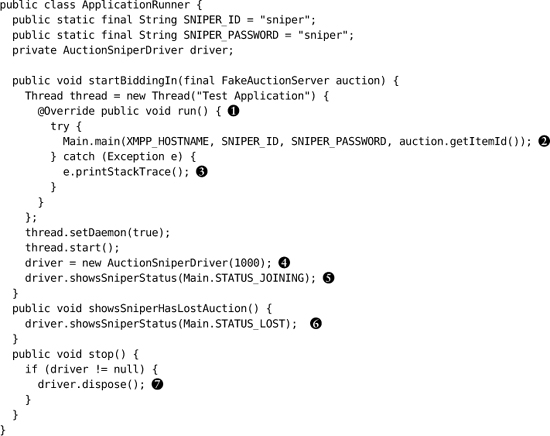
![]() We call the application through its
We call the application through its main() function to make sure we’ve assembled the pieces correctly. We’re following the convention that the entry point to the application is a Main class in the top-level package. WindowLicker can control Swing components if they’re in the same JVM, so we start the Sniper in a new thread. Ideally, the test would start the Sniper in a new process, but that would be much harder to test; we think this is a reasonable compromise.
![]() To keep things simple at this stage, we’ll assume that we’re only bidding for one item and pass the identifier to
To keep things simple at this stage, we’ll assume that we’re only bidding for one item and pass the identifier to main().
![]() If
If main() throws an exception, we just print it out. Whatever test we’re running will fail and we can look for the stack trace in the output. Later, we’ll handle exceptions properly.
![]() We turn down the timeout period for finding frames and components. The default values are longer than we need for a simple application like this one and will slow down the tests when they fail. We use one second, which is enough to smooth over minor runtime delays.
We turn down the timeout period for finding frames and components. The default values are longer than we need for a simple application like this one and will slow down the tests when they fail. We use one second, which is enough to smooth over minor runtime delays.
![]() We wait for the status to change to
We wait for the status to change to Joining so we know that the application has attempted to connect. This assertion says that somewhere in the user interface there’s a label that describes the Sniper’s state.
![]() When the Sniper loses the auction, we expect it to show a
When the Sniper loses the auction, we expect it to show a Lost status. If this doesn’t happen, the driver will throw an exception.
![]() After the test, we tell the driver to dispose of the window to make sure it won’t be picked up in another test before being garbage-collected.
After the test, we tell the driver to dispose of the window to make sure it won’t be picked up in another test before being garbage-collected.
The AuctionSniperDriver is simply an extension of a WindowLicker JFrameDriver specialized for our tests:
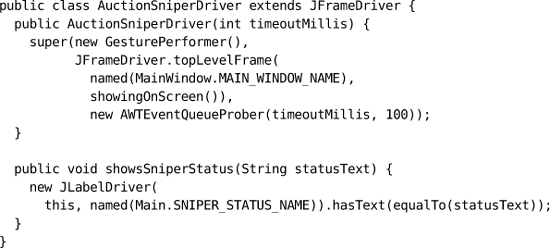
On construction, it attempts to find a visible top-level window for the Auction Sniper within the given timeout. The method showsSniperStatus() looks for the relevant label in the user interface and confirms that it shows the given status. If the driver cannot find a feature it expects, it will throw an exception and fail the test.
The Fake Auction
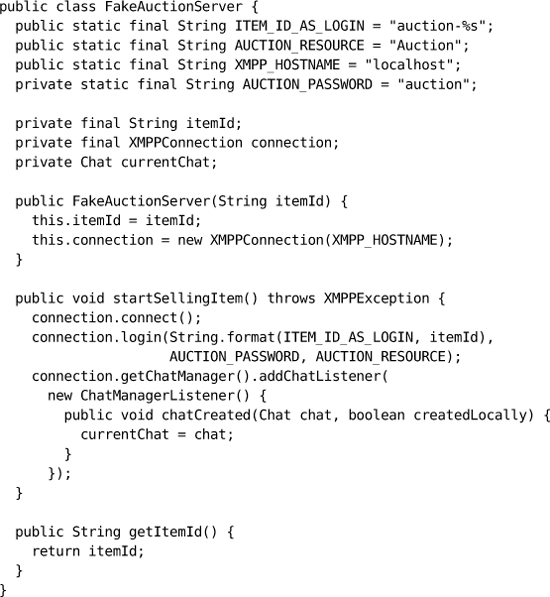
A FakeAuctionServer is a substitute server that allows the test to check how the Auction Sniper interacts with an auction using XMPP messages. It has three responsibilities: it must connect to the XMPP broker and accept a request to join the chat from the Sniper; it must receive chat messages from the Sniper or fail if no message arrives within some timeout; and, it must allow the test to send messages back to the Sniper as specified by Southabee’s On-Line.
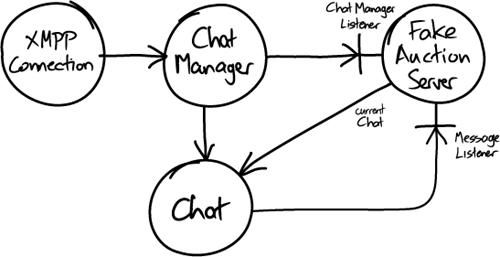
Smack (the XMPP client library) is event-driven, so the fake auction has to register listener objects for it to call back. There are two levels of events: events about a chat, such as people joining, and events within a chat, such as messages being received. We need to listen for both.
We’ll start by implementing the startSellingItem() method. First, it connects to the XMPP broker, using the item identifier to construct the login name; then it registers a ChatManagerListener. Smack will call this listener with a Chat object that represents the session when a Sniper connects in. The fake auction holds on to the chat so it can exchange messages with the Sniper.
Figure 11.1 Smack objects and callbacks
A Minimal Fake Implementation
![]()
We want to emphasize again that this fake is a minimal implementation just to support testing. For example, we use a single instance variable to hold the chat object. A real auction server would manage multiple chats for all the bidders—but this is a fake; its only purpose is to support the test, so it only needs one chat.
Next, we have to add a MessageListener to the chat to accept messages from the Sniper. This means that we need to coordinate between the thread that runs the test and the Smack thread that feeds messages to the listener—the test has to wait for messages to arrive and time out if they don’t—so we’ll use a single-element BlockingQueue from the java.util.concurrent package. Just as we only have one chat in the test, we expect to process only one message at a time. To make our intentions clearer, we wrap the queue in a helper class SingleMessageListener. Here’s the rest of FakeAuctionServer:
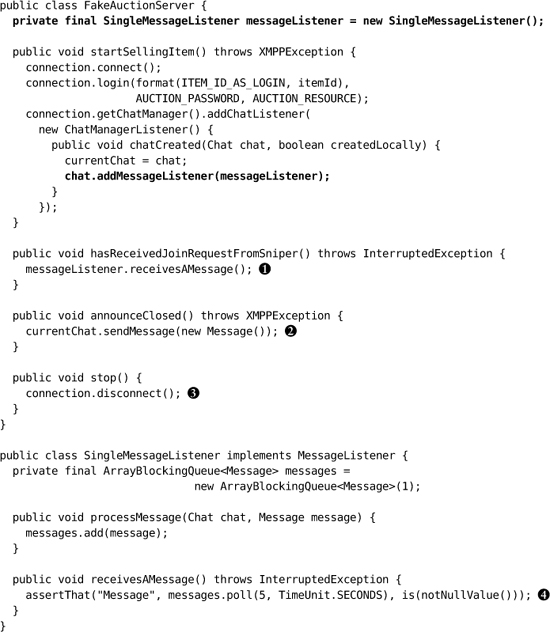
![]() The test needs to know when a
The test needs to know when a Join message has arrived. We just check whether any message has arrived, since the Sniper will only be sending Join messages to start with; we’ll fill in more detail as we grow the application. This implementation will fail if no message is received within 5 seconds.
![]() The test needs to be able to simulate the auction announcing when it closes, which is why we held onto the
The test needs to be able to simulate the auction announcing when it closes, which is why we held onto the currentChat when it opened. As with the Join request, the fake auction just sends an empty message, since this is the only event we support so far.
![]()
stop() closes the connection.
![]() The clause
The clause is(notNullValue()) uses the Hamcrest matcher syntax. We describe Matchers in “Methods” (page 339); for now, it’s enough to know that this checks that the Listener has received a message within the timeout period.
The Message Broker
There’s one more component to mention which doesn’t involve any coding—the installation of an XMPP message broker. We set up an instance of Openfire on our local host. The Sniper and fake auction in our end-to-end tests, even though they’re running in the same process, will communicate through this server. We also set up logins to match the small number of item identifiers that we’ll be using in our tests.
A Working Compromise
![]()
As we wrote before, we are cheating a little at this stage to keep development moving. We want all the developers to have their own environments so they don’t interfere with each other when running their tests. For example, we’ve seen teams make their lives very complicated because they didn’t want to create a database instance for each developer. In a professional organization, we would also expect to see at least one test rig that represents the production environment, including the distribution of processing across a network and a build cycle that uses it to make sure the system works.
Failing and Passing the Test
We have enough infrastructure in place to run the test and watch it fail. For the rest of this chapter we’ll add functionality, a tiny slice at a time, until eventually we make the test pass. When we first started using this technique, it felt too fussy: “Just write the code, we know what to do!” Over time, we realized that it didn’t take any longer and that our progress was much more predictable. Focusing on just one aspect at a time helps us to make sure we understand it; as a rule, when we get something working, it stays working. Where there’s no need to discuss the solution, many of these steps take hardly any time at all—they take longer to explain than to implement.
We start by writing a build script for ant. We’ll skip over the details of its content, since it’s standard practice these days, but the important point is that we always have a single command that reliably compiles, builds, deploys, and tests the application, and that we run it repeatedly. We only start coding once we have an automated build and test working.
At this stage, we’ll describe each step, discussing each test failure in turn. Later we’ll speed up the pace.
First User Interface
Test Failure
The test can’t find a user interface component with the name "Auction Sniper Main".
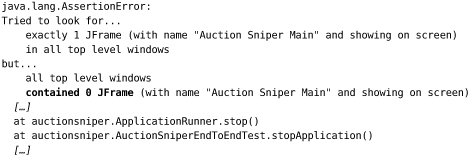
WindowLicker is verbose in its error reporting, trying to make failures easy to understand. In this case, we couldn’t even find the top-level frame so JUnit failed before even starting the test. The stack trace comes from the @After method that stops the application.
Implementation
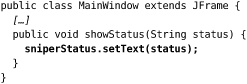
We need a top-level window for our application. We write a MainWindow class in the auctionsniper.ui package that extends Swing’s JFrame, and call it from main(). All it will do is create a window with the right name.
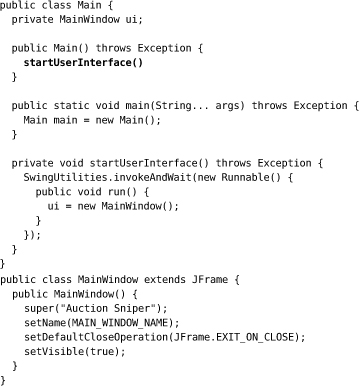
Unfortunately, this is a little messy because Swing requires us to create the user interface on its event dispatch thread. We’ve further complicated the implementation so we can hang on to the main window object in our code. It’s not strictly necessary here but we thought we’d get it over with.
Notes
The user interface in Figure 11.2 really is minimal. It does not look like much but it confirms that we can start up an application window and connect to it.
Figure 11.2 Just a top-level window
![]()
Our test still fails, but we’ve moved on a step. Now we know that our harness is working, which is one less thing to worry about as we move on to more interesting functionality.
Showing the Sniper State
Test Failure
The test finds a top-level window, but no display of the current state of the Sniper. To start with, the Sniper should show Joining while waiting for the auction to respond.

Implementation
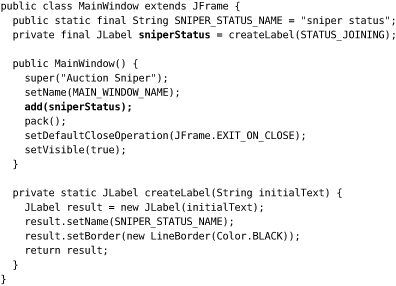
We add a label representing the Sniper’s state to MainWindow.
Notes
Another minimal change, but now we can show some content in our application, as in Figure 11.3.
Figure 11.3 Showing Joining status
![]()
Connecting to the Auction
Test Failure
Our user interface is working, but the auction does not receive a Join request from the Sniper.
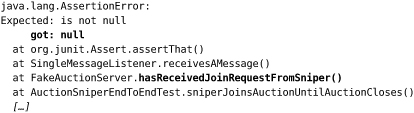
This failure message is a bit cryptic, but the names in the stack trace tell us what’s wrong.
Implementation
We write a simplistic implementation to get us past this failure. It connects to the chat in Main and sends an empty message. We create a null MessageListener to allow us to create a Chat for sending the empty initial message, since we don’t yet care about receiving messages.
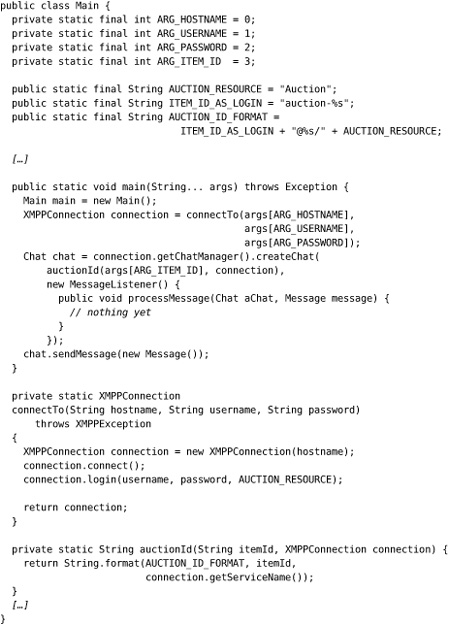
Notes
This shows that we can establish a connection from the Sniper to the auction, which means we had to sort out details such as interpreting the item and user credentials from the command-line arguments and using the Smack library. We’re leaving the message contents until later because we only have one message type, so sending an empty value is enough to prove the connection.
This implementation may seem gratuitously naive—after all, we should be able to design a structure for something as simple as this, but we’ve often found it worth writing a small amount of ugly code and seeing how it falls out. It helps us to test our ideas before we’ve gone too far, and sometimes the results can be surprising. The important point is to make sure we don’t leave it ugly.
We make a point of keeping the connection code out of the Swing invokeAndWait() call that creates the MainWindow, because we want the user interface to settle before we try anything more complicated.
Receiving a Response from the Auction
Test Failure
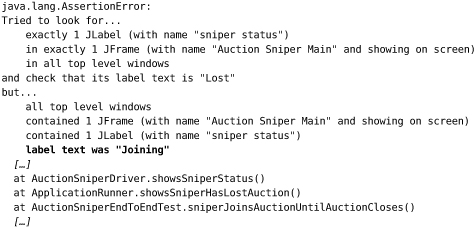
With a connection established, the Sniper should receive and display the Lost response from the auction. It doesn’t yet:
Implementation
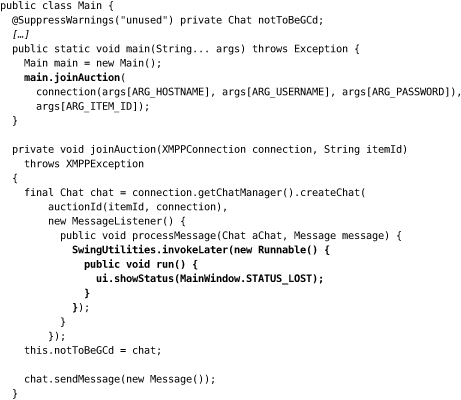
We need to attach the user interface to the chat so it can receive the response from the auction, so we create a connection and pass it to Main to create the Chat object. joinAuction() creates a MessageListener that sets the status label, using an invokeLater() call to avoid blocking the Smack library. As with the Join message, we don’t bother with the contents of the incoming message since there’s only one possible response the auction can send at the moment. While we’re at it, we rename connectTo() to connection() to make the code read better.
Why the Chat Field?
![]()
You’ll notice that we’ve assigned the chat that we create to the field notToBeGCd in Main. This is to make sure that the chat is not garbage-collected by the Java runtime. There’s a note at the top of the ChatManager documentation that says:
The chat manager keeps track of references to all current chats. It will not hold any references in memory on its own so it is necessary to keep a reference to the chat object itself.
If the chat is garbage-collected, the Smack runtime will hand the message to a new Chat which it will create for the purpose. In an interactive application, we would listen for and show these new chats, but our needs are different, so we add this quirk to stop it from happening.
We made this reference clumsy on purpose—to highlight in the code why we’re doing it. We also know that we’re likely to come up with a better solution in a while.
We implement the display method in the user interface and, finally, the whole test passes.
Notes
Figure 11.4 is visible confirmation that the code works.
Figure 11.4 Showing Lost status
![]()
It may not look like much, but it confirms that a Sniper can establish a connection with an auction, accept a response, and display the result.
The Necessary Minimum
In one of his school reports, Steve was noted as “a fine judge of the necessary minimum.” It seems he’s found his calling in writing software since this is a critical skill during iteration zero.
What we hope you’ve seen in this chapter is the degree of focus that’s required to put together your first walking skeleton. The point is to design and validate the initial structure of the end-to-end system—where end-to-end includes deployment to a working environment—to prove that our choices of packages, libraries, and tooling will actually work. A sense of urgency will help the team to strip the functionality down to the absolute minimum sufficient to test their assumptions. That’s why we didn’t put any content in our Sniper messages; it would be a diversion from making sure that the communication and event handling work. We didn’t sweat too hard over the detailed code design, partly because there isn’t much but mainly because we’re just getting the pieces in place; that effort will come soon enough.
Of course, all you see in this chapter are edited highlights. We’ve left out many diversions and discussions as we figured out which pieces to use and how to make them work, trawling through product documentation and discussion lists. We’ve also left out some of our discussions about what this project is for. Iteration zero usually brings up project chartering issues as the team looks for criteria to guide its decisions, so the project’s sponsors should expect to field some deep questions about its purpose.
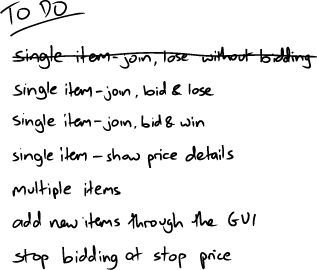
We have something visible we can present as a sign of progress, so we can cross off the first item on our list, as in Figure 11.5.
The next step is to start building out real functionality.